
959 Heat-Pump-DryerQUICK GUIDE:
dŽĚŽǁŶůŽĂĚĂŶLJŽƚŚĞƌĨƵƌƚŚĞƌŝŶĨŽƌŵĂƟŽŶŝŶLJŽƵƌůĂŶŐƵĂŐĞƉůĞĂƐĞŐŽƚŽ͗
go.he.services/haier-um

2
IT
…………..……………………………….………………………
……
..
.
3
DE
…………..……………………………….………………………
……
..
7
EN
…………..……………………………….………………………
……
..
11
ES
…………..……………………………….………………………
……
..
15
FR
…………..……………………………….………………………
……
..
19
NL
…………..……………………………….………………………
……
..
23
PT
…………..……………………………….………………………
……
..
27
BG
…………..……………………………….………………………
……
..
31
HR
…………..……………………………….………………………
……
..
35
HU
…………..……………………………….………………………
……
..
39
SL
…………..……………………………….………………………
……
..
43
SR
…………..……………………………….………………………
……
..
47
CS
…………..……………………………….………………………
……
..
51
PL
…………..……………………………….………………………
……
..
55
RO
…………..……………………………….………………………
……
..
59
SK
…………..……………………………….………………………
……
..
63
UKR
…………..……………………………….………………………
……
..
67
EL
…………..……………………………….………………………
……
..
71
DA
…………..……………………………….………………………
……
..
75
SV
…………..……………………………….………………………
……
..
79
FI
…………..……………………………….………………………
……
..
83
NO
…………..……………………………….………………………
……
..
87
AR
…………..……………………………….………………………
……
..
91

3
IT
GUIDA RAPIDA:
Asciugatrice a pompa di calore 959
GRAZIE PER AVER ACQUISTATO UN PRODOTTO HAIER
Leggere attentamente le presenti istruzioni prima di
utilizzare questo elettrodomestico. Le istruzioni contengono
informazioni importanti che vi aiuteranno a utilizzare al
meglio l'elettrodomestico e a garantire un'installazione, un
uso e una manutenzione sicuri e corretti.
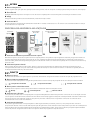
1 Installazione
Garantire una posizione che consenta l'apertura completa dello sportello. Non installare l'asciugatrice dietro una porta
con serratura, una porta scorrevole o una porta con cardini sul lato opposto dello sportello dell'asciugatrice poiché ciò
potrebbe limitarne l'apertura completa.
Installare l'elettrodomestico in un luogo asciutto e ben ventilato.
Non installare mai l'elettrodomestico all'aperto in un luogo umido o in un'area che potrebbe essere soggetta a perdite
d'acqua, come sotto o vicino a un lavello. In caso di perdite d'acqua disinserire l'alimentazione e lasciare asciugare
l'elettrodomestico all'aria.
Installare o utilizzare l'elettrodomestico solo dove la temperatura è superiore a 5°C.
Non posizionare l'elettrodomestico direttamente su un tappeto o vicino a una parete o a un mobile.
Non esporre l'elettrodomestico al gelo, al calore o alla luce solare diretta o in prossimità di fonti di calore (es. stufe,
caloriferi).
Assicurarsi che le informazioni elettriche sulla targhetta identificativa siano conformi all'alimentazione elettrica. In caso
contrario, contattare un elettricista.
Non utilizzare adattatori multipresa e prolunghe.
Prestare attenzione a non danneggiare il cavo elettrico e la presa. In caso di danni, far eseguire la sostituzione da un
elettricista.
Utilizzare una presa separata con messa a terra per l'alimentazione facilmente accessibile dopo l'installazione.
L'elettrodomestico deve essere collegato a terra.
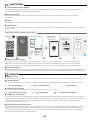
2 Pannello di controllo
Impostazioni:
1
Indicatore Hygienic
2
Indicatore antipiega
3
Indicatore serbatoio vuoto
4
Indicatore filtro pulito
5
Indicatore blocco bambini
6
Display
7
Indicatore Wi-Fi
8
Indicatore partenza
ritardata
9
Indicatore di segnale
10
Pulsante Start/Pausa
11
Manopola programmi
12
Pulsante di accensione
Funzioni:
13
Pulsante Hygienic
14
Pulsante Blocco bambini
15
Pulsante Antipiega
16
pulsante i-time
17
Pulsante Temp.
18
Pulsante
Asciugatura
19
Pulsante Partenza
ritardata
Scaricare l'app hOn
Per avere ulteriori informazioni nella tua lingua, consulta il sito:
go.he.services/haier-um
3

4
IMPOSTAZIONI
Pulsante di accensione
Per accendere o spegnere l'elettrodomestico, premere il pulsante di accensione (12). Ricordarsi di scollegare
l'apparecchio quando si spegne l'elettrodomestico.
Start/Pausa
Premere il pulsante Start/Pausa per avviare un ciclo di asciugatura. Premere nuovamente il pulsante per mettere in pausa il
ciclo di asciugatura.
Display
Il display mostra il tempo rimanente, un eventuale ritardo e altre informazioni correlate.
Indicatore Wi-Fi
Questo indicatore informa gli utenti sullo stato di connessione del Wi-Fi. Se viene stabilita la connessione Wi-Fi,
l'indicatore si illuminerà.
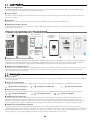
PROCESSO DI ASSOCIAZIONE ALL'APP
Indicatore blocco bambini
Il blocco bambini è stato realizzato per impedire ai bambini di regolare l'impostazione del programma. Per attivare questa
funzione, dopo l'avvio di un ciclo, premere contemporaneamente i pulsanti Hygienic e Antipiega per 3 secondi finché
l'icona dell'indicatore non si illumina. Per disattivarla, premere nuovamente entrambi pulsanti per 3 secondi.
Indicatore del cicalino
Il cicalino è attivato di default. Per attivare la funzione del cicalino, premere contemporaneamente i 2 pulsanti (Asciugatura
e Temp.) per 3 secondi o fino all'emissione di un segnale acustico. Per disattivarla, premere nuovamente entrambi i pulsanti
per 3 secondi.
FUNZIONI
pulsante i-time
Questa funzione è progettata per consentire agli utenti di regolare la durata del ciclo in base alle proprie esigenze.
Pulsante Temp.
Questo pulsante è impostato per regolare la temperatura di asciugatura in base alle esigenze o ai requisiti degli utenti.
Sono presenti 3 livelli:
Alta temperatura
Temperatura media
Bassa temperatura
Pulsante Asciugatura
Premere questo pulsante per impostare il contenuto finale di umidità della biancheria alla fine del ciclo.
Armadio
Pronto da indossare
Pronto da stirare
Indicatore antipiega
La funzione Antipiega è progettata per aiutare a rimuovere le pieghe dei vestiti. Al termine del ciclo di asciugatura,
la rotazione del cestello contribuisce allo stiramento dei vestiti; questo fa sì che non ci sarà più bisogno di preoccuparsi di
dimenticare i propri abiti nell'asciugatrice.** Al termine del ciclo di asciugatura, se era stata precedentemente selezionata
la funzione antipiega, la spia si accende. Il cestello mantiene la rotazione per altre 6 ore con ventilazione a freddo.
Indicatore Hygienic
La funzione Hygienic è progettata per rimuovere batteri, acari e virus sui vestiti con lavaggi ad alte temperature. La funzione
Hygienic costituisce il ciclo perfetto da utilizzare se si desidera rimuovere i cattivi odori dalla biancheria e lisciare le pieghe.
Questo ciclo può rinfrescare rapidamente i capi di cui si ha bisogno, garantendo il miglior compromesso tra tempo e
prestazioni di asciugatura.
Scaricare l'
app
hOn
Solo banda 2,4 GHz
Seguire le istruzioni
per l'associazione
Wi-Fi
domestico:
-
Nome
- Password
App hOn

5
Partenza ritardata
La funzione Partenza ritardata consente agli utenti di ritardare l'ora di inizio del ciclo (da 0 a 24 ore con mezz'ora a fase).
Quando questa funzione è attivata, l'icona dell'indicatore si illumina.
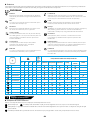
PROGRAMMI
Cotone
per l'asciugatura di indumenti o cappotti in cotone.
I valori sull'etichetta energetica si basano su
questo programma.
Mix
un nuovo ciclo innovativo per asciugare diversi tipi
di tessuti contemporaneamente.
Sintetici
per
asciugare tessuti sintetici che necessitano di
un trattamento accurato e specifico.
Rapido
un ciclo di temporizzazione breve che garantisce
capi pronti in poco tempo. Perfetto per asciugare
piccole quantità di indumenti in fibra chimica
leggera o in
cotone.
A tempo
specificamente progettato per diversi tipi di
tessuti. Gli utenti sono liberi di decidere il tempo di
asciugatura in completa autonomia.
Delicati
un ciclo progettato per asciugare tessuti delicati
che necessitano di un trattamento acc
urato e
specifico.
Remoto
seleziona questo programma per controllare da remoto il
dispositivo tramite le impostazioni Wi
-
Fi. In questo caso l'avvio
del ciclo avverrà tramite i comandi dell'app.
Lana
per l'asciugatura di capi in lana. Si
consiglia di lavare tutti i
vestiti a rovescio prima dell'asciugatura.
Asciugamani
imposta i migliori parametri di asciugatura per asciugamani e
altri tessuti durevoli, fornendo calore elevato e mantenendo
allo stesso tempo l'integrità delle fibre di co
tone.
Piumone
il ciclo perfetto per i tuoi piumoni; riduce al minimo i grovigli e le
pieghe grazie a specifici movimenti del cestello.
Sport
questo ciclo è adatto ai capi tecnici utilizzati quando si pratica
sport: la macchina asciuga
delicatamente e con particolare
cura i vestiti per evitare il restringimento e il deterioramento
delle fibre elastiche.
i
-Refresh
un ciclo brevettato da Haier che consente all'elettrodomestico
di prendersi cura di diversi tipi di tessuto (cotone e sinte
tici)
insieme, che vengono asciugati in soli 30 secondi.
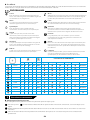
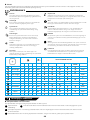
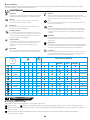
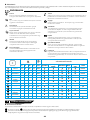
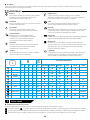
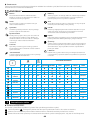
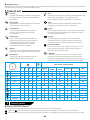
TEMPO DI
ASCIU-
GATURA
OPZIONI SELEZIONABILI
8 9 10 11 min Hygienic
Antipiega
Partenza
ritardata
Temp.
Asciugatura
i-time
Cotone
8
9
10
11
150
✓
✓
✓
✓
✓
A tempo
Mix
4
4
4
4
125
✓
✓
✓
✓
✓
A tempo
Sintetici
4
4
4
4
100
✓
✓
✓
✓
✓
A tempo
Rapido
1
1
1
1
30
✓
✓
✓
✓
—
A tempo
A tempo 8 9 10 11 /
✓
✓
✓
✓
—
✓
Delicati
2
2
2
2
100
✓
✓
✓
✓
✓
A tempo
Remoto
/
/
/
/
/
—
—
—
—
—
—
Lana
1
1
1
1
70
✓
✓
✓
—
—
✓
Asciugamani
6
6
6
6
220
✓
✓
✓
✓
✓
A tempo
Piumone
/
/
/
/
250
✓
✓
✓
✓
—
A tempo
Sport
4
4
4
4
94
✓
✓
✓
✓
✓
A tempo
i-Refresh
1
1
1
1
30
✓
✓
✓
✓
—
✓
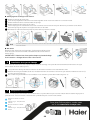
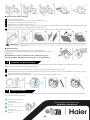
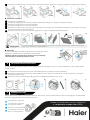
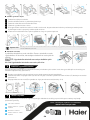
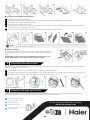
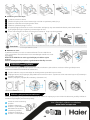
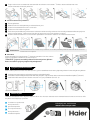
3 Cura e manutenzione
Pulizia del filtro per lanuggine
Per la pulizia del filtro per lanuggine (pulire la lanuggine dopo ogni ciclo):
❶ Aprire lo sportello; ❷ Estrarre i due filtri A e B in sequenza tirandoli verso l'alto, come mostrato in figura;
❸ Rimuovere delicatamente la lanuggine da entrambi i filtri utilizzando la punta delle dita o una spazzola morbida, un
panno o posizionando i filtri sotto l'acqua corrente;
❹ Chiudere entrambi i filtri riposizionandoli all'interno dello sportello, e assicurarsi che siano correttamente posizionati.

6
Pulizia dello scambiatore di calore
❶ Rimuovere lo zoccolo;
❷ Ruotare la maniglia in senso antiorario ed estrarre il coperchio anteriore;
❸ Rimuovere delicatamente il telaio del filtro in spugna;
❹ Rimuovere delicatamente la spugna dal telaio;
❺ Lavare la spugna sotto l'acqua corrente e ruotarla in modo da rimuovere polvere o pelucchi. Strizzare la spugna e
riposizionarla con cura sul telaio;
❻ Rimontare il telaio del filtro in spugna e assicurarsi che si trovi in posizione corretta.
Avviso
Se la lanuggine/il filtro del condensatore è molto sporco, può essere pulito sotto l'acqua corrente. Lasciare asciugare
bene prima dell'uso.
Serbatoio dell'acqua
Estrarre il
serbatoio dell'acqua dalla sua sede. Svuotare il serbatoio
dell'acqua. Al termine, inserire nuovamente il serbatoio dell'acqua
nell'asciugatrice.
IMPORTANTE: Dopo ogni ciclo di asciugatura, svuotare il serbatoio
dell'acqua.
Vedere la relativa sezione nel m
anuale.
4 Installazione del tubo di scarico
Per evitare di svuotare il serbatoio dell'acqua dopo ogni ciclo di asciugatura, l'acqua può essere scaricata direttamente in
un tubo di scarico (figura 1).
❶ Il sistema di scarico dell'acqua è situato nella parte posteriore dell'elettrodomestico in basso a destra;
❷ Scollegare il tubo (A) dal raccordo (B) tirandolo verso l'alto. Chiudere il tubo estratto con il tappo (C) fornito con il kit
(figura 2);
❸ Collegare il tubo al raccordo (B) prestando la massima attenzione (figura 3-4).
5 Etichetta di cura
Controllare le etichette di cura sui capi, soprattutto quando li si mette nell'asciugatrice per la prima volta. Di seguito sono
riportati i simboli più comunemente utilizzati:
Può essere inserito in
asciugatrice.
Asciugare ad alta
temperatura.
Non asciugabile in
asciugatrice.
Asciugare a bassa
temperatura.
Per ulteriori informazioni, fare
riferimento a www.haier-europe.com
FILTRO A
FILTRO B
FILTRO A
FILTRO B
max 85 cm

7
DE
SCHNELLANLEITUNG:
959 Wärmepumpentrockner
WIR DANKEN IHNEN FÜR DEN KAUF EINES HAIER-PRODUKTS
Bitte lesen Sie diese Anleitung sorgfältig durch, bevor Sie
das Gerät benutzen. Die Anleitung enthält wichtige
Informationen, die Ihnen helfen, das Gerät optimal zu
nutzen und eine sichere und ordnungsgemäße
Installation, Verwendung und Wartung zu gewährleisten.
1 Installation
Achten Sie auf einen Standort, der ein vollständiges Öffnen der Tür ermöglicht. Stellen Sie den Wäschetrockner nicht
hinter einer abschließbaren Tür, einer Schiebetür oder einer Tür mit Scharnieren auf der gegenüberliegenden Seite der
Wäschetrocknertür auf, da dies die vollständige Öffnung der Tür des Trockners einschränkt.
Stellen Sie das Gerät an einem gut belüfteten, trockenen Ort auf.
Stellen Sie das Gerät niemals im Freien, in einem Nassraum oder an einem Ort auf, an dem Wasser austreten kann, wie
z. B. unter oder in der Nähe eines Spülbeckens. Im Falle eines Wasserschadens unterbrechen Sie die Stromzufuhr und
lassen Sie das Gerät an der Luft trocknen.
Stellen Sie das Gerät nur an Orten auf, an denen die Temperatur über 5°C liegt.
Stellen Sie das Gerät nicht direkt auf einen Teppich oder in die Nähe einer Wand oder eines Möbels auf.
Setzen Sie das Gerät keinem Frost, keiner Hitze, direkter Sonneneinstrahlung oder in der Nähe von Wärmequellen
(z. B. Öfen, Heizungen) aus.
Stellen Sie sicher, dass die elektrischen Angaben auf dem Typenschild mit der Stromversorgung übereinstimmen. Ist
dies nicht der Fall, wenden Sie sich an einen Elektriker.
Verwenden Sie keine Mehrfachstecker-Adapter und Verlängerungskabel.
Achten Sie darauf, dass Sie das Stromkabel und den Stecker nicht beschädigen. Wenn Kabel und Stecker beschädigt
sind, lassen Sie sie von einem Elektriker austauschen.
Verwenden Sie für die Stromversorgung eine separate geerdete Steckdose, die nach der Installation leicht zugänglich
ist. Das Gerät muss geerdet sein.
2 Bedienfeld
Einstellungen:
1 Hygieneanzeige
2
Anzeige Knitterfrei
3
Anzeige Tank ausleeren
4
Anzeige Filter reinigen
5 Kindersicherungsanzeige
6
Anzeige
7
WLAN-Anzeige
8
Anzeige Verzögerter
Start
9 Signalanzeige
10
Taste Start/Pause
11
Programm-Knopf
12
Ein/Aus-Schalter
Funktionen:
13
Hygienetaste
14
Kindersicherungstaste
15
Taste Knitterfrei
16 i-time-Taste
17
Taste Temp.
18
Taste für
Trockengrad
19
Taste
„Zeitvorwahl“
Laden Sie die hOn App herunter
Um weitere Informationen in Ihrer Sprache herunterzuladen, besuchen Sie bitte unsere Website:
go.he.services/haier-um
7

8
EINSTELLUNGEN
Ein/Aus-Schalter
Um das Gerät ein- oder auszuschalten, drücken Sie die Einschalttaste (12). Denken Sie daran, den Netzstecker zu ziehen,
wenn Sie das Gerät ausschalten.
Start/Pause
Drücken Sie Start/Pause, um einen Trockendurchgang zu starten. Drücken Sie die Taste erneut, um den
Trockendurchgang zu unterbrechen.
Anzeige
Das Display zeigt die verbleibende Zeit, die Zeit bis zum verzögerten Start und andere Informationen an.
WLAN-Anzeige
Diese Anzeige weist darauf hin, ob das WLAN verbunden ist oder nicht. Wenn die Verbindung zum WLAN besteht,
leuchtet diese Anzeige auf.
KOPPLUNG MIT DER APP
Kindersicherungsanzeige
Die Kindersicherung soll verhindern, dass Kinder die Programmeinstellungen verändern. Um diese Funktion zu aktivieren, drücken
Sie nach dem Programmstart 3 Sekunden lang gleichzeitig die Tasten „Hygiene“ und „Knitterfrei“, bis das Anzeigesymbol
aufleuchtet. Um sie zu deaktivieren, drücken Sie diese beiden Tasten erneut 3 Sekunden lang.
Summer-Anzeige
Der Summer ist standardmäßig deaktiviert. Um die Summerfunktion zu aktivieren, drücken Sie die beiden Tasten
(Trockengrad und Temp.) gleichzeitig 3 Sekunden lang, bis Sie einen Piepton hören. Um sie zu deaktivieren, drücken Sie
dieselben beiden Tasten erneut für 3 Sekunden.
FUNKTIONEN
i-time-Taste
Mit dieser Funktion kann der Benutzer die Programmdauer an seine persönlichen Bedürfnisse anpassen.
Taste Temp.
Mit dieser Taste kann die Trocknungstemperatur an die persönlichen Bedürfnisse oder Anforderungen angepasst
werden. Es gibt 3 Stufen:
Hohe Temperatur
Mittlere Temperatur
Niedrige Temperatur
Taste für Trockengrad
Drücken Sie die Taste, um einzustellen, wie hoch der Trockengrad bei Programmende sein soll.
Schranktrocken
Bereit zum Tragen
Mangeltrocken
Anzeige Knitterfrei
Mithilfe der Knitterfrei-Funktion kommen die Kleider mit weniger Falten aus dem Trockner. Die Trommel dreht sich nach
dem Trocknen, um die Wäsche aufzulockern, sodass sie länger im Trockner bleiben kann, ohne zu zerknittern. Wenn das
Trockenprogramm beendet ist, leuchtet die Anzeige auf, wenn zuvor „Knitterfrei“ ausgewählt wurde. Bei kaltem Trocknen
dreht sich die Trommel noch sechs Stunden weiter.
Hygieneanzeige
Die Hygienefunktion wurde entwickelt, um Bakterien, Milben und Viren auf der Kleidung mit hoher Temperatur abzutöten.
Bei ausgewählter Hygienefunktion ist diese Anzeige das perfekte Programm, um schlechte Gerüche aus der Wäsche zu
entfernen und Falten zu glätten. Mit diesem Trockengang werden die von Ihnen benötigten Kleidungsstücke schnell
aufgefrischt und so ein guter Kompromiss zwischen Dauer und Trocknungsleistung gewährleistet.
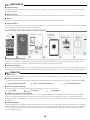
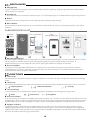
Laden Sie die App
herunter.
hOn
Nur 2,4-GHz-Band
Befolgen Sie die
Hinweise zur
Kopplung.
Heim-WLAN:
-
Name
- Kennwort
hOn-App

9
Zeitvorwahl
Mit der Zeitvorwahlfunktion kann der Benutzer den Programmstart verzögern (von 0 bis 24 Stunden mit
Zwischenschritten von einer halben Stunde). Wenn sie aktiviert ist, leuchtet das Anzeigesymbol auf.
PROGRAMME
Baumwolle
Zum Trocknen von Baumwollkleidung oder
Mänteln. Die Werte auf dem Energieetikett
beruhen auf diesem Programm.
Mix
Ein neues, innovatives Programm, das
unterschiedliche Textilien in der gleichen Zeit
trocknet.
Synthetik
Trocknet Synthetiktex
tilien, die eine
besondere Pflege erfordern.
Schnell
Ein kurzes Programm, das Ihre Wäsche in
kürzester Zeit trocknet. Perfekt zum Trocknen
kleiner Mengen von leichter Synthetik
- oder
Baumwollkleidung.
Timer
Besonders für verschiedene Arten von
Stoffen. Die Benutzer können den
Trocknungszeitpunkt selbst bestimmen.
Feinwäsche
Trocknet empfindliche Textilien, die eine
besondere Pflege erfordern.
Remote
Wählen Sie dieses Programm aus, um das Gerät über die
WLAN
-Einstellungen
fernzusteuern. In diesem Fall erfolgt
der Programmstart über die App
-Befehle.
Wolle
Zum Trocknen von Wolltextilien. Kleidungsstücke vor
dem Trocknen auf links drehen.
Handtücher
Stellt die besten Trocknungsparameter für Handtücher
und andere
strapazierfähige Stoffe ein. Sorgt für hohe
Hitze, wobei die Baumwollfasern geschont werden.
Daunen
Das perfekte Programm für Bettlaken, das dank
spezifischer Trommelbewegungen die Verwicklungen
und Falten in der Bettwäsche minimiert.
Sport
Dieses Pr
ogramm pflegt technische Textilien für Sport
und Freizeit: Die Maschine trocknet mit besonderer
Vorsicht, um das Einlaufen und Ausleiern elastischer
Fasern zu verhindern.
I-Refresh
Ein von Haier patentierter Waschgang, der es der
Maschine
ermöglicht, verschiedene Textilien (Baumwolle
und Synthetik) zusammen in nur 30 Minuten zu trocknen.
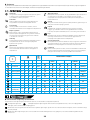
TROCK-
NUNGSZEIT
AUSWAHL-OPTIONEN
8
9
10
11
min
Hygiene
Knitterfrei
Zeitvorwahl
Temp.
Trockengrad
i-Time
Baumwolle
8
9
10
11
150
✓
✓
✓
✓
✓
Timer
Mix
4
4
4
4
125
✓
✓
✓
✓
✓
Timer
Synthetik
4
4
4
4
100
✓
✓
✓
✓
✓
Timer
Schnell
1
1
1
1
30
✓
✓
✓
✓
—
Timer
Timer
8
9
10
11
/
✓
✓
✓
✓
—
✓
Feinwäsche
2
2
2
2
100
✓
✓
✓
✓
✓
Timer
Remote / / / / / — — — — — —
Wolle
1
1
1
1
70
✓
✓
✓
—
—
✓
Handtücher
6
6
6
6
220
✓
✓
✓
✓
✓
Timer
Daunen
/
/
/
/
250
✓
✓
✓
✓
—
Timer
Sport
4
4
4
4
94
✓
✓
✓
✓
✓
Timer
i-Refresh
1
1
1
1
30
✓
✓
✓
✓
—
✓
3 Pflege und Wartung
Reinigung des Flusenfilters
Zum Reinigen des Flusensiebs (bitte reinigen Sie das Flusensieb nach jedem Durchgang):
❶ Öffnen Sie die Türe. ❷ Ziehen Sie die beiden Filter A und B nacheinander wie in der Abbildung gezeigt nach oben
heraus.
❸ Entfernen Sie Fusseln aus beiden Filtern vorsichtig mit den Fingerspitzen oder mit einer weichen Bürste, einem Tuch
oder unter fließendem Wasser.
❹ Schließen Sie beide Filter, indem Sie sie wieder in die Tür einsetzen und dabei sicherstellen, dass sie richtig positioniert sind.

10
Reinigung von Wärmetauschern
❶ Entfernen Sie die Sockelabdeckung.
❷ Drehen Sie den Griff gegen dem Uhrzeigersinn und ziehen Sie die vordere Abdeckung ab.
❸ Nehmen Sie den Schwammfilterrahmen vorsichtig heraus.
❹ Nehmen Sie den Schwamm vorsichtig aus dem Rahmen.
❺ Waschen Sie den Schwamm, indem Sie ihn unter laufendes Wasser halten und ihn so drehen, dass Staub und Flusen
entfernt werden. Wringen Sie den Schwamm aus und setzen Sie ihn vorsichtig wieder in den Rahmen ein.
❻ Setzen Sie den Schwammfilterrahmen wieder ein und vergewissern Sie sich, dass er richtig sitzt.
Hinweis
Wenn der Flusen-/Kondensatorfilter stark verschmutzt ist, kann er unter fließendem Wasser gereinigt werden. Lassen
Sie ihn vor der weiteren Verwendung gründlich trocknen.
Wasserbehälter
Ziehen Sie den Wasserbehälter aus seinem Gehäuse. Leeren Sie den
Wasserbehälter aus. Setzen Sie ihn
anschließend wieder in den
Wäschetrockner ein.
WICHTIG: Leeren Sie den Wasserbehälter nach jedem
Trockendurchgang aus.
Siehe „Ausleeren des Wasserbehälters“ in der Bedienungsanleitung.
4 Installation des Ablaufschlauchs
Damit der Wasserbehälter nicht nach jedem Trockengang geleert werden muss, kann das Wasser direkt in ein
Abwasserabflussrohr geleitet werden (Abbildung 1).
❶ Das Wasserablaufsystem befindet sich an der Rückseite der Maschine auf der unteren rechten Seite.
❷ Den Schlauch (A) nach oben vom Anschluss abziehen (B). Den abgezogenen Schlauch mit der Kappe verschließen (C),
die mit dem Kit geliefert wurde (Abbildung 2).
❸ Schließen Sie den Schlauch an das Anschlussstück (B) an und achten Sie auf richtigen Sitz (Abbildung 3-4).
5 Pflegeetikett
Lesen Sie die Pflegeetiketten auf Ihren Kleidungsstücken, insbesondere wenn Sie sie zum ersten Mal in den Wäschetrockner
geben. Im Folgenden sind die am häufigsten verwendeten Symbole aufgeführt:
Kann im Trockner
getrocknet werden.
Im Wäschetrockner bei
hoher Hitze trocknen.
Nicht trocknergeeignet.
Im Wäschetrockner bei
niedriger Hitze trocknen.
Weitere Informationen finden Sie unter
www.haier-europe.com
FILTER A
FILTER B
FILTER A
FILTER B
maximal 85 cm

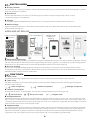
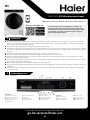
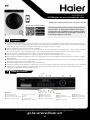
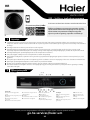
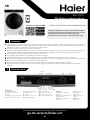
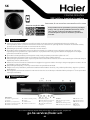
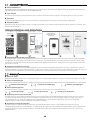
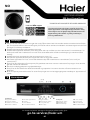
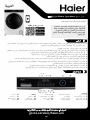
QUICK GUIDE: 959 Heat-Pump-Dryer
70026549
Download the hOn App
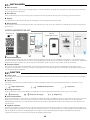
2 6 11
13
14 517 910
15 16 18 19
127 84
1 3
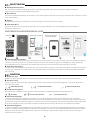
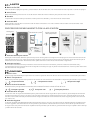
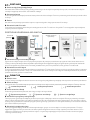
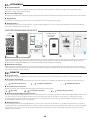
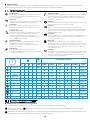
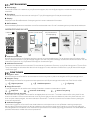
Fuctions:
13. Hygienic button
14. Child-lock button
15. Anti-crease button
16. i-time button
17. Temp. button
18. Dry level button
19. Delay button
Settings:
1. Hygienic indicator
2. Anti-crease indicator
3. Empty tank indicator
4.ÌïèäñĤï÷èõìñçìæä÷òõ
5. Child-lock indicator
6 Display
7àìĤìñçìæä÷òõ
8. Delay indicator
9. Signal indicator
10. Start/Pause button
11. Program knob
12. Power button
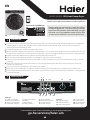
THANK YOU FOR PURCHASING A HAIER PRODUCT
Please read this instructions carefully before
using this appliance. The instructions contain
important information which will help you get
the best out of the appliance and ensure safe
and proper intallation, use and maintenance.
Ensure a location which allows opening the door fully. Do not install the tumble dryer behind a lockable door,
a sliding door or a door with hinges on the opposite side of the tumble dryer door as this limits the full
opening of the tumble dryer door.
Install the appliance in a well-ventilated, dry place.
Never install the appliance outdoors in a damp place, or in an area which may be prone to water leaks such as
under or near a sink unit. In the event of a water leak cut power supply and allow the machine to dry naturally.
Install or use the appliance only where the temperature is above 5°C.
Do not place the appliance directly on a carpet or close to a wall or furniture.
Do not expose the appliance to any frost, heat or direct sunlight or in the near of heat sources (e.g. stoves,
heaters).
Make sure that the electrical information on the rating plate agrees with the power supply. If it does not,
contact an electrician.
Do not use multi-plug adapters and extension cables.
Make sure not to demage the electric cable and the plug. If damaged have it raplaced by an electrician.
Use a separate earthed socket for the power supply which is easy accessible after installation. The appliance
must be earthed.
Installation
dŽĚŽǁŶůŽĂĚĂŶLJŽƚŚĞƌĨƵƌƚŚĞƌŝŶĨŽƌŵĂƟŽŶŝŶLJŽƵƌůĂŶŐƵĂŐĞƉůĞĂƐĞŐŽƚŽ͗
go.he.services/haier-um
1
Control panel
2
EN

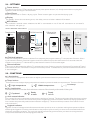
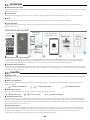
High temperature
Cupboard Ready
to iron
Middle temperature Low temp.
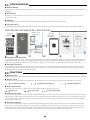
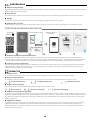
App hOn
,ŽŵĞtŝͲ&ŝ͗
-Name
ͲWĂƐƐǁŽƌĚ
Wi-Fi
Anna
^ĞƌŝĞƐϱ
Download the
App
Ready
to wear
2.4 GHz band only Follow pairing
ŝŶƐƚƌƵĐƟŽŶƐ
A B C D E F
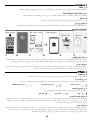
Anti-crease indicator
Anti-crease function is designed to help remove wrinkles of clothes. The drum will rotate after the drying cycle to
stretch clothes so there is no need to worry about forgetting to take out clothes. When the drying cycle ends, if
Anti-crease was previously selected the indicator will light up. The drum will keep rotation for another 6 hours
with cold wind in.
Hygienic indicator
Hygienic function is designed to kill bacteria and mites as well as virus on clothes with high temperature. When
selecting the Hygienic function, this indicator is the perfect cycle to use if you want to remove bad smells from
the linens smoothing creases. This cycle can quickly refresh the garments that you need, ensuring the best
compromise between time and drying performance.
2.1 - SETTINGS
2.2 - FUNCTIONS
Child lock indicator
Buzzer indicator
Power button
In order to turn ON or OFF the appliance please press power button (12). Kindly remember to unplug the
appliance when turning OFF the machine.
Child lock is designed to prevent children from adjusting the program setting. To activate this function, after a
cycle has been started, press the Hygienic and Anti crease button at the same time for 3 seconds until the
indicator icon lights up. To deactivate it, press these 2 buttons for 3 seconds again.
The buzzer is deactivated by default. To activate the buzzer function, press the 2 buttons (Dry level and Temp.)
at the same time for 3 seconds or until you hear a beep sound. To deactivate it, press the same two buttons for
3 seconds again.
Start/Pause
Press Start/Pause to Start a drying cycle. Press button again to pause the drying cycle.
i-time button
Temp. button
This function is designed to allow users to adjust cycle duration based on personal needs.
Dry-level button
Ùõèöö÷ëèåø÷÷òñ÷òöè÷÷ëèĤñäïðòìö÷øõèæòñ÷èñ÷òé÷ëèïäøñçõüä÷÷ëèèñçòé÷ëèæüæïè
This button is set to adjust drying temperature based on personal needs or requirements. There are 3 levels:
Display
The display shows the remaining time, the delay time and other related information.
:LƪLQGLFDWRU
Ýëìöìñçìæä÷òõõèðìñçöøöèõöúëè÷ëèõ÷ëèàìĤìöæòññèæ÷èçòõñò÷Òé÷ëèúìĤæòññèæ÷ìòñìööøææèööéøï
this indicator will light up.
APP PAIRING PROCESS

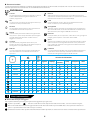
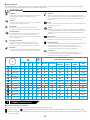
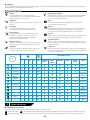
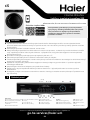
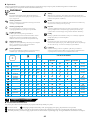
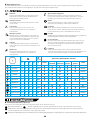
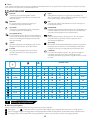
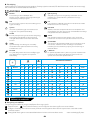
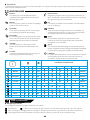
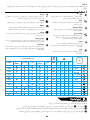
DRYING
TIME
ƟŵĞƌ
ƟŵĞƌ
ƟŵĞƌ
ƟŵĞƌ
ƟŵĞƌ
ƟŵĞƌ
ƟŵĞƌ
ƟŵĞƌ
Cotton
For drying cotton clothes or coats. The
values on the Energy Label are based on
this programme.
Synthetics
To dry synthetic fabrics that need an
äææøõä÷èäñçöóèæìĤæ÷õä÷ðèñ÷
Mix
Êñèúìññòùä÷ìùèæüæïè÷òçõüçìģèõèñ÷
kinds of fabrics in the same time.
Quick dry
A short timing cycle that allows you to have
items ready in a short time. Perfect to dry
öðäïïäðòøñ÷öòéïìêë÷úèìêë÷æëèðìæäïĤåèõ
or cotton clothing.
Timer
ÜóèæìĤæäïïüçèöìêñéòõçìģèõèñ÷÷üóèöòé
fabrics. The users can decide with complete
autonomy the drying time by themselves.
Wool
For drying wool clothes. It is recommended to
reverse all clothes before drying.
Towel
Sets the best drying parameters for towels and other
durable fabrics. Providing high heat and keeping at the
öäðè÷ìðè÷ëèìñ÷èêõì÷üòé÷ëèæò÷÷òñĤåèõö
Duvet
The perfect cycle for your duvets, that minimize the
÷äñêïèöäñçéòïçö÷ëäñîööóèæìĤæðòùèðèñ÷öòé÷ëè
drum.
Sports
Takes care of your technical garments used for
öóòõ÷äñçĤ÷ñèöö÷ëèðäæëìñèçõìèöêèñ÷ïüúì÷ë
special care to avoid shrinking and deterioration of
èïäö÷ìæĤåèõö
I-Refresh
An Haier patent-owned cycle, that allows the machine
÷ò÷äîèæäõèòéüòøõçìģèõèñ÷éäåõìæö÷òêè÷ëèõ¤æò÷÷òñ
and synthetic), drying them out with only 30’.
Delicate
A cycle design to dry delicate fabrics that
ñèèçäñäææøõä÷èäñçöóèæìĤæ÷õèä÷ðèñ÷
Remote
Select this program to remotely control the device
through WiFi settings. In this case, the start of
cycle will take place through the App commands.
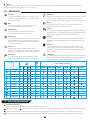
2.3 - PROGRAMS
Delay
Delay function allows users to delay the start time of the cycle (From 0 to 24 hours with 0.5 step hours).
When activated, the indicator icon lights up.
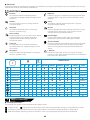
ŽƩŽŶ
Mix
^LJŶƚŚĞƟĐƐ
YƵŝĐŬƌLJ
Timer
ĞůŝĐĂƚĞ
Remote
Wool
Towel
ƵǀĞƚ
^ƉŽƌƚƐ
ŝͲZĞĨƌĞƐŚ
8
4
4
1
8
2
/
1
6
/
4
1
ϭϱϬ
ϭϮϱ
ϭϬϬ
ϯϬ
/
ϭϬϬ
/
ϳϬ
ϮϮϬ
ϮϱϬ
94
ϯϬ
8Hygienic ŶƟĐƌĞĂƐĞ Delay Temp. Dry level i-Time
9
4
4
1
9
2
/
1
6
/
4
1
9
ϭϬ
4
4
1
ϭϬ
2
/
1
6
/
4
1
10
11
4
4
1
11
2
/
1
6
/
4
1
11 min
SELECTABLE OPTIONS
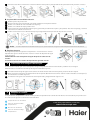
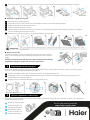
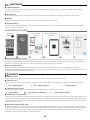
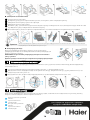
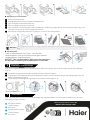
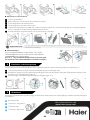
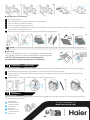
Open the door; Îû÷õäæ÷÷ëè÷úòĤï÷èõöÊäñçËìñöèôøèñæèóøïïìñê÷ëèðøóúäõçöäööëòúñìñ÷ëèĤêøõè
Ðèñ÷ïüõèðòùèïìñ÷öéõòðåò÷ëĤï÷èõöøöìñêüòøõĤñêèõ÷ìóöòõäöòé÷åõøöëäæïò÷ëòõøñçèõúä÷èõõøññìñê
Ìïòöèåò÷ëĤï÷èõöåüõèóòöì÷ìòñìñê÷ëèðìñöìçè÷ëèçòòõðäîìñêöøõè÷ëèüäõèóòöì÷ìòñèçæòõõèæ÷ïüìñóïäæè
Care and maintenance
3
/LQWƪOWHUFOHDQLQJ
Ýòæïèäñ÷ëèïìñ÷Ĥï÷èõ¤óïèäöèæïèäñ÷ëèïìñ÷äé÷èõèùèõüæüæïè¥
12
3
4

&ŽƌŵŽƌĞŝŶĨŽƌŵĂƟŽŶƉůĞĂƐĞƌĞĨĞƌƚŽ
www.haier-europe.com
1
2
max 85 cm
May be tumble dried.
Do not tumble dry.
Tumble dry – high heat.
Tumble dry – low heat.
6
Îû÷õäæ÷÷ëè÷úòĤï÷èõöÊäñçËìñöèôøèñæèóøïïìñê÷ëèðøóúäõçöäööëòúñìñ÷ëèĤêøõè
IMPORTANT: Empty the water tank after each drying cycle. See
empty the water tank section of the manual.
Drain Hose installation
4
Care label
5
Water tank
Pull out the water tank from its housing. Than empty the water
÷äñîØñæèüòøĤñìöëóïèäöèõèìñö÷äïï÷ëèúä÷èõ÷äñî÷ò÷ëè
tumble dryer.
In order to avoid to empty the water container after each drying cycle, the water can be discharged directly to a
úäö÷èúä÷èõçõäìñóìóè¤Ĥêøõè!¥
Ùïèäöèæëèæî÷ëèæäõèïäåèïöòñüòøõêäõðèñ÷öèöóèæìäïïüúëèñóïäæìñêì÷ìñ÷ëè÷øðåïèçõüèõéòõ÷ëèĤõö÷÷ìðè
Ëèïòúäõè÷ëèðòö÷æòððòñïüøöèçöüðåòïö
1 2 3
1
1
AB
C
2 3 4
2 3 4 5
Remove the kickplate;
Òé÷ëèïìñ÷¦÷ëèæòñçèñöèõĤï÷èõìöùèõüçìõ÷üì÷æäñåèæïèäñèçøñçèõõøññìñêúä÷èõÕè÷ì÷çõü÷ëòøõòøêëïüåèéòõèøöè
Turn the handle anti-clockwise and pull out the front cover;
Ðèñ÷ïüõèðòùè÷ëèöóòñêèĤï÷èõéõäðè
Gently remove the sponge from the frame;
Heat exchanger cleaning
1
2
The water drainage system is located at the back of the machine on the lower right side;
Íìöæòññèæ÷÷ëèëòöè¤Ê¥éõòð÷ëèĤ÷÷ìñê¤Ë¥åüóøïïìñêì÷øóúäõçöÌïòöè÷ëèèû÷õäæ÷èç÷øåèúì÷ë÷ëèæäó¤Ì¥
öøóóïìèçúì÷ë÷ëèîì÷¤Ĥêøõè"¥
1
2
Ìòññèæ÷÷ëèëòöèìñ÷ò÷ëèĤ÷÷ìñê¤Ë¥ðäîìñêöøõèì÷¤Ĥêøõè#¡$¥
3
3
4
àäöë÷ëèöóòñêèåüëòïçìñêì÷øñçèõäõøññìñê÷äó÷øõñìñêì÷öò÷òõèðòùèäñüçøö÷òõĥøģàõìñêòø÷÷ëè
öóòñêèäñçõèĤ÷ì÷æäõèéøïïüòñ÷ëèéõäðè
5
ÛèĤ÷÷ëèöóòñêèĤï÷èõéõäðèèñöøõìñê÷ëä÷ì÷ìöìñ÷ëèæòõõèæ÷óòöì÷ìòñ
6
FILTER A FILTER BFILTER A FILTER B

15
ES
GUÍA RÁPIDA:
Bomba de calor-Secadora 959
GRACIAS POR COMPRAR UN PRODUCTO HAIER
Lea atentamente estas instrucciones antes de utilizar
este aparato. Las instrucciones contienen información
importante que le ayudará a sacar el máximo partido
del aparato y a garantizar una instalación, un uso y un
mantenimiento seguros y correctos.
1 Instalación
Asegúrese de que la ubicación permite abrir la puerta completamente. No instale la secadora detrás de una puerta con
cerradura, una puerta corredera o una puerta con bisagras en el lado opuesto de la puerta de la secadora, ya que esto
limita la apertura total de la puerta de la secadora.
Instale el aparato en un lugar bien ventilado y seco.
No instale nunca el aparato al aire libre, en un lugar húmedo o en una zona propensa a las filtraciones de agua, como
debajo o cerca de un fregadero. En caso de fuga de agua, corte el suministro eléctrico y deje que la máquina se seque
de forma natural.
Instale o utilice el aparato sólo donde la temperatura sea superior a 5 °C.
No coloque el aparato directamente sobre una alfombra ni cerca de una pared o mueble.
No exponga el aparato a heladas, calor o luz solar directa ni cerca de fuentes de calor (por ejemplo, estufas o
calefactores).
Asegúrese de que la información eléctrica de la placa de características coincide con la fuente de alimentación. Si no es
así, póngase en contacto con un electricista.
No utilice adaptadores multienchufe ni cables alargadores.
Asegúrese de no dañar el cable eléctrico ni el enchufe. Si está dañado, haga que lo sustituya un electricista.
Utilice una toma de corriente con conexión a tierra separada para la fuente de alimentación, a la que se pueda acceder
fácilmente después de la instalación. El aparato debe estar conectado a tierra.
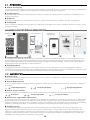
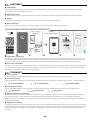
2 Panel de control
Ajustes:
1 Indicador Hygiene
2
Indicador Anti-Arrugas
3
Indicador de depósito vacío
4 Indicador de filtro limpio
5 Indicador de bloqueo infantil
6
Pantalla
7
Indicador Wifi
8 Indicador de Inicio Diferido
9 Indicador de señal
10
Botón de Inicio/Pausa
11
Selector de programa
12 Botón de On/Off
Funciones:
13
Botón Hygiene
14
Botón de bloqueo infantil
15
Botón Anti-Arrugas
16 Botón i-time
17
Botón Temperatura
18
Botón Nivel Secado
19 Botón Inicio Diferido
Descargar la aplicación hOn
Si desea descargar más información en su idioma, vaya a:
go.he.services/haier-um
15

16
AJUSTES
Botón de On/Off
Para encender o apagar el aparato, pulse el botón de encendido (12). No olvide desenchufar el aparato cuando lo apague.
Inicio/Pausa
Pulse Inicio/Pausa para iniciar un ciclo de secado. Pulse de nuevo el botón para pausar el ciclo de secado.
Pantalla
La pantalla muestra el tiempo restante, el tiempo de inicio diferido y otra información relacionada.
Indicador Wifi
Este indicador recuerda a los usuarios si el wifi está conectado o no. Si la conexión wifi se realiza correctamente, este
indicador se iluminará.
PROCESO DE EMPAREJAMIENTO CON LA APLICACIÓN
Indicador de bloqueo infantil
El bloqueo infantil está diseñado para evitar que los niños ajusten la configuración del programa. Para activar esta función,
después de iniciar un ciclo, pulse los botones Hygiene y Anti-Arrugas al mismo tiempo durante 3 segundos hasta que se
encienda el icono indicador. Para desactivarlo, pulse de nuevo estos 2 botones durante 3 segundos.
Indicador acústico
El zumbador está desactivado por defecto. Para activar la función zumbador, pulse los 2 botones (Nivel Secado y
Temperatura) al mismo tiempo durante 3 segundos o hasta que oiga un pitido. Para desactivarla, vuelva a pulsar estos dos
botones durante 3 segundos.
FUNCIONES
Botón i-time
Esta función está diseñada para permitir a los usuarios ajustar la duración del ciclo en función de sus necesidades personales.
Botón Temperatura
Este botón permite ajustar la temperatura de secado en función de las necesidades o requisitos personales. Hay 3 niveles:
Temperatura alta
Temperatura media
Temperatura baja
Botón de nivel de secado
Pulse el botón para ajustar el contenido de humedad final de la colada al final del ciclo.
Lista para guardar
Lista para usar
Lista para plancha
Indicador Anti-Arrugas
La función Anti-Arrugas está diseñada para ayudar a eliminar las arrugas de la ropa. El tambor girará después del ciclo de
secado para estirar la ropa, por lo que no hay que preocuparse por olvidarse de sacar la ropa. Cuando finalice el ciclo de
secado, si se ha seleccionado previamente Anti-Arrugas, el indicador se encenderá. El tambor seguirá girando otras 6 horas
con viento frío.
Indicador Hygiene
La función Hygiene está diseñada para eliminar bacterias y ácaros, así como virus en la ropa con alta temperatura. Si selecciona la
función Hygiene, este indicador es el ciclo perfecto para utilizar si desea eliminar los malos olores de la ropa alisando las
arrugas. Este ciclo permite refrescar rápidamente las prendas que necesitas, garantizando el mejor equilibrio entre tiempo
y rendimiento de secado.
Descargue la
aplicación
hOn
Sólo banda de 2,4 GHz
Siga las instrucciones
de emparejamiento
Wi-Fi
doméstica:
-
Nombre
- Contraseña
Aplicación
hOn

17
Inicio Diferido
La función de inicio diferido permite a los usuarios retrasar la hora de inicio del ciclo (de 0 a 24 horas con intervalos de
0,5 horas). Cuando está activada, el icono indicador se ilumina.
PROGRAMAS
Algodón
Para secar ropa de algodón o abrigos. Los valores
de la etiqueta energética se basan en este
programa.
Mezcla
Un nuevo e innovador ciclo para secar diferentes
tipos de telas al mismo tiempo.
Sintéticos
Para secar tejidos delicad
os y sintéticos que
necesitan un tratamiento específico y adaptado.
Secado Rápido
Un ciclo de tiempo corto que le permite tener las
prendas listas en poco tiempo. Perfecto para
secar pequeñas cantidades de ropa ligera de fibra
química o algodón.
Secado por tiempo
Diseñado específico para diferentes tipos de
tejidos. Los usuarios pueden decidir con total
autonomía el tiempo de secado por sí mismos.
Delicado
Un ciclo diseñado para secar tejidos delicados que
necesitan un tratamiento específico y
adaptado.
Remoto
Seleccione este programa para controlar el dispositivo de
forma remota a través de la configuración WiFi. En este caso,
el inicio del ciclo se realizará a través de los controles de la
aplicación.
Lana
Para secar ropa de lana.
Antes de secar, se recomienda dar la
vuelta a las prendas.
Toallas
Establece los mejores parámetros de secado para toallas y
otros tejidos duraderos. Proporcionando una alta temperatura
manteniendo al mismo tiempo la integridad de las fibras de
algodón.
Ropa Cama
El ciclo perfecto para su ropa de cama: minimiza los enredos y
pliegues gracias a movimientos específicos del tambor.
Ropa Deportiva
Se ocupa de las prendas técnicas utilizadas para la realización
de actividades deportivas y de fitness, se
cando
delicadamente y con un cuidado especial para evitar la
contracción y el deterioro de las fibras elásticas.
i
-Refresh
Un ciclo patentado por Haier, que permite a la máquina
ocuparse de sus diferentes tejidos juntos (algodón y
sintéticos), secándolos en sólo 30'.
TIEMPO DE
SECADO
OPCIONES SELECCIONABLES
8 9 10 11 min Hygiene
Anti-Arrugas
Inicio
Diferido
Tempe-
ratura
Nivel
Secado
i-Time
Algodón 8 9 10 11 150
✓
✓
✓
✓
✓
Secado por
tiempo
Mezcla 4 4 4 4 125
✓
✓
✓
✓
✓
Secado por
tiempo
Sintéticos
4
4
4
4
100
✓
✓
✓
✓
✓
Secado por
tiempo
Secado rápido
1 1 1 1 30
✓
✓
✓
✓
—
Secado por
tiempo
Secado por
tiempo
8 9 10 11 /
✓
✓
✓
✓
—
✓
Delicado 2 2 2 2 100
✓
✓
✓
✓
✓
Secado por
tiempo
Remoto
/
/
/
/
/
—
—
—
—
—
—
Lana
1
1
1
1
70
✓
✓
✓
—
—
✓
Toallas 6 6 6 6 220
✓
✓
✓
✓
✓
Secado por
tiempo
Ropa Cama / / / / 250
✓
✓
✓
✓
—
Secado por
tiempo
Ropa
Deportiva
4 4 4 4 94
✓
✓
✓
✓
✓
Secado por
tiempo
i-Refresh
1
1
1
1
30
✓
✓
✓
✓
—
✓
3 Cuidado y mantenimiento
Limpieza del filtro de pelusas
Para limpiar el filtro de pelusa (limpie las pelusas después de cada ciclo):
❶ Abra la puerta. ❷ Extraiga los dos filtros A y B en orden tirando de ellos hacia arriba, tal como se muestra en la imagen.
❸ Retire suavemente las pelusas de los dos filtros con las yemas de los dedos, o bien utilizando un cepillo suave, un paño
o agua corriente.

18
❹ Cierre los dos filtros volviendo a colocarlos dentro de la puerta y asegurándose de que estén en la posición correcta.
Limpieza del intercambiador de calor
❶ Retire la placa de protección.
❷ Gire el mando hacia la izquierda y tire de la cubierta frontal para extraerla.
❸ Retire con cuidado el marco del filtro de esponja.
❹ Retire con cuidado la esponja del marco.
❺ Lave la esponja manteniéndola bajo el grifo y girándola para eliminar el polvo y las pelusas. Escurra la esponja y vuelva a
colocarla con cuidado en el marco.
❻ Vuelva a colocar el marco del filtro de esponja asegurándose de que está en la posición correcta.
Aviso
Si el filtro de pelusa/condensador está muy sucio, puede limpiarse con agua corriente. Déjelo secar bien antes de utilizarlo.
Depósito de agua
Extraiga el depósito de agua de su alojamiento. A continuación, vacíe el
depósito de agua. Cuando termine, vuelva a colocar el depósito de agua
en la secadora.
I
MPORTANTE: Vacíe el depósito de agua después de cada ciclo de
secado.
Consulte la sección de vaciado del depósito de agua del manual.
4 Instalación de la manguera de desagüe
Con el fin de no tener que vaciar el depósito de agua después de cada ciclo de secado, puede evacuar el agua
directamente a una tubería de drenaje de aguas residuales (figura 1).
❶ El sistema de drenaje de agua se encuentra en el lado inferior derecho de la parte posterior de la máquina.
❷ Desconecte la manguera (A) del elemento de empalme (B) tirando hacia arriba. Cierre el tubo extraído con el tapón (C)
suministrado con el kit (figura 2).
❸ Conecte la manguera con el elemento de empalme (B) y asegúrela bien (figura 3-4).
5 Etiqueta de cuidado
Compruebe las etiquetas de cuidado de las prendas, especialmente cuando las introduzca en la secadora por primera vez.
A continuación figuran los símbolos más utilizados:
Se puede secar en secadora.
Secar en secadora a alta
temperatura.
No secar en secadora.
Secar en secadora a baja
temperatura.
Para más información, consulte
www.haier-europe.com
FILTRO A
FILTRO B
FILTRO A
FILTRO B
máx. 85 cm

19
FR
GUIDE RAPIDE :
959 Séchoir à pompe à chaleur
MERCI D’AVOIR ACHETÉ UN PRODUIT HAIER
Avant d’utiliser cet appareil, lisez attentivement ces
instructions. Les instructions contiennent des
informations importantes qui vous aideront à tirer le
meilleur parti de l’appareil et à garantir une installation,
une utilisation et un entretien sûrs et corrects.
1 Installation
Assurez-vous que l’emplacement permet l’ouverture complète de la porte. N’installez pas le sèche-linge derrière une
porte verrouillable, une porte coulissante ou une porte dont les charnières se trouvent du côté opposé à la porte du
sèche-linge, car cela limite l’ouverture complète de la porte du sèche-linge.
Installez l’appareil dans un endroit sec et bien aéré.
N’installez jamais l’appareil à l’extérieur, dans un endroit humide ou susceptible de présenter des fuites d’eau, par
exemple sous ou à proximité d’un évier. En cas de fuite d’eau, coupez l’alimentation électrique et laissez la machine
sécher naturellement.
N’installez ou n’utilisez l’appareil qu’à un endroit où la température ambiante est supérieure à 5 °C.
Ne placez pas l’appareil directement sur un tapis ou à proximité d’un mur ou d’un meuble.
N’exposez pas l’appareil au gel, à la chaleur ou à la lumière directe du soleil, ni à proximité de sources de chaleur
(par exemple, des poêles, des radiateurs).
Assurez-vous que les informations électriques figurant sur la plaque signalétique correspondent à l’alimentation
électrique. Si ce n’est pas le cas, contactez un électricien.
N’utilisez pas d’adaptateurs multiprises ni de câbles de rallonge.
Veillez à ne pas endommager le câble électrique et la prise. En cas d’endommagement, faites-le/la remplacer par un
électricien.
Utilisez une prise distincte avec mise à la terre pour l’alimentation électrique, facilement accessible après l’installation.
L’appareil doit être mis à la terre.
2 Panneau de commande
Configurations :
1 Indicateur Hygiène
2
Indicateur Anti-plis
3
Indicateur Bac vide
4
Indicateur Nettoyage
du filtre
5 Indicateur Sécurité enfant
6
Afficheur
7
Indicateur Wi-Fi
8
Indicateur Fin différée
9 Indicateur Signal
10
Bouton Start/Pause
11
Bouton Programme
12
Bouton Marche
Fonctions :
13
Bouton Hygiène
14
Bouton Sécurité enfant
15
Bouton Anti-plis
16 Bouton i-time
17
Bouton Temp.
18
Bouton Niveau sec.
19
Bouton Fin différée
Téléchargez l’application hOn.
Pour télécharger d’autres informations dans votre langue, accédez à :
go.he.services/haier-um
19

20
CONFIGURATIONS
Bouton Marche
Pour allumer ou éteindre l’appareil, appuyez sur le bouton Marche (12). N’oubliez pas de débrancher l’appareil lorsque vous
l’éteignez.
Start/Pause
Appuyez sur Start/Pause pour démarrer un cycle de séchage. Appuyez de nouveau sur le bouton pour interrompre le
cycle de séchage.
Afficheur
L’écran affiche le temps restant, le temps de fin différée et d’autres informations connexes.
Indicateur Wi-Fi
Cet indicateur rappelle aux utilisateurs si le Wi-Fi est connecté ou non. Si la connexion Wi-Fi est établie, cet indicateur s’allume.
PROCESSUS D’APPAIRAGE DE L’APPLICATION
Indicateur Sécurité enfant
La sécurité enfant est conçue pour empêcher les enfants de modifier le réglage du programme. Pour activer cette fonction,
après le démarrage d’un cycle, appuyez simultanément sur les boutons Hygiène et Anti-plis pendant 3 secondes jusqu’à ce
que l’icône de l’indicateur s’allume. Pour la désactiver, appuyez de nouveau sur ces deux boutons pendant 3 secondes.
Indicateur Sonnerie
La sonnerie est désactivée par défaut. Pour activer la fonction Sonnerie, appuyez simultanément sur les deux boutons
(Niveau sec. et Temp.) pendant 3 secondes jusqu’à entendre un bip sonore. Pour la désactiver, appuyez de nouveau sur
les deux mêmes boutons pendant 3 secondes.
FONCTIONS
Bouton i-time
Cette fonction est conçue pour permettre aux utilisateurs d’ajuster la durée du cycle en fonction de leurs besoins personnels.
Bouton Temp.
Ce bouton permet de régler la température de séchage en fonction des besoins personnels. Il existe trois niveaux :
Température haute
Température moyenne
Température basse
Bouton Niveau sec.
Appuyez sur le bouton pour régler le taux d’humidité final du linge à la fin du cycle.
Armoire
Prêt à porter
Prêt au repassage
Indicateur Anti-plis
La fonction Anti-plis est conçue pour aider à éliminer les plis des vêtements. Le tambour tourne après le cycle de séchage
pour étirer les vêtements. Cela évite d’avoir peur d’oublier de sortir les vêtements. À la fin du cycle de séchage, si l’option
Anti-plis a été sélectionnée auparavant, l’indicateur s’allume. Le tambour continuera à tourner pendant encore 6 heures
en soufflant de l’air froid.
Indicateur Hygiène
La fonction Hygiène est conçue pour éliminer les bactéries et les acariens ainsi que les virus sur les vêtements à haute
température. Lorsque vous sélectionnez la fonction Hygiène, cet indicateur est le cycle parfait à utiliser si vous voulez
éliminer les mauvaises odeurs du linge en le défroissant. Ce cycle permet de rafraîchir rapidement les vêtements dont
vous avez besoin, en assurant le meilleur compromis entre le temps et les performances de séchage.
Téléchargez
l’application .
hOn
Bande 2,4 GHz
uniquement
Suivez les
instructions
d’appairage.
Wi-Fi
domestique
:
-
Nom
- Mot de passe
App hOn
La pagina si sta caricando...
La pagina si sta caricando...
La pagina si sta caricando...
La pagina si sta caricando...
La pagina si sta caricando...
La pagina si sta caricando...
La pagina si sta caricando...
La pagina si sta caricando...
La pagina si sta caricando...
La pagina si sta caricando...
La pagina si sta caricando...
La pagina si sta caricando...
La pagina si sta caricando...
La pagina si sta caricando...
La pagina si sta caricando...
La pagina si sta caricando...
La pagina si sta caricando...
La pagina si sta caricando...
La pagina si sta caricando...
La pagina si sta caricando...
La pagina si sta caricando...
La pagina si sta caricando...
La pagina si sta caricando...
La pagina si sta caricando...
La pagina si sta caricando...
La pagina si sta caricando...
La pagina si sta caricando...
La pagina si sta caricando...
La pagina si sta caricando...
La pagina si sta caricando...
La pagina si sta caricando...
La pagina si sta caricando...
La pagina si sta caricando...
La pagina si sta caricando...
La pagina si sta caricando...
La pagina si sta caricando...
La pagina si sta caricando...
La pagina si sta caricando...
La pagina si sta caricando...
La pagina si sta caricando...
La pagina si sta caricando...
La pagina si sta caricando...
La pagina si sta caricando...
La pagina si sta caricando...
La pagina si sta caricando...
La pagina si sta caricando...
La pagina si sta caricando...
La pagina si sta caricando...
La pagina si sta caricando...
La pagina si sta caricando...
La pagina si sta caricando...
La pagina si sta caricando...
La pagina si sta caricando...
La pagina si sta caricando...
La pagina si sta caricando...
La pagina si sta caricando...
La pagina si sta caricando...
La pagina si sta caricando...
La pagina si sta caricando...
La pagina si sta caricando...
La pagina si sta caricando...
La pagina si sta caricando...
La pagina si sta caricando...
La pagina si sta caricando...
La pagina si sta caricando...
La pagina si sta caricando...
La pagina si sta caricando...
La pagina si sta caricando...
La pagina si sta caricando...
La pagina si sta caricando...
La pagina si sta caricando...
La pagina si sta caricando...
La pagina si sta caricando...
La pagina si sta caricando...
La pagina si sta caricando...
La pagina si sta caricando...
-
 1
1
-
 2
2
-
 3
3
-
 4
4
-
 5
5
-
 6
6
-
 7
7
-
 8
8
-
 9
9
-
 10
10
-
 11
11
-
 12
12
-
 13
13
-
 14
14
-
 15
15
-
 16
16
-
 17
17
-
 18
18
-
 19
19
-
 20
20
-
 21
21
-
 22
22
-
 23
23
-
 24
24
-
 25
25
-
 26
26
-
 27
27
-
 28
28
-
 29
29
-
 30
30
-
 31
31
-
 32
32
-
 33
33
-
 34
34
-
 35
35
-
 36
36
-
 37
37
-
 38
38
-
 39
39
-
 40
40
-
 41
41
-
 42
42
-
 43
43
-
 44
44
-
 45
45
-
 46
46
-
 47
47
-
 48
48
-
 49
49
-
 50
50
-
 51
51
-
 52
52
-
 53
53
-
 54
54
-
 55
55
-
 56
56
-
 57
57
-
 58
58
-
 59
59
-
 60
60
-
 61
61
-
 62
62
-
 63
63
-
 64
64
-
 65
65
-
 66
66
-
 67
67
-
 68
68
-
 69
69
-
 70
70
-
 71
71
-
 72
72
-
 73
73
-
 74
74
-
 75
75
-
 76
76
-
 77
77
-
 78
78
-
 79
79
-
 80
80
-
 81
81
-
 82
82
-
 83
83
-
 84
84
-
 85
85
-
 86
86
-
 87
87
-
 88
88
-
 89
89
-
 90
90
-
 91
91
-
 92
92
-
 93
93
-
 94
94
-
 95
95
-
 96
96


in altre lingue
- slovenčina: Haier HD90-A3959 Používateľská príručka
- română: Haier HD90-A3959 Manual de utilizare
Documenti correlati
Altri documenti
-
Candy ROE H9A2TCEX-S Manuale utente
-
Hoover HLE H9A2TE-S Manuale utente
-
Hoover ND C10TSBE-S Manuale utente
-
Hoover HCE H9A3TCEX-S Manuale utente
-
Candy CSOE H10A2DE-S Manuale utente
-
Candy CSOE H8A3TE-S Manuale utente
-
Hoover ND H9A2TCBEXS-S Manuale utente
-
Hoover NDP H9A3TCBEXS-S Manuale utente
-
-