
Peter
Operating instructions
Gebrauchsanweisung
Mode d‘emploi
Istruzioni per l‘uso
Manual de instrucciones
Gebruiksaanwijzing
Brugsanvisning
Käyttöohje
Bruksanvisning
Bruksanvisning
Инструкция по эксплуатации

Peter
7
14
1
15
2
1
2

2
J
A
H
R
E
G
A
R
A
N
T
I
E
•
2
Y
E
A
R
S
W
A
R
R
A
N
T
Y
•
2
A
N
N
É
E
S
D
E
G
A
R
A
N
T
I
E
•
3
17
12
11
13
16
10
4
6
8
9
5

Stadler Form Aktiengesellschaft, Chamerstrasse 174, 6300 Zug, Switzerland
Phone +41 41 720 48 48, Fax +41 41 720 48 44, www.stadlerform.com/contact
Share your feedback about Peter on:
Teilen Sie Ihr Feedback von Peter auf:
Partagez votre commentaire sur Peter :
www.stadlerform.com/Reviews
Download instruction manual:
Bedienungsanleitung hier herunterladen:
Téléchargez le mode d’emploi :
www.stadlerform.com/Peter/manual
For frequently asked questions go to:
Für häufig gestellte Fragen besuchen Sie:
Trouvez la foire aux questions sur :
www.stadlerform.com/Peter/support
Watch the video of Peter:
Schauen Sie sich das Video zu Peter an:
Regardez la video du Peter :
www.stadlerform.com/Peter/video

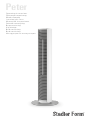
Congratulations! You have just purchased the exceptional PETER fan. He
will give you great pleasure and improve the indoor air for you.
As with all domestic electrical appliances, particular care is needed with
this model also, in order to avoid injury, fire damage or damage to the appli-
ance. Please study these operating instructions carefully before using the
appliance for the first time and follow the safety advice on the appliance
itself.
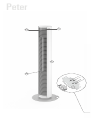
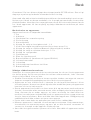
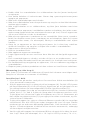
Description of the appliance
The appliance consists of the following main components:
1. Foot
2. Housing
3. Mains cable for power supply
4. On/off button
5. Control panel
6. Button for the selection of the speed level: 1–3
7. Display of the selected speed level (disappears after 5 s)
8. Button for the selection of „Natural Breeze“ mode
9. Button for the selection of timer function: 1–7 h
10. Button for swing mode
11. Rem ot e c on tro l
12. Compartment for remote control
13. Battery compartment remote control (type CR2032)
14. Infrared receiver
15. Air outlet
16. Air inlet with washable air filter
17. C arr yin g h andle
Important safety instructions
Please read through the operating instructions carefully before you use the
appliance for the first time and keep them safely for later reference; if nec-
essary pass them on to the next owner.
• Stadler Form refuses all liability for loss or damage which arises as a
result of failure to follow these operating instructions.
• The appliance is only to be used in the home for the purposes described
in these instructions. Unauthorised use and technical modifications to the
appliance can lead to danger to life and health.
• This appliance can be used by children aged from 8 years and above and
persons with reduced physical, sensory or mental capabilities or lack of
experience and knowledge if they have been given supervision or instruc-
tion concerning use of the appliance in a safe way and understand the
hazards involved. Children shall not play with the appliance. Cleaning and
user maintenance shall not be made by children without supervision.
• Never leave any parts of the packing within the reach of children.
• Assemble the appliance in accordance with the instructions for Assembly.
Follow the instructions for assembly exactly and ensure that all screws
are firmly tightened so as to avoid damage and hazards.
• Never insert objects into the grille of the fan. Do not cover the appliance
during operation.
• Always disconnect the power cord from the socket before removing the
protection grille.
English

• Only connect the cable to alternating current. Observe the voltage infor-
mation given on the appliance.
• Do not use damaged extension cords.
• Do not run the power cord over sharp edges and make sure that it does
not get trapped.
• Do not pull the plug from the socket with wet hands or by holding on to
the power cord.
• Do not use the appliance in immediate vicinity of a bath tub, a shower or a
swimming pool (observe a minimum distance of 3 m). Place the appliance
such that a person in the bath tub cannot touch the appliance.
• Do not place the appliance near a heat source. Do not subject the power
cord to direct heat (such as a heated hotplate, open flames, hot iron sole
plates or heaters for example). Protect power cords from oil.
• See to it that the appliance is properly positioned to ensure a high stabil-
ity during its operation and make sure that no one can trip over the power
cord.
• The appliance is not splash-proof.
• For indoor use only.
• Do not store the appliance outdoors.
• Store the appliance in a dry place inaccessible to children (pack the ap-
pliance).
• If the supply cord is damaged, it must be replaced by the manufacturer, or
its service agent, or a qualified person in order to avoid a hazard.
• Prior to any maintenance, cleaning and after each use, switch off the ap-
pliance and unplug the mains cable from the socket.
• Repairs to electrical appliances must only be carried out by a qualified
electrical technician.
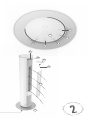
Assembly (see page 2 and 3)
Attach the foot (1) to the bottom of the housing (2) with the 4 screws pro-
vided. Make sure the screws are firmly tightened.
Setting up / operation
1. Place Peter in the desired location on a flat surface. Connect the mains
cable (3) to a suitable power outlet.
2. Switch on the appliance by pressing the on/off button (4). The blue LEDs
on the control panel (5) will then turn on. The appliance gives an audible
signal when a setting is changed via the control panel (5) or the remote
control (11).
3. Press the button for the selection of the speed level (6) to change the
fan speed (levels 1–3). Pressing once increases the speed by one level.
If you would like to increase the speed by another level, press again. The
number of the selected speed level (7) lights up on the front of the unit,
and disappears after 5 seconds.
4. Press the button for the selection of “Natural Breeze” mode (8) for natu-
ral wind conditions. The blue LED beneath the button (8) will now light
up. This mode provides an even more pleasant cooling effect, simulat-
ing a natural breeze. The fan speed of this breeze automatically varies
depending on the selected speed level.

5. By pressing the button for the timer (9) you can set the operating time
for between 1 and 7 hours (for example, 3 h = 1 h and 2 h LEDs lit, 7 h =
1 h, 2 h and 4 h LEDs lit). The selected time is displayed below the timer
button (9) with blue LEDs. Press once to set the operating time to 1 h,
press the button again for 2 h, and so on. The remaining time is indicated
by the illuminated LEDs below the timer button (9). The unit switches
off automatically after the set operating time has elapsed. If no LEDs
are lit below the timer button (9), the unit is set to continuous operation.
6. Activate swing mode by pressing the swing mode button (10). The appli-
ance now swings at an angle of approx. 70° to ensure optimum distribu-
tion of cooling air throughout the room. Press the swing mode button (10)
again if the appliance is to remain at a certain angle.
7. Switch off the appliance by pressing the on/off button (4).
8. The remote control (11) is in the compartment for remote control (12)
on the back of the appliance. It operates via infrared – for this purpose,
point the remote control at the infrared receiver (14) on the front of the
unit. The battery compartment (13) is on the back of the remote control
(11). This can be opened by pushing the cover downwards.
Cleaning
Prior to any maintenance, cleaning and after each use, switch off the appli-
ance and unplug the mains cable (3) from the socket.
Attention: Never submerge the appliance in water (danger of short-circuit).
• For external cleaning, rub with a damp cloth and then dry thoroughly.
• Make sure that the air inlet (16) and air outlet (15) are cleaned regularly
to prevent the build-up of dust. The air outlet (15) can be cleaned with a
dry brush or a vacuum cleaner. The air inlet screen (16) is fitted with an air
filter which can be removed and cleaned with a damp cloth. Remove the
filter by removing the 4 screws on the air inlet screen (16). After cleaning,
ensure that the air filter is completely dry and that the 4 screws are firmly
tightened again.
Repairs
• Repairs to electrical appliances must only be carried out by a qualified
electrical technician. If improper repairs are carried out, the warranty
lapses and all liability is refused.
• Never operate the appliance if the adaptor or plug is damaged, after it has
malfunctioned, if it has been dropped or has been damaged in any other
way (cracks/breaks in the casing).
• Do not push any object into the appliance.
• If the appliance is beyond repair, make it unusable immediately by cutting
through the cable and hand it in at the collection point provided for the
purpose.
Disposal
The European directive 2012 / 19 / CE on Waste Electrical and Electronic
Equipment (WEEE), requires that old household electrical appliances must
not be disposed in the normal unsorted municipal waste stream. Old appli-
ances must be collected separately in order to optimize the recovery and
recycling of the materials they contain and reduce the impact on human

health and the environment. The crossed out “wheeled bin” symbol on the
product reminds you of your obligation, that when you dispose of
the appliance it must be separately collected. Consumers should
contact their local authority or retailer for information concerning
the correct disposal of their old appliance.
Specifications
Rated voltage 220–240 V / 50 Hz
Rated power 36–60 W
Dimensions Housing: 135 x 1’090 mm (diameter x height)
Foot: 249 mm (diameter)
Weight 6.0 kg
Sound level 33–52 dB(A)
Complies with EU
regulations CE / WEEE / RoHS / EAC
All rights for any technical modifications are reserved

Gratulation! Sie haben soeben den aussergewöhnlichen Ventilator PETER
erworben. Er wird Ihnen viel Freude machen und die Raumluft für Sie ver-
bessern.
Wie bei allen elektrischen Haushaltsgeräten wird auch bei diesem Gerät zur
Vermeidung von Verletzungen, Brand- oder Geräteschäden besondere Sorg-
falt verlangt. Bitte studieren Sie die vorliegende Betriebsanleitung vor der
Inbetriebnahme und beachten Sie die Sicherheitshinweise auf dem Gerät.
Gerätebeschreibung
Das Gerät besteht aus den folgenden Hauptkomponenten:
1. Fuss
2. Gehäuse
3. Netzkabel für die Stromversorgung
4. Ein/Aus-Taste
5. Bedienelement
6. Taste für die Wahl der Leistungsstufe: 1–3
7. Anzeige der gewählten Geschwindigkeitsstufe (erlischt nach 5 s)
8. Taste für die Wahl des „Natural Breeze“ (natürliche Brise) Modus
9. Taste für die Wahl der Timer-Funktion 1–7 h
10. Taste für Schwenkfunktion
11. F ernbedienung
12. Fach für Fernbedienung
13. Batteriefach Fernbedienung (Typ CR2032)
14. Infrarot Empfänger
15. Luftaustritt
16. Lufteinlass mit abwaschbarem Filter
1 7. Trag egriff
Wichtige Sicherheitshinweise
Bitte lesen Sie die Gebrauchsanleitung genau durch, bevor Sie das Gerät das
erste Mal in Betrieb nehmen und bewahren Sie sie zum späteren Nachschla-
gen gut auf, geben Sie sie ggf. an den Nachbesitzer weiter.
• Für Schäden, die durch Nichtbeachten dieser Gebrauchsanleitung entste-
hen, lehnt Stadler Form jegliche Haftung ab.
• Das Gerät ist nur im Haushalt für die in dieser Gebrauchsanweisung
beschriebenen Zwecke zu benutzen. Ein nicht bestimmungsgemässer
Gebrauch sowie technische Veränderungen am Gerät können zu Gefahren
für Gesundheit und Leben führen.
• Dieses Gerät kann von Kindern ab 8 Jahren und Personen mit einge-
schränkten körperlichen, sensorischen oder geistigen Fähigkeiten, aber
auch von unerfahrenen und unwissenden Personen verwendet werden,
sofern diese das Gerät unter Aufsicht verwenden oder von einer anderen
Person über die sichere Verwendung des Gerätes unterwiesen wurden
und sich der damit verbundenen Gefahren bewusst sind. Kinder sollten
nicht mit dem Gerät spielen. Kinder sollten das Gerät nur unter Aufsicht
reinigen und pflegen.
• Bewahren Sie keine Verpackungsbestandteile in der Reichweite von Kin-
dern auf.
• Montieren Sie das Gerät gemäss Montageanleitung. Folgen Sie exakt der
Montageanleitung und stellen Sie sicher, dass alle Schrauben fest ange-
zogen sind, um Schäden und Gefahren zu vermeiden.
Deutsch

• Stecken Sie keine Gegenstände in das Gitter des Geräts. Das Gerät wäh-
rend des Betriebs nicht abdecken.
• Stellen Sie sicher, dass das Netzkabel von der Steckdose getrennt ist,
bevor Sie das Schutzgitter entfernen.
• Schliessen Sie das Kabel nur an Wechselstrom an. Achten Sie auf die
Spannungsangaben auf dem Gerät.
• Keine beschädigten Verlängerungskabel verwenden.
• Das Netzkabel nicht über scharfe Kanten ziehen oder einklemmen.
• Den Stecker nie am Netzkabel oder mit nassen Händen aus der Steckdose
ziehen.
• Das Gerät nicht in unmittelbarer Nähe einer Badewanne, einer Dusche
oder eines Schwimmbeckens benutzen (Mindestabstand von 3 m einhal-
ten). Gerät so aufstellen, dass Personen das Gerät von der Badewanne
aus nicht berühren können.
• Gerät nicht in der Nähe einer Wärmequelle aufstellen. Das Netzkabel
keiner direkten Hitzeeinwirkung (wie z.B. heisse Herdplatte, offene
Flammen, heisse Bügelsohle oder Heizöfen) aussetzen. Netzkabel vor Öl
schützen.
• Darauf achten, dass das Gerät beim Betrieb eine gute Standfestigkeit be-
sitzt und nicht über das Netzkabel gestolpert werden kann.
• Das Gerät ist nicht spritzwassergeschützt.
• Das Gerät ist nur zur Verwendung in Innenräumen geeignet.
• Das Gerät nicht im Freien aufbewahren.
• Das Gerät an einem trockenen und für Kinder unzugänglichen Ort aufbe-
wahren (einpacken).
• Wenn das Netzkabel beschädigt ist, muss es vom Hersteller oder in einer
vom Hersteller zugelassenen Werkstatt oder von ähnlich qualifizierten
Personen ersetzt werden, um Gefahren zu vermeiden.
• Vor jeder Wartung, Reinigung und nach jedem Gebrauch das Gerät aus-
schalten und das Netzkabel von der Steckdose trennen.
• Reparaturen an Elektrogeräten dürfen nur von instruierten Fachkräften
durchgeführt werden.
Montage (siehe Seite 2 und 3)
Befestigen Sie den Fuss (1) mit den 4 mitgelieferten Schrauben unten am
Gehäuse (2). Stellen Sie sicher, dass die Schrauben fest angezogen sind.
Inbetriebnahme / Bedienung
1. Stellen Sie Peter an den gewünschten Platz auf einen flachen Unter-
grund. Schliessen Sie das Netzkabel (3) an eine geeignete Steckdose an.
2. Schalten Sie das Gerät ein, indem Sie auf die Ein/Aus-Taste (4) drücken.
Danach leuchten die blauen LEDs auf dem Bedienelement (5). Das Gerät
gibt ein akkustisches Signal, wenn eine Einstellung über das Bedienele-
ment (5) oder mit der Fernbedienung (11) getätigt wird.
3. Drücken Sie die Taste für die Wahl der Leistungsstufe (6), um die Venti-
latorgeschwindigkeit zu verändern (1–3 Stufen). Einmal Drücken erhöht
die Geschwindigkeit um eine Stufe. Wenn Sie die Geschwindigkeit um
eine weitere Stufe erhöhen möchten, drücken Sie nochmals. Auf der
Vorderseite des Geräts leuchtet die Anzahl eingestellter Stufen (7), wel-
che nach 5 Sekunden erlischt.
4. Drücken Sie die Taste „Natural Breeze“ (8) für natürliche Windverhält-
nisse. Die blaue LED unterhalb der Taste (8) leuchtet nun. Dieser Modus

garantiert einen noch angenehmeren Kühleffekt. Dabei wird eine na-
türliche Windbrise simuliert. Die Ventilatorgeschwindigkeit dieser Brise
variiert automatisch je nach eingestellter Leistungsstufe.
5. Durch Drücken der Timer Taste (9) können Sie die Betriebsdauer wahl-
weise von 1–7 h einstellen (z.B. 3 h = LED 1 h + 2 h aktiv / 7h = LED 1 h,
2 h, 4 h aktiv) . Die gewählte Zeitdauer wird unterhalb der Timer Taste
(9) mit blauen LEDs angezeigt. Bei einmaligem Drücken ist 1 h Betriebs-
dauer eingestellt, bei nochmaligem Drücken 2 h Betriebszeit usw. Die
verbleibende Restlaufzeit wird anhand der leuchtenden LEDs unterhalb
der Timer Taste (9) angezeigt. Das Gerät schaltet automatisch aus, nach-
dem die eingestellte Betriebszeit abgelaufen ist. Leuchten keine LEDs
unterhalb der Timer Taste (9), ist das Gerät auf Dauerbetrieb eingestellt.
6. Aktivieren Sie die Schwenkfunktion durch Drücken der Schwenkfunk-
tions-Taste (10). Das Gerät schwenkt nun in einem Winkel von ca. 70°,
um eine optimale Verteilung der kühlenden Luft im Raum zu gewährleis-
ten. Soll das Gerät in einem gewissen Winkel stehen bleiben, drücken
Sie die Schwenkfunktions-Taste (10) erneut.
7. Schalten Sie das Gerät aus, indem Sie auf die Ein/Aus-Taste (4) drücken.
8. Die Fernbedienung (11) befindet sich im Fach (12) auf der Geräterücksei-
te. Diese funktioniert über Infrarot – halten Sie dazu die Fernbedienung
in Richtung des Infrarot Empfängers (14) auf der Vorderseite des Geräts.
Das Batteriefach (13) befindet sich auf der Rückseite der Fernbedienung
(11). Dieses kann geöffnet werden, indem die Abdeckung nach unten
geschoben wird.
Reinigung
Vor jeder Wartung, Reinigung und nach jedem Gebrauch das Gerät ausschal-
ten und das Netzkabel (3) von der Steckdose trennen.
Achtung: Das Gerät nie ins Wasser tauchen (Kurzschlussgefahr).
• Zur äusseren Reinigung mit einem feuchten Lappen abreiben und danach
gut trocknen.
• Darauf achten, dass Lufteinlass (16) und Luftaustritt (15) regelmässig ge-
reinigt werden, um eine Staubansammlung zu vermeiden. Den Luftaustritt
(15) mit einem trockenen Pinsel oder Staubsauger reinigen. Das Luftein-
lassgitter (16) ist mit einem Luftfilter ausgestattet, der abnehmbar ist und
mit einem feuchten Lappen gereinigt werden kann. Entnehmen Sie den
Filter, indem Sie die 4 Schrauben am Lufteinlassgitter (16) entfernen. Stel-
len Sie nach der Reinigung sicher, dass der Luftfilter komplett trocken ist
und die 4 Schrauben wieder fest angezogen sind.
Reparaturen
• Reparaturen an Elektrogeräten (Wechseln des Netzkabels) dürfen nur
von instruierten Fachkräften durchgeführt werden. Bei unsachgemässen
Reparaturen erlischt die Garantie und jegliche Haftung wird abgelehnt.
• Nehmen Sie das Gerät nie in Betrieb, wenn ein Kabel oder Stecker be-
schädigt ist, nach Fehlfunktionen des Gerätes, wenn dieses herunterge-
fallen ist oder auf eine andere Art beschädigt wurde (Risse/Brüche am
Gehäuse).
• Nicht mit irgendwelchen Gegenständen in das Gerät eindringen.
• Ausgedientes Gerät sofort unbrauchbar machen (Netzkabel durchtren-
nen) und bei der dafür vorgesehenen Sammelstelle abgeben.

Entsorgung
Die europäische Richtlinie 2012 / 19 / CE über Elektro- und Elektronik-Alt-
geräte (WEEE) verlangt, dass elektrische Haushaltsgeräte nicht über den
Restmüll oder sonstigen Haushaltsabfall entsorgt werden dürfen, sondern
an Sammelpunkten für das Recycling von elektrischen und elektronischen
Geräten abgegeben werden müssen. So können die Verwertung der enthal-
tenen Materialien optimiert und ihre Auswirkungen auf die menschliche Ge-
sundheit und die Umwelt reduziert werden. Das durchgestrichene
Abfalltonnensymbol auf dem Produkt erinnert Sie an diese Ver-
pflichtung. Bitte fragen Sie bei Ihrer Gemeindeverwaltung nach
der zuständigen Entsorgungsstelle.
Technische Daten
Nennspannung 220–240 V / 50 Hz
Nennleistung 36–60 W
Abmessungen Gehäuse: 135 x 1’090 mm (Durchmesser x Höhe)
Fuss: 249 mm (Durchmesser)
Gewicht 6.0 kg
Schalldruckpegel 33–52 dB(A)
Erfüllt EU-Vorschrift CE / WEEE / RoHS/ EAC
Technische Änderungen vorbehalten

Félicitation ! Vous venez d‘acheter le superbe ventilateur PETER. Nous espé-
rons que cet appareil vous donnera entière satisfaction et améliorera l’air
intérieur pour vous.
Comme pour tous les appareils ménagers électriques, il est important
d‘entretenir cet appareil correctement afin d’éviter les blessures, les incen-
dies ou les dommages. Veuillez lire attentivement le présent mode d’emploi
avant la mise en service et respecter les conseils de sécurité indiqués sur
l’appareil.
Description de l’appareil
L’appareil est composé des éléments principaux suivants :
1. Pied
2. Boîtier
3. Cordon de réseau pour alimentation électrique
4. Interrupteur marche/arrêt
5. Panneau de commande
6. Bouton de sélection du niveau de vitesse : 1 à 3
7. Affichage du niveau de vitesse sélectionnée (disparaît au bout de 5 s)
8. Bouton de sélection du mode «Natural Breeze» (brise naturelle)
9. Bouton de sélection de la fonction de minuterie : 1 à 7 h
10. Bouton pour mode oscillation
11. Té l éc o mm a n de
12. Compartiment pour la télécommande
13. Compartiment des piles de la télécommande (type CR2032)
14. Récepteur infrarouge
15. Sortie d’air
16. Entrée d’air avec filtre à air lavable
17. Poignée de transport
Conseils de sécurité importants
Veuillez lire attentivement le mode d‘emploi avant la première mise en
service de l’appareil et conservez-le pour toute consultation ultérieure ou
remettez-le, le cas échéant, au nouveau propriétaire.
• La société Stadler Form décline toute responsabilité des dommages résul-
tant du non-respect des indications données dans ce mode d‘emploi.
• Cet appareil ne doit être utilisé qu’aux fins domestiques décrites dans ce
mode d‘emploi. Toute utilisation contraire à sa destination ainsi que toute
modification technique apportée à l‘appareil peut entraîner des risques
pour la santé et la vie.
• Cet appareil peut être utilisé par les enfants âgés de 8 ans et plus et
les personnes aux capacités physiques, sensorielles ou mentales réduites
ou ne disposant pas de l’expérience ou de la connaissance nécessaire,
sous surveillance ou s’ils ont reçu les instructions concernant l’utilisation
de l’appareil et s’ils comprennent les dangers impliqués. Les enfants ne
doivent pas jouer avec l’appareil. Les opérations de nettoyage et d’entre-
tien ne doivent pas être effectuées par des enfants sans surveillance.
• Ne laissez jamais les matériaux de l’emballage à la portée des enfants.
• Assemblez l’appareil conformément aux instructions de montage. Pour
éviter tout dommage et danger, suivez strictement les instructions de
montage et veillez à ce que tous les écrous soient bien serrés.
Français

• N’insérez jamais d’objets dans la grille du ventilateur. Ne couvrez pas
l’appareil pendant le fonctionnement.
• Débranchez toujours le cordon d’alimentation de la prise secteur avant de
retirer la grille de protection.
• Ne branchez le câble qu’au courant alternatif. Tenez compte des indica-
tions de tension situées sur l‘appareil.
• Ne pas utiliser de rallonge électrique endommagée.
• Ne pas faire passer ou coincer le câble d’alimentation par-dessus des
arêtes vives.
• Ne jamais retirer la fiche de courant de la prise en tirant sur le câble d’ali-
mentation ou en ayant les mains mouillées.
• Ne pas utiliser l’appareil à proximité immédiate d’une baignoire, d’une
douche ou d’une piscine (respecter une distance minimum de 3 m). Placer
l’appareil de telle façon à ce que personne ne puisse le toucher à partir
de la baignoire.
• Ne pas placer l’appareil à proximité directe d‘ une source de chaleur. Ne
pas exposer le câble d’alimentation à la chaleur (comme p. ex. une plaque
chaude de cuisinière, flammes nues, semelle chaude de fer à repasser ou
poêles). Protéger le câble d’alimentation de tout contact avec de l‘huile.
• Veiller à ce que l’appareil ait une bonne stabilité lors de son fonctionne-
ment et que l’on ne puisse pas trébucher sur le câble d’alimentation.
• Cet appareil n’est pas protégé contre les projections d’eau.
• Pour usage intérieur uniquement.
• L’appareil ne doit pas être conservé à l’extérieur.
• Conserver l’appareil à un endroit sec et hors de portée des enfants (l’em-
baller).
• Pour éviter tout danger, faites remplacer le cordon d‘alimentation endom-
magé par le fabricant, un agent agréé ou une personne qualifiée.
• Les réparations sur les appareils électriques ne doivent être effectuées
que par des électriciens qualifiés.
Montage (voir page 2 et 3)
Attachez le pied(1) sur la partie inférieure du boîtier (2) avec les 4 vis four-
nies. Assurez-vous que les vis sont bien serrées.
Mise en marche / utilisation
1. Posez Peter à l’endroit souhaité, sur un sol plat. Connectez le câble d’ali-
mentation (3) à une prise de courant adéquate.
2. Mettez en marche l’appareil en appuyant sur l’interrupteur marche/arrêt
(4). Les DEL bleues sur le panneau de commande (5) vont ensuite s’allu-
mer. L’appareil émet un signal sonore lorsque vous modifiez un réglage
via le panneau de commande (5) ou la télécommande (11).
3. Appuyez sur le bouton pour sélectionner le niveau de vitesse (6) et modi-
fier la vitesse du ventilateur (niveaux 1 à 3). Appuyer une fois augmente
la vitesse d’un niveau. Si vous souhaitez passer à une vitesse supérieure,
appuyez de nouveau. Le chiffre du niveau de vitesse sélectionnée (7) est
affiché par une lumière sur la face avant de l’appareil, qui disparaît au
bout de 5 secondes.
4. Appuyez sur le bouton pour sélectionner le mode «Natural Breeze» (8)
pour obtenir des conditions de ventilation naturelles. La DEL bleue sous
le bouton (8) va maintenant s’allumer. Ce mode permet d’avoir un effet
de refroidissement encore plus agréable, tout en simulant une brise na-

turelle. La vitesse du ventilateur de cette brise varie automatiquement
en fonction du niveau de vitesse sélectionnée.
5. En appuyant sur le bouton du minuteur (9), vous pouvez régler les
heures de fonctionnement entre 1 et 7 heures (par exemple, 3 h = 1 h
et 2 h de DEL allumées, 7 h = 1 h, 2 h et 4 h de DEL allumées). La durée
sélectionnée s’affiche au-dessus du bouton (9) du minuteur avec des DEL
bleues. Appuyez une fois pour régler la durée de fonctionnement sur 1 h ;
appuyez de nouveau sur le bouton pour 2 h, et ainsi de suite. La durée
restante est indiquée par des DEL allumées en-dessous du bouton du
minuteur (9). L’appareil s’éteint automatiquement après l’écoulement de
la durée de fonctionnement réglée. Si aucune DEL n’est allumée en-des-
sous du minuteur (9), l’appareil est réglé sur un fonctionnement continu.
6. Activer le mode oscillation en appuyant sur le bouton «mode oscillation»
(10). L’appareil bascule à présent à un angle d’environ 70° pour garan-
tir une distribution optimale de l’air de refroidissement dans la pièce.
Appuyez à nouveau sur le bouton «mode oscillation» (10) si l’appareil doit
rester à un certain angle.
7. Puis mettez l’appareil en marche en appuyant sur l’interrupteur marche/
arrêt (4).
8. La télécommande (11) se trouve dans le compartiment de télécommande
(12) à l’arrière de l’appareil. Elle fonctionne par infrarouge – à cet effet,
pointez la télécommande vers le récepteur infrarouge (14) sur la face
avant de l’appareil. Le compartiment des piles (13) se trouve à l’arrière
de la télécommande (11). Vous pouvez l’ouvrir en poussant le couvercle
vers le bas.
Nettoyage
Avant toute opération d’entretien, de nettoyage et après chaque utilisation,
éteignez l’appareil et débranchez le cordon d’alimentation (3) de la prise.
Attention : Ne jamais plonger l’appareil dans l’eau (risque de court-circuit).
• Pour le nettoyage extérieur, utilisez un chiffon humide et séchez bien
l‘appareil.
• Veillez à ce que l’entrée d’air (16) et la sortie d’air (15) soient régulière-
ment nettoyées pour éviter l’accumulation de poussière. La sortie d’air
(15) peut être nettoyée à l’aide d’une brosse sèche ou d’un aspirateur.
L’écran d’entrée d’air (16) est équipé d’un filtre à air qui peut être retiré et
nettoyé avec un chiffon humide. Retirez le filtre en enlevant les 4 vis sur
l’écran d’entrée d’air (16). Après le nettoyage, assurez-vous que le filtre à
air est complètement sec et que vous avez bien resserrez les 4 vis.
Réparations
• Les réparations sur les appareils électriques ne doivent être effectuées
que par des électriciens qualifiés. La garantie s’éteint et toute responsa-
bilité est exclue en cas de réparations non conformes aux règles de l‘art.
• Ne mettez jamais l‘appareil en service en cas d’endommagement d’un
cordon ou d’une fiche, après un dysfonctionnement de l’appareil causé
par une chute ou par une autre détérioration de l’appareil (boîtier fissuré/
cassé).
• Ne pas pénétrer avec des objets quelconques dans l’appareil.
• Arrivé au bout de sa durée de vie, l’appareil doit immédiatement être
rendu inutilisable (sectionner le d’alimentation) et être déposé dans une
déchetterie prévue à cet effet.

Elimination
Conformément à la directive européenne 2012 / 19 / EC sur la mise au
rebut des déchets d’équipements électriques et électroniques (DEEE), les
appareils ménagers usés ne doivent pas être jetés avec les déchets non
triés. Ces appareils usés doivent être collectés séparément des déchets
ménagers pour optimiser la récupération et le recyclage de leurs compo-
sants dans le but de réduire les effets négatifs sur la santé humaine et sur
l’environnement. Le symbole de poubelle avec roulettes et croix indique que
ces produits doivent être collectés et mis au rebut séparément
des ordures ménagères. Les consommateurs doivent contacter les
autorités locales ou leurs revendeurs concernant la mise au rebut
de leurs vieux appareils.
Caractéristiques techniques
Tension nominale 220–240 V / 50 Hz
Puissance nominale 36–60 W
Dimensions Boîtier : 135 x 1’090 mm (diamètre x hauteur)
Pied : 249 mm (diamètre)
Poids 6.0 kg
Niveau de bruit 33–52 dB(A)
Conforme à la
réglementation UE CE / DEEE / RoHS / EAC
Sous réserve de modifications techniques

Congratulazioni! Avete appena acquistato il fantastico ventilatore PETER.
Sarà estremamente piacevole e migliorerà l’aria nell’ambiente per voi.
Come con tutte le apparecchiature elettriche domestiche, è necessaria par-
ticolare attenzione anche con questo modello, al fine di evitare infortuni,
danni da incendio o danni al dispositivo. Studiare con attenzione queste
istruzioni per l’uso prima di utilizzare il dispositivo per la prima volta e segui-
re tutte le istruzioni di sicurezza fornite con esso.
Descrizione dell’apparecchio
L’apparecchio consiste delle seguenti componenti principali:
1. Base
2. Alloggiamento
3. Cavo di alimentazione elettrica
4. Tasto di accensione/spegnimento
5. Pannello di controllo
6. Tasto selezione del livello di velocità: 1–3
7. Schermata del livello di velocità selezionata (scompare dopo 5 s)
8. Tasto selezione della modalità „Natural Breeze“ (Brezza Naturale)
9. Tasto selezione della funzione timer: 1–7 h
10. Tasto modalità oscillazione
11. Te l ec o ma n d o
12. Vano telecomando
13. Vano batteria telecomando (tipologia CR2032)
14. Ricevitore a infrarossi
15. Scarico aria
16. Presa d’aria con filtro dell’aria lavabile
17. Maniglia di trasporto
Importanti istruzioni di sicurezza
Prima di utilizzare l’apparecchio leggere attentamente le istruzioni per l’uso.
Dopo aver letto le istruzioni per l’uso, conservarle con cura per la futura
consultazione.
• La Stadler Form respinge ogni responsabilità per la perdita o danni che
incorrano come risultato di un mancato rispetto di queste istruzioni d’uso.
• L’apparecchio dev’essere usato solo in casa e per gli scopi descritti in
queste istruzioni. L’uso non autorizzato e le modifiche tecniche all’appa-
recchio possono portare a pericoli per la vita e la salute.
• Questo apparecchio può essere utilizzato da bambini di età superiore agli
8 anni e persone con ridotte capacità mentali, fisiche o sensoriali o prive
di esperienza e conoscenze in merito, in presenza di altre persone che
ne sorveglino l’operato o ricevano istruzioni sull’uso dell’apparecchio in
modo sicuro e ne comprendano i pericoli. I bambini non devono giocare
con l’apparecchio. Pulizia e manutenzione non deve essere effettuata da
bambini senza supervisione.
• Non lasciare mai alcuna parte dell’imballaggio alla portata dei bambini.
• Montare il dispositivo secondo le istruzioni per il montaggio. Seguire
esattamente le istruzioni per il montaggio e assicurare che tutte le viti
siano strette fermamente per evitare danni e pericoli.
• Non inserire oggetti nella griglia della ventilatore. Non coprire il dispositi-
vo durante il funzionamento.
Italiano

• Scollegare sempre il cavo di alimentazione dalla presa prima di rimuovere
la griglia di protezione.
• Collegate il cavo solo alla corrente alternata. Rispettate le informazioni
sul voltaggio riportate sull’apparecchio.
• Non utilizzate prolunghe danneggiate.
• Non fate scorrere il cavo su bordi taglienti ed assicuratevi che non riman-
ga incastrato.
• Non tirate il cavo dalla presa con mani umide o afferrando il cavo stesso.
• Non utilizzate questo apparecchio nelle immediate vicinanze di una vasca,
una doccia o una piscina (rispettate una distanza minima di 3 m). Posizio-
nate l’apparecchio in modo che una persona dentro la vasca non possa
toccare l’apparecchio.
• Non posizionate l’apparecchio vicino ad una sorgente di calore. Non sot-
toponete il cavo di alimentazione al calore diretto (come piastre, fiamme
libere, ferri da stiro caldi o caloriferi per esempio). Proteggete i cavi di
alimentazione dall’olio.
• Fate in modo che l’apparecchio sia posizionato appropriatamente per as-
sicurare una buona stabilità durante il suo funzionamento ed assicuratevi
che nessuno possa inciampare sul cavo.
• L’apparecchio non è impermeabilizzato.
• Solo per uso interno.
• Non conservare questo apparecchio all’esterno.
• Riponete l’apparecchio in un luogo asciutto inaccessibile ai bambini (ri-
mettete l’apparecchio nella confezione).
• Se il cavo è danneggiato, farlo sostituire da un produttore, dall’assistenza
o da personale qualificato per evitare pericoli.
• Prima di effettuare interventi di manutenzione, pulizia e dopo ogni utilizzo,
spegnere il dispositivo e scollegare il cavo di alimentazione dalla presa
di corrente.
• Le riparazioni agli apparecchi elettrici devono essere effettuate solo da
tecnici elettricisti qualificati.
Montaggio (si veda pag. 2 e 3)
Unite la base (1) alla parte inferiore dell’alloggiamento (2) con le 4 viti in
dotazione. Assicuratevi che le viti siano serrate saldamente.
Impostazione / Utilizzo
1. Posizionate Peter nell’area desiderata su una superficie piana. Collegate
il cavo d’alimentazione (3) a una presa di corrente adeguata.
2. Accendete l’apparecchio premendo il tasto on/off (accensione/spegni-
mento) (4). Il LED di colore blu sul pannello di controllo (5) si accenderà.
L’apparecchio emette un segnale acustico quando si modifica un’impo-
stazione tramite il pannello di controllo (5) o il telecomando (11).
3. Premete il tasto per la selezione del livello di velocità (6) per modificare
la velocità del ventilatore (livelli 1–3). Premendo una volta si aumenta
la velocità di un livello. Se desiderate aumentare la velocità di un altro
livello, premete di nuovo. Il numero del livello di velocità selezionato (7)
si illumina sulla parte anteriore dell’unità e scompare dopo 5 secondi.
4. Premete il tasto per la selezione della modalità „Natural Breeze“ (8) che
permette di simulare le condizioni di ventosità naturali. Il LED blu sotto
il tasto (8) si illuminerà. Questa modalità fornisce un effetto di raffred-
damento molto piacevole simulando una brezza naturale. La velocità di

questa brezza varia automaticamente a seconda del livello di velocità
selezionato.
5. Premendo il tasto per il timer (9) potete impostare il tempo di funziona-
mento compreso tra 1 ora e 7 ore (ad esempio, 3 h = 1 h e 2 h di accensio-
ne LED, 7 h = 1 h, 2 h e 4 h accensione LED). Il tempo di funzionamento è
visualizzato sotto il tasto timer (9) con un LED di colore blu. Premete una
volta per impostare il tempo di funzionamento ad un’ora, premete nuo-
vamente per impostare il tempo di funzionamento a due ore e così via.
Il tempo rimanente è indicato dal LED illuminato sotto il tasto timer (9).
L’unità si spegne automaticamente dopo che il tempo di funzionamento
impostato è scaduto. Se nessun LED è acceso sotto il timer (9), l’unità è
impostata in modalità di funzionamento continuo.
6. Attivate la modalità d’oscillazione premendo il tasto modalità d’oscilla-
zione (10). L’apparecchio ora oscilla con un angolo approssimativo di 70°
per garantire una distribuzione ottimale del flusso d’aria raffreddata in
tutta la stanza. Premete ancora il tasto modalità d’oscillazione (10) se
desiderate che l’apparecchio rimanga in una angolazione determinata.
7. Spegnete l’apparecchio premendo il tasto on/off (accensione/spegni-
mento) (4).
8. Il telecomando (11) è posizionato nel suo vano (12) nella parte posteriore
dell’apparecchio. Funziona tramite raggi infrarossi – a tale scopo, pun-
tate il telecomando in direzione del ricevitore a infrarossi (14) situato
nella parte anteriore dell’unità. Il vano della batteria (13) è situato nella
parte posteriore del telecomando (11). Per aprirlo, premete il coperchio
verso il basso.
Pulizia
Prima di effettuare interventi di manutenzione, pulizia e dopo ogni utilizzo,
spegnere il dispositivo e scollegare il cavo di alimentazione (3) dalla presa
di corrente.
Attenzione: Non immergete mai l’unità in acqua (pericolo di corto circuito).
• Per pulire l’esterno, passatelo con un panno umido e quindi asciugatelo
bene.
• Assicuratevi che la presa d’aria (16) e lo scarico dell’aria (15) siano puliti
regolarmente per prevenire l’accumulo di polvere. Lo scarico dell’aria (15)
può essere pulito utilizzando uno spazzolino asciutto o un aspirapolvere.
La griglia della presa d’aria (16) è dotata di un filtro d’aria apposito che può
essere rimosso e pulito con un panno umido. Rimuovete il filtro svitando
le 4 viti della griglia posizionata sulla presa d’aria (16). Dopo aver pulito il
filtro, assicuratevi che il filtro d’aria sia completamente asciutto e che le
4 viti siano nuovamente serrate saldamente.
Riparazione
• Le riparazioni agli apparecchi elettrici devono essere effettuate solo da
tecnici elettricisti qualificati. Se vengono effettuate riparazioni improprie,
la garanzia viene annullata e tutte le responsabilità sono rifiutate.
• Non utilizzate mai l’apparecchio se l’alimentatore o la spina sono dan-
neggiati, dopo un malfunzionamento, se è stato fatto cadere o è stato
danneggiato in qualunque altro modo (rotture/crepe nell’involucro).
• Non spingete oggetti nell’apparecchio.
• Se l’apparecchio è irreparabile, rendetelo inutilizzabile immediatamente e
consegnatelo al punto di raccolta appropriato.

Smaltimento
La Direttiva Europea 2012 / 19 / CE sullo Smaltimento dei rifiuti elettrici
ed elettronici (WEEE) prevede che i dispositivi elettrici domestici usati non
devono essere smaltiti nelle discariche municipali di rifiuti indifferenziati. I
dispositivi usati devono essere raccolti separatamente in modo da ottimiz-
zare il recupero e il riciclaggio dei materiali in essi contenuti e ridurre l’im-
patto sulla salute e sull’ambiente. Il simbolo del “cestino con ruote” barrato
sul prodotto ricorda l’obbligo di smaltire il dispositivo mediante
raccolta differenziata. I consumatori devono contattare le autorità
locali o il rivenditore per informazioni relative al corretto smalti-
mento di dispositivi usati.
Specifiche
Tensione nominale 220–240 V / 50 Hz
Potenza assorbita 36–60 W
Dimensioni Alloggiamento: 135 x 1’090 mm (diametro x altezza)
Base: 249 mm (diametro)
Peso 6.0 kg
Rumorosità 33–52 dB(A)
Conforme con i
regolamenti UE CE / WEEE / RoHS / EAC
Tutti i diritti relativi a qualsiasi modifica tecnica sono riservati
La pagina si sta caricando...
La pagina si sta caricando...
La pagina si sta caricando...
La pagina si sta caricando...
La pagina si sta caricando...
La pagina si sta caricando...
La pagina si sta caricando...
La pagina si sta caricando...
La pagina si sta caricando...
La pagina si sta caricando...
La pagina si sta caricando...
La pagina si sta caricando...
La pagina si sta caricando...
La pagina si sta caricando...
La pagina si sta caricando...
La pagina si sta caricando...
La pagina si sta caricando...
La pagina si sta caricando...
La pagina si sta caricando...
La pagina si sta caricando...
La pagina si sta caricando...
La pagina si sta caricando...
La pagina si sta caricando...
La pagina si sta caricando...
La pagina si sta caricando...
La pagina si sta caricando...
La pagina si sta caricando...
La pagina si sta caricando...
La pagina si sta caricando...
La pagina si sta caricando...
La pagina si sta caricando...
La pagina si sta caricando...
-
 1
1
-
 2
2
-
 3
3
-
 4
4
-
 5
5
-
 6
6
-
 7
7
-
 8
8
-
 9
9
-
 10
10
-
 11
11
-
 12
12
-
 13
13
-
 14
14
-
 15
15
-
 16
16
-
 17
17
-
 18
18
-
 19
19
-
 20
20
-
 21
21
-
 22
22
-
 23
23
-
 24
24
-
 25
25
-
 26
26
-
 27
27
-
 28
28
-
 29
29
-
 30
30
-
 31
31
-
 32
32
-
 33
33
-
 34
34
-
 35
35
-
 36
36
-
 37
37
-
 38
38
-
 39
39
-
 40
40
-
 41
41
-
 42
42
-
 43
43
-
 44
44
-
 45
45
-
 46
46
-
 47
47
-
 48
48
-
 49
49
-
 50
50
-
 51
51
-
 52
52


Stadler Form Peter Manuale utente
- Tipo
- Manuale utente
- Questo manuale è adatto anche per
in altre lingue
- français: Stadler Form Peter Manuel utilisateur
- español: Stadler Form Peter Manual de usuario
- Deutsch: Stadler Form Peter Benutzerhandbuch
- Nederlands: Stadler Form Peter Handleiding
- dansk: Stadler Form Peter Brugermanual
- svenska: Stadler Form Peter Användarmanual
Documenti correlati
-
Wilfa Peter Manuale del proprietario
-
Stadler Form Peter little Manuale utente
-
Stadler Form Q Manuale utente
-
-
-
-
Stadler Form Charly little Manuale utente
-
-
Wilfa CHARLY Manuale del proprietario