Franke Swing Spray Manuale utente
- Categoria
- Rubinetti
- Tipo
- Manuale utente

Franke Portugal S.A.
+35 / 121 426 9670
www.franke.pt
Franke Polska Sp. z o.o.
+48 / 22 / 711 6700
www.franke.pl
Franke Romania SRL
+40 / 21 / 350 1550
www.franke.ro
Franke Russia GmbH
www.franke.ru
+ 7 / 812 / 324 12 84
Franke Ramnaes AB
+46 / 220 / 220 50
www.franke.se
Franke Singapore Prviate Limited
+65 / 627 / 66898
www.franke.com.sg
+66 / 2 / 236 9777
www.franke.co.th
Franke Thailand Co. Ltd.
Franke Tunisia SARL
+216 / 71 / 700 430
www.franke.com
Franke Mutfak ve Banyo Sistemleri Sanayi Ticaret A.S.
+90 / 262 / 644 65 95
www.franke.com.tr
+38 / (0) 44 / 492 0015
www.franke.ua
Franke Ukraina LLC
Franke Consumer Products Inc.
+1 / 215 / 822 6590
www.frankeconsumerproducts.com
+7 / 3272 / 501 149
www.franke.com
Franke Kazakhstan Ltd.
+27 / 31 / 450 6301
www.franke.co.za
Franke Kitchen Systems (Pty) Ltd.
+43 / 1699 / 2002
www.franke.at
Franke GmbH
A
P
PL
RO
RUS
S
SGP
THA
TN
TR
UA
USA
KAZ
ZA
MA
NL
N
AUS
Franke Australia Pty Ltd
+61 / 3 / 9535 2000
www.franke.com.au
B
Franke N.V.
+32 / 54 / 310 111
www.franke.be
BG
+359 / 2 / 963 0130
www.franke.bg
Franke Bulgaria Ltd.
BR
Franke Sistemas de Cozinhas Ltda.
+55 / 47 / 3431 0500
www.franke.com.br
CZ
Franke s.r.o.
+42 / 02 / 810 904 11
www.franke.cz
CN
Franke China Kitchen System Co. Ltd.
+86 / 750 / 841 9288
www.franke.com.cn
CH
Franke Küchentechnik AG
+41 / 62 / 787 3131
www.kt.franke.ch
CDN
Franke Kindred Canada Limited
+1 / 705 / 526 5427
www.frankekindred.com
DK
Franke Danmark A/S
+45 / 86 / 249 024
www.frankedanmark.dk
D
Franke GmbH
+49 / 7761 / 520
www.franke.de
F
Franke France S.A.S.
+33 / (0) 130 / 289 400
www.franke.fr
E
Franke Espana S.A.U.
+34 / 93 / 565 3535
www.franke.es
FIN
+358 / 15 / 34 11-1
www.franke.fi
Franke Finland Oy
ET
+202 / 418 7757
www.franke.com
Nile Metallic Industries Co.
GR
+30 / 2299 / 040 100
www.franke.gr
Franke Hellas S.A.
H
+36 / 1 / 347 3600
www.franke.hu
Franke Kft.
GB
+44 / 161 / 436 6280
www.franke.co.uk
Franke UK Ltd.
HK
+86 / 750 / 885 5288
www.franke.com.hk
Franke Hong Kong Company Ltd.
I
+39 / 045 / 644 9311
www.franke.it
Franke S.p.A.
GE
+995 / 32 / 913 172
www.franke.ge
Franke Caucasus Ltd.
IND
+91 / 22 / 2491 9557
www.franke.co.in
Franke India Pvt. Ltd.
+212 / 22 / 674 200
www.franke.com
Franke Kitchen System SARL
+31 / 492 /585 111
www.franke.nl
Franke Roestvrijstaal Nederland B.V.
+47 / 35 / 566 450
www.franke-norge.no
Franke Norge A/S
Top_Clip_print.prn
D:\out\Top_Clip_ges.cdr
Donnerstag, 18. Mai 2006 10:44:01
Farbprofil: Generisches CMYK-Druckerprofil
Komposit Standardbildschirm
SWINGSPRAY
FUN-NR. 115.0155.644 chrome
Franke UK Ltd
West Park, MIOC
Styal Road - Manchester M22 5WB
Tel: +44 (0)161 436 6280
Fax: +44 (0)161 436 2180
www.franke.co.uk

INSTRUCTIONS FOR ASSEMBLING
AND SERVICING
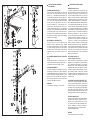
ASSEMBLY INSTRUCTIONS (Fig.1)
Place the o-ring (21) under the body of the tap (20) and
insert tap into sink tap hole. Introduce nut (22.2) and
washers (22.1) to the underside and hand tighten. NB
if more stability is required, also utilise tap support (23)
between the sink and the nuts. Connect the flexible pipes
(27) to the hot and cold water threaded inlets, ensuring
that the cold is on the right and the hot is on the left.
Connect the handspray (17) to the flexible pipe (15),
ensuring that the o-rings (16) and check valve (17.1) are
in place, and connect the spray hose to the pipe leading
from the tap. Fix the counter weight (24) in a suitable place
to ensure that the pull-out hose can be returned. Check
all connections before operating the tap, and ensure that
the sprayhead is operating correctly and automatically
shutting off the water supply.
REPLACEMENT OF CARTRIDGE (Fig.2)
To remove the lever (3), flick out the indicator (1) and
unscrew the screw (2), and unscrew cap (4), revealing
nut (5) which should be undone to remove the cartridge
(6). After the cartridge is replaced, follow this sequence
in reverse order. Also ensure that all the parts are fully
tightened to ensure a seal, and ease of operation of the
lever.
REPLACEMENT AND MAINTENCE OF THE AERATOR
(Fig.1)
Regularly clean the aerator so that the flow rate is not
restricted. Unscrew (18.2) and cleanout the filter (18.1) of
any impurities. Reverse the procedure to replace.
CARE AND MAINTENANCE
To maintain the appearance of this fitting, ensure it is only
cleaned using a soft damp cloth. A solution of warm water
and mild liquid detergent may be used where necessary,
and the fitting rinsed thoroughly. Abrasive or acidic
cleaners must not be used under any circumstances.
Avoid contact with all solvents. Failure to observe these
instructions will invalidate the warranty.
WARRANTY
5 year warranty on moving parts, 1 year on finish.
ISTRUZIONI PER L’INSTALLAZIONE
MONTAGGIO LAVELLO (Fig.1)
Posizionare la guarnizione (21) sul gambo filettato (20)
ed inserire il rubinetto nel foro del lavello. Infilare la guar-
nizione (22) e la flangia (22.1) sul gambo filettato (20)
poi fissare il rubinetto tramite il dado (22.2). Qualora si
ritenesse necessario aumentare la stabilità del rubinet-
to utilizzare la flangia (23) tra guarnizione (22) e lavello.
Collegare i tubetti di alimentazione (27): il sinistro all’ero-
gazione dell’acqua calda ed il tubetto di alimentazione de-
stro all’erogazione dell’acqua fredda, dopo aver montato
su di essi i niples (28) comprensivi di valvole di non ritorno
(29). Collegare il flessibile della doccia (15) al flessibile di
uscita del rubinetto (26) inserendo la guarnizione (25), poi
collegare la doccetta (17) all’estremità del flessibile (15)
interponendo la guarnizione (16), dopo aver verificato il
corretto posizionamento della valvola di non ritorno (17.1).
Ultimare l’installazione collegando il contrappeso (24)
garantendo una corsa sufficiente per l’estrazione del-
la doccetta (17). Verificare il corretto funzionamento del
rubinetto azionando la maniglia (3), verificare poi quello
della doccetta: aprendo l’acqua il getto esce dall’aerato-
re, agendo sulla parte frontale della doccetta (17) il getto
viene commutato nella doccia; ritornando ad agire sulla
stessa parte, il getto torna nella posizione aeratore. Alla
chiusura dell’erogazione il getto viene automaticamente
deviato in posizione aeratore.
SOSTITUZIONE CARTUCCIA
(chiudere l’impianto idrico) (Fig.2)
Estrarre la placchetta (1), allentare il grano (2) e togliere la
maniglia (3); svitare il cappuccio (4) e la ghiera di serrag-
gio (5), quindi estrarre la cartuccia (6). Per il montaggio,
procedere in senso inverso facendo particolare attenzio-
ne alla pulizia delle superfici dove agiscono le guarnizio-
ni di tenuta. Chiudere la ghiera di serraggio (5) in modo
tale da garantire la tenuta e al tempo stesso consentire
un morbido movimento della maniglia. Durante la fase di
montaggio assicurarsi che l’anello antifrizione (12) sia in
posizione corretta.
SOSTITUZIONE O PULIZIA DELL’AERATORE (Fig.1)
E’ buona norma procedere alla pulizia periodica dell’ae-
ratore per evitare l’accumulo di detriti e calcare che con
il passare del tempo, sono causa di una graduale diminu-
zione della portata. Per procedere allo smontaggio dell’ae-
ratore svitare la ghiera (18.2) e pulire il filtro (18.1) dalle
impurità. Rimontare procedendo nel senso inverso assicu-
randosi di posizionare correttamente la guarnizione (18).
PULIZIA DEL MISCELATORE
Superfici: le superfici cromate sono sensibili a detergenti
anti-calcare, acidi o abrasivi. Le superfici colorate sono
verniciate con una speciale laccatura a fuoco e non de-
vono essere in nessun caso pulite con detergenti acidi,
abrasivi o contenenti alcool. Pulire solo con acqua e un
panno morbido. Qualora non si osservassero queste
istruzioni decadrebbero i diritti.
GARANZIA
5 anni sulle parti mobili, un anno sulla finitura.
GB
Fig.1
Fig.2
I
-
 1
1
-
 2
2


Franke Swing Spray Manuale utente
- Categoria
- Rubinetti
- Tipo
- Manuale utente
in altre lingue
- English: Franke Swing Spray User manual