Indesit CAA 55 Guida utente

Categoria
Frigo-congelatori
Tipo
Guida utente
I
Istruzioni per l’uso
COMBINATO FRIGORIFERO/CONGELATORE
CAA 55
Sommario
Installazione, 2-3
Posizionamento e collegamento
Reversibilità apertura porte
Descrizione dell’apparecchio, 4
Vista d’insieme
Avvio e utilizzo, 5-6
Avviare l’apparecchio
Utilizzare al meglio il frigorifero
Utilizzare al meglio il congelatore
Manutenzione e cura, 7
Escludere la corrente elettrica
Pulire l’apparecchio
Evitare muffe e cattivi odori
Sbrinare l’apparecchio
Sostituire la lampadina
Precauzioni e consigli, 8
Sicurezza generale
Smaltimento
Risparmiare e rispettare l’ambiente
Anomalie e rimedi, 9
Assistenza, 10
Assistenza attiva 7 giorni su 7
Italiano, 1 English, 11
GBI
Portuges, 41
P
Espanol, 31
E

RO


PL

HU

CZ
Français, 21
F
Deutsch
, 91
D
2
I
Installazione
! È importante conservare questo libretto per poterlo
consultare in ogni momento. In caso di vendita,
di cessione o di trasloco, assicurarsi che resti insieme
all’apparecchio per informare il nuovo proprietario
sul funzionamento e sui relativi avvertimenti.
!
Leggere attentamente le istruzioni: ci sono importanti
informazioni sull’installazione, sull’uso e sulla sicurezza.
Posizionamento e collegamento
Posizionamento
1. Posizionare l’apparecchio in un ambiente ben aerato
e non umido.
2. Non ostruire le griglie posteriori di ventilazione:
compressore e condensatore emettono calore e
richiedono una buona aerazione per funzionare bene
e contenere i consumi elettrici.
3. Lasciare una distanza di almeno 10 cm tra la parte
superiore dell’apparecchio ed eventuali mobili
sovrastanti e di almeno 5 cm tra le fiancate e mobili/
pareti laterali.
4. Lasciare l’apparecchio lontano da fonti di calore (la
luce solare diretta, una cucina elettrica).
5. Per mantenere una ottimale distanza del prodotto
dalla parete posteriore, montare i distanzieri presenti
nel kit di installazione seguendo le istruzioni presenti
sul foglio dedicato.
Livellamento
1. Installare l’apparecchio su un pavimento piano e
rigido.
2. Se il pavimento non fosse perfettamente orizzontale,
compensare svitando o avvitando l’unico piedino di
regolazione anteriore.
Collegamento elettrico
Dopo il trasporto, posizionare l’apparecchio
verticalmente e attendere almeno 3 ore prima di
collegarlo all’impianto elettrico. Prima di inserire la spina
nella presa della corrente, accertarsi che:
la presa abbia la messa a terra e sia a norma di
legge;
la presa sia in grado di sopportare il carico massimo
di potenza della macchina, indicato nella targhetta
caratteristiche posta nel vano frigorifero in basso a
sinistra (es 150 W);
la tensione di alimentazione sia compresa nei valori
indicati nella targhetta caratteristiche, posta in basso
a sinistra (es 220-240 V);
la presa sia compatibile con la spina
dell’apparecchio. In caso contrario richiedere la
sostituzione della spina a un tecnico autorizzato (
vedi
Assistenza
); non usare prolunghe e multiple.
! Ad apparecchio installato, il cavo elettrico e la presa
della corrente devono essere facilmente raggiungibili.
! Il cavo non deve subire piegature o compressioni.
! Il cavo deve essere controllato periodicamente e
sostituito solo da tecnici autorizzati (vedi Assistenza).
! L’azienda declina ogni responsabilità qualora
queste norme non vengano rispettate.
I
3
Reversibilità apertura porte
Attenzione: prima di provare a rimuovere le porte, spegnere l’alimentatore e staccare la spina di rete.
Nell’eseguire questa operazione, è consigliabile rimuovere qualunque elemento/accessorio sfuso dall’interno
dell’apparecchio e inserire gli alimenti in contenitori isolati.
Potrebbe essere necessaria assistenza per poggiare con attenzione la parte posteriore dell’apparecchio su materiali
protettivi idonei (ad esempio, l’imballaggio originale).
Rimozione delle porte
1. Poggiare l’apparecchio sulla parte posteriore.
2. Svitare, estrarre e conservare la cerniera inferiore.
3. Aprire leggermente la porta inferiore e farla scivolare verso il basso; rimuoverla e appoggiarla attentamente da un lato.
4. Rimuovere la cerniera centrale e il distanziale, se presente. Aprire leggermente la porta superiore e farla scivolare
verso il basso; rimuoverla e appoggiarla attentamente da un lato.
5. Svitare e rimuovere dal mobile la copertura anteriore superiore.
6. Svitare e rimuovere il perno d’incernieramento e il bullone dalla parte destra in alto e reinserirli all’interno del foro dalla
parte sinistra.
Riposizionare la copertura
anteriore superiore.
7. Usare uno strumento sottile
e smussato per rimuovere
dalle porte le boccole delle
cerniere superiori ed
inferiori e gli sbozzatori,
facendo attenzione a non
rigare la maniglia.
Riposizionare gli sbozzatori
e le boccole nel lato
opposto.
8. Inserire gli sbozzatori in
dotazione all’interno dei
due fori d’incernieramento
centrali dal lato destro.
Riposizionamento delle porte
1. Far scivolare la porta superiore verso l’alto e inserire il perno d’incernieramento superiore all’interno della boccola della
porta. Riposizionare la cerniera centrale nel lato opposto.
2. Far scivolare attentamente verso l’altro
la porta inferiore all’interno del perno
d’incernieramento centrale.
3. Svitare il perno d’incernieramento
inferiore e riposizionarlo nel lato
opposto.
4. Fissare la cerniera inferiore
assicurandosi che la porta sia
allineata al mobile.
5. Mettere attentamente l’apparecchio in
posizione verticale nel punto richiesto
e assicurarsi che sia bene in piano.
Aprire e chiudere le porte per
controllare che la guarnizione
garantisca un’adeguata tenuta senza
fessure quando le porte sono chiuse.
NOTA: reinserire gli elementi/accessori sfusi nell’apparecchio e aspettare almeno 15 minuti prima di riaccendere.
1
3
4
6
5
2
7
8
2
3
1
4
I
Descrizione
dell’apparecchio
Vista d’insieme
Le istruzioni sull’uso valgono per diversi modelli per cui è possibile che la figura presenti particolari differenti rispetto a
quelli dell’apparecchio acquistato. La descrizione degli oggetti più complessi si trova nelle pagine seguenti.
Manopola
REGOLAZIONE
DELLA
TEMPERATURA
RIPIANO•
Cassetto
FRUTTA e
VERDURA
Vano
CONGELAMENTO e
CONSERVAZIONE
Vano
CONSERVAZIONE
Bacinella
GHIACCIO
Balconcino estraibile
con coperchio con
PORTAUOVA
*
Balconcino estraibile
PORTAOGGETTI
Balconcino
BOTTIGLIE
Scomparto
BOTTIGLIA da 2
LITRI
PIEDINO
di regolazione
Esiste un solo piedino di regolazione.
Variabili per numero e/o per posizione.
*
Presente solo in alcuni modelli.
I
5
Avvio e utilizzo
Avviare l’apparecchio
! Prima di avviare l’apparecchio, seguire
le istruzioni sull’installazione (
vedi Installazione
).
! Prima di collegare l’apparecchio pulire bene i vani
e gli accessori con acqua tiepida e bicarbonato.
1. Inserire la spina nella presa e accertarsi che si
accenda la lampada di illuminazione interna.
2. Ruotare la manopola per LA REGOLAZIONE DELLA
TEMPERATURA su un valore medio. Dopo qualche
ora sarà possibile inserire alimenti nel frigorifero.
Utilizzare al meglio il frigorifero
La temperatura all'interno del reparto frigorifero si regola
automaticamente in base alla posizione della manopola
del termostato.
1 = meno freddo
5 = più freddo
Si consiglia, comunque, una posizione media
Per aumentare lo spazio e disposizione e migliorare
l'aspetto estetico, questo apparecchio ha la "parte
raffreddante" posizionata all'interno della parete
posteriore del reparto frigo. Tale parete, durante il
funzionamento, si presenterà coperta di brina, oppure di
goccioline di acqua a secondo se il compressore è in
funzione o in pausa. Non preoccupatevi di questo! Il
frigorifero sta lavorando in modo normale.
Se si imposta la manopola FUNZIONAMENTO
FRIGORIFERO su valori alti, con grossi quantitativi di
alimenti e con una temperatura ambiente elevata,
l’apparecchio può funzionare di continuo, favorendo
un’eccessiva formazione di brina ed eccessivi consumi
elettrici: ovviare spostando la manopola verso i valori più
bassi (verrà effettuato uno sbrinamento automatico).
Negli apparecchi statici l’aria circola in modo naturale:
quella più fredda tende a scendere perché più pesante.
Ecco come sistemare gli alimenti:
Cibo Disposizione nel frigorifero
Carne e pesce pulito Sopra i cassetti frutta e verdura
Formaggi freschi Sopra i cassetti frutta e verdura
Cibi cotti Su qualsiasi ripiano
Salami, pane in
cassetta, cioccolata
Su qualsiasi ripiano
Frutta e verdura Nei cassetti frutta e verdura
Uova Nell'apposito balconcino
Burro e margarina Nell'apposito balconcino
Bottiglie, bibite, latte Negli appositi balconcini
Inserire soltanto alimenti freddi o appena tiepidi, non
caldi (
vedi Precauzioni e consigli
).
Ricordarsi che gli alimenti cotti non si mantengono
più a lungo di quelli crudi.
Non inserire liquidi in recipienti scoperti:
provocherebbero un aumento di umidità con
conseguente formazione di condensa.
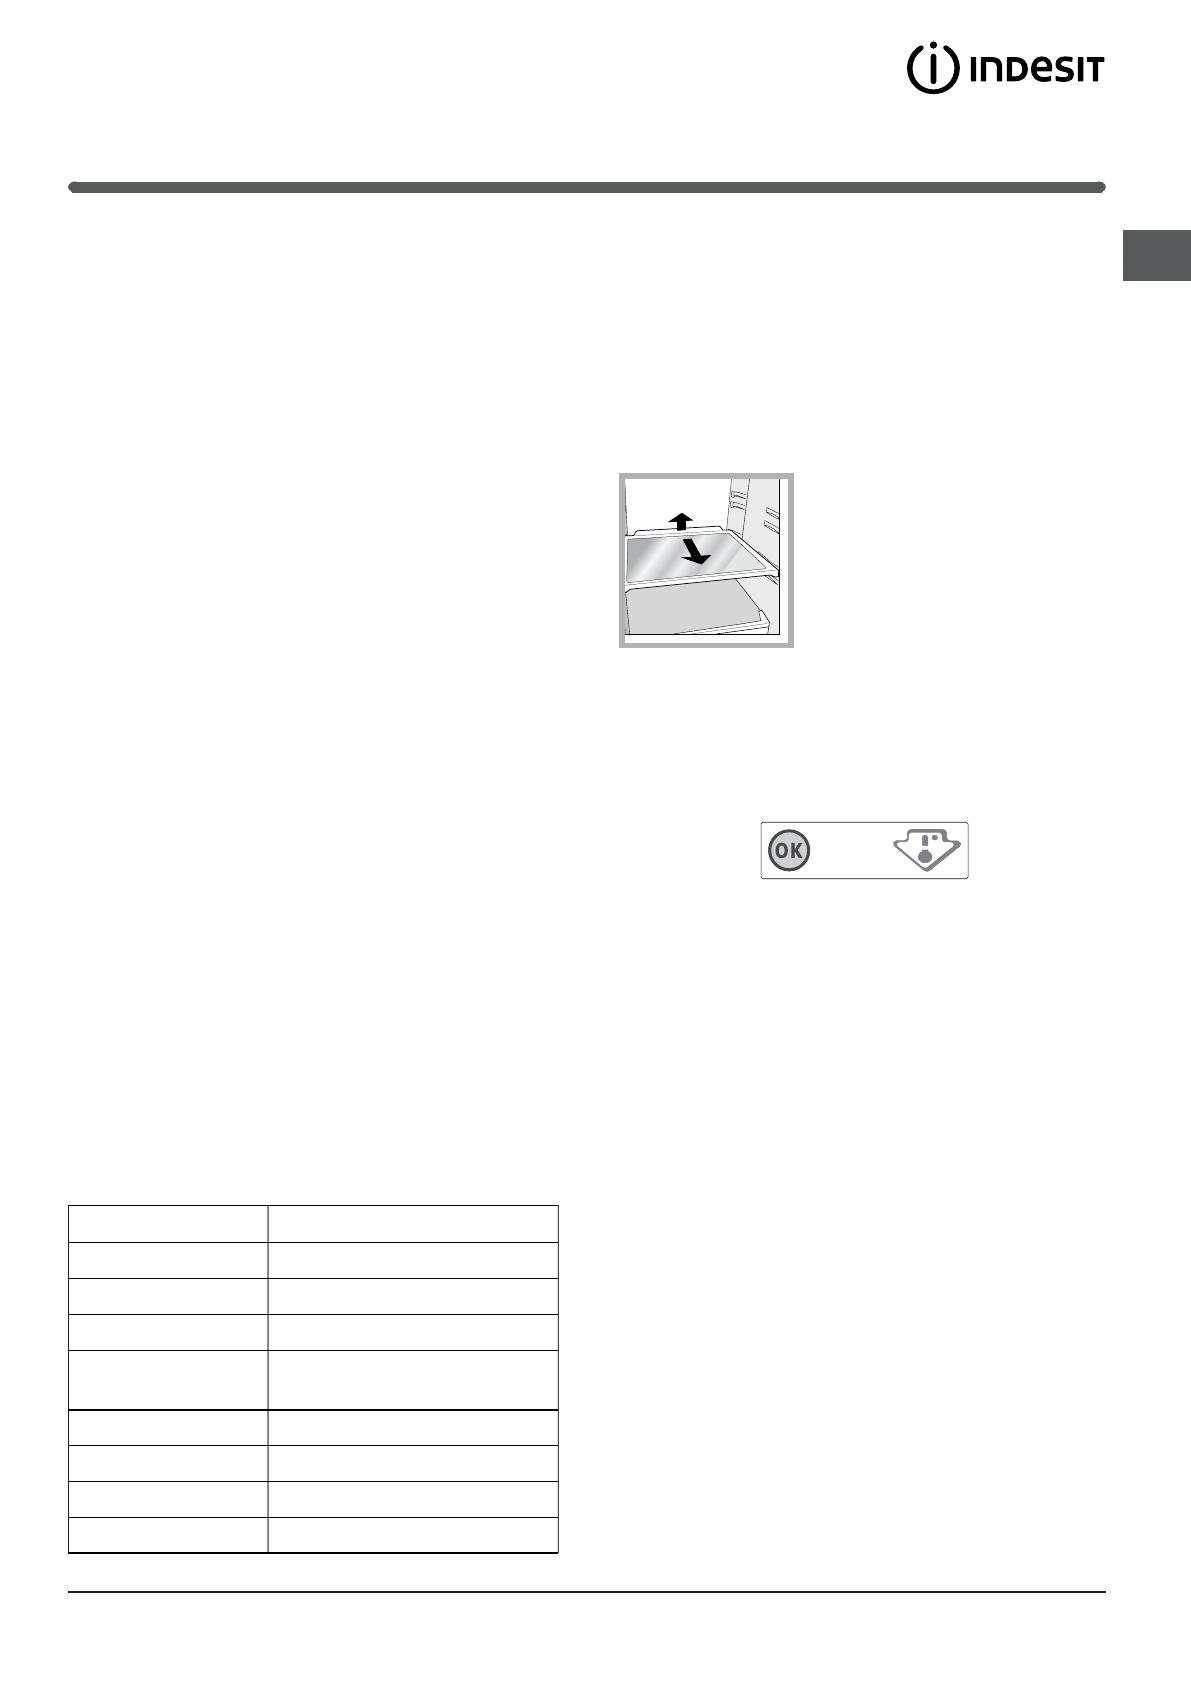
RIPIANI: pieni o a griglia.
Sono estraibili e regolabili in
altezza grazie alle apposite
guide (
vedi figura
), per
l’inserimento di contenitori
o alimenti di notevole
dimensione. Per regolare
l’altezza non è necessario
estrarre completamente il ripiano
Indicatore TEMPERATURA: per individuare la zona più
fredda del frigorifero.
1. Controllare che sull’indicatore risulti ben evidente OK
(
vedi figura
).
2. Se non compare la scritta OK significa che la
temperatura è troppo elevata: regolare la manopola
FUNZIONAMENTO FRIGORIFERO su una posizione
più alta (più freddo) e attendere circa 10 h finché la
temperatura si sia stabilizzata.
3. Controllare nuovamente l’indicatore: se necessario,
procedere con una nuova regolazione. Se si sono
introdotte grosse quantità di alimenti o si è aperta
frequentemente la porta del frigorifero, è normale che
l’indicatore non segni OK. Attendere almeno 10 h
prima di regolare la manopola FUNZIONAMENTO
FRIGORIFERO su una posizione più alta.
L’igiene alimentare
1. Dopo l’acquisto degli alimenti, eliminare qualsiasi tipo
di confezione esterna in carta/cartone o altri involucri,
che potrebbero introdurre nel frigo batteri o sporcizia.
2. Proteggere gli alimenti, (in particolare quelli
facilmente deperibili e quelli che emanano un forte
aroma), in modo da evitate il contatto tra essi,
eliminando in questo modo sia la possibilità di
contaminazione di germi/batteri, che la diffusione di
particolari odori all’interno del frigo
3. Riporre i cibi in modo in modo che l’aria possa
circolare liberamente tra essi
4. Tenere pulito l’interno del frigo, facendo attenzione a
non utilizzare prodotti ossidanti o abrasivi
1
2
6
I
Utilizzare al meglio il congelatore
Non ricongelare alimenti che stanno per scongelare o
scongelati; tali alimenti devono essere cotti per essere
consumati (entro 24 ore).
Gli alimenti freschi da congelare non devono essere
posti a contatto con quelli già congelati; vanno sistemati
nel vano superiore CONGELAMENTO e
CONSERVAZIONE dove la temperatura scende sotto i -
18°C e garantisce una buona velocità di congelamento.
Non mettere nel congelatore bottiglie di vetro contenenti
liquidi, tappate o chiuse ermeticamente, perché
potrebbero rompersi.
La quantità massima giornaliera di alimenti da congelare
è indicata sulla targhetta caratteristiche, posta nel vano
frigorifero in basso a sinistra (esempio: Kg/24h 4).
Al fine di ottenere un spazio maggiore nel reparto
freezer potete togliere i cassetti dalle loro sedi (tranne
quello più in basso e l’eventuale cassetto COOL CARE
ZONE a temperatura variabile), sistemando gli alimenti
direttamente sulle piastre evaporanti.
! Durante il congelamento evitare di aprire la porta.
! In caso di interruzione di corrente o di guasto,
non aprire la porta del congelatore: in questo modo
congelati e surgelati si conserveranno senza alterazioni
per circa 9-14 ore.
! Se per lungo tempo permane la temperatura ambiente
più fredda di 14°C, non si raggiungono completamente
le temperature necessarie per una lunga conservazione
nel reparto freezer e il periodo di conservazione risulterà
pertanto ridotto.
Interruttore di congelamento rapido
L’apparecchio è dotato di un interruttore manuale di
congelamento rapido (“Fast Freeze”).
Attivare il congelamento
rapido quando si
introducono alimenti freschi
da congelare.
Per attivare il congelamento
rapido, portare l’interruttore
nella posizione “I”:
l’interruttore avvia un
raffreddamento intenso che
garantisce il raggiungimento
delle temperature richieste
Fast Freeze Switch
Bacinella GHIACCIO
La collocazione sulla parte superiore dei cassetti ripisti
nel vano freezer garantisce una maggior pulizia (il
ghiaccio non viene più a contatto con gli alimenti) ed
ergonomia (non si sgocciola in fase di caricamento).
1. Verificare che la bacinella sia completamente vuota e
riempirla d’acqua attraverso l’apposito foro.
2. Fare attenzione a non superare il livello indicato (MAX
WATER LEVEL). Troppa acqua ostacola la fuoriuscita
dei ghiaccioli (se succede, attendere che il ghiaccio
si sciolga e svuotare la bacinella).
3. Ruotare la bacinella di 90°: l’acqua riempie le forme
per il principio dei vasi comunicanti (
vedi figura
).
4. Chiudere il foro con il coperchio in dotazione e riporre
la bacinella.
5. Quando il ghiaccio sarà formato (tempo minimo circa
8 ore) battere la bacinella su una superficie dura e
bagnarne l’esterno per far staccare i ghiaccioli; farli
poi uscire dal foro.
MAX
WATER LEVEL
MAX
WATER LEVEL
in tempi brevi.
Una volta congelato l’alimento fresco, riportare l’interruttore
nella posizione di spegnimento OFF (“0”).
NOTA: ai fini del risparmio energetico, controllare che il
congelamento rapido sia spento dopo 24 ore.
Per garantire l’ottimale funzionamento del frigorifero, il
pulsante del congelamento rapido (“Fast Freeze”) deve
trovarsi nella posizione di accensione ON quando la
temperatura ambiente è pari a 16°C o è inferiore.
5. Togliere gli alimenti dal frigo una volta superata la
durata massima di conservazione
6. Per una buona conservazione, i cibi facilmente
deperbili ( formaggi molli, pesce crudo, carne, etc…)
vanno posizionati nella zona più fredda, cioè quella
sopra le verduriere, dove si trova l’indicatore della
temperatura.
.
I
7
Manutenzione e cura
Escludere la corrente elettrica
Durante i lavori di pulizia e manutenzione è necessario
isolare l’apparecchio dalla rete di alimentazione
staccando la spina dalla presa.
Non è sufficiente portare la manopola per la regolazione
della temperatura sulla posizione
(apparecchio
spento) per eliminare ogni contatto elettrico.
Pulire l’apparecchio
Le parti esterne, le parti interne e le guarnizioni in
gomma possono essere pulite con una spugnetta
imbevuta di acqua tiepida e bicarbonato di sodio o
sapone neutro. Non usare solventi, abrasivi,
candeggina o ammoniaca.
Gli accessori estraibili possono essere messi a bagno
in acqua calda e sapone o detersivo per piatti.
Sciacquarli e asciugarli con cura.
Il retro dell’apparecchio tende a coprirsi di polvere,
che può essere eliminata utilizzando con delicatezza,
dopo aver spento l'apparecchio e staccato la presa di
corrente, la bocchetta lunga dell’aspirapolvere,
impostato su una potenza media.
Evitare muffe e cattivi odori
L’apparecchio è fabbricato con materiali igienici
che non trasmettono odori. Per mantenere questa
caratteristica è necessario che i cibi vengano sempre
protetti e chiusi bene. Ciò eviterà anche
la formazione di macchie.
Nel caso si voglia spegnere l’apparecchio per un
lungo periodo, pulire l’interno e lasciare le porte
aperte.
Sbrinare l’apparecchio
! Attenersi alle istruzioni sottostanti.
Per sbrinare l’apparecchio non usare oggetti taglienti ed
appuntiti che potrebbero danneggiare irreparabilmente il
circuito refrigerante..
Sbrinare il vano frigorifero
Il frigorifero è dotato di sbrinamento automatico: l’acqua
viene convogliata verso la parte posteriore da un
apposito foro di scarico
(
vedi figura
) dove il calore
prodotto dal compressore
la fa evaporare. L’unico
intervento da fare
periodicamente consiste
nel pulire il foro di scarico
affinché l’acqua possa
defluire liberamente.
Sbrinare il vano congelatore
Se lo strato di brina è superiore ai 5 mm è necessario
effettuare lo sbrinamento manuale:
1. posizionare la manopola per LA REGOLAZIONE
DELLA TEMPERATURA nella posizione
.
2. Avvolgere surgelati e congelati in carta da giornale e
metterli in un altro congelatore o in un luogo fresco.
3. Lasciare aperta la porta finché la brina non si sia
sciolta completamente; facilitare l’operazione
sistemando nel vano congelatore contenitori con
acqua tiepida.
4. Pulire e asciugare con cura il vano congelatore prima
di riaccendere l’apparecchio.
5. Alcuni apparecchi sono
dotati del SISTEMA DRAIN
per convogliare l’acqua
all’esterno: inserire il
raschietto in dotazione
nell'apposita fessura posta
in basso e lasciare che
l'acqua defluisca in un
contenitore (
vedi figura
)
6. Prima di inserire i cibi nel vano congelatore attendere
circa 2 ore per il ripristino delle condizioni ideali di
conservazione.
Sostituire la lampadina
Per sostituire la lampadina di illuminazione del vano
frigorifero, staccare la spina dalla presa di corrente.
Seguire le istruzioni
riportate qui sotto.
Accedere alla lampada
togliendo la protezione
come indicato in figura.
Sostituirla con una
analoga di potenza a
quella indicata sulla
protezione (15 W o 25 W).
8
I
Precauzioni e consigli
! L’apparecchio è stato progettato e costruito
in conformità alle norme internazionali di sicurezza.
Queste avvertenze sono fornite per ragioni
di sicurezza e devono essere lette attentamente.
Questa apparecchiatura è conforme
alle seguenti Direttive Comunitarie:
- 73/23/CEE del 19/02/73 (Bassa Tensione)
e successive modificazioni;
- 89/336/CEE del 03/05/89 (Compatibilità
Elettromagnetica) e successive modificazioni.
- 2002/96/CE..
Sicurezza generale
L’apparecchio è stato concepito per un uso di tipo
non professionale all’interno dell’abitazione.
L’apparecchio deve essere usato per conservare
e congelare cibi, solo da persone adulte e secondo le
istruzioni riportate in questo libretto.
L’apparecchio non va installato all’aperto, nemmeno
se lo spazio è riparato, perché è molto pericoloso
lasciarlo esposto a pioggia e temporali.
Non toccare l’apparecchio a piedi nudi o con le mani
o i piedi bagnati o umidi.
Non toccare le parti interne raffreddanti: c’è pericolo
di ustionarsi o ferirsi.
Non staccare la spina dalla presa della corrente
tirando il cavo, bensì afferrando la spina.
È necessario staccare la spina dalla presa prima di
effettuare operazioni di pulizia e manutenzione. Non è
sufficiente portare le manopole per la regolazione
della temperatura sulla posizione
(apparecchio
spento) per eliminare ogni contatto elettrico.
In caso di guasto, in nessun caso accedere ai
meccanismi interni per tentare una riparazione.
Ne pas utiliser, à l’intérieur des compartiments de
conservation pour aliments congelés, d’ustensiles
pointus et coupants ou d’appareils électriques d’un
type autre que celui recommandé par le fabricant.
Non mettere in bocca cubetti appena estratti dal
congelatore.
Questo apparecchio non è da intendersi adatto all’uso
da parte di persone (incluso bambini) con ridotte
capacità fisiche, sensoriali o mentali, o prive di
esperienza e conoscenza, a meno che siano state
supervisionate o istruite riguardo all’uso
dell’apparecchio da una persona responsabile della
loro sicurezza. I bambini dovrebbero essere
supervisionati per assicurarsi che non giochino con
l’apparecchio.
Gli imballaggi non sono giocattoli per bambini.
Smaltimento
Smaltimento del materiale di imballaggio: attenersi
alle norme locali, così gli imballaggi potranno essere
riutilizzati.
La direttiva Europea 2002/96/CE sui rifiuti di
apparecchiature elettriche ed elettroniche (RAEE),
prevede che gli elettrodomestici non debbano essere
smaltiti nel normale flusso dei rifiuti solidi urbani. Gli
apparecchi dismessi devono essere raccolti
separatamente per ottimizzare il tasso di recupero e
riciclaggio dei materiali che li compongono ed
impedire potenziali danni per la salute e l’ambiente. Il
simbolo del cestino barrato è riportato su tutti i
prodotti per ricordare gli obblighi di raccolta separata.
Per ulteriori informazioni, sulla corretta dismissione
degli elettrodomestici, i detentori potranno rivolgersi
al servizio pubblico preposto o ai rivenditori.
Risparmiare e rispettare l’ambiente
Installare l’apparecchio in un ambiente fresco e ben
aerato, proteggerlo dall’esposizione diretta ai raggi
solari, non disporlo vicino a fonti di calore.
Per introdurre o estrarre gli alimenti, aprire le porte
dell’apparecchio il più brevemente possibile.
Ogni apertura delle porte causa un notevole
dispendio di energia.
Non riempire con troppi alimenti l’apparecchio:
per una buona conservazione, il freddo deve
poter circolare liberamente. Se si impedisce la
circolazione, il compressore lavorerà continuamente.
Non introdurre alimenti caldi: alzerebbero la
temperatura interna costringendo il compressore a un
grosso lavoro, con grande spreco di energia elettrica.
Sbrinare l’apparecchio qualora si formasse del
ghiaccio (
vedi Manutenzione
); uno spesso strato
di ghiaccio rende più difficile la cessione di freddo
agli alimenti e fa aumentare il consumo di energia.
Mantenere efficienti e pulite le guarnizioni, in modo
che aderiscano bene alle porte e non lascino uscire il
freddo (
vedi Manutenzione
).
I
9
Anomalie e rimedi
Può accadere che l’apparecchio non funzioni. Prima di telefonare all’Assistenza (
vedi Assistenza
), controllare
che non si tratti di un problema facilmente risolvibile aiutandosi con il seguente elenco.
Possibili cause / Soluzione:
La spina non è inserita nella presa della corrente o non abbastanza da
fare contatto, oppure in casa non c’è corrente.
Le porte non chiudono bene o le guarnizioni sono rovinate.
Le porte vengono aperte molto spesso.
La manopola per LA REGOLAZIONE DELLA TEMPERATURA non è in
posizione corretta
Il frigorifero o il congelatore sono stati riempiti eccessivamente.
La temperatura ambiente di lavoro del prodotto è inferiore a 14°C.
La manopola per LA REGOLAZIONE DELLA TEMPERATURA non è in
posizione corretta.
Gli alimenti sono a contatto con la parete posteriore.
La porta non è ben chiusa o viene aperta di continuo.
La temperatura dell’ambiente esterno è molto alta.
Lo spessore della brina supera i 2-3 mm (
vedi Manutenzione
).
L’apparecchio non è stato installato ben in piano (
vedi Installazione
)
.
L’apparecchio è stato installato tra mobili o oggetti che vibrano
ed emettono rumori.
Il gas refrigerante interno produce un leggero rumore anche quando
il compressore è fermo: non è un difetto, è normale.
Le temperature elevate sono necessarie per evitare la formazioni di
condensa in particolari zone del prodotto
Si tratta del normale funzionamento del prodotto.
Il foro di scarico dell’acqua è otturato (
vedi Manutenzione
).
Verificare che l’interruttore di congelamento rapido
NONNON
NONNON
NON si trovi in
posizione ‘ON’, perché in questo caso il funzionamento avverrebbe al
100% (per ulteriori informazioni vedere pag. 6) . Se la formazione di
ghiaccio rimane abbondante nonostante l’interruttore non si trovi in
posizione ON, impostare la manopola di regolazione della temperatura su
una posizione inferiore (per ulteriori informazioni vedere pag. 4).
Se la porta del vano dispensa rimane aperta per periodi troppo lunghi, si
possono formare umidità o ghiaccio in eccesso. Il problema si risolverà
non appena la porta verrà chiusa e si permetterà al vano dispensa di
sbrinarsi, eliminando l’umidità presente. Si tratta di una situazione normale
per la funzione di raffreddamento del vano dispensa, soprattutto nel
periodo estivo.
Se la temperatura ambiente è uguale o inferiore a 16°C, ad esempio quando
il frigorifero è installato in un garage o in un luogo aperto, è necessario che
l’interruttore si trovi in posizione
ONON
ONON
ON affinché il frigorifero funzioni
correttamente (per ulteriori informazioni vedere pag. 6).
Anomalie:
La lampada di illuminazione
interna non si accende.
Il frigorifero e il congelatore
raffreddano poco.
Nel frigorifero gli alimenti
si gelano.
Il motore funziona di continuo.
L’apparecchio emette
molto rumore.
La temperatura di alcune parti
esterne del frigorifero è elevata.
La parete in fondo alla cella frigo
presenta brina o goccioline di acqua.
Sul fondo del frigo c’è dell’acqua.
Formazione di ghiaccio nel retro
del frigorifero.
Umidità o ghiaccio eccessivo nel
retro del frigorifero.
Frigorifero caldo.
10
I
Assistenza
Prima di contattare l’Assistenza:
Verificare se l’anomalia può essere risolta autonomamente (
vedi Anomalie e Rimedi
).
In caso negativo, contattare il Numero Unico Nazionale 199.199.199.
Comunicare:
il tipo di anomalia
il modello della macchina (Mod.)
il numero di serie (S/N)
Queste informazioni si trovano
sulla targhetta caratteristiche posta
nel vano frigorifero in basso a sinistra.
Assistenza Attiva 7 giorni su 7
Se nasce il bisogno di assistenza o manutenzione basta chiamare il Numero Unico Nazionale 199.199.199*
per essere messi subito in contatto con il Centro Assistenza Tecnica più vicino al luogo da cui si chiama.
È attivo 7 giorni su 7, sabato e domenica compresi, e non lascia mai inascoltata una richiesta.
* Al costo di 14,25 centesimi di Euro al minuto (iva inclusa) dal Lun. al Ven. dalle 08:00 alle 18:30, il Sab. dalle 08:00
alle 13:00 e di 5,58 centesimi di Euro al minuto (iva inclusa) dal Lun. al Ven. dalle 18:30 alle 08:00, il Sab. dalle 13:00
alle 08:00 e i giorni festivi, per chi chiama dal telefono fisso.
Per chi chiama da radiomobile le tariffe sono legate al piano tariffario dell’operatore telefonico utilizzato.
Le suddette tariffe potrebbero essere soggette a variazione da parte dell’operatore telefonico; per maggiori
informazioni consultare il sito www.indesit.com.
Mod.
RG 2330
TI
Cod.
93139180000 S/N 704211801
220 - 240 V- 50 Hz 150 W
W
Fuse
A
Max 15 w
Total
Gross
Bruto
Brut
Compr.
Kompr.
Syst.
R 134 a
kg 0,090
Gross
Bruto
Brut
340
Net
Util
Utile
Gross
Bruto
Brut
Freez. Capac
Poder de Cong
75
Made in Italy 13918
Test
P.S-I.
Pressure
HIGH-235
LOW 140
kg/24 h
4,0
Class
Clase
N
Classe
modello
numero di serie
195083721.03
11/2010
GB
REFRIGERATOR/FREEZER COMBINATION
Operating Instructions
Contents
Installation, 12-13
Positioning and connection
Door reversal
Description of the appliance, 14
Overall view
Start-up and use, 15-16
Starting the appliance
Using the refrigerator to its full potential
Using the freezer to its full potential
Maintenance and care, 17
Switching the appliance off
Cleaning the appliance
Avoiding mould and unpleasant odours
Replacing the light bulb
Precautions and tips, 18
General safety
Disposal
Respecting and conserving the environment
Troubleshooting, 19
Assistance, 20
Italiano, 1 English, 11
GBI
Portuges, 41
P
Espanol, 31
E

RO


PL

HU

CZ
Français, 21
F
CAA 55
Deutsch
, 91
D
12
GB
Installation
! Before placing your new appliance into operation
please read these operating instructions carefully. They
contain important information for safe use, for installation
and for care of the appliance.
! Please keep these operating instructions for future
reference. Pass them on to possible new owners of the
appliance.
Positioning and connection
Positioning
1. Place the appliance in a well-ventilated humidity-free
room.
2. Do not obstruct the rear fan grills. The compressor
and condenser give off heat and require good
ventilation to operate correctly and save energy.
3. Leave a space of at least 10 cm between the top part
of the appliance and any furniture above it, and at
least 5 cm between the sides and any furniture/side
walls.
4. Ensure the appliance is away from any sources of
heat (direct sunlight, electric stove, etc.).
5. In order to maintain the correct distance between the
appliance and the wall behind it, fit the spacers
supplied in the installation kit, following the
instructions provided.
Levelling
1. Install the appliance on a level and rigid floor.
2. If the floor is not perfectly horizontal, make the
necessary adjustments by tightening or loosening the
single foot at the front of the appliance.
Electrical connections
After the appliance has been transported, carefully
place it vertically and wait at least 3 hours before
connecting it to the electricity mains. Before inserting the
plug into the electrical socket ensure the following:
The appliance is earthed and the plug is compliant
with the law.
The socket can withstand the maximum power of the
appliance, which is indicated on the data plate located
on the bottom left side of the fridge (e.g. 150 W).
The voltage must be in the range between the values
indicated on the data plate located on the bottom left
side (e.g. 220-240V).
The socket is compatible with the plug of the
appliance.
If the socket is incompatible with the plug, ask an
authorised technician to replace it (
see Assistance
).
Do not use extension cords or multiple sockets.
! Once the appliance has been installed, the power
supply cable and the electrical socket must be easily
accessible.
! The cable must not be bent or compressed.
! The cable must be checked regularly and replaced by
authorised technicians only (see Assistance).
! The manufacturer declines any liability should these
safety measures not be observed.
GB
13
DOOR REVERSAL
Warning: Before attempting to remove the doors, switch off the electrical supply and pull out the mains plug.
It is recommended that you remove any loose items/fittings from inside the appliance and place food into insulated
containers whilst carrying out this operation.
You may require assistance to carefully lay the appliance onto its back onto suitable protective materials (i.e. original
packaging).
Remove the doors
1. Lay down the appliance on its back.
2. Unscrew, remove and retain the bottom hinge.
3. Slightly open the bottom door and slide downward remove and carefully place to one side
4. Remove centre hinge and spacer if fitted. Slightly open the top door and slide downwards, remove and carefully
place to one side.
5. Unscrew and remove the top front cover from the cabinet .
6. Unscrew and remove the hinge pin and the bolt from the top right hand and refit them into the hole in the left hand
side. Refit the top front
cover.
7. Use a thin blunt instrument
to remove the top and
bottom hinge bushes and
blanking plugs from the
doors, take care not to
mark the door handle.
Reposition the blanking
plugs and bushes on the
opposite side.
8. Fit the blanking plugs
provided into the right
hand two centre hinge
holes.
Replacing the doors
1. Slide the top door upwards and locate the top hinge pin into the door brush. Reposition the centre hinge on the
opposite side.
2. Carefully slide bottom door upward
into the centre hinge pin.
3. Unscrew the bottom hinge pin and
refit it on the opposite side..
4. Fit the bottom hinge making sure that
the door is aligned to the cabinet.
5. Carefully stand the appliance upright
in it’s required location and make
sure it is sitting level on the floor.
Open and close the doors checking
that the gasket makes a good seal
without any gaps when the doors are
closed.
Note: Replace loose items/fittings back
into the appliance and leave for at least
15 minutes before switching back on.
1
3
4
6
5
2
7
8
2
3
1
14
GB
Description of the
appliance
TEMPERATURE
REGULATING
Knob
SHELVES
FRUIT and
VEGETABLE bin
FREEZER and
STORAGE
compartment
STORAGE
compartment
ICE tray
Removable lidded shelf
with EGG TRAY
*
Removable
multipurpose
SHELVES•
BOTTLE shelf
Compartment for a
2 LITRE BOTTLE
Levelling FOOT
Overall view
The instructions contained in this manual are applicable to different model refrigerators. The diagrams may not
directly represent the appliance purchased. For more complex features, consult the following pages.
There is only one adjustable foot.
Varies by number and/or position.
*
Available only on certain models.
GB
15
Start-up and use
Starting the appliance
! Before starting the appliance, follow the installation
instructions (
see Installation
).
! Before connecting the appliance, clean the
compartments and accessories well with lukewarm
water and bicarbonate.
1. Insert the plug into the socket and ensure that the
internal light illuminates.
2. Turn the TEMPERATURE ADJUSTMENT knob to an
average value. After a few hours you will be able to
put food in the refrigerator.
Using the refrigerator to its full potential
The temperature inside the refrigerator compartment
automatically adjusts itself according to the position of
the thermostat knob.
1 = warmest 5 = coldest
We recommend, however, a medium position.
The cooling section of the refrigerator is located inside
the back wall of the refrigerator compartment for
increased space and improved aesthetics. During
operation, the back wall will be covered in frost or water
droplets depending on whether the compressor is
operating or paused. Do not worry, the refrigerator is
functioning normally.
If the TEMPERATURE ADJUSTMENT knob has been set
on high values with large quantities of food and with a
high ambient temperature, the appliance can operate
continuously, resulting in excessive frost formation and
excessive energy consumption: compensate for this by
shifting the knob towards lower values (defrosting will
occur automatically).
In static appliances, the air circulates in a natural way:
the colder air tends to move downwards as it is heavier.
The food should be stored as follows:
Food
Arrangement inside the
refrigerator
Fresh fish and meat
Above the fruit and vegetable
bins
Fresh cheese
Above the fruit and vegetable
bins
Cooked food On any shelf
Salami, bread loaf,
chocolate
On any shelf
Fruit and vegetables In the fruit and vegetable bins
Eggs On the shelf provided
Butter and margarine On the shelf provided
Bottles, drinks, milk On the shelf provided
Place only cold or lukewarm foods in the
compartment, not hot foods (
see Precautions and
tips
).
Remember that cooked foods do not last longer than
raw foods.
Do not store liquids in open containers. They will
increase humidity in the refrigerator and cause
condensation to form.
SHELVES: with or without grill.
Due to the special guides the
shelves are removable and the
height is adjustable (
see
diagram
), allowing easy storage
of large containers and food.
Height can be adjusted without
complete removal of the shelf.
TEMPERATURE Indicator light: to identify the coldest
area in the refrigerator.
1. Check that OK appears clearly on the indicator light
(
see diagram
).
2. If the word “OK” does not appear it means that the
temperature is too high: adjust the REFRIGERATOR
OPERATION knob to a higher position (colder) and
wait approximately 10 hours until the temperature
has been stabilised.
3. Check the indicator light again: if necessary, readjust
it following the initial process. If large quantities of
food have been added or if the refrigerator door has
been opened frequently, it is normal for the indicator
not to show OK. Wait at least 10 hours before
adjusting the REFRIGERATOR OPERATION knob to a
higher setting.
Food hygiene
1. Once you have bought your food, remove all
external packaging made of paper/cardboard or
other wrappers, which could introduce bacteria or
dirt inside your refrigerator.
2. Protect the food, (especially easily perishable items
and those that have a strong smell), in order to avoid
contact between them, thereby removing both the
possibility of germ/bacteria contamination as well as
the diffusion of strong odours inside the fridge.
3. Store all food in such a way as to ensure air can
circulate freely between different items.
1
2
16
GB
Using the freezer to its full potential
Do not re-freeze food that is defrosting or that has
already been defrosted. These foods must be
cooked and eaten (within 24 hours).
Fresh food that needs to be frozen must not come
into contact with food that has already been
defrosted. Fresh food must be stored above the grill
in the freezer compartment and if possible be in
direct contact with the walls (side and rear), where
the temperature drops below -18°C and guarantees
rapid freezing.
Do not place glass bottles which contain liquids, and
which are corked or hermetically sealed in the
freezer because they could break.
The maximum quantity of food that may be frozen
daily is indicated on the plate containing the technical
properties located on the bottom left side of the
refrigerator compartment (for example: Kg/24h: 4)
! Do not open the door during freezing.
! If there is a power cut or malfunction, do not open the
freezer door. This will help maintain the temperature
inside the freezer, ensuring that foods are conserved
for at least 9 -14 hours.
! If the room temperature drops below 14°C for an
extended period of time, the ideal temperature will not
be reached in the freezer compartment and food
preservation will be reduced.
Fast Freeze switch
The appliance is fitted with a manual "Fast Freezer"
switch.
When loading fresh food
to freeze switch "Fast
Freeze" on.
To set "Fast Freeze" ON,
press the switch to "I"
This switch activates
intensive cooling to
ensure that required
temperatures are reached
quickly.
Ice tray
The fact that they are situated on the top part of the
freezer drawers ensures greater cleanliness: the ice no
longer comes into contact with the food placed inside
the freezer compartment; furthermore, the dripping of the
water during filling is avoided (a lid to cover up the hole
after filling with water is also provided).
1. Pull out the tray by pushing it up.
Check that the tray is ompletely empty and fill it with
water through the opening provided.
2. Take care not to exceed the level indicated (MAX
WATER LEVEL). Excess water prevents the ice cubes
from dispensing (if this happens, wait for the ice to
melt and empty the tray).
3. Turn the tray 90°: due to the connected compartments
each mould fills with water (
see diagram
).
4. Close the opening with the lid provided and put the
tray back.
5. When the ice has formed (minimum time
approximately 8 hours) knock the tray against a hard
surface and wet the outside so that the ice cubes
come loose and take them out through the opening.
MAX
WATER LEVEL
MAX
WATER LEVEL
Fast Freeze Switch
So when the fresh food is frozen return the switch to its
OFF position, "0".
Note: for Energy Saving ensure that "Fast Freeze" is
switched off after 24 hours.
For the refrigerator to operate properly the "Fast Freeze"
button must be ON when room temperature is 16°C or
lower.
4. Keep the inside of your fridge clean, taking care not
to use oxidiser or abrasive products.
5. Remove all food past its expiry date from the
refrigerator.
6. For the correct preservation of food, all easily
perishable items (soft cheeses, raw fish, meat, etc.)
should be stored in the coldest zone of the fridge
compartment, i.e. just above the salad crisper where
the temperature indicator is situated.
GB
17
Maintenance and care
Switching the appliance off
During cleaning and maintenance it is necessary to
disconnect the appliance from the electricity supply:
It is not sufficient to set the temperature adjustment knobs
on
(appliance off) to eliminate all electrical contact.
Cleaning the appliance
The external and internal parts, as well as the rubber
seals may be cleaned using a sponge that has been
soaked in lukewarm water and bicarbonate of soda or
neutral soap. Do not use solvents, abrasive products,
bleach or ammonia.
The removable accessories may be soaked in warm
water and soap or dishwashing liquid. Rinse and dry
them carefully.
The back of the appliance may collect dust which can
be removed by delicately using the hose of a vacuum
cleaner set on medium power. The appliance must be
switched off and the plug must be pulled out before
cleaning the appliance.
Avoiding mould and unpleasant odours
The appliance is manufactured with hygienic materials
which are odour free. In order to maintain an odour
free refrigerator and to prevent the formation of stains,
food must always be covered or sealed properly.
If you want to switch the appliance off for an extended
period of time, clean the inside and leave the doors open.
Defrosting the appliance
! Follow the instructions below.
Do not use objects with sharp or pointed edges to
defrost the appliance as these may damage the
refrigeration circuit beyond repair.
Defrosting the refrigerator compartment
The refrigerator has an automatic defrosting function:
water is ducted to the
back of the appliance by a
special discharge outlet
(
see diagram
) where the
heat produced by the
compressor causes it to
evaporate. It is necessary
to clean the discharge
hole regularly so that the
water can flow out easily.
Defrosting the freezer compartment
If the frost layer is greater than 5 mm, it is necessary to
defrost manually:
1. Set the TEMPERATURE ADJUSTMENT knob to the
position
.
2. Wrap frozen foods in newspaper and place them in
another freezer or in a cool place.
3. Leave the door open until the frost has melted
completely. This can be made easier by placing
containers with lukewarm water in the freezer
compartment.
4. Clean and dry the freezer compartment carefully
before switching the appliance on again.
5. Certain appliances are
fitted with the DRAIN
SYSTEM to lead the water
outside: let the water flow
into a container (
see
diagram
).
6. Wait for approximately 2 hours, i.e. until the ideal
storage conditions have been restored, before
placing food in the freezer compartment.
Replacing the light bulb
To replace the light bulb in the refrigerator compartment,
pull out the plug from the electrical socket. Follow the
instructions below.
Access the light bulb by
removing the cover as
indicated in the diagram.
Replace it with a similar
light bulb within the power
range indicated on the
cover (15W or 25W).
18
GB
Precautions and tips
! The appliance was designed and manufactured in
compliance with international safety standards. The
following warnings are provided for safety reasons and
must be read carefully.
This appliance complies with the following
Community Directives:
- 73/23/EEC of 19/02/73 (Low Voltage) and
subsequent amendments;
-89/336/EEC of 03.05.89 (Electromagnetic
Compatibility) and subsequent amendments;
- 2002/96/CE..
General safety
The appliance was designed for domestic use inside the
home and is not intended for commercial or industrial
use.
The appliance must be used to store and freeze food
products by adults only and according to the
instructions in this manual.
The appliance must not be installed outdoors, even in
covered areas. It is extremely dangerous to leave the
appliance exposed to rain and storms.
Do not touch the appliance with bare feet or with wet or
moist hands and feet.
Do not touch the internal cooling elements: this could
cause skin abrasions or frost/freezer burns.
When unplugging the appliance always pull the plug
from the mains socket, do not pull on the cable.
Before cleaning and maintenance, always switch off the
appliance and disconnect it from the electrical supply. It
is not sufficient to set the temperature adjustment knobs
on
(appliance off) to eliminate all electrical contact.
In the case of a malfunction, under no circumstances
should you attempt to repair the appliance yourself.
Repairs carried out by inexperienced persons may
cause injury or further malfunctioning of the appliance.
Do not use any sharp or pointed utensils or electrical
equipment - other than the type recommended by the
manufacturer - inside the frozen food storage
compartments.
Do not put ice cubes taken directly from the freezer into
your mouth.
This appliance is not intended for use by persons
(including children) with reduced physical, sensory or
lack of experience and knowledge unless they have been
given supervision or instruction concerning use of the
appliance by a person responsible for their safety.
Children should be supervised to ensure that they do not
play with the appliance.
Keep packaging material out of the reach of children! It
can become a choking or suffocation hazard.
Disposal
Observe local environmental standards when
disposing packaging material for recycling purposes.
The European Directive 2002/96/EC on Waste
Electrical and Electronic Equipment (WEEE), requires
that old household electrical appliances must not be
disposed of in the normal unsorted municipal waste
stream. Old appliances must be collected separately
in order to optimise the recovery and recycling of the
materials they contain and reduce the impact on
human health and the environment. The crossed out
“wheeled bin” symbol on the product reminds you of
your obligation, that when you dispose of the
appliance it must be separately collected.
Consumers may take their old appliance to public
waste collection areas, other communal collection
areas, or if national legislation allows return it to a
retailer when purchasing a similar new product.
All major household appliance manufacturers are
active in the creation of systems to manage the
collection and disposal of old appliances.
Respecting and conserving the environment
Install the appliance in a fresh and well-ventilated
room. Ensure that it is protected from direct sunlight
and do not place it near heat sources.
Try to avoid keeping the door open for long periods or
opening the door too frequently in order to conserve
energy.
Do not fill the appliance with too much food:
cold air must circulate freely for food to be preserved
properly. If circulation is impeded, the compressor will
work continuously.
Do not place hot food directly into the refrigerator. The
internal temperature will increase and force the
compressor to work harder and will consume more
energy.
Defrost the appliance if ice forms (
see Maintenance
).
A thick layer of ice makes cold transference to food
products more difficult and results in increased
energy consumption.
Regularly check the door seals and wipe clean to
ensure they are free of debris and to prevent cold air
from escaping (
see Maintenance
).
GB
19
Troubleshooting
Malfunctions:
The internal light does not
illuminate.
The refrigerator and the freezer do
not cool well.
The food inside the refrigerator is
beginning to freeze.
The motor runs continuously.
The appliance makes a lot of noise.
Some of the external parts of the
refrigerator become hot.
The back wall of the refrigerator unit
is covered in frost or droplets of
water.
There is water at the bottom of the
refrigerator.
Icing water at rear of the Fridge
Excess moisture / Ice at rear of the
Fridge
Warm Fridge
Possible causes / Solutions:
The plug has not been inserted into the electrical socket, or not far enough
to make contact, or there is no power in the house.
The doors do not close properly or the seals are damaged.
The doors are opened too frequently.
The TEMPERATURE ADJUSTMENT knob is not in the correct position
The refrigerator or the freezer have been over-filled.
The atmospheric temperature of the area surrounding the appliance is
lower than 14°C.
The TEMPERATURE ADJUSTMENT knob is not in the correct position.
The food is in contact with the back inside wall of the refrigerator.
The door is not closed properly or is continuously opened.
The outside ambient temperature is very high.
The thickness of the frost exceeds 2-3 mm (
see Maintenance
).
The appliance has not been installed on a level surface (
see Installation
)
.
The appliance has been installed between cabinets that vibrate and make
noise.
The internal refrigerant makes a slight noise even when the compressor is
off. This is not a defect, it is normal.
These raised temperatures are necessary in order to avoid the formation of
condensation on certain parts of the product.
This shows the appliance is operating normally.
The water discharge hole is blocked (
see Maintenance
).
Make sure that the “Fast Freeze switch” (see pag 16 for details) is NOT in
the ‘ON’ position, this will cause 100% run. If switch is not in ON position
and severe icing persists, set temperature regulating knob (see pag 14 for
details) to lower position.
Excess moisture / Ice will occur if the Larder door is opened for prolonged
periods. This will disappear once the door is closed and the Larder allowed
to defrost and drain the moisture away. This is normal for cooling function
of the Larder compartment, especially in summer period.
If room temperature is 16 C or lower, (for example the product is located in
a garage or out building), for the refrigerator to operate correctly the “Fast
Freeze switch” must be in the ‘ON’ position (see pag 16 for details)
If the appliance does not work, before calling for Assistance (
see Assistance
), check for a solution from the following list.
20
GB
195083721.03
11/2010
Assistance
Before calling for Assistance:
Check if the malfunction can be solved on your own (
see Troubleshooting
).
If after all the checks, the appliance still does not operate or the problem persists, call the nearest Service
Centre
Communicating:
type of malfunction
appliance model (Mod.)
serial number (S/N)
This information can be found on the data
plate located on the bottom left side of the
refrigerator compartment.
Never call on unauthorized technicians and always refuse spare parts which are not originals.
Mod.
RG 2330
TI
Cod.
93139180000 S/N 704211801
220 - 240 V- 50 Hz 150 W
W
Fuse
A
Max 15 w
Total
Gross
Bruto
Brut
Compr.
Kompr.
Syst.
R 134 a
kg 0,090
Gross
Bruto
Brut
340
Net
Util
Utile
Gross
Bruto
Brut
Freez. Capac
Poder de Cong
75
Made in Italy 13918
Test
P.S-I.
Pressure
HIGH-235
LOW 140
kg/24 h
4,0
Class
Clase
N
Classe
model serial number
1 / 1