Husqvarna CTH 182T Manuale del proprietario
- Categoria
- Tosa erba
- Tipo
- Manuale del proprietario
Questo manuale è adatto anche per

532 43 92-16
04040
CTH 182T
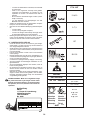
Instruction manual
Please read these instructions care-
ful ly and make sure you understand
them before using this machine.
Anleitungshandbuch
Bitte lesen Sie diese Anleitungen sorg-
fältig durch und vergewissern Sie sich,
daß Sie diese verstehen, bevor Sie die
Maschine in Betrieb nehmen.
Manuel d’instructions
Merci de lire trés attentivement le man-
uel d'instructions. Assurez-vous d'avoir
tout compris avant d'utiliser ce tracteur.
Manual de las instrucciones
Por favor lea cuidadosamente y com-
prenda estas intrucciones antes de
usar esta maquina.
Manuale di istruzioni
Prima di utilizzare la macchina leggete
queste istruzioni con attenzione ed ac-
certatevi di averle comprese bene.
Instructieboekje
Lees deze instructies aandachtig en
zorg dat u ze begrijpt voordat u deze
ma chine gebruikt.

2
1
Safety rules. Montaje.
3
Sicherheitsvorschriften. Montaggio.
Règles de sécurité. Montering.
2
Assembly. Descripción del funcionamiento.
18
Zusammenbau. Funzionamento.
Montage. Beschrijving van functies.
3
Functional description. Antes del arranque.
36
Funktionsbeschreibung. Prima dell’avviamento.
Description du fonctionnement. Maatregelen vóór het starten.
4
Before starting. Conducción.
46
Maßnahmen vor dem Anlassen. Guida.
Avant de démarrer. Rijden.
5
Driving. Mantenimiento, ajuste.
48
Betrieb. Manutenzione.
Conduite. Onderhoud, afstelling.
6
Maintenance, adjustment. Búsqueda de averías.
62
Wartung (Instandhaltung), Einstellung. Ricerca guasti.
Entretien, réglages. Het localiseren van fouten.
7
Troubleshooting. Conservación.
89
Störungssuche. Rismessaggio.
Recherche des pannes. Stallen.
8
Storage. Prezechowywanie
92
Aufbewahrung. Uskladnenie
Remisage. Tárolás
We reserve the right to make changes without prior notice.
Ånderungen ohne vorherige Mitteilung sind vorbehalten.
Nous nous réservons le droit d'apporter des modifications sans avis préalable.
Nos reservamos el derecho a introducir modificaciones sin previo aviso.
Ci riserviamo il diritto di modifiche o cambiamenti senza preavviso.
Wij houden ons het recht voor om veranderingen aan te brengen zonder voorafgaande mededeling.
Original Instructions in English, all others are translations.
La pagina si sta caricando...
La pagina si sta caricando...
La pagina si sta caricando...
La pagina si sta caricando...
La pagina si sta caricando...
La pagina si sta caricando...
La pagina si sta caricando...

10
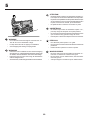
• Antes de dejar la posición del operador:
- desenganche la fuerza motriz y baje los acceso-
rios;
- cambie a neutro y enganche el freno de estaciona-
miento;
- pare el motor y remueva la llave.
• Desenganche la transmisión a los accesorios, pare el mo-
tor, y desconecte el (los) cable (s) de la bujía o remueva
la llave de ignición
- antes de limpiar bloqueos o desatrancar del con-
ducto;
- antes de inspeccionar, limpiar o trabajar sobre la
segadora;
- después de golpear un objeto extraño. Inspeccione
la segadora cuidadosamente, para verificar si hay
daños y haga reparaciones antes de volver a arrancar
y a operar el equipo;
- si la maquina empieza a vibrar anormalmente (ver-
ifíquela inmediatamente).
• Desenganche la transmisión a los accesorios cuando
haga el transporte o cuando no este en uso.
• Pare el motor y desenganche la transmisión a los ac-
cesorios
- antes de agregar combustible;
- antes de quitar el recogedor del césped;
- antes de haces ajustes de altura a menos que los
ajustes pueden ser hechos de la posición del operador.
• Reduzca los ajustes de la aceleración durante el tiempo
que el motor se apague, si el motor viene diseñado con
una válvula de apagado, sierre el combustible cuando
halla terminado de segar.
IV. MANTENIMIENTO Y ALMACENAMIENTO
• Guarde todos las tuercas, los pernos y los tornillos apre-
tados para asegurarse que el equipo esta en condiciones
de buena operación.
• Nunca guarde la máquina con combustible en el estanque
de combustible dentro de un edificio en donde hay fuentes
de ignición presente.
• Permita que ese enfríe el motor antes de guardarlo en
algún lugar cerrado.
• Para reducir el riesgo de encendido, guarde el motor, el
silenciador, el comportamiento de la batería limpios de
césped, hojas, y de demasiado grasa.
• Verifique frecuentemente el recogedor del césped para
ver si hay uso o deterioración.
• Para la seguridad reemplace las partes que estén usadas
o dañadas.
• Si el tanque del combustible debe ser vaciado hágalo
afuera.
• En maquinas de más de una cuchilla, tenga cuidado
puesto que la rotación de una cuchilla puede causar la
rotación de otras cuchillas.
• Cuando la maquina debe ser estacionada, almacenada
o cuando debe ser dejada desatendida, baje el conjunto
cortador a menos que una serradora mecánica es usada.
ADVERTENCIA: Siempre desconecte el alambre
de la bujía y póngalo donde no pueda entrar en
contacto con la bujía, para evitar el arranque por
accidente, durante la preparación, el transporte, el
ajuste o cuando se hacen reparaciones.

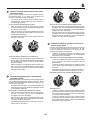
11
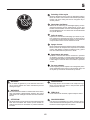
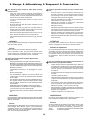
I. ADDESTRAMENTO ALL’USO
• Studiare attentamente le istruzioni. Acquisire dimesti-
chezza con i comandi e conoscere a fondo l’uso corretto
dell’equipaggiamento.
• Non consentire mai l’uso dei trattorini tosaerba ai bam-
bini né agli adulti che non abbiano dimestichezza con le
istruzioni sull’uso. Le normative locali possono stabilire
l’età minima per operare i trattorini tosaerba.
• Non operare mai con i tosaerba in caso vi siano persone,
specialmente bambini, o animaletti domestici nella zona
di lavoro.
• Tenere presente che in caso di incidenti, rischi o pericoli
provocati a persone o a beni, la responsabilità dell’operato
ricade sull’operatore, od utilizzatore.
• Non trasporta passeggeri.
• Ogni singolo conducente ha il dovere di procurarsi le
istruzioni pratiche della professione e del settore. Tali
istruzioni devono mettere in evidenza quanto segue:
- la necessità di prestare la massima attenzione e
di prendere le necessarie cautele durante l’uso dei
trattorini tosaerba;
- che se il trattorino scivola su un pendio, non se ne
può riottenere il controllo premendo i freni.
Cause principali della perdita del controllo:
a) insufficiente presa delle ruote;
b) velocità di guida troppo elevata;
c) freni inadeguati;
d) macchinario di tipo non idoneo al compito;
e) mancata comprensione degli effetti delle condizioni
del terreno, specialmente dei pendii;
f) traino o distribuzione del carico impropri
II. PREPARAZIONE
• Per ridurre il rischio di incendio - prima dell’uso mentre si
fa il carico del carburante e alla fine di ogni operazione di
taglio - ispezionare e togliere qualsiasi accumulo di sporco
dal trattore, dal rasaerba e dietro a tutte le protezioni.
• Indossare sempre scarpe robuste da lavoro e pantaloni
lunghi. Non usare i tosaerba a piedi nudi o indossando
soltanto sandali.
• Controllare scrupolosamente l’area in cui verrà utilizzato
l’equipaggiamento e togliere tutti gli oggetti che potreb-
bero venire scagliati dal macchinario.
• PERICOLO - La benzina è infiammabilissima.
- Conservare il carburante in contenitori appositi.
- Fare rifornimento soltanto all’aperto. E’ vietato fumare
durante il rifornimento.
- Fare rifornimento prima di avviare il motore. Non
svitare mai il tappo del serbatoio, né fare rifornimento
con il motore acceso o caldo.
- In caso di fuoriuscita di benzina, non mettere in moto
il motore. Spostare l’equipaggiamento dall’aerea in
cui si è verificata la fuoriuscita del carburante ed
evitare di provocare qualsiasi tipo di accensione fino
a quando i vapori non si siano dissipati.
- Reinserire e serrare bene il tappo del serbatoio e del
contenitore.
• Sostituire le marmitte che non funzionino bene.
• Prima di iniziare il lavoro ispezionare visualmente le lame,
i bulloni delle lame e il gruppo falciante per verificare che
non vi siano tracce di usura o danneggiamenti. In caso
di lame e bulloni danneggiati od usurati, installate un
nuovo set completo in modo che il macchinario rimanga
bilanciato.
• In caso di trattorini tosaerba a lame mul ti ple prestare la
massima attenzione in quanto ruotando una lama si può
provocare la rotazione delle altre.
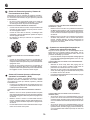
III. FUNZIONAMENTO
• Non accendere il motore in spazi ristretti dove vi si possa
accumulare ossido di carbonio, un gas inodore ma le-
tale.
• Usare i tosaerba soltanto con la luce del giorno oppure
in presenza di buona luce artificiale.
• Prima di avviare il motore disinnestare la frizione degli
accessori da taglio e portare la leva del cambio sulla
posizione di folle.
• Non impiegare questo macchinario su terreni con una
pendenza di oltre 15°.
• Tenere presente che non esistono pendii “sicuri”. Prestare
particolare attenzione sui pendii erbosi. Suggerimenti per
evitare il ribaltamento del macchinario:
- evitare di fermarsi o mettersi in marcia improvvisa-
mente in salita o in discesa;
- innestare la frizione lentamente; tenere sempre le
marce innestate, specialmente in discesa;
- procedere a bassa velocità sui pendii e nelle curve
strette;
- fare attenzione a dossi, buche o ad altri pericoli na-
scosti;
- non tagliare l’erba in diagonale sui pendii a meno che
non si disponga di un trattorino tosaerba realizzato
appositamente allo scopo.
• Prestare particolare attenzione quando si trainano og-
getti pesanti o quando si utilizza dell’equipaggiamento
pesante.
- Usare soltanto i punti approvati di traino nelle barre
di trazione.
- Limitarsi ai carichi che si è in grado di controllare con
sicurezza.
- Non sterzare bruscamente. Prestare particolare at-
tenzione durante la retromarcia.
- Impiegare contrappesi o pesi per ruote ogniqualvolta
siano raccomandati nel manuale d’uso.
• Fare attenzione al traffico quando si lavora in prossimità
di strade e quando le si deve attraversare.
• Attivare il dispositivo di bloccaggio delle lame per inter-
romperne la rotazione prima di attraversare superfici non
erbose.
• Durante l’uso di qualsiasi accessorio non dirigere mai lo
scarico dei materiali verso i passanti e non consentire a
nessuno di avvicinarsi al macchinario in funzione.
• Non usare mai i trattorini tosaerba con protezioni o schermi
difettosi oppure non installati.
• Non modificare le impostazioni del regolatore del motore
né far operare il motore a velocità eccessive. Le velocità
eccessive possono aumentare il pericolo di infortuni.
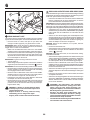
• Prima di lasciare il posto di guida, o dell’operatore:
- disinnestare la leva di comando della presa di forza
ed abbassare gli accessori;
- portare la leva sulla posizione di folle ed innestare il
freno di parcheggio;
- spegnere il motore e togliere le chiavi.
1. Norme Antinfortunistiche
Regole di sicurezza per trattorini da prato
ATTENZIONE: QUESTO TRATTORINO TOSAERBA HA UNA POTENZA SUFFICIENTE AD AMPUTARE MANI E PIEDI E A SCAGLIARE
OGGETTI. LA MANCATA OSSERVANZA DELLE SEGUENTI ISTRUZIONI ANTINFORTUNISTICHE POTREBBE CAUSARE LESIONI
GRAVI E PERSINO IL DECESSO DELLA VITTIMA.

12
• Disinnestare la trasmissione del moto agli accessori,
spegnere il motore e scollegare i fili delle candele oppure
togliere la chiavetta di accensione:
- prima di pulire eventuali intasamenti e pri ma di stasare
lo scivolo;
- prima di interventi o controlli sul tosaerba e prima
delle operazioni di pulizia;
- dopo aver colpito un oggetto estraneo. Controllare che
il tosaerba non sia stato danneggiato ed effettuare
le riparazioni del caso prima di riavviare e mettere in
funzione l’equipaggiamento;
- se il tosaerba, o trattorino, vibra in modo anomalo (in
qual caso eseguire immediatamente dei controlli).
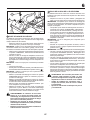
• Disinnestare la trasmissione del moto agli accessori
du rante il trasporto del macchinario oppure quando non
è in uso.
• Spegnere il motore e disinnestare la motorizzazione degli
accessori nei seguenti casi:
- prima di fare rifornimento;
- prima di smontare il contenitore dell’erba tagliata;
- prima di regolare l’altezza, a meno che le rego-
lazioni non possano essere eseguite dal posto
dell’operatore.
• Ridurre la velocità, con la leva dell’acceleratore, per ral-
lentare il motore prima dello spegnimento. Se il motore
è provvisto di valvola di arresto, chiudere l’alimentazione
del carburante alla fine del lavoro.
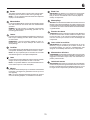
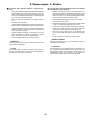
IV. MANUTENZIONE E PERIODI DI INATTIVITA’
• Verificare che tutti i dadi, i bulloni e le viti siano sempre
ben stretti per assicurare che l’equipaggiamento sia in
buone condizioni operative.
• Non lasciare mai l’equipaggiamento, con benzina nel ser-
batoio, in locali chiusi dove i vapori possano raggiungere
fiamme libere o scintille.
• Lasciare raffreddare il motore prima di riporre i tosaerba,
o trattorini, in qualsiasi spazio stretto e chiuso.
• Per ridurre i pericoli d’incendio assicurarsi che il motore,
la marmitta, il vano batteria e la zona di stoccaggio ben-
zina siano liberi da erba, foglie o quantità eccessive di
grasso.
• Controllare spesso il raccoglitore dell’erba tagliata per indi-
viduare eventuali segni di usura o di danneggiamento.
• Per maggiore sicurezza, sostituire le parti usurate o dan-
neggiate.
• Il serbatoio del carburante va vuotato all’aperto, qualora
necessario.
• In caso di macchinario a lame multiple prestare la mas-
sima attenzione quando si ruota una lama in quanto ciò
può provocare la rotazione delle altre.
• Prima di parcheggiare, mettere in magazzino o lasciare
incustoditi i tosaerba, o i trattorini, abbassare l’apparato
falciante a meno che si utilizzi un dispositivo meccanico
per il bloccaggio in posizione della campana tosaerba.
PERICOLO: scollegare sempre i fili delle candele, e
collocarli dove non possano ve nire in contatto con
le candele per non provocare accensioni inavvertite,
durante l’allestimento, il trasporto, la regolazione o
la riparazione dei tosaerba o dei trattorini.
La pagina si sta caricando...

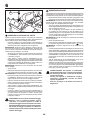
14
- voordat u de maaimachine controleert, schoonmaakt
of eraan werkt;
- nadat u een ongewenst voorwerp heeft geraakt.
Inspecteer de maaimachine op schade en voer
reparaties uit voordat u de machine weer start en
gebruikt;
- als de machine abnormaal begint te trillen (onmid-
dellijk controleren).
- vor dem Entfernen von Verstopfungen aus dem
Mähwerk oder dem Auswurf;
• Schakel de aandrijving naar de hulpstukken uit tijdens
transport of als ze niet worden gebruikt.
• Stop de motor en schakel de aandrijving naar het hulpstuk
uit,
- voordat u tankt;
- voordat u de opvangzak verwijdert;
- voordat u de hoogte verstelt tenzij de hoogte vanuit
de bestuurdersplaats kan worden ingesteld.
• Minder gas tijdens het uitlopen van de motor, en als de
motor met een afsluitklep is uitgerust, moet u de brand-
stoftoevoer aan het einde van het maaien afsluiten.
IV. ONDERHOUD EN OPSLAG
• Houd alle moeren, bouten en schroeven goed vastge-
draaid zodat u er zeker van kunt zijn dat de machine in
een veilige bedrijfsstaat verkeert.
• Sla de machine nooit in een gebouw op, waar dampen een
open vlam of vonk kunnen bereiken, terwijl zich benzine
in de tank bevindt.
• Laat de motor afkoelen voordat u hem in een besloten
ruimte opbergt.
• Beperk brandgevaar: houd de motor, geluiddemper, ac-
curuimte en benzine-opslagruimte vrij van gras, bladeren
of een overmaat aan smeervet.
• Controleer de opvangzak vaak op slijtage of verwering.
• Vervang versleten of beschadigde onderdelen om veil-
igheidsredenen.
• Als de brandstoftank afgetapt moet worden, moet dit
buiten worden gedaan.
• Op machines met meerdere messen dient u eraan te
denken dat het draaien van één mes andere messen
kan doen draaien.
• Wanneer de machine moet worden geparkeerd, opge-
slagen of alleen moet worden gelaten, moet de maai-
inrichting neergelaten worden tenzij een mechanische
vergrendeling wordt gebruikt.
WAARSCHUWING: Maak de bougiekabel altijd
los, plaats hem waar hij de bougie niet kan raken
teneinde onverhoeds starten te voorkomen tijdens
het opstellen, vervoeren, afstellen of uitvoeren van
reparaties.
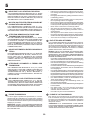
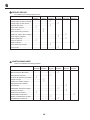
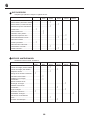
Vibration Lärmpegel
Vibration Vibratie
Vibración Vibrazioni
Vibrering Vibration
Vibrasjon Tärinä
m/s
ISO 3744 2000/14EC
ISO 11094 2005/88/EC
EMC 2004/108/EC
2
02663
*
*
As rated by the engine manufacturer
2006/42/EC
LpA < 90 dBa
LpA < 90 dBa
LwA < 100 dBa
LwA < 100 dBa
EN 1033
A (8) ≤ 2.5
EN 1032
A (8) ≤ 0.5
CTH 182T
13.4/10
0-7,3
107
38-102
235
Notified Body
SNCH
11, Route de Luxembourg
L-5230 Sandweiler
TUV Rheinland
No. 0499

15
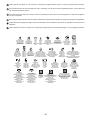
These symbols may appear on your machine or in the literature supplied with the product. Learn and understand their meaning.
Diese Symbole finden Sie auf Ihrer Maschine oder in Unterlagen, die mit dem Produkt ausgehändigt wurden. Bitte machen Sie
sich mit deren Bedeutung vertraut.
Ces symboles peuvent figurer sur tracteur ou dans les publications fournies avec le produit. Apprenez à comprendre la significa-
tion de ces symboles.
Estos símbolos pueden aparecer sobre su unidad o en la literatura proporcionada con el producto. Aprenda y comprenda sus significados.
Simboli utilizzati sull'apparato di taglio o nella documentazione fornita unitamente al prodotto. E' importante conoscerne bene il
significato.
Deze symbolen kunnen op uw machine of in de bij het produkt geleverde documentatie aanwezig zijn. Lees en begrijp de betekenis.
BATTERY
BATTERIE
BATTERIE
BATERÍA
BATTERIA
ACCU
CAUTION
VORSICHT
DANGER
PRECAUCIÓN
ATTENZIONE
OPGELET
BEWARE OF
THROWN OBJECTS
VORSICHT, HOCHGESCHLEUDERT
GEGENSTÄNDE
ATTENTION AUX PROJECTILES
CUIDADO CON
OBJETOS LANZADOS
ATTENZIONE AGLI OGGETTI
SCAGLIATI
LET OP WEGGESLINGERDE
VOORWERPEN
FORWARD
VORWÄRTSGANG
MARCHE AVANT
MARCHA HACIA
DELANTE MARCIA
VOORUIT
FAST
SCHNELLFAHRT
VITESSE RAPIDE
MARCHA RÁPIDA
AVANZAMENTO VELOCE
VELOCE
SLOW
LANGSAMFAHRT
VITESSE LENTE
MARCHA LENTA
AVANZAMENTO LENTO
LANGZAAM RIJDEN
ENGINE ON
MOTOR LÄUFT
MOTEUR EN MARCHE
MOTOR ENCENDIDO
MOTORE ACCESO
MOTOR AAN
ENGINE OFF
MOTOR AUS
MOTEUR ARRÊTÉ
MOTOR APAGADO
MOTORE SPENTO
MOTOR UIT
OIL PRESSURE
ÖLDRUCK
PRESSION D'HUILE
PRESIÓN DEL ACEITE
PRESSIONE DELL'OLIO
OLIEDRUK
LIGHTS ON
LICHT AN
PHARES ALLUMÉS
LUCES ENCENDIDAS
LUCI ACCESE
LICHTEN AAN
FUEL
KRAFTSTOFF
CARBURANT
COMBUSTIBLE
CARBURANTE
BRANDSTOF
CHOKE
STARTKLAPPE
STARTER
ESTRANGULACIÓN
STARTER
CHOKE
MOWER HEIGHT
MÄHWERKHÖHE
HAUTEUR DE COUPE
ALTURA DE LA SEGADORA
ALTEZZA APPARATO
FALCIANTE
MAAIHOOGTE
PARKING BRAKE LOCKED
FESTSTELLBREMSE VERRIEGELT
FREIN DE PARKING VERROUILLÉ
FRENO DE ESTACIONAMIENTO
CERRADO
FRENO DI PARCHEGGIO INNESTATO
PARKEERREM GEBLOKKEERD
UNLOCKED
ENTRIEGELT
DEVERROUILLÉ
ABIERTO
DISINNESTATO
GEDEBLOKKEERD
REVERSE
RÜCKWÄRTSFAHRT
MARCHE ARRIÈRE
MARCHA ATRÁS
RETROMARCIA
ACHTERUIT-RIJDEN
NEUTRAL
LEERLAUF
POSITION NEUTRE
PUNTO NEUTRO
FOLLA
NEUTRAALSTAND
HIGH
HOCH
HAUT
ALTO
AUMENTARE
HOOG
LOW
NIEDRIG
BAS
BAJO
DIMINUIRE
LAAG
ATTACHMENT
CLUTCH ENGAGED
ANBAUGERÄTE-KUPPLUNG
EINGEKUPPELT
LAMES EMBRAYÉES
EMBRAGUE DEL ACCESORIO
ENGANCHADO
FRIZIONE ACCESSORIE
INNESTATA
KOPPELING HULPSTUK
INGESCHAKELD
PARKING BRAKE
FESTSTELLBREMSE
FREIN DE PARKING
FRENO DE ESTACIONAMIENTO
FRENO DI PARCHEGGIO
PARKEERREM
IGNITION
ZÜNDUNG
ALLUMAGE
IGNICIÓN
AVVIAMENTO
ONTSTEKING
ATTACHMENT
CLUTCH DISENGAGED
ANBAUGERÄTE-KUPPLUNG
AUSGEKUPPELT
LAMES DÉBRAYÉES
EMBRAGUE DEL ACCESORIO
DESENGANCHDO
FRIZIONE ACCESSORI
DISINNESTATA
KOPPELING HULPSTUK
UITGESCHAKELD
P
KEEP BYSTANDERS AWAY
ZUSCHAUER FERNHALTEN
TENIR LES PASSANTS À DISTANCE
GUÁRDESE LEJOS DE GENTE
TENERE LONTANI I PASSANTI
OMSTANDERS UIT DE
BUURT HOUDEN
WARNING
WARNUNG
ATTENTION
ADVERTENCIA
PERICOLO
WAARSCHUWING
ENGINE START
ANLASSEN DES MOTORS
DÉMARRAGE DU MOTEUR
ARRANQUE DEL MOTOR
AVVIAMENTO DEL MOTORE
HET STARTEN VAN DE MOTOR
REVERSE
RÜCKWÄRTSFAHRT
MARCHE ARRIÈRE
MARCHA ATRÁS
RETROMARCIA
ACHTERUIT-RIJDEN
ROS ON
ROS AN
ROS ON
ROS ON
ROS ON
ROS ON

16
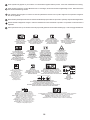
These symbols may appear on your machine or in the literature supplied with the product. Learn and understand their meaning.
Diese Symbole finden Sie auf Ihrer Maschine oder in Unterlagen, die mit dem Produkt ausgehändigt wurden. Bitte machen Sie
sich mit deren Bedeutung vertraut.
Ces symboles peuvent figurer sur tracteur ou dans les publications fournies avec le produit. Apprenez à comprendre la significa-
tion de ces symboles.
Estos símbolos pueden aparecer sobre su unidad o en la literatura proporcionada con el producto. Aprenda y comprenda sus significados.
Simboli utilizzati sull'apparato di taglio o nella documentazione fornita unitamente al prodotto. E' importante conoscerne bene il
significato.
Deze symbolen kunnen op uw machine of in de bij het produkt geleverde documentatie aanwezig zijn. Lees en begrijp de betekenis.
EUROPEAN MACHINERY
DIRECTIVE FOR SAFETY
EUROPÄISCHE VERORDNUNG
FÜR MASCHINEN-SICHERHEIT
CONFORME AUX NORMES DE
SÉCURITÉ EUROPÉENNES
DIRECTIVO DE MAQUINARIA
EUROPEO PARA LA SEGURIDAD
NORMATIVE ANTINFORTUNISTICHE
EUROPEE PER MACCHINARI
VEILIGHEIDSRICHTLIJN VOOR
EUROPESE MACHINES
DANGER, KEEP HANDS AND FEET AWAY
GEFAHR, HÄNDE UND FÜSSE FERNHALTEN
DANGER, GARDEZ LES MAINS ET LES PIEDS AU LOIN
PELIGRO, MANTENGA LAS MANOS Y LOS PIES LEJOS
PERICOLO. TENERE LONTANI MANI PIEDI
GEVAAR, HANDEN EN VOETEN UIT DE BUURT HOUDEN
READ OWNERS MANUAL
BETRIEBSANLEITUNG LESEN
LIRE LE MANUEL
D'INSTRUCTIONS
LEA EL MANUAL DE
INSTRUCCIONES
LEGGERE IL MANUALE
DELL'OPERATORE
GEBRUIKERSHANDLEIDING
LEZEN
MOWER LIFT
MÄHWERKHUB
RELEVAGE DE L'UNITÉ DE COUPE
LEVANTAMIENTO DE LA SEGADORA
SOLLEVAMENTO APPARATO FALCIANTE
MAAIHOOGTEREGELING
FREE WHEEL
FREILAUF
ROUE LIBRE
RUEDA LIBRE
COMANDO DISINNESTO
VRIJWIEL
HOT SURFACES
HEISSE OBERFLÄCHEN
SURFACES CHAUDES
SUPERFICIES MUY CALIENTES
SUPERFICIE ROVENTE
HETE OPPERVLAKKEN
MAX
+
_
90N
MAX
+
_
150N
DRAWBAR LOADING
ANHÄNGESCHIENENLAST
CHARGEMENT DE LA BARRE DE TRACTION
CARGA DE LA BARRA DE ENGANCHE
CARICO DI TRAZIONE DELLA BARRA
BELASTING OP TREKHAAK
BRAKE/CLUTCH PEDAL
BREMS / KUPPLUNGSPEDAL
PÉDALE DE FREIN / D’EMBRAYAGE
PEDAL DE FRENO / DE EMBRAGUE
PEDALE FRENO/FRIZIONE
REM / KOPPELINGSPEDAAL
SOUND POWER LEVEL
GERÄUSCHPEGEL
NIVEAU DE PUISSANCE ACCOUSTIQUE
NIVEL DE LA POTENCIA ACÚSTICA
LIVELLO DELLA POTENZA SONORA
GELUIDSNIVEAU
Consult manual for safe
operation practices.
Für den sicheren Betrieb ziehen
Sie das Bedienungshandbuch zu Rate.
Consultez le manuel pour connaître
les Modes de fonctionnement sûre.
Consulte el manual para conocer
las Prácticas de Manejo Seguro.
Consultare il manuale per le
Procedure di Operazioni Sicure.
Raadpleeg de handleiding voor
Veilige gebruiksprocedures.
Risk of fire
due to debris buildup.
Brandgefahr durch Ansammlung
von Mährückständen.
Risque d'incendie provoqué
par l'accumulation de débris.
Riesgo de incendio debido
a acumulación de restos y escombros.
Rischio di incendio a causa
di un accumulo di sporco.
Brandgevaar door
de ophoping van afval.
WARNING: Read Engine Owner’s Manual –
Fire hazard – Poisonous fumes or toxic gases
WARNUNG: Lesen Sie das Bedienungshandbuch –
Brandgefahr – Giftige Dämpfe oder toxische Gase
AVERTISSEMENT : Veuillez lire le Manuel d’utilisation du moteur –
Risques d’incendie – Fumées ou gaz toxiques
ATENCIÓN: Leer el Manual de Uso del Motor –
Peligro de fuego – Humos venenosos o gases tóxicos
AVVERTENZA: leggere il manuale per l’utente del motore –
Rischio d’incendio – Fumi velenosi o gas tossici
WAARSCHUWING: Lees de handleiding van de motor –
Brandgevaar – Giftige dampen of gassen
CAUTION: Fingers or hand entanglement – belt drive
ACHTUNG: Öffnung der Gangschaltung. Gefahr des Verfangens von Finger oder Hand – Riemenantrieb
PRUDENCE : Risque d’accrochage des doigts ou de la main – courroie de transmission
ADVERTENCIA: Enganche de dedos o manos – mandado por correa
ATTENZIONE: Fare attenzione a mani e dita – trasmissione a cinghia
VOORZICHTIG: Gevaar voor beknelling van vingers of handen – riemaandrijving
DO NOT OPERATE WITHOUT BAGGER OR DEFLECTOR
NICHT IN BETRIEB NEHMEN OHNE GRASFANGBOX ODER DEFLEKTOR
NE JAMAIS UTILISER SANS BAC OU DÉFLECTEUR
NO PONGA EN MARCHA SIN RECOGEDOR O DEFLECTOR
NONAZIONARE LA MACCHINA SENZA IL CESTO O SENZO IL DEFLETTORE DI SCARICO
ZONDER STORTGOOT OF AFWIJKENDE SPATDOEK NIET OPEREREN
NO OPERATION
ON SLOPES MORE THAN 15°
NICHT AUF ABHÄNGEN MIT
MEHR ALS 15° STEIGUNG BETREIBEN
NE PAS UTILISER SUR DES
PENTES DE PLUS DE 15°
NO OPERE SOBRE PENDIENTES
DE MÁS DE 15°
NON USARE SU PENDII CON
UN'INCLINAZIONE DI OLTRE 15°
NIET OP HELLINGEN VAN MEER DAN
15° GEBRUIKEN
15°

17
01738
GEFAHR
AUGEN SCHÜTZEN
EXPLOSIVE GASE
KÖNNEN ERBLINDUNG
UND KÖRPERVERLET-
ZUNGEN VERURSAC-
HEN.
GEVAAR
OGEN BESCHERMEN
EXPLOSIEVE GASSEN
KUNNEN BLINDHEID
OF LETSEL VERO-
ORZAKEN.
PELIGRO
PROTEJE SUS OJOS
GASES EXPLOSIVOS
PUEDEN CAUSAR CE-
GUE-DAD O LESIONES.
PERICOLO
RIPARARE GLI OCCHI
VAPORI ESPLOSIVI
PUO’ PROVOCARE
CECITA’ O LESIONI
ZU VERMEIDEN:
• FUNKEN
• FEUER
• RAUCHEN
GEEN
• VONKEN
• VUUR
• ROKEN
NO
• CHISPAS
• LLAMAS
• FUMAR
DIVIETO
• SCINTILLE
• FIAMME
• SIGARETTE
AUGEN UNVER-
ZÜGLICH MIT WASSER
AUSSPÜLEN. SOFORT
ÄRZTLICHE HILFE
AUFSUCHEN.
OGEN ONMIDDELLIJK
MET WATER SPOELEN.
SNEL MEDISCHE HULP
INROE-PEN.
LÍMPIESE LOS OJOS
CON UN CHORRO DE
AGUA.OBTENGA AYU-
DAMÉDICA RÁPIDAM-
ENTE.
LAVARE IMMEDIATA-
MENTE GLI OCCHI
CON ACQUA. SOT-
TOPORRE AL PIU’
PRES TO ALLE CURE
DEL MEDICO.
SCHWEFELSÄURE
KANN ERBLINDUNG
ODER SCHWERE VERÄT-
ZUNGEN VERURSACHEN.
ZWAVELZUUR
KAN BLINDHEID OF ERN-
STIGE BRANDWONDEN
VER-OORZAKEN.
ÁCIDO SULFÚRICO
PUEDEN CAUSAR CE-
GUE-DAD O QUEMADU-
RAS MUY GRAVES.
ACIDO SOLFORICO
PUO’ PROVOCARE LA
CECITA’ OD USTIONI
GRAVI.
FÜR KINDER UNZUGÄNGLICH AUFBEWAHREN. NICHT KIPPEN. DIE BATTERIE NICHT ÖFFNEN!
UIT DE BUURT VAN KINDEREN HOUDEN. NIET KANTELEN. DE BATTERIJ NIET OPENMAKEN!
MANTENER FUERA DEL ALCANCE DE NIÑOS. NO LA INCLINE. ¡NO ABRA LA BATERÍA!
TENERE LONTANO DALLA PORTATA DEI BAMBINI. NON INCLINARE. NON APRIRE LA BATTERIA!
La pagina si sta caricando...

19
2
0
2466
1
02464
2
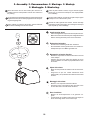
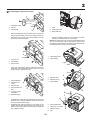
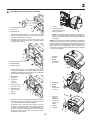
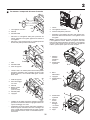
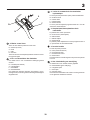
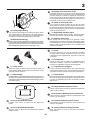
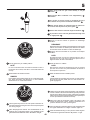
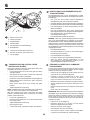
Seat
Remove the hardware securing seat to the cardboard pack ing
and set the hardware aside for assembly of seat to tractor.
Pivot seat upward and remove from cardboard packing.
Remove the cardboard packing and discard.
Place seat on seat pan so head of shoulder bolt is positioned
over large slotted hole in pan (1).
Push down on seat to engage shoulder bolt in slot and pull
seat towards rear of tractor.
The seat is adjustable for individual setting in relation to the
clutch and brake ped al. Set the seat to the correct position
by moving it forwards or backwards. Tighten the adjustment
bolt securely (2).
Sitz
Entnehmen Sie die Teile, mit denen der Sitz an der Karton-
age befestigt ist. Bewahren Sie diese Teile auf, da sie für die
Montage des Sitzes am Traktor noch benötigt werden.
Kippen Sie den Sitz nun nach oben, und nehmen Sie ihn aus
der Kartonage. Entfernen Sie die restlichen Verpackungsteile
und entsorgen Sie diese.
Der Sitz wird so auf die Sitzplatte plaziert, dass sich der
Hauptbolzen über dem Schlitz in der Platte befindet (1).
Sitz herunterdrücken, so dass der Bolzen in den Schlitz
einrastet und dann den Sitz nach hinten ziehen.
Der Sitz ist persönlich im Verhältnis zum Kupplungs- bzw. Brem-
spedal einstellbar. Den Sitz vor- oder zurückschieben, bis die richtige
Sitz-stellung erhalten wird. Die Einstellschraube anziehen (2).
Siège
Retirer le bouton de réglage et la rondelle plate qui fixent le
siège à l'emballage de carton, le conserver pour le montage
du siège sur le tracteur.
Basculer le siège vers le haut et le sortir de l'emballage de
carton. Se débarrasser ensuite de l'emballage.
Placer le siège sur son embase de façon que la tête de la vis
à épaulement se place dans le trou à l'extrémité de la large
fente de l'embase (1).
Pousser le siège vers le bas pour engager la vis à épaulement
dans la fente puis repousser le siège vers l'arrière du tracteur.
La position du siège seul, par rapport à la position de la pédale
de frein et d'embrayage, est réglable. Rechercher une posi-
tion assise correcte en déplaçant le siège vers l'avant ou vers
l'arrière. Serrer ensuite à fond la vis de réglage (2).
Asiento
Remueva la manilla de ajuste y la arandela plana que aseguran
el asiento al empaque de cartón y póngalos de lado para poder
utilizarlos durante la instalación del asiento sobre el tractor.
Gire el asiento hacia arriba y remuevalo del embalaje de
cartón. Remueva y desechese del embalaje de cartón.
Colocar el asiento y en el asiento del recipiente de manera
que la cabeza del bulón de la espalda esté posicionada en
el agujero ancho ranurado en el recipiente (1).
Empujar en el asiento para enganchar el bulón de la espalda en
la ranura y empujar el asiento hacia la parte trasera del tractor.
El asiento es ajustable individualmente en relación a los
pedales del embrague y de freno. Ajustar el asiento en la
posición correcta desplazándolo hacia adelante o atrás.
Apretar el tornillo de ajuste (2).
Sedile
Rimuovere i dispositivi di fissaggio che fissano il sedile
sull’imballaggio di cartone e mettere da parte i dispositivi di
fissaggio per assemblare il sedile sul trattore.
Muovere il sedile verso l’alto e rimuoverlo dall’imballaggio di
cartone. Rimuovere ed eliminare l’imballaggio di cartone.
Posizionare il sedile sulla relativa scocca in modo tale che il
bullone nella parte superiore dello spallamento si posizioni
sopra il foro grande posto sul fondo. (1).
Premere sul sedile per inserire il bullone dello spallamento
nella fessura e tirare il sedile verso il retro del trattore.
Il sedile è regolabile. Regolare il sedile fino ad assumere la
posizione più comoda, spostandolo avanti o indietro. Stringere
la vite di regolanzione (2).
Zitting
Verwijder de bevestigingselementen waarmee de zitting aan de
kartonnen verpakking bevestigd is en zet deze bevestiging-sele-
menten opzij voor het monteren van de zitting op de trekker.
Draai de zitting omhoog en haal hem uit de kartonnen verpak-
king. Verwijder de kartonnen verpakking en werp die weg.
Plaats de stoel op de zitpan zodat de kop van de borstbout
zich over het grote sleufgat in de pan bevindt (1).
Druk op de stoel totdat de borstbout in de sleuf past en trek
de stoel vervolgens naar de achterzijde van de tractor.
De zitting is verstelbaar voor de individuele instelling in
verhouding tot de koppelings- resp. rempedaal. Stel de zizting
in de juiste zitpositie door deze naar voor en naar achter te
schuiven. Haal de stelschroef aan.

20
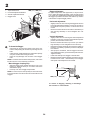
NOTE:
Check that the flex connector is correctly con nect ed to the
safe ty switch (3) on the seat hold er.
2
3
HINWEIS:
Prüfen, daß das Kabel richtig an dem Sicherheitsschalter (3)
auf dem Halter des Sitzes angeschlossen ist.
REMARQUE:
Vérifier que le câble électrique est bien connecté sur le con-
tacteur de sécurité (3) placé sous l'embase du siège.
NOTA:
Controlar que el cable está correctamente acoplado al inter-
ruptor de seguridad (3) en el soporte del asiento.
NOTA:
Controllare che il cavo sia ben collegato all’interruttore disi-
curezza (3) sul supporto del sedile.
N.B.
Controleer of de snoer correct is aangesloten op deveilighe-
idsschakelaar (3), op de houder van de zitting.

21
02591
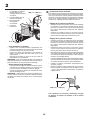
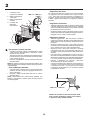
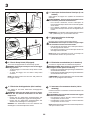
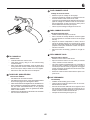
Install battery
NOTE: If battery is put into service after month and year
indicated on label, charge battery for minimum of one hour
at 6-10 amps.
WARNING: Before installing battery remove metal brace-
lets, wrist watch bands, rings, etc. from your person.
Touching these items to battery could result in burns.
• Remove Battery Cover
Einbau der Batterie
HINWEIS: Falls diese Batterie nach dem auf dem Aufkleber
angegebenen Datum (Monat und Jahr) in Betrieb genommen
wird, die Batterie mindestens eine Stunde lang mit 6 bis 10
Ampere aufladen.
WARNUNG: Vor dem Einbau der Batterie Metallarmbänder,
Uhrarmbänder, Ringe und dgl. ablegen. Wenn diese
Gegenstäande mit der Batterie in Berührung kommen, könnte
dies Brandverletzungen verursachen.
• Entfernen Sie die Batterieabdeckung
Mise en place de la batterie
REMARQUE : Si la batterie est mise en service au-delà de
l'année et du mois indiqués sur l'étiquette, recharger la bat-
terie, pendant une heure au moins, à 6-10 A .
ATTENTION : Avant de mettre en place la batterie, pren dre
la précaution de retirer gourmette, montre-bracelet, anneau,
etc. Leur contact avec la batterie pouvant entraîner des
brûlures.
• Retirer le capotage de la batterie
Instalación de la batería
NOTA: Si utiliza la bateria después del mes y año indicado
sobre la etiqueta, cargue la batería por un mínimo de una
hora a 6-10 amps.
ADVERTENCIA: Antes de instalar la batería, quitese los
brazaletes metálicos, correas de reloj, sortijas, etc. Si estos
objetos tocan la bateria pueden producirse quemaduras.
• Quite el tapador del acumulador
Installazione della batteria
NOTA: Se questa batteria viene messa in uso dopo il mese
e l’anno indicati sull’etichetta, caricarla per almeno un’ora a
6-10 Ampère.
PERICOLO: Prima di installare la batteria eliminare anelli,
collane,braccialetti e altri oggetti di metallo dalla persona. Il
contatto del metallo con la batteria può causare incendi,
• Portare giuí il coperchio dellíaccumulatore.
Accu installeren
N. B.: Als deze accu na de maand en het jaar, aangegeven
op het etiket, in bedrijf wordt genomen, laad de accu dan
minstens één uur op met 6-10 A.
WAARSCHUWING: Doe voor het intalleren van de accu alle
metalen voorwerpen: armbanden, ringen, horloges enz. Haf.
Anders kan het contact tussen deze voorwerpen en de accu
brandwonden veroorzaken.
• Verwyder het accudeksel.
4
6
5
1
2
3
1. Tapador del acumulador
2. Cable positivo (+)
3. Cable negativo (-)
4. Protección
5. Terminal de batería
6. Batería
1. Coperchio dellí accumu-
latore
2. Cavo elettrico positivo (+)
3. Cavo elettrico negativo (-)
4. Paraurti
5. Polo della batteria
6. Batteria
1. Accudeksel
2. Kabel positieve (+)
3. Kabel negatieve (-)
4. Stootwand
5. Accuklem
6. Accu
1. Battery Cover
2. Cable Positive (+)
3. Cable Negative (-)
4. Fender
5. Battery terminal
6. Battery
1. Batterieabdeckung
2. Positives Kabel (+)
3. Negatives Kabel (-)
4. Schutzblech
5. Batterieklemme
6. Batterie
1. Capotage de batterie
2. Câble (+)
3. Câble (-)
4. Carrosserie
5. Borne de la batterie
6. Batterie
2

22
0
2591
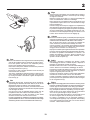
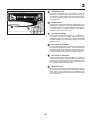
WARNING: Positive terminal must be con nect ed first to
prevent sparks from ac ci den tal grounding.
Remove terminal caps and discard. Connect the red cable to
+ and then the black earth ca ble to -. Screw tight the cables.
Grease the battery poles with vaseline to prevent corrosion.
Replace battery cover.
WARNUNG! Um einen Kurzschluß zu vermeiden, muß der
Pluspol zuerst angeschlossen werden.
Die Schutzkappen von den Anschlußklemmen entfernen und
entsorgen. Die Batterie in Position neben den Fahrersitz brin-
gen. Die Batterieklemmen müssen nach vorn zeigen. Zuerst
das rote Kabel an „+“ und dann das schwarze Kabel an„-“
anschließen. Die kabel fest anschrauben. Batterieklemmen
mit wasserfreiem Fett (Vaseline) einfetten, um Korrosion zu
verhindern. Batterieabdeckung wieder montieren.
ATTENTION : La borne positive doit être connectée la pre-
mière afin d'éviter les étincelles qui peuvent se produire à
la suite d'une mise à la masse accidentelle.
Retirer les capuchons de protection des bornes et les mettre
de côté. Placer la batterie dans son logement, les bornes du
côté extérieur. Raccorder en premier le câble rouge (+) à la
borne positive de la batterie puis le câble noir (-) à la borne
négative. Fixer les deux câbles à l'aide des vis et des écrous
fournis. Graisser les bornes de la batterie avec une graisse
résistante à l'humidité (vaseline) afin d'éviter la corrosion.
Replacer le capotage de la batterie.
ADVERTENCIA: A fin de evitar chispas por contacto acci-
dental a tierra hay que conectar primero el borne positivo.
Remueva las tapas protectoras de los terminales y póngalas
de lado. Ponga la batería en su sitio debajo del asiento. ‘Los
bornes han de estar orientados hacia adelante. Conecte
primero el cable rojo al borne positivo y después el negro
de masa al borne negativo. Sujete los cables. Lubrique los
bornes con grasa que no contenga agua (vaselina) a fin
de evitar la corrosión. Reponga el tapador del acumulador.
PERICOLO: Il polo positivo deve essere collegato per primo
onde evitare scintille.
Togliere i cappucci protettivi dai poli e scartarli.Montare la
batteria nel vano sotto il sedile, con i poli in avanti. Collegare
il cavo rosso al polo positivo (+) e quello nero negativo (-)
alla terra. Ingrassare i poli con grasso privo di acqua (va-
sellina) per evitare corrosione. Rimetter il coperchiodellíac-
cumulatore.
WAARSCHUWING: De positieve klem moet eerst
aangesloten worden om vonken door per ongeluk aarden
te voorkomen.
Verwijder de beschermdoppen van de accupolen en gooi ze
weg. Zet de accu op zijn plaats onder de zitting. De accupolen
dienen naar voren te zijn gericht. Sluit eerst de rode kabel aan
op + en daarna de zwarte aard-kabel op-. Schroef de kabels
vast. Smeer de accupolen in met watervrij vet (vaseline) om
corrosie te voorkomen. Plaats het accudeksel terug.
2

23
2
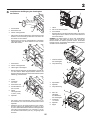
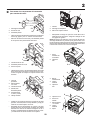
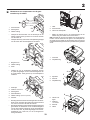
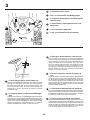
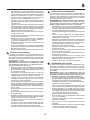
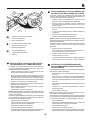
To install bagger com po nents to tractor
1. Dis charge Chute
2. 3/8 Nut
3. Flat Washer
02330
3
1
2
1. 3/8 Lock nut
2. Flat Wash er
3. Support Tube
1. Support Bracket
2. Clevis Pin 10 x
17mm
3. 3/8 Lock Nut
4. 3/8 x 63,5mm Hex
Bolt
5. 10,3mm (13/32")
flat washer
6. Retainer Spring
1. Hook
2. Discharge Chute
3. Back plate slot
02306
2
1
3
• Remove discharge chute from rear of tractor. Unhook the
two (2) straps and pull chute out and away from tractor.
• Remove the two (2) 3/8 nuts and flat washers from the
bolts at the tractor back plate.
• Using the nuts and flat washers removed from tractor
back plate, install the bagger support tube to the back
plate as shown. Tighten securely.
• Install the two upper support brack ets through the back
plate and to the chas sis, install the clevis pin 10x17mm
and secure with retainer spring.
• Assemble both support brackets to the outside of the
bagger support tube using two each 3/8 x 63,5mm hex
bolts13/32" I.D. flat washers and 3/8 locknuts from parts
bag. Tight en securely.
• Replace discharge chute into rear opening of tractor.
Secure the chute with the two hook straps.
NOTE: The strap hook must go through the discharge chute
only. Do not allow the hook to enter the slot in the tractor
back plate. This will allow the dis charge chute to float with the
mower deck when moving on uneven terrain.
02277
1
2
3
0
3028
2
5
3
1
4
6
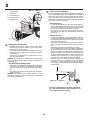
1. Front bagger tube
2. Vinyl binding
0
2
9
0
5
2
1
3. Spreader bars
4. Retainer spring
5. Vinyl binding
02
9
0
6
4
3
4
5
5
6. Dump handle tube
7. Clevis pin 10 x 44mm
8. Retainer spring
9. Cap
029
0
7
6
7
8
9
La pagina si sta caricando...
La pagina si sta caricando...
La pagina si sta caricando...
La pagina si sta caricando...
La pagina si sta caricando...
La pagina si sta caricando...
La pagina si sta caricando...

31
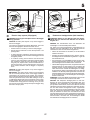
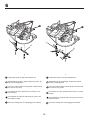
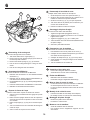
Per montare i componenti del cesto di raccolta
1. Convogliatore di scarico
2. Dadi 3/8
3. Rondella Piatta
1. Dadi
2. Rondella Piatta
3. Telaio di supporto
1. Staffa di supporto
2. Perno di fissaggio
10x17mm
3. Dadi 3/8
4. Bullone a testa
esagonale
(3/8 x 63,5mm)
5. Rondella piatta
6. Coppiglia
1. Gancio
2. Convogliatore di scarico
3. Fessura sulla piastra posteriore
• Rimuovere il convogliatore dalla parte posteriore del
trattore. Allentare le due graffe, sganciare ed estrarre il
convogliatore.
• Rimuovere i due (2) dadi da 3/8 e le rondelle piatte dai
bulloni sulla piastra posteriore del trattore.
• Usando i dadi e le rondelle piatte rimosse dalla piastra
posteriore, installare il tubo di sostegno del sacco sulla
piastra posteriore, come indicato nella figura. Avvitare
bene i dadi.
• Installare le due staffe di supporto attraverso la piastra
posteriore e al chassis montare la coppiglia e fissare con
il perno di fissaggio 10x17mm.
• Assemblare nel modo indicato nella figura entrambe le
staffe di supporto sull’esterno del tubo di sostegno del
sacco, usando bulloni esagonali 3/8 x 63,5 mm, rondelle
piatte di diametro interno 13/32” e controdadi da 3/8. Av-
vitare bene.
• Rimontare il convogliatore di scarico nell' apertura pos-
teriore del trattore. Fissare bene il convogliatore con le
due graffe.
NOTA: il gancio della fascia passa solamente attraverso
il convogliatore di scarico. Evitare che il gancio entri nella
fessura sulla piastra posteriore del trattore. Il convogliatore
di scarico sarà in grado di muoversi con il piano di taglio del
trattore, quando questo opera su terreni non piani.
5. Rivestimento
in plastica
6. Asta di
scarico
7. Perno di
fissaggio
10 x 44mm
8. Coppiglia
9. Tappo
1. Piastrina
d'arresto
dell'asta di
scarico
2. Rivestimento
in plastica
3. Barre
distanziatrici
4. Coppiglia
5. Rivestimento in
plastica
02330
3
1
2
02306
2
1
3
02277
1
2
3
0
3028
2
5
3
1
4
6
0
2
9
0
5
2
1
02
9
0
6
4
3
4
5
5
0
29
07
6
7
8
9
2

32
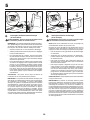
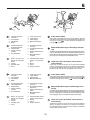
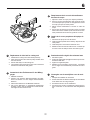
Per montare il cesto di raccolta:
• Svolgere il sacchetto ruotando completamente in avanti
il tubo anteriore dell’insaccatrice e premendo la parte
inferiore in vinile sul tubo.
• All’interno del sacchetto, installare le barre distanziatrici e
le molle di tenuta sui perni di entrambi i lati del sacchetto,
come mostrato in figura.
• Premere i collegamenti in vinile sui lati del tubo anteriore
dell’insaccatrice.
NOTA: Per i trattori con sistema di svuotamento elettrico, fare
riferimento alle istruzioni allegate al kit per ulteriori procedure
di assemblaggio.
Solo svuotamento manuale:
• Introdurre l'asta di scarico nel foro collocato sulla parte
superiore del cesto. Montare la coppiglia e fissare con il
perno di fissaggio.
• Spingere il tappo sull’estremità della leva di scarico
dell’insaccatrice.
NOTA: L'asta discarico puo' anche essere utilizzata per
liberare il convogliatore, qualora questo dovesse ostruirsi
con erba bagnata.
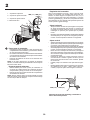
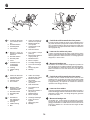
1. Controllare che la
superficie sia allineata
2. Staffa di regolazione
orizzontale
3. Staffa di regolazione
verticale
4. Lucchetto del
dispositivo
d’insaccatura
Adattare la macchina in base alla funzione desid-
erata: raccolta, mulching o scarico a terra. Vedere
il "Capitolo 5" del presente manuale.
02967
1
6MM (1/4") - 9MM (3/8")
2
3
4
02983
10MM (7/16") - 16MM (5/8")
4
Regolazione del cesto:
Per il buon funzionamento del cesto, puo' essere necessa-
rio regolarne il blocco Si dovrebbe avere un gioco di 6mm
(1/4") - 9 mm (3/8") tra la parte superiore e il parafango. La
superficie superiore del cesto dovra' essere allineata con
la parte superiore del parafango. Per regolare la posizione
del cesto:
Regolazione orizzontale
• Allentare leggermente i dadi che serrano le staffe destra
e sinistra di regolazione orizzontale del sacco. Allentare
quanto basta affinché le staffe possano essere spostate
per mantenendo la loro posizione.
• Spostare le staffe in avanti e all’indietro quanto è neces-
sario per lo spostamento desiderato del gruppo del sacco.
Stringere di nuovo i dadi in maniera salda.
Regolazione verticale
• Allentare leggermente i dadi che serrano le staffe di
regolazione verticale. Allentare quanto basta affinché le
staffe possano essere spostate per mantenendo la loro
posizione.
• Spostare le staffe verso l’alto o verso il basso quanto è
necessario per lo spostamento desiderato del gruppo del
sacco. Stringere di nuovo i dadi in maniera salda.
• Montate di nuovo il blocco del contenitore e verificate
l'allineamento del cesto con il parafango posteriore. Se
necessario, ripetere la procedura fino alla posizione de-
siderata.
• Una volta ottenuto il collegamento corretto, rimuovere il
dispositivo d’insaccatura dal trattore e inserire il lucchetto
del dispositivo d’insaccatura (4) nella contropiastra del trat-
tore, come mostrato in figura. Serrare accuratamente.
• Montare e abbassare con cautela il dispositivo
d’insaccamento per attivare il nottolino.
• Calcolare la distanza tra il dispositivo d’insaccamento e
il nottolino, come mostrato in figura. Se la distanza non
è compresa tra 10 mm – 16 mm, rimuovere con cautela
il dispositivo d’insaccamento e, se necessario, ripetere
la regolazione verticale.
2

33
Hetmonteren van componenten van de gras-
container op de trekker
1. Afvoertrechter
2. 3/8 borgmoer
3. Vlakke sluitring
1. Borgmoer 3/8
2. Vlakke sluitring
3. Steun
1. Stennijzer
2. Vorkbout 10x17mm
3. 3/8 borgmoer
4. 3/8 Zeskantbout
5. Vlakke sluitring 10,3 mm (13.32")
6. Sluitveer
1. Haak
2. Afvoertrechter
3. Gleuf in de achterplaat
• Verwijder de afvoertrechter van de achterzijde van de
trek ker. Haak de twee (2) riemen los en trek de trechter
van de trekker af.
• Verwijder de twee (2) 3/8-moeren en de platte borgschijfjes
van de bouten aan de achterplaat van de trekker.
• Gebruik de van de achterplaat verwijderde moeren
en platte borgschijfjes om de ondersteuningsbuis van
de grascontainer zoals getoond op de achterplaat te
monteren.
• Bevestig de twee bovenste steunbeugels door de achter-
plaat en aan het frame. Bevesting de trekpen Vorkbout
10x17mm en zet hem vast met de sluitveer.
• Bevestig de beide bovenste ondersteuningsbeugels zoals
getoond aan de buitenkant van de ondersteuningsbuis
van de grascontainer met behulp van de zeskantbouten
van 3/8 x 63,5 mm, de platte borgschijfjes met een bin-
nendiameter van 13/32 inch, en de 3/8 borgmoeren.
Stevig aandraaien.
• Plaats de trechter terug in de achteropening van de
trekker. Borg de trechter met de twee riemen.
N.B.: De haak van de riem moet alleen door de afvoertrech-
terheen. Laat de haak niet in de gleuf in de achterplaat van
de trekker komen omdat de afvoertrechter dan niet met het
maaidek meebeweegt wanneer er op oneffen terrein gemaaid
wordt.
6. Hendel voor
legen
7. Vorkbout
10 x 44mm
8. Sluitveer
9. Hetten
1. Voorstenn
2. Vinylafdichting
3. Spreiders
4. Sluitveer
5. Vinylafdichting
02330
3
1
2
02306
2
1
3
02277
1
2
3
0
3028
2
5
3
1
4
6
0
2
9
0
5
2
1
0
2
9
0
6
4
3
4
5
5
0
29
07
6
7
8
9
2
La pagina si sta caricando...

35
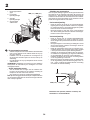
TO ADJUST GAUGE WHEELS
Gauge wheels are properly adjusted when they are slightly
off the ground when mower is at the desired cutting height in
operating position. Gauge wheels then keep the deck in proper
position to help prevent scalping in most terrain con di tions.
• Adjust gauge wheels with tractor on a flat level surface.
• Adjust mower to desired cutting height.
• With mower in desired height of cut po si tion, gauge wheels
should be assembled so they are slightly off the ground.
In stall gauge wheel in appropriate hole with shoulder bolt,
3/8 washer, and 3/8-16 locknut and tighten se cure ly.
• Repeat for opposite side installing gauge wheel in same
adjustment hole.
EINSTELLEN DER TASTRÄDER
Die Tasträder müssen sich in geringem Abstand vom Boden
befinden, wenn das Mähwerk in Betriebsstellung die gewün-
schte Schnitthöhe aufweist. Die Tasträder halten dann das
Mähwerk in der korrekten Stellung, um in den meisten Terrains
ein Abschuppen zu verhindern.
• Die Tasträder mit dem Traktor auf einer ebenen Fläche
einstellen.
• Den Mäher auf die gewünschte Schnitthöhe einstellen.
• Wenn sich das Mähwerk in der gewünschten Schnit-
thöhe befindet, sollten die Tasträder so zusammengebaut
werden, daß sie sich in geringem Abstand vom Boden
befinden. Das erste Tastrad in die entsprechende Öffnung
einbauen.
• Auf der gegenüberliegenden Seite wiederholen und das
andere Tastrad in dieselbe Einstellöffnung einbauen.
PARA AJUSTAR LAS RUEDAS CALIBRADO-
RAS
Las ruedas calibradoras están bien ajustadas cuando se en-
cuentran un poco a distancia del terreno al mismo tiempo que
la segadora esté a la altura de corte deseada. Entonces las
ruedas calibradoras mantienen el conjunto segador en posición
para prevenir el corte raspeo en casi todos los terrenos.
• Ajuste las ruedas calibradoras con el tractor en una
superficie nivelada plana.
• Ajuste la segadora a la altura de corte deseada con la
manilla de ajuste de altura.
• Con la segadora a la altura deseada para la posición de
corte, se tienen que montar las ruedas calibradoras de
modo que queden un poco sobre el suelo. Instale las
ruedas calibradoras en el agujero adecuado con el perno
con resalto, la arandela de 3/8, y la tuerca de seguridad
de 3/8-16 y apriételos en forma segura.
• Repita el procedimiento para el lado opuesto instalando
la rueda calibradora en el mismo agujero de ajuste.
REGOLAZIONE DEI RUOTINI ANTERIORI
La regolazione dei ruotini anteriori può essere eseguita cor-
rettamente se sono leggermente sollevati da terra quan do il
tosaerba si trova all’altezza di taglio desiderata in posizione
di esercizio. I ruotini anteriori mantengono il piano di taglio
nella corretta posizione aiutando ad evitare l’asportazione
del prato dalla maggior parte dei terreni.
• Regolare i ruotini anteriori con il trattore posto su una
superficie piana e livellata.
• Regolare il tosaerba sulla desiderata altezza di taglio.
• Con il tosaerba nella desiderata altezza della posizione
di taglio, assemblare i ruotini anteriori in modo che siano
leggermente sollevati da terra. Installare il ruotino anteriore
nel foro appropriato.
• Ripetere sul lato opposto installando il ruotino anteriore
nello stesso foro di regolazione.
PEILWIELEN AFSTELLEN
De peilwielen zijn goed afgesteld wanneer ze een klein
beetje boven de grond zijn terwijl de maaier in de bedrijfs-
stand op de gewenste maaihoogte is. De peilwielen houden
het maaibord dan in de juiste stand om onder de meeste
terreinomstandigheden te helpen voorkomen dat er te kort
wordt gemaaid.
• Stel de peilwielen af met de tractor op vlakke, horizontale
grond.
• Stel de maaier op de gewenste maaihoogte af.
• Terwijl de maaier in de gewenste maaihoogtestand is,
dienen de peilwielen zodanig te worden gemonteerd dat
ze een klein beetje boven de grond zijn. Installeer het
peilwiel in het juiste gat.
• Herhaal dit aan de andere kant en installeer het peilwiel
in hetzelfde stelgat.
REGLAGE DES ROULETTES DE JAUGE
Les roulettes de jauge sont correctement réglées lorsqu'elles
se trouvent légèrement au-dessus du sol pendant la tonte, le
carter de coupe étant à la hauteur désirée pour la coupe.
• Régler les roulettes de jauge lorsque le tracteur se trouve
sur un terrain plat.
• Régler le carter de coupe à la hauteur de coupe désirée.
• Lorsque le carter de coupe est à la hauteur souhaitée, la
roulette de jauge doit être placée légèrement au dessus
du sol. Fixer la roulette de jauge dans le trou approprié du
support situé sur le carter de coupe à l'aide de la vis, de la
rondelle plate 3/8 et de l'écrou frein 3/8-16. Serrer à fond.
• Répéter cette opération pour l'autre côté en plaçant la
seconde roulette dans le trou correspondant à celui utilisé
pour la première roulette de jauge .
2

36
3. Functional description. 3. Funktionsbeschreibung.
3. Description du fonctionnement.
3. Descripción del funcionamiento. 3. Funzionamento.
3. Beschrijving van functies
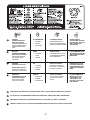
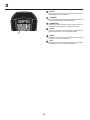
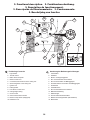
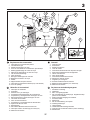
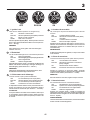
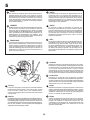
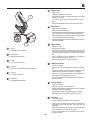
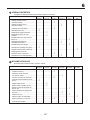
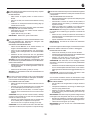
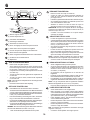
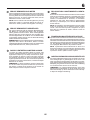
Positioning of controls
1. Light Switch.
2. Throttle control.
3. Brake and clutch pedal.
4. Motion control lever
5. Connection/disconnections of the cutting unit.
6. Quick lifting/lower of the cutting unit.
7. Ignition lock.
8. Parking Brake.
9. Free-wheel Control Lever
10. Cutting height setting.
11. Choke control
14. Service Reminder/Hourmeter
17. Electric Dump Switch (If Equipped)
18. EZ Mulch Lever
Anordnung der Bedienungseinrichtungen
1. Lichtschalter.
2. Gashebel
3. Brems- und Kupplungspedal.
4. Ein- und Ausschalten des Antriebes
5. Ein-und Ausschalten des Mähaggregats.
6. Schnelles Heben und Senken des Mähaggregats.
7. Zündschloß.
8. Feststellbremse.
9. Ein und Ausschalten des Freilaufes
10. Mähhöheneinstellung.
11. Kaltstartregler
14. Service Reminder/Studenzähler
17. Elektrischer Auskippschalter (falls installiert)
18. Mulchhebel
5
2
3
4
1
14
10
11
6
7
8
18
9
17
La pagina si sta caricando...

38
3
01347
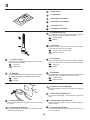
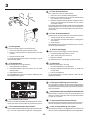
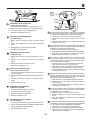
1. Light switch
1. Lichtschalter
1. Interrupteur des phares
1. Interruptor de alumbrado
1. Interruttore luci
1. Schakelaar verlichting
0
135
8
0247
3
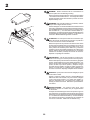
3. Clutch/Brake Pedal
Used for declutching and braking the tractor and starting
the engine.
3. Kupplungs-/Bremspedal
Wird zum Entkuppeln und Bremsen des Traktors und zum
Starten des Motors benutzt.
3. Pédale de frein/D’embrayage
Permet de débrayer et de freiner le tracteur et de démarrer
le moteur.
3. Pedal del embrague/Freno
Se usa para desembragar y frenar el tractor y arrancar el
motor.
3. Pedale della frizione/Del freno
Utilizzato per disaccoppiare la frizione, frenare il trattore e
avviare il motore.
3. Koppeling/Rempedaal
Gebruikt om de tractor te ontkoppelen en te remmen en om
de motor te starten.
2. Throttle control
The throttle control regulates the engine revs and thus the
rotation speed of the blades.
= Full speed
= Idling speed
2. Gashebel
Mit dem Gashebel wird die Drehzahl des Motors und damit
die Drehgeschwindigkeit des Mähaggregats geregelt.
= Vollgas
= Leerlauf
01355
2. Commande des gaz
La commande des gaz permet de faire varier le régime du
moteur et donc la vitesse de rotation des lames.
= Régime rapide
= Ralenti
2. Acelerador
Se regula con él el régimen del motor y, por lo tanto, también
la velocidad de rotación de las cuchillas.
= Posición de plena aceleración.
= Posición de ralenti
2. Acceleratore
Questo comando aumenta o diminuisce il regime di giri del
motore e di consequenza la velocità di rotazione delle lame.
= Pieno gas
= Minimo
2. Gashendel
Met de gasregelaar wordt het toerental van de motor geregeld
en daardoor ook de rotatiesnelheid van de messen.
= Volgas-positie
= Stationair-positie
La pagina si sta caricando...
La pagina si sta caricando...
La pagina si sta caricando...
La pagina si sta caricando...
La pagina si sta caricando...
La pagina si sta caricando...
La pagina si sta caricando...
La pagina si sta caricando...
La pagina si sta caricando...
La pagina si sta caricando...
La pagina si sta caricando...
La pagina si sta caricando...
La pagina si sta caricando...
La pagina si sta caricando...
La pagina si sta caricando...
La pagina si sta caricando...
La pagina si sta caricando...
La pagina si sta caricando...
La pagina si sta caricando...
La pagina si sta caricando...
La pagina si sta caricando...
La pagina si sta caricando...
La pagina si sta caricando...
La pagina si sta caricando...
La pagina si sta caricando...
La pagina si sta caricando...
La pagina si sta caricando...
La pagina si sta caricando...
La pagina si sta caricando...
La pagina si sta caricando...
La pagina si sta caricando...
La pagina si sta caricando...
La pagina si sta caricando...
La pagina si sta caricando...
La pagina si sta caricando...
La pagina si sta caricando...
La pagina si sta caricando...
La pagina si sta caricando...
La pagina si sta caricando...
La pagina si sta caricando...
La pagina si sta caricando...
La pagina si sta caricando...
La pagina si sta caricando...
La pagina si sta caricando...
La pagina si sta caricando...
La pagina si sta caricando...
La pagina si sta caricando...
La pagina si sta caricando...
La pagina si sta caricando...
La pagina si sta caricando...
La pagina si sta caricando...
La pagina si sta caricando...
La pagina si sta caricando...
La pagina si sta caricando...
La pagina si sta caricando...
La pagina si sta caricando...
La pagina si sta caricando...
La pagina si sta caricando...
-
 1
1
-
 2
2
-
 3
3
-
 4
4
-
 5
5
-
 6
6
-
 7
7
-
 8
8
-
 9
9
-
 10
10
-
 11
11
-
 12
12
-
 13
13
-
 14
14
-
 15
15
-
 16
16
-
 17
17
-
 18
18
-
 19
19
-
 20
20
-
 21
21
-
 22
22
-
 23
23
-
 24
24
-
 25
25
-
 26
26
-
 27
27
-
 28
28
-
 29
29
-
 30
30
-
 31
31
-
 32
32
-
 33
33
-
 34
34
-
 35
35
-
 36
36
-
 37
37
-
 38
38
-
 39
39
-
 40
40
-
 41
41
-
 42
42
-
 43
43
-
 44
44
-
 45
45
-
 46
46
-
 47
47
-
 48
48
-
 49
49
-
 50
50
-
 51
51
-
 52
52
-
 53
53
-
 54
54
-
 55
55
-
 56
56
-
 57
57
-
 58
58
-
 59
59
-
 60
60
-
 61
61
-
 62
62
-
 63
63
-
 64
64
-
 65
65
-
 66
66
-
 67
67
-
 68
68
-
 69
69
-
 70
70
-
 71
71
-
 72
72
-
 73
73
-
 74
74
-
 75
75
-
 76
76
-
 77
77
-
 78
78
-
 79
79
-
 80
80
-
 81
81
-
 82
82
-
 83
83
-
 84
84
-
 85
85
-
 86
86
-
 87
87
-
 88
88
-
 89
89
-
 90
90
-
 91
91
-
 92
92
-
 93
93
-
 94
94
-
 95
95
-
 96
96


Husqvarna CTH 182T Manuale del proprietario
- Categoria
- Tosa erba
- Tipo
- Manuale del proprietario
- Questo manuale è adatto anche per
in altre lingue
- English: Husqvarna CTH 182T Owner's manual
- français: Husqvarna CTH 182T Le manuel du propriétaire
- español: Husqvarna CTH 182T El manual del propietario
- Deutsch: Husqvarna CTH 182T Bedienungsanleitung
- Nederlands: Husqvarna CTH 182T de handleiding