Samsung WF-B1261 Manuale utente
- Categoria
- Lavatrici
- Tipo
- Manuale utente

Washing Machine
Owner’s Instructions
WF- J1461(V/S/C), J1261(V/S/C),
J1061(V/S/C), J861(V/S/C)
WF- B1461(V/S/C), B1261(V/S/C),
B1061(V/S/C), B861(V/S/C)
WF- R1261(V/S/C), R1061(V/S/C),
R861(V/S/C)
WF- F1261(V/S/C), F1061(V/S/C),
F861(V/S/C)
WF-S1061(V/S/C), S861(V/S/C)
Register your product at
www.samsung.com/global/register
CODE NO : DC68-02350U-EN
Safety Precautions
. . . . . . . . . . . . . . . . . . . . . . . . . . . . .2
Before using the appliance . . . . . . . . . . . . . . . . . . . . . . . . . . 2
Safety instructions. . . . . . . . . . . . . . . . . . . . . . . . . . . . . . . . 2
Installing the Washing Machine . . . . . . . . . . . . . . . . . . . . .
3
Unpacking the Washing Machine . . . . . . . . . . . . . . . . . . . . . .
3
Overview of the washing machine
. . . . . . . . . . . . . . . . . . . . . 3
Selecting a location . . . . . . . . . . . . . . . . . . . . . . . . . . . . . . . 3
Adjusting the leveling feet
. . . . . . . . . . . . . . . . . . . . . . . . . . 3
Removing the shipping bolts
. . . . . . . . . . . . . . . . . . . . . . . . . 4
Connecting the water supply hose
. . . . . . . . . . . . . . . . . . . . . 4
Positioning the drain hose
. . . . . . . . . . . . . . . . . . . . . . . . . . . 4
Plugging in the machine. . . . . . . . . . . . . . . . . . . . . . . . . . . . 5
Washing a Load of Laundry
. . . . . . . . . . . . . . . . . . . . . . . .6
Overview of the control panel
. . . . . . . . . . . . . . . . . . . . . . . . 6
Washing for the first time . . . . . . . . . . . . . . . . . . . . . . . . . . . 7
Putting detergent in the washing machine:. . . . . . . . . . . . . . . . 7
Washing clothes manually. . . . . . . . . . . . . . . . . . . . . . . . . . . 7
Selecting options
. . . . . . . . . . . . . . . . . . . . . . . . . . . . . . . . 8
Washing tips and hints . . . . . . . . . . . . . . . . . . . . . . . . . . . . .
8
Maintaining the Washing Machine . . . . . . . . . . . . . . . . . . .
9
Repairing a frozen washing machine . . . . . . . . . . . . . . . . . . . .
9
Cleaning the exterior . . . . . . . . . . . . . . . . . . . . . . . . . . . . . .
9
Cleaning the debris filter
. . . . . . . . . . . . . . . . . . . . . . . . . . . . 9
Cleaning the water hose mesh filter
. . . . . . . . . . . . . . . . . . . . . 9
Troubleshooting
. . . . . . . . . . . . . . . . . . . . . . . . . . . . . . 10
Problems and solutions
. . . . . . . . . . . . . . . . . . . . . . . . . . . 10
Understanding error messages
. . . . . . . . . . . . . . . . . . . . . . . 10
Programme Chart . . . . . . . . . . . . . . . . . . . . . . . . . . . . .
11
Appendix
. . . . . . . . . . . . . . . . . . . . . . . . . . . . . . . . . . 12
Fabric care chart . . . . . . . . . . . . . . . . . . . . . . . . . . . . . . . .
12
Electrical warnings
. . . . . . . . . . . . . . . . . . . . . . . . . . . . . . 12
Protecting the environment. . . . . . . . . . . . . . . . . . . . . . . . . 12
Declaration of conformity . . . . . . . . . . . . . . . . . . . . . . . . . . 12
Specification . . . . . . . . . . . . . . . . . . . . . . . . . . . . . . . . . . 13
WF-J1461-02350U_EN.indd 1 2006-08-28 ソタネト 4:42:18

2
Safety Precautions
Congratulations on your purchase of this Samsung washing machine. These Owner’s Instructions contain valuable
information on the installation, use, and care of this appliance. Please take the time to read these instructions so that
you can take full advantage of the washing machine’s features and enjoy this appliance for many years to come.
Before using the appliance
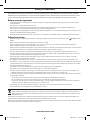
• Packing materials can be dangerous to children; keep all packing material (plastic bags, polystyrene, etc.) well out of the
reach of children.
• The appliance is designed for home use only.
• Make sure that water and electrical connections are made by qualified technicians, observing the manufacturer’s
instructions (see “Installing the Washing Machine”) and local safety regulations.
• All packaging and shipping bolts must be removed before the appliance is used. Serious damage may occur if they are not
removed. See “Removing the shipping bolts”.
• Before washing clothes for the first time, you must run a complete cycle without clothes. See “Washing for the first time”.
Safety instructions
• Before cleaning or carrying out maintenance, unplug the appliance from the electrical outlet or set the (On/Off) button
to Off.
• Make sure that the pockets of all clothing to be washed are empty.
Hard, sharp objects, such as coins, safety pins, nails, screws, or stones can cause extensive damage to the appliance.
• Always unplug the appliance and turn off the water after use.
• Before you open the door of the appliance, check that the water has drained. Do not open the door if you can still see water.
• Pets and small children may climb into the appliance. Check the appliance before each use.
• The glass door becomes very hot during the washing cycle. Keep children away from the appliance while it is in use.
• Do not attempt to repair the appliance yourself. Repairs made by inexperienced or unqualified persons may cause injury
and/or make more serious repairs to the appliance necessary.
• If the plug (power supply cord) is damaged, it must be replaced by the manufacturer or its service agent or a similar
qualified person in order to avoid a hazard.
• This appliance should only be serviced by an authorized service center, and only genuine spare parts should be used.
• This appliance is not intended for use by young children or infirm persons unless theyhave been adequately supervised by
a responsible person to ensure that they can use the appliance safely. Young children should be supervised to ensure that
they do not play with the appliance.
• This appliance has to be connected to the plug endurable to proper power consumption.
• This appliance has to be positioned so that the plug is accessible after installation.
• Do not use processed water containing oil, cream or lotion, which is usually found in skin-care shops or massage clinics.
- Otherwise this will cause the packing to be deformed, which causes a malfunction or water leak.
• A stainless washing tube does not usually rust. However if some metal such as a hair pin is left in the tube for an extended
time, the tube could rust.
- Do not leave water or bleach containing chlorine in the tube for an extended period of time.
- Do not regularly use or leave water containing iron in the tube for an extended period of time.
- If rust starts appearing on the surface of the tube, apply a cleansing agent (neutral) to the surface and use a sponge or
soft cloth to clean it. (Under no circumstances use a metal brush)
• For washing machines with ventilation openings in the base, that a carpet must not obstruct the openings.
• Use the new hose-sets and old hose-sets should not be reused.
This marking shown on the product or its literature, indicates that it should not be disposed with other household wastes
at the end of its working life. To prevent possible harm to the environment or human health from uncontrolled waste
disposal, please separate this from other types of wastes and recycle it responsibly to promote the sustainable reuse of
material resources.
Household users should contact either the retailer where they purchased this product, or their local government office, for
details of where and how they can take this item for environmentally safe recycling.
Business users should contact their supplier and check the terms and conditions of the purchase contract. This product should
not be mixed with other commercial wastes for disposal.
• SAVE THESE INSTRUCTION
WF-J1461-02350U_EN.indd 2 2006-08-28 ソタネト 4:42:19

3
Installing the Washing Machine
Unpacking the Washing Machine
Unpack your washing machine and inspect it for shipping damage. Also make sure that you have received all of the
items shown below. If the washing machine was damaged during shipping or you do not have all of the items, contact
your Samsung dealer immediately.
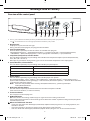
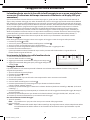
Overview of the washing machine
Selecting a location
Before you install the washing machine, select a location with the following characteristics:
• A hard, level surface (if the surface is uneven, see “Adjusting the leveling feet,” below)
• Away from direct sunlight.
• Adequate ventilation
• Room temperature that will not fall below 0˚C
• Away from sources of heat such as coal or gas Make sure that the washing machine does not stand on its power
cord. Ventilation openings must not be obstructed by carpeting when the washing machine is installed on a
carpeted floor.
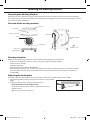
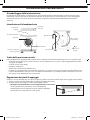
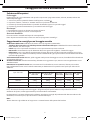
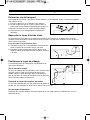
Adjusting the leveling feet
If the floor is uneven, adjust the feet (do not insert pieces of wood or any other objects under the feet):
1. Loosen the leg bolt by turning it with your hand until it is at the desired
height.
2. Tighten the locking nut by turning it with the wrench.
• Place the washer on a sturdy, flat surface.
If the washer is placed on an uneven or weak surface, noise or
vibration occurs.
(Only a 1 degrees angle is allowed.)
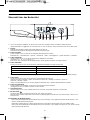
Control panel
Detergent drawer
Door
Base cover
Adjustable feet
Cover top
Debris filter
Plug
Drain Hose
Cold Water supply
hose
Bolt hole covers
o
C
rp
m
Mi
n
Fuzzy control
Temp Spin Delay Start Function
Door open
Powe
r
Spin
Check
Remaining Ti
me
Delay Star
t
Rins
e
Wa
sh
Pre-wash
Eco
Speed
y
Wo
ol
Delicate
Synthetic
Co
tton
START
PAUS
E
12:00
WF-J1461-02350U_EN.indd 3 2006-08-28 ソタネト 4:42:20

4
Installing the Washing Machine
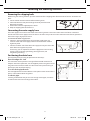
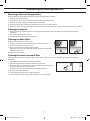
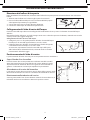
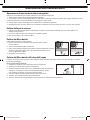
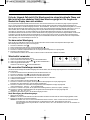
Removing the shipping bolts
Before using the washing machine, you must remove all of the shipping bolts from the back of the unit. To remove the
bolts:
1. Loosen all bolts with the wrench before removing them.
2. Take each bolt head and pull it through the wide part of the hole.
Repeat for each bolt.
3. Fill the holes with the supplied plastic covers.
4. Keep the shipping bolts for future use.
Connecting the water supply hose
The water supply hose must be connected to the washing machine at one end and to the water faucet at the other.
Do not stretch the water supply hose. If the hose is too short and you do not wish to move the water faucet, replace the
hose with a longer, high pressure hose.
To connect the water supply hose:
1. Take the L-shaped arm fitting for the cold water supply hose and
connect to the cold water supply intake on the back of the machine.
Tighten by hand.
2. Connect the other end of the cold water supply hose to your sink’s cold
water faucet and tighten it by hand.
If necessary, you can reposition the water supply hose at the washing
machine end by loosening the fitting, rotating the hose, and
retightening the fitting.
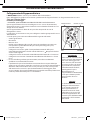
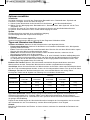
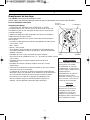
Positioning the drain hose
The end of the drain hose may be positioned in three ways:
Over the edge of a sink
The drain hose must be placed at a height of between 60 and 90 cm. To
keep the drain hose spout bent, use the supplied plastic hose guide. Secure
the guide to the wall with a hook or to the faucet with a piece of string to
prevent the drain hose from moving.
ln a sink drain pipe branch
The drain pipe branch must be above the sink siphon so that the end of the
hose is at least 60 cm above the ground.
ln a drain pipe
Samsung recommends that you use a 65 cm high vertical pipe; it must be
no shorter than 60 cm and no longer than 90 cm.
WF-J1461-02350U_EN.indd 4 2006-08-28 ソタネト 4:42:21

5
Installing the Washing Machine
Plugging in the machine
You MUST ground the plug of the washing machine.
Check with a licensed electrician before using the machine to make sure it is properly grounded.
For U.K. Users.
Wiring lnstructions
- WARNING THIS APPLIANCE MUST BE EARTHED.
This appliance must be earthed. In the event of an electrical short circuit, earthing
reduces the risk of electric shock providing an escape wire for the electric current.
The appliance is equipped with a mains lead which includes an earth wire for
connecting to the earth terminal of your mains plug.
The plug must be plugged into a socket that is properly installed and earthed.
* The wires in this mains lead are coloured in accordance with the following code:
• Green and yellow : Earth
• Blue : Neutral
• Brown : Live
• AS the colours of the wires in the mains lead of this appliance may not
correspond with the coloured markings indentifying the terminals in your plug,
proceed as follows.
• Connect the green and yellow wire to the terminal in the plug marked with the
letter E or the earth symbol (
) or coloured green or green-and-yellow.
• Connect the blue wire to the terminal marked with the letter N or coloured
black.
• Connect the brown wire to the terminal marked with the letter L or coloured
red.
* Consult a qualified electrician or service technician if in doubt about any of
these instructions.
The manufacturer of this washing machine will not accept any liability for
damage to persons or material for non observance of these requirements.
There are no user serviceable parts inside the washing machine and if the mains
lead of this appliance is damaged, it must only be replaced by qualified service
personnel approved by the manufacturer because special tools are required.
GREEN AND
YELLOW 13 AMP FUSE
BLUE
BROWN
WARNING
Ensure that the plug and
power cord are not damaged
before use. If you have any
reason to remove the moulded
plug from this appliance,
immediately remove the fuse
and dispose of the plug.
Do not connect the plug to
a mains socket under any
circumstances as there is a
danger of electric shock.
CIRCUITS
Your washing machine should
be operated on a separate
circuit from other appliances.
Failure to do this may cause
the circuit breaker to trip or the
fuse to blow.
WF-J1461-02350U_EN.indd 5 2006-08-28 ソタネト 4:42:21

6
Washing a Load of Laundry
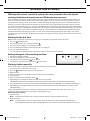
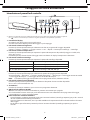
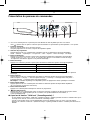
Overview of the control panel
This is a general manual. The INLAY system may be different from that of the product you purchased.
For (
�
), see item 4 below to select the right specifications that match your product.
1. Display panel
Displays wash cycle and error messages.
During execution of the program, the program indicator blinks.
2. Program Select button
Press the button repeatedly to select one of the six available wash program.
Cotton(Baumwolle/weiss)
Colour(Baumwolle/bunt) Synthetics(Synthetik) Handwash(Handwäsche)
Wool(Wolle) Quick(Schnellprogramm) Rinse+Spin(Spülen+Schleudern) Spin(Schleudern)
3. Temperature(Temperatur) selection button
Press the button repeatedly to cycle through the available water temperature options [cold water(Kaltwäsche),
30˚C, 40˚C , 60˚C and 95˚C].
When pressing this button during washing, you can see the selected temperature in the display panel.
4. Spin(Schleudern) selection button
Press the button repeatedly to cycle through the available spin speed options.
WF-J1461/B1461
Ohne Schleudern, 400, 800, 1400 rpm
WF-J1261/B1261/R1261/F1261
Ohne Schleudern, 400, 800, 1200 rpm
WF-J1061/B1061/R1061/F1061/S1061
Ohne Schleudern, 400, 800, 1000 rpm
WF-J861/B861/R861/F861/S861
Ohne Schleudern, 400, 600, 800 rpm
5. Option button
Press the button repeatedly to cycle through the available partial wash options
Rinse Hold(Spülstopp) Rinse
+
(Spülen
+
) Rinse Hold+Rinse
+
(Spülstopp+Spülen
+
) Prewash(Vorwäsche)
Prewash+Rinse Hold(Vorwäsche+Spülstopp) Prewash+Rinse
+
(Vorwäsche+Spülen
+
) Prewash+Rinse Hold+Rins
e
+
(Vorwäsche+Spülstopp+Spülen
+
)
Note: Prewash is only available when washing cotton(Baumwolle/weiss), synthetic(Synthetik) or
Colour(Baumwolle/bunt).
6. Delay Start selection button
Press this button repeatedly to rotate between the retarded start options available.
(from 3 Hours to 24 Hours, in 1 hour increments)
7. Start/Pause button
Press to pause and restart programs.
8. (On/Off) button
Press once to turn the washing machine on, press again to turn the washing machine off.
If the washing machine power is left on for longer than 10 minutes without any buttons being touched, the power
automatically turns off.
What is the “Child Lock” function?
- If you press the “Child Lock” button[Spin(Schleudern)+Option button] longer than 2 sec during operation, this
function is selected.
- If once this function is selected, no change can be done until the end of laundry.
- Press the “Child Lock” button[Spin(Schleudern)+Option button] longer than 2 sec to cancel the function.
A
WF-J1461-02350U_EN.indd 6 2006-08-28 ソタネト 4:42:23

7
Washing a Load of Laundry
WM stops the current step of the cycle or does not proceed to the next step of
washing (indication of remain time on LED display may increase).
Your new washing machine is equipped with Fuzzy Logic system, which not only sets the optimum level of water and
other parameters of washing, but also controls the washing process as well as makes necessary corrections in order
to provide better washing results. In the above- mentioned matter, the Fuzzy Logic system has detected deviations in
washing cycle such as: high quantity of detergent at the end of the cycle, high vibration level while spinning, etc.You
can adjust existing wash programs, i.e. change wash temperature and spin speed. After detection of such abnormalities,
the washing machine is suspending the normal course of program in order to normalize these parameters and continue
the cycle. Fuzzy logic system makes 7 attempts to eliminate such deviations. If it is impossible to normalize the above
mentioned deviations by Fuzzy Logic system, you will see the corresponding indication on LED lamps. (see chapter
“Troubleshooting”) The operation of Washing machine that corresponds to above- mentioned scheme is considered to
be normal.
Washing for the first time
Before washing clothes for the first time, you must run a complete cycle without clothes. To do this:
1. Press the
(On/Off ) button.
2. Pour a little detergent in the detergent drawer
.
3. Turn on the water supply to the washing machine.
4. Press the Temperature button repeatedly until 40˚C is displayed.
5. Press the Start/Pause button.
• This will remove any water from the manufacturer’s test run remaining in the machine.
Putting detergent in the washing machine:
1. Pull out the detergent drawer.
2. Add laundry detergent into compartment
.
3. Add softener into compartment
(if you desire).
4. Add prewash detergent into compartment
(if you desire).
Washing clothes manually
You can wash clothes manually without using the Fuzzy Logic feature. To do so:
1. Turn on the water at the water source sink.
2. Press the
(On/Off ) button on the washing machine.
3. Open the door.
4. Load the articles one at a time loosely into the drum, without overfilling.
5. Close the door.
6. Put the detergent in the detergent drawer
.
7. Repeatedly press the Program button to select the cycle you prefer:
Cotton(Baumwolle/weiss)
, Colour(Baumwolle/bunt), Synthetics(Synthetik), and Quick(Schnellprogramm)...
8. Press the Spin button to select the spin speed [No Spin(Ohne Schleudern), 400, 800,...,No Spin(Ohne Schleudern),...]
9. Repeatedly press the Option button to select the cycle you prefer [Prewash(Vorwäsche), Rinse
+
(Spülen
+
), Rinse
hold(Spülstopp), ... ]
10. Press the Temperature button to select the temperature [cold water(Kaltwäsche) , 30˚C, 40˚C, 60˚C, 95˚C].
11. Press the Start/Pause button and the machine will begin the cycle.
When the cycle is finished:
1. Open the door.
Note: The door will not open until 3 minutes after the machine stops or the power turns off.
2. Remove laundry.
Note: The Slow rotation of drum is not fail of the machine after the last spin of Cotton(Baumwolle/weiss)
,
Colour(Baumwolle/bunt) or Quick(Schnellprogramm) course. That is a function to remove laundry easily.
WF-J1461-02350U_EN.indd 7 2006-08-28 ソタネト 4:42:27

8
Washing a Load of Laundry
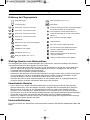
Selecting options
Prewash(Vorwäsche)
Prewash is only available when washing cotton, Colour, synthetics, delicate clothes. To use prewash:
1. Load the prewash detergent into compartment
of the detergent drawer.
2. Select “Cotton(Baumwolle/weiss)”, ”Colour(Baumwolle/bunt)” or ”Synthetic(Synthetik)” with the Program select
button.
3. Press the Option button until the “Prewash(Vorwäsche)” indicator lights up on the control panel.
4. Press Start/Pause to begin the cycle.
Rinse
+
(Spülen
+
)
Your machine will run through an additional rinsing cycle.
The washing duration will be prolonged accordingly.
Rinse Hold(Spülstopp)
The laundry remains soaking in the final rinse water.
Before the laundry can be unloaded, the “Spin” program must be run.
Washing tips and hints
Sorting your laundry: Sort your laundry according to the following characteristics:
• Type of fabric care label symbol: Sort laundry into cottons, mixed fibers, synthetics, silks, wools and rayon.
• Colour: Divide whites and colours. Wash new, coloured items separately.
• Size: Placing items of different sizes in the same load will improve the washing action.
• Sensitivity: Wash delicate items separately, using the Wool wash program for pure new wool, curtains and silk
articles. Check the labels on the items you are washing or refer to the fabric care chart in the appendix.
Emptying pockets: Coins, safety pins and similar items can damage linen, the washing machine drum, and the water
tank.
Securing fasteners: Close zippers and fasten buttons or hooks; loose belts or ribbons should be tied together.
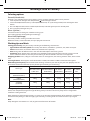
Determining load capacity: Do not overload the washing machine or your laundry may not wash properly. Use the
chart below to determine the load capacity for the type of laundry you are washing.
Fabfic Type
Load Capacity
WF-J1461/J1261/
J1061/J861
WF-B1461/B1261/
B1061/B861
WF-R1261/
R1061/R861
WF-F1261/
F1061/F861
WF-S1061/
S861
Cotton
(Baumwolle/weiss)
7.0 kg 6.0 kg 5.2 kg 4.5 kg 3.5 kg
Colour
(Baumwolle/bunt)
7.0 kg 6.0 kg 5.2 kg 4.5 kg 3.5 kg
Synthetics
(Synthetik)
3.0 kg 3.0 kg 2.5 kg 2.5 kg 2.0 kg
Wool (Wolle)
2.0 kg 2.0 kg 1.5 kg 1.5 kg 1.0 kg
Detergent tips: The type of detergent you should use is based on the type of fabric (Cotton, Synthetic, Wool items)
colour, wash temperature, degree and type of soiling. Always use “low suds” laundry soap, which is designed for
automatic washing machines.
When determining the detergent quantity, it’s necessary to consider recommendations of the detergent manufacturer,
indicated on the package, as well as weight, type of laundry, it’s fouling factor and water hardness in your region.
Note:
Keep detergents and additives in a safe, dry place out of the reach of children.
WF-J1461-02350U_EN.indd 8 2006-08-28 ソタネト 4:42:27

9
Maintaining the Washing Machine
Repairing a frozen washing machine
If the temperature drops below freezing and your washing machine is frozen:
1. Unplug the washing machine.
2. Pour warm water on the source faucet to loosen the water supply hose.
3. Remove the water supply hose and soak it in warm water.
4. Pour warm water into the washing machine drum and let it sit for 10 minutes.
5. Reconnect the water supply hose to the water faucet and check if the water supply and drain operations are normal.
Cleaning the exterior
1. Wipe the washing machine surfaces, including the control panel, with a soft cloth and non-abrasive household
detergents.
2. Use a soft cloth to dry the surfaces.
3. Do not pour water on the washing machine.
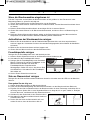
Cleaning the debris filter
Clean the debris filter 2 or 3 times a year.
1. Remove the base cover from the front of the washing machine.
2. Unscrew the filter cap and take it out.
3. Wash any dirt or other material from the filter.
Make sure the drain pump propeller behind the filter is not blocked.
Replace the filter cap.
4. Replace the base cover.
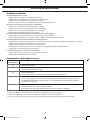
Cleaning the water hose mesh filter
You should clean the water hose mesh filter at least one time per year, or when the lamps on your machine flickers:
To do this:
1. Turn off the water source to the washing machine.
2. Unscrew the hose from the back of the washing machine.
3. With a pair of pliers, gently pull out the mesh filter from the end of the
hose and rinse it under water until clean.
Also clean the inside and outside of the threaded connector.
4. Push the filter back into place.
5. Screw the hose back onto the washing machine.
6. Turn on the faucet and make sure the connections are watertight.
WF-J1461-02350U_EN.indd 9 2006-08-28 ソタネト 4:42:28

10
Troubleshooting
Problems and solutions
The washing machine will not start
• Make sure the door is firmly closed.
• Make sure the washing machine is plugged in.
• Make sure the water source faucet is turned on.
• Make sure to press the Start/Pause button.
No water or insufficient water supply
• Make sure the water source faucet is turned on.
• Make sure the water source hose is not frozen.
• Make sure the water intake hose is not bent.
• Make sure the filter on the water intake hose is not clogged.
Detergent remains in the detergent drawer after the wash program is complete
• Make sure the washing machine is running with sufficient water pressure.
• Put the detergents in the inner parts of the detergent drawer(away from the outside edges).
Washing machine vibrates or is too noisy
• Make sure the washing machine is set on a level surface. If the surface is not level, adjust the washing machine feet
to level the appliance.
• Make sure that the shipping bolts are removed.
• Make sure the washing machine is not touching any other object.
• Make sure the laundry load is balanced.
The washing machine does not drain and/or spin
• Make sure the drain hose is not squashed or bent.
• Make sure the water hose mesh filter is not clogged.
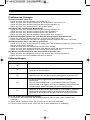
Understanding error messages
Error displayed Solution
dE • Close the door.
4E • Make sure the source water faucet is turned on.
• Check the water pressure.
5E • Clean the debris filter.
• Make sure the drainage hose is installed correctly.
UE • Laundry load is unbalanced; loosen any tangled laundry.
• If only one item of clothing needs washing, such as a bathrobe or jeans, the final spin result
might be unsatisfactory and an “UE” error message will be shown in the display window.
LE • Check the end of the drain hose is too low. (Make sure the holder of drain hose in the back is
intact)
• Check the end of the drain hose is submerged in water.
Before contacting After-Sales service:
1. Try to remedy the problem (See “Troubleshooting” on this page).
2. Restart the programme to see if the fault is repeated.
3. If the malfunction persists, call after-sales service and describe the problem.
WF-J1461-02350U_EN.indd 10 2006-08-28 ソタネト 4:42:28

11
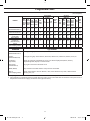
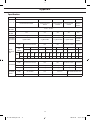
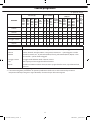
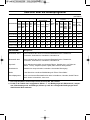
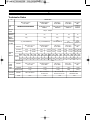
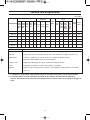
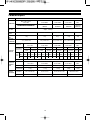
Programme Chart
( user option)
PROGRAM
Max load (kg)
Detergent And
Additives
Tempera
-
ture
(MAX) ˚C
Spin Speed
(MAX) rpm
Delay
start
Cycle
Time
(min)
WF-
J1461/
J1261/
J1061/
J861
WF-
B1461/
B1261/
B1061/
B861
WF-
R1261/
R1061/
R861
WF-
F1261/
F1061/
F861
WF-
S1061/
S861
Pre
-
wash
Wash
Soft-
ener
WF-
J1461/
B1461
WF-
J1261/
B1261/
R1261/
F1261
WF-
J1061/
B1061/
R1061/
F1061/
S1061
WF-
J861/
B861/
R861/
F861/
S861
Cotton
(Baumwolle/weiss)
7.0 6.0 5.2 4.5 3.5
yes
95 1400 1200 1000 800+
126
Colour
(Baumwolle/bunt)
7.0 6.0 5.2 4.5 3.5
yes
60 1400 1200 1000 800+
98
Synthetics
(Synthetik)
3.0 3.0 2.5 2.5 2.0
yes
60 800 800 800 800
73
Wool (Wolle)
2.0 2.0 1.5 1.5 1.0 - yes
40 400 400 400 400
42
Handwash
(Handwäsche)
2.0 2.0 1.5 1.5 1.0 - yes
40 400 400 400 400
37
Quick
(Schnellprogramm)
3.0 3.0 2.0 2.0 1.5 - yes
60 1400 1200 1000 800+
28
PROGRAM Type of WASH
Cotton
(Baumwolle/weiss)
Averagely or lightly soiled cottons, bed linen, table linen, underwear, towels, shirts,etc.
Colour
(Baumwolle/bunt)
Averagely or lightly soiled cottons, bed linen, table linen, underwear, towels, shirts, etc.
Synthetics
(Synthetik)
Lightly or averagely soiled blouses, shirts, etc. Made of polyester(Diolen, Trevira),
polyamide(perlon, Nylon) or similar blends.
Handwash
(Handwäsche)
Very light wash course like hand wash.
Wool (Wolle) Only machine washable wollens with pure new wool label.
Quick
(Schnellprogramm)
Lightly soiled cottons or linen blouses, shirts, dark coloured terry cloth, coloured linen
articles, jeans, etc.
1. The programme duration data has been measured under the conditions specified in Standard IEC 456.
2. Consumption in individual homes may differ from the values given in the table due to variations in the pressure and
temperature of the water supply, the load and the type of laundry.
WF-J1461-02350U_EN.indd 11 2006-08-28 ソタネト 4:42:28

12
Appendix
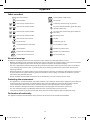
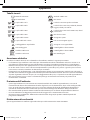
Fabric care chart
Resistant material Can be ironed at 100˚C max
Delicate fabric Do not iron
Item may be washed at 95˚C Can be dry cleaned using any solvent
Item may be washed at 60˚C Dry clean with perchloride, lighter fuel, pure
alcohol or R113 only
Item may be washed at 40°C. Dry clean with aviation fuel, pure alcohol or
R113 only
Item may be washed at 30°C. Do not dry clean
Item may be hand washed Dry flat
Dry clean only Can be hung to dry
Can be bleached in cold water Dry on clothes hanger
Do not bleach Tumble dry, normal heat
Can be ironed at 200˚C max Tumble dry, reduced heat
Can be ironed at 150˚C max Do not tumble dry
Electrical warnings
To reduce the risk of fire, electrical shock, and other injuries, keep these safety precautions in mind:
• Operate the appliance only from the type of power source indicated on the marking label. If you are not sure of the
type of power supplied to your home, consult your appliance dealer or local power company.
• Use only a grounded or polarized outlet. This plug will fit into the power outlet only one way. If you are unable to
insert the plug fully into the outlet, try reversing the plug. If the plug still doesn’t fit, contact your electrician to
replace your outlet.
• Protect the power cord. Power supply cords should be routed so that they are unlikely to be walked on or pinched
by items placed on or against them. Pay particular attention to cords at plugs, convenience receptacles, and the
point where they exit from the unit.
• Do not overload the wall outlet or extension cords. Overloading can result in fire or electric shock.
Protecting the environment
• This appliance is manufactured from recyclable materials. If you decide to dispose of this appliance, please observe
local waste disposal regulations. Cut off the power cord so that the appliance cannot be connected to a power
source. Remove the door so that animals and small children cannot get trapped inside the appliance.
• Do not exceed the detergent quantities recommended in the detergent manu-facturers’ instructions.
• Use stain removal products and bleaches before the wash cycle only when strictly necessary.
• Save water and electricity by only washing full loads (the exact amount depends upon the program used).
Declaration of conformity
This appliance complies with European safety standards, EC directive 93/68 and EN Standard 60335.
WF-J1461-02350U_EN.indd 12 2006-08-28 ソタネト 4:42:35

13
Appendix
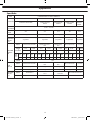
Specification
TYPE FRONT LOADING WASHER
DIMENSION
WF-J1461/J1261/J1061/J861
WF-B1461/B1261/B1061/B861 WF-R1261/R1061/R861 WF-F1261/F1061/F861 WF-S1061/S861
W598mm X D600mm X H844mm
W598mm X D550mm X
H844mm
W598mm X D450mm
X H844mm
W598mm X D404mm
X H844mm
W598mm X
D340mm X
H844mm
WATER
PRESSURE
50 kPa ~ 800 kPa
WATER
VOLUME
68 l 59 l 49 l 48 l 43 l
NET WEIGHT
75 kg 75 kg 66 kg 62 kg 58 kg
WASH AND
SPIN CAPAC
-
ITY
7 kg (DRY LAUNDRY) 6 kg (DRY LAUNDRY) 5.2 kg (DRY LAUNDRY) 4.5 kg (DRY LAUNDRY)
3.5 kg (DRY
LAUNDRY)
POWER
CONSUMP
-
TION
MODEL WF-J1461/J1261/J1061/J861
WF-B1461/B1261/B1061/
B861
WF-R1261/R1061/
R861
WF-F1261/F1061/F861 WF-S1061/S861
WASHING
AND
HEATING
220 V 2000 W 220 V 2000 W 220 V 1900 W 220 V 1800 W 220 V 1800 W
240 V 2400 W 240 V 2400 W 240 V 2200 W 240 V 2100 W 240 V 2100 W
SPIN
MODEL
WF-
J1461
WF-
J1261
WF-
J1061
WF-
J861
WF-
B1461
WF-
B1261
WF-
B1061
WF-
B861
WF-
R1261
WF-
R1061
WF-
R861
WF-
F1261
WF-
F1061
WF-
F861
WF-
S1061
WF-
S861
230V 700 W 360 W 320 W 270 W 580 W 530 W 500 W 430 W 550 W 500 W 430 W 270 W 230 W 180 W 250 W 200 W
PUMPING 34 W
PACKAGE Wt
MODEL WF-J1461/J1261/J1061/J861
WF-B1461/B1261/B1061/
B861
WF-R1261/R1061/
R861
WF-F1261/F1061/F861 WF-S1061/S861
PAPER 2.5 kg 2.5 kg 2.1 kg 1.9 kg 1.8 kg
PLASTIC 1.0 kg 1.0 kg 0.9 kg 0.8 kg 0.8 kg
SPIN REVO
-
LUTION
MODEL WF-J1461/B1461
WF-J1261/B1261/R1261/
F1261
WF-J1061/B1061/R1061/
F1061/S1061
WF-J861/B861/R861/F861/S861
rpm 1400 1200 1000 800
WF-J1461-02350U_EN.indd 13 2006-08-28 ソタネト 4:42:35

Contact SAMSUNG WORLD WIDE
If you have any questions or comments relating to Samsung products,
please contact the SAMSUNG customer care center.
WF-J1461-02350U_EN.indd 14 2006-08-28 ソタネト 4:42:35

Lavabiancheria Manuale
dell’utente
WF- J1461(V/S/C), J1261(V/S/C),
J1061(V/S/C), J861(V/S/C)
WF- B1461(V/S/C), B1261(V/S/C),
B1061(V/S/C), B861(V/S/C)
WF- R1261(V/S/C), R1061(V/S/C),
R861(V/S/C)
WF- F1261(V/S/C), F1061(V/S/C),
F861(V/S/C)
WF-S1061(V/S/C), S861(V/S/C)
Registrare il prodotto presso
www.samsung.com/global/register
CODICE N.: DC68-02350U-IT
Precauzioni di sicurezza . . . . . . . . . . . . . . . . . . . . . . . . . .
2
Prima di utilizzare l’apparecchiatura . . . . . . . . . . . . . . . . . . . . 2
Istruzioni per la sicurezza . . . . . . . . . . . . . . . . . . . . . . . . . . . 2
Installazione della lavabiancheria
. . . . . . . . . . . . . . . . . . .3
Disimballaggio della lavabiancheria . . . . . . . . . . . . . . . . . . . . 3
Introduzione alla lavabiancheria . . . . . . . . . . . . . . . . . . . . . . . 3
Scelta della posizione corretta . . . . . . . . . . . . . . . . . . . . . . . . 3
Regolazione dei piedi di appoggio . . . . . . . . . . . . . . . . . . . . . 3
Rimozione dei bulloni di trasporto . . . . . . . . . . . . . . . . . . . . . 4
Collegamento del tubo di carico dell’acqua. . . . . . . . . . . . . . . . 4
Posizionamento del tubo di scarico . . . . . . . . . . . . . . . . . . . . . 4
Collegamento dell’apparecchiatura. . . . . . . . . . . . . . . . . . . . . 5
Lavaggio di un carico di biancheria
. . . . . . . . . . . . . . . . . . .6
Introduzione al pannello di controllo . . . . . . . . . . . . . . . . . . . . 6
Primo lavaggio . . . . . . . . . . . . . . . . . . . . . . . . . . . . . . . . . . 7
Inserimento del detersivo nella lavabiancheria. . . . . . . . . . . . . . 7
Lavaggio manuale. . . . . . . . . . . . . . . . . . . . . . . . . . . . . . . . 7
Selezione delle opzioni. . . . . . . . . . . . . . . . . . . . . . . . . . . . . 8
Suggerimenti e consigli per un lavaggio corretto . . . . . . . . . . . . 8
Manutenzione della lavabiancheria
. . . . . . . . . . . . . . . . . .9
Riparazione di una lavabiancheria congelata . . . . . . . . . . . . . . . 9
Pulizia delle parti esterne . . . . . . . . . . . . . . . . . . . . . . . . . . . 9
Pulizia del filtro detriti . . . . . . . . . . . . . . . . . . . . . . . . . . . . . 9
Pulizia del filtro detriti del tubo dell’acqua . . . . . . . . . . . . . . . . 9
Risoluzione dei problemi
. . . . . . . . . . . . . . . . . . . . . . . . 10
Problemi e soluzioni. . . . . . . . . . . . . . . . . . . . . . . . . . . . . . 10
Comprendere i messaggi di errore . . . . . . . . . . . . . . . . . . . . 10
Tabella programmi . . . . . . . . . . . . . . . . . . . . . . . . . . . .
11
Appendice
. . . . . . . . . . . . . . . . . . . . . . . . . . . . . . . . . . 12
Tabella tessuti. . . . . . . . . . . . . . . . . . . . . . . . . . . . . . . . . . 12
Avvertenze elettriche . . . . . . . . . . . . . . . . . . . . . . . . . . . . . 12
Protezione dell’ambiente . . . . . . . . . . . . . . . . . . . . . . . . . . 12
Dichiarazione di conformità . . . . . . . . . . . . . . . . . . . . . . . . 12
Specifiche . . . . . . . . . . . . . . . . . . . . . . . . . . . . . . . . . . . . 13
WF-J1461-02350U_IT.indd 1 2006-08-29 ¿ÀÈÄ 5:05:13

2
Precauzioni di sicurezza
Congratulazioni per l’acquisto di questa lavabiancheria Samsung. Il presente manuale di istruzioni contiene
informazioni utili per l’installazione, l’uso e la manutenzione di questa apparecchiatura. Si consiglia di leggere
attentamente le istruzioni fornite in modo da conoscere tutti i vantaggi offerti dalle funzioni della lavabiancheria, in
modo da poterla utilizzare al meglio per molti anni.
Prima di utilizzare l’apparecchiatura
• I materiali di imballaggio (buste di plastica, parti in polistirolo, ecc...) possono rappresentare un pericolo per i bambini:
tenerli fuori dalla loro portata.
• L’apparecchiatura è stata progettata solo per uso domestico.
• Assicurarsi che i collegamenti elettrici e idrici siano eseguiti da tecnici qualificati e che siano rispettate tutte le istruzioni
e le raccomandazioni riguardanti le normative di sicurezza locali riportate dal costruttore (vedere “Installazione della
lavabiancheria”).
• Tutti gli imballi e i bulloni per il trasporto devono essere rimossi prima di mettere in funzione l’apparecchiatura. La mancata
rimozione può causare gravi danni all’unità. Vedere “Rimozione dei bulloni per il trasporto”.
• Prima di eseguire il primo lavaggio, è necessario eseguire un lavaggio a vuoto. Vedere “Primo lavaggio”.
Istruzioni per la sicurezza
• Prima di eseguire operazioni di pulizia o manutenzione, scollegare l’apparecchiatura dall’alimentazione o impostare il
pulsante
(On/Off) su Off.
• Assicurarsi che tutte le tasche degli indumenti da lavare siano vuote.
Oggetti duri o appuntiti, come monete, spille, aghi, viti o pietre, possono provocare gravi danni all’apparecchiatura.
• Terminato l’uso, scollegare l’apparecchiatura dall’alimentazione e chiudere il rubinetto del carico dell’acqua.
• Prima di aprire lo sportello della lavabiancheria, assicurarsi che l’acqua sia stata completamente scaricata. Non aprire lo
sportello in presenza di acqua residua.
• Animali di piccola taglia e bambini possono accidentalmente arrampicarsi all’interno dell’apparecchiatura. Verificare
l’apparecchiatura prima dell’uso.
• Il vetro dello sportello diventa molto caldo durante il ciclo di lavaggio. Tenere l’apparecchiatura fuori dalla portata dei
bambini durante l’uso.
• Non tentare di effettuare autonomamente la manutenzione dell’apparecchiatura. Le riparazioni eseguite da personale
inesperto o non qualificato possono causare gravi danni e/o rendere eventuali riparazioni molto più serie del necessario.
• I cavi di alimentazione danneggiati devono essere sostituiti dal costruttore, da un tecnico dell’assistenza o da personale
qualificato onde evitare l’insorgenza di pericoli.
• Questa apparecchiatura deve essere sottoposta a manutenzione unicamente da parte di un centro assistenza autorizzato e
le componenti difettose devono essere sostituite con parti di ricambio originali.
• Questa apparecchiatura non è progettata per l’uso da parte di bambini o disabili se non adeguatamente supervisionati
da una persona responsabile in grado di garantirne l’uso in sicurezza. Controllare che i bambini non giochino con questa
apparecchiatura.
• L’apparecchiatura deve essere collegata a una presa con consumo di corrente appropriato.
• L’apparecchiatura deve essere posizionata in modo che la presa sia accessibile.
• Non usare acqua di processo contenente olio, crema o lozione, normalmente impiegati nei centri estetici e di massaggio.
- La mancata osservanza di questa precauzione provoca la deformazione dell’involucro, causando di conseguenza un
malfunzionamento o una perdita d’acqua.
• Solitamente, un cestello di lavaggio in acciaio inossidabile non arrugginisce. Tuttavia, se qualche oggetto metallico, come
una forcina per capelli, viene lasciato nel cestello per un lungo periodo di tempo, questo può arrugginire.
- Non lasciare acqua o sbiancante contenente cloro nel cestello per un lungo periodo di tempo.
- Non utilizzare regolarmente né lasciare per un lungo periodo di tempo acqua ferrosa all’interno del cestello.
- Ai primi segni di ruggine sulla superficie del cestello, applicare un prodotto per la pulizia (neutro) e usare una spugna o
un panno morbido per pulire. (Non usare mai una spazzola metallica)
• Per i modelli di lavabiancheria che dispongono di aperture di ventilazione alla base, assicurarsi che tappeti o altri oggetti
non ostruiscano tali aperture.
• Utilizzare un nuovo set di collegamenti, senza riutilizzare quello precedente.
Il simbolo che appare sul prodotto e sulla relativa documentazione indica che, al termine della sua vita utile,
l’apparecchiatura non deve essere smaltita insieme agli altri rifiuti domestici. Per evitare il rischio di danni all’ambiente o
alla salute dovuti a uno smaltimento incontrollato dei rifiuti, si prega di smaltire l’apparecchiatura separatamente dagli
altri tipi di rifiuti e di riciclarla in modo da favorire il riutilizzo dei materiali che la compongono.
Per informazioni dettagliate sullo smaltimento dell’apparecchiatura e il suo riciclaggio, contattare il proprio rivenditore o le
autorità locali.
Le aziende sono pregate di contattare il proprio fornitore e controllare i termini e le condizioni del contratto di acquisto. Questo
prodotto non deve essere smaltito insieme ad altri rifiuti commerciali.
• CONSERVARE QUESTE ISTRUZIONI PER CONSULTAZIONE FUTURA
WF-J1461-02350U_IT.indd 2 2006-08-29 ¿ÀÈÄ 5:05:14

3
Installazione della lavabiancheria
Disimballaggio della lavabiancheria
Disimballare la lavabiancheria e ispezionarla per rilevare eventuali danni subiti durante il trasporto. Assicurarsi che
nell’imballo siano presenti tutte le componenti elencate di seguito. Nel caso la lavabiancheria sia stata danneggiata
durante il trasporto o in assenza di alcune componenti, contattare immediatamente il Rivenditore Autorizzato
Samsung.
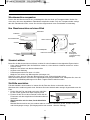
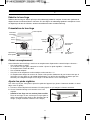
Introduzione alla lavabiancheria
Scelta della posizione corretta
Prima di effettuare l’installazione della lavabiancheria, scegliere la posizione di installazione in base ai seguenti criteri:
• Superficie d’appoggio rigida e piana (nel caso in cui la superficie non sia in piano, vedere “Regolazione dei piedi di
appoggio” di seguito)
• Lontano da luce solare diretta.
• Adeguata ventilazione
• Temperatura ambiente non inferiore a 0˚C
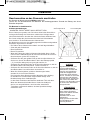
• Lontano da sorgenti di calore come caloriferi o impianti a gas Assicurarsi di non posizionare la lavabiancheria sopra
il cavo di alimentazione. Nel caso in cui si posizioni la lavabiancheria su pavimenti rivestiti di moquette, assicurarsi
che le aperture di ventilazione non siano ostruite.
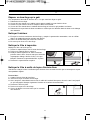
Regolazione dei piedi di appoggio
Nel caso in cui il pavimento non sia in piano, regolare i piedini (non inserire pezzi di legno o altri oggetti sotto i piedini):
1. Svitare a mano la vite del piedino fino a raggiungere l’altezza desiderata.
2. Stringere il dado di fissaggio usando la chiave inglese fornita.
• Posizionare la lavabiancheria su una superficie piana e resistente.
Se la lavabiancheria è posizionata su una superficie non
perfettamente piana o cedevole, possono verificarsi vibrazioni.
(E’ consentita una inclinazione di 1 solo grado.)
Pannello di
controllo
Vaschetta detersivo
Sportello
Coperchio della base
Piedini regolabili
Copertura
superiore
Filtro detriti
Spina elettrica
Tubo di scarico
Tubo di carico
acqua fredda
Tappi per fori
bulloni
o
C
rp
m
Mi
n
Fuzzy control
Temp Spin Delay Start Function
Door open
Powe
r
Spin
Check
Remaining Ti
me
Delay Star
t
Rins
e
Wa
sh
Pre-wash
Eco
Speedy
Wo
ol
Delicate
Synthetic
Co
tton
START
PAUS
E
12:00
WF-J1461-02350U_IT.indd 3 2006-08-29 ¿ÀÈÄ 5:05:15

4
Installazione della lavabiancheria
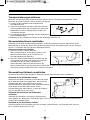
Rimozione dei bulloni di trasporto
Prima di utilizzare la lavabiancheria, rimuovere tutti i bulloni di trasporto presenti sul retro dell’unità . Per rimuovere i
bulloni:
1. Allentare tutti i bulloni con la chiave inglese prima di rimuoverli.
2. Estrarre i bulloni afferrandoli per la testa ed estraendoli dalla propria
sede. Ripetere l’operazione per ogni bullone.
3. Coprire i fori con i tappi in plastica forniti in dotazione.
4. Conservare i bulloni per un eventuale trasporto futuro.
Collegamento del tubo di carico dell’acqua
Il tubo di carico dell’acqua deve essere collegato alla lavabiancheria da una parte e al rubinetto di carico dell’acqua
dall’altra.
Non tendere il tubo dell’acqua. Se il tubo è troppo corto e non si desidera spostare il rubinetto, sostituirlo con un tubo
ad alta pressione di maggiore lunghezza.
Collegamento del tubo di carico dell’acqua:
1. Collegare la presa a L alla predisposizione del tubo di carico dell’acqua
fredda posta sul retro dell’apparecchiatura. Serrarla a mano.
2. Collegare l’altro capo del tubo di carico dell’acqua fredda all’apposita
uscita della tubatura dell’acqua e serrarla a mano.
Se necessario, riposizionare il tubo di carico dell’acqua dalla parte
della lavabiancheria allentando il dado, ruotando il tubo e serrando
nuovamente il dado di fissaggio.
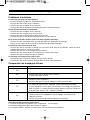
Posizionamento del tubo di scarico
La parte terminale del tubo di scarico può essere posizionata in tre modi diversi:
Sopra il bordo di un lavandino
Il tubo di scarico deve essere posizionato a un’altezza variabile tra i 60 e i
90 cm. Per evitare l’eccessiva piega del tubo di scarico, utilizzare la guida
di plastica fornita in dotazione. Assicurare la guida al muro mediante un
gancio o al rubinetto con un laccio per impedirne lo spostamento.
Alla tubazione di scarico del lavandino
La tubatura di scarico deve essere posta sopra il sifone dello scarico in modo
che il terminale del tubo di scarico sia a un’altezza di almeno 60 cm da terra.
Direttamente nella tubazione di scarico
Samsung raccomanda l’uso di una tubazione verticale di scarico di 65 cm; la
tubazione non deve essere inferiore a 60 cm né superiore a 90 cm.
WF-J1461-02350U_IT.indd 4 2006-08-29 ¿ÀÈÄ 5:05:16

5
Installazione della lavabiancheria
Collegamento dell’apparecchiatura
E’ NECESSARIO mettere a terra la presa elettrica della lavabiancheria.
Prima dell’utilizzo, far verificare da un tecnico specializzato che l’apparecchiatura sia adeguatamente messa a terra.
Solo per il Regno Unito.
Istruzioni per il cablaggio
- ATTENZIONE, QUESTA APPARECCHIATURA DEVE ESSERE COLLEGATA A MASSA.
Questa apparecchiatura deve essere collegata a massa. In caso di cortocircuito,
un’appropriata messa a terra riduce il rischio di scosse elettriche fornendo una via
di fuga alla scarica elettrica.
Questa apparecchiatura è dotata di una spina che comprende un cavo di
collegamento a massa.
La spina deve essere inserita in una presa collegata in modo appropriato alla massa
dell’abitazione.
*I cavi di questa spina sono contraddistinti dalle seguenti colorazioni:
• Verde e giallo: Massa
• Blu: Neutro
• Marrone: Fase
• Poiché i colori utilizzati nella spina di questa apparecchiatura possono non
corrispondere a quelli utilizzati nella presa alla quale collegare la spina,
procedere come segue.
• Collegare il cavo verde e giallo al corrispondente terminale della presa
contraddistinto dalla lettera E o dal simbolo della terra (
) oppure dal colore
verde o verde e giallo.
• Collegare il cavo blu al terminale contraddistinto dalla lettera N o al cavo nero.
• Collegare il cavo marrone al terminale contraddistinto dalla lettera L o al cavo
rosso.
* In caso di dubbi riguardanti queste istruzioni, consultare un elettricista
qualificato o un tecnico dell’assistenza.
Il produttore di questa lavabiancheria non accetta alcuna responsabilità per
danni causati a persone o materiali in caso di non osservanza di queste direttive.
All’interno della lavabiancheria non vi sono parti che possano essere riparate
dall’utente. Nel caso in cui la spina di alimentazione sia danneggiata, deve
essere sostituita da personale qualificato approvato dal costruttore poiché sono
richiesti specifici strumenti per la sua sostituzione.
VERDE E GIALLO FUSIBILE 13 AMP
BLU MARRONE
ATTENZIONE
Prima dell’uso assicurarsi che la
spina e il cavo di alimentazione
non siano danneggiati. Nel
caso sia necessario rimuovere
la spina pressofusa da questa
apparecchiatura, rimuovere
immediatamente il fusibile,
quindi gettare la spina.
Non collegare mai
l’apparecchiatura direttamente
a una presa elettrica poiché
esiste il rischio di scossa
elettrica.
CIRCUITI
La lavabiancheria deve essere
collegata all’alimentazione
su un circuito separato da
altre apparecchiature. La
mancata osservanza di tale
indicazione può portare alla
mancata sopportazione del
carico da parte dell’interruttore
automatico o alla bruciatura
del fusibile.
WF-J1461-02350U_IT.indd 5 2006-08-29 ¿ÀÈÄ 5:05:16

6
Lavaggio di un carico di biancheria
Introduzione al pannello di controllo
Questo è un manuale generico. L’INLAY del sistema può essere diverso da quello del prodotto acquistato.
Per (
�
), vedere la voce 4 sotto per selezionare le giuste specifiche corrispondenti al prodotto.
1. Pannello del display
Visualizza il ciclo di lavaggio e i messaggi di errore.
Durante l’esecuzione del programma di lavaggio, la spia lampeggia.
2. Pulsante di selezione Programma
Premere il pulsante ripetutamente per selezionare uno dei sei programmi di lavaggio disponibili.
Cotone
Colorati Sintetici Lavaggio a mano Lana Rapido Risciacquo+Centrifuga Centrifuga
3. Pulsante di selezione Temperatura
Premere il pulsante ripetutamente per impostare le opzioni di temperatura disponibili [Lavaggio a Freddo, 30˚C,
40˚C , 60˚C e 95˚C].
Premendo questo pulsante durante il lavaggio viene visualizzata sul display la temperatura selezionata.
4. Pulsante di selezione Centrifuga
Premere il pulsante ripetutamente per impostare le opzioni di centrifuga disponibili.
WF-J1461/B1461
Esclusione Centrifuga, 400, 800, 1400 rpm
WF-J1261/B1261/R1261/F1261
Esclusione Centrifuga, 400, 800, 1200 rpm
WF-J1061/B1061/R1061/F1061/S1061
Esclusione Centrifuga, 400, 800, 1000 rpm
WF-J861/B861/R861/F861/S861
Esclusione Centrifuga, 400, 600, 800 rpm
5. Pulsante di selezione Opzione
Premere il pulsante ripetutamente per selezionare le opzioni di lavaggio parziale disponibili
Arresto in Amollo
Risciacquo
+
Arresto in Amollo+Risciacquo
+
Prelavaggio Prelavaggio+Arresto in Amollo
Prelavaggio+Risciacquo
+
Prelavaggio+Arresto in Amollo+Risciacquo
+
Nota: La funzione prelavaggio è disponibile solo nei programmi Cotone, Sintetici o Colorati.
6. Pulsante di selezione Avvio Ritardato
Premere questo pulsante ripetutamente per selezionare le opzioni di avvio ritardato disponibili.
(da 3 a 24 ore, con incrementi di 1 ora)
7. Avvio/Pausa
Premere il pulsante per mettere in pausa o riavviare i programmi selezionati.
8. Pulsante di selezione (On/Off)
Premere una volta per avviare la lavabiancheria, premere nuovamente per spegnerla.
Se la lavabiancheria rimane accesa per più di dieci minuti senza aver selezionato alcun programma di lavaggio,
l’apparecchiatura si spegne automaticamente.
Cos’è la funzione “Sicurezza bambini”?
- Questa funzione si seleziona premendo il pulsante “Sicurezza bambini” [Centrifuga+Opzione] per più di 2 secondi
durante il funzionamento dell’apparecchiatura.
- Se questa funzione è selezionata, non è possibile modificare le impostazioni della lavabiancheria fino al termine
del lavaggio.
- Per disattivare questa funzione premere il pulsante “Sicurezza bambini” [Centrifuga+Opzione] per più di 2
secondi.
A
WF-J1461-02350U_IT.indd 6 2006-08-29 ¿ÀÈÄ 5:05:18
La pagina sta caricando ...
La pagina sta caricando ...
La pagina sta caricando ...
La pagina sta caricando ...
La pagina sta caricando ...
La pagina sta caricando ...
La pagina sta caricando ...
La pagina sta caricando ...
La pagina sta caricando ...
La pagina sta caricando ...
La pagina sta caricando ...
La pagina sta caricando ...
La pagina sta caricando ...
La pagina sta caricando ...
La pagina sta caricando ...
La pagina sta caricando ...
La pagina sta caricando ...
La pagina sta caricando ...
La pagina sta caricando ...
La pagina sta caricando ...
La pagina sta caricando ...
La pagina sta caricando ...
La pagina sta caricando ...
La pagina sta caricando ...
La pagina sta caricando ...
La pagina sta caricando ...
La pagina sta caricando ...
La pagina sta caricando ...
La pagina sta caricando ...
La pagina sta caricando ...
La pagina sta caricando ...
La pagina sta caricando ...
La pagina sta caricando ...
La pagina sta caricando ...
La pagina sta caricando ...
La pagina sta caricando ...
-
 1
1
-
 2
2
-
 3
3
-
 4
4
-
 5
5
-
 6
6
-
 7
7
-
 8
8
-
 9
9
-
 10
10
-
 11
11
-
 12
12
-
 13
13
-
 14
14
-
 15
15
-
 16
16
-
 17
17
-
 18
18
-
 19
19
-
 20
20
-
 21
21
-
 22
22
-
 23
23
-
 24
24
-
 25
25
-
 26
26
-
 27
27
-
 28
28
-
 29
29
-
 30
30
-
 31
31
-
 32
32
-
 33
33
-
 34
34
-
 35
35
-
 36
36
-
 37
37
-
 38
38
-
 39
39
-
 40
40
-
 41
41
-
 42
42
-
 43
43
-
 44
44
-
 45
45
-
 46
46
-
 47
47
-
 48
48
-
 49
49
-
 50
50
-
 51
51
-
 52
52
-
 53
53
-
 54
54
-
 55
55
-
 56
56


Samsung WF-B1261 Manuale utente
- Categoria
- Lavatrici
- Tipo
- Manuale utente
in altre lingue
- English: Samsung WF-B1261 User manual
- français: Samsung WF-B1261 Manuel utilisateur
- Deutsch: Samsung WF-B1261 Benutzerhandbuch
Documenti correlati
Altri documenti
-
Koenic KWM 62212 A3 Manuale del proprietario
-
Hoover WA 1407TD Manuale utente
-
Blomberg WNF 7300 WE20 Manuale utente
-
Blomberg WNF 7341 A Manuale utente
-
Blomberg WNF 5341 WE Manuale utente
-
Candy CST 26LE/1-88 Manuale utente
-
Haier HW80-B14266 Manuale utente
-
Haier HW80-BD1626 Manuale utente
-
-
ESA EW222A Guida d'installazione