
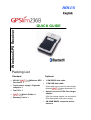
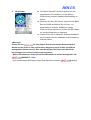
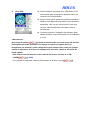
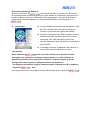
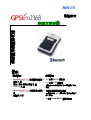
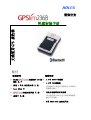
HOLUX
QUICK GUIDE
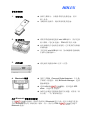
Packing List
Standard Optional
HOLUX Wireless GPS
Receiver x 1
Travel power supply / Cigarette
adapter x 1
Tool CD x 1
Quick Guide x 1
Warranty Card x 1
1.5M RS232 data cable
1.5M USB data cable
(Data cable can be used for data transfer
between
and Notebook PC)
Output convert to PDA Car charger
adaptor
(PDA Car charge adaptor can be used for
PDA data transfer and power supply)
2M 28dB MMCX connector active
antenna
English
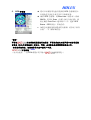
Wireless GPS Receiver

HOLUX
Instructions for First Use
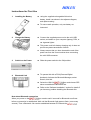
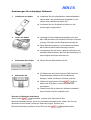
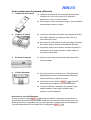
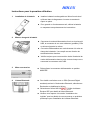
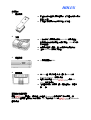
1. Installing the Battery
2. Charge the Battery
3. Switch on the Power
4. Bluetooth Link
Note about Bluetooth connection
When you power on the
, you need to wait 6 seconds for Bluetooth to self-test
before a connection is established. Wait until the Bluetooth light starts to flash ( once every
second). Then a Bluetooth- link can be established between a PDA and the
.
z Using the supplied rechargeable lithium-ion
battery, install it as shown in the adjacent diagram,
and replace casing.
z To ensure safe operation, only use battery as
instructed.
z Connect the supplied power cord to the mini USB
socket, and attach to your computer (laptop), PDA, or
car cigarette lighter.
z This power cord is for battery charging only. It does not
provide any data transmission function.
z Always ensure that you have inserted the end of the
power cord into the correct socket when connecting
the mini USB connector.
z Slide the power switch to the ON position.
z To operate link with a PDA (Personal Digital
Assistant): Activate the Bluetooth Manager, select
Search, and link.
z Select the HOLUX
icon and choose SPP
slave to establish the Bluetooth link.
z Refer to the “Software Installation” section for details i
f
you have any problem installing the Bluetooth link.

HOLUX
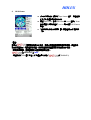
5. GPS Viewer
<Warning>
Do not place the
under strong sunlight for a long time. Do not place it in a
high-temperature environment, or near heat radiating devices such as a stove or
radiator. Doing so will cause the device to breakdown and to function unstably.
- For further information, please read the user’s manual in the supplied CD.
-
PASSKEY – 0000
(For security, some PDAs will prompt users for the
Passkey)
z You can install the GPS viewer program from the
supplied CD to check current positioning and satellite
signal reception.
z Activate the GPS Viewer, set the Baud Rate to 38400,
and press Scan for automatic scanning. Once you find
the correct Com Port, choose GPS Status to start
viewing.
z Refer to the “Software Installation” section for details i
f
you have any difficulty with installation and use.

HOLUX
Kurzanleitung
Lieferumfang
Standard Zubehör
HOLUX Drahtloser GPS
Empfänger x 1
Reisenetzteil /
Zigarettenanzünderadapter x 1
Hilfsprogramm-CD x 1
Kurzanleitung x 1
Garantiekarte x 1
1.5 m RS232 Datenkabel
1.5 m USB Datenkabel
(Datenkabel können für Datentransfer
zwischen und einem Notebook
PC verwendet werden.)
Ausgangsadapter auf PDA
Autoladeadapter
(PDA Autoladeadapter kann für PDA
Datentransfer und Stromversorgung
verwendet werden.
2 m 28dB MMCX Anschluss
Aktivantenne
Drahtloser -GPS-Empfänger
Deutsch

HOLUX
Anweisungen für erstmaligen Gebrauch
1. Installieren des Akkus
2. Laden des Akkus
3. Einschalten des Geräts
4. Bluetooth-Link
Hinweis zur Bluetooth-Verbindung
Wenn Sie den
einschalten, müssen Sie 6 Sekunden für den
Bluetooth-Selbsttest warten, bevor eine Verbindung hergestellt wird. Warten Sie, bis das
Bluetooth-Licht zu blinken (einmal pro Sekunde) beginnt. Es kann eine
Bluetooth-Verbindung zwischen einem PDA und dem
hergestellt werden.
z Installieren Sie den mitgelieferten, wiederaufladbaren
Lithium-Akku, wie nebenstehend abgebildet ist, und
setzen Sie die Abdeckung wieder auf.
z Verwenden Sie zur Sicherheit den Akku nur den
Anweisungen entsprechend.
z Verbinden Sie die mitgelieferte Netzleitung mit dem
Mini-USB-
A
nschluss und schließen Sie Ihren Computer
(Laptop), PDA oder den Kfz-Zigarettenanzünder an.
z Diese Netzleitung dient nur zum Aufladen des Akkus.
Mit ihr können keine Daten übertragen werden.
z Vergewissern Sie sich immer, dass bei Verbindung mit
dem Mini-USB-
A
nschluss das Ende der Netzleitung mit
dem richtigen Anschluss verbunden ist.
z Setzen Sie den Netzschalter auf ON.
z Zur Bedienung des Links mit einem PDA (Personal
Digital Assistant): Aktivieren Sie den Bluetooth
Manager, wählen Sie Search (Suchen) und Link.
z Wählen Sie das Symbol HOLUX
und
wählen Sie SPP Slave, um den Bluetooth-Link
herzustellen.
z Details finden Sie im Abschnitt “Software-Installation”,
wenn Probleme bei der Installation des

HOLUX
5. GPS Viewer
<Warnung>
Setzen Sie den
für eine längere Zeit keinem starken Sonnenlicht aus.
Stellen Sie ihn weder in einer sehr warmen Umgebung noch in Nähe von Wärme
erzeugenden Geräten wie z.B. Öfen oder Heizkörpern auf. Dies kann das Gerät
beschädigen und zu einer Funktionsstörung führen.
- Weitere Informationen finden Sie im Benutzerhandbuch auf der beiliegenden CD.
-
PASSKEY – 0000
(Aus Sicherheitsgründen fragen einige PDAs Benutzer nach dem
Passkey)
z Sie können das GPS Viewer-Programm von der
mitgelieferten CD installieren, um die aktuelle
Positionierung und den Satellitensignalempfang zu
prüfen.
z Aktivieren Sie den GPS Viewer, setzen Sie die Baud
Rate auf 38400 und klicken Sie auf Scan, um
automatisch zu scannen. Sobald der richtige
COM-
A
nschluss gefunden ist, wählen Sie GPS Status,
um mit dem Betrachten zu beginnen.
z Details finden Sie im Abschnitt “Software-Installation”,
wenn Probleme bei der Installation und Verwendung
auftreten sollten.

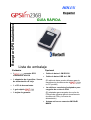
HOLUX
GUÍA RÁPIDA
Lista de embalaje
Estándar Opcional
1 receptor GPS
inalámbrico HOLUX
1 adaptador de cigarrillos / fuente
de alimentación de viaje
1 x CD de herramientas
1 guía rápida
1 tarjeta de garantía
Cable de datos 1.5M RS232
Cable de datos USB de 1.5M
(El cable de datos puede utilizarse para la
transferencia de datos entre el
y
un PC portátil)
La salida se convierte al adaptador para
cargador de coche de PDA
(El adaptador para cargador de coche de
PDA puede utilizarse para la transferencia
de datos de PDA y la fuente de
alimentación)
Antena activa con conector 2M 28dB
MMCX
Receptor GPS inalámbrico
Español

HOLUX
Instrucciones para la primera utilización
1. Instalación de la batería
2. Carga de la batería
3. Encienda el aparato
4. Vínculo Bluetooth
Nota sobre la conexión Bluetooth
Cuando conecte la unidad
, tendrá que esperar 6 segundos a que termine la
autocomprobación Bluetooth para poder establecer una conexión. Espere hasta que la luz
Bluetooth comience a parpadear (una vez por segundo). A continuación, podrá establecer
el enlace Bluetooth entre una unidad PDA y el dispositivo
.
z Utilizando la batería de litio recargable suministrada,
instálela, tal y como se muestra en la ilustración
adyacente y vuelva a colocar la tapa.
z Para asegurar un funcionamiento seguro, utilice la batería
exclusivamente como se indica.
z Conecte el cable de alimentación suministrado al zócalo
mini USB y adjúntelo al equipo (portátil), PDA o al
encendedor del coche.
z Este cable de alimentación es sólo para cargar la batería.
No cumple ninguna función de transmisión de datos.
z Asegúrese siempre de insertar el extremo del cable de
alimentación en el zócalo correcto cuando realice la
conexión del mini USB.
z Deslice el interruptor de encendido hasta la posición
ON (encendido).
z Para que funcione el vínculo con un PDA (Personal
Digital Assistant): active el Administrador Bluetooth,
seleccione Buscar y realice el vínculo.
z Seleccione el icono HOLUX
y elija SPP
secundario para establecer el vínculo Bluetooth.
z Consulte la sección "Instalación del software" para
obtener detalles si tiene algún problema para
instalar el vínculo Bluetooth.

HOLUX
5. Visor GPS
<Advertencia>
No coloque la unidad
donde la luz directa de sol incida sobre ella durante
prolongados períodos de tiempo. No coloque la unidad en lugares donde la
temperatura sea elevada o junto a dispositivos que irradien calor como por ejemplo
estufas o radiadores. Si lo hace, la unidad podría averiarse y dejar de funcionar de
forma estable.
- Para obtener más información, lea el manual del usuario incluido en el CD.
- CLAVE
– 0000
(Por razones de seguridad, algunos PDA solicitan al usuario la clave
)
z Puede instalar el programa visor GPS desde el CD
suministrado para comprobar la posición actual y la
recepción de la señal satélite.
z Active el Visor GPS, ajuste la velocidad de baudios a
38400 y pulse Explorar para realizar una exploración
automática. Una vez que encuentre el Puerto com
correcto, seleccione Estado GPS para iniciar la
visualización.
z Consulte la sección "Instalación del software" para
obtener detalles si tiene dificultades con la instalación
y el uso.

HOLUX
GUIDA RAPIDA
Contenuto della confezione
Standard Optional
1 Ricevitore GPS
Wireless HOLUX
1 Alimentatore da viaggio /
adattatore per accendisigari da
automobile.
1 CD strumenti
1 Guida rapida
1 Scheda garanzia
Cavo dati RS232 da 1.5 m
Cavo dati USB da 1.5 m
(Il cavo dati può essere utilizzato per il
trasferimento dei dati tra
e
PC portatile)
Uscita convertita su adattatore per
accendisigari da automobile PDA.
(L’adattatore per accendisigari da
automobile PDA può essere utilizzato
per il trasferimento dei dati PDA e
come alimentatore)
Connettore antenna attiva 2M 28dB
MMCX
Italiano
Ricevitore GPS Wireless

HOLUX
Istruzioni per il primo utilizzo
1. Installazione della batteria
2. Ricarica della batteria
3. Accensione
4. Collegamento Bluetooth
z Installare la batteria ricaricabile al litio in dotazione
come mostrato nell’illustrazione accanto e chiudere il
coperchio.
z Per un funzionamento sicuro, utilizzare la batteria solo
come indicato.
z Collegare il cavo di alimentazione in dotaazione alla
presa mini USB, e collegarlo al computer (portatile),
PDA, o all’accendisigari da auto.
z Questo cavo di alimentazione serve escusivamente
per la ricarica della batteria. Non è utilizzabile per la
trasmissione dei dati.
z Verificare di inserire il cavo di alimentazione nella
presa corretta quando lo si collega alla mini USB.
z Portare l’interruttore di accensione nella posizione
ON.
z Per attivare il collegamente con un PDA (Personal
Digital Assistant): Attivare Bluetooth Manager,
selezionare Search (Ricerca), e effettuare il
collegamento.
z Selezionare l’icona HOLUX
e
selezionare SPP slave per stabilire il collegamento
Bluetooth.
z Consultare la sezione “Installazione del software”
nel caso ci fossero dei problemi nel corso
dell’installazione del Bluetooth.

HOLUX
Nota sulla connessione Bluetooth
Quando si accende il GP
, è necessario attendere 6 secondi per l’esecuzione
dell’autodiagnostica di Bluetooth prima che venga stabilita la connessione. Attendere fino a
quando l’indicatore luminoso di Bluetooth inizia a lampeggiare ( una volta al secondo). A
questo punto è possibile stabilire una connessione Bluetooth tra il PDA (palmare) e il
.
5. GPS Viewer
<Avvertenza>
Non posizionare
sotto la luce solare diretta per un periodo di tempo
prolungato. Non collocarlo in ambienti a alte temperature, o nelle vicinanze di
dispositivi generanti calore quali stufe o radiatori. Il mancato rispetto di questi
accorgimenti causerà guasto o malfunzionamento del dispositivo .
- Per maggiori informazioni, leggere il manuale utente contenuto nel CD in dotazione.
- Password
– 0000
(Per ragioni di sicurezza, alcuni PDA possono chiedere agli utente la password
)
z Si può installare il programma per visualizzare il GPS
dal CD in dotazione per controllare la posizione
corrente e la ricezione del segnale dal satellite.
z Attivare il visualizzatore per GPS, impostare il valore
del Baud su 38400, e premere Scan per la ricerca
automatica. Una volta individuata a porta Com
corretta, selezionare Stato del GPS per visualizzare lo
stato del GPS.
z Consultare la sezione “Installazione del software” in
caso di difficoltà nell’installazione e nell’uso.

HOLUX
GUIDE DE DEMARRAGE RAPIDE
Contenu du Paquet
Standard Optionnel
Récepteur GPS sans fil
HOLUX x 1
Adaptateur d’alimentation /
allume-cigare pour voyage x 1
CD d’Outils x 1
Guide de Démarrage Rapide
x 1
Carte de Garantie x 1
Câble de données RS232 de 1.5M
Câble de données USB de 1.5M
(Le câble de données est utile pour réaliser un
transfert des données entre le récepteur
et un ordinateur portable câble: en
option. )
Adaptateur de charge pour véhicule et
convertisseur de sortie vers PDA
(L’adaptateur de charge pour véhicule et
connexion PDA permet d’effectuer un
transfert des données avec un PDA et de
fournir une alimentation.)
Antenne active 28dB pour connecteur
MMCX de 2M
Récepteur GPS sans fil
Français

HOLUX
Instructions pour la première utilization
1. Installation de la batterie
2. Mise en charge de la batterie
3. Mise sous tension
4. Liaison Bluetooth
z Installez la batterie rechargeable au lithiun fournie ainsi
qu'illustré dans le diagramme ci-contre et remettez le
caport en place.
z Pour garantir un fonctionnement sûr, utilisez la batterie
en respectant scrupuleusement les instructions
z Connectez le cordon d'alimentation fourni sur la prise mini
USB, et connectez-le sur votre ordinateur (portable), PD
A
ou allume-cigare de la voiture.
z Ce cordon d'alimentation sert exclusivement à la mise en
charge de la batterie. Il ne remplit aucune fonction de
transmission des données.
z Vérifiez toujours que vous avez bien inséré l'extrémité du
cordon d'alimentation dans la prise correcte lorsque vous
connectez le connecteur mini USB.
z Faites glisser le connecteur d'alimentation en position
MARCHE.
z Pour établir une liaison avec un PDA (Personal Digital
A
ssistant) activez le Gestionnaire Bluetooth, sélectionnez
Rechercher et établissez la liaison.
z Sélectionnez l'icône HOLUX
et choisissez
Esclave SPP pour établir la liaison Bluetooth.
z Veuillez vous reporter à la section “Installation des
logiciels” pour les détails si vous rencontrez un problème
quelconque pour l'installation de la liaison Bluetooth.

HOLUX
Note relative à la connexion Bluetooth
Lorsque vous mettez sous tension le
, il vous faut attendre 6 secondes pour
l'autotest Bluetooth avant de pouvoir établir une connexion. Attendez que le témoin
lumineux Bluetooth commence à clignote (une fois par seconde). Un lien Bluetooth peut
alors être établi entre un PDA et le
.
5. Afficheur GPS
<Avertissement>
Ne pas exposer l'appareil
à une forte lumière du soleil pendant une
longue période. Ne pas le placer dans un endroit très chaud ou près d'équipements
produisant de la chaleur comme une cuisinière ou un radiateur. Ne pas respecter
cette consigne provoquera une panne et un fonctionnement instable de l'appareil.
- Pour de plus amples informations, veuillez consulter le manuel utilisateur sur le CD
fourni.
- le mot de passe
– 0000
( pour raison de sécurité certains PDA inviteront les utilisateurs à donner leur mot de passe
)
z Vous pouvez installer le programme de visualisation GPS
à partir du CD fourni pour voir votre position actuelle et la
réception du signal satellite.
z
A
ctivez l'Afficheur GPS, réglez le Débit en bauds à 38400,
puis appuyez sur Balayer pour le balayage automatique.
Une fois que vous avez trouvé le Port Com correct,
choisissez l'État GPS pour commencer à visualiser.
z Veuillez vous reporter à la section “Installation des
logiciels” pour les détails si vous rencontrez une difficulté
quelconque pendant l'installation et l'utilisation.

HOLUX
快速安裝手冊
配件
標準配件 選購配件
HOLUX 無線藍芽衛星接
收器 乙 個
旅充 / 車充 雙用充電器 乙 組
Tool CD 乙 片
HOLUX
快速安裝手冊乙
份
保證卡 乙 張
1.5 公尺 RS232 傳輸線
1.5 公尺 USB 傳輸線
(傳輸線可以使用在接收機與電腦間的資料
傳輸)
充電與傳輸兩用車充電線
(可同時使用PDA 充電與接收器資料傳輸之
車充電線)
2 公尺 28dB MMCX 主動式天線
無線藍芽衛星接收器
繁體中文

HOLUX
快速操作
1. 電池安裝
2. 充電
3. 開啟電源
4. 藍芽連線
藍芽連線之注意事項 :
開啟 電源後,需等待 6 秒鐘使 Bluetooth 做連線前之自我測試,待
Bluetooth 燈號開始閃爍後(每秒閃爍一次),方能進行 PDA 與 的 Bluetooth
配對連線。
z 取出附件中可重複充電式鋰電池,依左圖所示裝妥電池
並蓋上後蓋。
z 不正確的使用電池可能導致安全上的危害。
z 將附件中的充電電源線接到 mini USB 的電源插座,
並連接到您所使用的電腦(手提式電腦)、PDA 或汽車
上的點煙器。
z 此電源線僅供充電用,並不能提供資料傳輸功能。
z 注意 mini USB 接頭的方向性。
z 將電源開關撥至 ON。
z 以 PDA(個人數位助理)為例,請啓動 PDA 上的
Bluetooth Manager,搜尋及連線。
z 點取找到的項目 HOLUX
,選定 SPP
slave,完成並連線。
z 如有藍芽連線上的問題,請參閱詳細操作“軟體安
裝”一章。

HOLUX
5. GPS Viewer
<警告>
請勿將
置放在強烈陽光下過久。請勿將本產品置放在高溫的環境中,或會散發
熱能的裝置附近,如暖爐或散熱器。這麼做會造成裝置故障及其功能運作不穩定。
- 相關詳細資訊,請閱讀隨附光碟中的使用手冊。
- 的 PASSKEY 是 0000
(某些廠牌的 PDA 基於安全上的考量會要求您輸入
的 PASSKEY)
z 您可以安裝所附光碟中的 Gps Viewer 程式,查看目前
的定位及衛星訊號的接收狀況。
z 開啟Gps Viewer,設定Baud rate 為 38400 並按下Scan
自動掃瞄,找尋到正確的Com Port即可點取GPS Status
查看。
z 如有安裝及使用上的問題,請參閱詳細操作”軟體安裝”
一章
。

HOLUX
快速安装手册
配件
标准配件 选购配件
HOLUX 无线蓝芽 GPS 接
收机 乙 个
旅充 / 车充 双用充电器 乙 组
Tool CD 乙 片
快速安装手册 乙 份
保证卡 乙 张
1.5 米 RS232 传输线
1.5 米 USB 传输线
(传输线可以使用在接收机与计算机间
的数据传输)
充电与传输两用车充电线
(可同时使用 PDA 充电与接收器数据传
输之车充电线)
2 米 28dB MMCX 主动式天线
简体
无线蓝芽 GPS 接收器
简体中文

HOLUX
首次使用说明
1. 安装电池
2. 对电池充电
3. 打开电源
4. Bluetooth 链接
关于 Bluetooth 连接的注意事项
打开 的电源时,需要等待 6 秒让 Bluetooth 进行自检,然后才能建立连接。
等待 Bluetooth 指示灯开始闪烁(每秒一次),然后在 PDA 和 之间建立
Bluetooth 链接。
z 按照左图所示,安装附带的充电锂电池,然后
装上外盖。
z 为确保安全操作,请按照说明使用电池。
z 将附带的电源线连接到 mini USB 插口,然后连接
到计算机(笔记本电脑)、PDA 或车用点火器。
z 此电源线仅在电池充电时使用。它不提供任何数据
传输功能。
z 当连接至 mini USB 插口时,务必确保将电源线端
头插入正确的插口。
z 将电源开关拨到 ON(打开)位置。
z 使用与 PDA(Personal Digital Assistant,个人数
字助理)的链接: 激活 Bluetooth Manager,选择
搜索和链接。
z 选择 HOLUX
图标,然后选择 SPP
slave,以建立蓝芽链接。
z 如果在安装蓝芽链接时遇到任何问题,请参见“软
件安装”一节了解详细信息。
La pagina si sta caricando...
La pagina si sta caricando...
-
 1
1
-
 2
2
-
 3
3
-
 4
4
-
 5
5
-
 6
6
-
 7
7
-
 8
8
-
 9
9
-
 10
10
-
 11
11
-
 12
12
-
 13
13
-
 14
14
-
 15
15
-
 16
16
-
 17
17
-
 18
18
-
 19
19
-
 20
20
-
 21
21
-
 22
22


in altre lingue
- English: Holux GPSlim 236B
- français: Holux GPSlim 236B
- español: Holux GPSlim 236B
- Deutsch: Holux GPSlim 236B