Behringer DDM4000 Guida utente
- Categoria
- Giocattoli
- Tipo
- Guida utente
Questo manuale è adatto anche per

Quick Start Guide
(EN)
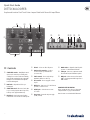
Controls
(1) STORE/LEVEL switches – Briey ip the switch
up to store the current loop as a backing track,
or hold up for 3 seconds to delete stored backing
track. Hold the switch in the down position while
turning the associated LOOP knob to adjust the
level of the backing track.
(2) LOOP knobs – Adjust the level of a loop or
backing track.
(3) SERIAL/SYNC switch – When set to Serial, either
loop 1 or 2 can be played at a time. In Sync mode,
both loops can be played simultaneously.
(4) DECAY knob – Controls the amount of volume
reduction that occurs each time an overdub repeats.
(5) FX knob – Selects one of the 7 FX options.
(6) LOOP 1 and 2 footswitches – Use these
to control several loop-related functions.
(see reverse side)
(7) STOP footswitch – Press to stop both loops
immediately. Hold to erase the loops.
(8) FX footswitch – Press to engage the selected
loop FX.
(9) INPUT jacks – Connect one ¼" TS cable for mono
operation, or 2 cables for stereo.
(10) OUTPUT jacks – Send audio via one or two
¼" TS cables.
(11) Power input – Connect the 9V power supply.
(9 V DC, >300 mA)
(12) MODE switches – Adjust ne details of pedal’s
operation. See the full manual for details.
(13) USB input – Connect to a computer to transfer
les back and forth, and for rmware updates.
(14) MIDI jacks – Allows connection of an external
MIDI clock, and program and CC changes from a
MIDI controller.
IMPORTANT SAFETY INSTRUCTION
Before operating the device, please see “Important
Safety Instructions” on page 3 of the full manual.
Visit tcelectronic.com to download the full manual
DITTO X4 LOOPER
Simple and Intuitive Dual-Track Guitar Looper Pedal with Powerful Loop Eects
(1)
(2) (3) (4) (5)
(6) (7)
(8)
(9) (10) (11) (12) (13) (14)
(1)
(2) (3) (4) (5)
(6) (7)
(8)
(9) (10) (11) (12) (13) (14)
V 2.0

2 Ditto X4 Looper Quick Start Guide 3
(ES)
Controles
(1) STORE/LEVEL switches – Gire brevemente
el interruptor hacia arriba para almacenar
el bucle actual como una pista de
acompañamiento, o manténgalo presionado
durante 3 segundos para eliminar la pista de
acompañamiento almacenada. Mantenga el
interruptor en la posición hacia abajo mientras
gira la perilla LOOP asociada para ajustar el
nivel de la pista de acompañamiento.
(2) LOOP knobs – Ajustar el nivel de un bucle o
pista de acompañamiento.
(3) SERIAL/SYNC switch – Cuando se establece
en Serie, se puede reproducir el bucle 1 o 2 a la
vez. En el modo Sync, ambos bucles se pueden
reproducir simultáneamente.
(4) DECAY knob – Controla la cantidad de
reducción de volumen que se produce cada
vez que se repite una sobregrabación.
(5) FX knob – Selecciona una de las 7 opciones de FX.
(6) LOOP 1 and 2 footswitches – Úselos para
controlar varias funciones relacionadas con el
lazo. (ver reverso)
(7) STOP footswitch – Presione para detener
ambos bucles inmediatamente. Mantenga
pulsado para borrar los bucles.
(8) FX footswitch – Presione para activar el
efecto de bucle seleccionado.
(9) INPUT jacks – Conecte un cable TS de ¼" para
funcionamiento mono o 2 cables para estéreo.
(10) OUTPUT jacks – Envíe audio a través de uno o
dos cables TS de ¼".
(11) Power input – Conecte la fuente de
alimentación de 9V. (9 V CC,> 300 mA)
(12) MODE switches – Ajuste los detalles nos del
funcionamiento del pedal. Consulte el manual
completo para obtener más detalles.
(13) USB input – Conéctese a una computadora
para transferir archivos de un lado a otro y
para actualizaciones de rmware.
(14) MIDI jacks – Permite la conexión de un
reloj MIDI externo y cambios de programa y
CC desde un controlador MIDI.
(FR)
Réglages
(1) STORE/LEVEL switches – Relevez
brièvement le commutateur pour
stocker la boucle actuelle comme piste
d’accompagnement, ou maintenez-le enfoncé
pendant 3 secondes pour supprimer la piste
d’accompagnement stockée. Maintenez
le commutateur en position basse tout en
tournant le bouton LOOP associé pour régler le
niveau de la piste d’accompagnement.
(2) LOOP knobs – Ajustez le niveau d’une boucle
ou d’une piste d’accompagnement.
(3) SERIAL/SYNC switch – Lorsqu’il est réglé sur
Série, la boucle 1 ou 2 peut être lue à la fois.
En mode Sync, les deux boucles peuvent être
jouées simultanément.
(4) DECAY knob – Contrôle la quantité de
réduction de volume qui se produit chaque
fois qu’un overdub se répète.
(5) FX knob – Sélectionne l’une des 7 options FX.
(6) LOOP 1 and 2 footswitches – Utilisez-les
pour contrôler plusieurs fonctions liées à la
boucle. (voir au verso)
(7) STOP footswitch – Appuyez sur pour arrêter
immédiatement les deux boucles. Maintenez
enfoncé pour eacer les boucles.
(8) FX footswitch – Appuyez pour activer l’eet
de boucle sélectionné.
(9) INPUT jacks – Connectez un câble TS ¼"
pour un fonctionnement mono ou 2 câbles
pour la stéréo.
(10) OUTPUT jacks – Envoyez l’audio via un ou
deux câbles TS ¼".
(11) Power input – Branchez l’alimentation 9V.
(9 V CC,> 300 mA)
(12) MODE switches – Ajustez les détails du
fonctionnement de la pédale. Consultez le
manuel complet pour plus de détails.
(13) USB input – Connectez-vous à un ordinateur
pour transférer des chiers dans les deux sens
et pour les mises à jour du micrologiciel.
(14) MIDI jacks – Permet la connexion d’une horloge
MIDI externe et les changements de programme
et de CC à partir d’un contrôleur MIDI.
(DE)
Bedienelemente
(1) STORE/LEVEL switches – Klappen Sie den
Schalter kurz nach oben, um die aktuelle
Schleife als Hintergrundspur zu speichern,
oder halten Sie 3 Sekunden lang gedrückt,
um die gespeicherte Hintergrundspur zu
löschen. Halten Sie den Schalter in der unteren
Position, während Sie den zugehörigen
LOOP-Knopf drehen, um den Pegel der
Hintergrundspur einzustellen.
(2) LOOP knobs – Stellen Sie den Pegel eines
Loops oder einer Backing-Spur ein.
(3) SERIAL/SYNC switch – Bei Einstellung
auf Seriell kann entweder Loop 1 oder
2 gleichzeitig abgespielt werden. Im
Sync-Modus können beide Loops gleichzeitig
abgespielt werden.
(4) DECAY knob – Steuert die Lautstärke, die bei
jeder Wiederholung eines Overdubs auftritt.
(5) FX knob – Wählt eine der 7 FX-Optionen aus.
(6) LOOP 1 and 2 footswitches – Verwenden
Sie diese, um mehrere schleifenbezogene
Funktionen zu steuern. (siehe Rückseite)
(7) STOP footswitch – Drücken Sie, um beide
Schleifen sofort zu stoppen. Halten Sie
gedrückt, um die Schleifen zu löschen.
(8) FX footswitch – Drücken Sie, um den
ausgewählten Loop-Eekt zu aktivieren.
(9) INPUT jacks – Schließen Sie ein ¼" TS-Kabel
für Monobetrieb oder 2 Kabel für Stereo an.
(10) OUTPUT jacks – Buchsen - Senden Sie Audio
über ein oder zwei ¼" TS-Kabel.
(11) Power input – Schließen Sie das 9V-Netzteil
an. (9 V DC,> 300 mA)
(12) MODE switches – Passen Sie die Details der
Pedalbetätigung an. Einzelheiten nden Sie
im vollständigen Handbuch.
(13) USB input – Stellen Sie eine Verbindung zu
einem Computer her, um Dateien hin und
her zu übertragen und Firmware-Updates
durchzuführen.
(14) MIDI jacks – Ermöglicht den Anschluss einer
externen MIDI-Clock sowie Programm- und
CC-Änderungen von einem MIDI-Controller.
INSTRUCCIONES DE SEGURIDAD IMPORTANTES
Antes de utilizar el dispositivo, consulte las
“Instrucciones de seguridad importantes” en la
página 3 del manual completo.
Visite tcelectronic.com para descargar el
manual completo
CONSIGNES DE SÉCURITÉ IMPORTANTES
Avant d’utiliser l’appareil, veuillez consulter les
«Consignes de sécurité importantes» à la page 3 du
manuel complet.
Visitez tcelectronic.com pour télécharger le
manuel complet
WICHTIGE SICHERHEITSHINWEISE
Bevor Sie das Gerät in Betrieb nehmen, lesen Sie
bitte „Wichtige Sicherheitshinweise“ auf Seite 3 des
vollständigen Handbuchs.
Besuchen Sie tcelectronic.com, um das vollständige
Handbuch herunterzuladen
(PT)
Controles
(1) STORE/LEVEL switches – Vire brevemente
a chave para cima para armazenar o loop
atual como uma faixa de apoio ou segure
por 3 segundos para excluir a faixa de apoio
armazenada. Segure a chave na posição para
baixo enquanto gira o botão LOOP associado
para ajustar o nível da trilha de apoio.
(2) LOOP knobs – Ajuste o nível de um loop ou
faixa de apoio.
(3) SERIAL/SYNC switch – Quando denido
como Serial, o loop 1 ou 2 pode ser
reproduzido por vez. No modo Sync,
ambos os loops podem ser reproduzidos
simultaneamente.
(4) DECAY knob – Controla a quantidade de
redução de volume que ocorre cada vez que
um overdub se repete.
(5) FX knob – Seleciona uma das 7 opções de FX.
(6) LOOP 1 and 2 footswitches – Use-os para
controlar várias funções relacionadas ao loop.
(veja o verso)
(7) STOP footswitch – Pressione para parar
os dois loops imediatamente. Segure para
apagar os loops.
(8) FX footswitch – Pressione para ativar o
loop FX selecionado.
(9) INPUT jacks – Conecte um cabo TS de ¼"
para operação mono ou 2 cabos para estéreo.
(10) OUTPUT jacks – Envie áudio por meio de um
ou dois cabos TS de ¼".
(11) Power input – Conecte a fonte de
alimentação de 9V. (9 V DC,> 300 mA)
(12) MODE switches – Ajuste os detalhes nos da
operação do pedal. Veja o manual completo
para detalhes.
(13) USB input – Conecte-se a um computador
para transferir arquivos para frente e para trás
e para atualizações de rmware.
(14) MIDI jacks – Permite a conexão de um
relógio MIDI externo e mudanças de programa
e CC de um controlador MIDI.
INSTRUÇÃO DE SEGURANÇA IMPORTANTE
Antes de operar o dispositivo, consulte “Instruções
importantes de segurança” na página 3 do
manual completo.
Visite tcelectronic.com para baixar o
manual completo
(IT)
Controlli
(1) STORE/LEVEL switches – Sposta
brevemente l’interruttore verso l’alto per
memorizzare il loop corrente come base
musicale o tienilo premuto per 3 secondi per
eliminare la base musicale memorizzata.
Tenere l’interruttore in posizione abbassata
mentre si ruota la manopola LOOP associata
per regolare il livello della base musicale.
(2) LOOP knobs – Regola il livello di un loop o di
una base musicale.
(3) SERIAL/SYNC switch – Quando è
impostato su Serial, è possibile riprodurre
il loop 1 o 2 alla volta. In modalità Sync,
entrambi i loop possono essere riprodotti
contemporaneamente.
(4) DECAY knob – Controlla la quantità di
riduzione del volume che si verica ogni volta
che si ripete una sovraincisione.
(5) FX knob – Seleziona una delle 7 opzioni FX.
(6) LOOP 1 and 2 footswitches – Usali per
controllare diverse funzioni relative al
loop. (vedi retro)
(7) STOP footswitch – Premere per
interrompere immediatamente entrambi i
loop. Tieni premuto per cancellare i loop.
(8) FX footswitch – Premere per attivare il loop
FX selezionato.
(9) INPUT jacks – Collegare un cavo TS da ¼"
per il funzionamento mono o 2 cavi per stereo.
(10) OUTPUT jacks – Invia audio tramite uno o
due cavi TS da ¼".
(11) Power input – Collegare l’alimentatore 9V.
(9 V CC,> 300 mA)
(12) MODE switches – Regola i dettagli ni del
funzionamento del pedale. Vedere il manuale
completo per i dettagli.
(13) USB input – Collegarsi a un computer per
trasferire i le avanti e indietro e per gli
aggiornamenti del rmware.
(14) MIDI jacks – Consente il collegamento di un
clock MIDI esterno e modiche di programma
e CC da un controller MIDI.
IMPORTANTI ISTRUZIONI DI SICUREZZA
Prima di utilizzare il dispositivo, vedere “Istruzioni
importanti per la sicurezza” a pagina 3 del
manuale completo.
Visita tcelectronic.com per scaricare il
manuale completo
(NL)
Bediening
(1) STORE/LEVEL switches – Klap de schakelaar
kort omhoog om de huidige loop als
achtergrondtrack op te slaan, of houd deze
3 seconden ingedrukt om de opgeslagen
achtergrondtrack te verwijderen. Houd
de schakelaar omlaag terwijl u aan de
bijbehorende LOOP-knop draait om het niveau
van de achtergrondtrack aan te passen.
(2) LOOP knobs – Pas het niveau van een
loop- of achtergrondtrack aan.
(3) SERIAL/SYNC switch – Indien ingesteld
op Serieel, kan lus 1 of 2 tegelijk worden
afgespeeld. In de synchronisatiemodus
kunnen beide loops tegelijkertijd
worden afgespeeld.
(4) DECAY knob – Regelt de hoeveelheid
volumevermindering die optreedt elke keer
dat een overdub wordt herhaald.
(5) FX knob – Selecteert een van de 7 FX-opties.
(6) LOOP 1 and 2 footswitches – Gebruik deze
om verschillende lusgerelateerde functies te
besturen. (zie achterkant)
(7) STOP footswitch – Druk op om beide lussen
onmiddellijk te stoppen. Houd ingedrukt om
de loops te wissen.
(8) FX footswitch – Druk op om de
geselecteerde loop FX te activeren.
(9) INPUT jacks – Sluit een ¼" TS-kabel aan voor
monobediening, of 2 kabels voor stereo.
(10) OUTPUT jacks – Stuur audio via een of twee
¼" TS-kabels.
(11) Power input – Sluit de 9V-voeding aan.
(9 V DC,> 300 mA)
(12) MODE switches – Pas jne details van de
bediening van het pedaal aan. Zie de volledige
handleiding voor details.
(13) USB input – Maak verbinding met een
computer om bestanden heen en weer over te
dragen en voor rmware-updates.
(14) MIDI jacks – Maakt aansluiting mogelijk van
een externe MIDI-klok en programma- en
CC-wijzigingen van een MIDI-controller.
BELANGRIJKE VEILIGHEIDSINSTRUCTIE
Raadpleeg “Belangrijke veiligheidsinstructies” op
pagina 3 van de volledige handleiding voordat u het
apparaat gebruikt.
Bezoek tcelectronic.com om de volledige
handleiding te downloaden

4 Ditto X4 Looper Quick Start Guide 5
(SE)
Kontroller
(1) STORE/LEVEL switches – Vänd snabbt upp
strömbrytaren för att lagra den aktuella
slingan som ett backing-spår, eller håll
intryckt i 3 sekunder för att radera det lagrade
backing-spåret. Håll omkopplaren nedåt
medan du vrider på den tillhörande LOOP-
ratten för att justera nivån på backspåret.
(2) LOOP knobs – Justera nivån på en loop eller
backing track.
(3) SERIAL/SYNC switch – När den är inställd
på Serial kan antingen loop 1 eller 2 spelas
åt gången. I synkroniseringsläge kan båda
slingorna spelas samtidigt.
(4) DECAY knob – Kontrollerar mängden
volymreduktion som inträar varje gång en
overdub upprepas.
(5) FX knob – Väljer ett av de 7 FX-alternativen.
(6) LOOP 1 and 2 footswitches – Använd dessa
för att styra era looprelaterade funktioner.
(se baksidan)
(7) STOP footswitch – Tryck för att stoppa
båda öglorna omedelbart. Håll för att
radera öglorna.
(8) FX footswitch – Tryck för att aktivera den
valda slingan FX.
(9) INPUT jacks – Anslut en ¼" TS-kabel för
mono-drift, eller 2 kablar för stereo.
(10) OUTPUT jacks – Skicka ljud via en eller två
¼" TS-kablar.
(11) Power input – Anslut 9V strömförsörjning.
(9 V DC,> 300 mA)
(12) MODE switches – Justera na detaljer om
pedalens funktion. Se hela handboken för
mer information.
(13) USB input – Anslut till en dator för att
överföra ler fram och tillbaka och för
rmwareuppdateringar.
(14) MIDI jacks – Tillåter anslutning av en extern
MIDI-klocka och program- och CC-ändringar
från en MIDI-styrenhet.
VIKTIG SÄKERHETSINSTRUKTION
Se ”Viktiga säkerhetsinstruktioner” på sidan 3 i hela
bruksanvisningen innan du använder enheten.
Besök tcelectronic.com för att ladda ner
hela handboken
(PL)
Sterowanica
(1) STORE/LEVEL switches – Krótko przesuń
przełącznik w górę, aby zapisać bieżącą pętlę
jako podkład lub przytrzymaj przez 3 sekundy,
aby usunąć zapisany podkład. Przytrzymaj
przełącznik w dolnym położeniu, obracając
powiązane pokrętło LOOP, aby wyregulować
poziom podkładu.
(2) LOOP knobs – Dostosuj poziom pętli
lub podkładu.
(3) SERIAL/SYNC switch – W przypadku
ustawienia Serial można jednocześnie
odtwarzać pętlę 1 lub 2. W trybie
synchronizacji obie pętle mogą być
odtwarzane jednocześnie.
(4) DECAY knob – Kontroluje stopień
zmniejszenia głośności, który występuje przy
każdym powtórzeniu dogrywania.
(5) FX knob – Wybiera jedną z 7 opcji FX.
(6) LOOP 1 and 2 footswitches – Użyj ich do
sterowania kilkoma funkcjami związanymi z
pętlą. (patrz odwrotna strona)
(7) STOP footswitch – Naciśnij, aby natychmiast
zatrzymać obie pętle. Przytrzymaj, aby
usunąć pętle.
(8) FX footswitch – Naciśnij, aby włączyć
wybrany efekt pętli.
(9) INPUT jacks – Podłącz jeden kabel TS ¼" dla
trybu mono lub 2 kable dla stereo.
(10) OUTPUT jacks – Przesyłaj dźwięk jednym lub
dwoma kablami TS ¼".
(11) Power input – Podłącz zasilanie 9V.
(9 V DC,> 300 mA)
(12) MODE switches – Dostosuj szczegóły
działania pedału. Szczegółowe informacje
można znaleźć w pełnej instrukcji.
(13) USB input – Połącz się z komputerem,
aby przesyłać pliki w tę iz powrotem oraz
aktualizacje oprogramowania układowego.
(14) MIDI jacks – Umożliwia podłączenie
zewnętrznego zegara MIDI oraz zmianę
programu i CC ze sterownika MIDI.
WAŻNA INSTRUKCJA BEZPIECZEŃSTWA
Przed uruchomieniem urządzenia zapoznaj
się z częścią „Ważne instrukcje dotyczące
bezpieczeństwa” na stronie 3 pełnej instrukcji.
Odwiedź tcelectronic.com, aby pobrać
pełną instrukcję
LEGAL DISCLAIMER
Music Tribe accepts no liability for any loss which may
be suered by any person who relies either wholly or in
part upon any description, photograph, or statement
contained herein. Technical specications, appearances
and other information are subject to change without
notice. All trademarks are the property of their
respective owners. Midas, Klark Teknik, Lab Gruppen,
Lake, Tannoy, Turbosound, TC Electronic, TC Helicon,
Behringer, Bugera and Coolaudio are trademarks or
registered trademarks of Music Tribe Global Brands Ltd.
© Music Tribe Global Brands Ltd. 2021 All rights reserved.
LIMITED WARRANTY
For the applicable warranty terms and conditions and
additional information regarding
Music Tribe’s Limited Warranty, please see complete
details online at musictribe.com/warranty.
LEGAL DISCLAIMER
Music Tribe no admite ningún tipo de responsabilidad
por cualquier daño o pérdida que pudiera sufrir
cualquier persona por conar total o parcialmente en la
descripciones, fotografías o armaciones contenidas en
este documento. Las especicaciones técnicas, imágenes
y otras informaciones contenidas en este documento
están sujetas a modicaciones sin previo aviso. Todas las
marcas comerciales que aparecen aquí son propiedad de
sus respectivos dueños. Midas, Klark Teknik, Lab Gruppen,
Lake, Tannoy, Turbosound, TC Electronic, TC Helicon,
Behringer, Bugera, Oberheim, Auratone y Coolaudio son
marcas comerciales o marcas registradas de Music Tribe
Global Brands Ltd. © Music Tribe Global Brands Ltd.
2021 Reservados todos los derechos.
LIMITED WARRANTY
Si quiere conocer los detalles y condiciones aplicables de la
garantía así como información adicional sobre la Garantía
limitada de
Music Tribe, consulte online toda la información en la web
musictribe.com/warranty.
LEGAL DISCLAIMER
Music Tribe ne peut être tenu pour responsable pour
toute perte pouvant être subie par toute personne
se ant en partie ou en totalité à toute description,
photographie ou armation contenue dans ce document.
Les caractéristiques, l’apparence et d’autres informations
peuvent faire l’objet de modications sans notication.
Toutes les marques appartiennent à leurs propriétaires
respectifs. Midas, Klark Teknik, Lab Gruppen, Lake, Tannoy,
Turbosound, TC Electronic, TC Helicon, Behringer, Bugera,
Oberheim, Auratone et Coolaudio sont des marques ou
marques déposées de Music Tribe Global Brands Ltd.
© Music Tribe Global Brands Ltd. 2021 Tous droits réservés.
LIMITED WARRANTY
Pour connaître les termes et conditions de garantie
applicables, ainsi que les informations supplémentaires et
détaillées sur la Garantie Limitée de
Music Tribe, consultez le site Internet musictribe.com/warranty.
LEGAL DISCLAIMER
Music Tribe übernimmt keine Haftung für Verluste, die
Personen entstanden sind, die sich ganz oder teilweise
auf hier enthaltene Beschreibungen, Fotos oder Aussagen
verlassen haben. Technische Daten, Erscheinungsbild und
andere Informationen können ohne vorherige Ankündigung
geändert werden. Alle Warenzeichen sind Eigentum der
jeweiligen Inhaber. Midas, Klark Teknik, Lab Gruppen,
Lake, Tannoy, Turbosound, TC Electronic, TC Helicon,
Behringer, Bugera, Oberheim, Auratone und Coolaudio sind
Warenzeichen oder eingetragene Warenzeichen der Music
Tribe Global Brands Ltd.
© Music Tribe Global Brands Ltd. 2021 Alle Rechte
vorbehalten.
LIMITED WARRANTY
Die geltenden Garantiebedingungen und zusätzliche
Informationen bezüglich der von
Music Tribe gewährten beschränkten Garantie nden Sie
online unter musictribe.com/warranty.
LEGAL DISCLAIMER
O Music Tribe não se responsabiliza por perda alguma
que possa ser sofrida por qualquer pessoa que dependa,
seja de maneira completa ou parcial, de qualquer
descrição, fotograa, ou declaração aqui contidas. Dados
técnicos, aparências e outras informações estão sujeitas
a modicações sem aviso prévio. Todas as marcas são
propriedade de seus respectivos donos. Midas, Klark Teknik,
Lab Gruppen, Lake, Tannoy, Turbosound, TC Electronic,
TC Helicon, Behringer, Bugera, Oberheim, Auratone e
Coolaudio são marcas ou marcas registradas do Music Tribe
Global Brands Ltd.
© Music Tribe Global Brands Ltd. 2021 Todos direitos
reservados.
LIMITED WARRANTY
Para obter os termos de garantia aplicáveis e condições e
informações adicionais a respeito da garantia limitada do
Music Tribe, favor vericar detalhes na íntegra através do
website musictribe.com/warranty.
LEGAL DISCLAIMER
Music Tribe non si assume alcuna responsabilità per
eventuali danni che possono essere subiti da chiunque si
adi in tutto o in parte a qualsiasi descrizione, fotograa
o dichiarazione contenuta qui. Speciche tecniche, aspetti
e altre informazioni sono soggette a modiche senza
preavviso. Tutti i marchi sono di proprietà dei rispettivi
titolari. Midas, Klark Teknik, Lab Gruppen, Lake, Tannoy,
Turbosound, TC Electronic, TC Helicon, Behringer, Bugera,
Oberheim, Auratone e Coolaudio sono marchi o marchi
registrati di Music Tribe Global Brands Ltd.
© Music Tribe Global Brands Ltd. 2021 Tutti i diritti riservati.
LIMITED WARRANTY
Per i termini e le condizioni di garanzia applicabili e le
informazioni aggiuntive relative alla garanzia limitata di
Music Tribe, consultare online i dettagli completi su
musictribe.com/warranty.
LEGAL DISCLAIMER
Music Tribe aanvaardt geen aansprakelijkheid voor enig
verlies dat kan worden geleden door een persoon die
geheel of gedeeltelijk vertrouwt op enige beschrijving,
foto of verklaring hierin. Technische specicaties,
verschijningen en andere informatie kunnen zonder
voorafgaande kennisgeving worden gewijzigd. Alle
handelsmerken zijn eigendom van hun respectievelijke
eigenaren. Midas, Klark Teknik, Lab Gruppen, Lake, Tannoy,
Turbosound, TC Electronic, TC Helicon, Behringer, Bugera,
Oberheim, Auratone en Coolaudio zijn handelsmerken
of gedeponeerde handelsmerken van Music Tribe Global
Brands Ltd.
© Music Tribe Global Brands Ltd. 2021 Alle rechten
voorbehouden.
LIMITED WARRANTY
Voor de toepasselijke garantievoorwaarden en aanvullende
informatie met betrekking tot de beperkte garantie van
Music Tribe, zie de volledige details online op musictribe.
com/warranty.
LEGAL DISCLAIMER
Music Tribe tar inget ansvar för någon förlust som kan
drabbas av någon person som helt eller delvis förlitar sig på
någon beskrivning, fotogra eller uttalande som nns här.
Tekniska specikationer, utseenden och annan information
kan ändras utan föregående meddelande. Alla varumärken
tillhör respektive ägare. Midas, Klark Teknik, Lab Gruppen,
Lake, Tannoy, Turbosound, TC Electronic, TC Helicon,
Behringer, Bugera, Oberheim, Auratone och Coolaudio är
varumärken eller registrerade varumärken som tillhör Music
Tribe Global Brands Ltd.
© Music Tribe Global Brands Ltd. 2021 Alla Rättigheter
reserverade.
LIMITED WARRANTY
För tillämpliga garantivillkor och ytterligare information om
Music Tribes begränsade garanti, se fullständig information
online på musictribe.com/warranty.
LEGAL DISCLAIMER
Music Tribe nie ponosi odpowiedzialności za jakiekolwiek
straty, które mogą ponieść osoby, które polegają w
całości lub w części na jakimkolwiek opisie, fotograi
lub oświadczeniu zawartym w niniejszym dokumencie.
Specykacje techniczne, wygląd i inne informacje mogą
ulec zmianie bez powiadomienia. Wszystkie znaki
towarowe są własnością ich odpowiednich właścicieli.
Midas, Klark Teknik, Lab Gruppen, Lake, Tannoy,
Turbosound, TC Electronic, TC Helicon, Behringer, Bugera,
Oberheim, Auratone i Coolaudio są znakami towarowymi
lub zastrzeżonymi znakami towarowymi rmy Music
Tribe Global Brands Ltd. © Music Tribe Global Brands Ltd.
2021 Wszystkie prawa zastrzeżone.
LIMITED WARRANTY
Aby zapoznać się z obowiązującymi warunkami
gwarancji i dodatkowymi informacjami dotyczącymi
ograniczonej gwarancji
Music Tribe, zapoznaj się ze wszystkimi szczegółami w
trybie online pod adresem musictribe.com/warranty.

6 Ditto X4 Looper Quick Start Guide 7
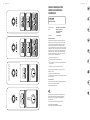
DECAY
STOP
STOP
ALL
CLEAR
ALL
LAYER FADING NO LAYER FADING
SELECT FX
ENGAGE/DISENGAGE FX
ENGAGE
FX
DISENGAGE
FX
TAPE STOP
FADE
DOUBLE
HOLD
REVERSE
HALF
ONCE
NOTE: When the loop is cleared,
DITTO X4 returns to true bypass
*
FEDERAL COMMUNICATIONS
COMMISSION COMPLIANCE
INFORMATION
Responsible Party Name: Music Tribe Commercial NV Inc.
Address: 5270 Procyon Street,
Las Vegas NV 89118,
United States
Phone Number: +1 702 800 8290
DITTO X4 LOOPER
This equipment has been tested and found to comply with the limits for a Class
B digital device, pursuant to part 15 of the FCC Rules. These limits are designed
to provide reasonable protection against harmful interference in a residential
installation. This equipment generates, uses and can radiate radio frequency
energy and, if not installed and used in accordance with the instructions, may cause
harmful interference to radio communications. However, there is no guarantee that
interference will not occur in a particular installation. If this equipment does cause
harmful interference to radio or television reception, which can be determined
by turning the equipment o and on, the user is encouraged to try to correct the
interference by one or more of the following measures:
• • Reorient or relocate the receiving antenna.
• • Increase the separation between the equipment and receiver.
• • Connect the equipment into an outlet on a circuit dierent from that to which the
receiver is connected.
• • Consult the dealer or an experienced radio/TV technician for help.
This device complies with Part 15 of the FCC rules. Operation is subject to the
following two conditions:
(1) this device may not cause harmful interference, and
(2) this device must accept any interference received, including interference that may
cause undesired operation.
Important information:
Changes or modications to the equipment not expressly approved by Music Tribe
can void the user’s authority to use the equipment.
Operation Ambient Temperature up to 45°C
Hereby, Music Tribe declares that this product is in compliance with Directive
2014/35/EU,Directive 2014/30/EU, Directive 2011/65/EU and Amendment
2015/863/EU, Directive 2012/19/EU, Regulation 519/2012 REACH SVHC and
Directive 1907/2006/EC.
Full text of EU DoC is available at https://community.musictribe.com/
EU Representative: Music Tribe Brands DK A/S
Address: Ib Spang Olsens Gade 17, DK - 8200 Aarhus N, Denmark
DITTO X4 LOOPER

-
 1
1
-
 2
2
-
 3
3
-
 4
4
-
 5
5


Behringer DDM4000 Guida utente
- Categoria
- Giocattoli
- Tipo
- Guida utente
- Questo manuale è adatto anche per
in altre lingue
- English: Behringer DDM4000 User guide
- français: Behringer DDM4000 Mode d'emploi
- español: Behringer DDM4000 Guía del usuario
- Deutsch: Behringer DDM4000 Benutzerhandbuch
- Nederlands: Behringer DDM4000 Gebruikershandleiding
- português: Behringer DDM4000 Guia de usuario
- polski: Behringer DDM4000 instrukcja
- svenska: Behringer DDM4000 Användarguide
Documenti correlati
Altri documenti
-
TC Electronic TUBE PILOT OVERDRIVE Guida Rapida
-
TC Electronic JUNE-60 Guida utente
-
TC Electronic GAUSS TAPE ECHO Guida utente
-
-
TC Electronic DITTO+ LOOPER Manuale utente
-
-
TC-Helicon TC HELICON Play Accoustic Guida utente
-
TC-Helicon VOICELIVE PLAY Guida utente
-
TCHELICON DITTO MIC LOOPER Guida Rapida
-
TC Electronic PLETHORA X5 Guida Rapida