Falmec FDNUB36C6SS Manuale del proprietario
- Categoria
- Cappe da cucina
- Tipo
- Manuale del proprietario

installation
video
INSTRUCTIONS
BOOKLET
falmec.com
MADE IN VITTORIO VENETO (TV) - ITALY
EN INSTRUCTIONS BOOKLET
FR MODE D'EMPLOI
ES MANUAL DE INSTRUCCIONES
IT LIBRETTO ISTRUZIONI
Nube
FDNUB36C6SS

2
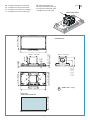
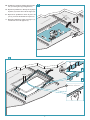
HOLE SIZES
DIMENSIONE FORATURA
21 1/4” - 540 mm
38 1/4” - 973 mm
36 3/8” - 925 mm
19 3/8” - 492 mm
14 5/8” - 370 mm
21 7/8” - 556 mm
5” - 128 mm
min 3/8” - 10 mm
/max 1” - 25 mm
9 3/8” - 239 mm
13 3/8” - 341 mm
10 7/8” - 275 mm
3 3/4”
95 mm
10 7/8” - 275 mm
5 7/8”
150 mm
37” - 940 mm
19 7/8 “ - 505 mm
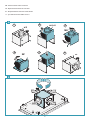
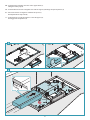
EN Installation with motor on the hood.
FR Installation avec moteur sur la hotte.
ES Instalación con el motor en la campana.
IT Installazione con motore sulla cappa.
NUBE: 70 lb - 32 Kg
page
9
120VAC 60Hz 280W
FDNUB36C6SS
EN- cable length 5,0ft (1,5m)
FR- longueur de câble 5,0ft (1,5m)
ES- longueur de câble 5,0ft (1,5m)
IT- lunghezza cavo 5,0ft (1,5m)

3
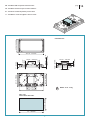
HOLE SIZES
DIMENSIONE FORATURA
10 7/8” - 275 mm
3 3/8” - 86 mm
8 1/2” - 216 mm
7 5/8” - 193 mm
5 5/8”
144 mm
21 1/4” - 540 mm
38 1/4” - 973 mm
5” - 128 mm
10 7/8” - 275 mm
3 3/4”
95 mm
min 3/8” - 10 mm
/max 1” - 25 mm
21 7/8” - 556 mm
36 3/8” - 925 mm
14 5/8” - 370 mm
19 3/8” - 492 mm
37” - 940 mm
19 7/8 “ - 505 mm
EN Installation with conveyor kit and remote motor.
FR Installation avec kit convoyeur et moteur à distance.
ES - Instalación con kit transportador y motor remoto.
IT - Installazione con kit convogliatore e motore remoto.
NUBE: 52 lb - 24 Kg
page
14
FDNUB36C6SS

4
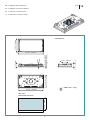
HOLE SIZES
DIMENSIONE FORATURA
37” - 940 mm
19 7/8 “ - 505 mm
5 7/8” - 150 mm
5 1/8” - 130 mm
21 1/4” - 540 mm
38 1/4” - 973 mm
5” - 128 mm
3 3/4”
95 mm
min 3/8” - 10 mm
/max 1” - 25 mm
36 3/8” - 925 mm
19 3/8” - 492 mm
NUBE: 48 lb - 24 Kg
EN Installation with remote motor.
FR Installation avec moteur à distance.
ES Instalación con motor remoto.
IT Installazione con motore remoto.
page
16
FDNUB36C6SS

5
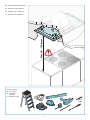
Max 59” - 1500 mm
EN - Measurements for installation.
FR - Mesures pour l'installation.
ES - Medidas para la instalacion.
IT - Misure per l’installazione.
ø3/8"
9 mm
EN - tool required
FR - outil requis
ES - herramienta
requerida
IT - Attrezzi necessari

6
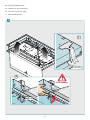
FALSE CEILING
2
min.
2 3/8” - 60 mm
min.
2 3/8” - 60 mm
1
FALSE CEILING
G
3
4
double adhesive
2
1
H
H
√
x
1
2
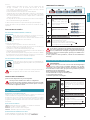
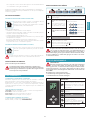
EN - Preliminary operations: Cutting the plasterbo-
ard (1), inserting the supporting frame (2).
FR -
Opérations préliminaires: Découpe de la plaque
de plâtre (1), insertion d'un cadre de support (2).
ES - Operaciones preliminares: Corte de placas de
yeso (1), inserción del bastidor de soporte (2).
IT - Operazioni preliminari: Taglio cartongesso (1),
inserimento cornice di supporto (2).

7
X
Y
X
1
2
Y
4
3
Ø3/8”
Ø9
mm
3
EN - Preliminary operations: xing the mandatory safety chains to the ceiling.
FR - Opérations préliminaires: xation au plafond des chaînes de sécurité obligatoires.
ES - Operaciones preliminares: jación en el techo de las cadenas de seguridad obligatorias.
IT - Operazioni preliminari: ssaggio a sotto delle catenelle di sicurezza obbligatorie.
X
24" 3/8
(620 mm)
Y
5" 7/8
(150 mm)

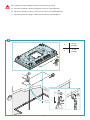
8
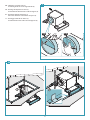
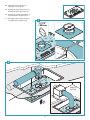
EN - Open the panel, remove the lters (4) and gas piston (5).
FR - Ouvrir le panneau, retirer les ltres (4) et le piston à gaz (5).
ES - Abrir el panel, quitar los ltros (4) y un pistón de gas (5).
IT - Aprire pannello, togliere ltri (4) e pistone a gas (5);
1
2
4
2
3
1
1
2
4
2
3
1
4
5

9
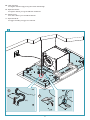
INLET
1 2
3
EN - Remove the ange from the hood (1) and the motor (2). If the air outlet is upward, see (3).
For other directions, see (4) and (5).
FR - Retirer la bride de la hotte (1) et du moteur (2). Si la sortie d'air est vers le haut, voir (3). Pour
d'autres directions, voir (4) et (5).
ES - Retirar la brida de la campana (1) y del motor (2). Si la salida de aire es ascendente, véase (3).
Para otras direcciones, ver (4) y (5).
IT - Togliere la angia dalla cappa (1) e dal motore (2). Se l'uscita aria è verso l'alto, vedi (3). Per
altre direzioni, Vedere (4) e (5).

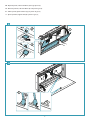
10
5
4
AIR
180°
3
4
90°
5
x 8
6
x 8
2
1
OUTLET
EN - Side movement of the air exhaust
FR - Deplacement lateral de la sortie d'air
ES - Desplazamiento lateral de la salida del aire
IT - Spostamento laterale dell'uscita aria

11
4 3/8”
112 mm
x8
1
1
2
15 3/8”
390 mm
3
4
4
3
x4
6
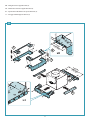
EN - Fixing the motor support brackets (6).
FR - Fixation des étriers de support du moteur (6).
ES - Fijación de las abrazaderas de soporte del motor (6).
IT - Fissaggio stae di supporto motore (6).

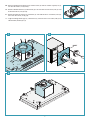
12
7
1
2
8
EN - Fitting the non-return valve (7).
Positioning the motor on the support frame (8).
FR - Montage du clapet de non retour (7).
Positionnement du moteur sur le cadre de support (8).
ES - Montaje de válvula antirretorno (7).
Colocación del motor en el bastidor de soporte (8).
IT - Montaggio valvola di non ritorno (7).
Posizionamento motore sulla cornice di supporto (8).

13
ø 15
5 7/8"
150mm
1
2
3
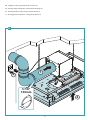
9
EN - Fitting the suction pipe and electrical connection (9).
FR - Montage du tuyau d'aspiration et branchement électrique (9).
ES - Montaje del tubo de aspiración y la conexión eléctrica (9).
IT - Montaggio tubo d'aspirazione e collegamento elettrico (9).

14
AIR
AIR
3
4
2
2
V2 (x4)
V1 (x8)
3
V1 (x8)
4
V2 (x4)
2
1
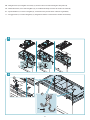
EN - Remove the ange from the hood (1).
Fixing the brackets onto the rectangular connection (2).
FR - Retirer la bride de la hotte (1).
Fixation des étriers sur raccord rectangulaire (2).
ES - Retirar la brida de la campana (1).
Fijación de las bridas en el accesorio rectangular (2).
IT - Togliere la angia dalla cappa (1).
Fissaggio stae su raccordo rettangolare (2).

15
1
2
L
CT
M
H
G
3
1
8 1/4”
217mm
3 3/8”
87mm
CUE
2
4
EN -
Positioning the rectangular connection on the support frame (3).
Fitting the suction pipe (4).
FR -
Positionnement du raccord rectangulaire sur le cadre de support (3). Montage du tuyau d'aspiration (4).
ES -
Colocación del racor rectangular en el bastidor de soporte (3).
Montaje del tubo de aspiración (4).
IT -
Posizionamento raccordo rettangolare su cornice di supporto (3).
Montaggio tubo d'aspirazione (4).

16
1
2
5 7/8"
150mm
1
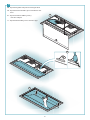
EN - Fitting the non-return valve (1).
Fixing the suction pipe (2).
FR - Montage du clapet de non retour (1).
Montage du tuyau d'aspiration (2).
ES - Montaje de la válvula antirretorno (1).
Fijación del tubo de aspiración (2).
IT - Montaggio valvola di non ritorno (1).
Fissaggio tubo di aspirazione (2).
F
1
2
REMOTE
MOTOR
2

17
(x2)
2
1
CM
1
EN - Final operations:
Passing the chains through, passing the control cable through.
FR - Opérations nales :
Passage des chaînes, passage du câble des commandes.
ES - Últimos pasos:
Paso de las cadenas ,paso del cable de mandos.
IT - Operazioni nali:
Passaggio catenelle, passaggio cavo comandi.

18
EN - Closing the holding brackets.
FR - Fermeture des étriers d'étanchéité.
ES - Cierre de los soportes de sellado.
IT - Chiusura sta e di tenuta.
V3
OK!
Disassembly!
2
1
2

19
V4
2
CM
CE
1
V5
(x8)
V5
(x8)
4
3
EN - Fixing the motor (or rectangular connection) (3), electrical connection and tensioning the safety chains (4).
FR - Fixation du moteur (ou raccord rectangulaire) (3), raccordement électrique et tension des chaînes de sécurité (4).
ES - Fijación del motor (o accesorio rectangular) (3), conexión eléctrica y tensado de las cadenas de seguridad (4).
IT - Fissaggio motore (o raccordo rettangolare) (3), collegamento elettrico e tensionamento catenelle di sicurezza (4).

20
3
1
2
EN - Repositioning lters and piston and closing the hood.
FR - Repositionnement des ltres, piston et fermeture de la
hotte.
ES - Reposicionamiento de ltros, pistón y
cierre de la campana.
IT - Riposizionamento ltri, pistone e chiusura cappa.
5
La pagina sta caricando ...
La pagina sta caricando ...
La pagina sta caricando ...
La pagina sta caricando ...
La pagina sta caricando ...
La pagina sta caricando ...
La pagina sta caricando ...
La pagina sta caricando ...
La pagina sta caricando ...
La pagina sta caricando ...
La pagina sta caricando ...
La pagina sta caricando ...
La pagina sta caricando ...
La pagina sta caricando ...
La pagina sta caricando ...
La pagina sta caricando ...
La pagina sta caricando ...
La pagina sta caricando ...
La pagina sta caricando ...
La pagina sta caricando ...
-
 1
1
-
 2
2
-
 3
3
-
 4
4
-
 5
5
-
 6
6
-
 7
7
-
 8
8
-
 9
9
-
 10
10
-
 11
11
-
 12
12
-
 13
13
-
 14
14
-
 15
15
-
 16
16
-
 17
17
-
 18
18
-
 19
19
-
 20
20
-
 21
21
-
 22
22
-
 23
23
-
 24
24
-
 25
25
-
 26
26
-
 27
27
-
 28
28
-
 29
29
-
 30
30
-
 31
31
-
 32
32
-
 33
33
-
 34
34
-
 35
35
-
 36
36
-
 37
37
-
 38
38
-
 39
39
-
 40
40


Falmec FDNUB36C6SS Manuale del proprietario
- Categoria
- Cappe da cucina
- Tipo
- Manuale del proprietario
in altre lingue
Documenti correlati
-
Falmec Mercurio Evo Manuale utente
-
-
-
-
-
-
-
Falmec FPMER24W3SS Manuale del proprietario
-
-