
RENLIG
DW55
GB
DE
FR
IT


ENGLISH 4
DEUTSCH 22
FRANÇAIS 43
ITALIANO 64

Contents
Safety information 4
Product description 5
Control panel 6
Washing programmes 8
Use of the appliance 9
Setting the water softener 9
Use of dishwasher salt 10
Use of rinse aid 10
Loading cutlery and dishes 11
Use of detergent 12
Setting and starting a washing programme
13
Care and cleaning 14
What to do if… 15
Technical data 17
Installation 18
Water connection 18
Electrical connection 19
Environment concerns 19
IKEA GUARANTEE 20
Subject to change without notice
Safety information
For your safety and correct operation of
the appliance, read this manual carefully
before installation and use. Always keep these
instructions with the appliance even if you
move or sell it. Users must fully know the oper-
ation and safety features of the appliance.
Correct use
• The appliance is designed exclusively for
domestic use.
• Only use the appliance to clean household
utensils that are applicable for dishwashers.
• Do not put solvents in the appliance. Risk of
explosion.
• Put the knives and all items with sharp points
in the cutlery basket with their points down.
If not, put in a horizontal position in the main
basket.
• Use only branded products for dishwashers
(detergent, salt, rinse aid).
• If you open the door while the appliance is
in operation, hot steam can escape. Risk of
skin burns.
• Do not remove dishes from the dishwasher
before the end of the washing programme.
• When the washing programme is comple-
ted, disconnect the mains plug from the
mains socket and close the water tap.
• Only an authorised service engineer can re-
pair this appliance. Use only original spare
parts.
• Do not do repairs yourself to prevent injury
and damage to the appliance. Always con-
tact your local After Sales Service.
General safety
• Persons (including children) with reduced
physical sensory, mental capabilities or lack
of experience and knowledge must not use
the appliance. They must have supervision
or instruction for the operation of the appli-
ance by a person responsible for their safe-
ty.
• Obey the safety instructions from the man-
ufacturer of the dishwasher detergent to
prevent burns to eyes, mouth and throat.
• Do not drink the water from the dishwasher.
Detergent residues can stay in your appli-
ance.
• Always close the door when you do not use
the appliance to prevent injury and not to
stumble over the open door.
• Do not sit or stand on the open door.
Child safety
• Only adults can use this appliance. Children
must get supervision to make sure that they
do not play with the appliance.
• Keep all the packaging away from children.
There is a risk of suffocation.
• Keep all detergents in a safe area. Do not
let children touch the detergents.
• Keep children away from the appliance
when the door is open.
ENGLISH 4

Installation
• Make sure that the appliance is not dam-
aged because of transport. Do not connect
a damaged appliance. If necessary, contact
the supplier.
• Remove all packaging before first use.
• A qualified and competent person must do
the electrical installation.
• A qualified and competent person must do
the plumbing installation.
• Do not change the specifications or modify
this product. Risk of injury and damage to
the appliance.
• Do not use the appliance:
– if the mains cable or water hoses are
damaged,
– if the control panel, worktop or plinth area
are damaged, that you can get access to
the inner side of the appliance.
If you have any doubts, please contact your
After Sales Service. Refer to the list of the
After Sales Services at the end of user man-
ual.
• Do not drill into the sides of the appliance to
prevent damage to hydraulic and electrical
components.
Warning! Carefully obey the instructions
for electrical and water connections.
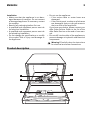
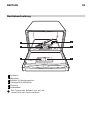
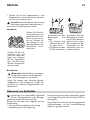
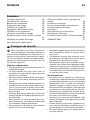
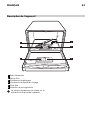
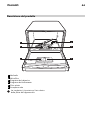
Product description
6
1
5
4
2
3
ENGLISH 5

1 Spray arm
2 Microfilter
3 Detergent dispenser
4 Rinse aid dispenser
5 Flat filter
6 Salt container
The rating label is on the right side of ap-
pliances door.
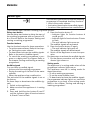
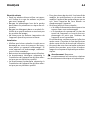
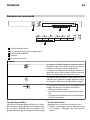
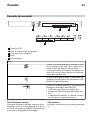
Control panel
1 3 42
5
ABC
1 On/off button
2 Programme selection buttons
3 Delay start button
4 Indicator lights
5 Function buttons
Indicator lights
1)
The indicator light comes on when it is neces-
sary to fill the salt container. Refer to the chap-
ter 'Use of dishwasher salt'.
The salt indicator light can stay on for some
hours, but it does not have an unwanted effect
on the operation of the appliance.
1)
The indicator light comes on when it is neces-
sary to fill the rinse aid. Refer to the chapter
'Use of rinse aid'.
ENGLISH 6

Indicator lights
The indicator light comes on when the washing
programme is completed. Auxiliary functions:
• Level of the water softener.
• Activation/deactivation the audible signals.
• An alarm if the appliance has a malfunction.
1) The indicator light is off while a washing programme operates.
Delay start button
Use the delay start button to delay the start of
the washing programme with an interval of 3,
6 or 9 hours. Refer to the chapter 'Setting and
starting a washing programme'.
Function buttons
Use the function buttons for these operations:
• To set the water softener. Refer to the chap-
ter 'Setting the water softener'.
• To deactivate/activate the audible signals.
Refer to the section 'Audible signals'.
• To cancel the washing programme in pro-
gress or a delay start in progress. Refer to
the chapter 'Setting and starting a washing
programme'.
Audible signals
You can hear an audible signal:
• At the end of the washing programme.
• During the setting of the level of the water
softener.
• When the appliance has a malfunction.
The activation of the audible signals is set at
the factory.
Do these steps to deactivate the audible sig-
nals:
1. Switch on the appliance.
2. Make sure that the appliance is in setting
mode.
3. Press and hold function buttons B and C
until the indicator lights of function buttons
A, B and C start to flash.
4. Press the function button C.
– Indicator lights for function buttons A
and B go off.
– Indicator light for function button C starts
to flash.
– The end indicator light comes on.
The audible signals are activated.
5. Press the function button C again.
– The end indicator light goes off.
The audible signals are deactivated.
6. Switch off the appliance to save the oper-
ation.
Do these steps to activate the audible signals:
1. Do the above procedure until the end in-
dicator light comes on.
Setting mode
The appliance is in setting mode when all the
programme indicator lights are on.
The appliance must be in setting mode for
these operations:
– To set a washing programme.
– To set the water softener level.
– To deactivate/activate the audible signals.
If a programme indicator light is on, cancel the
programme to go back to the setting mode.
Refer to the chapter "Setting and starting a
washing programme".
ENGLISH 7

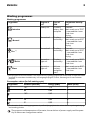
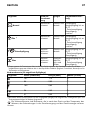
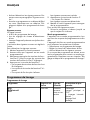
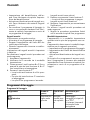
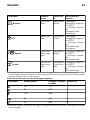
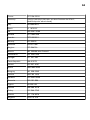
Washing programmes
Washing programmes
Programme Degree of
soil
Type of
load
Programme descrip-
tion
Intensive
Heavy soil Crockery,
cutlery, pots
and pans
Prewash
Main wash up to 70°C
2 intermediate rinses
Final rinse
Drying
Normal
Normal soil Crockery
and cutlery
Prewash
Main wash up to 65°C
1 intermediate rinse
Final rinse
Drying
Eco
1)
Normal soil Crockery
and cutlery
Prewash
Main wash up to 55°C
1 intermediate rinse
Final rinse
Drying
Quick
Normal or
light soil
Crockery
and cutlery
Main wash up to 50°C
1 intermediate rinse
Final rinse
Glass
Normal or
light soil
Delicate
crockery
and glass-
ware
Main wash up to 40°C
1 intermediate rinse
Final rinse
1) Test programme for test institutes. This is the economy washing programme. Please refer to separate leaflet
supplied, for test data. Available only in 3 languages (English, French, German) just for test institutes
purpose.
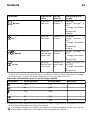
Consumption values (for full washing cycle)
Programme Duration (minutes) Energy (kWh) Water (litres)
107 1,15 9
84 0,80 7
1)
149 0,63 7
36 0,40 6
31 0,35 6
1) The duration of this washing programme is prefixed (longer) than the others due to a prolonged drying
and washing phases.
The pressure and temperature of the water, the variations of power supply and the quan-
tity of dishes can change these values.
ENGLISH 8

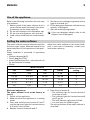
Use of the appliance
Refer to the following instructions for each step
of procedure:
1. Make a check if the water softener level is
correct for the water hardness in your area.
If necessary set the water softener.
2. Fill the salt container with dishwasher salt.
3. Fill the rinse aid dispenser with rinse aid.
4. Load cutlery and dishes into the dishwash-
er.
5. Set the correct washing programme for the
type of load and soil.
6. Fill the detergent dispenser with the correct
quantity of detergent.
7. Start the washing programme.
If you use detergent tablets, refer to the
chapter 'Use of detergent'.
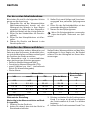
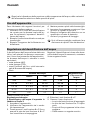
Setting the water softener
The water softener removes minerals and salts
from the water supply. Minerals and salts can
have bad effect on the operation of the appli-
ance.
Water hardness is measured in equivalent
scales:
• German degrees (dH°).
• French degrees (°TH).
• mmol/l (millimol per litre - international unit
for the hardness of water).
•Clarke.
Adjust the water softener to the water hard-
ness in your area. If necessary, contact your
local water authority.
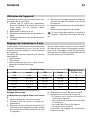
Water hardness
Water hardness
setting
°dH mmol/l °TH Clarke
>24 >4.2 >40 > 28 5
18- 24 3.2- 4.2 32- 40 22- 28 4
12- 18 2.1- 3.2 19- 32 13- 22 3
4- 12 0.7- 2.1 7- 19 5 -13 2
< 4 < 0.7 < 7 < 5
1
1)
1) No use of salt required.
Electronic adjustment
The water softener is set at the factory at
level 3.
1. Switch on the appliance.
2. Make sure that the appliance is in setting
mode.
3. Press and hold function buttons B and C
until the indicator lights for function buttons
A, B and C start to flash.
4. Release function buttons B and C.
5. Press function button A.
– The indicator light for function button A
continues to flash.
– The indicator lights for function buttons B
and C go off.
– The end indicator light starts to flash.
– You can hear an audible signal.
The setting function of the water softener is
activated.
ENGLISH 9

The end indicator light flashes and an au-
dible signal operates to show the level of
the water softener. The pause is approxi-
mately 3 seconds.
Example: 3 flashes / 3 intermittent audible
signals - pause - 3 flashes / 3 intermittent
audible signals - pause - etc... = level 3
6. Press the function button A one time to in-
crease the water softener level by one step.
7. Press the on/off button to save the opera-
tion.
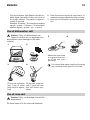
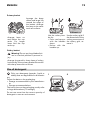
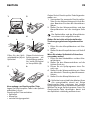
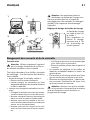
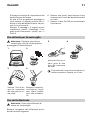
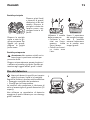
Use of dishwasher salt
Caution! Only use dishwashers salt.
Types of salt that are not applicable for
dishwashers cause damage to the water
softener.
1
2
3
Fill the salt container
with 1 litre of water
(only the first opera-
tion).
4
Fill the salt container
with 1 kg of salt. Use
the salt funnel sup-
plied.
5
Make sure that there
is no grain of salt out-
er of the salt com-
partment.
6
It is normal that water overflows from the
salt container when you fill it with salt.
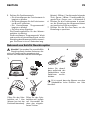
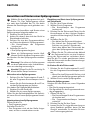
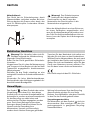
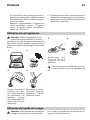
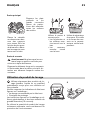
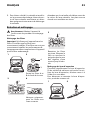
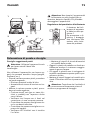
Use of rinse aid
Caution! Only use branded rinse aid for
dishwashers.
Do these steps to fill the rinse aid dispenser:
ENGLISH 10

1 2
3
max
4
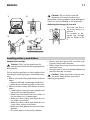
Caution! Do not fill the rinse aid
dispenser with other products (e.g.
dishwasher cleaning agent, liquid detergent).
There is a risk of damage to the appliance.
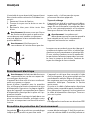
Adjusting the dosage of rinse aid
The rinse aid dial is
set at the factory at
position 1.
To increase or de-
crease the dosage
refer to 'What to do
if...'
Loading cutlery and dishes
Helpful hints and tips
Caution! Only use the appliance for
household utensils that are applicable for
dishwashers.
Do not use the appliance to clean objects that
can absorb water (sponges, household cloths,
etc.).
• Before you load cutlery and dishes, do these
steps:
– Remove all food remainings and debris.
– Make burnt, remaining food in pans soft.
• While you load cutlery and dishes, do these
steps:
– Load hollow items (e.g. cups, glasses and
pans) with the opening down.
– Make sure that water does not collect in
the container or in a deep base.
– Make sure that cutlery and dishes do not
lie inside one another.
– Make sure that cutlery and dishes do not
cover other cutlery and dishes.
– Make sure that glasses do not touch other
glasses.
– Put small objects in the cutlery basket.
• Plastic items and pans with non-stick coat-
ings can keep water droplets.
• Plastic items do not dry as well as porcelain
and steel items.
• Put light items in the main basket. Make sure
that the items do not move.
Caution! Make sure that the spray arm
can move freely before you start a
washing programme.
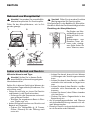
ENGLISH 11

Primary basket
Arrange items on
and below the cup
racks. For longer
items fold the cup
racks up.
Arrange the deep
dishes and large lids
around the edge of
the basket. Arrange
the items to let water
touch all surfaces.
Cutlery basket
Warning! Do not put long-bladed kni-
ves in a vertical position to prevent in-
jury.
Arrange long and/or sharp items of cutlery
horizontally in the primary basket. Be careful
with sharp items such as knives.
Use the cutlery bas-
ket for:
• Forks and spoons
with the handles
down.
• Knives with the
handles up.
Use the cutlery grid. If
the dimensions of the
cutlery prevent use of
the cutlery grid, re-
move it.
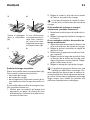
Use of detergent
Only use detergents (powder, liquid or
tablet) that are applicable for dishwash-
ers.
Follow the data on the packaging:
• Dosage recommended by the manufactur-
er.
• Storage recommendations.
The instructions on the packaging usually refer
to large dishwashers (12 settings).
Do not use more than the correct quantity of
detergent to save an environment.
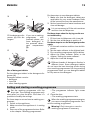
1 2
ENGLISH 12

3
A
Fill the detergent dis-
penser (A) with de-
tergent.
4
B
If you use a washing
programme with
prewash phase, put
more detergent in
the prewash deter-
gent compartment
(B).
5
A
6
Use of detergent tablets
Put the detergent tablet in the detergent dis-
penser (A).
Detergent tablets contain:
•detergent
•rinse aid
• other cleaning agents.
Do these steps to use detergent tablets:
1. Make sure that the detergent tablets are
applicable for your water hardness. Refer
to the instructions from the manufacturer.
2. Set the lowest levels of water hardness and
rinse aid dosage.
It is not necessary to fill the salt container
and the rinse aid dispenser.
Do these steps when the drying results are
not satisfactory:
1. Fill the rinse aid dispenser with rinse aid.
2. Set the rinse aid dosage to position 2.
Do these steps to use the detergent powder
again:
1. Fill the salt container and the rinse aid dis-
penser.
2. Set the water softener to the highest level.
3. Do a washing programme without dishes.
4. Adjust the water softener. Refer to the
chapter 'Setting the water softener'.
5. Adjust the rinse aid dosage.
Different brands of detergent dissolve in
different times. Some detergent tablets
do not have the best cleaning results during
short washing programmes. Use long washing
programmes when you use detergent tablets
to fully remove the detergent.
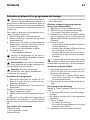
Setting and starting a washing programme
Set the washing programme with the
door ajar. The washing programme only
starts after you close the door. Until then it is
possible to modify the settings.
Do these steps to set and start a washing pro-
gramme:
1. Switch on the appliance.
2. Make sure that the appliance is in setting
mode.
3. Press one of the programme buttons. Refer
to the chapter 'Washing programmes'.
– The programme indicator light comes
on.
4. Close the door.
– The washing programme starts.
When the washing programme operates,
you cannot change the programme. Can-
cel the washing programme.
Warning! Only interrupt or cancel a
washing programme if necessary.
ENGLISH 13

Caution! Open the door carefully. Hot
steam can come free.
Cancelling a washing programme
1. Press and hold function buttons B and C
until all the programme lights come on.
2. Release function buttons B and C to cancel
the washing programme.
At this time you can do these steps:
1. Switch off the appliance.
2. Set a new washing programme .
Fill the detergent dispenser with detergent be-
fore you set a new washing programme.
Interrupting a washing programme
Open the door.
• The programme stops.
Close the door.
• The programme continues from the point of
interruption.
Setting and starting a washing programme
with delay start
1. Press the on/off button.
2. Set a washing programme.
– The programme indicator light comes
on.
3. Press the delay start button until the indi-
cator light with the correct number of hours
starts to flash (3, 6, or 9 hours).
4. Close the door.
– The countdown of the delay start starts.
– The countdown of the delay start de-
creases with steps of 3 hours.
When the countdown is completed, the
washing programme starts automatical-
ly.
Do not open the door during the count-
down to prevent interruption of the count-
down. When you close the door again, the
countdown continues from the point of inter-
ruption.
Cancelling a delay start:
1. Press and hold function buttons B and C
until all the programme lights come on.
– When you cancel a delay start, you also
cancel the washing programme.
2. Set a new washing programme.
End of the washing programme
Switch off the appliance in these conditions:
• The appliance stops automatically.
• The audible signals for the end of the pro-
gramme operate.
1. Open the door.
– The end indicator light comes on.
– The programme indicator light stays on.
2. Press the on/off button.
3. For better drying results, keep the door
ajar for some minutes before you remove
the dishes.
Let the dishes cool down before you remove
them from the appliance. Hot dishes are easily
damaged.
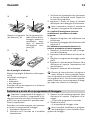
Care and cleaning
Warning! Switch the appliance off before
you clean the filters.
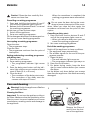
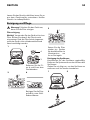
Cleaning the filters
Important! Do not use the appliance without
the filters. Make sure that the installation of the
filters is correct. Incorrect installation will cause
unsatisfactory washing results and damage to
the appliance.
1 2
B
A
Remove the filters A
and B from the bot-
tom of the appliance.
ENGLISH 14

3
1
2
4
Fully clean the filters
below running water.
5
1
2
Put the filters back.
Turn the microfilter
clockwise to lock it.
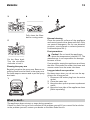
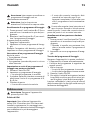
Cleaning the spray arm
Regularly examine the spray arm. Remove re-
maining food from the holes in the spray arm.
Do these steps to remove and to put the spray
arm back:
1
2
3
External cleaning
Clean the external surfaces of the appliance
and control panel with a damp soft cloth. Only
use neutral detergents. Do not use abrasive
products, scouring pads or solvents (acetone,
trichloroethylene etc...).
Frost precautions
Caution! Do not install the appliance
where the temperature is below 0 °C. The
manufacturer is not responsible for damage
because of frost.
If not possible, empty the appliance and close
the door. Disconnect the water inlet hose and
remove water from the water inlet hose.
Long periods of non-operation
Do these steps when you do not use the ap-
pliance for a long period:
1. Disconnect the mains plug from the mains
socket.
2. Close the water tap.
3. Keep the door open to prevent unpleasant
smells.
4. Keep the inner side of the appliance clean
(filters especially).
What to do if…
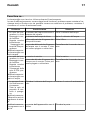
The appliance does not start or stops during operation.
If there is a fault, first try to find a solution to the problem yourself. If you cannot find a solution
to the problem yourself, contact your dealer or the After Sales Service.
ENGLISH 15

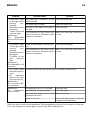
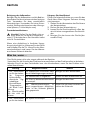
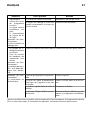
Problem Possible cause Solution
• Continuous flash
of the light of the
running pro-
gramme.
• Intermittent audi-
ble signal.
• 1 flash of the end
indicator light.
Malfunction:
The dishwasher
does not fill with wa-
ter.
The water tap is blocked or furred
with limescale.
Clean the water tap.
The water tap is closed. Open the water tap.
The filter in the water inlet hose is
blocked.
Clean the filter.
The connection of the water inlet
hose is not correct. The hose can be
kinked or squashed.
Make sure that the connection is
correct.
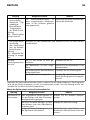
• Continuous flash
of the light of the
running pro-
gramme.
• Intermittent audi-
ble signal.
• 2 flashes of the
end indicator
light.
Malfunction:
The dishwasher will
not drain.
There is a blockage in the sink spi-
got.
Clean the sink spigot.
The connection of the water drain
hose is not correct. The hose can be
kinked or squashed.
Make sure that the connection is
correct.
• The drain pump
operates continu-
ously.
• All indicators
lights on the con-
trol panel go off.
Malfunction:
The anti-flood de-
vice operates.
Close the water tap and contact your local After Sales Service.
Malfunction:
The programme
does not start.
The appliance door is not closed. Close the door.
Mains plug is not connected in. Put in the mains.
The fuse has blown out in the
household fuse box.
Replace the fuse.
Delay start is set. Cancel the delay start to start the
programme immediately.
After the check, switch on the appliance. The programme continues from the point of interrup-
tion. If the malfunction shows again, contact your After Sales Service.
ENGLISH 16

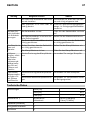
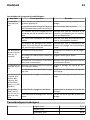
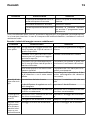
When the cleaning results are not satisfactory:
Problem Possible cause Solution
The dishes are
not clean
The selected washing programme is
not applicable for the type of load
and soil.
Set different washing programme.
The basket is loaded incorrectly so
that water cannot reach all surfaces.
Load the basket correctly.
Spray arm do not turn freely because
of incorrect arrangement of the load.
Make sure that the cutlery and dishes
do not block the spray arm.
The filters are dirty or not correctly in-
stalled.
Make sure that the filters are clean
and installed correctly.
The quantity of detergent is too little
or missing.
Make sure that the quantity of deter-
gent in detergent dispenser is correct.
Limescales
particles on the
dishes
The salt container is empty. Fill the salt container with salt.
The water softener is adjusted on a
wrong level.
Set the water softener.
The salt container cap is not closed
correctly.
Make sure that the salt container is
closed correctly.
The dishes are
wet and dull
Make sure that the salt container is
closed correctly.
Set the rinse aid dosage.
The rinse aid dispenser is empty. Fill the rinse aid dispenser.
There are
streaks, milky
spots or a blu-
ish coating on
glasses and
dishes
Wrong dosage of rinse aid. Decrease the rinse aid dosage.
Dry water drop
signs on
glasses and
dishes
Wrong dosage of rinse aid. Increase rinse aid dosage.
The detergent can be the cause. Use different type of detergent.
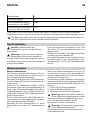
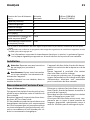
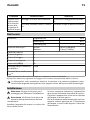
Technical data
Dimensions Width (cm) 54,5
Height (cm) 44,7
Depth (cm) 49,4
Water supply pressure
1)
Minimum
Maximum
0,8 bar (0,08 MPa)
10 bar (1,0 MPa)
Capacity (place settings) 6
ENGLISH 17

Energy class A
Washing class A
Drying class B
Noise (dB(A)) 45
Average annual energy con-
sumption (kWh)
2)
138,6
Average annual water con-
sumption (litres)
2)
1540
1) If the pressure in your area is lower or higher, please contact your After Sales Service.
2) The data is based on the washing programme for test institutes assuming 220 cycles per a year.
Information on the electrical connection, voltage and overall power is given on the rating
plate on the inner edge of the dishwasher door.
Installation
Caution! Refer to the assembly
instructions, in order to proceed with the
installation.
Warning! Make sure that mains plug is
disconnected from the mains socket
during installation.
Install the appliance on a shelf in a furniture of
the kitchen.
If a repair is necessary, the appliance must be
easily accessible for the engineer.
Put the appliance adjacent to a water tap and
a drain.
For the venting of the dishwasher only water
fill, water drain and power supply cable open-
ings are necessary.
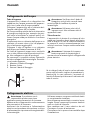
Water connection
Inlet hose
The appliance has safety features to prevent
that the water in the appliance goes back into
the drinking water system.
Connected the appliance to a hot (max. 60°)
or cold water supply.
If the hot water comes from alternative sources
of energy that are more environmentally
friendly (e.g. solar or photovoltaic panels and
aeolian), use a hot water supply to decrease
energy consumption.
It is important that a water tap or stopcock is
near the dishwasher with easy access.
Connect the inlet hose to a water tap with an
external thread of 3/4”.
If the water inlet hose is too short, replace the
water inlet hose with an applicable, longer
high-pressure hose. Do not connect an exten-
sion hose.
To suit the installation, it is possible to turn the
end of the hose that is connected to the dish-
washer. Do these steps :
1. Loosen the retaining nut.
2. Turn the hose.
3. Tighten the retaining nut.
Warning! Make sure that the retaining
nut and all other connections are tight
before you move the dishwasher into position.
Warning! Always use a new water inlet
hose. Do not use connection hoses from
an old appliance.
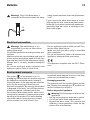
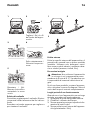
Drain hose
The appliance has water safety system to pre-
vent water damage. If there is a malfunction,
the drain pump automatically starts to drain
the remaining water out of the dishwasher.
ENGLISH 18

Warning! Only if the dishwasher is
connected to the mains socket, the water
safety system operates when the dishwasher
is off.
A
If you connect the water drain hose to a trap
spigot under the sink, remove the plastic mem-
brane (A). If you do not remove the membrane,
remaining food can cause a blockage in the
drain hose spigot
Electrical connection
Warning! The manufacturer is not
responsible if you do not follow these
safety precautions.
Ground the appliance according to safety pre-
cautions.
Make sure that the rated voltage and type of
power on the rating plate agree with the volt-
age and the power of the local power supply.
Always use a correctly installed shockproof
socket.
Do not use multi-way plugs, connectors and
extension cables. There is a risk of fire.
Do not replace the mains cable yourself. Con-
tact the After Sales Service.
Make sure that the mains plug is accessible
after installation.
Do not pull the mains cable to disconnect the
appliance. Always pull the mains plug.
This appliance complies with the E.E.C. Direc-
tives.
Environment concerns
The symbol on the product or on its
packaging indicates that this product may not
be treated as household waste. Instead it
should be taken to the appropriate collection
point for the recycling of electrical and
electronic equipment. By ensuring this product
is disposed of correctly, you will help prevent
potential negative consequences for the
environment and human health, which could
otherwise be caused by inappropriate waste
handling of this product. For more detailed
information about recycling of this product,
please contact your local council, your
household waste disposal service or the shop
where you purchased the product.
Packaging materials
The materials with the symbol
are recycla-
ble. Dispose the packaging in a suitable col-
lection containers to recycle it.
Before disposal of appliance
Warning! Do these steps to dispose the
appliance:
• Pull the mains plug out of the mains socket.
• Cut off the mains cable and discard it.
• Discard the door catch. This prevents the
children to close themselves inside the ap-
pliance. Risk of suffocation.
ENGLISH 19

IKEA GUARANTEE
How long is the IKEA guarantee valid?
This guarantee is valid for five (5) years from
the original date of purchase of Your appli-
ance at IKEA, unless the appliance is named
LAGAN in which case two (2) years of guar-
antee apply. The original sales receipt is re-
quired as proof of purchase. If service work is
carried out under guarantee, this will not ex-
tend the guarantee period for the appliance,
Which appliances are not covered by the
IKEA five (5) years guarantee?
The range of appliances named LAGAN and
all appliances purchased in IKEA before 1st of
August 2007
Who will execute the service?
IKEA service provider will provide the service
through its own service operations or author-
ized service partner network.
What does this guarantee cover?
The guarantee covers faults of the appliance,
which have been caused by faulty construction
or material faults from the date of purchase
from IKEA. This guarantee applies to domestic
use only. The exceptions are specified under
the headline “What is not covered under this
guarantee?” Within the guarantee period, the
costs to remedy the fault e.g. repairs, parts, la-
bour and travel will be covered, provided that
the appliance is accessible for repair without
special expenditure. On these conditions the
EU guidelines (Nr. 99/44/EG) and the respec-
tive local regulations are applicable. Replaced
parts become the property of IKEA.
What will IKEA do to correct the problem?
IKEA appointed service provider will examine
the product and decide, at its sole discretion,
if it is covered under this guarantee. If consid-
ered covered, IKEA service provider or its au-
thorized service partner through its own serv-
ice operations, will then, at its sole discretion,
either repair the defective product or replace
it with the same or a comparable product.
What is not covered under this guarantee?
• Normal wear and tear.
• Deliberate or negligent damage, damage
caused by failure to observe operating in-
structions, incorrect installation or by con-
nection to the wrong voltage, damage
caused by chemical or electro-chemical re-
action, rust, corrosion or water damage in-
cluding but not limited to damage caused by
excessive lime in the water supply, damage
caused by abnormal environmental condi-
tions.
• Consumable parts including batteries and
lamps.
• Non-functional and decorative parts which
do not affect normal use of the appliance,
including any scratches and possible color
differences.
• Accidental damage caused by foreign ob-
jects or substances and cleaning or unblock-
ing of filters, drainage systems or soap
drawers.
• Damage to the following parts: ceramic
glass, accessories, crockery and cutlery bas-
kets, feed and drainage pipes, seals, lamps
and lamp covers, screens, knobs, casings
and parts of casings. Unless such damages
can be proved to have been caused by pro-
duction faults.
• Cases where no fault could be found during
a technician’s visit.
• Repairs not carried out by our appointed
service providers and/or an authorized
service contractual partner or where non-
original parts have been used.
• Repairs caused by installation which is faulty
or not according to specification.
• The use of the appliance in a non-domestic
environment i.e. professional use.
• Transportation damages.
• Cost for carrying out the initial installation of
the IKEA appliance, unless it is due to a re-
pair or a replacement for faulty parts.
This restriction does not apply to fault-free
work carried out by a qualified specialist using
our original parts in order to adapt the appli-
ance to the technical safety specifications of
another EU country.
ENGLISH 20
La pagina si sta caricando...
La pagina si sta caricando...
La pagina si sta caricando...
La pagina si sta caricando...
La pagina si sta caricando...
La pagina si sta caricando...
La pagina si sta caricando...
La pagina si sta caricando...
La pagina si sta caricando...
La pagina si sta caricando...
La pagina si sta caricando...
La pagina si sta caricando...
La pagina si sta caricando...
La pagina si sta caricando...
La pagina si sta caricando...
La pagina si sta caricando...
La pagina si sta caricando...
La pagina si sta caricando...
La pagina si sta caricando...
La pagina si sta caricando...
La pagina si sta caricando...
La pagina si sta caricando...
La pagina si sta caricando...
La pagina si sta caricando...
La pagina si sta caricando...
La pagina si sta caricando...
La pagina si sta caricando...
La pagina si sta caricando...
La pagina si sta caricando...
La pagina si sta caricando...
La pagina si sta caricando...
La pagina si sta caricando...
La pagina si sta caricando...
La pagina si sta caricando...
La pagina si sta caricando...
La pagina si sta caricando...
La pagina si sta caricando...
La pagina si sta caricando...
La pagina si sta caricando...
La pagina si sta caricando...
La pagina si sta caricando...
La pagina si sta caricando...
La pagina si sta caricando...
La pagina si sta caricando...
La pagina si sta caricando...
La pagina si sta caricando...
La pagina si sta caricando...
La pagina si sta caricando...
La pagina si sta caricando...
La pagina si sta caricando...
La pagina si sta caricando...
La pagina si sta caricando...
La pagina si sta caricando...
La pagina si sta caricando...
La pagina si sta caricando...
La pagina si sta caricando...
La pagina si sta caricando...
La pagina si sta caricando...
La pagina si sta caricando...
La pagina si sta caricando...
La pagina si sta caricando...
La pagina si sta caricando...
La pagina si sta caricando...
La pagina si sta caricando...
La pagina si sta caricando...
La pagina si sta caricando...
La pagina si sta caricando...
La pagina si sta caricando...
-
 1
1
-
 2
2
-
 3
3
-
 4
4
-
 5
5
-
 6
6
-
 7
7
-
 8
8
-
 9
9
-
 10
10
-
 11
11
-
 12
12
-
 13
13
-
 14
14
-
 15
15
-
 16
16
-
 17
17
-
 18
18
-
 19
19
-
 20
20
-
 21
21
-
 22
22
-
 23
23
-
 24
24
-
 25
25
-
 26
26
-
 27
27
-
 28
28
-
 29
29
-
 30
30
-
 31
31
-
 32
32
-
 33
33
-
 34
34
-
 35
35
-
 36
36
-
 37
37
-
 38
38
-
 39
39
-
 40
40
-
 41
41
-
 42
42
-
 43
43
-
 44
44
-
 45
45
-
 46
46
-
 47
47
-
 48
48
-
 49
49
-
 50
50
-
 51
51
-
 52
52
-
 53
53
-
 54
54
-
 55
55
-
 56
56
-
 57
57
-
 58
58
-
 59
59
-
 60
60
-
 61
61
-
 62
62
-
 63
63
-
 64
64
-
 65
65
-
 66
66
-
 67
67
-
 68
68
-
 69
69
-
 70
70
-
 71
71
-
 72
72
-
 73
73
-
 74
74
-
 75
75
-
 76
76
-
 77
77
-
 78
78
-
 79
79
-
 80
80
-
 81
81
-
 82
82
-
 83
83
-
 84
84
-
 85
85
-
 86
86
-
 87
87
-
 88
88


in altre lingue
- English: IKEA RDW55 User manual
- français: IKEA RDW55 Manuel utilisateur
- Deutsch: IKEA RDW55 Benutzerhandbuch