
Lenovo PHAB2 Plus
Safety, Warranty & Quick Start Guide
Lenovo PB2-670M
English/Deutsch/Français/Italiano/Português/Nederlands/Dansk/
Svenska/Norsk bokmål/Suomi/Español/Eesti/Latviešu/Lietuvių/Íslenska

English ...................................................................1
Contents
Deutsch.......................................................................................... 12
Français.......................................................................................... 16
Italiano............................................................................................ 28
Português....................................................................................... 39
Nederlands..................................................................................... 50
Dansk............................................................................................. 61
Svenska ......................................................................................... 65
Norsk bokmål................................................................................. 69
Suomi............................................................................................. 73
Español .......................................................................................... 84
Eesti............................................................................................... 95
Latviešu ....................................................................................... 107
Lietuvių ........................................................................................ 119
Íslenska........................................................................................ 131

Reading first - regulatory information
Be sure to read the Regulatory Notice for your country or region before using the
wireless devices contained in your device. To obtain a PDF version of the Regulatory
Notice, refer to the “Downloading publications” section below.
Getting support
To get support on network service and billing, contact your wireless network operator.
To learn how to use your device and view its technical specifications, go to
http://support.lenovo.com.
Downloading publications
Electronic versions of your publications are available from http://support.lenovo.com.
To download the publications for your device, go to http://support.lenovo.com and
follow the instructions on the screen.
Accessing your User Guide
Your User Guide contains detailed information about your device. To access your User
Guide, go to http://support.lenovo.com and follow the instructions on the screen.
Legal notices
Lenovo and the Lenovo logo are trademarks of Lenovo in the United States, other
countries, or both.
Other company, product, or service names may be trademarks or service marks of
others.
Manufactured under license from Dolby Laboratories. Dolby, Dolby Atmos, and the
double-D symbol are trademarks of Dolby Laboratories.
LIMITED AND RESTRICTED RIGHTS NOTICE: If data or software is delivered pursuant
a General Services Administration “GSA” contract, use, reproduction, or disclosure is
subject to restrictions set forth in Contract No. GS-35F-05925.
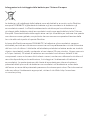
English
Read this guide carefully before using your device.
1

2
5
11
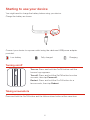
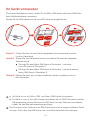
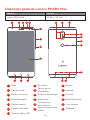
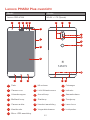
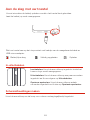
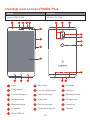
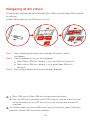
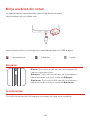
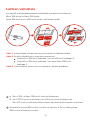
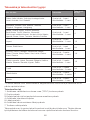
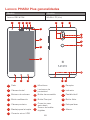
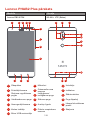
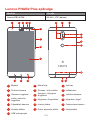
Microphones
2
6
3
8
8
10
4
1
12
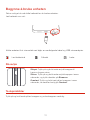
Receiver
Front camera Light/Proximity sensor Indicator
On/Off button
Touch screen
Multitask button Back buttonHome button
9
Flash
13
Rear camera
14 15
Laser focusHeadset jack
16
Card tray
17
Fingerprint sensor
7
Volume buttons
18
Speaker
19
Micro USB connector
1 3 4 5
6
9
7
8
101112
13
1
17
142
19
18
2
16
15
2
Lenovo PHAB2 Plus overview
Model Version
WLAN + LTE (Voice)Lenovo PB2-670M

3
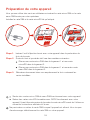
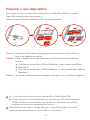
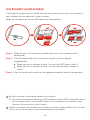
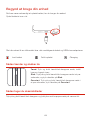
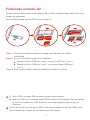
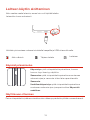
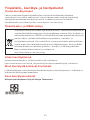
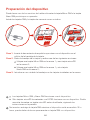
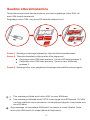
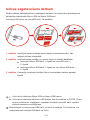
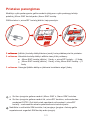
You can use cellular services by inserting the Micro-SIM card or Nano-SIM card provided
by your carrier.
Install the SIM cards and the microSD card as shown.
Do not insert or remove the SIM card while your device is on. Doing so can
permanently damage your SIM card or device.
Preparing your device
Step 1.
Step 2.
Step 3.
Insert the eject tool that comes with your device into the hole in the
card tray.
Pull out the card tray and do one of the following:
Insert a Micro-SIM card in Slot 1 and a microSD card in Slot 2;
Insert a Micro-SIM card in Slot 1 and another Nano-SIM card in
Slot 2.
Carefully insert the tray with the installed cards back into the slot.
Nano
-SIM
Micro
-SIM
Micro
-SIM
microSD
Slot2
Slot1
Micro
-SIM
microSD
Nano
-SIM
Micro-SIM and Nano-SIM cards work with your device.
Only microSD cards formated with FAT32 work with your device. You might need
to format your microSD card before using by following the instructions on the
screen

4
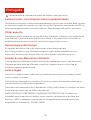
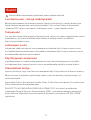
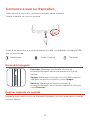
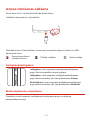
Turning on/off
You might need to charge the battery before using your device.
Charge the battery as shown.
Connect your device to a power outlet using the cable and USB power adapter
provided.
Low battery Fully charged
Charging
Turn on: Press and hold the On/Off button until the
Lenovo logo appears.
Turn off: Press and hold the On/Off button for a few
seconds, then tap Power off.
Restart: Press and hold the On/Off button for a
few seconds, then tap Reboot.
Starting to use your device
Taking screenshots
Press and hold the On/Off button and the Volume down button at the same time.

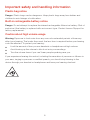
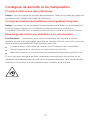
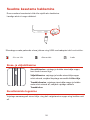
Important safety and handling information
Plastic bag notice
Danger: Plastic bags can be dangerous. Keep plastic bags away from babies and
children to avoid danger of suffocation.
Built-in rechargeable battery notice
Danger: Do not attempt to replace the internal rechargeable lithium ion battery. Risk of
explosion if the battery is replaced with an incorrect type. Contact Lenovo Support for
factory replacement.
Caution about high volume usage
WarningExposure to loud noise from any source for extended periods of time may
affect your hearing. The louder the sound, the less time is required before your hearing
could be affected. To protect your hearing:
Limit the amount of time you use headsets or headphones at high volume.
Avoid turning up the volume to block out noisy surroundings.
Turn the volume down if you can’t hear people speaking near you.
If you experience hearing discomfort, including the sensation of pressure or fullness in
your ears, ringing in your ears or muffled speech, you should stop listening to the
device through your headset or headphones and have your hearing checked.
5

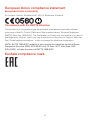
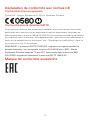
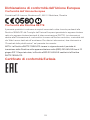
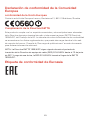
European Union compliance statement
European Union conformity
EU contact: Lenovo, Einsteinova 21, 851 01 Bratislava, Slovakia
0560
Compliance with the R&TTE Directive
This product is in compliance with the essential requirements and other relevant
provisions of the EU Council Radio and Telecommunications Terminal Equipment
(R&TTE) Directive, 1999/5/EC. The Declaration of Conformity information is located in
the Regulatory Notices, which you can download from the Lenovo Support Web site.
See “Downloading publications” in this document for additional information.
NOTE: R&TTE 1999/5/EC remains in force during the transition period of Radio
Equipment Directive (RED) 2014/53/EU until 12 June, 2017. After then, RED
2014/53/EU will take the place of R&TTE 1999/5/EC.
EurAsia compliance mark
6

Service and support information
The following information describes the technical support that is available for your
product, during the warranty period or throughout the life of your product. Refer to the
Lenovo Limited Warranty (LLW) for a full explanation of Lenovo warranty terms. See
“Lenovo Limited Warranty notice” later in this document for details on accessing the full
warranty.
Online technical support
Online technical support is available during the lifetime of a product at:
http://www.lenovo.com/support
Telephone technical support
You can get help and information from the Customer Support Center by telephone.
Before contacting a Lenovo technical support representative, please have the following
information available: model and serial number, the exact wording of any error
message, and a description of the problem.
Your technical support representative might want to walk you through the problem while
you are at your device during the call.
Worldwide Lenovo support telephone list
Important: Telephone numbers are subject to change without notice. The most
up-to-date telephone list for the Customer Support Center is always available at:
http://www.lenovo.com/support/phone
If the telephone number for your country or region is not listed, contact your Lenovo
reseller or Lenovo marketing representative.
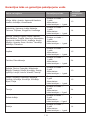
Warranty information
Lenovo Limited Warranty notice
This product is covered by the terms of the LLW, version L505-0010-02 08/2011. You
can read the LLW at http://www.lenovo.com/warranty/llw_02. You can read the LLW in
a number of languages from this Web site. If you cannot view the LLW from the Web
site, contact your local Lenovo office or reseller to obtain a printed version of the LLW.
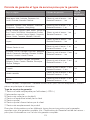
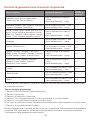
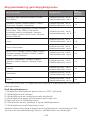
Warranty period and type of warranty service
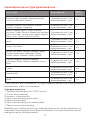
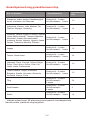
Country or region Warranty period
Germany, Italy, Austria, United Kingdom, Israel,
Australia, New Zealand
1,3
Type of warranty
service
Parts and Labor - 1 year
Battery Pack/Earphone
- 1 year
7

* Excludes some components. 90-day limited warranty for power adapters, keyboards,
plastics and hinges.
Type of warranty service
1. Customer Replaceable Unit (“CRU”) Service
2. On-site Service
3. Courier or Depot Service
4. Customer Carry-In Service
5. Mail-in Service
6. Customer Two-Way Mail-in Service
7. Product Exchange Service
For a full explanation of the types of warranty service, refer to the full warranty. See
“Lenovo Limited Warranty notice” for details on accessing the full warranty.
Country or region Warranty period
Japan 1,5
Taiwan, South Korea 3,4
Parts and Labor - 2 years
Battery Pack/Earphone
- 1 year
1,3
Czech Republic, Hungary, Romania, Bulgaria,
Greece, Croatia, Slovenia, Slovakia, Cyprus,
Poland
1,5
Turkey
Parts and Labor - 2 years
Battery Pack/Earphone
- 2 years
3,4
Parts and Labor - 2 years
Battery Pack/Earphone
- 2 years
4 Saudi Arabia
Spain, Switzerland, Portugal, Netherlands,
Belgium, Sweden, Denmark, Norway, Finland,
Estonia, Latvia, Lithuania, Iceland, France
Parts and Labor - 2 years
Battery Pack/Earphone
- 1 year
Serbia 1,4
Type of warranty
service
Parts and Labor - 1 year
Battery Pack/Earphone
- 1 year
Parts and Labor - 1 year
Battery Pack/Earphone
- 1 year
Parts and Labor - 2 years
Battery Pack/Earphone
- 1 year
Russia, Ukraine, Egypt, Lebanon, Morocco,
South Africa, Tunisia, Mauritius, Mozambique,
United Arab Emirates, Jordan, Kenya, Nigeria,
Uganda, Ghana, Oman,Tanzania, Namibia,
Pakistan
4
Parts and Labor - 1 year
Battery Pack/Earphone
- 1 year
Indonesia, Vietnam, India, Malaysia, Thailand,
Philippines, Singapore, Hong Kong
1,4
Parts and Labor - 1 year
Battery Pack/Earphone
- 1 year
8

Environmental, recycling, and disposal information
General recycling statement
Lenovo encourages owners of information technology (IT) equipment to responsibly
recycle their equipment when it is no longer needed. Lenovo offers a variety of
programs and services to assist equipment owners in recycling their IT products. For
information on recycling Lenovo products, go to http://www.lenovo.com/recycling.
Important battery and WEEE information
Recycling information for India
Recycling and disposal information for India is available at:
http://www.lenovo.com/social_responsibility/us/en/sustainability/ptb_india.html
Additional recycling statements
Additional information about recycling device components and batteries is in your User
Guide. See “Accessing your User Guide” for details.
Battery recycling marks
Battery recycling information for Taiwan
Batteries and electrical and electronic equipment marked with the symbol of a
crossed-out wheeled bin may not be disposed as unsorted municipal waste.
Batteries and waste of electrical and electronic equipment (WEEE) shall be
treated separately using the collection framework available to customers for
the return, recycling, and treatment of batteries and WEEE. When possible,
remove and isolate batteries from WEEE prior to placing WEEE in the waste
collection stream. Batteries are to be collected separately using the
framework available for the return, recycling, and treatment of batteries and
accumulators.
Country-specific information is available at:
http://www.lenovo.com/recycling
廢電池請回收
9

Batteries or packaging for batteries are labeled in accordance with European Directive
2006/66/EC concerning batteries and accumulators and waste batteries and
accumulators. The Directive determines the framework for the return and recycling of
used batteries and accumulators as applicable throughout the European Union. This
label is applied to various batteries to indicate that the battery is not to be thrown
away, but rather reclaimed upon end of life per this Directive.
In accordance with the European Directive 2006/66/EC, batteries and accumulators
are labeled to indicate that they are to be collected separately and recycled at end of
life. The label on the battery may also include a chemical symbol for the metal
concerned in the battery (Pb for lead, Hg for mercury, and Cd for cadmium). Users of
batteries and accumulators must not dispose of batteries and accumulators as
unsorted municipal waste, but use the collection framework available to customers for
the return, recycling, and treatment of batteries and accumulators. Customer
participation is important to minimize any potential effects of batteries and
accumulators on the environment and human health due to the potential presence of
hazardous substances. For proper collection and treatment, go to:
http://www.lenovo.com/recycling
Battery recycling information for the European Union
10

Restriction of Hazardous Substances Directive (RoHS)
Turkey
The Lenovo product meets the requirements of the Republic of Turkey Directive on the
Restriction of the Use of Certain Hazardous Substances in Waste Electrical and
Electronic Equipment (WEEE).
Türkiye AEEE Yönetmeliğine Uygunluk Beyanı
Bu Lenovo ürünü, T.C. Çevre ve Orman Bakanlığı’nın “Atık Elektrikli ve Elektronik Eşya Bazı
Zararlı Maddelerin Kullanımının Sınırlandırılmasına Dair Yönetmelik (AEEE)” direktierine
uygundur.
AEEE Yönetmeliğine Uygundur.
Ukraine
Цим підтверджуємо, що продукція Леново відповідає вимогам нормативних актів
України, які обмежують вміст небезпечних речовин
India
RoHS compliant as per E-Waste (Management & Handling) Rules, 2011.
Vietnam
Lenovo products sold in Vietnam, on or after September 23, 2011, meet the
requirements of the Vietnam Circular 30/2011/TT-BCT (“Vietnam RoHS”).
European Union
Lenovo products sold in the European Union, on or after 3 January 2013 meet the
requirements of Directive 2011/65/EU on the restriction of the use of certain hazardous
substances in electrical and electronic equipment (“RoHS recast” or “RoHS 2”).
For more information about Lenovo progress on RoHS, go to:
http://www.lenovo.com/social_responsibility/us/en/RoHS_Communication.pdf
11

Zuerst lesen: Vorschriften und Gesetze
Lesen Sie unbedingt die Gesetzlichen Hinweise für Ihr Land oder Ihre Region, bevor Sie
die in Ihrem Gerät enthaltenen drahtlosen Geräte verwenden. Wie Sie eine PDF-Version
der Gesetzlichen Hinweise erhalten können, erfahren Sie im nachfolgenden Abschnitt
„Veröffentlichungen herunterladen“.
Support
Zur Unterstützung bei Netzwerkdiensten und Rechnungsstellung kontaktieren Sie den
Betreiber Ihres Mobilfunk-Netzwerks. Um zu erfahren, wie Sie Ihr Gerät nutzen und die
technischen Spezifikationen anzeigen, gehen Sie zu http://support.lenovo.com.
Veröffentlichungen herunterladen
Die elektronischen Versionen Ihrer Veröffentlichungen sind verfügbar unter
http://support.lenovo.com. Zum Herunterladen der Veröffentlichungen für Ihr Gerät
rufen Sie http://support.lenovo.com auf und folgen Sie den Anweisungen auf dem
Bildschirm.
Zugriff auf dasBenutzerhandbuch
Die Bedienungsanleitung enthält ausführliche Informationen zu Ihrem Gerät. Um auf
das Benutzerhandbuch zuzugreifen, besuchen Sie http://support.lenovo.com und
folgen Sie den Anweisungen auf dem Bildschirm.
Rechtshinweise
Lenovo und das Lenovo-Logo sind Marken von Lenovo in den USA und/oder anderen
Ländern.
Sonstige Unternehmens-, Produkt- oder Dienstleistungsnamen können Marken oder
Dienstleistungsmarken anderer Markeninhaber sein.
Hergestellt unter Lizenz der Firma Dolby Laboratories. Dolby, Dolby Atmos und das
Doppel-D-Symbol sind Markenzeichen von Dolby Laboratories.
HINWEISE ZU EINGESCHRÄNKTEN RECHTEN (LIMITED AND RESTRICTED RIGHTS
NOTICE): Werden Daten oder Software gemäß einem GSA-Vertrag (General Service
Administration) ausgeliefert, unterliegt die Verwendung, Vervielfältigung oder
Offenlegung den in Vertrag-Nr. GS-35F-05925 festgelegten Einschränkungen.
Lesen Sie diese Anleitung vor der Verwendung Ihres Geräts sorgfältig durch.
Deutsch
12

Lenovo PHAB2 Plus – Übersicht
Lenovo PB2-670M
Modell Version
WLAN+LTE (Voice-Funktion)
Taste „Ein/Aus“
Lautstärketasten
Kamera an der
Rückseite
Kamera an der
Vorderseite
Licht-/Näherungssensor
13
5
11
Mikrofone
2
6
3
8
8
10
4
1
12
Empfänger
Anzeige
Touchscreen
Multitask-Taste Zurück-TasteStart-Taste
9
Flash
13 14 15
LaserfokusKopfhörerbuchse
16
Kartenfach
17
Fingerabdrucksensor
7
18
Lautsprecher
19
Mikro-USB-Anschluss
1 3 4 5
6
9
7
8
101112
13
1
17
142
19
18
2
16
15
2

Schritt 1. Führen Sie das mit dem Gerät mitgelieferte Auswurfwerkzeug in das
Loch im Kartenfach.
Schritt 2.
Schritt 3.
Ziehen Sie das Kartenfach heraus und führen Sie eine der folgenden
Aktionen durch:
Stecken Sie eine Mikro-SIM-Karte in Steckplatz 1 und eine
microSD-Karte in Steckplatz 2;
Stecken Sie eine Mikro-SIM-Karte in Steckplatz 1 und eine weitere
Nano-SIM-Karte in Steckplatz 2.
Setzen Sie das Fach mit den installierten Karten sorgfältig zurück in
den Steckplatz.
14
Sie können Netzdienste nutzen, indem Sie die Mikro-SIM-Karte oder Nano-SIM-Karte
Ihres Mobilfunkanbieters einsetzen.
Setzen Sie die SIM-Karten und die microSD-Karte wie abgebildet ein.
Das Einsetzen oder Entfernen der SIM-Karte darf nicht bei eingeschaltetem Gerät
erfolgen. Dies kann Ihre SIM-Karte oder das Gerät dauerhaft beschädigen.
Ihr Gerät vorbereiten
Nano
-SIM
Micro
-SIM
Micro
-SIM
microSD
Slot2
Slot1
Micro
-SIM
microSD
Nano
-SIM
Ihr Gerät ist nur mit Mikro-SIM- und Nano-SIM-Karten kompatibel.
Ihr Gerät ist nur mit microSD-Karten kompatibel, die mit FAT32 formatiert wurden.
Möglicherweise müssen Sie Ihre microSD-Karte vor dem Gebrauch formatieren,
indem Sie den Bildschirmanweisungen folgen.

Ein-/Ausschalten
Verbinden Sie Ihr Gerät mithilfe des mitgelieferten Kabels und USB-Netzteils mit einer
Netzsteckdose.
Niedrige Akkuladung Vollständig geladen
Wird geladen
Einschalten: Drücken und halten Sie die Taste „Ein/Aus“,
bis das Lenovo-Logo erscheint.
Ausschalten: Drücken und halten Sie die Taste „Ein/Aus“
einige Sekunden lang, und tippen Sie dann auf Aus.
Neustart: Drücken und halten Sie die Taste „Ein/Aus“
einige Sekunden lang und tippen Sie dann auf Neustart.
Inbetriebnahme Ihres Geräts
Screenshots aufnehmen
Halten Sie die Taste „Ein/Aus“ und die Lautstärke-Taste „Leiser“ gleichzeitig gedrückt.
Ggf. müssen Sie den Akku aufladen, bevor Sie das Gerät starten können.
Laden Sie den Akku auf wie gezeigt.
15

À lire en premier - Informations réglementaires
Lisez attentivement le document Avis réglementaire spécifique à votre pays ou à votre
région avant d’utiliser les périphériques sans fil fournis avec votre appareil. Pour obtenir
une version PDF du document Avis réglementaire, consultez la section
« Téléchargement de publications » ci-dessous.
Assistance
Pour obtenir des informations sur les services réseau et la facturation, contactez votre
opérateur de réseau sans fil. Pour apprendre à utiliser votre appareil et consulter ses
caractéristiques techniques, rendez-vous sur le site http://support.lenovo.com.
Téléchargement de publications
Les versions électroniques de vos publications sont disponibles sur le site
http://support.lenovo.com. Pour télécharger les publications concernant votre appareil,
consultez le site http://support.lenovo.com et suivez les informations à l’écran.
Accès au Guide de l’utilisateur
Votre Guide de l’utilisateur contient des informations détaillées concernant votre
appareil. Pour accéder à votre Guide de l’utilisateur, rendez-vous sur
http://support.lenovo.com et suivez les instructions qui s’affichent à l’écran.
Mentions légales
Lenovo et le logo Lenovo sont des marques déposées de Lenovo aux États-Unis,
et/ou dans d’autres pays.
Les autres noms de société, de produit ou de service sont des marques ou des
marques de service d’autres sociétés.
Fabriqué sous licence Dolby Laboratories. Dolby, Dolby Atmos et le symbole
double-D sont des marques commerciales de Dolby Laboratories.
REMARQUE SUR LES DROITS LIMITÉS ET RESTREINTS : si les données ou les
logiciels sont fournis conformément à un contrat « General Services Administration »
(« GSA »), l’utilisation, la reproduction et la divulgation sont soumises aux restrictions
stipulées dans le contrat no GS-35F-05925.
Lisez attentivement ce guide avant d’utiliser votre appareil.
Français
16

Aperçu Lenovo PHAB2 Plus
Lenovo PB2-670M
Modèle Version
WLAN + LTE (Voix)
Bouton Marche/Arrêt
Boutons de réglage
du volume
Appareil photo avant
Capteur de
luminosité/proximité
17
5
11
Microphones
2
6
3
8
10
4
1
12
Récepteur
Indicateur
Écran tactile
Bouton multitâche Bouton PrécédentBouton Accueil
9
Flash
13
Caméra arrière
14 15
Mise au point laserPrise casque
16
Tiroir
17
Lecteur d’empreintes
digitales
7
18
Haut-parleur
19
Connecteur micro USB
1 3 4 5
6
9
7
8
101112
13
1
17
142
19
18
2
16
15
2

Vous pouvez utiliser des services cellulaires en insérant la carte micro-SIM ou la carte
nano-SIM fournie par votre opérateur.
Installez la carte SIM et la carte microSD tel qu’indiqué.
Ne pas insérer ou retirer la carte SIM lorsque l’appareil est allumé. Vous risquez
d’endommager définitivement la carte SIM ou votre appareil.
Nano
-SIM
Micro
-SIM
Micro
-SIM
microSD
Slot2
Slot1
Micro
-SIM
microSD
Nano
-SIM
Seules des cartes micro-SIM et nano-SIM fonctionnent avec votre appareil.
Seules des cartes microSD formatées avec FAT32 fonctionnent avec votre
appareil. Il peut être nécessaire de formater la carte microSD avant de l’utiliser en
suivant les instructions affichées à l’écran.
Étape 3.
Préparation de votre appareil
Étape 1. Insérez l’outil d’éjection fourni avec votre appareil dans la perforation du
tiroir de la carte.
Étape 2.
Sortez le tiroir et procédez de l’une des manières suivantes :
Placez une carte micro-SIM dans le logement 1 et une carte
microSD dans le logement 2.
Placez une carte micro-SIM dans le logement 1 et une autre carte
nano-SIM dans le logement 2.
Réinsérez doucement dans son emplacement le tiroir contenant les
cartes installées.
18
La pagina si sta caricando...
La pagina si sta caricando...
La pagina si sta caricando...
La pagina si sta caricando...
La pagina si sta caricando...
La pagina si sta caricando...
La pagina si sta caricando...
La pagina si sta caricando...
La pagina si sta caricando...
La pagina si sta caricando...
La pagina si sta caricando...
La pagina si sta caricando...
La pagina si sta caricando...
La pagina si sta caricando...
La pagina si sta caricando...
La pagina si sta caricando...
La pagina si sta caricando...
La pagina si sta caricando...
La pagina si sta caricando...
La pagina si sta caricando...
La pagina si sta caricando...
La pagina si sta caricando...
La pagina si sta caricando...
La pagina si sta caricando...
La pagina si sta caricando...
La pagina si sta caricando...
La pagina si sta caricando...
La pagina si sta caricando...
La pagina si sta caricando...
La pagina si sta caricando...
La pagina si sta caricando...
La pagina si sta caricando...
La pagina si sta caricando...
La pagina si sta caricando...
La pagina si sta caricando...
La pagina si sta caricando...
La pagina si sta caricando...
La pagina si sta caricando...
La pagina si sta caricando...
La pagina si sta caricando...
La pagina si sta caricando...
La pagina si sta caricando...
La pagina si sta caricando...
La pagina si sta caricando...
La pagina si sta caricando...
La pagina si sta caricando...
La pagina si sta caricando...
La pagina si sta caricando...
La pagina si sta caricando...
La pagina si sta caricando...
La pagina si sta caricando...
La pagina si sta caricando...
La pagina si sta caricando...
La pagina si sta caricando...
La pagina si sta caricando...
La pagina si sta caricando...
La pagina si sta caricando...
La pagina si sta caricando...
La pagina si sta caricando...
La pagina si sta caricando...
La pagina si sta caricando...
La pagina si sta caricando...
La pagina si sta caricando...
La pagina si sta caricando...
La pagina si sta caricando...
La pagina si sta caricando...
La pagina si sta caricando...
La pagina si sta caricando...
La pagina si sta caricando...
La pagina si sta caricando...
La pagina si sta caricando...
La pagina si sta caricando...
La pagina si sta caricando...
La pagina si sta caricando...
La pagina si sta caricando...
La pagina si sta caricando...
La pagina si sta caricando...
La pagina si sta caricando...
La pagina si sta caricando...
La pagina si sta caricando...
La pagina si sta caricando...
La pagina si sta caricando...
La pagina si sta caricando...
La pagina si sta caricando...
La pagina si sta caricando...
La pagina si sta caricando...
La pagina si sta caricando...
La pagina si sta caricando...
La pagina si sta caricando...
La pagina si sta caricando...
La pagina si sta caricando...
La pagina si sta caricando...
La pagina si sta caricando...
La pagina si sta caricando...
La pagina si sta caricando...
La pagina si sta caricando...
La pagina si sta caricando...
La pagina si sta caricando...
La pagina si sta caricando...
La pagina si sta caricando...
La pagina si sta caricando...
La pagina si sta caricando...
La pagina si sta caricando...
La pagina si sta caricando...
La pagina si sta caricando...
La pagina si sta caricando...
La pagina si sta caricando...
La pagina si sta caricando...
La pagina si sta caricando...
La pagina si sta caricando...
La pagina si sta caricando...
La pagina si sta caricando...
La pagina si sta caricando...
La pagina si sta caricando...
La pagina si sta caricando...
La pagina si sta caricando...
La pagina si sta caricando...
La pagina si sta caricando...
La pagina si sta caricando...
La pagina si sta caricando...
La pagina si sta caricando...
La pagina si sta caricando...
La pagina si sta caricando...
La pagina si sta caricando...
-
 1
1
-
 2
2
-
 3
3
-
 4
4
-
 5
5
-
 6
6
-
 7
7
-
 8
8
-
 9
9
-
 10
10
-
 11
11
-
 12
12
-
 13
13
-
 14
14
-
 15
15
-
 16
16
-
 17
17
-
 18
18
-
 19
19
-
 20
20
-
 21
21
-
 22
22
-
 23
23
-
 24
24
-
 25
25
-
 26
26
-
 27
27
-
 28
28
-
 29
29
-
 30
30
-
 31
31
-
 32
32
-
 33
33
-
 34
34
-
 35
35
-
 36
36
-
 37
37
-
 38
38
-
 39
39
-
 40
40
-
 41
41
-
 42
42
-
 43
43
-
 44
44
-
 45
45
-
 46
46
-
 47
47
-
 48
48
-
 49
49
-
 50
50
-
 51
51
-
 52
52
-
 53
53
-
 54
54
-
 55
55
-
 56
56
-
 57
57
-
 58
58
-
 59
59
-
 60
60
-
 61
61
-
 62
62
-
 63
63
-
 64
64
-
 65
65
-
 66
66
-
 67
67
-
 68
68
-
 69
69
-
 70
70
-
 71
71
-
 72
72
-
 73
73
-
 74
74
-
 75
75
-
 76
76
-
 77
77
-
 78
78
-
 79
79
-
 80
80
-
 81
81
-
 82
82
-
 83
83
-
 84
84
-
 85
85
-
 86
86
-
 87
87
-
 88
88
-
 89
89
-
 90
90
-
 91
91
-
 92
92
-
 93
93
-
 94
94
-
 95
95
-
 96
96
-
 97
97
-
 98
98
-
 99
99
-
 100
100
-
 101
101
-
 102
102
-
 103
103
-
 104
104
-
 105
105
-
 106
106
-
 107
107
-
 108
108
-
 109
109
-
 110
110
-
 111
111
-
 112
112
-
 113
113
-
 114
114
-
 115
115
-
 116
116
-
 117
117
-
 118
118
-
 119
119
-
 120
120
-
 121
121
-
 122
122
-
 123
123
-
 124
124
-
 125
125
-
 126
126
-
 127
127
-
 128
128
-
 129
129
-
 130
130
-
 131
131
-
 132
132
-
 133
133
-
 134
134
-
 135
135
-
 136
136
-
 137
137
-
 138
138
-
 139
139
-
 140
140
-
 141
141
-
 142
142
-
 143
143
-
 144
144


in altre lingue
- français: Lenovo Phab 2 Plus Guide de démarrage rapide
- español: Lenovo Phab 2 Plus Guía de inicio rápido
- português: Lenovo Phab 2 Plus Guia rápido
- dansk: Lenovo Phab 2 Plus Hurtig start guide
- eesti: Lenovo Phab 2 Plus Lühike juhend
Documenti correlati
-
Mode d'Emploi pdf Lenovo Phab 2 Pro Istruzioni per l'uso
-
Lenovo PHAB2 Safety, Warranty & Quick Start Manual
-
Lenovo TAB3 10 Business Guida Rapida
-
-
-
-
-
-
-
