
USER GUIDE - TOUCH GLASS CONTROLS
www.zephyronline.com


CONTROLS - User instructions Pag. 4
COMMANDES - Notice d’utilisation Pag. 16
MANDOS - Manual de utilización Pag. 28
COMANDI - Istruzioni per l’uso Pag. 40

- 4 -
1. SAFETY
1.1 Safety...............................................................................................................................................5
2. REMOTE CONTROL
2.1 Synchronisation.............................................................................................................................7
2.2 Operation.......................................................................................................................................7
2.3 General Information....................................................................................................................7
3. USER INTERFACE
3.1 Keypad layout................................................................................................................................8
3.2 Display layout.................................................................................................................................8
4. INDIVIDUAL BUTTON FUNCTIONS
4.1 Power Button (1).............................................................................................................................9
4.2 Fan Speed Button (2).....................................................................................................................9
4.3 Light Button (3)...............................................................................................................................9
4.4 Delay Off Button (4)........................................................................................................................9
5. DISPLAY OPTIONS
5.1 Light Indicator..............................................................................................................................10
5.2 Filter Clean and Charcoal Filter Replace Indicators.......................................................10
- Metal Filter Clean Indicator
- Charcoal Filter Replace Indicator
5.3 Delay Off Indicator.....................................................................................................................11
5.4 Clean Air Indicator......................................................................................................................11
5.5 Fan Speed Indicator...................................................................................................................12
6. MAINTENANCE
6.1 Maintenance...............................................................................................................................13
6.2 Replacing the light bulb........................................................................................................14
USA
Contents
www.zephyronline.com

- 5 -
IMPORTANT SAFETY INSTRUCTIONS
FOR RESIDENTIAL USE ONLY
READ AND SAVE THESE INSTRUCTIONS
PLEASE READ ENTIRE INSTRUCTIONS BEFORE PROCEEDING.
IMPORTANT: Save these Instructions for the Local Electrical Inspectors use.
INSTALLER: Please leave these Instructions with this unit for the owner.
OWNER: Please retain these instructions for future reference.
Take care when using cleaning agents or detergents.
Suitable for use in household cooking area
WARNING - To reduce the risk of fire or electric shock, do not use this fan with any Solid-State
Speed Control Device.
CAUTION - To reduce risk of fire and to properly exhaust air, be sure to duct air outside – Do
not vent exhaust air into spaces within walls or ceilings or into attics, crawl spaces, or garages.
CAUTION - For general ventilating use only. Do not use to exhaust hazardous or explosive
materials and vapors.
CAUTION - To avoid motor bearing damage and noisy and/or unbalanced impellers, keep drywall
spray, construction dust, etc. off power unit.
CAUTION - Please read specification label on product for further information and require-
ments.
WARNING – TO REDUCE THE RISK OF FIRE, ELECTRIC SHOCK, OR INJURY TO PERSONS, OBSERVE
THE FOLLOWING:
A. Use this unit only in the manner intended by the manufacturer. If you have ques tions,
contact the manufacturer.
B. Before servicing or cleaning unit, switch power off at service panel and lock the service
disconnecting means to prevent power from being switched on accidentally. When the service
disconnecting means cannot be locked, securely fasten a prominent warning device, such as a
tag, to the service panel.
WARNING - TO REDUCE THE RISK OF A RANGE TOP GREASE FIRE:
A. Never leave surface units unattended at high settings. Boilovers cause smoking and greasy
spillovers that may ignite. Heat oils slowly on low or medium settings.
B. Always turn hood ON when cooking at high heat or when flambeing foods ( i.e. Crepes Suzette,
Cherries Jubilee, Peppercorn Beef Flambè ).
C. Clean ventilating fans frequently. Grease should not be allowed to accumulate on fan or
filter.
D. Use proper pan size. Always use cookware appropriate for the size of the surface element.
E. Keep fan, filters and grease laden surface clean.
F. Use high range setting on range only when necessary.Heat oil slowly on low to medium set-
ting.
1. Safety
www.zephyronline.com

- 6 -
G. Don’ t leave range unattended when cooking.
H. Always use cookware and utensils appropriate for the type and amount off food being pre-
pared.
WARNING – TO REDUCE THE RISK OF INJURY TO PERSONS IN THE EVENT OF A RANGE TOP
GREASE FIRE, OBSERVE THE FOLLOWING:
A. SMOTHER FLAMES with a close-fitting lid, cookie sheet, or metal tray, then turn off the burner.
BE CAREFUL TO PREVENT BURNS. If the flames do not go out mmediately, EVACUATE AND CALL
THE FIRE DEPARTMENT.
B. NEVER PICK UP A FLAMING PAN – You may be burned.
C. DO NOT USE WATER, including wet dishcloths or towels – a violent steam explosion will re-
sult.
D. Use an extinguisher ONLY if:
1. You know you have a Class ABC extinguisher, and you already know how to perate it.
2. The fire is small and contained in the area where it started.
3. The fire department is being called.
4. You can fight the fire with your back to an exit.
Proper maintenance of the Range Hood will assure proper performance of the unit.
INSTALLATION INSTRUCTIONS
WARNING – TO REDUCE THE RISK OF FIRE, ELECTRIC SHOCK, OR INJURY TO PERSONS, OBSERVE
THE FOLLOWING:
A. Installation work and electrical wiring must be done by qualified person(s) in accordance with
all applicable codes and standards, including fire-rated construction.
B. Sufficient air is needed for proper combustion and exhausting of gases through the flue (chimney)
of fuel burning equipment to prevent back drafting. Follow the heating equipment manufacturer’s
guideline and safety standards such as those published by the National Fire Protection Associa-
tion (NFPA), and the American Society for Heating, Refrigeration and Air Conditioning Engineers
(ASHRAE), and the local code authorities.
C. When cutting or drilling into wall or ceiling, do not damage electrical wiring and other hidden
utilities.
D. Ducted fans must always be vented to the outdoors.
E. This unit must be grounded.
WARNING - TO REDUCE THE RISK OF FIRE, USE ONLY METAL DUCTWORK.
WARNING - UNDER CERTAIN CIRCUMSTANCES DOMESTIC APPLIANCES MAY BE DANGEROUS.
A. Do not check filters with hood working.
B. Do not touch the lamps after a prolonged use of the appliance.
C. No food must be cooked flambè underneath the hood.
D. The use of an unprotected flame is dangerous for the filters and could cause fires.
E. Watch constantly the fried food in order to avoid the cooking oil flares up.
F. before performing any mainteinance operation, disconnect the hood from the electrical ser-
vice.
The manufacturers will not to accept any responsability for eventual damages, because of failure
to observe the above instructions.
1. Safety
www.zephyronline.com

- 7 -
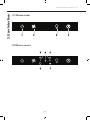
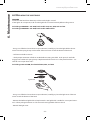
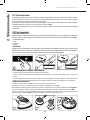
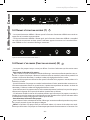
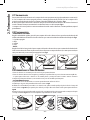
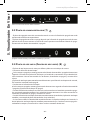
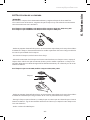
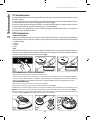
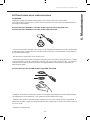
2.1 Sy n c h r o n i S a t i o n :
To synchronise the remote control with the range hood for the first time, proceed as follows:
1. With range hood off, press and hold the “light” button on the range hood until the light
indicator begins to flash (approximately 3 seconds). Fig.1
2. Rotate the remote top until the light indicator on the remote illuminates. Push down on the
remote until the lights on the hood turn on. Fig.2
The range hood may now be activated using the remote control. If you experience any problems,
repeat the procedure.
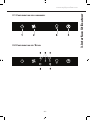
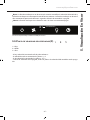
2.2 op e r a t i o n :
- BLOWER SPEED
Adjust blower speed by rotating the remote top until the desired speed level indicator is
illuminated. Push down on the remote to activate the selected blower speed level. Fig.3
= Blower Off
1 = Low
2 = Medium
3 = Hight
- LIGHTS:
Adjust lights level by rotating the remote top until the lights indicator illuminates. Push down on
the remote to active the lights. Push once for bright, twice for normal, three times for dim and a
fourth time to switch the lights off. Fig.2
1
2
3
2.3 Ge n e r a l in f o r m a t i o n :
- The remote control has a range of approximately 15 feet.
- The remote control is equipped with a magnetic base and may be attached to ferrous surface for
easy storage.
- The remote top is made of a plastic material and is prone to scratches, Use care when handling and
cleaning the remote; we suggest using a microfiber cloth to clean it.
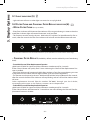
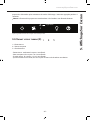
- BATTERY REPLACEMENT:
The batteries will last approximately 12-15 months, depending on usage.
1. Remove rubber cover from bottom of remote. Fig.4
2. Using a Philips head screwdriver, remove the screws securing the bottom plate to remote body.
Fig.5A Pull up to remove bottom plate and remote body from remote top. Fig.5B
3. Press on the metal spring located in the battery tray to dislodge battery. Replace both batteries with
type 3V CR2032. Fig.6 Re-assemble by following instructions in reverse.
A
B
654
2. Remote Control
www.zephyronline.com

- 8 -
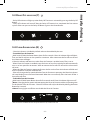
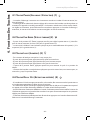
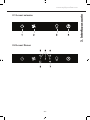
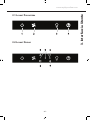
3.1 Ke y p a d l a y o u t
3.2 di S p l a y l a y o u t
3. User Interface
www.zephyronline.com

- 9 -
4.1 po w e r b u t t o n (1)
- Power Button will turn power on and off for the entire hood (fan and lights)
- Hood will remember the last speed and light level it was last turned off at (Example: hood is tur-
ned off at when it was last on high speed and high lights; hood will turn back on at high speed
and high lights when Power Button is pressed)
4.2 fa n Sp e e d b u t t o n (2)
- From off, press once for low speed (1), twice for medium (2), and three times for high (3).
- Fan should cycle through speeds low (1), medium (2), and high (3) continuously.
4.3 li G h t b u t t o n (3)
- Lights are three level (high, medium, low)
- From off, touch once for high
- From off, touch twice for medium
- From off, touch three times for low
- From off, touch four times to cycle back to off
- Light level will cycle from high, medium, low, off
4.4 de l a y of f b u t t o n (4)
- If fan is off, press once and fan will turn on at low speed and automatically turn off after five (5)
minutes.
- If the fan is already on (example high speed) the fan will change to low speed when the Delay
Off Button is pressed and turn off after five minutes.
- When the Delay Off Function is on, the user can still change the fan speed by pressing the Fan
Speed Button without interrupting the five minute Delay Off Timer.
- Delay Off Function can be turned off by pressing Delay Off Function button or Power Button.
4. Individual Button Functions
www.zephyronline.com

- 10 -
5. Display Options
5.1 li G h t i n d i c a t o r (5)
- Light indicator will turn on when lights are turned on at any light level
5.2 fi l t e r cl e a n a n d ch a r c o a l fi l t e r re p l a c e i ndi c a t o r (6)
- m
e t a l fi l t e r cl e a n (always enabled)
- Filter Clean Indicator will illuminate after 30 hours of fan usage indicating it is time to clean the
metal filter. Indicator light will remain illuminated, it will not blink
- This function must be reset by the user. With hood off, hold the Fan Speed Button for five se-
conds, after five seconds the Filer Clean Indicator will turn off and the 30 hour timer will reset
clean metal filter indicator becomes illuminated and fan on speed 3 (indicator turns on after 30 hours of fan usage)
- ch a r c o a l fi l t e r re p l a c e (disabled by default, must be enabled by user if recirculating
hood)
- To enable Charcoal Filter Replacement Function:
With hood off, hold Fan Speed and Delay Off buttons simultaneously for 5 seconds.
Filter Clean Indicator will quickly flash 3 times indicating the Charcoal Filter Replacement Fun-
ction is enabled.
- Filter Clean Indicator will continuously blink after 120 hours of unit fan usage indicating it is time
to replace the charcoal filter. Indicator light will blink, it will not remain illuminated.
- This function must be reset by the user. With hood off, hold the Delay Off Button for five seconds,
after five seconds the Filter Clean Indicator will stop blinking and turn off and the 120 hour timer
will reset.
Order replacement charcoal filter kit number Z0F-00AC through your local dealer,
www.zephyronline.com or the Zephyr customer service department.
- To disable Charcoal Filter Replacement Function:
With hood off, hold Fan Speed and Delay Off buttons simultaneously for 5 seconds.
Filter Clean Indicator will illuminate for 3 second then turn off indicating the Charcoal Filter Re-
placement Function is disabled.
replace charcoal filter indicator blinking and fan on speed 3 (indicator turns on after 120 hours of fan usage)
www.zephyronline.com

- 11 -
5.3 de l a y of f i n d ic ator (7)
- Delay Off Indicator will light up when Delay Off Function is activated by pressing the Delay Off
Button.
- Delay Off Indicator will turn off after the Delay Off Function has completed the five minute
cycle or if the user presses the Delay Off Button again or the Power Button.
delay off timer enabled and fan speed changed to 1
5.4 cl e a n ai r i n dic a to r (8)
- Clean Air Indicator is disabled by default and must be enabled by the user.
- To enable Clean Air Function:
With hood off, hold the Power Button down for five seconds. Clean Air Indicator light will illumi-
nate, and the fan will turn on low speed for 10 minutes. After 10 minutes the fan will turn off and
the 4 hour timer will begin.
Clean Air Indicator will remain on when Clean Air Function is enabled, even if fan is not on.
- When Clean Air Function is enabled, every four hours of non fan usage the fan will automatically
turn on at low speed for 10 minutes. After 10 minutes the fan will turn off and the 4 hour timer
will reset.
- When the Clean Air Function automatically turns the fan on the Clean Air Indicator will blink and
the Low Speed fan indicator will illuminate.
- If the user changes the fan speed while the Clean Air Function is operating, the Clean Air Indicator
will stop blinking but will remain illuminated. When the user manually turns the hood off the 4
hour timer will reset.
- To disable Clean Air Function:
With hood off, hold Power Button down for five seconds until Clean Air Indicator light turns off.
Note1: Changing the fan speed and interrupting the Clean Air Function while it is operating does
not disable the Clean Air Function. Clean Air Function will only be disabled by holding the Power
Button for 5 seconds
Note2: Turning lights on/off does not disable the Clean Air Function
clean air function enabled with low fan speed turned on by clean air function
5. Display Options
www.zephyronline.com

- 12 -
5. Display Options
5.5 fa n Sp e e d i n d ic ator (9)
1 = Low
2 = Medium
3 = High
- On speed low, only number 1 indicator will be on
- On speed medium, 1 and 2 indicator will be on
- On speed high, 1, 2 and 3 indicators will be on
- When fan off, no fan speed indicator will be on
www.zephyronline.com

- 13 -
6. Maintenance
6.1 ma i n t e n a n c e
• It is recommended to operate the range hood prior to cooking. It is recommended to leave
the range hood in operation for 15 minutes after cooking is terminated in order to completely
eliminate cooking vapors and odors. The proper function of the range hood is conditioned
by the regularity of the maintenance operations.
• The anti-grease lters capture the grease particles suspended in the air, and are therefore
subject to clogging according to the frequent use of the range hood. In order to prevent fire
hazard, it is recommendable to clean the filter a minimum of every 2 months by carrying out
the following instructions:
- Remove the filters from the range hood and wash them in a solution of water and neutral
liquid detergent, leaving to soak.
- Rinse thoroughly with warm water and leave to dry.
- The filters may also be washed in the dishwasher at low setting.
The aluminium panels may discolor after several washes. This is not cause for customer
complaint nor replacement of panels.
• Clean the fan and other surfaces of the cooker hood regularly using a cloth moistened with
denatured alcohol or non abrasive liquid detergent.
www.zephyronline.com

- 14 -
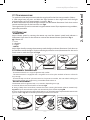
6.2 re p l a c i n G t h e l i G h t b u l b :
WARNING
Disconnect the hood from electricity and be sure the lights are cool.
If new lights do not operate, make sure the light bulb is inserted correctly before calling service.
For bulb type GU4/MR11 12V 20W; hood models ALA, ALL, APN, ASU and ASL
For bulb type GU5/MR16 12V 20W; hood models AHZ and ATI
- Using a small flat head screwdriver or equivalent tool, carefully pry loose the light bulb to discon-
nect it from the spring clamps in the socket. Take care not to scratch the bottom of the hood.
- Pull down on bulb to remove.
- Check proper orientation of bulb to socket before inserting new bulb. Push upwards until bulb
engages into socket and spring clamps. Replacement bulb must have a safety heat fused lens “sui-
table for use in open luminaries”.
For bulb type G4 12V 20W; hood models ADU, ADL, and AED
- Using a small flat head screwdriver or equivalent tool, carefully pry loose the light cover. Take care
not to scratch the bottom of the hood.
- Remove the defective light bulb and replace with a new light bulb, “suitable for use in open lumina-
ries”. Follow package directions and do not touch new light bulb with bare hands.
- Reinstall the light cover.
light bulb
6. Maintenance
www.zephyronline.com

- 15 -
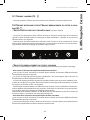
STAPLE YOUR RECEIPT HERE
Proof of the original purchase
date is needed to obtain
service under warranty
TO OBTAIN SERVICE UNDER WARRANTY OR FOR ANY SERVICE RELATED QUESTIONS, please call:
1-888-880-8368
Zephyr Corporation (referred to herein as “we” or “us” ) warrants to the original consumer purchaser (referred to herein
as “you” or “your” ) of Zephyr products ( the “Products” ) that such Products will be free from defects in materials or
work-manship as follows:
One Year Limited Warranty for Parts: For one year from the date of your original purchase of the Products, we will
provide, free of charge, Products or parts to replace those that failed due to manufacturing defects. We may choose, in
our sole discretion, to repair or replace parts before we elect to replace the Products.
One Year Limited Warranty for Labor: For one year from the date of your original purchase of the Products, we will
provide,free of charge, the labor cost associated with repairing the Products or part store place those that failed due to
manufacturing defects. After the first year from the date of your original purchase, you are responsible for all labor costs
associated with this warranty.
Warranty Exclusions: This warranty covers only repair or replacement, at our option, of defective Products or parts and
does not cover any other costs related to the Products including but not limited to: (a) normal maintenance and service
required for the Products and consumable parts such as light bulbs, metal and carbon filters and fuses; (b) any Products or
parts which have been subject to freight damage, misuse, negligence, accident, faulty installation or installation contrary
to recommended installation instructions, improper maintenance or repair ( other than by us ) ; (c) commercial use of the
Products or use otherwise inconsistent with its intended purpose; (d) natural wear of the finish of the Products or wear
caused by improper maintenance, use of corrosive and abrasive cleaning products, pads, and oven cleaner products; (e)
chips, dents or cracks caused by abuse or misuse of the Products; (f ) service trips to your home to teach you how to use
the Products; or (g) damage to the Products caused by accident, fire, floods or act of God. If you are outside our service
area, additional charges may apply for shipping costs for warranty repair at our designated service locations and for the
travel cost to have a service technician come to your home to repair, remove or reinstall the Products. After the first year
from the date of your original purchase, you are also responsible for all labor costs associated with this warranty.
Limitations of Warranty. OUR OBLIGATION TO REPAIR OR REPLACE, AT OUR OPTION, SHALL BE YOUR SOLE AND
EXCLUSIVE REMEDY UNDER THIS WARRANTY. WE SHALL NOT BE LIABLE FOR INCIDENTAL, CONSEQUENTIAL OR
SPECIAL DAMAGES ARISING OUT OF OR IN CONNECTION WITH THE USE OR PERFORMANCE OF THE PRODUCTS. THE
EXPRESS WARRANTIES IN THE PRECEDING SECTION ARE EXCLUSIVE AND IN LIEU OF ALL OTHER EXPRESS WARRAN-
TIES. WE HEREBY DISCLAIM AND EXCLUDE ALL OTHER EXPRESS WARRANTIES FOR THE PRODUCTS, AND DISCLAIM
AND EXCLUDE ALL WARRANTIES IMPLIED BY LAW, INCLUDING THOSE OF MERCHANTABILITY AND FITNESS FOR A
PARTICULAR PURPOSE. Some states or provinces do not allow limitations on the duration of an implied warranty or the
exclusion or limitation of incidental or consequential dam-ges, so the above limitations or exclusions may not apply to
you. To the extent that applicable law prohibits the exclusion of implied warranties, the duration of any applicable implied
warranty is limited to the same one-year period described above. Any oral or written description ofthe Products is for the
sole purpose of identifying the Products and shall not be construed as an express warranty. Prior to using, implementing
or permitting use of the Products, you shall determine the suitability of the Products for the intended use, and you shall
assume all risk and liability whatsoever inconnection with such determination. We reserve the right to use functionally
equivalent refurbished or reconditioned parts or Products as warranty replacements or as part of warranty service. This
warranty is not transferable from the original purchaser and applies in the United States and Canada.
To Obtain Service Under Limited Warranty: To qualify for warranty service, you must: (a) notify us at the address or
telephone number stated below with in 60 days of the discovery of the defect; (b) give the model number and part
identification number and serial number; and (c) describe the nature of any defect in the Product or part. At the time of
the request for warranty service, you must present evidence of your proof of purchase and proof of the original purchase
date. If we determine that the warranty exclusions list ed above apply or if you fail to provide the necessary documentation
to obtain service, you will be responsible for all shipping, travel, labor and other costs related to the services.
Please check our website for any revisions, www.zephyronline.com
Zephyr Corporation Service Department, 2277 Harbor Bay Parkway, Alameda, CA94502 1-888-880-8368
JUN08.0101
www.zephyronline.com

- 16 -
1. SÉCURITÉ
1.1 Sécurité........................................................................................................................................17
2. TÉLÉCOMMANDE
2.1 Synchronisation.......................................................................................................................20
2.2 Fonctionnement.......................................................................................................................20
2.2 Informations générales.........................................................................................................20
3. INTERFACE UTILISATEUR
3.1 Configuration Des Commandes..........................................................................................21
3.2 Configuration De L’écran......................................................................................................21
4. FONCTIONS DES TOUCHES
4.1 Allumage/Extinction (1)........................................................................................................22
4.2 Vitesse Turbine (2)....................................................................................................................22
4.3 Lumières (3)...............................................................................................................................22
4.4 Extinction Différée (4)............................................................................................................22
5. AFFICHAGE SUR L’ECRAN
5.1 Voyant Lumières.........................................................................................................................23
5.2 Voyant nettoyage filtre voyant remplacement du filtre à charbo..........................23
- Voyant nettoyage du filtre métallique
- Voyant de remplacement du filtre à charbon
5.3 Voyant d’extinction différée...................................................................................................24
5.4 Voyant d’air propre....................................................................................................................24
5.5 Voyant vitesse turbine.............................................................................................................25
6. MANTENANCE
6.1 Mantenance.................................................................................................................................26
6.2 Remplacement De L’ampoule..............................................................................................27
Sommaire
F
www.zephyronline.com

- 17 -
INSTRUCTIONS DE SECURITE IMPORTANTES
POUR UN USAGE DOMESTIQUE EXCLUSIVEMENT
LIRE ET CONSERVER LES INSTRUCTIONS
COMMENCER PAR LIRE ENTIEREMENT LES INSTRUCTIONS.
IMPORTANT: Conserver les Instructions à usage des Inspecteurs Electriques Locaux.
A L’ATTENTION DE L’INSTALLATEUR : Laisser les Instructions dans l’unité à usage du
propriétaire.
A L’ATTENTION DU PROPRIETAIRE : Conserver les Instructions pour des consultations
ultérieures.
N’utiliser des produits de nettoyage ou des détergents qu’avec la plus grande prudence.
Cet appareil est propre à une utilisation domestique et culinaire.
AVERTISSEMENT – Afin de réduire les risques d’incendie ou d’électrocution, ne pas utiliser
le moteur avec un Dispositif de Contrôle de la Vitesse à Semi-conducteurs quel qu’il soit.
ATTENTION – Afin de réduire les risques d’incendie et de permettre une aspiration correcte
de l’air, s’assurer que celui-ci est bien transporté à l’extérieur à travers un conduit d’évacuation.
– Ne pas évacuer l’air dans des interstices tels qu’entre des cloisons ou des plafonds, dans des
greniers, des espaces confinés ou des garages.
ATTENTION – N’utiliser que pour une ventilation générique. Cet appareil n’est pas propre
à l’aspiration de matières ou de vapeurs dangereuses ou explosives.
ATTENTION – Afin d’éviter des bruits et des dommages au niveau du moteur, et/ou un
déséquilibre au niveau des hélices, veiller à ce que l’unité d’alimentation n’entre pas en contact
avec du spray, de la poussière etc.
ATTENTION – Pour obtenir des compléments d’informations, consulter l’étiquette de spé-
cification sur le produit.
AVERTISSEMENT – AFIN DE RÉDUIRE LES RISQUES D’INCENDIE, D’ÉLECTROCUTION OU DE
DOMMAGES AUX PERSONNES, RESPECTER LES REGLES SUIVANTES :
A. N’utiliser l’unité que pour les opérations prévues par le fabricant. Pour toute question
éventuelle, contacter le fabricant.
B. Avant d’effectuer des opérations de maintenance ou de nettoyage sur l’unité, débrancher
le panneau de service et fermer à clef les commandes de déconnection afin d’éviter toute
mise sous tension accidentelle.
Au cas où les commandes de déconnection ne pourraient être fermées à clef, fixer sur le
panneau de service un message avertissant du danger, par exemple une plaque.
AVERTISSEMENT – AFIN DE RÉDUIRE LES RISQUES D’INCENDIE PAR INFLAMMATION DES
GRAISSES PRESENTES SUR LA GAZINIERE :
A. Ne jamais laisser de casseroles sur feu vif sans surveillance. D’éventuels débordements dus
à une forte ébullition peuvent provoquer de la fumée et des dépôts de graisses susceptibles
de prendre feu. Réchauffer l’huile lentement, à petit feu ou moyen.
1. Sécurité
www.zephyronline.com

- 18 -
B. ALLUMER systématiquement la hotte pour cuisiner à des températures élevées ou pour
flamber des aliments (ex. : Crêpes Suzette, Cherries Jubilee – cerises flambées au brandy et
glace -, Boeuf flambé au poivre).
C. Nettoyer souvent le moteur. Eviter que les graisses ne s’accumulent sur le moteur ou sur
le filtre.
D. Utiliser des plats aux dimensions adaptées. Toujours utiliser des ustensiles de cuisine adaptés
à la taille de la casserole qui se trouve sur la cuisinière.
E. Veiller à ce que le moteur, les filtres et la surface où viennent s’accumuler les graisses
restent propres.
F. N’utiliser une flamme élevée que lorsque cela est nécessaire. Réchauffer l’huile lentement,
à faible ou moyenne température.
F. Ne jamais laisser la cuisinière sans surveillance pendant la cuisson.
G. Utiliser systématiquement des ustensiles de cuisine adaptés au type et à la quantité d’ali-
ments que l’on prépare.
AVERTISSEMENT – AFIN DE RÉDUIRE LES RISQUES DE DOMMAGES AUX PERSONNES EN CAS
D’INCENDIE PAR INFLAMMATION DES GRAISSES PRESENTES SUR LA CUISINIERE, RESPECTER
LES REGLES SUIVANTES:
A. ETOUFFER LA FLAMME à l’aide d’un couvercle hermétique, une plaque à four ou un plateau
en métal et éteindre le brûleur. PROCEDER AVEC LA PLUS GRANDE PRUDENCE AFIN D’EVITER
TOUTE BRULURE. Si les flammes ne s’éteignent pas immédiatement, EVACUER LA PIECE ET
APPELER LES POMPIERS.
B. NE JAMAIS TOUCHER UN PLAT EN FEU – on risque de se brûler.
C. NE PAS UTILISER D’EAU, ni de chiffons ou de serviettes humides – cela pourrait provoquer
une violente explosion de vapeur.
D. Utiliser un extincteur UNIQUEMENT dans les cas suivants :
1. On dispose d’un extincteur de Classe ABC que l’on sait faire fonctionner.
2. L’incendie est peu important et il est confiné à la zone où il a éclaté.
3. On a déjà appelé les pompiers.
4. On peut affronter les flammes tout en ayant une issue de secours derrière soi.
Une bonne maintenance de la hotte garantit le parfait fonctionnement de l’unité.
INSTRUCTIONS D’INSTALLATION
AVERTISSEMENT – AFIN DE RÉDUIRE LES RISQUES D’INCENDIE, D’ÉLECTROCUTION OU DE
DOMMAGES AUX PERSONNES, RESPECTER LES REGLES SUIVANTES :
A. Les opérations d’installation et de branchement électrique doivent être effectuées par du
personnel qualifié, conformément aux lois et aux normes en vigueur, y compris celles relatives
aux appareils à feu.
B. Il est nécessaire de disposer d’une quantité d’air suffisante pour une bonne combustion et
aspiration des gaz à travers le conduit de fumée de l’installation de combustion du carburant,
afin d’éviter un appel d’air de l’arrière. Suivre les indications du fabricant de l’installation de
chauffage et les normes de sécurité correspondantes telles que celles émises par l’Association
Nationale de Protection contre les Incendies (National Fire Protection Association - NFPA),
la Société Américaine des Techniciens de Chauffage, Réfrigération et Climatisation de l’Air
(American Society for Heating, Refrigeration and Air Conditioning Engineers - ASHRAE), et
par les autorités locales préposées.
C. Au cours des opérations de découpage ou de perforation du mur ou du plafond, veiller à
ne pas endommager les câbles électriques ou d’autres canalisations cachées.
1. Sécurité
www.zephyronline.com

- 19 -
D. L’appareil doit toujours être relié à un trou d’évacuation vers l’extérieur.
E. L’unité doit être reliée à la terre.
AVERTISSEMENT – AFIN DE RÉDUIRE LES RISQUES D’INCENDIE, N’UTILISER QUE DES CON-
DUITS METALLIQUES
AVERTISSEMENT – LES APPAREILS ELECTROMENAGERS PEUVENT PARFOIS S’AVERER DAN-
GEREUX.
A. Ne pas contrôler les filtres lorsque la hotte est en état de marche.
B. Ne pas toucher les lampes après une utilisation prolongée de l’appareil.
C. Ne jamais faire flamber d’aliments sous la hotte.
D. L’usage de flammes libres est dangereux pour les filtres et peut générer des incendies.
E. Contrôler constamment les fritures pour éviter que des éclaboussures d’huile ne prennent
feu.
F. Avant d’effectuer toute opération de maintenance, débrancher la hotte du réseau d’ali-
mentation électrique.
Le fabricant ne pourra être retenu responsable d’éventuels dommages causés par le non
respect des instructions susmentionnées.
1. Sécurité
www.zephyronline.com

- 20 -
2. Télécommande
2.1 Sy n c h r o n i S a t i o n :
Pour synchroniser la télécommande avec la hotte de la cuisine, pour la première fois, procéder en suivant les indications suivantes:
1. En tenant arrêtée la hotte de la cuisine, appuyer et maintenir appuyée la touche “Eclairage” sur la hotte de la cuisine jusqu’à ce
que le voyant commence à clignoter (environ 3 secondes). Fig.1
2. Faire pivoter la partie supérieure de la télécommande jusqu’à ce que le voyant sur la télécommande ne s’allume. Appuyer
la télécommande jusqu’à ce que les voyants de la hotte ne s’allument. Fig.2
La hotte de la cuisine pourrait ne pas s’activer à l’aide de la télécommande. Si vous deviez rencontrer un problème répéter
la procédure.
2.2 fo n c t i o n n e m e n t :
- VITESSE DU VENTILATEUR
Régler la vitesse du ventilateur en faisant pivoter la partie supérieure de la télécommande jusqu’à ce que le voyant du niveau de
vitesse souhaitée ne s’allume. Appuyer sur la télécommande pour activer le niveau de la vitesse du ventilateur souhaité. Fig.3
? = Ventilateur éteint
1 = Bas
2 = Moyen
3 = Haut
- ECLAIRAGE:
Régler le niveau de l’éclairage en faisant pivoter la partie supérieure de la télécommande jusqu’à ce que le voyant
de l’éclairage ne s’allume. Appuyer sur la télécommande pour activer l’éclairage. Appuyer une fois pour lumineux,
deux fois pour normal, trois fois pour atténué et quatre fois pour éteindre l’éclairage. Fig.2
1
2
3
2.3 in f o r m a t i o n S d e ca r a c t e r e Ge n e r a l :
- La télécommande est caractérisée par une portée d’environ 4,5 m.
- La télécommande est dotée d’une base magnétique et peut être apposée sur des surfaces métalliques pour un rangement
pratique.
- La partie supérieure de la télécommande est réalisée en matière plastique anti-rayures. Apporter le plus grand soin en
manipulant et en nettoyant la télécommande; nous conseillons d’utiliser un linge en microfibres pour son nettoyage.
- REMPLACEMENT DES PILES:
Les piles ont un cycle de vie d’environ de 12 à 15 mois, selon l’usage qu’on en fait.
1. Enlever le couvercle en caoutchouc de la partie inférieure de la télécommande. Fig.4
2. En utilisant un tournevis plat ou cruciforme, enlever les vis qui fixent la plaque au bas de la télécommande. Fig.5A Tirer
pour enlever la plaque de fond et le corps de la télécommande de la partie supérieure de la télécommande. Fig.5B
3. Exercer une pression sur le ressort métallique situé dans le compartiment des piles pour les extraire. Remplacer les deux
piles avec le type 3V CR2032. Fig.6 Remonter en répétant en sens inverse la même procédure.
A
B
654
www.zephyronline.com
La pagina si sta caricando...
La pagina si sta caricando...
La pagina si sta caricando...
La pagina si sta caricando...
La pagina si sta caricando...
La pagina si sta caricando...
La pagina si sta caricando...
La pagina si sta caricando...
La pagina si sta caricando...
La pagina si sta caricando...
La pagina si sta caricando...
La pagina si sta caricando...
La pagina si sta caricando...
La pagina si sta caricando...
La pagina si sta caricando...
La pagina si sta caricando...
La pagina si sta caricando...
La pagina si sta caricando...
La pagina si sta caricando...
La pagina si sta caricando...
La pagina si sta caricando...
La pagina si sta caricando...
La pagina si sta caricando...
La pagina si sta caricando...
La pagina si sta caricando...
La pagina si sta caricando...
La pagina si sta caricando...
La pagina si sta caricando...
La pagina si sta caricando...
La pagina si sta caricando...
La pagina si sta caricando...
La pagina si sta caricando...
-
 1
1
-
 2
2
-
 3
3
-
 4
4
-
 5
5
-
 6
6
-
 7
7
-
 8
8
-
 9
9
-
 10
10
-
 11
11
-
 12
12
-
 13
13
-
 14
14
-
 15
15
-
 16
16
-
 17
17
-
 18
18
-
 19
19
-
 20
20
-
 21
21
-
 22
22
-
 23
23
-
 24
24
-
 25
25
-
 26
26
-
 27
27
-
 28
28
-
 29
29
-
 30
30
-
 31
31
-
 32
32
-
 33
33
-
 34
34
-
 35
35
-
 36
36
-
 37
37
-
 38
38
-
 39
39
-
 40
40
-
 41
41
-
 42
42
-
 43
43
-
 44
44
-
 45
45
-
 46
46
-
 47
47
-
 48
48
-
 49
49
-
 50
50
-
 51
51
-
 52
52


Zephyr ADLE42ASX Hood User Manual
- Categoria
- Cappe da cucina
- Tipo
- Hood User Manual
in altre lingue
- English: Zephyr ADLE42ASX
- français: Zephyr ADLE42ASX
- español: Zephyr ADLE42ASX
