
A
Revisione Hardware
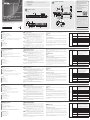
Vista anteriore
1
Pulsanti selezione porte*
2
LED porte*
3
Ripristina pulsante semipremuto
4
Interruttore ripristino aggiornamento Firmware
5
Porta aggiornamento Firmware
6
LED accensione
7
LED ID stazione
Nota: Il numero di pulsanti e LED varia per i modelli KH1508A, KH1516A e
KH1532A.Per ulteriori dettagli vedere il manuale dell’utente.
Vista posteriore
1
Presa per l’alimentazione
2
Interruttore di accensione
3
Porte a catena margherita
4
Terminale di messa a terra
5
Porte della console
6
Sezione porta KVM
B
Installazione Hardware
Installazione stazione singola
1
Mettere a terra l’unità KH1508A / KH1516A / KH1532A collegando
un'estremità del fi lo di messa a terra al morsetto di messa a terra e l'altra
estremità del fi lo ad un oggetto adatto.
Nota: Non tralasciare questo passaggio.Una corretta messa a terra aiuta a
prevenire danni all'unità dovuti a sovratensioni o elettricità statica.
2
Collegare la tastiera, il monitor e il mouse della console alle porte della
console dell'unità. Le porte sono codifi cate a colori e contrassegnate con
icone per una facile identifi cazione.
Nota: È possibile utilizzare qualsiasi combinazione di connessioni tra tastiera
e mouse.Ad esempio, è possibile utilizzare una tastiera PS / 2 con un
mouse USB.
3
Utilizzare il cavo Cat 5e/6 per collegare qualsiasi porta KVM disponibile ad
un cavo adattatore KVM appropriato per il computer che si sta installando.
Nota: Per sostenere una risoluzione di 1280 x 1024, la distanza massima
consigliata tra l'unità e il cavo adattatore KVM è di 50 metri.
4
Collegare il cavo adattatore KVM al computer. Collegare i connettori
del cavo adattatore KVM alle porte appropriate del computer che si sta
installando.
5
Inserire l'estremità femmina del cavo di alimentazione nella presa di
alimentazione del KH1508A / KH1516A / KH1532A; collegare l'estremità
maschio in una fonte di alimentazione CA.
Dopo avere collegato il KH1508A / KH1516A / KH1532A, è possibile accendere
l'alimentazione. Dopo l'accensione, è possibile attivare i server.
Funzionamento
Manuale
Premere il pulsante di selezione porta corrispondente alla porta a cui si desidera
passare.
Display sullo schermo (OSD)
Per visualizzare la schermata principale OSD, premere due volte il tasto di
scelta rapida OSD. Il tasto di scelta rapida predefi nito è [Blocco scorrimento].
Puoi cambiare il tasto di scelta rapida al tasto Ctrl se vuoi.
L'OSD incorpora un sistema di password a due livelli (amministratore / utente).
Prima che venga visualizzata la schermata principale OSD, viene visualizzata
una finestra di dialogo di accesso che richiede un nome utente e una
password. Per continuare è necessario fornire un nome utente e una password
validi.
Se questa è la prima volta che si esegue l'OSD o se la funzione di password
non è stata impostata, premere [Invio]. La schermata principale OSD viene
visualizzata nella modalità amministratore.
Tasti di scelta rapida
[Num Lock]
+ [-]
o
[Ctrl] + [F12]
[A] [Invio]
Richiama la modalità di scansione automatica.
Quando è attiva la scansione automatica,
premere [P] o fare clic con il pulsante sinistro
per mettere in pausa la scansione automatica.
Quando la scansione automatica è in pausa,
premere qualsiasi tasto o fare clic con il pulsante
sinistro per riprendere la scansione automatica.
[Esc] o [Barra
spaziatrice]
Esce dalla modalità tasto di scelta rapida.
[F1] Imposta il sistema operativo in Windows.
[F2] Imposta il sistema operativo su Mac.
[F3] Imposta il sistema operativo su Sun.
[H] Attiva o codici di chiamata di scelta rapida.
[ID porta] [Invio]
Consente di commutare l'accesso al computer
che corrisponde a tale ID porta.
[R][Invio]
Riporta le impostazioni dell'interruttore ai valori
predefi niti. Si tratta di un tasto di scelta rapida
riservata al solo amministratore.
[T]
Commuta il tasto di scelta rapida OSD tra [Ctrl]
[Ctrl] e [Blocco scorrimento][Blocco scorrimento].
Nota: Per ulteriori dettagli vedere il manuale dell’utente.
KH1508A / KH1516A / KH1532A Cat 5 Switch KVM a alta densità
www.aten.com
A
Revisión del hardware
Vista frontal
1
Botones de selección de puerto*
2
LEDs de los puertos*
3
Restaurar pulsador semi-presionado
4
Conmutador de recuperación de actualización de fi rmware
5
Puerto de actualización del fi rmware
6
LED de alimentación
7
LED de ID de estación
Nota: El número de pulsadores y LEDs varía para KH1508A, KH1516A y
KH1532A. Para más detalles, consulte el manual del usuario.
Vista posterior
1
Toma de corriente
2
Botón de encendido
3
Puertos en cadena margarita
4
Terminal de conexión a tierra
5
Puertos de consola
6
Selección de puerto KVM
B
Instalación del hardware
Instalación de estación única
1
Conecte a tierra el KH1508A / KH1516A / KH1532A conectando un
extremo del cable de conexión de tierra al terminal de conexión a tierra y el
otro extremo del cable a un objeto correctamente conectado a tierra.
Nota: No omita este paso. Una conexión a tierra adecuada ayuda a
prevenir daños a la unidad por subidas de tensión o electricidad
estática.
2
Conecte el teclado de la consola, el monitor y el ratón a los puertos de
consola de la unidad. Los puertos están codificados por colores y están
marcados con iconos para facilitar su identifi cación.
Nota: Puede utilizar cualquier combinación de conexión de teclado y ratón.
Por ejemplo, puede utilizar un teclado PS/2 con un ratón USB.
3
Utilice el cable Cat 5e/6 para conectar cualquier puerto KVM disponible a
un cable adaptador KVM apropiado para el equipo que está instalando.
Nota: Para soportar una resolución de 1280 x 1024, la distancia máxima
recomendada entre la unidad y el cable adaptador KVM es de 50
metros.
4
Conecte el cable adaptador KVM al ordenador. Conecte los conectores
del cable adaptador KVM a los puertos apropiados del equipo que está
instalando.
5
Conecte el extremo hembra del cable de alimentación en la toma de
corriente del KH1508A / KH1516A / KH1532A; conecte el extremo macho
en una fuente de alimentación de CA.
Una vez realizado el cableado del KH1508A / KH1516A / KH1532A, puede
encenderlo. Una vez encendido, puede encender los servidores.
Operación
Manual
Presione el botón de selección del puerto que corresponde al puerto al que
desea cambiar.
Menú en pantalla (OSD)
Para mostrar la pantalla principal del OSD, toque la tecla de acceso directo al
OSD dos veces. La tecla de acceso directo predeterminada es [Bloq. Despl].
Puede cambiar la tecla de acceso directo a la tecla Ctrl si lo desea.
El OSD incorpora un sistema de contraseña de dos niveles (administrador /
usuario). Antes de que aparezca la pantalla principal del OSD, aparecerá un
cuadro de diálogo de inicio de sesión pidiendo un nombre de usuario y una
contraseña. Deberá proporcionar un nombre de usuario y una contraseña
válidos para continuar.
Si es la primera vez que se ejecuta el OSD o si no se ha confi gurado la función
de contraseña, pulse [Intro]. La pantalla principal del OSD aparece en el modo
administrador.
Teclas de acceso directo
[Bloq Num]
+ [-]
o
[Ctrl] + [F12]
[A] [Intro]
Abre el modo de exploración automática.
Cuando la exploración automática está activada,
presione [P] o haga clic con el botón izquierdo
del ratón para pausarla. Cuando la exploración
automática está en pausa, presione cualquier
tecla o haga clic con el botón izquierdo del ratón
para reanudarla.
[Esc] o [Espacio] Sale del modo de teclas de acceso directo.
[F1] Establece el sistema operativo Windows.
[F2] Establece el sistema operativo Mac.
[F3] Establece el sistema operativo Sun.
[H]
Activa o desactiva las teclas de activación de
acceso directo.
[ID de puerto]
[Intro]
Cambia el acceso al equipo que corresponde a
ese ID de puerto.
[R][Intro]
Devuelve la confi guración del conmutador a sus
valores predeterminados. Esta es una tecla de
acceso directo exclusiva para el administrador.
[T]
Activa o desactiva la tecla de acceso directo
al OSD entre [Ctrl] [Ctrl] y [Bloq. Despl] [Bloq.
Despl].
Nota: Para más detalles, consulte el manual del usuario.
Conmutador KVM de alta densidad KH1508A / KH1516A / KH1532A Cat 5
www.aten.com
A
Hardware Übersicht
Vorderseite
1
Anschlussauswahl Drucktasten*
2
Anschluss LEDs*
3
Halbverdeckte Drucktaste für Zurücksetzen
4
Schalter für Firmware-Aktualisierungswiederherstellung
5
Anschluss für Firmware-Aktualisierung
6
Netz-LED
7
Station ID LED
Hinweis: Die Anzahl der Drucktasten und LEDs variieren zwischen KH1508A,
KH1516A und KH1532A. Weitere Einzelheiten fi nden Sie im
Benutzerhandbuch.
Rückseite
1
Netzbuchse
2
Netzschalter
3
Daisy-Chain-Anschlüsse
4
Erdungsanschluss
5
Konsolenanschlüsse
6
KVM Anschlussabschnitt
B
Hardware Installation
Einzelstation Installation
1
Erden Sie den KH1508A / KH1516A / KH1532A, indem Sie ein Ende des
Erdungskabels mit dem Erdungsanschluss und das andere Ende des Kabels
mit einem geeigneten geerdeten Gegenstand verbinden.
Hinweis: Lassen Sie diesen Schritt nicht aus. Eine ordnungsgemäße
Erdung hilft bei der Vermeidung von Schäden am Gerät durch
Stromspitzen oder statischer Elektrizität.
2
Schließen Sie Tastatur, Monitor und Maus der Konsole an die
Konsolenanschlüsse des Geräts an. Die Anschlüsse sind farbcodiert und zur
einfachen Identifi zierung mit Symbolen versehen.
Hinweis: Sie können jede beliebige Kombination von Tastatur- und
Mausanschlüssen verwenden. Beispielsweise können Sie eine
PS/2-Tastatur mit einer USB-Maus verwenden.
3
Verwenden Sie das Cat 5e/6-Kabel, um einen beliebigen freien KVM-Anschluss
an ein KVM-Adapterkabel anzuschließen, das für den Computer, den Sie
installieren, geeignet ist.
Hinweis: Um eine Aufl ösung von 1280 x 1024 Pixel zu unterstützen,
sollte der empfohlene maximale Abstand zwischen Gerät und
KVM-Adapterkabel 50 Meter betragen.
4
Schließen Sie das KVM-Adapterkabel an den Computer an. Stecken Sie die
Anschlüsse des KVM-Adapterkabels in die entsprechenden Anschlüsse des
Computers, den Sie installieren.
5
Stecken Sie die Buchse des Netzkabels in die Netzbuchse des KH1508A /
KH1516A / KH1532A und den Stecker in eine Wechselstromquelle.
Nachdem der KH1508A / KH1516A / KH1532A verkabelt ist, können Sie den
Strom einschalten. Nach dem Einschalten können Sie die Server einschalten.
Bedienung
Manuell
Drücken Sie Anschlussauswahl Drucktaste, die dem Anschluss entspricht, auf
den Sie umschalten möchten.
Bildschirmanzeige (OSD)
Um den OSD-Hauptbildschirm anzuzeigen, tippen Sie zweimal auf die
OSD-Direkttaste. Die Standarddirekttaste ist [Rollen]. Sie können die Direkttaste
auch auf die Strg-Taste umschalten, wenn Sie möchten.
Das OSD verfügt über ein zweistufiges (Administrator/Benutzer)
Passwortsystem. Bevor der OSD-Hauptbildschirm angezeigt wird, erscheint ein
Anmelde-Dialogfeld, in dem Sie nach einem Benutzernamen und Passwort
gefragt werden. Sie müssen einen gültigen Benutzernamen und ein gültiges
Passwort angeben, um fortzufahren.
Wenn das OSD zum ersten Mal ausgeführt wird oder wenn die Passwortfunktion
nicht aktiviert ist, drücken Sie [Enter]. Der OSD-Hauptbildschirm wird im
Administratormodus angezeigt.
Direkttasten
[Num Lock]
+ [-]
oder
[Strg] + [F12]
[A] [Enter]
Ruft den Modus Auto Scan auf.
Wenn Auto Scan aktiviert ist, drücken Sie [P]
oder klicken Sie mit der linken Maustaste,
um die Auto Scan anzuhalten. Wenn der
automatische Scan unterbrochen wird,
drücken Sie eine beliebige Taste oder klicken
Sie mit der linken Maustaste, um den
automatischen Scan fortzusetzen.
[Esc] oder
[Leertaste]
Beendet den Direkttastenmodus.
[F1] Stellt das Betriebssystem auf Windows ein.
[F2] Stellt das Betriebssystem auf Mac ein.
[F3] Stellt das Betriebssystem auf Sun ein.
[H] Schaltet die Direkttaste-Aufruftasten um.
[Anschluss ID]
[Enter]
Schaltet den Zugriff auf den Computer um,
der dieser Anschluss ID entspricht.
[R][Enter]
Setzt die Einstellungen des Switch auf
ihre Standardwerte zurück. Dies ist eine
Direkttaste nur für Administratoren.
[T]
Schaltet die OSD-Direkttaste zwischen [Strg]
[Strg] und [Rollen][Rollen] um.
Hinweis: Weitere Einzelheiten fi nden Sie im Benutzerhandbuch.
KH1508A / KH1516A / KH1532A Cat 5 High-Density KVM Switch
www.aten.com
A
Présentation du matériel
Vue de face
1
Boutons de sélection de port*
2
LED de ports*
3
Réinitialiser le bouton à demi enfoncé
4
Commutateur de récupération de mise à niveau du microprogramme
5
Port de mise à niveau du microprogramme
6
LED d'alimentation
7
LED d'ID de station
Remarque : Le nombre de boutons et de LED varie pour KH1508A,
KH1516A et KH1532A. Pour plus de détails, consultez le manuel
d'utilisation.
Vue de dos
1
Prise d'alimentation
2
Bouton marche/arrêt
3
Ports connectés en guirlande
4
Prise de terre
5
Ports de console
6
Section du port KVM
B
Installation matérielle
Installation avec station unique
1
Mise à la terre du KH1508A / KH1516A / KH1532A en connectant une
extrémité du fi l de mise à la terre à la borne de mise à la terre et l'autre
extrémité du fi l à un objet approprié raccordé à la terre.
Remarque : Ne pas ignorer cette étape. Une mise à la terre appropriée
permet de protéger l'appareil contre les surtensions ou
l'électricité statique.
2
Branchez le clavier de la console, le moniteur et la souris aux ports de
console de l'appareil. Les ports sont codés par couleur et marqués par des
icônes pour permettre une identifi cation facile.
Remarque : Vous pouvez utiliser n'importe quelle combinaison de
connexions clavier et souris. Par exemple, vous pouvez utiliser
un clavier PS/2 avec une souris USB.
3
Utilisez le câble Cat 5e/6 pour connecter n'importe quel port KVM
disponible à un câble d'adaptateur KVM correspondant à l'ordinateur que
vous installez.
Remarque : Pour prendre en charge une résolution de 1280 x 1024, la
distance maximale recommandée entre l'appareil et le câble
d'adaptateur KVM est de 50 mètres.
4
Connectez le câble d'adaptateur KVM à l'ordinateur. Branchez les
connecteurs du câble d'adaptateur KVM aux ports appropriés de
l'ordinateur que vous installez.
5
Branchez l'extrémité femelle du cordon d'alimentation à la prise
d'alimentation du KH1508A / KH1516A / KH1532A ; branchez l'extrémité
mâle à une source d'alimentation secteur.
Après avoir câblé le KH1508A / KH1516A / KH1532A, vous pouvez mettre
l'alimentation sous tension. Une fois l'alimentation sous tension, vous pouvez
allumer les serveurs.
Fonctionnement
Manuel
Appuyez sur le bouton de sélection de port correspondant au port choisi.
Affi chage à l'écran (OSD)
Pour affi cher l'écran principal de l'OSD, appuyez deux fois sur la touche de raccourci
OSD. La touche de raccourci par défaut est [Arrêt défi l]. Vous pouvez également
changer la touche de raccourci par la touche Ctrl.
L'OSD intègre un système de mot de passe à deux niveaux (administrateur / utilisateur).
Avant l'apparition de l'écran principal de l'OSD, une boîte de dialogue de connexion
apparaît vous demandant de saisir un nom d'utilisateur et un mot de passe. Vous
devez fournir un nom d'utilisateur et un mot de passe valides pour continuer.
Si c'est la première fois que l'OSD s'exécute, ou si la fonction de mot de passe
n'a pas été défi nie, appuyez sur [Entrée]. L'écran principal de l'OSD s'affi che
en mode administrateur.
Touches de raccourci
[Verr num]
+ [-]
ou
[Ctrl] + [F12]
[A] [Entrée]
Appelle le mode Auto Scan.
Lorsque Auto Scan est actif, appuyez sur [P]
ou faites un clic gauche pour mettre en pause
l'analyse automatique. Lorsque l'analyse
automatique est en pause, appuyez sur une
touche ou faites un clic gauche pour reprendre
l'analyse automatique.
[Echap] ou
[Barre d'espace]
Quitte le mode touche de raccourci.
[F1] Défi nit le système d'exploitation sur Windows.
[F2] Défi nit le système d'exploitation sur Mac.
[F3] Défi nit le système d'exploitation sur Sun.
[H]
Bascule les touches d'appel de touche de
raccourci.
[ID de port]
[Entrée]
Permute l'accès sur l'ordinateur correspondant à
cette ID de port.
[R][Entrée]
Renvoie les paramètres du commutateur à leurs
valeurs par défaut. C'est une touche de raccourci
destinée uniquement à l'administrateur.
[T]
Bascule la touche de raccourci de l'OSD entre
[Ctrl][Ctrl] et [Arrêt défi l][Arrêt défi l].
Remarque : Pour plus de détails, consultez le manuel d'utilisation.
Commutateur KVM haute densité Cat 5 KH1508A / KH1516A / KH1532A
www.aten.com
2 3
4
5 6
7
1
&
1
2
3
54 6
A
Hardware Review
Front View
1
Port Selection Pushbuttons*
2
Port LEDs*
3
Reset Semi-pressed Pushbutton
4
Firmware Upgrade Recovery Switch
5
Firmware Upgrade Port
6
Power LED
7
Station ID LED
Note: The number of pushbuttons and LEDs vary for KH1508A, KH1516A
and KH1532A. For more details, please see the user manual.
Rear View
1
Power Socket
2
Power Switch
3
Daisy Chain Ports
4
Grounding Terminal
5
Console Ports
6
KVM Port Section
B
Hardware Installation
Single Station Installation
1
Ground the KH1508A / KH1516A / KH1532A by connecting one end
of the grounding wire to the grounding terminal, and the other end of
the wire to a suitable grounded object.
Note: Do not omit this step. Proper grounding helps to prevent
damage to the unit from surges or static electricity.
2
Plug the keyboard, monitor, and mouse into the unit’s console
ports. The ports are color coded and marked with icons for easy
identifi cation.
Note: You can use any combination of keyboard and mouse
connections. For example, you can use a PS/2 keyboard with a
USB mouse.
3
Use Cat 5e/6 cable to connect any available KVM port to a KVM
adapter cable that is appropriate for the computer you are installing.
Note: To support a resolution of 1280 x 1024, the recommended
maximum distance between the unit and the KVM adapter
cable is 50 meters.
4
Connect the KVM adapter cable to the computer. Plug the connectors
on the KVM adapter cable into the appropriate ports of the computer
you are installing.
5
Plug the female end of the power cord into the KH1508A / KH1516A /
KH1532A 's power socket; plug the male end into an AC power source.
After the KH1508A / KH1516A / KH1532A is cabled up, you can turn on
the power. After it is powered up, you can turn on the servers.
Operation
Manual
Press the Port Selection Pushbutton that corresponds to the port which
you wish to switch to.
On-screen Display (OSD)
To display the OSD Main Screen, tap the OSD hotkey twice. The default
hotkey is [Scroll Lock]. You can change the hotkey to the Ctrl key if you
like.
The OSD incorporates a two-level (administrator / user) password system.
Before the OSD Main Screen comes up, a login dialog box appears that
asks for a username and password. You must provide a valid username
and password in order to continue.
If this is the first time that the OSD is being run, or if the password
function has not been set, press [Enter]. The OSD Main Screen displays in
the administrator mode.
Hotkeys
[Num Lock]
+ [-]
or
[Ctrl] + [F12]
[A] [Enter]
Invokes the Auto Scan mode.
When Auto Scan is in effect, press [P] or
left-click to pause auto-scanning. When
auto-scanning is paused, press any key or
left-click to resume auto-scanning.
[Esc] or
[Spacebar]
Exits the hotkey mode.
[F1] Sets the Operating System to Windows.
[F2] Sets the Operating System to Mac.
[F3] Sets the Operating System to Sun.
[H] Toggles the Hotkey invocation keys.
[Port ID][Enter]
Switches access to the computer that
corresponds to that Port ID.
[R][Enter]
Returns the switch’s settings to their
default values. This is an administrator-only
hotkey.
[T]
Toggles the OSD Hotkey between [Ctrl][Ctrl]
and [Scroll Lock][Scroll Lock].
Note: For more details, please see the user manual.
B
Package Contents
1 KH1508A / KH1516A / KH1532A Cat 5 High-Density KVM Switch
1 Firmware Upgrade Cable
1 Power Cord
1 Rack Mounting Kit
1 Foot Pad Set (4 pcs.)
1 User Instructions
Front View
Rear View
Hardware Installation
© Copyright 2017 ATEN
®
International Co., Ltd.
ATEN and the ATEN logo are trademarks of ATEN International Co., Ltd. All rights reserved. All
other trademarks are the property of their respective owners.
This product is RoHS compliant.
Part No. PAPE-1223-J50G Printing Date: 09/2017
Cat 5 High-Density KVM Switch
Quick Start Guide
KH1508A
/
KH1516A
/
KH1532A
KH1508A / KH1516A / KH1532A Cat 5 High-Density KVM Switch
www.aten.com
Support and Documentation Notice
All information, documentation, fi rmware,
software utilities, and specifi cations
contained in this package are subject to
change without prior notifi cation by
the manufacturer.
To reduce the environmental impact of our
products, ATEN documentation and software
can be found online at
http://www.aten.com/download/
Technical Support
www.aten.com/support
이 기기는 업무용(A급) 전자파적합기기로서 판매자 또는
사용자는 이 점을 주의하시기 바라며, 가정외의 지역에
서 사용하는 것을 목적으로 합니다.
Scan for
more information
EMC Information
FEDERAL COMMUNICATIONS COMMISSION INTERFERENCE
STATEMENT:
This equipment has been tested and found to comply with the limits
for a Class A digital device, pursuant to Part 15 of the FCC Rules.
These limits are designed to provide reasonable protection against
harmful interference when the equipment is operated in a commercial
environment. This equipment generates, uses, and can radiate radio
frequency energy and, if not installed and used in accordance with
the instruction manual, may cause harmful interference to radio
communications. Operation of this equipment in a residential area
is likely to cause harmful interference in which case the user will be
required to correct the interference at his own expense.
FCC Caution: Any changes or modifi cations not expressly approved by
the party responsible for compliance could void the user's authority to
operate this equipment.
Warning: Operation of this equipment in a residential environment
could cause radio interference.
Suggestion: Shielded twisted pair (STP) cables must be used with the
unit to ensure compliance with FCC & CE standards.
This device complies with Part 15 of the FCC Rules. Operation is subject
to the following two conditions: (1) this device may not cause harmful
interference, and (2) this device must accept any interference received,
including interference that may cause undesired operation.
1
2
2
3
5
3
4
or
or
A
Hardware Review
La pagina sta caricando ...
-
 1
1
-
 2
2


ATEN KH1508A Guida Rapida
- Categoria
- Switch KVM
- Tipo
- Guida Rapida
in altre lingue
- English: ATEN KH1508A Quick start guide
- français: ATEN KH1508A Guide de démarrage rapide
- español: ATEN KH1508A Guía de inicio rápido
- Deutsch: ATEN KH1508A Schnellstartanleitung
- русский: ATEN KH1508A Инструкция по началу работы
- português: ATEN KH1508A Guia rápido
- 日本語: ATEN KH1508A クイックスタートガイド