Panasonic NVVZ1E Istruzioni per l'uso
- Categoria
- Telecamere di sicurezza
- Tipo
- Istruzioni per l'uso
Questo manuale è adatto anche per

74
ITALIANO ENGLISH
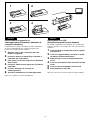
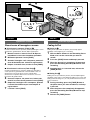
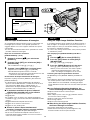
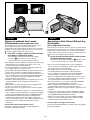
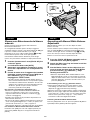
Playing Back on a VCR
(Using the Supplied Cassette Adaptor)
By using the supplied Cassette Adaptor, you can play back
compact cassettes in your VCR in the same way as full-size
cassettes.
1 Push the Battery Compartment Cover upward
and remove it.
2 Insert the supplied battery and then re-attach
the Battery Compartment Cover.
3 Slide the Open Lever in the direction of the
arrow.
4 Insert the recorded cassette and close the Top
Cover.
5 Insert the Cassette Adaptor into the VCR.
6 Start playback on the VCR.
After use, take out the cassette from the Cassette Adaptor.
Come rivedere le riprese in un
videoregistratore (Utilizzando l’adattatore di
cassette in dotazione)
L’adattatore per cassette in dotazione permette di riprodurre
nel vostro videoregistratore le cassette compatte come
fossero una normale cassetta standard.
1 Spingete verso l’alto il coperchio del vano
batteria e toglietelo.
2 Inserite la batteria (in dotazione) e rimettete il
coperchio del vano batteria.
3 Fate scorrere la levetta di apertura in direzione
della freccia.
4 Inserite la videocassetta registrata e chiudete il
coperchio.
5 Inserite l’adattatore di cassette nel
videoregistratore.
6 Avviate la riproduzione sul videoregistratore.
Dopo l’uso, togliete la cassetta dall’adattatore.
1 2
34
5
6

76
ITALIANO ENGLISH
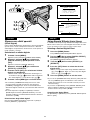
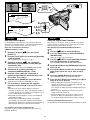
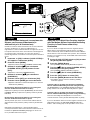
High-Speed Rewinding
1 Press the [6] Button for more than 1 second
in the Stop Mode.
≥The [≈] Indication 1 appears.
≥During High-Speed Rewinding, the tape winding sound
is louder.
≥When rewinding the tape to the beginning, the Movie
Camera automatically changes over from the
High-Speed Rewinding Mode to the Rewinding Mode
near the beginning of the tape, and it switches over to
the Stop Mode at the beginning of the tape.
≥If you press the [∫] Button during High-Speed
Rewinding, it takes several seconds before the tape is
stopped, in order to protect the tape from damage.
≥When using the Remote Controller, press the [
66
66
6]
Button for more than 3 seconds.
≥During High-Speed Rewinding, the Tape Counter shows
[0:00.00].
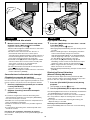
Eliminating Picture Distortions
(Manual Tracking Adjustment)
This Movie Camera adjusts the tracking automatically. With
certain cassettes, however, the tracking adjustment may not be
precise. In this case, adjust the tracking manually.
" Press the [FOCUS/SET] Button briefly during
playback.
≥The [TRACK.] Indication 2 appears.
# Turn the [TRACKING] Dial to adjust the tracking.
≥
The Tracking Adjustment Function is automatically cancelled when
the [TRACKING] Dial is not turned for 5 seconds.
≥It may not be possible to remove the noise bars completely.
≥It is not possible to adjust the tracking when a menu is
displayed.
≥If you eject the cassette after adjusting the tracking, the
adjusted setting is cancelled.
Returning to the Auto Tracking Mode
Press [FOCUS/SET] Button for more than 2 seconds during
playback.
MENU
FOCUS / SET
MF/
TRACKING
#
"
s SEARCH
6
S
1
2
TRACK.TRACK.
1
Riavvolgimento ad Alta velocità
1 Mentre la movie si trova nel modo stop, tenete
premuto il tasto [6] per più di 1 secondo.
≥Apparirà l’indicazione [≈] 1.
≥Durante il Riavvolgimento ad Alta velocità, il rumore del
nastro che si avvolge è più forte.
≥Quando il nastro viene riavvolto sino all’inizio, in
prossimità del inizio del nastro, la movie passa
automaticamente dal Riavvolgimento ad Alta velocità, al
normale Riavvolgimento veloce. All’inizio del nastro, la
movie passa automaticamente nel modo Stop.
≥Premendo il tasto [∫] durante il Riavvolgimento ad Alta
velocità, noterete che occorrono alcuni secondi prima
che il nastro si arresti. E’ un accorgimento per
proteggere il nastro da possibili danni.
≥Se state utilizzando il telecomando, tenente premuto il
tasto [
66
66
6] per più di 3 secondi.
≥Durante il Riavvolgimento ad Alta velocità, il contanastro
mostra l’indicazione [0:00:00].
Come eliminare le distorsioni nelle immagini
(Regolazione manuale del tracking)
La movie regola automaticamente l’allineamento (tracking).
Con alcune cassette, però, questa regolazione potrebbe non essere
precisa. In questo caso potete ricorrere alla regolazione manuale.
" Durante la riproduzione, premete per un attimo
il tasto [FOCUS/SET].
≥Apparirà l’indicazione [TRACK.] 2.
# Regolate il tracking ruotando la manopola
[TRACKING].
≥La funzione di regolazione manuale del tracking viene
automaticamente terminata se la manopola [TRACKING]
non viene ruotata per 5 secondi.
≥Potrebbe non essere possibile rimuovere completamente le
barre che disturbano l’immagine.
≥Quando è visualizzato un menu non è possibile regolare il
tracking.
≥La regolazione del tracking viene annullata quando viene
estratta la cassetta.
Per tornare alla regolazione automatica del tracking.
In riproduzione, tenete premuto il tasto [FOCUS/SET] per più
di 2 secondi.

78
ITALIANO ENGLISH
s SEARCH SEARCH r
BLC
;W.B
∫1
65
S
2
3
1
1
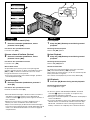
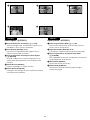
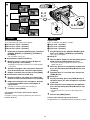
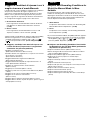
Cue Playback
1 Keep the [D] Button pressed during normal
playback.
Resuming Normal Playback
Release the [D] Button.
Review Playback
2 Keep the [C] Button pressed during normal
playback.
Resuming Normal Playback
Release the [C] Button.
Search Lock Function
For longer Cue or Review Playback, press the Cue Button
[5] or the Review Button [6] only briefly.
As this locks the search function, you do not need to keep the
button pressed for a long time.
≥To resume normal playback, press the Play Button [1].
Still Playback
3 Press the [;] Button during normal playback.
Resuming Normal Playback
Press the [;] Button again.
¡In the Cue, Review and Still Playback Modes, horizontal
noise bars 1 appear in the picture, or the picture may
become black and white or distorted.
¡During Cue or Review Playback, no indications are displayed
on the LCD Monitor.
¡If you leave the Movie Camera in the Still Playback Mode for
about 6 minutes, it automatically switches over to the Stop
Mode. And, if the Movie Camera is being powered by the
Battery, it switches off completely after a further 6 minutes.
Ricerca veloce in avanti (Cue)
1 Durante la normale riproduzione, tenete
premuto il tasto [D].
Per tornare alla riproduzione normale
Lasciate il tasto [D].
Ricerca veloce all’indietro (Review)
2 Durante la normale riproduzione, tenete
premuto il tasto [C].
Per tornare alla riproduzione normale.
Lasciate il tasto [C].
Blocco della ricerca
Se prevedete che la ricerca possa essere più lunga del
normale, premete solo per un attimo i tasti di Ricerca veloce
[5] o [6]. La funzione rimarrà bloccata e non avrete
bisogno di mantenere il tasto premuto.
≥Per tornare alla normale visione delle immagini, premete il
tasto di Riproduzione [1].
Fermoimmagine
3 Durante la normale riproduzione, premete il
tasto [;].
Per tornare alla riproduzione normale
Premete nuovamente il tasto [;].
¡Nei modi di Fermoimmagine e di Ricerca Veloce in Avanti e
all’indietro, le immagini potranno essere disturbate da
striature orizzontali 1, oppure potranno apparire in bianco e
nero o distorte.
¡Durante la ricerca veloce in avanti e all’indietro (Cue e
Review) non viene visualizzata alcuna indicazione.
¡Dopo essere rimasta per più di 6 minuti in Fermoimmagine,
la movie tornerà automaticamente al modo Stop. Dopo altri 6
minuti, se è alimentata dalla batteria, la movie si spegnerà
completamente.

80
ITALIANO ENGLISH
5
4
6
1
3
2
CAMERA
OFF
VCR
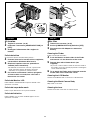
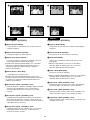
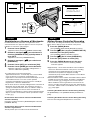
After Use
1 Take out the cassette. (m 42)
2 Set the [CAMERA/OFF/VCR] Switch to [OFF].
3 Disconnect the AC Adaptor or remove the
Battery.
Cleaning the Finder
If dust has entered the Finder…
4 Push the Buttons on both sides of the Finder
and remove it in the direction of the arrow.
5 Remove dust with a blower brush (not
supplied).
¡If you use a cotton swab or similar to clean the inside of
the Finder, use it very carefully to prevent scratching the
screen inside the Finder.
6 To re-attach the Finder, push it forward onto the
Finder Tube until it locks with a click.
Cleaning the LCD Monitor
Clean the LCD Monitor with a soft cloth or a blower brush.
Cleaning the Movie Camera Body
Wipe it with a soft cloth.
Cleaning the Lens
Clean the lens with a soft cloth or a blower brush.
Al termine
1 Togliete la cassetta. (m 42)
2 Impostate l’interruttore [CAMERA/OFF/VCR] su
[OFF].
3 Scollegate l’alimentatore CA o togliete la
batteria.
Pulizia del mirino
Se nel mirino dovesse introdursi della polvere…
4 Premete i due tasti a lato del mirino e toglietelo,
estraendolo in direzione della freccia.
5 Eliminate la polvere con uno spazzolino a
soffietto (non in dotazione).
¡Se utilizzate un bastoncino cotonato, o qualcosa di
simile, per pulire l’interno del mirino, fate molta
attenzione a non graffiare lo schermo interno.
6 Per inserire nuovamente il mirino, spingetelo
all’interno della sua sede, fino a che non si
blocca con uno scatto.
Pulizia del Monitor LCD
Pulite il Monitor LCD utilizzando un panno morbido o uno
spazzolino a soffietto.
Pulizia del corpo della movie
Pulite il corpo della movie con un panno morbido.
Pulizia dell’obiettivo
Pulite l’obiettivo con un panno morbido oppure con uno
spazzolino a soffietto.

82
ITALIANO ENGLISH
Advanced Operations
Fading In/Out
∫ Fading In 1
Fading in lets you make the picture (and sound) appear
gradually at the beginning of a recording.
1 With the Movie Camera in the Recording Pause
Mode, aim it at the scene that you want to
record.
2 Press the [FADE] Button and keep it pressed.
3 When the picture has completely disappeared,
press the Recording Start/Stop Button to start
recording.
4 Approximately 3–4 seconds later, release the
[FADE] Button.
∫ Fading Out
2
Fading out lets you make the picture (and sound) disappear
gradually at the end of a recording. By fading out a scene and
fading in the following one, you can produce smooth scene-to-
scene transitions.
5 During recording, press the [FADE] Button at
the point where you want to fade out, and keep
it pressed.
6 After the picture has completely disappeared,
press the Recording Start/Stop Button to stop
recording.
7 Release the [FADE] Button.
Operazioni avanzate
Dissolvenze di immagine e suono
∫ Dissolvenza in apertura (Fade In) 1
Usando la dissolvenza in apertura (Fade-in), immagini e suoni
appariranno gradualmente all’inizio della registrazione.
1 Mentre la movie si trova in Pausa di Ripresa,
inquadrate la scena che intendete riprendere.
2 Mantenete premuto il tasto [FADE].
3 Quando l’immagine sarà scomparsa, premete il
tasto di Avvio/Arresto. Inizierà la registrazione.
4 Dopo 3-4 secondi circa, lasciate il tasto [FADE].
∫ Dissolvenza in chiusura (Fade Out)
2
Usando la dissolvenza in chiusura (Fade-out), immagini e
suoni spariranno gradualmente al termine della scena. La
dissolvenza in chiusura di una scena, seguita dalla
dissolvenza in apertura della scena successiva, crea una
transizione di grande effetto.
5 Durante la ripresa, nel punto in cui volete che
termini la scena, tenete premuto il tasto [FADE].
6 Dopo che l’immagine sarà scomparsa, premete
il tasto di Avvio/Arresto per interrompere la
registrazione.
7 Lasciate il tasto [FADE].
1
2
FADE
2, 4, 5, 7
3, 6
CAMERA
OFF
VCR

84
ITALIANO ENGLISH
Using Special Effects
(Digital Effects)
In addition to the Super Image Stabilizer and Digital Zoom, this
Movie Camera offers you various digital effect modes to make
it easy to enhance your scenes in many creative ways.
Selecting a Desired Digital Effect
1 Press the [MENU] Button.
The [CAMERA FUNCTIONS] Main-Menu appears.
2 Turn the [
3434
3434
34] Dial to select [DIGITAL EFFECT]
and then press the [SET] Button.
The [DIGITAL EFFECT] Sub-Menu appears.
3 Turn the [
3434
3434
34] Dial to select [EFFECT1] or
[EFFECT2].
4 Press the [SET] Button to select the desired
digital effect.
≥When you select the Super Image Stabilizer Mode, the
[[] Lamp 1 lights. When you select any other digital
effect, the [©] Lamp 2 lights.
5 Press the [MENU] Button to exit the menu.
≥If you set the [CAMERA/OFF/VCR] Switch to [OFF] and then
set it to [CAMERA] again, the indication of the selected
digital effect flashes for a few seconds to inform you of the
selected setting.
≥If you have set [EFFECT2] on the [DIGITAL EFFECT] Sub-
Menu to [B/W] or [SEPIA], changing the selected white
balance mode is not possible. (l 106)
Cancelling the Digital Effect
Set [EFFECT1] or [EFFECT2] on the [DIGITAL EFFECT] Sub-
Menu to [OFF].
Riprese con effetti speciali
(Effetti Digitali)
Oltre al Super Stabilizzatore di Immagine e allo Zoom Digitale,
questa movie vi mette a disposizione numerosi e differenti
effetti digitali, che permettono di arricchire le vostre riprese in
modo semplice e creativo.
Selezione di un effetto digitale
1 Premete il tasto [MENU].
Apparirà il menu principale [CAMERA FUNCTIONS].
2 Ruotate il selettore [
3434
3434
34] per selezionare
[DIGITAL EFFECT], quindi premete il tasto
[SET].
Apparirà il sottomenu [DIGITAL EFFECT].
3 Ruotate il selettore [
3434
3434
34] per selezionare
[EFFECT1] o [EFFECT2].
4 Premete il tasto [SET] per selezionare l’effetto
digitale che desiderate.
≥Selezionando il Super Stabilizzatore di Immagine, si
accenderà la spia [[] 1. Selezionando un qualsiasi
altro effetto digitale, si accenderà la spia [©] 2.
5 Premete il tasto [MENU] per uscire dal menu.
≥Se il selettore [CAMERA/OFF/VCR] viene messo sulla
posizione [OFF] e quindi nuovamente sulla posizione
[CAMERA], lampeggerà per alcuni secondi l’indicazione
dell’effetto digitale selezionato, per informarvi della selezione
attiva.
≥Se avete impostato su [B/W] o su [SEPIA] la funzione
[EFFECT2] del sottomenu [DIGITAL EFFECT], non sarà
possibile modificare la modalità di bilanciamento del bianco
selezionata. (l 106)
Disattivazione degli effetti digitali
Nel sottomenu [DIGITAL EFFECT], impostate su [OFF] la
funzione [EFFECT1] o [EFFECT2].
MENU
FOCUS / SET
MF/
TRACKING
2,3
2,4
1,5
DIGITAL EFFECT
PRESS MENU TO EXIT
EFFECT1 OFF SIS D.ZOOM
EFFECT2 OFF
SIS+D.ZOOM MOSAIC
STRETCH
RETURN ----
CAMERA FUNCTIONS
PRESS MENU TO EXIT
1.
CAMERA SETUP
2.
DIGITAL EFFECT
3.
TITLE SETUP
4.
DATE/TIME SETUP
5.
OTHER FUNCTIONS
6.
LCD/EVF SETUP
1
2
A
INFO-
WINDOW
CAMERA
V C R

86
ITALIANO ENGLISH
220
D.ZOOM
220
D.ZOOM
MOSAIC
STRETCH
12 3
4
5
Effetti Digitali 1 [EFFECT1]
1 Super Stabilizzatore di Immagine [[] (l 90)
Assicura immagini stabili, anche durante le riprese con il
teleobiettivo o da un veicolo in movimento.
2 Zoom Digitale [D.ZOOM] (l 92)
Per ottenere un ingrandimento del soggetto che sia
superiore a quello dello zoom ottico.
3 Super Stabilizzatore di Immagine e Zoom Digitale
[[/D.ZOOM]
Un modo combinato che consente di registrare con un
elevato fattore di ingrandimento senza oscillazioni nelle
immagini.
4 Effetto Mosaico [MOSAIC]
Per dare all’immagine un aspetto “mosaico”.
5 Effetto Stretch [STRETCH]
L’immagine viene allungata in senso orizzontale, mentre la
sua altezza rimane immutata.
Digital Effects 1 [EFFECT1]
1 Super Image Stabilizer Mode [[] (l 90)
This prevents shaky pictures when recording in the tele
range or from a moving vehicle.
2 Digital Zoom Mode [D.ZOOM] (l 92)
It enlarges the subject beyond the optical zooming range.
3 Super Image Stabilizer and Digital Zoom Mode
[[/D.ZOOM]
This combination mode allows recording in the extreme tele
range and prevents shaky pictures.
4 Mosaic Mode [MOSAIC]
The picture becomes mosaic-like.
5 Stretch Mode [STRETCH]
The picture is stretched horizontally while its height
remains unchanged.

88
ITALIANO ENGLISH
Effetti Digitali 2 [EFFECT2]
1 Effetto Negativo [NEGA]
Le riprese hanno i colori alterati con un effetto simile al
negativo fotografico.
2 Effetto Solarizzazione [SOLARI]
L’immagine acquista un effetto pittorico.
3 Effetto Virato Seppia [SEPIA]
Le scene assumo una colorazione tendente al marrone,
simile a quella delle fotografie di altri tempi.
≥Quando viene utilizzato l’Effetto Seppia, non è possibile
regolare manualmente il Bilanciamento del bianco, né
annullare le regolazioni di Bilanciamento del bianco
effettuate manualmente.
4 Effetto Bianco e Nero [B/W]
Le immagini sono in bianco e nero.
≥Quando viene utilizzato l’Effetto Bianco e Nero, non è
possibile regolare manualmente il Bilanciamento del bianco,
né annullare le regolazioni di Bilanciamento del bianco
effettuate manualmente.
5 Dissolvenza digitale 1 [D.FADE1] (l 94)
Nella dissolvenza in apertura, l’immagine appare partendo
dal centro ed espandendosi fino a occupare tutto lo
schermo. Nella dissolvenza in chiusura si ha l’effetto
contrar io.
6 Dissolvenza digitale 2 [D.FADE2] (l 94)
L’immagine appare gradualmente da uno sfondo bianco
(dissolvenza in apertura) e svanisce scomponendosi in
piccoli punti bianchi simili a un effetto di neve che turbina o
cade (dissolvenza in chiusura).
7 Dissolvenza digitale 3 [D.FADE3] (l 94)
L’immagine appare da uno schermo nero, con un effetto
tendina (dissolvenza in apertura). La dissolvenza in
chiusura ha l’effetto contrario.
Digital Effects 2 [EFFECT2]
1 Negative Mode [NEGA]
The picture has reversed colours similar to photographic
negatives.
2 Solarisation Mode [SOLARI]
The picture has an effect similar to a painting.
3 Sepia Mode [SEPIA]
Scenes have a brown tint similar to the colour of old
photographs.
≥When the Sepia Mode is used, it is not possible to
manually adjust the white balance or to cancel the
manually adjusted white balance setting.
4 Black & White Mode [B/W]
The picture is in black and white.
≥When the Black & White Mode is used, it is not possible to
manually adjust the white balance or to cancel the
manually adjusted white balance setting.
5 Digital Fade 1 Mode [D.FADE1] (l 94)
The picture fades in starting at the centre and extending
toward the edges and fades out in reverse direction.
6 Digital Fade 2 Mode [D.FADE2] (l 94)
The picture fades in from a white screen and fades out to
white in small dots similar to snow melting or falling.
7 Digital Fade 3 Mode [D.FADE3] (l 94)
The picture fades in with a wipe effect from a black screen
and fades out to black.
1234
NEGA
SOLARI
SEPIA
B/W
567
D.FADE1
D.FADE2
D.FADE3

90
ITALIANO ENGLISH
A
INFO-
WINDOW
CAMERA
V C R
MENU
FOCUS / SET
MF/
TRACKING
2
1
3
DIGITAL EFFECT
PRESS MENU TO EXIT
EFFECT1 OFF SIS D.ZOOM
EFFECT2 OFF
SIS+D.ZOOM MOSAIC
STRETCH
RETURN ----
Using the Super Image Stabilizer Function
In recording situations where shaking of the Movie Camera is
likely to happen, for example when you have zoomed in on a
distant subject or when you record while walking, you can use
this function to stabilize the image.
≥In case of very strong camera shake, it may not be possible
to stabilize the picture.
After displaying the [DIGITAL EFFECT] Sub-Menu...
(l 84)
1 Turn the [
3434
3434
34] Dial to select [EFFECT1].
2 Press the [SET] Button to select [SIS] or
[SIS
ii
ii
iD.ZOOM].
≥The [[] and/or [©] Lamp lights.
3 Press the [MENU] Button to exit the menu.
≥The [[] and/or [D.ZOOM] Indication appear.
≥When you use this function, the shutter speed is
automatically adjusted between 1/125 s and
1/50 s according to the brightness of the scene.
Cancelling the Super Image Stabilizer Function
Set [EFFECT1] on the [DIGITAL EFFECT] Sub-Menu to
[OFF].
≥Cancelling the Super Image Stabilizer Function also resets
the shutter speed to 1/50 s. However, after selecting the
Sports Mode or the Portrait Mode, cancelling the Super
Image Stabilizer Function does not reset the shutter speed to
1/50 s.
∫ In the Following Recording Conditions, the
Picture Stabilizing Effect May Not Be Sufficient:
≥Subjects with horizontal or vertical stripes
≥Flat subjects
¡Dark subjects (In this case, the [[] Indication flashes.
Increase the amount of light.)
≥Subjects under many fluorescent lamps
≥Fast-moving subjects
≥Subjects with a flat background
∫ When Using the Super Image Stabilizer Function,
the Picture Changes as Follows:
≥The picture quality deteriorates slightly.
≥Under fluorescent lamps, the picture brightness may
fluctuate and the colours may be unnatural.
Uso del Super Stabilizzatore di Immagine
Vi consigliamo di utilizzare questa funzione se prevedete che
l’immagine possa oscillare, come quando riprendete un
soggetto distante con lo zoom oppure effettuate una ripresa
camminando.
≥In caso di forti oscillazioni della movie, potrebbe non essere
possibile stabilizzare l’immagine.
Dopo aver visualizzato il sottomenu
[DIGITAL EFFECT]...(l 84)
1 Ruotate il selettore [
3434
3434
34] per selezionare
[EFFECT1].
2 Premete il tasto [SET] per selezionare [SIS] o
[SIS+D.ZOOM].
≥Si accenderanno le spie [[] e/o [©].
3 Premete il tasto [MENU] per uscire dal menu.
≥Appariranno le indicazioni [[] e/o [D.ZOOM].
≥Quando utilizzate questa funzione, la velocità
dell’otturatore viene impostata automaticamente tra 1/125
e 1/50 in base alla luminosità della scena.
Disattivazione del Super Stabilizzatore di Immagine
Impostate su [OFF] la funzione [EFFECT1] del sottomenu
[DIGITAL EFFECT].
≥La disattivazione del Super Stabilizzatore di Immagine
riporta la velocità dell’otturatore a 1/50 di secondo. Se sono
stati selezionati il Modo Sport o il Modo Ritratto, la
disattivazione del Super Stabilizzatore di Immagine non
riporterà la velocità dell’otturatore a 1/50 di sec.
∫ In particolari condizioni di ripresa, l’effetto di
stabilizzazione potrebbe non essere efficace:
≥Soggetti con strisce orizzontali o verticali.
≥Soggetti piatti.
¡Un soggetto scuro (In questo caso vedrete lampeggiare
l’indicazione [[]. Cercate di aumentare l’illuminazione della
scena.)
≥Soggetti illuminati da lampade fluorescenti.
≥Soggetti che si muovono velocemente.
≥Soggetti con uno sfondo piatto
∫
Quando si utilizza il Super Stabilizzatore di
Immagine, l’immagine subisce le seguenti modifiche
≥Si ha una leggera perdita di qualità dell’immagine.
≥Se la scena è illuminata da lampade a fluorescenza, la
luminosità dell’immagine potrebbe non essere costante e i
colori non essere naturali.

92
ITALIANO ENGLISH
Uso dello Zoom Digitale
Lo Zoom Digitale è una funzione molto utile quando volete
riprendere un soggetto distante e intendete ingrandirlo più di
quanto lo zoom normale (ottico) non riesca a fare.
Dopo aver visualizzato il sottomenu
[DIGITAL EFFECT]...(l 84)
1 Ruotate il selettore [
3434
3434
34] per selezionare
[EFFECT1].
2 Premete il tasto [SET] per selezionare [D.ZOOM]
o [SIS+D.ZOOM].
≥Si accenderanno le spie [©] e/o [[].
3 Ruotate il selettore [
3434
3434
34] per selezionare
[RETURN] e quindi premete il tasto [SET] per
selezionare [YES].
≥Apparirà il Menu principale [CAMERA FUNCTIONS].
4 Selezionate la funzione [D.ZOOM] sul
sottomenu [CAMERA SETUP]. (l 30)
5 Premete il tasto [SET] per selezionare la
gamma di ingrandimenti desiderata (fino a 40t,
fino a 100t, fino a 220t).
6 Premete il tasto [MENU] per uscire dal menu.
≥Appariranno le indicazioni [D.ZOOM] e/o [[] .
7 Per avvicinarvi o allontanarvi dal soggetto,
premete la leva Zoom [W/T] verso [T] o verso
[W].
≥Quando la funzione di Zoom Digitale è attivata, è
possibile un effetto ottico da 1t (grandangolo) a 20t, e
un effetto digitale tra 21t e 220t. Il passaggio da zoom
ottico a effetto digitale è automatico.
≥Utilizzando lo Zoom Digitale si ha una certa perdita di
qualità dell’immagine.
≥Nella gamma di ingrandimento dello zoom digitale
(21t–220t) non è possibile regolare manualmente il
Bilanciamento del bianco o disattivare le impostazioni di
Bilanciamento del bianco effettuate manualmente.
Per disattivare la funzione di Zoom Digitale
Impostate su [OFF] la funzione [EFFECT1] del sottomenu
[DIGITAL EFFECT].
Using the Digital Zoom Function
This function is convenient, when you record a very distant
subject and want to enlarge it even further than is possible
with the normal (optical) zoom function.
After displaying the [DIGITAL EFFECT] Sub-Menu...
(l 84)
1 Turn the [
3434
3434
34] Dial to select [EFFECT1].
2 Press the [SET] Button to select [D.ZOOM] or
[SIS
ii
ii
iD.ZOOM].
≥The [©] and/or [[] Lamp lights.
3 Turn the [
3434
3434
34] Dial to select [RETURN] and then
press the [SET] Button to select [YES].
≥The [CAMERA FUNCTOINS] Main-Menu appears.
4 Select [D.ZOOM] on the [CAMERA SETUP] Sub-
Menu. (l 30)
5 Press [SET] Button to select the desired digital
zoom range (up to 40t, up to 100t or up to
220t).
6 Press the [MENU] Button to exit the menu.
≥The [D.ZOOM] and/or [[] Indication appear.
7 Push the [W/T] Zoom Lever toward [T] or [W] to
zoom in or out as desired.
≥With the Digital Zoom Function activated, you can
optically zoom between 1t (wide-angle) and 20t and
digitally between 21t and 220t.
The changeover between optical and digital zooming is
automatic.
≥When using the Digital Zoom Function, the picture
quality is somewhat reduced.
≥Within the digital zoom range (21t–220t), it is not
possible to adjust the white balance manually or to
cancel the manually adjusted white balance setting.
Cancelling the Digital Zoom Function
Set [EFFECT1] on the [DIGITAL EFFECT] Sub-Menu to [OFF].
CAMERA SETUP
M.SENSOR OFF
D.ZOOM
TALLY LAMP
40X 100X 220X
OFF
DIGITAL EFFECT
EFFECT1 OFF SIS D.ZOOM
EFFECT2 OFF
SIS+D.ZOOM MOSAIC
STRETCH
20 25
25
D.ZOOM
77
s
VOL
r
WT
A
INFO-
WINDOW
CAMERA
V C R
MENU
FOCUS / SET
MF/
TRACKING
2,3
4,5
1,3,4
6

94
ITALIANO ENGLISH
Dissolvenza digitale
Sono disponibili 3 tipi di dissolvenza digitale.
1 Dissolvenza digitale 1 [D.FADE1]
2 Dissolvenza digitale 2 [D.FADE2]
3 Dissolvenza digitale 3 [D.FADE3]
1 Impostate la funzione [EFFECT2] del sottomenu
[DIGITAL EFFECT] su [D.FADE1], [D.FADE2] o
[D.FADE3].
¡Si accenderà la spia [´].
∫ Dissolvenza in apertura (Fade In)
2 Mentre la movie si trova in Pausa di Ripresa,
tenete premuto il tasto [FADE].
≥L’immagine scomparirà lentamente con l’effetto digitale
selezionato.
3 Quando l’immagine sarà scomparsa, premete il
tasto di Avvio/Arresto. Inizierà la registrazione.
4 Dopo 3-4 secondi circa, lasciate il tasto [FADE].
∫ Dissolvenza in chiusura (Fade Out)
5 Durante la ripresa, nel punto in cui volete che
termini la scena, tenete premuto il tasto [FADE].
6 Dopo che l’immagine sarà scomparsa, premete
il tasto di Avvio/Arresto per interrompere la
registrazione.
≥La movie, ora, si troverà in Pausa di Ripresa.
7 Lasciate il tasto [FADE].
Per disattivare la funzione di dissolvenza digitale
selezionata.
Impostate su [OFF] la funzione [EFFECT2] del sottomenu
[DIGITAL EFFECT].
Digital Fade
There are 3 Digital Fade Modes available.
1 Digital Fade 1 [D.FADE1]
2 Digital Fade 2 [D.FADE2]
3 Digital Fade 3 [D.FADE3]
1 Set [EFFECT2] on the [DIGITAL EFFECT] Sub-
Menu to [D.FADE1], [D.FADE2] or [D.FADE3].
¡The [´] Lamp lights.
∫ Fading In
2 With the Movie Camera in the Recording Pause
Mode, keep the [FADE] Button pressed.
≥The picture disappears gradually with the selected
digital fade effect.
3 When the picture has completely disappeared,
press the Recording Start/Stop Button to start
recording.
4 Approximately 3–4 seconds later, release the
[FADE] Button.
∫ Fading Out
5 During recording, press the [FADE] Button at
the point where you want to fade out, and keep
it pressed.
6 After the picture has completely disappeared,
press the Recording Start/Stop Button to stop
recording.
≥The Movie Camera is now in the Recording Pause
Mode.
7 Release the [FADE] Button.
Cancelling the Selected Digital Fade Function
Set [EFFECT2] on the [DIGITAL EFFECT] Sub-Menu to [OFF].
1
2
3
D.FADE1
D.FADE2
D.FADE3
FADE
2, 4
5, 7
MENU
FOCUS / SET
MF/
TRACKING
1
3, 6
A
INFO-
WINDOW
CAMERA
V C R
CAMERA
OFF
VCR

96
ITALIANO ENGLISH
MOTION SENSOR
STDBY
MOTION SENSOR
REC
CAMERA SETUP
PRESS MENU TO EXIT
M.SENSOR OFF ON
D.ZOOM
TALLY LAMP
40X
OFF
RETURN ----
CAMERA FUNCTIONS
PRESS MENU TO EXIT
1.
CAMERA SETUP
2.
DIGITAL EFFECT
3.
TITLE SETUP
4.
DATE/TIME SETUP
5.
OTHER FUNCTIONS
6.
LCD/EVF SETUP
MENU
FOCUS / SET
MF/
TRACKING
2,4
2,3
1,5
Motion-Sensor-Controlled Recording
In this mode, recording automatically starts when the built-in
Motion Sensor detects some movement in the picture.
1 Press the [MENU] Button.
≥The [CAMERA FUNCTIONS] Main-Menu appears.
2 Turn the [
3434
3434
34] Dial to select [CAMERA SETUP]
and then press the [SET] Button.
≥The [CAMERA SETUP] Sub-Menu appears.
3 Turn the [
3434
3434
34] Dial to select [M.SENSOR].
4 Press the [SET] Button to select [ON].
5 Press the [MENU] Button to exit the menu.
≥The Motion Sensor Function Stand-by [STDBY]
Indication appears.
≥Approximately 1 second after the Movie Camera’s Motion
Sensor has detected movement in the picture, recording
automatically starts. Approximately 10 seconds after
movement in the picture has stopped, recording
automatically stops and the Movie Camera is in the Motion
Sensor Stand-by Mode.
≥
When the Movie Camera remains in the Motion Sensor Stand-
by Mode for more than 6 minutes, the Finder or LCD Monitor
turns off, and the [ƒ] Lamp goes out to conserve power.
When the Motion Sensor again detects movement in the
picture, recording automatically restarts after approximately
4 seconds, and the Finder or LCD Monitor turns on, and the
[ƒ] Lamp lights.
Cancelling the Motion Sensor Function During Stand-by
Set [M.SENSOR] on the [CAMERA SETUP] Sub-Menu to
[OFF].
Cancelling the Motion Sensor Function During Recording
Press the Recording Start/Stop Button for 2 seconds.
Registrazione a Sensore di Movimento
E’ una modalità molto particolare: la registrazione inizia
automaticamente non appena l’apposito sensore incorporato
individua un movimento nell’immagine.
1 Premete il tasto [MENU].
≥Apparirà il Menu principale [CAMERA FUNCTIONS].
2 Ruotate la manopola [
3434
3434
34] per selezionare la
funzione [CAMERA SETUP], quindi premete il
tasto [SET].
≥Apparirà il sottomenu [CAMERA SETUP].
3 Ruotate la manopola [
3434
3434
34] per selezionare
[M.SENSOR].
4 Premete il tasto [SET] per selezionare [ON].
5 Premete il tasto [MENU] per uscire dal menu.
≥Apparirà l’indicazione di standby di Registrazione a
Sensore di Movimento [STDBY].
≥La registrazione inizia automaticamente,
approssimativamente 1 secondo dopo che il sensore della
movie ha rilevato un movimento nell’immagine. La
registrazione si interromperà automaticamente dopo circa 10
secondi dal momento in cui sarà cessato qualsiasi
movimento nell’immagine. La movie tornerà in standby di
Registrazione a Sensore di Movimento.
≥Se la movie rimane in stand-by di Registrazione a Sensore di
Movimento per più di 6 minuti, per risparmiare energia, si
spengono automaticamente il mirino, (o il Monitor LCD) e la
spia
[ƒ]
.Non appena il sensore rileva nuovamente un
movimento nell’immagine, la ripresa riparte automaticamente
dopo 4 secondi e si accendono il mirino (o il Monitor LCD) e
la spia
[ƒ]
.
Disattivazione della funzione di Sensore di Movimento
durante lo Stand-by
Impostate su [OFF] la funzione [M.SENSOR] del sottomenu
[CAMERA SETUP].
Disattivazione della funzione di Sensore di Movimento
durante la registrazione
Tenete premuto per 2 secondi il tasto di Avvio/Arresto.

98
ITALIANO ENGLISH
∫ In the Following Recording Situations, the Motion
Sensor May Not Work Correctly:
≥A white wall or another single-colour background behind the
subject.
≥A subject with horizontal, vertical or oblique stripes.
≥Sudden changes in the surrounding brightness.
≥Exposure of the Movie Camera to slight shocks or vibration.
≥Extremely slow or fast movement of the subject.
≥Very little movement of the subject.
≥Recording in a dimly lit place. (The [MOTION SENSOR]
Indication flashes.)
≥A very small subject.
≥Movement of the subject near the edge of the picture.
≥A background with horizontal or vertical stripes.
≥To prevent accidental recording start caused by Movie
Camera movement, the Movie Camera should be mounted
on a tripod or be otherwise secured in a very stable position.
≥Although you can select a Digital Effect on the
[DIGITAL EFFECT] Sub-Menu when [M.SENSOR] on the
[CAMERA SETUP] Sub-Menu is set to [ON], the Motion
Sensor Function has priority and the selected digital effect is
automatically cancelled.
≥When [M.SENSOR] on the [CAMERA SETUP] Sub- Menu is
set to [ON], it is not possible to manually start recording by
pressing the Recording Start/Stop Button or to activate the
Recording Check or Camera Search Function.
≥When you use the AC Adaptor to power the Movie Camera,
the Motion Sensor Function Stand-by Mode will continue
when no movement is detected in the picture, even when the
tape has reached the end during recording. Therefore, we
recommend that you check the tape within a week. When
you use the Battery to power the Movie Camera, it remains
in the Motion Sensor Function Stand-by Mode until the
Battery is discharged, at which time the [CAMERA] Lamp
flashes for a few seconds.
≥To ensure correct functioning of the Motion Sensor Function,
the moving subject should be quite large in the picture.
Therefore, when you have zoomed the lens to the maximum
wide-angle position, the distance between lens and subject
should preferably be within about 2 metres. For subjects at
larger distances, be sure to zoom in accordingly.
≥The Movie Camera requires time to set up before recording
starts. Therefore, the beginning of movement is not recorded.
≥If there is a power interruption, the Motion Sensor Function is
cancelled.
∫ Nelle seguenti situazioni di ripresa, il Sensore di
Movimento potrebbe non funzionare
correttamente:
≥Il soggetto si trova davanti a un muro bianco o a uno sfondo
che ha un unico colore uniforme.
≥Il soggetto presenta righe orizzontali, verticali od oblique.
≥Si verificano cambi improvvisi nella luminosità ambientale.
≥La movie è esposta a leggeri urti o a vibrazioni.
≥Il soggetto si muove troppo lentamente o troppo
velocemente.
≥Il soggetto effettua uno spostamento minimo.
≥La ripresa viene effettuata con un’illuminazione molto debole.
(Lampeggia l’indicazione [MOTION SENSOR].)
≥Il soggetto è molto piccolo.
≥Il soggetto si muove in prossimità dei bordi dell’immagine.
≥Lo sfondo presenta righe orizzontali o verticali.
≥Per evitare che la registrazione venga attivata da un
movimento accidentale della movie, è bene montare la
telecamera su un cavalletto o collocarla in posizione molto
stabile.
≥Quando è attiva la Registrazione a Sensore di Movimento (la
funzione [M.SENSOR] del sottomenu [CAMERA SETUP] è
impostata su [ON]), anche se è possibile selezionare un
effetto digitale sul sottomenu [DIGITAL EFFECT], la
Registrazione a Sensore di Movimento ha la priorità e
l’effetto digitale selezionato viene annullato
automaticamente.
≥Quando è attiva la Registrazione a Sensore di Movimento (la
funzione [M.SENSOR] del sottomenu [CAMERA SETUP] è
impostata su [ON]), non è possibile avviare manualmente la
registrazione premendo il tasto di Avvio/Arresto della
registrazione, né utilizzare le funzioni di Controllo della
Registrazione e Ricerca nella Telecamera.
≥Se state utilizzando l’alimentatore CA per fornire energia alla
movie, la modalità di standby di Registrazione a Sensore di
Movimento continuerà a rimanere attivata, anche se il nastro
durante la registrazione è giunto alla fine. Per questo motivo,
vi consigliamo di controllare il nastro almeno una volta alla
settimana.Se state utilizzando l’alimentazione a batteria, la
movie rimarrà in standby di Registrazione a Sensore di
Movimento fino a che la batteria non sarà scarica. A quel
punto, la spia [CAMERA] lampeggerà per alcuni secondi.
≥Per un corretto funzionamento della Registrazione a Sensore
di Movimento, l’oggetto che si muove nell’immagine deve
essere sufficientemente ampio. Se lo zoom si trova sulla
posizione di massimo grandangolo, vi consigliamo una
distanza di circa 2 metri tra obiettivo e soggetto. Per soggetti
più lontani, regolate lo zoom di conseguenza.
≥Per avviarsi, la movie ha bisogno di un certo periodo di
tempo. L’inizio del movimento, quindi, non potrà essere
registrato.
≥Se viene a mancare l’energia elettrica, la Registrazione a
Sensore di Movimento viene annullata.

100
ITALIANO ENGLISH
0LUX
1
1
O LUX
OFF
ON
Recording in Dark Places Without Any
Illumination
(0 Lux Night View Function)
This function is convenient when you want to record at night in
places without any illumination, for example for observing the
behaviour of nocturnal animals, etc. In this mode, the Movie
Camera emits infrared rays which makes it possible to record
subjects that are invisible to the naked eye.
1 Set the [0 LUX OFF/ON] Switch to [ON] to make
the [0LUX] Indication appear.
≥The built-in Infra-red Beam Emitters 1 light. Be careful
not to cover them with your hand when recording.
≥Do not use the 0 Lux Night View Function in brightly lit
places and never aim the Movie Camera against the sun, as
this could cause irreparable damage.
≥The playback picture of scenes recorded with the
0 Lux Night View Function will be in black and white.
≥If you change the setting of the [0 LUX OFF/ON] Switch
during recording, a switching noise is also recorded.
≥When recording with the 0 Lux Night View Function, it is not
possible to adjust the white balance manually or to cancel
the manually adjusted white balance setting.
≥It is not possible to use any of the Programme AE Modes
when the 0 Lux Night View Mode is activated.
≥When using the 0 Lux Night View Function, the subject
should be within 3 metres from the Movie Camera.
≥When the automatic focusing is not precise, adjust the focus
manually.
≥If you do not want the Tally Lamp to light during recording
using the 0 Lux Night View Function, set [TALLY LAMP] on
the [CAMERA SETUP] Sub-Menu to [OFF].
≥As the iris is fully opened in the 0 Lux Night View Mode,
subjects in white or other light colours may be recorded
whitish, blurred and with weak contrast.
Cancelling the 0 Lux Night View Function
Set the [0 LUX OFF/ON] Switch to [OFF] to make the [0LUX]
Indication disappear.
Riprese in ambienti scuri senza
illuminazione
(Visione notturna 0 Lux)
E’ una funzione che permette di riprendere di notte, senza
alcuna illuminazione, per osservare ad esempio il
comportamento di animali notturni. Quando si trova in questa
modalità, la movie emette raggi infrarossi che consentono di
riprendere soggetti invisibili all’occhio umano.
1 Impostate su [ON] il selettore [0 LUX OFF/ON] e
fate apparire l’indicazione [0LUX].
≥Si accenderà il dispositivo di emissione di raggi
infrarossi 1. Fate attenzione a non coprirlo
inavvertitamente con la mano durante le riprese.
≥Non utilizzate la funzione di Visione Notturna 0 Lux in luoghi
molto illuminati e non puntate mai la movie verso il sole,
potrebbe danneggiarsi irreparabilmente.
≥Le immagini riprese con la funzione di Visione Notturna 0
Lux vengono riprodotte in bianco e nero.
≥Se il selettore [0 LUX OFF/ON] viene spostato mentre si è in
ripresa, verrà registrato un leggero disturbo di immagine.
≥Durante le riprese con la funzione di Visione Notturna 0 Lux,
non è possibile regolare manualmente il Bilanciamento del
bianco, né annullare le regolazioni di Bilanciamento del
bianco effettuate manualmente.
≥Quando è attiva la funzione di Visione Notturna 0 Lux non è
possibile utilizzare alcun programma di Esposizione
Automatica.
≥Nelle riprese con Visione Notturna 0 Lux, il soggetto deve
trovarsi a non più di 3 metri dalla movie.
≥Se la messa a fuoco non è precisa, è necessario regolarla
manualmente.
≥Se non volete che durante le riprese con Visione Notturna 0
Lux si accenda la spia di registrazione, impostate su [OFF] la
funzione [TALLY LAMP] del sottomenu [CAMERA SETUP].
≥Nella modalità di Visione Notturna 0 lux, il diaframma è
completamente aperto, per questo motivo i soggetti che
hanno colori molto luminosi, o sono addirittura bianchi, nelle
registrazioni possono apparire sbiaditi, sfocati e poco
contrastati.
Disattivazione della Visione Notturna 0 Lux
Impostate su [OFF] il selettore [0 LUX OFF/ON] per far
scomparire l’indicazione [0LUX].

102
ITALIANO ENGLISH
MENU
FOCUS / SET
MF/
TRACKING
3,5
3,4
2,6
0LUX
REC
STDBY
MOTION SENSOR
MOTION SENSOR
0LUX
1
O LUX
OFF
ON
CAMERA SETUP
PRESS MENU TO EXIT
M.SENSOR OFF ON
D.ZOOM
TALLY LAMP
40X
OFF
RETURN ----
Using the 0 Lux Night View Function together
with the Motion-Sensor-Controlled Recording
Function in Dark Places without Any
Illumination
If you use the 0 Lux Night View Function together with the
Motion-Sensor-Controlled Recording Function, recording
starts automatically when the Movie Camera’s built-in Motion
Sensor detects some movement in the picture. This combined
function is convenient for easy, unattended animal observation
recordings at night.
1 Set the [0 LUX OFF/ON] Switch to [ON] to make
the [0LUX] Indication appear.
2 Press the [MENU] Button.
≥The [CAMERA FUNCTIONS] Main-Menu appears.
3 Turn the [
3434
3434
34] Dial to select [CAMERA SETUP]
and then press the [SET] Button.
≥The [CAMERA SETUP] Sub-Menu appears.
4 Turn the [
3434
3434
34] Dial to select [M.SENSOR].
5 Press the [SET] Button to select [ON].
6 Press the [MENU] Button to exit the menu.
≥The Motion Sensor Function Stand-by [STDBY]
Indication appears.
Cancelling the 0 Lux Night View Function and Motion-
Sensor-Controlled Recording Function during Stand-by
Set [M.SENSOR] on the [CAMERA SETUP] Sub-Menu to
[OFF] and then set the [0 LUX OFF/ON] Switch to [OFF].
Cancelling the 0 Lux Night View Function and Motion-
Sensor-Controlled Recording Function during Recording
Press the Recording Star t/Stop Button for more than 2
seconds and then set the [0 LUX OFF/ON] Switch to [OFF].
If you use the Motion Sensor Function together with the 0 Lux
Night View Function, the [MOTION SENSOR] Indication
flashes, and recording may not be possible in some cases.
Uso della Visione Notturna 0 Lux assieme alla
Ripresa con Sensore di Movimento (in
ambienti bui privi di illuminazione)
Quando la funzione di Visione Notturna 0 Lux viene utilizzata
assieme alla Ripresa con Sensore di Movimento, la
registrazione si avvia automaticamente non appena il sensore
incorporato nella movie rileva un movimento nell’immagine. E’
una funzione utile, ad esempio, per osservare di notte il
mondo degli animali, senza dover controllare personalmente la
movie.
1 Impostate su [ON] il selettore [0 LUX OFF/ON] e
fate apparire l’indicazione [0LUX].
2 Premete il tasto [MENU].
≥Apparirà il Menu principale [CAMERA FUNCTIONS].
3 Ruotate il selettore[
3434
3434
34] per selezionare
[CAMERA SETUP], quindi premete il tasto
[SET].
≥Apparirà il sottomenu [CAMERA SETUP].
4 Ruotate il selettore [
3434
3434
34] per selezionare
[M.SENSOR].
5 Premete il tasto [SET] per selezionare [ON].
6 Premete il tasto [MENU] per uscire dal menu.
≥Apparirà l’indicazione di Pausa di Ripresa con Sensore
di Movimento [STDBY].
Disattivazione della Visione Notturna 0 Lux collegata a
Sensore di Movimento durante lo stand-by
IImpostate su [OFF] la funzione [M.SENSOR] del sottomenu
[CAMERA SETUP] e impostate su [OFF] il selettore [0 LUX
OFF/ON].
Disattivazione della Visione Notturna 0 Lux collegata a
Sensore di Movimento durante la ripresa
Tenete premuto per oltre 2 secondi il tasto di Avvio/Arresto,
quindi mettete sulla posizione [OFF] il selettore [0 LUX OFF/
ON].
Utilizzando la Registrazione a Sensore di Movimento
contemporaneamente alla funzione di Visione Notturna 0 Lux,
l’indicazione [MOTION SENSOR] lampeggia. In alcuni casi
non è possibile effettuare la ripresa.

104
ITALIANO ENGLISH
Subjects and Recording Conditions for
Which the Manual Mode Is More
Suitable
The following subjects and recording situations are not
suitable for recording in the Full Auto Mode. In these cases,
adjusting the white balance and/or focus manually will provide
more beautiful pictures. Also read the pages related to the
manual adjustment indicated in parentheses.
1. White Balance
To adjust the white balance manually, see “Recording with
Manual White Balance Adjustment”. (l 106)
2. Focus
To adjust the focus manually, see “Recording with Manual
Focus Adjustment”. (l 110)
≥If you select the Manual Mode, the [MNL] Indication appears.
≥During recording, it is not possible to change the recording
mode ([AUTO], [5], [7], [4], [ ], [ ]), even if you
press the [PROG. AE] Button. (l 112)
∫ Subjects and Recording Conditions Not Suitable
for Recording in the Full Auto Mode (problematic
adjustments in parentheses)
≥Subjects with dark surfaces (White Balance, Focus)
≥When moving the Movie Camera from outdoors to indoors
while recording (White Balance)
≥Subjects lit by different light sources (White Balance)
≥Subjects lit by mercury-vapour or natrium lamps
(White Balance)
≥Subjects with shiny surfaces or a lot of light reflection
(Focus)
≥Subjects with weak contrast (Focus)
≥Subjects with part of it near and part of it far away from the
Movie Camera (Focus)
≥Subjects without vertical contours (Focus)
≥Subjects with fast movement (Focus)
≥Subjects behind moving objects (Focus)
≥Subjects behind glass covered by dirt, dust or water drops
(Focus)
Soggetti e condizioni di ripresa in cui è
meglio ricorrere al modo Manuale
Il modo Full Auto si rivela inadatto ai soggetti e alle condizioni
di ripresa che indichiamo di seguito. In questi casi, la
regolazione manuale del Bilanciamento del bianco elo della
Messa a fuoco garantisce immagini più belle. Tra parentesi
vengono segnalate le regolazioni da effettuare manualmente.
Vi consigliamo di rileggere le pagine che le descrivono.
1. Bilanciamento del bianco:
Per la regolazione manuale del Bilanciamento del bianco,
vedi “Riprese con Bilanciamento del bianco manuale”
(l 106)
2. Messa a fuoco:
Per la regolazione manuale della Messa a fuoco, vedi
“Riprese con Messa a fuoco manuale” (l 110)
≥Selezionando il modo Manuale, apparirà l’indicazione [MNL].
≥Durante la registrazione, non è possibile modificare la
modalità di registrazione ([AUTO], [5], [7], [4], [ ],
[ ]), anche premendo il tasto [PROG. AE]. (l 112)
∫ Soggetti e condizioni non adatti alle riprese con
il modo Full Auto (Tra parentesi: la regolazione
automatica che presenta problemi)
≥Soggetti con superfici scure
(Bilanciamento del bianco, Messa a fuoco)
≥Quando, durante una registrazione, ci si sposta con la movie
da un interno a un esterno
(Bilanciamento del bianco)
≥Soggetti illuminati da sorgenti di luce differenti
(Bilanciamento del bianco)
≥Soggetti illuminati da lampade al vapore di mercurio o al
natrio (Bilanciamento del bianco)
≥Soggetti con superfici lucide o molto riflettenti
(Messa a fuoco)
≥Soggetti poco contrastati (Messa a fuoco)
≥Soggetti in parte vicini e in parte lontani dalla movie (Messa
a fuoco)
≥Soggetti senza contorni verticali (Messa a fuoco)
≥Soggetti che si muovono velocemente
(Messa a fuoco)
≥Soggetti dietro a oggetti in movimento (Messa a fuoco)
≥Soggetti dietro a un vetro coperto da sporco, polvere o gocce
d’acqua (Messa a fuoco)

106
ITALIANO ENGLISH
Recording with Manual White Balance
Adjustment
With this Movie Camera, you can also adjust the white
balance manually.
Use this mode for special subjects and recording conditions,
such as listed (l 104), for which the Full Auto Mode is not
suitable, and for light sources outside the range 1 (l 108).
Use it also when you want to manually adjust the white
balance for each new scene as professionals do.
1 Press the [PROG. AE] Button repeatedly until an
indication other than [AUTO] appears.
2 Attach the White Lens Cap and zoom in until the
entire screen is white.
3 Aim the Movie Camera at the subject that you
want to record and then keep the [W.B] Button
pressed until the [1] Indication
1 stops
flashing and remains lit.
¡When the Sepia Mode, Black & White Mode or 0 Lux
Night View Mode is used, it is not possible to manually
adjust the white balance. Also, if the white balance was
manually adjusted, it cannot be cancelled, even if you
press the [W.B] Button.
In the following cases, the [1] Indication flashes:
¡ During manual adjustment of the white balance. (If the
surroundings are dark and the white balance cannot be
adjusted, the [1] Indication keeps flashing.)
¡When the previously set white balance setting is maintained.
¡When you are trying to adjust the white balance in the digital
zoom range (21q– 220q). In this case, first adjust the white
balance in the optical zoom range (1q – 20q) and then
zoom back to within the Digital Zoom Mode.
Cancelling the Manual White Balance Mode
Press the [W.B] Button once. Or, press the [PROG. AE] Button
repeatedly until the [AUTO] Indication appears.
Riprese con Bilanciamento del bianco
manuale
Questa movie permette di regolare manualmente il
Bilanciamento del bianco.
Vi consigliamo di utilizzare questo modo per soggetti e
condizioni di ripresa speciali, come quelli indicati (l 104), per
i quali non è adatto il modo Full Auto, e per i tipi di
illuminazione che sono al di fuori della gamma 1 (l 108).
Potete utilizzare questo modo anche per regolare
manualmente il Bilanciamento del bianco prima di ogni
ripresa, una precauzione utilizzata in campo professionale.
1 Premete ripetutamente il tasto [PROG. AE] fino
a che non appare
una indicazione diversa da [AUTO].
2 Attaccate il copri-obiettivo e zoomate in avanti
fino a che l’inquadratura non è completamente
bianca.
3 Puntate la movie verso il soggetto che intendete
riprendere e tenete premuto il tasto [W.B] fino a
che l’indicatore [1]
1 non smette di
lampeggiare e rimane visibile.
¡Quando vengono utilizzati gli effetti Seppia, Bianco e
Nero o Visione Notturna 0 Lux, non è possibile regolare
manualmente il Bilanciamento del bianco. Se era stata
effettuata una regolazione manuale del Bilanciamento
del bianco, questa non potrà essere annullata,
nemmeno premendo il tasto [W.B].
Nei seguenti casi lampeggia l’indicazione [1]
¡Durante la regolazione manuale del Bilanciamento del
bianco (se l’ambiente è molto scuro e non è possibile
regolare il Bilanciamento del bianco, l’indicazione [1]
continua a lampeggiare).
¡Quando viene mantenuta la precedente impostazione di
Bilanciamento del bianco.
¡Se cercate di regolare il Bilanciamento del bianco mentre lo
zoom è nella gamma digitale (21q– 220q). In questo caso
passate allo zoom ottico (1q – 20q), regolate il
Bilanciamento del bianco e quindi tornate allo zoom digitale.
Per disattivare il Bilanciamento del bianco manuale.
Premete il tasto [W.B] una sola volta. Oppure premete più
volte il tasto [PROG. AE] fino a che appare l’indicazione
[AUTO].
2
1
MNL MNL
2
1
3
PROG. AE
;W.B
s
VOL
r
WT
-
 1
1
-
 2
2
-
 3
3
-
 4
4
-
 5
5
-
 6
6
-
 7
7
-
 8
8
-
 9
9
-
 10
10
-
 11
11
-
 12
12
-
 13
13
-
 14
14
-
 15
15
-
 16
16
-
 17
17


Panasonic NVVZ1E Istruzioni per l'uso
- Categoria
- Telecamere di sicurezza
- Tipo
- Istruzioni per l'uso
- Questo manuale è adatto anche per
in altre lingue
Documenti correlati
-
Panasonic NV RZ1 E Manuale utente
-
-
-
-
-
-
-
-
-