34552 2 Wireless HD Cameras

Chacon 34552 2 Wireless HD Cameras, 34552 Manuale utente

  • Ciao, ho analizzato il contenuto di questo documento e sono pronto a rispondere alle tue domande sul monitor digitale wireless e telecamera wireless Chacon 34552 e T8204-3W. Questo manuale fornisce istruzioni dettagliate su come installare, connettere e configurare i dispositivi, incluse le informazioni sulle loro funzionalità principali come lo schermo touchscreen, la risoluzione della telecamera e la possibilità di accesso remoto. Inizia pure a fare le tue domande, sarò lieto di aiutarti.
  • Come posso collegare la telecamera al monitor?
    Qual è la risoluzione della telecamera?
    Posso visualizzare le immagini da remoto?
    Qual è la risoluzione del display del monitor?
Quick user Guide
Ref. : 34552
v1.2 220307
www.chacon.com
1. Product overview
1 Reset button
2 Memory card slot (Max 128 Gb)
3 Power jack (12V DC/ 1A)
4 Power button
5 Antenna
6 USB port (support USB ash drive
upgrade and mouse)
7 Ethernet port
8 Red indicator
9 Power indicator
10 Microphone
1x 2x 1x8x3x 1x 3x
EN
1
2
3
4 5
6
7
8 9 10
1
2
3
4 5
6
7
8 9 10
1
2
3
4 5
6
7
8 9 10
Wireless Digital Monitor
Note: Memory card cannot be inserted
or removed without switching o the
devise. Otherwise, it will lead to system
crash.
1 Antenna
2 Indicator light
3 IR LED
4 PIR
5 Speaker
6 Stand
7 Microphone
1
2
3
4
5
7
6
Wireless Digital Outdoor Camera
1 INSTALLING YOUR DEVICES
1. Screw the antenna to the camera
2. Locate a suitable location to mount the
camera
3. Secure the camera stand to a stable sur-
face, ceiling or wall using four screws.
4. Loosen the thumb screw of the camera
stand and secure the camera body to
the market. Make sur the camera is in an
upright position (relative to your viewing
environment).
2 WIRELESS CONNECTION
3 WIRED CONNECTION
2. Click the home button
and enter into main
menu
3. Choose the System
Setup and go into
wireless setup
Connect the Monitor to the router by
Ethernet cable.
-> Enable/Disable Wi-Fi
function
-> Indicates the Wi-Fi
routers in the drop-
down list. Choose the
appropriate Wi-Fi router
and enter the Wi-Fi router
password if necessary.
1. Power on the
camera (Red LED
quick ash)
Reset Button
Wireless Setup
Camera Audio Setup
Volume Setup
Wireless Setup
>
>
>
Screen OFF after 1 min
Wi-Fi
ABCD......
Hotspot list
>
>
Camera 1
Camera 1
Camera 2
Camera 2
Camera 3
Camera 3
Camera 4
Camera 4
Paired
Paired
UnPaired
UnPaired
Repeater
Pair New Camera
9c*******
9c*******
X
X
X
X
System Info
Factory Setting
Change Security Code
Upgrade
>
>
>
Screen OFF after 1 min
Device Model
Cloud ID
Network State
T8204-3W
******
ONLINE
Camera 1 Camera 2
Camera 3 Camera 4
Camera 1
1 2 3 4
876
5
S/W Version
Build Time
3.1.8.2.19
******** More Parameter
QR Code
Online
Oine
Connecting
-> Connection successfully
NConnect
-> Connection Failure
-> Processing
Wireless Setup
Camera Audio Setup
Volume Setup
Wireless Setup
>
>
>
Screen OFF after 1 min
Wi-Fi
ABCD......
Hotspot list
>
>
Camera 1
Camera 1
Camera 2
Camera 2
Camera 3
Camera 3
Camera 4
Camera 4
Paired
Paired
UnPaired
UnPaired
Repeater
Pair New Camera
9c*******
9c*******
X
X
X
X
System Info
Factory Setting
Change Security Code
Upgrade
>
>
>
Screen OFF after 1 min
Device Model
Cloud ID
Network State
T8204-3W
******
ONLINE
Camera 1 Camera 2
Camera 3 Camera 4
Camera 1
1 2 3 4
876
5
S/W Version
Build Time
3.1.8.2.19
******** More Parameter
QR Code
Online
Oine
Connecting
-> Connection successfully
NConnect
-> Connection Failure
-> Processing
Modem
4 PAIR THE CAMERA TO NVR
This section allows you to add the camera, if you have purchased addition cameras or change
original camera channel.
Notes: Before leaving factory, the camera has been matched with monitor, the image will come
out when the kit is powered.
1. Power on the cameras and
monitor and press reset
button
2. Enter the Camera Info in
the Main Page
3. Tap the match code
and camera would be
paired with Monitor
Automatically.
Reset Button
Tips:
1. If the camera still does not match the code after the code has timed out, click “pair new
camera” again to try again.
2. If you need to replace a new camera, please click “X” to delete the channel and then click on
the code to match.
3. The Red LED will always on which indicate the camera have been paired successfully.
Wireless Setup
Camera Audio Setup
Volume Setup
Wireless Setup
>
>
>
Screen OFF after 1 min
Wi-Fi
ABCD......
Hotspot list
>
>
Camera 1
Camera 1
Camera 2
Camera 2
Camera 3
Camera 3
Camera 4
Camera 4
Paired
Paired
UnPaired
UnPaired
Repeater
Pair New Camera
9c*******
9c*******
X
X
X
X
System Info
Factory Setting
Change Security Code
Upgrade
>
>
>
Screen OFF after 1 min
Device Model
Cloud ID
Network State
T8204-3W
******
ONLINE
Camera 1 Camera 2
Camera 3 Camera 4
Camera 1
1 2 3 4
876
5
S/W Version
Build Time
3.1.8.2.19
******** More Parameter
QR Code
Online
Oine
Connecting
-> Connection successfully
NConnect
-> Connection Failure
-> Processing
5 LIVE VIEW
6 APP SETUP
Double click to enter full
screen mode on the selected
camera
The NVR system allows you to remotely access the live video from your iPhone, iPad or Android
mobile device.
1. Download APP
Download and install “N connect” APP into your device
Double click to exit full screen mode and go back to split
screen
1. Speaker -> Click to adjust the volume
2. Home -> Go back to main menu
3. Zoom -> Zoom in the image
4. Playback -> Enter the event list
5. Speaker -> Long press to talk
6. Wi-Fi signal -> Wi-Fi status indication
7. Recording -> Video recording indication
8. PIR -> Motion triggered indication
Wireless Setup
Camera Audio Setup
Volume Setup
Wireless Setup
>
>
>
Screen OFF after 1 min
Wi-Fi
ABCD......
Hotspot list
>
>
Camera 1
Camera 1
Camera 2
Camera 2
Camera 3
Camera 3
Camera 4
Camera 4
Paired
Paired
UnPaired
UnPaired
Repeater
Pair New Camera
9c*******
9c*******
X
X
X
X
System Info
Factory Setting
Change Security Code
Upgrade
>
>
>
Screen OFF after 1 min
Device Model
Cloud ID
Network State
T8204-3W
******
ONLINE
Camera 1 Camera 2
Camera 3 Camera 4
Camera 1
1 2 3 4
876
5
S/W Version
Build Time
3.1.8.2.19
******** More Parameter
QR Code
Online
Oine
Connecting
-> Connection successfully
NConnect
-> Connection Failure
-> Processing
Wireless Setup
Camera Audio Setup
Volume Setup
Wireless Setup
>
>
>
Screen OFF after 1 min
Wi-Fi
ABCD......
Hotspot list
>
>
Camera 1
Camera 1
Camera 2
Camera 2
Camera 3
Camera 3
Camera 4
Camera 4
Paired
Paired
UnPaired
UnPaired
Repeater
Pair New Camera
9c*******
9c*******
X
X
X
X
System Info
Factory Setting
Change Security Code
Upgrade
>
>
>
Screen OFF after 1 min
Device Model
Cloud ID
Network State
T8204-3W
******
ONLINE
Camera 1 Camera 2
Camera 3 Camera 4
Camera 1
1 2 3 4
8 7 6
5
S/W Version
Build Time
3.1.8.2.19
******** More Parameter
QR Code
Online
Oine
Connecting
-> Connection successfully
NConnect
-> Connection Failure
-> Processing
2. Camera Connection
Monitor Parameter
1) Click the + to add smart device
2) Choose New Device
3) Scan the Cloud ID from the QR code in Monitor’s Manager
4) For your privacy and security, change the default password
to your private password
5) The live view would show successfully in the
list
Display Resolution 1024*600
Video/Audio Compression H.264
Display Type Color 7’’ Touchscreen
Channel Display Mode Full/Quad
Storage Media Support Memory Card Up to 128GB
Audio Two-way
Wireless Setup
Camera Audio Setup
Volume Setup
Wireless Setup
>
>
>
Screen OFF after 1 min
Wi-Fi
ABCD......
Hotspot list
>
>
Camera 1
Camera 1
Camera 2
Camera 2
Camera 3
Camera 3
Camera 4
Camera 4
Paired
Paired
UnPaired
UnPaired
Repeater
Pair New Camera
9c*******
9c*******
X
X
X
X
System Info
Factory Setting
Change Security Code
Upgrade
>
>
>
Screen OFF after 1 min
Device Model
Cloud ID
Network State
T8204-3W
******
ONLINE
Camera 1 Camera 2
Camera 3 Camera 4
Camera 1
1 2 3 4
876
5
S/W Version
Build Time
3.1.8.2.19
******** More Parameter
QR Code
Online
Oine
Connecting
-> Connection successfully
NConnect
-> Connection Failure
-> Processing
Device Model
Cloud ID
Network State
T8204-3W
******
ONLINE
S/W Version
Build Time
3.1.8.2.19
******** More Parameter
QR Code
Wireless Setup
Camera Audio Setup
Volume Setup
Wireless Setup
>
>
>
Screen OFF after 1 min
Wi-Fi
ABCD......
Hotspot list
>
>
Camera 1
Camera 1
Camera 2
Camera 2
Camera 3
Camera 3
Camera 4
Camera 4
Paired
Paired
UnPaired
UnPaired
Repeater
Pair New Camera
9c*******
9c*******
X
X
X
X
System Info
Factory Setting
Change Security Code
Upgrade
>
>
>
Screen OFF after 1 min
Device Model
Cloud ID
Network State
T8204-3W
******
ONLINE
Camera 1 Camera 2
Camera 3 Camera 4
Camera 1
1 2 3 4
876
5
S/W Version
Build Time
3.1.8.2.19
******** More Parameter
QR Code
Online
Oine
Connecting
-> Connection successfully
NConnect
-> Connection Failure
-> Processing
7 SPECIFICATIONS
Camera Parameter
Resolution 3MP
PIR Support
View Angle FOV:110°
Compression H.264+
Low Light Solution 2 IR LEDs
Night Visibility 15M Body Identication
Audio Two-way
Housing type Metal
Environmental Rating IP66
Power Option DC 12V/1A
Operating Temperature -10°C ~ 50°C
Storage Temperature -20°C ~ 60°C
Transmission Frequency 2.4GHz
Transmission Range Up to 400 meters (LoS)
Power Option DC 12V
Operating Temperature -10°C ~ 40°C
Storage Temperature -20°C ~ 50°C
Support
www.chacon.com/support
Don’t throw batteries or out of order products with the household waste (garbage).
The dangerous substances that they are likely to include may harm health or the
environment. Make your retailer take back these products or use the selective collect
of garbage proposed by your city.
Direct current (DC)
Hereby, Chacon declares that the radio equipment type 34552 is in compliance with
Directive 2014/53/EU.
The full text of the EU declaration of conformity is available at the following internet
address: https://www.chacon.com/conformity
1. APERÇU DU PRODUIT
1x 2x 1x8x3x 1x 3x
FR
1
2
3
4 5
6
7
8 9 10
1
2
3
4 5
6
7
8 9 10
1
2
3
4 5
6
7
8 9 10
Moniteur numérique sans l
1 Bouton de réinitialisation
2 Emplacement pour carte mémoire
(Max 128 Gb)
3 Prise d’alimentation (12V DC/ 1A)
4 Bouton d’alimentation
5 Antenne
6 ports USB (prise en charge de la
mise à niveau du lecteur ash USB et
de la souris)
7 Port Ethernet
8 Indicateur rouge
9 Indicateur d’alimentation
10 Microphone
Remarque : La carte mémoire ne peut
pas être insérée ou retirée sans éteindre
l’appareil. Sinon, cela entraînera une
panne du système.
1 Antenne
2 Voyant lumineux
3 LED IR
4 PIR
5 Haut-parleur
6 Support
7 Microphone
1
2
3
4
5
7
6
Caméra extérieure sans l
1 INSTALLATION DE VOS APPAREILS
1. Vissez l’antenne à la camera
2. Localisez un emplacement approprié pour
placer la camera
3. Fixez le support de la caméra à une sur-
face stable, au plafond ou au mur à l’aide
de quatre vis.
4. Desserrez la vis à ailettes du support de la
caméra et xez le corps de la caméra au
marché. Assurez-vous que la caméra est
en position verticale (par rapport à votre
environnement de vision).
2 CONNEXION SANS FIL
3 CONNEXION FILAIRE
2. Cliquez sur le bouton
home et entrez dans le
menu principal
3. Choisissez la
conguration du
système et allez dans la
conguration sans l.
Connectez le moniteur au routeur par un
câble Ethernet.
-> Activer/désactiver la
fonction Wi-Fi
-> Indique les routeurs
Wi-Fi dans la liste
déroulante. Choisissez le
routeur Wi-Fi approprié
et saisissez le mot de
passe du routeur Wi-Fi si
nécessaire.
1. Mettez la caméra
sous tension
(le voyant
rouge clignote
rapidement).
Reset Button
Wireless Setup
Camera Audio Setup
Volume Setup
Wireless Setup
>
>
>
Screen OFF after 1 min
Wi-Fi
ABCD......
Hotspot list
>
>
Camera 1
Camera 1
Camera 2
Camera 2
Camera 3
Camera 3
Camera 4
Camera 4
Paired
Paired
UnPaired
UnPaired
Repeater
Pair New Camera
9c*******
9c*******
X
X
X
X
System Info
Factory Setting
Change Security Code
Upgrade
>
>
>
Screen OFF after 1 min
Device Model
Cloud ID
Network State
T8204-3W
******
ONLINE
Camera 1 Camera 2
Camera 3 Camera 4
Camera 1
1 2 3 4
876
5
S/W Version
Build Time
3.1.8.2.19
******** More Parameter
QR Code
Online
Oine
Connecting
-> Connection successfully
NConnect
-> Connection Failure
-> Processing
Wireless Setup
Camera Audio Setup
Volume Setup
Wireless Setup
>
>
>
Screen OFF after 1 min
Wi-Fi
ABCD......
Hotspot list
>
>
Camera 1
Camera 1
Camera 2
Camera 2
Camera 3
Camera 3
Camera 4
Camera 4
Paired
Paired
UnPaired
UnPaired
Repeater
Pair New Camera
9c*******
9c*******
X
X
X
X
System Info
Factory Setting
Change Security Code
Upgrade
>
>
>
Screen OFF after 1 min
Device Model
Cloud ID
Network State
T8204-3W
******
ONLINE
Camera 1 Camera 2
Camera 3 Camera 4
Camera 1
1 2 3 4
876
5
S/W Version
Build Time
3.1.8.2.19
******** More Parameter
QR Code
Online
Oine
Connecting
-> Connection successfully
NConnect
-> Connection Failure
-> Processing
Modem
4 ASSOCIER LA CAMÉRA AU NVR
Cette section vous permet d’ajouter une caméra, si vous avez acheté des caméras
supplémentaires ou de changer le canal de la caméra d’origine.
Notes : Avant de quitter l’usine, la caméra a été associée à un moniteur, l’image s’ache lorsque
le kit est alimenté.
1. Mettez les caméras et le
moniteur sous tension et
appuyez sur le bouton de
réinitialisation.
2. Entrez les informations
sur la caméra dans la
page principale
3. Tapez sur le code
de correspondance
et la caméra sera
automatiquement
associée au moniteur.
Reset Button
Conseils:
1. Si la caméra ne correspond toujours pas au code après que le code ait expiré, cliquez à
nouveau sur « associer une nouvelle caméra « pour réessayer.
2. Si vous devez remplacer une nouvelle caméra, veuillez cliquer sur «X» pour supprimer le canal,
puis cliquez sur le code à associer.
3. La LED rouge s’allume toujours pour indiquer que la caméra a été associée avec succès.
Wireless Setup
Camera Audio Setup
Volume Setup
Wireless Setup
>
>
>
Screen OFF after 1 min
Wi-Fi
ABCD......
Hotspot list
>
>
Camera 1
Camera 1
Camera 2
Camera 2
Camera 3
Camera 3
Camera 4
Camera 4
Paired
Paired
UnPaired
UnPaired
Repeater
Pair New Camera
9c*******
9c*******
X
X
X
X
System Info
Factory Setting
Change Security Code
Upgrade
>
>
>
Screen OFF after 1 min
Device Model
Cloud ID
Network State
T8204-3W
******
ONLINE
Camera 1 Camera 2
Camera 3 Camera 4
Camera 1
1 2 3 4
876
5
S/W Version
Build Time
3.1.8.2.19
******** More Parameter
QR Code
Online
Oine
Connecting
-> Connection successfully
NConnect
-> Connection Failure
-> Processing
5 VUE EN DIRECT
6 CONFIGURATION DE L’APPLICATION
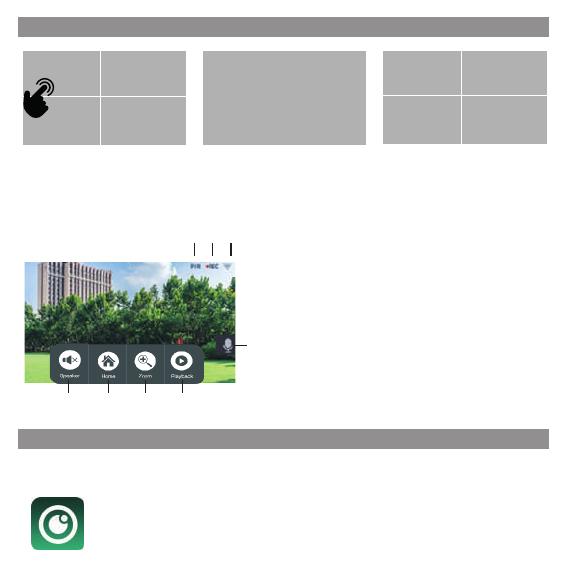
Double-cliquez pour passer
en mode plein écran sur la
caméra sélectionnée.
Le système NVR vous permet d’accéder à distance à la vidéo en direct depuis votre iPhone,
iPad ou appareil mobile Android.
1. Téléchargez l’APP
Téléchargez et installez l’App «N connect» sur votre appareil.
Double-cliquez pour quitter le mode plein écran et revenir à
l’écran partagé.
1. Haut-parleur -> Cliquez pour régler le volume
2. Accueil -> Retourner au menu principal
3. Zoom -> Zoomer sur l’image
4. Lecture -> Entrer dans la liste des
événements
5. Haut-parleur -> Appui long pour parler
6. Signal Wi-Fi -> Indication du statut Wi-Fi
7. Enregistrement -> Indication d’enregistrement
video
8. PIR -> Indicateur de détection de mouvement
Wireless Setup
Camera Audio Setup
Volume Setup
Wireless Setup
>
>
>
Screen OFF after 1 min
Wi-Fi
ABCD......
Hotspot list
>
>
Camera 1
Camera 1
Camera 2
Camera 2
Camera 3
Camera 3
Camera 4
Camera 4
Paired
Paired
UnPaired
UnPaired
Repeater
Pair New Camera
9c*******
9c*******
X
X
X
X
System Info
Factory Setting
Change Security Code
Upgrade
>
>
>
Screen OFF after 1 min
Device Model
Cloud ID
Network State
T8204-3W
******
ONLINE
Camera 1 Camera 2
Camera 3 Camera 4
Camera 1
1 2 3 4
876
5
S/W Version
Build Time
3.1.8.2.19
******** More Parameter
QR Code
Online
Oine
Connecting
-> Connection successfully
NConnect
-> Connection Failure
-> Processing
Wireless Setup
Camera Audio Setup
Volume Setup
Wireless Setup
>
>
>
Screen OFF after 1 min
Wi-Fi
ABCD......
Hotspot list
>
>
Camera 1
Camera 1
Camera 2
Camera 2
Camera 3
Camera 3
Camera 4
Camera 4
Paired
Paired
UnPaired
UnPaired
Repeater
Pair New Camera
9c*******
9c*******
X
X
X
X
System Info
Factory Setting
Change Security Code
Upgrade
>
>
>
Screen OFF after 1 min
Device Model
Cloud ID
Network State
T8204-3W
******
ONLINE
Camera 1 Camera 2
Camera 3 Camera 4
Camera 1
1 2 3 4
8 7 6
5
S/W Version
Build Time
3.1.8.2.19
******** More Parameter
QR Code
Online
Oine
Connecting
-> Connection successfully
NConnect
-> Connection Failure
-> Processing
2. Connexion de la caméra
Paramètres du moniteur
1) Cliquez sur le + pour ajouter un dispositif intelligent
2) Choisissez Nouveau dispositive
3) Scannez le Cloud ID à partir du code QR dans le moniteur.
4) Pour votre vie privée et votre sécurité, changez le mot de
passe par défaut par votre mot de passe privé.
5) La vue en direct s’ache avec succès dans la
liste.
Résolution d'achage 1024*600
Compression vidéo/audio H.264
Type d'achage Écran tactile 7'' couleur
Mode d'achage des canaux Complet/Quad
Média de stockage Supporte la carte mémoire jusqu'à 128GB
Wireless Setup
Camera Audio Setup
Volume Setup
Wireless Setup
>
>
>
Screen OFF after 1 min
Wi-Fi
ABCD......
Hotspot list
>
>
Camera 1
Camera 1
Camera 2
Camera 2
Camera 3
Camera 3
Camera 4
Camera 4
Paired
Paired
UnPaired
UnPaired
Repeater
Pair New Camera
9c*******
9c*******
X
X
X
X
System Info
Factory Setting
Change Security Code
Upgrade
>
>
>
Screen OFF after 1 min
Device Model
Cloud ID
Network State
T8204-3W
******
ONLINE
Camera 1 Camera 2
Camera 3 Camera 4
Camera 1
1 2 3 4
876
5
S/W Version
Build Time
3.1.8.2.19
******** More Parameter
QR Code
Online
Oine
Connecting
-> Connection successfully
NConnect
-> Connection Failure
-> Processing
Wireless Setup
Camera Audio Setup
Volume Setup
Wireless Setup
>
>
>
Screen OFF after 1 min
Wi-Fi
ABCD......
Hotspot list
>
>
Camera 1
Camera 1
Camera 2
Camera 2
Camera 3
Camera 3
Camera 4
Camera 4
Paired
Paired
UnPaired
UnPaired
Repeater
Pair New Camera
9c*******
9c*******
X
X
X
X
System Info
Factory Setting
Change Security Code
Upgrade
>
>
>
Screen OFF after 1 min
Device Model
Cloud ID
Network State
T8204-3W
******
ONLINE
Camera 1 Camera 2
Camera 3 Camera 4
Camera 1
1 2 3 4
876
5
S/W Version
Build Time
3.1.8.2.19
******** More Parameter
QR Code
Online
Oine
Connecting
-> Connection successfully
NConnect
-> Connection Failure
-> Processing
7 SPECIFICATIONS
Paramètres de la caméra
Résolution 3MP
PIR Support
Angle de vue FOV : 110
Compression H.264+
Solution pour faible luminosité 2 LEDs IR
Visibilité de nuit Identication du corps 15M
Audio Double sens
Type de boîtier Métal
Caractéristiques environnementales IP66
Option d'alimentation DC 12V/1A
Température de fonctionnement -10°C ~ 50°C
Température de stockage -20°C ~ 60°C
Audio bidirectionnel
Fréquence de transmission 2.4GHz
Gamme de transmission Jusqu'à 400 mètres (LoS)
Option d'alimentation DC 12V
Température de fonctionnement -10°C ~ 40°C
Température de stockage -20°C ~ 50°C
Ne jetez pas les batteries ou les appareils hors d’usage avec les déchets ménagers
(ordures). Les substances dangereuses qu’ils sont susceptibles de contenir peuvent
nuire à la santé ou à l’environnement. Faites reprendre ces produits par votre
distributeur ou utilisez la collecte sélective des déchets proposée par votre commune.
Courant Continu (CC)
Le soussigné, Chacon, déclare que l’équipement radioélectrique du type 34552 est
conforme à la directive 2014/53/UE.
Le texte complet de la déclaration UE de conformité est disponible à l’adresse
internet suivante: https://www.chacon.com/conformity
Support
www.chacon.com/support
Pour en savoir plus :
www.quefairedemesdechets.fr
1. PRODUCTOVERZICHT
1x 2x 1x8x3x 1x 3x
NL
1
2
3
4 5
6
7
8 9 10
1
2
3
4 5
6
7
8 9 10
1
2
3
4 5
6
7
8 9 10
Draadloze Digitale Monitor
1 Resetknop
2 Geheugenkaartsleuf (Max 128 Gb)
3 Voedingsaansluiting (12V DC/ 1A)
4 Aan/uit-knop
5 Antenne
6 USB-poort (ondersteuning voor USB
ash drive upgrade en muis)
7 Ethernet-poort
8 Rode indicator
9 Voedingsindicator
10 Microfoon
Opmerking: De geheugenkaart kan niet
worden geplaatst of verwijderd zonder
het toestel uit te schakelen. Anders zal
dit leiden tot een systeemcrash.
1 Antenne
2 Indicatorlampje
3 IR-LED
4 PIR
5 Luidspreker
6 Voet
7 Microfoon
1
2
3
4
5
7
6
Draadloze Digitale Buitencamera
1 INSTALLATIE VAN UW APPARATEN
1. Schroef de antenne op de camera
2. Zoek een geschikte plaats om de camera
te monteren
3. Bevestig de camerastandaard aan een
stabiel oppervlak, plafond of muur met
behulp van drie schroeven.
4. Draai de duimschroef van de camerastan-
daard los en zet de camerabehuizing vast
op de markt. Zorg ervoor dat de camera
rechtop staat (ten opzichte van uw kijkom-
geving).
/