
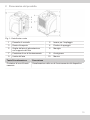
DHP 20
Instruction manual EN
Istruzioni per l’uso IT
Betriebsanleitung DE
Manual de instrucciones ES
Mode d’emploi FR
Bedieningshandleiding NL
Instrukcja eksploatacji PL
Manual de instruções PT
Betjeningsvejledning DA
Käyttöohje FI
Bruksanvisning NO
Bruksanvisning SV

I. EN - INSTRUCTION MANUAL
1 Device models............................................................................................................. 2
2 Product overview ........................................................................................................ 3
3 Control panel............................................................................................................... 4
4 About this operating manual ..................................................................................... 5
5 Product description .................................................................................................... 5
6 Safety ........................................................................................................................... 6
7 Transport and installation.......................................................................................... 7
8 Device operation and control..................................................................................... 8
9 Maintenance and care................................................................................................. 9
10 Troubleshooting.......................................................................................................... 11
11 Repair........................................................................................................................... 12
12 Decommissioning, storage and disposal ................................................................. 12
13 EC Declaration of Conformity.................................................................................... 13
1 Device models
This operating manual covers various device models. Their functions and operation are
however nearly identical To find out which model you have, refer to the type plate. For more
information, see Technical data.
Model Main features
DHP20 Extendable handle, carrier handle, 2 castors
2

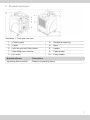
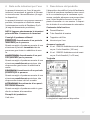
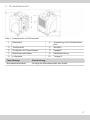
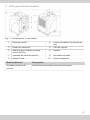
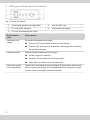
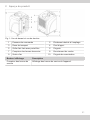
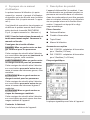
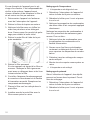
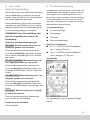
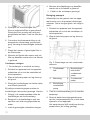
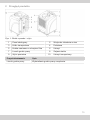
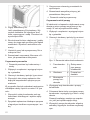
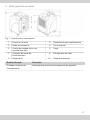
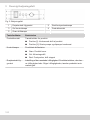
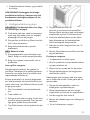
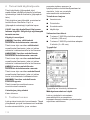
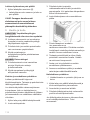
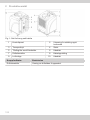
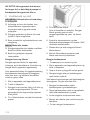
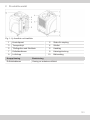
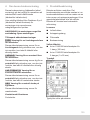
2 Product overview
Illustration1: Front and rear view
1 Control panel 2 Recess for stacking
3 Castor 4 Base
5 Inlet air grille with filter holder 6 Handle
7 Operating hours counter 8 Cable winder
9 Air outlet 10 Carry handle
Button/indicator Description
Operating hours counter Display of operating hours
3

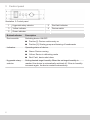
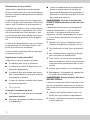
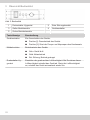
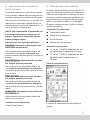
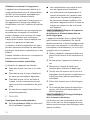
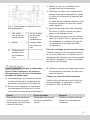
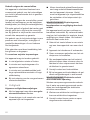
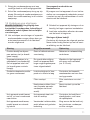
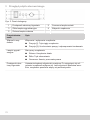
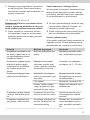
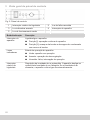
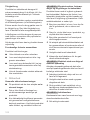
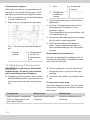
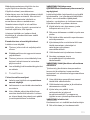
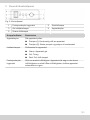
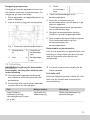
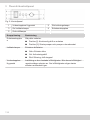
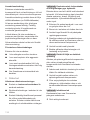
3 Control panel
Illustration2: Control panel
1 Hygrostat rotary selector 2 Red fault indicator
3 Yellow indicator 4 Device switch
5 Green indicator
Button/indicator Description
Device switch Switching device ON/OFF:
■Position [I]: Device continuously on
■Position [II]: Starting pump and draining off condensate
Indicators Operating status of device:
■Green: Device running
■Yellow: Device in defrosting mode
■Red: Fault, device shut down
Hygrostat rotary
selector
Setting desired target humidity When the set target humidity is
reached, the device is automatically switched off. If the air humidity
increases again, the device restarts automatically.
4

4 About this operating manual
This operating manual (hereinafter referred
to as the manual) allows the operator to op-
erate the humidifier (referred to as the
device) safely and efficiently.
Reproduction of this document or parts
thereof is only permitted with the explicit
written consent of HEYLO GmbH (herein-
after referred to as the manufacturer).
NOTICE!Before using the device, please
read this manual carefully. Keep this doc-
ument for future reference.
Safety signs and instructions
DANGER! Warning regarding an immin-
ent risk of injury
This safety instruction warns of an immedi-
ate dangerous situation which can lead to
serious injury or death.
WARNING! Warning of a potential risk to
human life.
This safety instruction warns of a poten-
tially hazardous situation which, if not
avoided, could result in death or serious in-
jury.
CAUTION! Warning of a potential risk to
human life.
This safety instruction warns of a poten-
tially hazardous situation which, if not
avoided, could result in minor to moderate
injury.
ATTENTION! Warning regarding damage
to property
These safety warnings highlight potential
risks of damage to the device.
Contact details of manufacturer
See rear cover.
5 Product description
The device dehumidifies the air in the room.
In the process, condensate collects in the
condensate tank from where it can be re-
moved by means of a built-in pump to a col-
lecting vessel or an on-site drain. The
device is automatically defrosted when ne-
cessary.
Scope of delivery
■Dehumidifier
■Drain hose
■Filter pad
■Operating manual
Optional accessory
■Prod. no. 1306539 Exhaust air adapter
for 1hose (100mm)
■Prod. no. 1306553 Exhaust air adapter
for 3hoses (3 x 50mm)
Type plate
The type plate is attached to the device.
5

Intended use
The device is intended solely for dehumidi-
fying air at atmospheric pressure in a com-
mercial environment.
Intended use also includes compliance with
the operating conditions (see Operating
conditions).
Any use other than the specified is deemed
improper. Improper use shall void all war-
ranty cover.
The air dehumidifier must not be operated
by children or by persons with limited phys-
ical, sensory or mental faculties.
Before operating the device, users must
have read and understood this operating
manual.
Reasonably foreseeable misuse
The device must not be used:
■In rooms/spaces that are not enclosed,
or outdoors
■In rooms with a potentially explosive or
aggressive atmosphere
■In rooms with air that has been treated
with ozone, or that contains a high con-
centration or solvents or dust.
■At locations where the prescribed min-
imum safety distances cannot be main-
tained
6 Safety
General safety instructions
■The device must only be operated by
persons who have been properly in-
structed in its operation.
■It is forbidden to make any modifica-
tions to device.
■Maintenance and troubleshooting tasks
must be performed by suitably qualified
persons only. Shut down the device and
disconnect the mains plug.
WARNING! Risk of explosion, injury from
burns or poisoning by refrigerant
The device is operated with an odourless
and flammable refrigerant. If the device is
operated incorrectly, there is a risk that the
refrigeration causes explosion, fire, poison-
ing or other injury. The refrigerant is pres-
surised.
ÜOnly operate the device in rooms larger
than 4m2.
ÜNever drill holes into the device, and do
not use welding equipment or cutting
torches in its vicinity.
ÜDo not attempt to speed up defrosting by
using implements.
ÜAll work on the refrigeration circuit must
be performed by staff of the manufac-
turer or an authorised technician.
ÜAvoid contact with the refrigerant.
ÜWhen handling the refrigerant, strictly
adhere to the applicable safety regula-
tions.
WARNING! Risk of electric shock
When carrying out work on electrically
powered components, or if such compon-
ents come into contact with water, there is a
risk of serious or even fatal injury from elec-
tric shock.
ÜAll work on the electrical equipment must
be carried out by qualified electricians.
ÜTake suitable measures to prevent elec-
trically powered components coming into
contact with water.
ÜBefore moving the device to a different
location, disconnect the mains plug and
empty the condensate tank.
6

WARNING! Risk of infection
The condensate may be contaminated with
pathogens.
ÜNever drink the condensate.
ÜRegularly pump off the condensate.
Avoid leaving condensate in the collect-
ing vessel or in the condensate drain
hose for a longer period of time.
Operating conditions
The device is intended for mobile or station-
ary use indoors, on construction sites, as
well as in garages and storage rooms. The
device operates efficiently:
■At temperatures between +5°C and
+32°C and within a relative air humidity
range of 40% to 100%.
Ideal room temperature range: 20°C to
27°C.
■In enclosed rooms where there is as
little air exchange as possible.
■Placed at close as possible to the
centre of the room.
■When the dry air discharged by the
device is directed towards the humid
part of the room.
Do not use the device under the following
ambient conditions:
■Rooms with a potentially explosive at-
mosphere, or an atmosphere containing
sulphur or salt.
■Atmospheres with high solvent or dust
concentration.
7 Transport and installation
Transport
WARNING! Risk of injury from device
toppling over
ÜTransport the device in an upright posi-
tion and secure it against tipping or slip-
ping.
ÜPlace the device on a level, firm surface.
WARNING! Risk of injury during machine
transport
ÜTo transport the device, use the handle
and the castors.
ÜFor heavy loads, work in teams of two
and use suitable lifting gear.
Procedure
1. Before transporting the device, empty
the condensate tank.
2. Ensure that the drain hose is removed
from the device and that the mains plug
is disconnected.
3. Transport the device to the location of
operation.
4. To transport heavy loads, work in teams
of two and use suitable lifting gear.
5. When the device is at its location of op-
eration, apply the castor brake.
NOTICE!Ensure that the air can circulate
freely around and through the device. Do
not cover the air inlet and outlet open-
ings. The distance between the air outlet
and the air filter must be minimum 1 m.
Unpacking
1. Remove the device from the cardboard
box and place it on the ground.
2. Check the scope of delivery for com-
pleteness.
7

Report any transport damage or incom-
plete delivery to your dealer.
Adjusting handle
1. Release the locking mechanism of the
handle, and pull out the handle to the de-
sired length.
Connecting drain hose
For operation, the supplied drain hose must
always be connected to the device.
ATTENTION! Poor device performance
ÜDo not kink the drain hose.
ÜDo not place any objects on the hose.
Procedure
1. Secure the quick-release coupling of the
drain hose to the connector at the rear of
the device.
2. Lead the drain hose away from the
device and place the free end in an on-
site drain opening or a sufficiently large
collecting vessel (maximum level differ-
ence: 6m).
Stacking devices
For operation or storage, it is permissible to
combine maximum two devices in a stack.
1. Do to this, loosen and fully retract the
handle of the device at the bottom.
2. Place the second device on the first one.
Ensure that the bases of the second
device slot into the recesses in the first
one.
Connecting device to electric power
mains
1. Ensure that the voltage of the power
mains corresponds to that specified in
Technical data.
2. Ensure that the mains socket is suffi-
ciently protected (see in Technical
data).
3. The power socket to which the device is
connected must be equipped with a RC
circuit breaker. This is particularly import-
ant for operation in humid rooms and on
construction sites.
4. Make sure that the mains socket is
earthed and matches the power plug of
the device.
5. Connect the power plug into the mains
socket.
8 Device operation and control
Prior to switching on
1. Make sure that the device is not standing
on a wet ground and ensure that it is in
an upright and stable position.
2. Make sure that the condensate can drain
off properly.
3. If necessary, record the readings of the
operating hours counter.
NOTICE!Before starting the device for
the first time, after transport and after
prolonged storage, leave the device in its
final position for approx. 15 minutes be-
fore switching it on.
Setting target humidity, switching on
device and running it in continuous
mode
1. Set the hygrostat to the desired target
humidity.
2. Set the device switch to position [I].
ðThe green indicator is lit, indicating
that the compressor is running.
ðThe device starts in continuous
mode and runs until the set target
humidity is reached or the auto-
matic defrost function is triggered
(yellow indicator lit).
In continuous mode, condensate is
automatically pumped off.
8

ðThe device switches off automatically
as soon as the set target humidity is
reached. The device remains however
in ready mode. If the target humidity is
again exceeded, the device is automat-
ically restarted.
Pumping off condensate (before moving
device to a different location)
üThe device must not be in defrost mode
(yellow indicator must be off).
1. Set the device switch to position [II].
ðThe condensate pump starts to
pump the condensate through the
drain hose into the drain or the on-
site drain / collecting vessel.
2. As soon as there is no condensate left in
the tank, quickly set the switch to posi-
tion[0], to prevent the pump from run-
ning dry.
Switching device off
1. Set the device switch to position [0].
ðThe indicator in the device switch is off
and the device is shut down.
NOTICE!For planned prolonged stand-
stills, pump off the condensate before
shutting down the device.
9 Maintenance and care
WARNING! Risk of injury from inhaling
harmful substances
ÜDepending on the location of operation,
the components of the device may be-
come contaminated with mould or other
hazardous organisms or substances.
ÜWhen using compressed air to clean the
device and/or the filter, work in a well-
ventilated area, preferably outdoors.
ÜDuring cleaning, wear safety goggles
and a breathing mask.
ATTENTION! Risk of damage to property
ÜDetergents can cause damage to sur-
faces. Use only mild detergents.
ÜUse only approved original spare parts.
Cleaning housing and filter
The cleaning intervals for the device depend
on the actual operating conditions. Check
and clean the device regularly.
If the device is used for drying at construc-
tion sites, it must be checked and cleaned
after each use; the air filter must be re-
placed at least once a week.
1. Switch off the device at the device
switch.
2. Disconnect the power plug.
3. Clean the housing with a damp, lint-free
cloth and a mild detergent. The original
gloss can be restored with polish.
4. Remove the filter holder by the recessed
grip.
5. Take the filter from the housing.
For foam filters: Clean the filter thor-
oughly with a mild detergent and water.
Let the filter dry.
6. Check the drain fitting and the connected
drain hose for damage. Replace dam-
aged components.
7. Insert the new or cleaned filter in the fil-
ter holder.
9

8. Mount the filter holder together with the
filter in the same way as it was installed
at the factory.
Cleaning evaporator
üThe evaporator must be de-iced and
dry.
1. Switch off the device at the device switch
and disconnect the power plug.
2. Remove the housing cover and place it
on the ground.
3. Clean the cooling coils from both sides
with compressed air.
To remove greasy dirt from the cooling coils,
proceed as follows:
1. Clean the condensate tray under the
cooling coils as well as the drain hose.
2. Spray the cooling coils with a mild deter-
gent solution, using a spray bottle.
3. Let the cleaned components dry.
4. Mount the covers in the same way as
they were installed at the factory.
ðYou have now cleaned the evaporator.
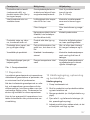
Cleaning pump sump
Depending on the way the device is used,
deposits may form in the pump sump. To
clean the pump sump, proceed as follows:
1. Switch off the device at the device switch
and disconnect the power plug.
2. Remove the housing cover and place it
on the ground.
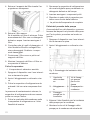
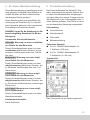
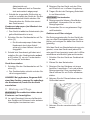
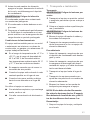
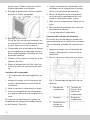
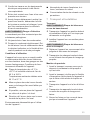
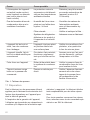
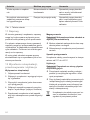
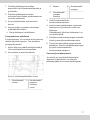
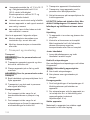
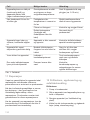
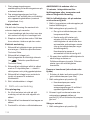
Illustration3: Removing condensate tank
1 Condensate
tray
2 Securing
screws of
condensate
pump
3 Housing 4 Condensate
pump
5 Fixture of
condensate
pump
3. Disconnect the condensate hose from
the condensate pump.
4. Loosen the two securing screws of the
condensate pump and slide the pump to
the side to remove it from the device.
The connecting cable is sufficiently long
to remain attached to the device.
5. Clean the condensate pump with a damp
cloth and a mild detergent.
6. Replace the condensate pump in the
device. Secure the condensate pump
and push the condensate hose into the
pump.
Spare parts and customer service
If you have any queries regarding the
device, or wish to order spare parts, contact
your dealer or HEYLO.
10

10 Troubleshooting
WARNING! Risk of poisoning by refriger-
ant, injury from burns, crushing or elec-
tric shock during troubleshooting
ÜAll work in connection with troubleshoot-
ing and repairs must be carried out by
authorised personnel or the manufac-
turer.
ÜIn the event of a malfunction, switch off
the device and secure it against inadvert-
ent switching on.
ÜBefore starting work, allow hot compon-
ents to cool down.
Faults and malfunctions during
operation
In the event of a fault or malfunction, refer to
the table below. If necessary, contact the
HEYLO Customer Service.
Fault/malfunction Possible cause Remedy
No function available in
continuous or pump mode
(all indicators off)
No or incorrect power
supply
Check the power cord and
mains connection
Device switch is in position
ON (continuous mode), but
device fails to start (all in-
dicators off)
Overpressure protection
tripped due to high ambi-
ent temperature
Wait until the device
switches on automatically
(approx. 5‑15min)
Fan running but there is no
condensate
Humidity or temperature
in room too low
Check the indoor climate
values using a thermo-hy-
grometer
Filter clogged Check filter and clean, if
necessary
Refrigeration system de-
fective (in this case,
evaporator does not be-
come cold)
Contact the manufacturer
Device is noisy and vi-
brates, condensate es-
capes
Device is not in level and
upright position
Check the operating condi-
tions, particularly the in-
stallation site
Device heats up, makes a
lot of noise and dehumidi-
fies poorly
Insufficient air circulation;
function only available
when housing is closed
Ensure that the air can cir-
culate freely; clean evapor-
ator and filter
Water escaping from
device
Leak in condensate sys-
tem
Run condensate pump test
with water and locate leak
Red indicator lit Pump runs dry Check condensate pump
and drain hose for dirt/
blockage
Table1: Troubleshooting table
11

11 Repair
During the warranty period, all repairs must
be performed by persons authorised by the
manufacturer.
After the warranty period has elapsed, cer-
tain repair can be carried out by the device
owner, provided he or she has the neces-
sary skills. Such repairs are not covered by
the manufacturer's warranty.
If you have any queries concerning the re-
pair of your device, contact your dealer or
HEYLO Customer Service.
12 Decommissioning, storage
and disposal
Decommissioning
1. Pump out the condensate.
2. Switch off the device at the device switch
and disconnect the power plug.
3. Clean the device (see Maintenance and
cleaning).
4. Disconnect all incoming and outgoing
lines (discharge and power supply lines).
5. Package the device so that it is protected
against moisture and dust.
Storage
CAUTION! Risk of injury from device top-
pling over
ÜDo not stack more than two devices one
on top of the other.
ÜSecure devices against toppling over.
Procedure
Store the device at a temperature between
5°C and +40°C.
Disposal
CAUTION! Risk of damage to the envir-
onment from hazardous substances
ÜDismantle the device and recycle or dis-
pose of the materials according to the
applicable statutory regulations.
ÜFor the disposal of auxiliary materials
and consumables, observe the informa-
tion in the safety data sheets and the ap-
plicable statutory regulations.
Do not dispose of the device as
household waste.
12

13 EC Declaration of Conformity
EC Declaration of Conformity in accordance with Low Voltage Directive 2014/35/EC An-
nex IV
Manufacturer: DANTHERM
S.p.A
Via Gardesana11 37010- Pastrengo (VR),
ITALY
Product: Dehumidifier Type: DHP20
We herewith declare that the machine conforms to all relevant requirements of the fol-
lowing EU Directives:
■2014/35/EU Low Voltage Directive
■2014/30/EU EMC Directive
■2011/65/EU RoHS Directive
The following harmonised standards have been applied:
EN 60335-1 EN 60335-2-40 EN 55014-1:2017 EN 55014-2:2015
Pastrengo, 2022
Stefano Verani — Member of the Board
13

II. IT - ISTRUZIONI PER L’USO
1 Varianti del prodotto................................................................................................... 14
2 Panoramica del prodotto............................................................................................ 15
3 Panoramica pannello di controllo ............................................................................. 16
4 Nota sulle istruzioni per l’uso.................................................................................... 17
5 Descrizione del prodotto............................................................................................ 17
6 Sicurezza...................................................................................................................... 18
7 Trasporto e installazione............................................................................................ 19
8 Funzionamento e uso ................................................................................................. 20
9 Manutenzione e cura................................................................................................... 21
10 Risoluzione dei guasti ................................................................................................ 23
11 Riparazione.................................................................................................................. 24
12 Disattivazione, stoccaggio e smaltimento................................................................ 24
13 Dichiarazione di conformità CE................................................................................. 25
1 Varianti del prodotto
Nelle presenti istruzioni per l’uso vengono descritte diverse varianti di prodotto. Le funzioni e
l’uso sono fondamentalmente identici. La variante in uso è indicata sulla targhetta del pro-
dotto. Per maggiori informazioni consultare i Dati tecnici/Technical Data.
Variante Caratteristiche principali
DHP20 Maniglia estraibile, manico, 2 ruote di trasporto
14

2 Panoramica del prodotto
Fig.1: Vista fronte e retro
1 Pannello di controllo 2 Incavo per l’impilaggio
3 Ruota di trasporto 4 Piedino di appoggio
5 Griglia dell’aria di alimentazione
con supporto del filtro
6 Maniglia
7 Contatore di ore di funzionamento 8 Avvolgicavo
9 Uscita dell’aria 10 Manico
Tasto/Visualizzazione Descrizione
Contatore di ore di funzio-
namento
Visualizzazione delle ore di funzionamento del dispositivo.
15

3 Panoramica pannello di controllo
Fig.2: Pannello di controllo
1 Interruttore rotativo igrostato 2 Spia di guasto rossa
3 Segnalazione luminosa gialla 4 Interruttore del dispositivo
5 Segnalazione di funzionamento
verde
Tasto/Visualiz-
zazione
Descrizione
Interruttore del di-
spositivo
Accensione/spegnimento del dispositivo:
■Posizione [I]: Funzionamento continuo del dispositivo
■Posizione [II]: Avvio della pompa e scarico della condensa
Segnalazioni lu-
minose
Stato operativo del dispositivo:
■Verde: Il dispositivo è in funzione
■Giallo: Sbrinamento
■Rosso: Guasto, funzionamento interrotto
Interruttore rotati-
vo igrostato
Impostazione dell’umidità dell’aria richiesta. Al raggiungimento di
questa umidità dell’aria, il dispositivo si spegne. Se l’umidità
dell’aria aumenta, il dispositivo si riaccende automaticamente.
16

4 Nota sulle istruzioni per l’uso
Le presenti istruzioni per l’uso (di seguito
istruzioni) consentono al gestore di lavorare
in sicurezza con il deumidificatore (di segui-
to dispositivo).
Le presenti istruzioni non possono essere ri-
prodotte, fotocopiate né distribuite senza
l’autorizzazione scritta di DanthermS.p.A.
(di seguito denominato produttore).
NOTA!Leggere attentamente le istruzioni
prima dell’uso. Conservare le istruzioni.
Consigli di prudenza utilizzati
PERICOLO! Avvertimento di un pericolo
immediato per le persone
Questo consiglio di prudenza avverte di una
situazione di pericolo immediato tale da
provocare gravi lesioni o addirittura la mor-
te.
AVVERTENZA! Avvertimento di un peri-
colo possibile per le persone.
Questo consiglio di prudenza avverte di una
situazione possibilmente pericolosa, tale
da provocare gravi lesioni o addirittura la
morte.
PRUDENZA! Avvertimento di un pericolo
possibile per le persone.
Questo consiglio di prudenza avverte di una
situazione possibilmente pericolosa, tale
da provocare lesioni da lievi a medie.
ATTENZIONE! Avvertimento di un possi-
bile danno materiale.
Questo consiglio di prudenza mette in guar-
dia da un danno alla macchina.
Recapiti del produttore
Vedi retro.
5 Descrizione del prodotto
Il dispositivo deumidifica l’aria dell’ambiente.
Il liquido di condensa risultante viene raccol-
to in un contenitore per la condensa e può
essere condotto attraverso una pompa inter-
na e il tubo flessibile di scarico in un reci-
piente di raccolta o in uno scarico. Il disposi-
tivo è dotato di uno sbrinamento automatico.
Contenuto della fornitura
■Deumidificatore
■Tubo flessibile di scarico
■Tappetino del filtro
■Istruzioni per l’uso
Accessori opzionali
■N. art. 1306539 Adattatore aria di scari-
co per 1tubo flessibile (100mm)
■N. art. 1306553 Adattatore aria di scari-
co per 3tubi flessibili (3x50mm)
Targhetta
La targhetta è applicata sul dispositivo.
17

Destinazione d’uso prevista
Il dispositivo è destinato esclusivamente
all’uso commerciale per la deumidificazione
dell’aria a pressione atmosferica in ambienti
interni chiusi.
La destinazione d’uso prevista comprende
anche il rispetto delle condizioni di funziona-
mento (vedi Condizioni di funzionamento).
Qualsiasi uso diverso o non corrispondente
a quanto indicato è considerato non confor-
me alla destinazione d’uso prevista. L’uso
non conforme alla destinazione d’uso previ-
sta pregiudicherà qualsiasi diritto di garan-
zia.
L’utilizzo del deumidificatore non è consenti-
to alle persone con limitazioni fisiche, sen-
soriali o psichiche né ai bambini.
Ciascun utente deve aver letto e compreso
le presenti istruzioni.
Applicazioni errate prevedibili
Il dispositivo non può essere utilizzato:
■In ambienti non chiusi o all’aperto.
■In ambienti a rischio di esplosione o in
atmosfera aggressiva.
■In ambienti con aria trattata con ozono,
alta concentrazione di solventi ed eleva-
ta presenza di polvere.
■In caso di mancato rispetto delle distan-
ze minime prescritte.
6 Sicurezza
Consigli di prudenza generali
■Sul dispositivo può intervenire un solo
operatore istruito.
■Non sono ammesse modifiche struttura-
li al dispositivo.
■I lavori di manutenzione sul dispositivo
possono essere eseguiti soltanto da
personale adeguatamente qualificato. Il
dispositivo deve essere spento e scolle-
gato dalla rete elettrica.
AVVERTENZA! Pericolo di esplosione,
ustioni e avvelenamento causati dal refri-
gerante.
Il dispositivo funziona con un refrigerante
inodore infiammabile. In caso di utilizzo
scorretto, il refrigerante può provocare
esplosioni, incendi, avvelenamento e lesio-
ni. Il circuito del refrigerante si trova sotto
pressione.
ÜMettere in funzione il dispositivo solo in
ambienti di superficie superiore a 4m2.
ÜNon perforare né dare fuoco al dispositi-
vo.
ÜNon utilizzare alcun oggetto per accele-
rare il processo di sbrinamento.
ÜTutti i lavori sul circuito del refrigerante
possono essere svolti solo dal produttore
o da personale specializzato da lui auto-
rizzato.
ÜEvitare ogni contatto con il refrigerante.
ÜManeggiare i refrigeranti nel rispetto del-
le norme di sicurezza vigenti.
AVVERTENZA! Scossa elettrica dovuta a
tensione elettrica
I lavori sui componenti sotto tensione o l’ac-
qua sui componenti sotto tensione possono
provocare scosse elettriche potenzialmente
letali.
ÜI lavori sugli impianti elettrici sono con-
sentiti solo agli elettricisti specializzati.
ÜEvitare il contatto tra acqua e componen-
ti sotto tensione.
18

ÜPrima di ogni spostamento, spegnere il
dispositivo, staccare la spina e svuotare/
scaricare mediante la pompa il contenito-
re per la condensa.
AVVERTENZA! Rischio di infezione
La condensa può essere contaminata da
sostanze patogene.
ÜNon bere mai la condensa.
ÜScaricare regolarmente con la pompa la
condensa. Evitare di lasciare la conden-
sa nel recipiente di raccolta o nel tubo
flessibile di scarico della condensa per
un lungo periodo di tempo.
Condizioni di funzionamento
Il dispositivo è previsto per l’uso mobile o
fisso in ambienti interni, cantieri, garage e
magazzini. Il dispositivo funziona in modo
efficiente:
■Nell’intervallo di temperatura da +5°C a
+32°C e nell’intervallo di umidità dal
40% al 100% di umidità relativa.
Temperature ambiente comprese tra
20°C e 27°C sono le condizioni ideali.
■In ambienti chiusi con il minor ricambio
d’aria possibile.
■Se il dispositivo è posizionato il più pos-
sibile al centro dell’ambiente.
■L’aria secca emessa è diretta verso la
zona umida dell’ambiente.
Non utilizzare il dispositivo nei seguenti am-
bienti:
■Con atmosfera esplosiva, contenente
olio, zolfo o sale.
■Ad alta concentrazione di solventi o pol-
vere.
7 Trasporto e installazione
Trasporto
AVVERTENZA! Pericolo di lesioni a cau-
sa di rovesciamento
ÜTrasportare il dispositivo in posizione
verticale e assicurarlo contro rovescia-
mento o scivolamento.
ÜCollocare il dispositivo su superfici piane
e stabili.
AVVERTENZA! Pericolo di lesioni duran-
te il trasporto
ÜSpostare il dispositivo con la maniglia e
le ruote di trasporto.
ÜTrasportare i carichi pesanti con due per-
sone o un idoneo ausilio di sollevamen-
to.
Come procedere
1. Prima del trasporto, assicurarsi che il
serbatoio della condensa sia stato svuo-
tato con la pompa.
2. Prima del trasporto, assicurarsi che il tu-
bo flessibile di scarico sia stato rimosso
dal dispositivo e che il cavo di rete sia
staccato.
3. Trasportare il dispositivo nel luogo di uti-
lizzo.
4. Trasportare i dispositivi pesanti in due o
con l’aiuto di ausili di sollevamento.
5. Fissare i freni sulle ruote per assicurare il
dispositivo.
NOTA!L’aria deve poter circolare libera-
mente. Non ostruire le aperture di pas-
saggio dell’aria. Lo spazio libero davanti
all’uscita dell’aria e al filtro dell'aria deve
essere di almeno 1m.
Disimballaggio
1. Estrarre il dispositivo dalla scatola e col-
locarlo sul pavimento.
19

2. Controllare la completezza della fornitu-
ra.
Segnalare immediatamente al rivenditore
specializzato eventuali danni connessi al
trasporto o il contenuto incompleto della
fornitura.
Regolare la maniglia
1. Allentare il blocco della maniglia e tirarla
fino all’altezza desiderata.
Collegare il tubo flessibile di scarico
Il tubo flessibile di scarico fornito in dotazio-
ne deve essere obbligatoriamente collegato
al dispositivo.
ATTENZIONE! Prestazioni insufficienti
del dispositivo
ÜNon piegare il tubo flessibile di scarico.
ÜNon collocare alcun oggetto sul tubo
flessibile di scarico.
Come procedere
1. Fissare il raccordo rapido del tubo flessi-
bile di scarico sulle prese di collegamen-
to che si trovano sul retro del dispositivo.
2. Condurre il tubo flessibile di scarico in
uscita dal dispositivo verso uno scarico o
un recipiente di raccolta di grandezza
sufficiente (dislivello massimo: 6m).
Impilare dispositivi
Sia per il funzionamento che per lo stoccag-
gio possono essere impilati l’uno sull’altro
massimo due dispositivi.
1. Allentare la maniglia del dispositivo che
si trova in basso e arretrare completa-
mente la maniglia.
2. Impilare un dispositivo sull’altro. A tal fi-
ne, collocare il dispositivo superiore negli
incavi di quello inferiore.
Collegamento elettrico
1. Assicurarsi che la tensione di rete sia
corrispondente a quanto prescritto in Da-
ti tecnici/Technical Data.
2. Assicurarsi che la presa e la rete di ali-
mentazione siano sufficientemente in si-
curezza (vedi Dati tecnici/Techni-
cal Data).
3. Assicurarsi che la presa di rete sia sem-
pre assicurata tramite un salvavita, spe-
cialmente in ambienti umidi e in cantiere.
4. Assicurarsi che la presa della corrente
impiegata sia messa a terra e sia adatta
alla spina del dispositivo.
5. Inserire la spina nella presa della corren-
te.
8 Funzionamento e uso
Prima dell’accensione
1. Assicurarsi che il dispositivo non si trovi
su una superficie bagnata e che sia in
posizione verticale e sicura.
2. Assicurarsi che la condensa possa de-
fluire in modo sicuro.
3. Se necessario, tenere un registro dei dati
del contatore di ore di funzionamento.
NOTA!Lasciare a riposo il dispositivo pri-
ma della messa in funzione, dopo il tra-
sporto e dopo un lungo periodo di stoc-
caggio per circa 15 minuti nella sua posi-
zione definitiva.
Regolazione dell’umidità dell’aria,
accensione del dispositivo e
funzionamento continuo
1. Impostare l’interruttore rotativo dell’igro-
stato sull’umidità desiderata.
2. Impostare l’interruttore del dispositivo
sulla posizione[I].
20
La pagina si sta caricando...
La pagina si sta caricando...
La pagina si sta caricando...
La pagina si sta caricando...
La pagina si sta caricando...
La pagina si sta caricando...
La pagina si sta caricando...
La pagina si sta caricando...
La pagina si sta caricando...
La pagina si sta caricando...
La pagina si sta caricando...
La pagina si sta caricando...
La pagina si sta caricando...
La pagina si sta caricando...
La pagina si sta caricando...
La pagina si sta caricando...
La pagina si sta caricando...
La pagina si sta caricando...
La pagina si sta caricando...
La pagina si sta caricando...
La pagina si sta caricando...
La pagina si sta caricando...
La pagina si sta caricando...
La pagina si sta caricando...
La pagina si sta caricando...
La pagina si sta caricando...
La pagina si sta caricando...
La pagina si sta caricando...
La pagina si sta caricando...
La pagina si sta caricando...
La pagina si sta caricando...
La pagina si sta caricando...
La pagina si sta caricando...
La pagina si sta caricando...
La pagina si sta caricando...
La pagina si sta caricando...
La pagina si sta caricando...
La pagina si sta caricando...
La pagina si sta caricando...
La pagina si sta caricando...
La pagina si sta caricando...
La pagina si sta caricando...
La pagina si sta caricando...
La pagina si sta caricando...
La pagina si sta caricando...
La pagina si sta caricando...
La pagina si sta caricando...
La pagina si sta caricando...
La pagina si sta caricando...
La pagina si sta caricando...
La pagina si sta caricando...
La pagina si sta caricando...
La pagina si sta caricando...
La pagina si sta caricando...
La pagina si sta caricando...
La pagina si sta caricando...
La pagina si sta caricando...
La pagina si sta caricando...
La pagina si sta caricando...
La pagina si sta caricando...
La pagina si sta caricando...
La pagina si sta caricando...
La pagina si sta caricando...
La pagina si sta caricando...
La pagina si sta caricando...
La pagina si sta caricando...
La pagina si sta caricando...
La pagina si sta caricando...
La pagina si sta caricando...
La pagina si sta caricando...
La pagina si sta caricando...
La pagina si sta caricando...
La pagina si sta caricando...
La pagina si sta caricando...
La pagina si sta caricando...
La pagina si sta caricando...
La pagina si sta caricando...
La pagina si sta caricando...
La pagina si sta caricando...
La pagina si sta caricando...
La pagina si sta caricando...
La pagina si sta caricando...
La pagina si sta caricando...
La pagina si sta caricando...
La pagina si sta caricando...
La pagina si sta caricando...
La pagina si sta caricando...
La pagina si sta caricando...
La pagina si sta caricando...
La pagina si sta caricando...
La pagina si sta caricando...
La pagina si sta caricando...
La pagina si sta caricando...
La pagina si sta caricando...
La pagina si sta caricando...
La pagina si sta caricando...
La pagina si sta caricando...
La pagina si sta caricando...
La pagina si sta caricando...
La pagina si sta caricando...
La pagina si sta caricando...
La pagina si sta caricando...
La pagina si sta caricando...
La pagina si sta caricando...
La pagina si sta caricando...
La pagina si sta caricando...
La pagina si sta caricando...
La pagina si sta caricando...
La pagina si sta caricando...
La pagina si sta caricando...
La pagina si sta caricando...
La pagina si sta caricando...
La pagina si sta caricando...
La pagina si sta caricando...
La pagina si sta caricando...
La pagina si sta caricando...
La pagina si sta caricando...
La pagina si sta caricando...
La pagina si sta caricando...
La pagina si sta caricando...
La pagina si sta caricando...
La pagina si sta caricando...
La pagina si sta caricando...
La pagina si sta caricando...
-
 1
1
-
 2
2
-
 3
3
-
 4
4
-
 5
5
-
 6
6
-
 7
7
-
 8
8
-
 9
9
-
 10
10
-
 11
11
-
 12
12
-
 13
13
-
 14
14
-
 15
15
-
 16
16
-
 17
17
-
 18
18
-
 19
19
-
 20
20
-
 21
21
-
 22
22
-
 23
23
-
 24
24
-
 25
25
-
 26
26
-
 27
27
-
 28
28
-
 29
29
-
 30
30
-
 31
31
-
 32
32
-
 33
33
-
 34
34
-
 35
35
-
 36
36
-
 37
37
-
 38
38
-
 39
39
-
 40
40
-
 41
41
-
 42
42
-
 43
43
-
 44
44
-
 45
45
-
 46
46
-
 47
47
-
 48
48
-
 49
49
-
 50
50
-
 51
51
-
 52
52
-
 53
53
-
 54
54
-
 55
55
-
 56
56
-
 57
57
-
 58
58
-
 59
59
-
 60
60
-
 61
61
-
 62
62
-
 63
63
-
 64
64
-
 65
65
-
 66
66
-
 67
67
-
 68
68
-
 69
69
-
 70
70
-
 71
71
-
 72
72
-
 73
73
-
 74
74
-
 75
75
-
 76
76
-
 77
77
-
 78
78
-
 79
79
-
 80
80
-
 81
81
-
 82
82
-
 83
83
-
 84
84
-
 85
85
-
 86
86
-
 87
87
-
 88
88
-
 89
89
-
 90
90
-
 91
91
-
 92
92
-
 93
93
-
 94
94
-
 95
95
-
 96
96
-
 97
97
-
 98
98
-
 99
99
-
 100
100
-
 101
101
-
 102
102
-
 103
103
-
 104
104
-
 105
105
-
 106
106
-
 107
107
-
 108
108
-
 109
109
-
 110
110
-
 111
111
-
 112
112
-
 113
113
-
 114
114
-
 115
115
-
 116
116
-
 117
117
-
 118
118
-
 119
119
-
 120
120
-
 121
121
-
 122
122
-
 123
123
-
 124
124
-
 125
125
-
 126
126
-
 127
127
-
 128
128
-
 129
129
-
 130
130
-
 131
131
-
 132
132
-
 133
133
-
 134
134
-
 135
135
-
 136
136
-
 137
137
-
 138
138
-
 139
139
-
 140
140
-
 141
141
-
 142
142
-
 143
143
-
 144
144


Master DHP 20 Condensation Dehumidifier Manuale utente
- Tipo
- Manuale utente
- Questo manuale è adatto anche per
in altre lingue
- español: Master DHP 20 Condensation Dehumidifier Manual de usuario
- Nederlands: Master DHP 20 Condensation Dehumidifier Handleiding
- português: Master DHP 20 Condensation Dehumidifier Manual do usuário
- dansk: Master DHP 20 Condensation Dehumidifier Brugermanual
- eesti: Master DHP 20 Condensation Dehumidifier Kasutusjuhend
- svenska: Master DHP 20 Condensation Dehumidifier Användarmanual
Altri documenti
-
HEYLO KT 20 Manuale utente
-
DeLonghi DEM8.5 Manuale del proprietario
-
Bosch WTYH6791GB Manuale utente
-
-
Siemens WT4HY791GB/03 Manuale utente
-
-
-
-
-