Pepperl+Fuchs FLT-8-H-2800-300/120a Istruzioni per l'uso
- Tipo
- Istruzioni per l'uso

Abmessungen: Dimensions:
Construzione: Dimensiones:
alle Maße in mm
All dimensions are in mm
Tutte le dimensioni sono indicate in mm
Todas las dimensiones son en mm
Anschluss: Connection type:
Allacciamento elettrico: Conexión:
Deutsch English ItaliaEspañol
Sicherheitshinweise:
• Vor der Inbetriebnahme Betriebsanleitung lesen
• Anschluss, Montage und Einstellung nur durch Fachper-
sonal
• Kein Sicherheitsbauteil gemäß EU-Maschinenrichtlinie,
darf nicht für Personenschutz oder NOT-AUS-Funktion
verwendet werden.
Technical data
Technische Daten Dati tecniciDatos técnicos
Security Instructions:
• Read the operating instructions before attempting
commissioning
• Installation, connection and adjustments should only be
undertaken by specialist personnel
• No safety component in accordance with the EU
Machinery Directive. May not be used for protection of
personnel or EMERGENCY-STOP functions.
Avvertenze di sicurezza
• "Prima della messa in funzione, leggere le istruzioni per
l'uso.
• "Gli interventi di collegamento, montaggio e regolazione
devono essere effettuati solo da personale specializzato.
• "Non si tratta di un componente di sicurezza conforme
alla Direttiva UE "Macchine", pertanto non è consentito il
suo utilizzo per la protezione delle persone o per la
funzione di arresto d'emergenza.
Indicación de seguridad:
• Antes de la puesta en marcha leer las indicaciones de
uso.
• La conexión, el montaje y los ajustes deben realizarse
sólo por personal cualificado.
• No es ningún elemento de seguridad según las normas
CE que pueda utilizarse para protección de personas o
como función de paro de emergencia.
0V
+UB
3
BN/2
WH/1
GY/4
YE/5
64
16
37
138
126
36 ø20
52
150
100
2 x ø 4.5
31.3
30.5
A
+Tw-
Flächen-Lichttaster
Area scanner
Sensor óptico de detecciónde superficies
Sensore di superficie a raggi luminosi
FLT-8-H-2800-300/120a
Allgemeine Daten
Tastfeld 300 mm x 500 mm bei Tastweite 2000 mm
Tastbereich min. 100 ... 1200 mm
Tastbereich max. 100 ... 2800 mm
Lichtsender 4 x IRED
Lichtart infrarot, Wechsellicht
Lichtfleckabbildung 43 mm x 43 mm bei 2000 mm
Kennzeichnung CE
Betriebsart Hintergrundausblendung
Kenndaten funktio-
nale Sicherheit
MTTFd 470 a
Gebrauchsdauer (TM) 20 a
Diagnosedeckungsgrad
(DC)
0 %
Anzeigen/Bedienele-
mente
Funktionsanzeige LED rot
Bedienelemente Tastweiteneinsteller
Elektrische Daten
Betriebsspannung UB15 ... 48 V DC
Leerlaufstrom I0100 mA
Leistungsaufnahme P02,5 W
Ausgang
Schaltungsart hell-/dunkelschaltend
Signalausgang 2 PNP, antivalent, kurzschlussfest, offene
Kollektoren
Schaltspannung 48 V DC
Schaltstrom 200 mA
Ansprechzeit 100 ms
Abfallzeit toff 200 ms
Umgebungsbedin-
gungen
Umgebungstemperatur -20 ... 60 °C (-4 ... 140 °F)
Lagertemperatur -20 ... 75 °C (-4 ... 167 °F)
Mechanische Daten
Montagehöhe max. 2800 mm
Schutzart IP65
Anschluss Gerätestecker, Binder Serie 581, 5-polig
Material
Gehäuse Makrolon GV30 schwarz
Lichtaustritt Glasscheibe rot
Masse 320 g
Allgemeine Informa-
tionen
Lieferumfang 2 m Anschlusskabel
Normen- und Richtli-
nienkonformität
Normenkonformität
Produktnorm IEC 60947-5-2
Störaussendung EN 61000-6-3
Normen EN 61000-6-2 ohne EN 61000-4-5, EN
61000-4-11
General specificati-
ons
Detection field 300 mm x 500 mm at 2000 mm sensor range
Detection range min. 100 ... 1200 mm
Detection range max. 100 ... 2800 mm
Light source 4 x IRED
Light type modulated infrared light
Light spot representa-
tion
43 mm x 43 mm at 2000 mm
Marking CE
Operating mode Background suppression
Functional safety
related parameters
MTTFd 470 a
Mission Time (TM) 20 a
Diagnostic Coverage
(DC)
0 %
Indicators/operating
means
Function indicator LED red
Control elements Sensing range adjuster
Electrical specificati-
ons
Operating voltage UB15 ... 48 V DC
No-load supply current
I0
100 mA
Power consumption P02.5 W
Output
Switching type light/dark on
Signal output 2 PNP, complementary, short-circuit protec-
ted, open collectors
Switching voltage 48 V DC
Switching current 200 mA
Response time 100 ms
De-energized delay toff 200 ms
Ambient conditions
Ambient temperature -20 ... 60 °C (-4 ... 140 °F)
Storage temperature -20 ... 75 °C (-4 ... 167 °F)
Mechanical specifi-
cations
Mounting height max. 2800 mm
Degree of protection IP65
Connection Connector, Binder series 581, 5-pin
Material
Housing Makrolon GV30 black
Optical face Glass, red
Mass 320 g
General information
Scope of delivery 2 m Connecting cable
Compliance with
standards and direc-
tives
Standard conformity
Product standard IEC 60947-5-2
Emitted interference EN 61000-6-3
Standards EN 61000-6-2 without EN 61000-4-5, EN
61000-4-11
Dati generali
Campo di rilevamento 300 mm x 500 mm Per ampiezza di scansione
2000 mm
Campo di scansione
min.
100 ... 1200 mm
Campo di scansione
max.
100 ... 2800 mm
Trasmettitore fotoelett-
rico
4 x IRED
Tipo di luce infrarosso, modulata
Immagine del punto
luminoso
43 mm x 43 mm a 2000 mm
Marcatura CE
Modo operativo Soppressione dello sfondo
Parametri Functio-
nal Safety
MTTFd 470 a
Durata del'utilizzo (TM) 20 a
Grado di copertura della
diagnosi (DC)
0 %
Indicatori / Elementi
di comando
Visualizzatore funzioni LED rosso
Elementi di comando Regolatore dell'ampiezza di scansione
Dati elettrici
Tensione di esercizio UB15 ... 48 V DC
Corrente in assenza di
carico I0
100 mA
Consumo (di potenza)
P0
2,5 W
Uscita
Tipo di circuito Commutazione light on/dark on
Uscita del segnale 2 PNP, antivalente., a prova di cortocircuito,
collettori aperti
Tensione di uscita 48 V DC
Corrente di uscita 200 mA
Tempo di reazione 100 ms
Ttempo caduta toff 200 ms
Condizioni ambien-
tali
Temperatura ambiente -20 ... 60 °C (-4 ... 140 °F)
Temperatura di stoccag-
gio
-20 ... 75 °C (-4 ... 167 °F)
Dati meccanici
Altezza dimontaggio max. 2800 mm
Grado di protezione IP65
Collegamento Connettore, fascetta serie 581, 5 pin
Materiale
Custodia Macrolon GV30 nero
Superficie dell'ottica Lastra di vetro, rossa
Peso 320 g
Informazioni generali
Dotazione 2 m Cavo di collegamento
Conformità agli stan-
dard e alle direttive
Standard di conformità
Standard di prodotto IEC 60947-5-2
Emissione di interfe-
renze
EN 61000-6-3
Norme EN 61000-6-2 senza EN 61000-4-5, EN
61000-4-11
Datos generales
Area palpador 300 mm x 500 mm con rango de detección
2000 mm
Rango de detección
mín.
100 ... 1200 mm
Rango de detección
máx.
100 ... 2800 mm
Emisor de luz 4 x IRED
Tipo de luz Infrarrojo, luz alterna
Imagen del haz de luz 43 mm x 43 mm con 2000 mm
Identificación CE
Modo operativo Supresión de fondo
Datos característicos
de seguridad funcio-
nal
MTTFd 470 a
Duración de servicio
(TM)
20 a
Factor de cobertura de
diagnóstico (DC)
0 %
Elementos de indica-
ción y manejo
Indicación de la función LED rojo
Elementos de mando Regulador del rango de detección
Datos eléctricos
Tensión de trabajo UB15 ... 48 V CC
Corriente en vacío I0100 mA
Consumo de potencia
P0
2,5 W
Salida
Tipo de conmutación conmutación claro/oscuro
Señal de salida 2 PNP, antivalente, prot. ctra. cortocircuito,
colectores abiertos
Tensión de conmutación 48 V CC
Corriente de conmuta-
ción
200 mA
Tiempo de respuesta 100 ms
Tiempo de caída toff 200 ms
Condiciones ambien-
tales
Temperatura ambiente -20 ... 60 °C (-4 ... 140 °F)
Temperatura de
almacenaje
-20 ... 75 °C (-4 ... 167 °F)
Datos mecánicos
Altura del montaje máx. 2800 mm
Grado de protección IP65
Conexión Conector macho, serie Binder 581, 5 polos
Material
Carcasa Makrolon GV30 negro
Salida de luz Luneta de vidrio roja
Masa 320 g
Información general
Volumen de suministro 2 m Cable de conexión
Conformidad con
Normas y Directivas
Conformidad con la nor-
mativa
Norma del producto IEC 60947-5-2
Aviso de perturbación EN 61000-6-3
Estándares EN 61000-6-2 sin EN 61000-4-5, EN 61000-
4-11
11/11/2019
Date: DIN A3 -> A7
Part. 419522 45-0639D
Doc.
= Light on
= Dark on

Adressen / Addresses / Adresses / Direcciónes / Indirizzi Adressen / Addresses / Adresses / Direcciónes / Indirizzi
Contact Pepperl+Fuchs GmbH · 68301 Mannheim · Germany · Tel. +49 621 776-1111 · Fax +49 621 776-27-1111 · E-mail: fa-info@de.pepperl-fuchs.com USA Headquarters: Pepperl+Fuchs Inc. · Twinsburg · USA · E-mail: fa-info@us.pepperl-fuchs.com
Worldwide Headquarters: Pepperl+Fuchs GmbH · Mannheim · Germany · E-mail: fa-info@pepperl-fuchs.com Asia Pacific Headquarters: Pepperl+Fuchs Pte Ltd · Singapore · E-mail: fa-info@sg.pepperl-fuchs.com
For more contact-adresses refer to the catalogue or internet: http://www.pepperl-fuchs.com
Zusätzliche Informationen, Kennlinien, Hinweise
Informazioni, caratteristiche, avvertenze aggiuntive
Additional information; characteristic curves, notes
Información adicional, lineas caracteristicas, notas
Die Aktiv-Infrarot-Flächen-Lichttaster der Serie FLT-8 erkennen Personen oder Gegenstände, die sich inner-
halb des definierten Tastfeldes befinden, unabhängig von deren Bewegungszustand und vom Hintergrund.
Die Sensoren erzeugen in der mechanisch einstellbaren Tastfeldebene ein scharf begrenztes räumliches
Tastfeld, das aus drei bzw. vier einzelnen teleskopähnlichen Lichtstrahlen besteht.
Funktionsbeschreibung
Der FLT-8-H dient der Erfassung von Personen und Gegenständen, die in den Tastbereich des Ge-
rätes eintauchen. Das Gerät spricht an, wenn das zu erfassende Objekt von mindestens einem der
Lichtstrahlen getroffen wird. Die Lichtschranke arbeitet als Taster mit Hintergrundausblendung.
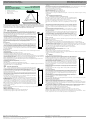
Wenn der Hintergrund (Fußboden, Wand) dauernd oder zeitweise, z. B. durch Nässe, spiegelnd
glänzt, muss der FLT-8-H um mindestens 5° um die Längsachse gedreht montiert werden, um Ein-
spiegelungen zu verhindern (Abbildung).
Alle Lichtschrankenfunktionen des FLT-8-H wie Senderansteuerung, Zeitverhalten Messwerterfas-
sung und Auswertung sowie die Ausgangssteuerung werden von einem Microcontroller-System ge-
steuert bzw. ausgeführt. Dieses System gewährleistet außerdem, dass alle Tastarme unabhängig
voneinander arbeiten, also nicht miteinander konkurrieren oder sich gegenseitig beeinflussen.
Mehrere Sensoren FLT-8-H können so angeordnet sein, dass ihre Tastfelder unmittelbar aneinan-
der angrenzen bzw. sich überlappen, ohne dass es zu Fehlschaltungen kommt.
Die Funktion des Lichttasters wird durch eine rote LED angezeigt, die durch die Frontscheibe sicht-
bar ist.
Montagehinweise
Der Lichttaster wird über 2 Durchgangsbohrungen M5 befestigt. Die Untergrundfläche muss plan
sein, um Gehäuseverzug zu vermeiden. Es empfiehlt sich, die Schrauben mit Federscheiben zu si-
chern, um einer Dejustage vorzubeugen. Wird das Gerät in eine Abdeckung integriert (Hinterwand-
montage), empfiehlt sich die Verwendung unserer Montageplatte, die als Zubehör erhältlich ist.
Wenn der Hintergrund (Fußboden, Wand) dauernd oder- zeitweise, z.B. durch Nässe, spiegelnd
glänzt, muss das Gerät um > 5° um die Längsachse gedreht montiert werden, um Einspiegelungen
zu verhindern (Abbildung).
Montage im Freien
Der Sensor muss vor Regen und Spritzwasser geschützt werden. Eventuell ist eine Abdeckung zu installieren.
Justage-/Einstellung
Einstellung der Tastweite:
1)Taster auf den Hintergrund (z.B. Fußboden) ausrichten.
2)Tastweitenregler gegen den Uhrzeigersinn drehen bis die rote LED aufleuchtet.
3)Tastweitenregler vorsichtig im Uhrzeigersinn drehen bis die Anzeige LED gerade erlischt.
4)Um eine stabile Einstellung zu erzielen, empfiehlt es sich, den Tastweitenregler nach Schritt 3 um eine volle Umdrehung
gegen den Uhrzeigersinn zu drehen.
Nach dieser Einstellung sollte mit einem hellen (weißen) Objekt die Einstellung überprüft werden (rote LED leuchtet auf).
Dabei ist unbedingt darauf zu achten, dass Sie mindestens einen Lichtfleck vollständig abdecken.
Sollte das Gerät auf keinen feststehenden Hintergrund ausgerichtet werden sind folgende Einstellungen vorzunehmen:
1)Taster auf das Tastgut ausrichten
2)Tastweitenregler bis Linksanschlag drehen
3)Tastweitenregler nach rechts drehen bis LED gerade aufleuchtet
4)Tastgut entfernen
5)LED-Anzeige erlischt (veränderliche Hintergrundeinflüsse beachten!)
Die Ausrichtung des Tastfeldes sollte unter Zuhilfenahme der Ausrichthilfe FLT-...-AR (Zubehör) erfolgen. Damit kann das
Tastfeld durch sichtbares rotes Licht abgebildet werden.
Functional specifications
The FLT-8-H serves to detect persons and objects as they enter the detection range of the device.
The device responds at the moment the object to be detected is hit by at least one of the light beams.
The light beam switch functions as a sensing device with background suppression.
In case the background (floor, wall) produces permanent or temporary sparkling reflections, e. g. due
to wetness, the FLT-8-H needs to be turned by at least 5°around its longitudinal axis during instal-
lation to prevent mirror effects (fig).
All light beam switch functions of the FLT-8-H such as transmitter control, time behavior, data acqui-
sition and evaluation as well as output control are controlled or executed by a microcontroller sys-
tem. This system also enables all sensing arms to function independently from each other, that is to
avoid conflicts and interferences.
Several FLT-8-H sensors can be arranged in such a way that their scanned areas can border on
each other directly or overlap without any switching error occurring.
The light scanner function is displayed by a red LED which can be observed through the front disc.
Assembly instructions
The light scanner is attached by means of two M5 pass-through mounting holes. To prevent the
casing from distortion, the foundation needs to be even. In order to prevent maladjustment, all
screws should be secured using spring washers. In case the device is integrated into a covering (re-
ar wall assembly) we recommend that you use our assembly plate which is available as an optional
item.
In case the background (floor, wall) produces permanent or temporary sparkling reflections, e. g. due
to wetness the device needs to be turned by at least > 5°around its longitudinal axis during installa-
tion to prevent mirror effects (fig).
Outdoor assembly
The sensor needs to be protected from rain and splash water. A covering may be necessary to be installed.
Alignment / adjustment
Adjustment of detection range:
1)Align sensor with the background (e. g. floor).
2)Turn detection range regulator counter-clockwise until red LED lights up.
3)Turn detection range regulator carefully clockwise until LED goes off.
4)In order to reach a stable adjustment, the detection range regulator should be turned counter-clockwise one full revolution
after step 3.
After this operation, the function of the current adjustment should be checked using a bright (white) object (red LED lights
up). In doing so it is vital that you cover at least one light spot completely.
In case the device is aligned with no fixed background, the following adjustments need to be made:
1)Orient sensor towards to the sensor material.
2)Turn detection range regulator to the left limit stop.
3)Turn detection range regulator right until LED flashes up.
4)Remove sensor material.
5)LED goes off (please mind variable background factors!)
The adjustment of the scanning area should be effected using FLT-...-AR (accessories). This allows to image the scanning
area by red light.
Descripción de las funciones
Descripción de las funciones FLT-8-H (con supresión de fondo)
El FLT-8-H sirve para la detección de personas y objetos, que entran en el rango de detección
del aparato. El aparato responde, cuando un objeto a detectar es alcanzado por un mínimo un
haz de luz. La barrera óptica por reflexión directa con supresión de fondo.
Si un fondo (suelo, pared) brilla de forma permanente o a veces, p.ej. debido a la humedad,
debe montarse el FLT-8-H inclinado 5° mínimo de su eje longitudinal, para evitar reflejos (Figu-
ra).
Todas las funciones de las barreras ópticas del FLT-8-H, como control de emisor, comportami-
ento temporal de la detección de medición y evaluación, así como el control de salida, están
realizadas y controladas por un sistema microprocesador. Este sistema permite además, que
todos los haces de detección puedan trabajar independientemente, es decir, no se influencian
entre si.
Se pueden montar varios sensores FLT-8-H de forma que sus áreas de detección se sobrepon-
gan, sin que esto produzca conmutaciones erróneas.
La función del palpador óptico se indica a través de un LED rojo visible por la ventana frontal.
Indicaciones de montaje
Se fija la fibra óptica a través de los 2 agujeros pasantes M5. La base debe ser plana para evitar
el desplazamiento de la carcasa. Se recomienda asegurar los tornillos con arandelas glover
para prevenir un desajuste. Si se integra el aparato en una cubierta (montaje en pared trasera),
se recomienda la utilización de nuestra placa de montaje, obtenible como accesorio.
Si un fondo (suelo, pared) brilla de forma permanente o a veces, p.ej. debido a la humedad,
debe montarse el FLT-8-H inclinado 5° mínimo de su eje longitudinal, para evitar reflejos (Figu-
ra).
Montaje en el exterior
El sensor debe estar protegido contra lluvia y salpicaduras de agua. .Además puede instalarse una protección
Ajustes
Ajuste del rango de detección:
1)Situar el palpador enfocando al fondo (p.ej. suelo)
2)Girar en sentido contrario a las agujas del reloj el regulador del palpador hasta que se enciende el LED rojo.
3)Girar con cuidado en sentido a las agujas del reloj el regulador del palpador hasta que se apague el indicador LED.
4)Para obtener un ajuste estable, se recomienda girar el regulador del palpador después del paso 3 en una vuelta completa
en sentido contrario a las agujas del reloj.
Después de este ajuste debería comprobarse el ajuste del objeto con un objeto claro (blanco) (LED rojo se enciende).En-
tonces debe observarse que como mínimo un punto de luz este completamente cubierto.
Si el aparato no esta ajustado a ningún fondo fijo deberían realizarse los ajustes siguientes:
1)Ajustar el palpador al objeto
2)Reg. del rango de detec. girar hasta tope izquierdo
3)Reg. del rango de detec. girar a la derecha hasta encenderse el LED
4)Retirar el objeto a detectar
5)Display por LED se apaga (observar influencias de fondo cambiantes!)
La alineación del área de detección debería realizarse con la ayuda de alineación FLT-...-AR (Accesorios). Con ello puede
mostrarse el área de detección mediante luz roja visible.
Funzione
Funzione di FLT-8-H (soppressione dello sfondo)
Il modello FLT-8-H serve a rilevare persone e oggetti, che finiscono nello spazio di rilevamento
dell'apparecchio, il quale interviene quando l'oggetto da esaminare viene colpito da almeno uno
dei raggi. La fotocellula funziona come un sensore a tasteggio con soppressione dello sfondo.
Se lo sfondo (pavimento, parete) luccica creando una riflessione continua o a intervalli (per es.,
a causa di umidità), occorre installare FLT-8-H ruotandolo di almeno 5° rispetto all'asse longi-
tudinale per evitare eventuali riflessioni (figura).
Tutte le funzioni di FLT-8-H come il comando del trasmettitore, la temporizzazione, il rilevamen-
to dei valori misurati e il controllo, nonché il comando dell'uscita, vengono gestite ed eseguite
da un sistema a microcontrollore. Tale sistema assicura inoltre che tutti i bracci di rilevamento
funzionino in modo indipendente, ossia che non siano in concorrenza tra di loro o non interfe-
riscano reciprocamente.
Gli altri sensori FLT-8-H si possono disporre in modo che i loro campi di rilevamento siano im-
mediatamente adiacenti uno accanto all'altro o si sovrappongano senza che si verifichino delle
commutazioni errate.
Il funzionamento della fotocellula a tasteggio è indicato da una spia LED rossa visibile attraver-
so il vetrino frontale.
Indicazioni di installazione
La fotocellula a tasteggio viene fissata utilizzando due fori passanti M5. La superficie di fondo
deve essere piana per evitare uno spostamento dell'involucro. Si consiglia di fissare le viti con
delle rosette elastiche per evitare un disallineamento. Se l'apparecchio è integrato sotto una co-
pertura (montaggio dietro parete), si consiglia di utilizzare la nostra piastra di montaggio dispo-
nibile come accessorio.
Se lo sfondo (pavimento, parete) luccica creando una riflessione continua o a intervalli (per es.,
a causa di umidità), occorre installare l'apparecchio ruotandolo di un angolo inferiore a 5° ris-
petto all'asse longitudinale per evitare eventuali riflessioni (figura).
Installazione all'aperto
Il sensore va protetto dalla pioggia e da eventuali spruzzi d'acqua. Eventualmente, occorre installarlo sotto una copertura.
Impostazione di precisione/regolazione
Regolazione dell'ampiezza di esplorazione
1)Allineare il sensore rispetto allo sfondo di riferimento (per es., con il pavimento).
2)Ruotare il regolatore dell'ampiezza di esplorazione in senso antiorario, finché non si accende il LED rosso..
3)Ruotare il regolatore dell'ampiezza di esplorazione in senso orario, finché l'indicazione del LED non si sta per spegnere.
4)Per effettuare una regolazione stabile, si raccomanda dopo la fase 3 di ruotare il regolatore dell'ampiezza di esplorazione,
compiendo un giro completo in senso antiorario.
Dopo aver effettuato tale regolazione, è opportuno controllare l'impostazione con un oggetto chiaro (bianco) (il LED rosso
deve essere acceso). A riguardo occorre assolutamente fare attenzione a coprire completamente almeno uno spot.
Se l'apparecchio non viene allineato rispetto a uno sfondo fisso, vanno effettuate le seguenti regolazioni.
1)Allineare il sensore a tasteggio rispetto al materiale da esaminare.
2)Ruotare a sinistra fino in fondo il regolatore dell'ampiezza di esplorazione.
3)Ruotare a destra il regolatore dell'ampiezza di esplorazione, finché il LED non si sta per accendere.
4)Rimuovere il materiale da esaminare.
5)L'indicatore LED si spegne (fare attenzione ad eventuali interferenze dello sfondo, che possono variare!).
È opportuno effettuare l'allineamento del campo di rilevamento con l'ausilio dell'apposito sistema di controllo FLT-...-AR (ac-
cessorio). In questo modo con la luce rossa visibile si può delineare il campo di rilevamento.
Tastfeldgröße
Dimensions du champs détection
Dimensioni di campo registrazione
Size of detection field
Dimensiónes de campo detección
> 200 mm
B
A D
1500 mm 380 mm x 220 mm 30 mm x 30 mm
1800 mm 450 mm x 270 mm 35 mm x 35 mm
2000 mm 500 mm x 300 mm 43 mm x 43 mm
2500 mm 610 mm x 370 mm 57 mm x 57 mm
2800 mm 685 mm x 415 mm 64 mm x 64 mm
A
B
C
D
A: Tastfeldgröße, detection field size
B: eingestellte Tastweite, adjusted sensing range
C: Hintergrund, background
D: Lichtfleckgröße, light spot size
~200
2000
~5˚
0˚
~200
2000
~5˚
0˚
~200
2000
~5˚
0˚
~200
2000
~5˚
0˚
-
 1
1
-
 2
2


Pepperl+Fuchs FLT-8-H-2800-300/120a Istruzioni per l'uso
- Tipo
- Istruzioni per l'uso
in altre lingue
Documenti correlati
-
Pepperl+Fuchs LT2-8-HS-6000/49/115 Istruzioni per l'uso
-
-
-
-
-