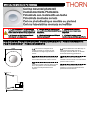
Thorn SensaLite / SWITCHLITE MRE SLDD PC Guida d'installazione
- Categoria
- Illuminazione a soffitto
- Tipo
- Guida d'installazione

SWITCHLITE MRE SLDD PC 96239828
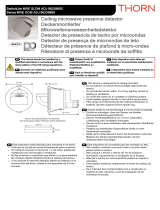
Ceiling mounted photocell
Deckenmontierte Photozelle
Fotocélula con instalación en techo
Fotocélula montada no teto
Cellule photoélectrique montée au plafond
Cellula fotoelettrica montata sul soffitto
ENThis device should be installed by a
qualified electrician in accordance with the
latest edition of the IEE wiring regulations.
PTSomente um eletricista qualificado
deve instalar este dispositivo.
DEDieses Gerät ist ausschließlich
von qualifizierten Elektrofachkräften zu
installieren.
FRSeul un électricien qualifié peut
installer ce dispositif.
ESSomente um eletricista
qualificado deve instalar este
dispositivo.
ESIl dispositivo deve essere
installato da un elettricista qualificato.
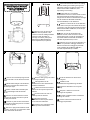
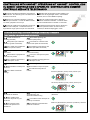
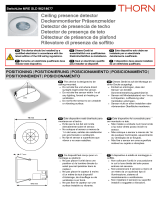
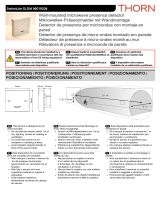
POSITIONING |POSITIONIERUNG |POSICIONAMIENTO |POSICIONAMENTO |
POSITIONNEMENT |POSICIONAMENTO
76 mm76 mm
ENThis device is designed to be
ceiling-mounted. Do not site the unit
where direct sunlight might enter the
sensor.
ESEste dispositivo está diseñado para
montarse en el techo. Evite que la luz del
sol incida directamente sobre el sensor.
FRCe dispositif est conçu pour un
montage au plafond. Ne pas placer l'unité
dans une position où la lumière directe
du soleil pourrait pénétrer dans le
capteur.
DEDieses Gerät ist auf die Montage an
einer Decke ausgelegt. Einheit so
anbringen, dass der Sensor vor direkter
Sonneneinstrahlung geschützt ist.
PTEste dispositivo foi concebido para
ser montado no teto. Não instale a
unidade num local onde a luz solar direta
possa incidir no sensor.
ITIl dispositivo è adatto al montaggio a
soffitto. Non collocare l'unità in una
posizione in cui la luce diretta del sole
possa entrare nel sensore.
3.7 mm
64.8 mm64.8 mm

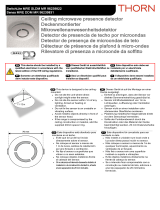
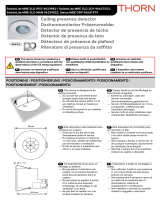
INSTALLATION |INSTALACIÓN |INSTALLAZIONE |INSTALAÇÃO
ENBe careful bending springs when
mounting unit.
PTTenha cuidado para não dobrar
as molas ao montar a unidade.
DEVorsicht beim Biegen von Federn bei
der Montage der Einheit.
FRFaire attention à la compression des
ressorts lors du montage de l'unité.
ESDoble los muelles con cuidado al
montar la unidad.
ITPiegare le molle con cautela
durante il montaggio dell'unità.
Flush fixing | Einbau Montage |
Montaje a ras | Montagem encastrada |
Fixation encastrée | Montaggio a filo
1
ITPraticare un foro di 64 mm di
diametro nel soffitto e far passare il
cablaggio esistente.
ENDrill a 64mm diameter hole in ceiling and
feed cables through.
DEÖffnung mit Durchmesser von 64 mm in die
Decke bohren und vorhandene Kabel
hindurchführen.
ESTaladre un orificio de 64mm de diámetro
en el techo y pase por él los cables.
PTFaça um furo de 64 mm de diámetro no teto
e passe por ele os fios do circuito.
FRPercer un trou de 64mm de diamètre dans
le plafond et faire passer le câblage existant par
ce dernier.
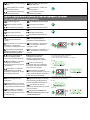
2 3
ENPush the wiring plug into socket on
the top of detector.
DELeitungsstecker in die Steckbuchse
an der Oberseite des Detektors einstecken.
ESInserte los bornes de conexión en la
toma de la parte superior del detector.
PTEncaixe a ficha do cabo na parte
superior do detector.
FRPousser la fiche de raccordement
dans la prise située sur le dessus du
détecteur.
ITInserire il cavo nella presa sulla parte
superiore del rilevatore.
ENBend the springs up and push
detector through hole in ceiling. When
fully inserted the springs snap back to
hold the device in place.
ESDoble los muelles hacia arriba e
introduzca el detector por el orificio del
techo. Cuando esté totalmente
introducido, los muelles saltan para
mantener el dispositivo en su lugar.
FRReplier les ressorts vers le haut et
pousser le détecteur à travers le trou
dans le plafond. Quand les ressorts
sont complètement insérés, ils se
remettent dans leur position initiale
pour maintenir le dispositif en place.
DEFedern nach oben biegen und Detektor
durch die Öffnung in der Decke schieben.
Sobald der Detektor vollständig eingeschoben
ist, schnappen die Federn zurück und halten das
Gerät fest an Ort und Stelle.
PTDobre as molas para cima e empurre o
detector através do furo no teto. Ao serem
totalmente inseridas as molas saltam de volta
para manter o dispositivo no lugar.
ITPiegare le molle verso l'alto e inserire il
rilevatore nel foro sul soffitto. Una volta inserito,
le molle si riassestano fissando il dispositivo in
posizione.

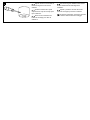
Surface fixing | Oberflächenmontage |
Ajuste de superficie | Montagem
aparente | Fixation apparente |
Montaggio superficiale
1
FRPercer un trou de 30mm de
diamètre dans le plafond. Faire
passer le circuit de câblage existant
à travers et fixer le boîtier de
montage en surface (code pièce
SwitchLite KIT MSF SLDM ADJ,
vendu séparément) au plafond.
ENDrill a 30mm diameter hole in the ceiling.
Feed the existing circuit wiring through and
attach the surface mounting box (part code
SwitchLite KIT MSF SLDM ADJ, sold
separately) to the ceiling.
DEBohren Sie ein Loch mit dem
Durchmesser von 30 mm in die Decke. Führen
Sie die bestehenden Kabel hindurch und
bringen Sie die Dose zur Oberflächenmontage
(Art.-Nr. SwitchLite KIT MSF SLDM ADJ,
separat erhältlich) an der Decke an.
ESTaladre un orificio de 30mm de diámetro
en el techo. Pase por él los cables del circuito
y coloque la caja de montaje (código de pieza
SwitchLite KIT MSF SLDM ADJ; se vende por
separado) en el techo.
PTFaça um furo de 30 milímetros de
diâmetro no teto. Passe os fios do circuito
através dele e fixe a caixa de montagem na
superficie SwitchLite KIT MSF SLDM ADJ.
Vendida separadamente) no teto.
ITPraticare un foro di 30 mm di diametro sul
soffitto. Far passare il cablaggio esistente e
fissare la scatola di montaggio superficiale
(codice SwitchLite KIT MSF SLDM ADJ,
venduta separatamente) al soffitto.
2 3 4
ENRemove or bend both springs so that
they do not stick out over the sensor head
bezel.
DEBeide Federn biegen oder entfernen,
sodass sie nicht über den Rahmen des
Sensorkopfs ragen.
ESRetire o doble ambos muelles para
que no sobresalgan del cabezal del
sensor.
PTRemova ou dobre ambas as molas
para que não fiquem fora sobre o painel
da cabeça do sensor.
FREnlever ou plier les deux ressorts de
sorte qu'ils ne ressortent pas sur la lunette
de la tête du capteur.
ITRimuove o piegare entrambe le molle
per fare in modo che non fuoriescano dalla
ghiera della testa del sensore.
ENPush the wiring plug into socket
on the top of detector.
DELeitungsstecker in die
Steckbuchse an der Oberseite des
Detektors einstecken.
ESInserte los bornes de conexión
en la toma de la parte superior del
detector.
PTEncaixe a ficha do cabo na
parte superior do detector.
FRPousser la fiche de
raccordement dans la prise située
sur le dessus du détecteur.
ITInserire il cavo nella presa sulla
parte superiore del rilevatore.
ENPush the detector into the surface
mounting box.
DEDetektor in die
Oberflächenmontagehalterung schieben.
ESIntroduzca el detector en la caja de
montaje.
PTEmpurre o detector na caixa de
montagem da superfície.
FRPousser le détecteur dans le boîtier de
montage en surface.
ITInserire il rilevatore nella scatola di
montaggio superficiale.

5ENTighten screw on the outside of
the mounting box to secure the
detector.
ESApriete el tornillo de la parte
superior de la caja de montaje para
fijar el detector.
FRSerrer la vis à l'extérieur du
boîtier de montage pour fixer le
détecteur.
DEZur Sicherung des Detektors Schrauben
an der Außenseite der Montagedose
anziehen.
PTAperte o parafuso do lado de fora da
caixa de montagem para fixar o detector.
ITPer fissare il rilevatore, serrare la vite nella
parte esterna della scatola di montaggio.

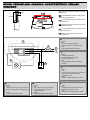
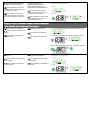
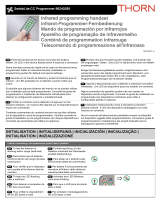
WIRING |VERKABELUNG |CABLEADO |CHICOTE ELÉTRICO |CÂBLAGE |
CABLAGGIO
6 mm
35 mm
ENThe cable clamp must clamp the outer
sheath only.
DEDie Kabelklemme darf nur die äußere
Abschirmung einklemmen.
ESLa abrazadera para cables solo debe
sujetar la funda.
PTO grampo do cabo deve fixar apenas o
revestimento externo.
FRLe serre-câbles doit uniquement serrer
la gaine extérieure.
ITApplica il morsetto alla sola guaina
esterna del cavo.
3
2
1
NC •
COM •
NO •
• L
• N
• SW
4
5
6
ENKey
1. Neutral
2. Live
3. 10A circuit protection if required
4. Momentary push-to-make switch, 230V
5. Load
6. Insert link wire between COM and L
DEZeichenerklärung
1. Neutral
2. Netzspannungsführend
3. 10A circuit protection if required
4. Moment-Taster, 230 V
5. Last
6. Verbindungsdraht zwischen COM und L
einführen
ESExplicación
1. Neutro
2. Live
3. 10A protección de circuito, en caso necesario
4. Interruptor con botón de activación
momentáneo, 230V
5. Carga
6. Inserte un cable de enlace entre COM yL
PTLegenda
1. Neutro
2. Fase
3. 10A proteção do circuito, caso necessário
4. Interruptor de pressão momentânea, 230
V
5. Carga
6. Insira um jumper entre COM e L
FRLégende
1. Neutre
2. Plus
3. 10A protection du circuit si nécessaire
4. Commutateur poussoir à marche
momentané, 230V
5. Charge
6. Insérez le fil de liaison entre COM et L
ITLeggenda
1. Neutro
2. Live
3. 10A protezione del circuito, se necessario
4. Interruttore temporaneo, 230 V
5. Carico
6. Inserire il cavo di collegamento fra COM e L

CONTROLLING WITH HANDSET |STEUERUNG MIT HANDSET |CONTROL CON
EL MANDO |CONTROLE COM O APARELHO |CONTRÔLE AVEC COMBINÉ |
CONTROLLO MEDIANTE TELECOMANDO
ENPoint the handset at the detector and press the
buttons shown.The detector gives a red flash when it
receives a command.
ESApunte con el mando al detector y pulse los
botones que se indican. Cuando el detector recibe
una orden, parpadea una luz roja.
FRPointer le combiné vers le détecteur et appuyer
sur les boutons indiqués. Le détecteur émet un
clignotement rouge quand il reçoit une commande.
DERichten Sie das Handset auf den Detektor und
drücken Sie die angezeigten Tasten. Der Detektor
blinkt rot, wenn er einen Befehl empfängt.
PTAponte o telecomando para o detector e
pressione os botões mostrados. O detector emite
uma luz vermelha flash ao receber um comando.
ITIndirizzare il telecomando verso il rilevatore e
premere i pulsanti indicati. Quando riceve un
comando, il rilevatore lampeggia in rosso.
Initialisation | Initialisierung | Inicialización | Inicialização | Initialisation | Inizializzazione
* default | Voreinstellung | valor predeterminado | padrão | défaut | predefinito
ENTo test the detector is
working (walk test)
ESPara probar que el detector
funciona (prueba caminando)
FRPour vérifier que le détecteur
fonctionne (test de marche)
DEZur Funktionsprüfung des
Detektors (Gehprüfung)
PTPara testar se o detector está
funcionando (teste de caminhada)
ITPer testare il funzionamento del
rilevatore (test della camminata)
ENTo stop the LED flashing
after a test
ESPara detener el parpadeo de
LED tras una prueba
FRPour arrêter le clignotement
de la LED après un test
DEAnhalten des LED-Blinkens
nach einer Prüfung
PTPara que o LED pare de piscar
após o teste
ITPer arrestare il lampeggiamento
del LED dopo un test
ð
ENTo set the burn-in time
ESPara establecer el tiempo de
«burn-in»
FRPour définir la durée de
rodage
DEEinstellung der Einbrennzeit
PTPara definir o tempo de ajuste
ITPer definire il tempo di test
iniziale
*0 hours | Stunden | horas | Horas | heures | ore
50 hours | Stunden | horas | Horas | heures | ore
ð
100 hours | Stunden | horas | Horas | heures | ore
ð
ENTo switch between presence
and absence detection
ENPara cambiar entre
detección de presencia y de
ausencia
FRPour basculer entre
détection de présence et
d'absence
DESchaltung zwischen
Anwesenheits- und
Abwesenheitserkennung
PTPara alternar entre detecção de
presença e ausência
ITPer alternare il rilevamento di
presenza e assenza
* Presence | Präsenz | Presencia | Presença | Présence
| Presenza
Absence | Abwesenheit | Ausencia | Ausência | Assenza
ð

ENTo reset the unit to the factory
defaults
ESPara restablecer los valores
de fábrica de la unidad
FRPour rétablir les valeurs par
défaut d'usine de l'unité
DEZurücksetzen der Einheit auf
Werkseinstellungen
PTPara retornar a unidade aos
padrões de fábrica
ITPer riportare l'unità alle
impostazioni di fabbrica
Light levels | Lichtpegel | Niveles de luz | Níveis de iluminação | Niveaux de lumière | Livelli della luce
* default | Voreinstellung | valor predeterminado | padrão | défaut | predefinito
ENTo turn the lights on
ESPara encender las luces.
FRPour allumer les lumières.
DE UmdieBeleuchtungeinzuschalten.
PTPara ligar a iluminação.
ITPer accendere l'illuminazione.
ENTo turn the lights off
ESPara apagar las luces.
FRPour éteindre les lumières.
DE UmdieBeleuchtungauszuschalten.
PTDesligar a iluminação.
ITPer spegnere l'illuminazione.
ENTo cancel an "on" or "off"
override and resume normal
operation
ESPara cancelar una anulación de
«encendido» o «apagado» y
reanudar el funcionamiento normal
FR Pourannulerunecommandede
dépassement«marche»ou«arrêt»et
reprendreunfonctionnementnormal
DEAbbrechen einer „An-“oder
„Aus“" Überschreibung und
Aufnahme des Normalbetriebs
PTPara cancelar o comando de
"ligar" ou "desligar" e reiniciar a
operação normal
ITPer annullare un override "on" o
"off" e riprendere il funzionamento
normale
ð ð
ENTo set a target light level
(where the lighting system
responds to ambient light level)
ESPara establecer un nivel de
luz objetivo (el sistema de
iluminación responde al nivel de
luz ambiente)
FRPour définir un niveau de
luminosité cible (le système
d'éclairage réagissant au niveau
de luminosité ambiante)
DEEinstellung eines Ziel-
Lichtpegels (an dem das
Beleuchtungssystem auf den
Umgebungslichtpegel reagiert)
PTPara um nível-alvo de
iluminação (em que o sistema de
iluminação responde ao nível de
iluminação do ambiente)
ITPer impostare un livello di
illuminazione di destinazione (in cui il
sistema di illuminazione risponda al
livello della luce ambientale)
2 = Low | Niedrig | Bajo | Baixo | Faible | Basso
7 = High | Hoch | Alto | Alto | Haut | Alto
9 = None | Keine/r | Ninguno | Nenhum | Aucun | Nessuno
2, 5, 7:
4, *6, 9:
ð
ENTo set an ambient light level
above which lights can't be
switched on
ESPara establecer un nivel de
luz ambiente por encima del cual
no se puedan encender las luces
FRPour définir un niveau de
luminosité ambiante au-dessus
duquel les éclairages ne peuvent
pas être allumés.
DEEinstellung eines
Umgebungslichtpegels, bei dessen
Überschreitung die Beleuchtung
nicht eingeschaltet werden kann
PTPara definir um nível de
iluminação ambiente em que a luzes
não se acendam
IT Perimpostareunlivellodellaluce
ambientalealdisopradelqualenonsiapiù
possibileaccendereleluci
2 = Low | Niedrig | Bajo | Baixo | Faible | Basso
9 = High | Hoch | Alto | Alto | Haut | Alto
2, 5, 7:
4, 6, *9:
ð

ENTo set an ambient light level
above which lights switch off
ESPara establecer un nivel de
luz ambiente por encima del cual
se apaguen las luces
FRPour définir un niveau de
luminosité ambiante au-dessus
duquel les éclairages s'éteignent.
DEEinstellung eines
Umgebungslichtpegels, bei
dessen Überschreitung die
Beleuchtung ausgeschaltet wird
PTPara definir um nível de
iluminação ambiente acima do
qual as luzes se apagam
ITPer impostare un livello della
luce ambientale al di sopra del
quale spegnere le luci
2 = Low | Niedrig | Bajo | Baixo | Faible | Basso
9 = High | Hoch | Alto | Alto | Haut | Alto
2, 5, 7:
4, 6, *9:
ð
Detection | Erkennung | Detección | Detecção | Détection | Rilevamento
* default | Voreinstellung | valor predeterminado | padrão | défaut | predefinito
ENTo set the time-out period
ESPara establecer el tiempo de
espera
FRPour définir la période de
temporisation
DEEinstellung der Timeout-
Dauer
PTPara definir o intervalo de
tempo
ITPer impostare il periodo di
timeout
1, 10, *20 minutes | Minuten | minutos | minutos | minuti:
5, 15, 30 minutes | Minuten | minutos | minutos | minuti:
ð
10 seconds | Sekunden | segundos | secondes | secondi:
ð
ENTo change the sensitivity to
movement
ESPara cambiar la sensibilidad
al movimiento
FRPour modifier la sensibilité
au mouvement
DEÄnderung der
Bewegungsempfindlichkeit
PTPara alterar a sensibilidade
ao movimento
ITPer modificare la sensibilità al
movimento
1 = Low | Niedrig | Bajo | Baixo | Faible | Basso
9 = High | Hoch | Alto | Alto | Haut | Alto
1, 5, *9:
3, 6, 8:
ð

TROUBLESHOOTING |SOLUCIÓN DE PROBLEMAS |SOLUÇÃO DE PROBLEMAS
|FEHLERBEHUNG |DÉPANNAGE |RISOLUZIONE DEI PROBLEMI
ENWhat if the load does not come on? What if the load does not turn off? What if the load cycles on and off?
lCheck that the live supply to the circuit is good.
Strap across the L and LIVE OUT terminal to turn
the load on.
lIf the supply and wiring are good, increase the
Lux On level setting to turn on at a higher
ambient natural light level.
lIncrease the Lux Off level setting to
turn on at lower ambient natural
light level.
lIncrease the difference between
the Lux On and Lux Off levels.
lIncrease the Timeout setting.
DEWas passiert, wenn die Last nicht zustande
kommt?
Was passiert, wenn die Last nicht
abnimmt?
Was, wenn die Lastzyklen ein und
aus?
lVergewissern Sie sich, dass die
netzspannungsführenden Leitungen an den
Schaltkreis intakt sind. Schnallen Sie die
Anschlüsse L und LIVE OUT, um die Last
einzuschalten.
lWenn Versorgung & Leitungen intakt sind,
erhöhen Sie die Lux-Pegeleinstellung, um eine
Einschaltung bei stärkerem Umgebungslicht zu
bewirken.
lDie Lux-Off-Pegeleinstellung
erhöhen, um eine Einschaltung bei
schwächerem Tageslicht zu
bewirken.
lDifferenz zwischen den Pegeln von
Lux On und Lux Off erhöhen.
lEinstellung der Zeitüberschreitung
erhöhen.
ES¿Y si la carga no se enciende? ¿Y si la carga no se apaga? ¿Qué pasa si los ciclos de carga
dentro y fuera?
lCompruebe que el suministro real al circuito sea
óptimo. Ate a través del terminal L y LIVE OUT
para encender la carga.
lSi el suministro y el cableado son óptimos,
aumente el ajuste del nivel Lux On para que se
encienda con un nivel de luz natural ambiente
más alto.
lAumente el ajuste de nivel Lux Off
para que se encienda a un nivel de
luz natural ambiente más bajo.
lAumente la diferencia entre los
niveles Lux On y Lux Off.
lAumente el ajuste de tiempo de
espera.
PTE se não houver carga? E se a carga não desligar? E se os ciclos de carga dentro e fora?
lVerifique se a alimentação do circuito está em
boas condições. Ligue os terminais L (fase) e
RETORNO para ativar a carga.
lSe a alimentação e fiação estiverem em boas
condições, aumente a configuração do nível de
Lux On para ativar em um nível mais alto de luz
natural ambiente.
lAumentar a configuração do nível
de Lux Off para ativação em um
nível de iluminação ambiente mais
baixo.
lAumentar a diferença entre os
níveis Lux On e Lux Off
lAumentar a configuração do
intervalo de desligamento
automático.
FRQue faire si la charge ne s'allume pas? Que faire si la charge ne s'éteint
pas?
Que faire si les cycles de charge sur
et en dehors?
lVérifier qu'il n'y a aucun problème au niveau de
l'alimentation du circuit. Relier les bornes L et
LIVE OUT pour activer la charge.
lSi l'alimentation et le câblage sont en bon état de
marche, augmenter le paramètre de luminosité
(en Lux) pour l'activer à un niveau d'éclairage
naturel ambiant plus élevé.
lAugmenter le niveau Lux
Désactivation pour allumer lorsque
la luminosité ambiante naturelle est
plus basse.
lAugmenter la différence entre les
niveaux Lux Activation et Lux
Désactivation.
lAugmenter la temporisation.
ITCosa fare se il carico non si attiva? Cosa fare se il carico non si disattiva? E se i cicli di carico e fuori?
lVerifica che l'alimentazione in tensione verso il
circuito sia corretta. Collega i morsetti L e LIVE
OUT per attivare il carico.
lSe l'alimentazione e il cablaggio sono corretti,
aumenta il livello di luminosità in modo che
venga attivato a un livello di luce naturale
ambientale più elevato.
lAumento dell'impostazione del
livello Lux Off per l'attivazione a un
livello inferiore di luce ambientale
naturale.
lAumento della differenza fra i livelli
Lux On e Lux Off.
lAumento dell'impostazione di
Timeout.

ENTECHNICAL DATA
Weight kg 0.10
Supply voltage AC @ 50Hz 230 +/- 10%
Supply voltage DC N/A
Power consumption ON mW 740
Power consumption OFF mW 260
Terminal Capacity 2.5mm²
Cable N/A
Min load 100mA
Max load
Resistive and incandescent
lighting
10A
Resistive and fluorescent
lighting
6A
Compact fluorescent lighting 3A
Fluorescent lighting 6 fittings max
LED lighting 3A
Low
voltage:
lighting (switch
primary of
transformer)
3A
supply with relay
output
N/A
supply with open
collector output
N/A
Fans and ventilation
equipment
3A
Max power factor correction
capacitance
40μF
Purpose Sensing control
Construction Independentlymounted control for flush mounting
Type of action Type 1.Baction (micro disconnection)
Pollution Degree 2
Software Class A
Rated impulse voltage 4000V
Temperature ºC -10 to 30
Humidity 5 to 95%non-condensing
Material (casing) Flame retardant ABS and PC/ABS
IP rating IP40
Compliance EMC-2004/108/EC, LVD-2006/95/EC
DETECHNISCHE DATEN
Gewicht kg 0,10
Versorgungsspannung AC bei 50 Hz 230 +/- 10%
Versorgungsspannung DC N/A
Stromverbrauch AN mW 740
Stromverbrauch AUS mW 260
Leiterkapazität 2.5mm²
Kabel N/A
Min. Last 100mA
Max. Last
Widerstandsfähige Glühlampen 10A
Widerstandsfähige Neonbeleuchtung 6A
Kompakte Neonbeleuchtung 3A
Neonbeleuchtung Max. 6 Anschlüsse
LED-Beleuchtung 3A
Niederspannung: Beleuchtung
(Schaltung auf der
Primärseite des
Transformators)
3A
Versorgung mit
Relais-Ausgang
N/A
Versorgung mit
Open-Collector-
Ausgang
N/A
Ventilatoren und Lüftungssysteme 3A
Max. Kapazität der
Blindleistungskompensation
40μF
Zweck Steuerung
Bauweise Separat montierte Steuerung für bündige Montage
Aktionsart Aktionstyp 1.B (Mikro-Abschaltung)
Verschmutzung Grad 2
Software Klasse A
Bemessungsstoßspannung 4000V
Temperatur ºC -10 bis +30
Feuchtigkeit 5 bis 95% nicht-kondensierend
Material (Gehäuse) Brandverzögerndes ABS und PC/ABS
IP rating IP40
Compliance EMC-2004/108/EC, LVD-2006/95/EC
ESDATOS TÉCNICOS
Peso (kg) 0,10
Voltaje de entrada de CA a 50Hz 230 +/- 10%
Voltaje de entrada de CC N/A
Consumo energético en encendido en
mW
740
Consumo energético en apagado en
mW
260
Capacidad del terminal 2.5 mm²
Cable N/A
Carga mín. 100 mA
Carga máx
Iluminación incandescente y resistiva 10 A
Iluminación fluorescente y resistiva 6 A
Iluminación fluorescente compacta 3 A
Iluminación fluorescente máx. 6 conectores de iluminación
Iluminación LED 3 A
Bajo voltaje: iluminación (interruptor
primario del
transformador)
3 A
suministro con salida de
relé
N/A
suministro con salida de
colector abierto
N/A
Equipo de ventilación y ventiladores 3 A
Capacitancia máx. de corrección del
factor de potencia
40 μF
Finalidad Control de sensores
Construcción Control instalado de forma independiente para
instalación a ras
Tipo de acción Acción de tipo 1.B (microdesconexión)
Contaminación Grado 2
Software Clase A
Voltaje nominal de impulso 4000V
Temperatura (°C) de -10 a 30
Humedad Del 5 al 95% sin condensación
Material (carcasa) ABS y PC/ABS retardantes de llama
Grado de protección IP IP40
Conformidad con normativas 2004/108/CE (CEM), 2006/95/CE (DBT)

PTDADOS TÉCNICOS
Peso (kg) 0.10
Tensão de alimentação CA,
50 Hz
230 +/- 10%
Tensão de alimentação CC N/A
Consumo de energia ligado
(mW)
740
Consumo de energia
desligado (mW)
260
Capacidade do terminal 2.5mm²
Cabo N/A
Carga mín. 100mA
Carga máx.
Lâmpada incandescente 10A
Lâmpada fluorescente 6A
Lâmpada fluorescente
compacta
3A
Lâmpada fluorescente 6 fittings max
Lâmpada de LED 3A
Baixa
tensão:
iluminação (ligar ao
primário do
transformador)
3A
alimentar com a
saída do relé
N/A
alimentar com a
saída do coletor
aberto
N/A
Ventiladores e equipamentos
de ventilação
3A
Capacitância máxima de
correção do fator de
potência
40μF
Objetivo Controle de sensibilidade
Construção Controle instalado de maneira independente para
instalação nivelada
Tipo de ação Ação Tipo 1.B (microdesconexão)
Poluição Nível 2
Software Classe A
Tensão de impulso nominal 4000 V
Temperatura (ºC) -10 a +30
Umidade 5%a 95%, sem condensação
Material (caixa) ABS e PC/ABSretardante de chamas
Classificação IP IP40
Compatibilidade EMC-2004/108/EC, LVD-2006/95/EC
FRDONNÉES TECHNIQUES
Poids kg 0,10
Tension d'alimentation CA à 50Hz 230 +/- 10%
Tension d'alimentation CC N/A
Consommation électrique en marche
en mW570
740
Consommation électrique à l’arrêt en
mW
260
Capacité des terminaux 2.5mm²
Câble N/A
Charge min. 100mA
Charge max.
Éclairage résistif et incandescent 10A
Éclairage résistif et incandescent 6A
Éclairage fluorescent compact 3A
Éclairage fluorescent max 6 installations
Éclairage LED 3A
Basse
tension:
Éclairage (commutateur
primaire du
transformateur)
3A
alimentation avec sortie
relais
N/A
alimentation avec sortie
collecteur ouvert
N/A
Ventilateurs et équipements de
ventilation
3A
Capacitance max. de correction du
facteur de puissance
40μF
Rôle Contrôle de détection
Construction Commande indépendante à encastrer
Type d'action Action Type 1.B (micro déconnexion)
Pollution Niveau 2
Logiciel Classe A
Tension nominale de tenue aux chocs 4000V
Température ºC -10 à 30
Humidité 5 à 95% sans condensation
Matériau (boîtier) ABS et PC/ABS ignifuges
Indice IP IP40
Conformité EMC-2004/108/EC, LVD-2006/95/EC
ITSPECIFICHE TECNICHE
Peso in kg 0,10
Tensione di alimentazione CA a 50 Hz 230 +/- 10%
Tensione di alimentazione CC N/A
Consumo di energia ACCESO in mW 740
Consumo di energia SPENTO in mW 260
Capacità del morsetto 2.5 mm²
Cavo N/A
Carico min 100 mA
Carico max
Illuminazione resistiva e incandescente 10 A
Illuminazione resistiva e fluorescente 6 A
Illuminazione fluorescente compatta 3 A
Illuminazione fluorescente 6 supporti max
Illuminazione LED 3 A
Bassa
tensione:
illuminazione (interruttore
principale del
trasformatore)
3 A
alimentazione con uscita a
relè
N/A
alimentazione con uscita a
collettore aperto
N/A
Ventole e apparecchiature di
ventilazione
3 A
Capacitanza di correzione del fattore di
alimentazione massima
40 μF
Scopo Controllo sensori
Costruzione Controllo con montaggio indipendente per il
montaggio a incasso
Tipo di azione Azione di tipo 1.B (micro disconnessione)
Inquinamento Grado 2
Software Classe A
Tensione nominale a impulso 4000 V
Temperatura in °C Da -10 a 30
Umidità da 5 a 95% senza condensa
Materiale (rivestimento) ABS e PC/ABS ignifugo
Classificazione IP IP40
Conformità EMC-2004/108/EC, LVD-2006/95/EC

Thorn Lighting Ltd
Durhamgate
Spennymoor
Co Durham
DL16 6HL UK
Tel: +44 (0)1388 420042
Due to our policy of continual product improvement, Thorn reserves the right to alter the specification of this product without prior notice.
Ref: WD764 v3
www.thornlighting.com
technical@thornlighting.com
-
 1
1
-
 2
2
-
 3
3
-
 4
4
-
 5
5
-
 6
6
-
 7
7
-
 8
8
-
 9
9
-
 10
10
-
 11
11
-
 12
12


Thorn SensaLite / SWITCHLITE MRE SLDD PC Guida d'installazione
- Categoria
- Illuminazione a soffitto
- Tipo
- Guida d'installazione
in altre lingue
- English: Thorn SensaLite / SWITCHLITE MRE SLDD PC Installation guide
- français: Thorn SensaLite / SWITCHLITE MRE SLDD PC Guide d'installation
- español: Thorn SensaLite / SWITCHLITE MRE SLDD PC Guía de instalación
- Deutsch: Thorn SensaLite / SWITCHLITE MRE SLDD PC Installationsanleitung
- português: Thorn SensaLite / SWITCHLITE MRE SLDD PC Guia de instalação
Documenti correlati
-
 Thorn SensaLite / SWITCHLITE MRE SLD Guida d'installazione
-
 Thorn SensaLite / SENSA MRE DDM MR Guida d'installazione
-
 Thorn SensaLite / SWITCHLITE MRE SLDM ADJ Guida d'installazione
-
 Thorn SensaLite / SWITCHLITE SLDM Guida d'installazione
-
 Thorn SensaLite / SWITCHLITE MRE SLD IP55 Guida d'installazione
-
 Thorn SensaLite / SWITCHLITE CC PROGRAMMER Istruzioni per l'uso


Altri documenti
-
CP Electronics EBDHS-AD High Bay Presence Detectors Guida d'installazione
-
CP Electronics EBDRC-AD Guida d'installazione
-
CP Electronics EBDMR-AD Guida d'installazione
-
CP Electronics EBDMR-PRM Guida d'installazione
-
CP Electronics EBDSPIR-PRM Guida d'installazione
-
CP Electronics EBDRC-DD Guida d'installazione
-