Moser 1591Q Operating Instructions Manual
- Tipo
- Operating Instructions Manual

Type 1591Q Quick Charge
Originalbetriebsanleitung
Akku-Haarschneidemaschine Typ 1591Q
de
Translation of the original operation manual
Cordless hair clipper type 1591Q
en
Traduction du mode d’emploi d’origine
Tondeuse à cheveux rechargeable type 1591Q
fr
Traduzione delle istruzioni per l’uso originali
Tagliacapelli a batteria tipo 1591Q
it
Traducción del manual de uso original – Máquina de corte de pelo
con alimentación por batería modelo 1591Q
es
Tradução do manual de utilização original
Máquina para corte de cabelo com bateria tipo 1591Q
pt
Vertaling van de originele gebruiksaanwijzing
Accutondeuse type 1591Q
nl
Översättning av originalbruksanvisning
Batteridriven hårklippningsmaskin Typ 1591Q
sv
Oversettelse av originalversjonen til bruksanvisningen
Batteridrevet hårklippemaskin type 1591Q
no
Alkuperäiskäyttöohjeen käännös
Akkukäyttöinen hiustenleikkuukone Tyyppi 1591Q
fi
Orijinal kullanma kılavuzunun çevirisi
Bataryalı saç kesme makinesi Tip 1591Q
tr
Tłumaczenie oryginalnej instrukcji obsługi
Akumulatorowa maszynka do strzyżenia włosów Typ 1591Q
pl
Překlad originálního návodu k použití
Akumulátorový zastřihovač vlasů typ 1591Q
cs
Preklad originálneho návodu na obsluhu
Akumulátorový strihač vlasov – typ 1591Q
sk
Az eredeti gépkönyv fordítása
1591Q típusú akkumulátoros hajvágó gép
hu
Prevod originalnih navodil za uporabo
Aparat za striženje las na akumulatorski pogon tip 1591Q
sl
Traducerea manualului de utilizare original
Maşină de tuns părul cu acumulatori tip 1591Q
ro
Превод на оригиналното упътване
Машинка за подстригване – работа с акумулатор тип 1591Q
bg
Перевод оригинального руководства по эксплуатации – Машинка
для стрижки волос с питанием от аккумулятора, тип 1591Q
ru
Переклад оригінальної інструкції – Машинка для стриження
волосся з живленням від акумулятора, тип 1591Q
uk
Μετάφραση των πρωτότυπων οδηγιών λειτουργίας
Επαναφορτιζόμενη κουρευτική μηχανή τύπου 1591Q
el
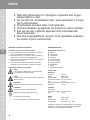
! "#$ % د ' () ا+,-./ام ا 12 3 4
#5 6 ز ' 89 : % ا ' ;< " =<$) > 6 ' ?@6 ر = % – B" ا ز 1591Q
!< 3 ($ 6ت D6E% ' 9, - . / ا م
E< 3 FE 6ت E-<3 G% > 6,-./ ا م د ' () ا +,- < $ 6 ل
! "# $%اءة د* +, ا -. / 0 1 2 ل 456 , 7 89 و ا./ + 0 2ب 72<= >?2 > + @ A $B,
ا *5% و ع <9 ا./DE ا م ا * "G 2 ز Iول >% ة .
اJ/B% د* +, ا -. / 0 1 2 ل KL ا 7"M ء >N اO@ /P و اQ/ RS 4A 456 , T+ E <9
>62ن !VG , ا * WXW ل إ*+A.
<9 Q2 * = ZV8 + [ ا * "G 2 ز I\% اف ^2*_=، ا Q %ص J 8b أن ! 6Wن د* +,
ا -. / 0 1 2 ل >%<d2
ً
>f ا * "G 2 ز .
<9 Q2 * = وTW د أي Z 0 2 رض >f Z 0 8 + 1 2ت وإرk2دات اI> 2ن ا Ol8 + = ،
! "# اZB2ع ا * / WT+ G 2ت ا Ol8 + = .
I"J ا ' " EFز و ا LرI6 د ات
M@ "
mn % o 2T[ JN ا * p0 d 2 ت ا*6G%42q+= >f اQ/ 1 2ل ا O Wت أو
ا * / 0 %ض rX 2 4 2 ت mn + % ة .
M@ "
mn % ا- o R"2 ر >f اQ/ 12ل ا O Wت أو ا * / 0 %ض rX 2 4 2 ت mn + % ة .
!8N = "
ZlL!% >N اQ/ 1 2ل و $Wع إX2 4 2 ت TV E ! = أو وTW د أ mn 2 ر
Xl + = .
!O?(P
Z@B+A r>6 2 o + = Qp W ل أs% ا ر >2د!=.
Z@B+A >% <t 4 10 8 W >2ت و op2 q u K2>= .
! /n8# اI>% K@ 2 ا ZD2 ذ إT% ا ء > 0w.
$[ 4/@R+L اrT%اءات و <t ا * /V 8 V, ا Od / %ح.
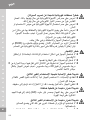
و 2Q ا R O -S
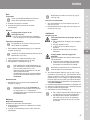
أ ,$ 6 ء ا 1#V ا ء ا RWFX % )ا ' ",Y ا ' - FZ( 84 ر:Y (1
AkR % ة $y ا * 50 %
Bزر Z5z + ,/إ ! d 2ف
C> {k% ا * 5l N
D$ 2JEة ا * 5l N
E> |mL $ 2JEة ا * 5l N
Fز !} > D py *5R % ة ا * dy
G< %k2 ة Z @ ~ +
Hر أس > D py *?B Å >V/ Wى \Wل ا * 50 %
IوQE ة ا * /zL! = ا*6G%42q+=
J$ 2 4É وQE ة ا * /zL! =
ا'?(6X6ت ا '-GO(%
آ '(% ا ' -;\ ( ) :E8" ك ذو !(6ر E_- $ "
4n2 ر! = :4n2 ر! = K+Eر!E ا * @ + 6, و ا O0Eن
>Eة mE > = ا * Bn2 ر ! = :*z2!= 100 د$+d=
اI402د )ا * nWلxا * 0 %ضxا-ر Z R 2ع(:141 x 32 x 29
>[
ا * Wزن:132 Ñ% ام Zd%!B2
ً
>V/ Wى ا o B 0 2ث ا *?Ws2 ء : 6 0 د !V+ B , )A( J 8b ا I $ pb J 8b
>V2 < = 2 5 .[
ا -K / M ا ز :< 2,5 م/ث²
: 6D/ة ا ' ;8 a
اI402د
>f ا * 8Wازم )ا *nWلxا * 0 %ضxا-ر Z R 2ع(:72 x 96 x 58 >[
ا * Wزن:6 1 Ñ% ا م Zd%!B2
ً
وb/ ة ا ' -\N=% ا'W5">6c(%
ا * n% ا ز :>G 2 !Ü 6000
ا./ Gáك ا * dEرة :1 2 و اط J 8b ا I $ pb
<W * /+= ا * /5z + , :100 – 240 <W *} / 5 0 – 6 0 K% Z M
KL ا ا * "G 2 ز ! /W<% J 8b Q1 2 ! = J2ز* = و- !pE ر أي sWs2 ء -. 8 6 + = . Z /n2 4t
> W اXR 2 ت KL ا ا * "G 2 ز >f >02 ! +% و Z 0 8 + 1 2ت ا-Zl2 د ا Iو ر و 49 اO/08d= 4 2 * / W ا <t
ا * 6 G % و > z @ 2 \ + V9 2004/108/EG وا*RW*/+= ا O @ D R?= 2006/42/EG.
ا,- < $ 6 ل ا ' d5 6 ز
ا ' - 8e ( "
اQ/ RS 41W اد Z z 8 + ا * "G 2 ز * @ d, ا * "G 2 ز أو ا -Q / R 2 ظ 4A 456 ,
آ >N <9 و $} -Qt .
Z |7E >N JEم o dp2 ن أي k9 ء <9 >l/W!2ت ا*/V8+[.
ا < ly 72<= ا ITM ا ء * 8 / |7E >N JEم وTW د أي أs% ا ر o 2T1 = JN
ا * @d,.
ا 1E 6 ن
!O?(P! أZ" ا ر X 6 #$ % Da g 3@( % M6Bh % .
ا Q %ص J 8b ر 4Å ا * "G 2 ز 4 1pE ر Z+2ر >/%دد )A C(
واo/BA إ *b $+1= ا * "G E ا OL7Wر ة J 8b * WQ= ا *GW! = .
I8 a ا ' ?@6 ر = %
!%Tb ZDp+y >Eة .2J/w Zd%!B2
ً
*5lN ا*"G2ز $B, ا./012*A
Iول >% ة .
1.أ دm, $ 2 4É وQE ة ا * /zL! = ا*6G%42q+= )J( <9 > Em, )E( ا * "G 2 ز )ا * %.[
ا * / Ws+ l9 2ⓐ(.
!/W<% ا * "G 2 ز J 8b o~2 م kl N ذ 79 !lWل دون kl N ا * Bn2 ر! =
456 , >R%ط.
2.أ دm, وQE ة ا * /zL! = <9 >pE ر ا * 6G%4 2 ء ا * l 2 q n9 )ا * %.[
ا * / Ws+ l9 2ⓑ(.
3.$[ 4å!d2ف ا * "G 2 ز >N máل
ا * ?z Å J 8b زر ا * /5z + , /ا r ! d 2ف )ا * %.[
ا * / Ws+ l9 3ⓑ(.
4.sf ا * "G 2 ز J 8b $ 2JEة ا * 5l N )ا * %.[ ا * / Ws+ l9 2( .
·J@E kl N ا * "G 2 ز ، .Wف ! ?9 ء > {k% ا * 5l N )C( 456 ,
> @ /~[ . 40E kl N ا * Bn2 ر! = 456 , 7 2>,، .Wف ! W >ç ا O {k%
ا *?W q 9 و <t دورة >D/ 8 R = )1 0 إs2 ء ا ت / Z W $ و اQE (.
·40E .l# ا * "G 2 ز >N $ 2JEة ا * 5l N ، .Wف ! @nRÜ ا O {k%
)o 1Å ZW<+% ا *n2 $ = (.
·!V/ z %ق kl N ا * Bn2 ر ! = >N TE ! E 456 , 7
ُ
89ّ QW ا *9
120 د:(G%.
ا ' -;\ ( ) > 6 ' ?@6 ر = %
1.kz , ا * "G 2 ز >N máل ا *?z Å J 8b زر ا * /5z + , /ا r ! d 2ف ^[ $[ 4å!d2<A
40E ا-o /G2 ء >N ا-./DEام )ا * %.[ ا * / Ws+ l9 3ⓐ/ⓑ(.
·40E kl N ا * Bn2 ر ! = 456 , 7 2>,، !16@ë ا./ 0 1 2 ل ا * "G 2 ز OEة
Zp, إ *b 100 د:(G%. Z /n8# KLه ا * V0 = >N ا *n2 $ = >2 4w
5 إ *b 1 0 دور ات kl N .
·ا o0Eام ا*0@2!= ا *62<+= 45R % ة ا * dy !{^% 456 , TE .8 B9
J 8b >Eة ا./ 0 1 2 * G 2 .
ا+,-./ام
ا ' 89 : % > 6,- <$ 6 ل ا ' " ؤ وس ا R . kk % 'e? l E_- Fى BFل ا ' ;< "
!16@ë أ!?2
ً
ا./012ل TG2ز ا*lá$= >f ا*%
ِ
ؤوس اODpp= *?BÅ >V/Wى
\Wل ا * 50 % .
!16@ë Z0E!, ا * % أس ا O D py *?B Å >V/ Wى \Wل ا *50 % و <t m1V=
>
ُ
V/W!2ت >D/8R=.
* 8 1%ور إ *b >V/ Wى أ د ob * nWل ا * dy، 7, >2 J8 +ë ا *d+2م 4A KW د<f
ا * % أس ا O D py *?B Å >V/ Wى
\Wل ا * 50 % olW ا * E ا m, .
و >N máل ا *d+2م 4L *ë، <Bå>62o6[ ا -m / + 2 ر 4w أ\W ا ل $y >D/ 8 R =
Z / % ا وح 4w 3 >[ )ا * %.[ ا * / Ws+ l9 5ⓐ( و 6 >[ )ا * %.[
ا * / Ws+ l9 5ⓑ(.
! " n (o / إزا'% ا ' " أس ا R . kq 'e? l BFل ا ' ;< "
1.$[ 4E<f ا * % أس ا O D py *?B Å \Wل ا * 50 % < Wق kR % ة ا * dy 42Z"2ه
ا * VG [ إ *b أن !V/ d % <9 >62 o A )ا * %.[ ا * / Ws+ l9 4ⓐ(.
2.!16@ë إزا*= ا * % أس ا O D py *?B Å \Wل ا * 50 % <+12 40E >N máل
.l B A 42Z"2ه ا * VG [ )ا * %.[ ا * / Ws+ l9 4ⓑ(.
ا '<O 6 =% > 6 ' d5 6 ز
! Or(Q و2( 6 X % ا ' d5 6 ز
M@ " ! 2< G 6 ت n5">6c(% X 6 #$ % Da !_"ب ا ' _F ا c ) .
$[ 4 å\R 2 ء ا * "G 2 ز و <p8 A JN ا*/+2ر ا*6G%42q9 $B,
ا *5% و ع <9 Z @~+ R A وX+2o/A.
- Z z nÉ ا * "G 2 ز <9 اO2ء.
ا Q %ص J 8b JEم ZV%ب أي .W ا q , إ *b د ا m, ا * "G 2 ز .
- Zd[ 4 WX, ا * "G 2 ز 42*/+2ر ا*6G%42q9 إ- 40E ا * / |7E >N
TR 2 < A 456 , Z2م.
!O?(P! أZ" ا ر X 6 #$ % Da EF ا د n($6و=% :F=% .
ا./DE ا م اOWاد ا *6+12و!= ا *dW!= $E ! { دي إ *b إ *l2ق أs% ا ر
4 2 * "G 2 ز و > 8ld 2 Z A .
- ZV/ 01, أي >W اد >L! B = أو >p@ R % ة !
- ZV/DE م .Wى >W اد ا * / @ ~+ و ز ! Wت kR % ات ا * dy
ا * /9 ! @ pu ا *p2 o f 4 2./ 0 1 2 * G 2 .
!16@ë ا * lp W ل J 8b 4D2m2ت ا * / @ ~ + و ز !} ا *5R % ات >N
42q0ë ا Ol89 أو JN \% !t ا - Zp2 ل 41%7M o 2 *DE>= ا*M42qN.
40E ا -. / 0 1 2 ل ، $[ 4åزا*= ا * % أس ا O D py *?B Å >V/ Wى \Wل ا * 50 %
)ا * %.[ ا * / Ws+ l9 4ⓑ( ^[ أدر kR % ة ا * dy olW
اIJ 8b )ا * %.[
ا * / Ws+ l9 6ⓐ(. ا./ 01, < %k2 ة ا * / @ ~+ rز ا * = 4d2!2 ا * 50 % >N
< /l2ت ا * zn2 ء ا * D 2 ر T9 * 8 "G 2 ز و >N kR % ة ا * dy )ا * %.[ ا * / Ws+ l9
ر$[ 7( . اsz Å أ!?2
ً
J 8b J/ 8 = ا * / @ ~ +. KL ه ا * 01 8 + = ZV1 u 4åزا *= 4d2!2
ا * 50 % ا O / W اTE ة 4w > 5Å و kR % ة ا * dy 4 6, .G W * = 4 W ا .n = < %k2 ة
ا * / @ ~ + ا O 8ld = )EASY CLEANING(.
! "# أن Z B db > W Xá ت ا * 5l N ا O / W اTE ة 4 2 * "G 2 ز و $ 2JEة ا * 5l N داq12
ً
o~+ R = .
ا./ 0 1, $n0 = $ 1 2ش o 2J1= و>B 8 8 = $8+á
ً
* / @ ~ + ا * "G 2 ز .
o ~ kR % ة $y ا * 50 % 4 W ا .n = 4D2m= ا * / @ ~+.
ا./DE م ز !} kR % ات ا * dy * /M!+} ا *5R % ة )ا * %.[ ا * / Ws+ l9 ر$[ 8( .
$[ 4/M!+} kR % ة $y ا * 50 % 456 , > @ /~[ * ?1 2 ن TW د ة
$y J2 * += OEة \W ! 8 = .
Ñ+% kR % ة ا * dy إذا -Q~} أن أداءK2 $E Z % ا Tf 40E >Eة
ا./ 0 1 2 ل \W ! 8 = رÑ[ Z @~+ RG 2 و ZM!+/G2 456 , > @ /~[ .
ا,- ? / ا ل It " ة ا ' Gq
!O?(P! M@ " ا L2 6 > % وb/ وث أZ" ا ر E6د=% X - (d%
ا+,-./ام ا '\(" ا '9cv.
$[ 4 å\R 2 ء ا * "G 2 ز $B, Zz++% kR % ة $y ا * 50 % .
1.$[ 4å!d2ف ا * "G 2 ز >N máل ا * ?z Å J 8b زر ا * /5z + , /ا r ! d 2ف )ا * %.[
ا * / Ws+ l9 3ⓑ(.
2.اsz Å J 8b kR % ة $y ا * 50 % <9 ا-Z"2 ه ا O 0 2 7É * zn2 ء ا * "G 2 ز
)ا * %.[ ا * / Ws+ l9 6ⓐ(. ا <p, kR % ة $y ا * 50 % JN ا * "G 2 ز .
3.* ñJ 2 د ة kR % ة ا * dy * Ws0 G 2 ا IX 8 9 ، $W>W ا 4/_B+} اO5
ْ
B
َ
ë ا * Dn 2 <9
4 R /l= ا*/_B+} ا O / W اTE ة 4 2 * zn2 ء ا * D 2 ر T9 و اsz n W ا J 8b ا *5R % ة إ *b
أن
!V/ d % وs0 G 2 4 2 * "G 2 ز )ا * %.[ ا * / Ws+ l9 6ⓑ(.
E< 6 'd% ا R;6 n )
It " ة ا ' Gq + ! Gq >;W ) #( / .
It " ة ا ' Gq !d" ا ' ;< " .
E/ة M/ E % ا ' ?@6 ر = % :k( " ة #/ا
ً
.
ا *VB#: kR % ة ا * dy > / VD = .
$[ 4/@~+ و Z M ! +} ا *5R % ة )ا * %.[ ا * / Ws+ l9 7/8(.
ا *VB#: kR % ة ا * dy >/ô78=.
$[ 4/z++% kR % ة ا * dy )ا * %.[ ا * / Ws+ l9 ر$[ 6( .
إ26 > % ا ' ?;" ة
ا *VB#: ا * ?z Å ا O 1 2 رس J 8b ا * B5% ة 7B+% TEا
ً
.
! "# ZDR + ا * ?z Å ا O 1 2 رس J 8b ا * B5% ة .
ا *VB#: زاو!= ا * dy kE ! E ة ا-olEار.
ا Q %ص J 8b ا./DE ا م ا * "G 2 ز 4 1V/ Wى أ7_% ZVn+l2
ً
.
ا R xI" ا ' eF c 4 + = e4 ء .
ا *VB#: ! "# أن ! 6Wن ا * "G 2 ز >nR | máل J1 8 + = ا * 5l N .
Z |7E >N أن ا * "G 2 ز >nR | . )ا * %.[ ا * / Ws+ l9 3ⓑ(.
ا *VB#: > W Xá ت ا * 5l N > / VD = .
!"# أن ZBdb >WXáت ا*5lN اO/WاTEة 42*"G2ز و$2JEة ا*5lN داq12
ً
o~+ R = .
ا *VB#: m8, 4 2 * /zL! = ا*6G%42q+=.
Z |7E >N .á > = ا * %4Å 4w وQE ة ا * /zL! = و >pE ر ا * 6G% 4 2 ء ا * l 2 q n9 .
ا < ly 7B, ا * /+2ر ا*6G%42q9 * 8 / |7E >N .á > / A .
ا < ly ا * /zL! = ا*6G%42q+=.
ا ' - . 3q Ea ا ' d5 6 ز
!O?(P! إ EW 6 X ( % b/ وث أZ" ا ر >(h(% g4 b6 ' % D/م
ا ' - . 3q Ea ا ' d5 6 ز >;W ) ,3 ( Y .
ا Q %ص J 8b إ <% اغ kl @ = ا * Bn2 ر ! = $B, ا * / D 8y >@G2!
ا * / D 8y >N ا * "G 2 ز 456 , > @ 2 .# !l2 <S J 8b ا*B+õ=
و !lWل دون Z 0 %ض ا r oV2 ن
وا*B+õ= Iي أs% ا ر >l/ 1 8 = .
J@E ا * / D 8y >N ا ITG M ة ا*6G%42q+= Ñ+% ا OV/ 0 1 8 = ، ا Q %ص J 8b اQ/ % ا م
ا O d /?+ 2 ت ا*d2oWo+= ا * "2 ري 4G2 ا * 01,.
E< 3 FE 6ت M 62% > 6 ' - . 3q Ea ا 1#5 V ة ا'W5">6c(% و اL' W-"وX( % g4
ا + !86 د ا 1و ر و >4:
! D?f ا * / D 8y >N ا ITG M ة ا*6G%42q+= د ا m, ا-Zl2 د
اIو ر و 49 O"1 W J = >N ا * d W ا ow ا Ol8 + = ا * /9 Z% Z6M J 8b
ا * / WT+ A ا Iو ر 49 2002/96/ECا * D 2ص 4 2 ITG M ة ا*6G%42q+=
و اr*6/%و o + = ا*0/+d=. و ! l~ % KL ا ا * / WT+ A ر >9 ا * "G 2 ز >f
ا*@R2!2ت ا*B 8E!= أو اO@M* +=.
!1@6ë ا * / D 8y >"2o+2
ً
>N ا * "G 2 ز 4 W اQE ة >N o d 2ط T1f
ا ITG M ة ا*/240= * 8 B8E!= أو 41%7M >N >% ا7M إJ2دة ZEو!%
ا*@R2!2ت.
إ D9ن ا R@6 > G %
ا o~% ا *pR l = ر$[ 116
ar
Operating Instructions
Cordless Hair Clipper

de
en
fr
it
es
pt
nl
sv
no
fi
tr
pl
cs
sk
hu
sl
ro
bg
ru
uk
el
ar
2
1
A
B
E
I
C
D
F
G
J
H

de
en
fr
it
es
pt
nl
sv
no
fi
tr
pl
cs
sk
hu
sl
ro
bg
ru
uk
el
ar
3
7
4
a
b
2
b
a
3
a
b
5 6
b
a
a
b
8

DEUTSCH
de
en
fr
it
es
pt
nl
sv
no
fi
tr
pl
cs
sk
hu
sl
ro
bg
ru
uk
el
ar
4
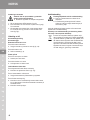
Allgemeine Sicherheitshinweise
Bestimmungsgemäßer Gebrauch
· Nutzen Sie Haarschneidemaschinen ausschließlich zum Schneiden
von menschlichem Haupthaar, Barthaar und Augenbrauen.
· Nutzen Sie Tierhaarschneidemaschinen ausschließlich zum Schneiden
von Tierhaaren und Tierfell.
Anforderungen an den Anwender
· Lesen Sie vor der ersten Inbetriebnahme die Betriebsanleitung voll-
ständig durch und machen Sie sich mit dem Gerät vertraut.
· Dieses Gerät ist nicht für den Gebrauch von Personen (einschließlich
Kindern) mit verringerten körperlichen, sensorischen oder geistigen
Fähigkeiten oder Mangel an Erfahrung und Wissen bestimmt, es sei
denn, sie werden beaufsichtigt oder erhielten eine Anweisung hin-
sichtlich des Gebrauches des Gerätes von einer Person, die für ihre
Sicherheit verantwortlich ist. Kinder sollten beaufsichtigt werden, um
sicherzustellen, dass sie nicht mit dem Gerät spielen.
· Das Gerät außerhalb der Reichweite von Tieren und vor Witterungs-
einflüssen geschützt ablegen.
Gefährdungen
Beachten Sie die folgenden Sicherheitshinweise!
Gefahr! Stromschlag durch Schäden am Gerät/Stecker-
schaltnetzteil.
f Das Gerät nicht benutzen, wenn es nicht ordnungsgemäß
funktioniert, wenn es beschädigt ist, oder wenn es ins Wasser
gefallen ist. Reparaturen ausschließlich von einem autorisier-
ten Service Center unter Verwendung von Original-Ersatzteilen
durchführen lassen, um Gefährdungen zu vermeiden.
f Das Gerät niemals mit einem beschädigten Stromkabel bzw.
Steckerschaltnetzteil verwenden. Ein beschädigtes Stromka-
bel bzw. Steckerschaltnetzteil, darf nur von einem autorisierten
Service Center oder einer ähnlich qualifizierten Person durch
ein Original-Ersatzteil ersetzt werden, um Gefährdungen zu
vermeiden.

DEUTSCH
de
en
fr
it
es
pt
nl
sv
no
fi
tr
pl
cs
sk
hu
sl
ro
bg
ru
uk
el
ar
5
f Elektrogeräte dürfen nur durch elektrotechnisch ausgebildete
Fachkräfte repariert werden.
Gefahr! Stromschlag durch eintretende Flüssigkeit.
f Ein ins Wasser gefallenes Elektrogerät auf keinen Fall berühren.
Sofort den Netzstecker ziehen.
f Elektrogeräte niemals in der Badewanne oder unter der Dusche
benutzen.
f Elektrogeräte stets so ablegen bzw. aufbewahren, dass sie
nicht ins Wasser (z.B. Waschbecken) fallen können. Den Kon-
takt von Elektrogeräten mit Wasser und anderen Flüssigkeiten
vermeiden.
f Das Gerät nur in trockenen Räumen benutzen und
aufbewahren.
f Als zusätzliche Sicherheitsmaßnahme wird der Einbau einer
geprüften Fehlerstrom-Schutzeinrichtung (RCD) mit einem
Bemessungsauslösestrom von nicht mehr als 30 mA in den
Badezimmerstromkreis empfohlen.
Explosionsgefahr!
f Das Gerät niemals in Umgebungen benutzen, in denen Aerosol-
(Spray-) Produkte verwendet werden, oder in denen Sauerstoff
freigesetzt wird.
f Versuchen Sie nicht, den Akku selbst auszuwechseln.
f Das Gerät nicht längere Zeit Temperaturen unter 0°C oder über
+40°C aussetzen. Direkte Sonneneinstrahlung vermeiden.
Warnung! Verletzungen durch unsachgemäße Handhabung.
f Benutzen Sie das Gerät, zum Schutz vor Verletzungen, niemals
mit beschädigtem Schneidsatz.
f Schalten Sie das Gerät immer vor dem Ablegen aus, da das
Gerät durch die Vibrationen herunterfallen kann.
Vorsicht! Schäden durch falsche Spannungsversorgung.
f Betreiben Sie das Gerät ausschließlich mit Wechselstrom mit
der auf dem Typenschild angegebenen Spannung.

DEUTSCH
de
en
fr
it
es
pt
nl
sv
no
fi
tr
pl
cs
sk
hu
sl
ro
bg
ru
uk
el
ar
6
Vorsicht! Schäden durch unsachgemäße Handhabung.
f Verwenden Sie ausschließlich das vom Hersteller empfohlene
Zubehör.
f Verwenden Sie zum Aufladen des Gerätes ausschließlich das
im Lieferumfang enthaltene Steckerschaltnetzteil. Ersetzen Sie
defekte Steckerschaltnetzteile nur durch Original-Ersatzteile, die
Sie über unsere Servicecenter beziehen können.
f Niemals Gegenstände in die Geräteöffnungen stecken oder fal-
len lassen.
f Beim Ausstecken des Gerätes niemals am Stromkabel oder am
Gerät selbst ziehen.
f Das Stromkabel nicht um das Gerät wickeln.
f Das Stromkabel und das Gerät von heißen Oberflächen
fernhalten.
f Das Gerät nicht mit verdrehtem oder abgeknicktem Kabel aufla-
den bzw. aufbewahren.
f Keine Einwegbatterien verwenden. Lassen Sie die Akkus aus-
schließlich im Service Center austauschen.
Allgemeine Benutzerhinweise
Informationen zum Gebrauch der Betriebsanleitung
f Bevor Sie das Gerät zum ersten Mal in Betrieb nehmen,
muss die Betriebsanleitung vollständig gelesen und verstan-
den werden.
f Betrachten Sie die Betriebsanleitung als Teil des Produkts
und bewahren Sie sie gut und erreichbar auf.
f Fügen Sie diese Betriebsanleitung bei Weitergabe des
Geräts an Dritte bei.
f Bei Konflikten mit nationalen Sicherheitsbestimmungen oder
-anweisungen ist den nationalen Vorgaben Folge zu leisten.
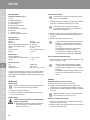
Symbol- und Hinweiserklärung
GEFAHR
Gefahr durch Stromschlag mit möglicher schwerer
Körperverletzung oder Tod als Folge.
GEFAHR
Explosionsgefahr mit möglicher schwerer Körperver-
letzung oder Tod als Folge.
WARNUNG
Warnung vor einer möglichen Körperverletzung oder
einem gesundheitlichen Risiko.
VORSICHT
Hinweis auf die Gefahr von Sachschäden.
Hinweis mit nützlichen Informationen und Tipps.
Sie werden zu einer Handlung aufgefordert.
Führen Sie diese Handlungen in der beschriebenen
Reihenfolge durch.
f
1.

DEUTSCH
de
en
fr
it
es
pt
nl
sv
no
fi
tr
pl
cs
sk
hu
sl
ro
bg
ru
uk
el
ar
7
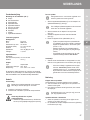
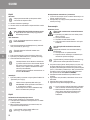
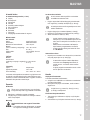
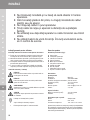
Produktbeschreibung
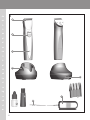
Bezeichnung der Teile (Abb. 1)
A Schneidsatz
B Ein-/Ausschalter
C Ladeanzeige
D Ladeständer
E Ladeständerbuchse
F Öl für den Schneidsatz
G Reinigungsbürste
H Kammaufsatz
I Steckerschaltnetzteil
J Geräteanschlussstecker
Technische Daten
Handgerät
Antrieb: DC-Motor
Akku: NIMH-Akku
Betriebsdauer Akku: bis zu 100 min
Abmessungen (LxBxH): 141 x 32 x 29 mm
Gewicht: ca. 132 g
Emissionsschalldruckpegel: max. 60 dB(A) @ 25 cm
Vibration: < 2,5 m/s
2
Ladeständer
Abmessungen
mit Zubehör (BxTxH): 72 x 96 x 58 mm
Gewicht: ca. 61 g
Steckerschaltnetzteil
Typ: Adapter 6000
Leistungsaufnahme: max. 12 W
Betriebsspannung: 100 – 240 V / 50 – 60 Hz
Das Gerät ist schutzisoliert und funkentstört. Es erfüllt die Anfor-
derungen der EU-Richtlinie Elektromagnetische Verträglichkeit
2004/108/EG und die Maschinenrichtlinie 2006/42/EG.
Betrieb
Vorbereitung
Bewahren Sie das Verpackungsmaterial für eine spä-
tere sichere Lagerung oder Transport auf.
f Kontrollieren Sie die Vollständigkeit des Lieferumfangs.
f Prüfen Sie alle Teile auf eventuelle Transportschäden.
Sicherheit
Vorsicht! Schäden durch falsche
Spannungsversorgung.
f Betreiben Sie das Gerät ausschließlich mit Wech-
selstrom mit der auf dem Typenschild angegebe-
nen Spannung.
Akku laden
Vor der ersten Inbetriebnahme ist eine Ladezeit von
ca. 2 Stunden erforderlich!
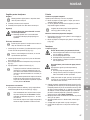
1. Stecken Sie den Geräteanschlussstecker (J) des Stecker-
schaltnetzteiles in die Ladeständerbuchse (E) (Abb. 2
ⓐ
).
Durch ein intelligentes Lademanagement wird ein
Überladen des Akkus verhindert.
2. Stecken Sie das Steckerschaltnetzteil in die Netzsteckdose
(Abb. 2
ⓑ
).
3. Schalten Sie mit dem Ein-/Ausschalter das Gerät aus
(Abb. 3
ⓑ
).
4. Stellen Sie das Gerät in die Ladestation (Abb. 2).
· Während des Ladevorgangs blinkt die Ladean-
zeige (C) gleichmäßig. Bei voll geladenem Akku
blinkt die Ladeanzeige in einem anderen Zyklus
(10 an / 1 aus).
· Nach Entnahme des Gerätes aus dem Ladestän-
der erlischt die Anzeige (Stromsparmodus).
· Die Ladezeit bis zum Erreichen der vollen Kapazi-
tät beträgt bis zu 120 Minuten.
Akku Betrieb
1. Schalten Sie mit dem Ein-/Ausschalter das Gerät ein und
nach Gebrauch aus (Abb. 3
ⓐ/ⓑ
).
· Bei voll geladenem Akku kann das Gerät bis zu
100 Minuten betrieben werden. Diese Kapazität
wird nach ca. 5 – 10 Ladezyklen erreicht.
· Bei unzureichender Pflege des Schneidsatzes
kann sich die Laufzeit erheblich reduzieren.
Bedienung
Schneiden mit Kammaufsätzen
Das Gerät kann auch mit einem Kammaufsatz betrieben
werden.
f Zur Einstellung der Schnittlänge lässt sich der Kammaufsatz
in 5 Raststufen verstellen.
f Je weiter der Kammaufsatz eingeschoben wird, desto kür-
zer die Schnittlänge.
Die Schnittlänge kann von 3 mm (Abb. 5
ⓐ
) bis zu
6 mm (Abb. 5
ⓑ
) eingestellt werden.
Kammaufsatz aufsetzen / abnehmen
1. Schieben Sie den Kammaufsatz in Pfeilrichtung bis zum
Anschlag auf den Schneidsatz (Abb. 4
ⓐ
).
2. Der Kammaufsatz lässt sich durch Schieben in Pfeilrichtung
entfernen (Abb. 4
ⓑ
).

DEUTSCH
de
en
fr
it
es
pt
nl
sv
no
fi
tr
pl
cs
sk
hu
sl
ro
bg
ru
uk
el
ar
8
Instandhaltung
Reinigung und Pflege
Gefahr! Stromschlag durch eintretende
Flüssigkeit.
f Schalten Sie das Gerät aus bevor Sie mit der Rei-
nigung und Pflege beginnen.
f Das Gerät nicht in Wasser tauchen!
f Lassen Sie keine Flüssigkeiten in das Gerätein-
nere gelangen.
f Stellen Sie das Gerät nur vollständig getrocknet
wieder in den Ladeständer.
Vorsicht! Schäden durch aggressive Chemikalien.
Aggressive Chemikalien können das Gerät und Zube-
hör schädigen.
f Verwenden Sie keine Lösungs- oder
Scheuermittel.
f Verwenden Sie ausschließlich das vom Hersteller
empfohlene Reinigungsmittel und Schneidsatzöl.
Hygiene-Spray sowie Schneidsatzöl können Sie über
Ihren Händler oder unser Service Center beziehen.
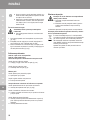
f Nehmen Sie nach jedem Gebrauch den Kammaufsatz ab
(Abb. 4
ⓑ
) und klappen Sie den Schneidsatz vom Gehäuse
ab (Abb. 6
ⓐ
). Entfernen Sie mit der Reinigungsbürste die
Haarreste aus der Gehäuseöffnung und vom Schneidsatz
(Abb. 7). Drücken Sie zusätzlich den Reinigungshebel. So
können Sie einfach die Haarreste zwischen Scherkamm und
Schermesser mit der Reinigungsbürste entfernen (EASY
CLEANING).
f Halten Sie die Ladekontakte am Ladeständer und am Gerät
stets sauber.
f Wischen Sie das Gerät nur mit einem weichen, eventuell
leicht feuchten Tuch ab.
f Reinigen Sie den Schneidsatz mit dem Hygienespray.
f Ölen Sie den Schneidsatz mit dem Schneidsatzöl (Abb. 8).
f Für eine gute und lang anhaltende Schneidleis-
tung ist es wichtig den Schneidsatz häufig zu ölen.
f Wenn nach längerer Gebrauchsdauer trotz regel-
mäßigem Reinigen und Ölen die Schneidleistung
nachlässt, sollte der Schneidsatz ausgewechselt
werden.
Austausch des Schneidsatzes
Warnung! Verletzungen und Sachschäden durch
unsachgemäße Handhabung.
f Schalten Sie das Gerät aus bevor Sie den
Schneidsatz austauschen.
1. Schalten Sie mit dem Ein-/Ausschalter das Gerät aus
(Abb. 3
ⓑ
).
2. Drücken Sie den Schneidsatz in Pfeilrichtung vom Gehäuse
weg (Abb. 6
ⓐ
). Entfernen Sie den Schneidsatz.
3. Zum Wiedereinsetzen den Schneidsatz mit dem Haken in
die Aufnahme am Gehäuse ansetzen und bis zum Einrasten
zum Gehäuse drücken (Abb. 6
ⓑ
).
Problembehebung
Schneidsatz schneidet schlecht.
Schneidsatz rupft.
Akkulaufzeit ist zu kurz.
Ursache: Schneidsatz ist verschmutzt.
f Reinigen und ölen Sie den Schneidsatz (Abb. 7/8).
Ursache: Schneidsatz ist verschlissen.
f Tauschen Sie den Schneidsatz aus (Abb. 6).
Hautverletzung
Ursache: Zu starker Druck auf die Haut.
f Schwächerer Druck auf die Haut.
Ursache: Schneidwinkel zu steil angesetzt.
f Gerät flacher ansetzen.
Ladeanzeige leuchtet nicht.
Ursache: Gerät muss beim Laden ausgeschaltet sein.
f Prüfen Sie ob das Gerät ausgeschaltet ist. (Abb. 3
ⓑ
)
Ursache: Ladekontakte sind verschmutzt.
f Reinigen Sie die Ladekontakte am Ladeständer und am
Gerät.
Ursache: Defekte Stromversorgung.
f Überzeugen Sie sich von der einwandfreien Kontaktierung
zwischen Steckerschaltnetzteil und Steckdose. Überprüfen
Sie das Stromkabel auf eventuelle Beschädigungen.
f Prüfen Sie die Stromversorgung.
Entsorgung
Vorsicht! Umweltschäden bei falscher Entsorgung.
f Akkus vor der Entsorgung entladen!
f Die ordnungsgemäße Entsorgung dient dem
Umweltschutz und verhindert mögliche schädliche
Auswirkungen auf Mensch und Umwelt.
Beachten Sie im Falle der Entsorgung des Geräts die jeweiligen
gesetzlichen Vorschriften.
Information zur Entsorgung von elektrischen und elektroni-
schen Geräten in der europäischen Gemeinschaft:
Innerhalb der Europäischen Gemeinschaft wird für
elektrisch betriebene Geräte die Entsorgung durch
nationale Regelungen vorgegeben, die auf der EU-
Richtlinie 2002/96/EC über Elektronik-Altgeräte
(WEEE) basieren. Danach darf das Gerät nicht mehr
mit dem kommunalen oder Hausmüll entsorgt werden.
Das Gerät wird bei den kommunalen Sammelstellen
bzw. Wertstoffhöfen kostenlos entgegengenommen.

ENGLISH
de
en
fr
it
es
pt
nl
sv
no
fi
tr
pl
cs
sk
hu
sl
ro
bg
ru
uk
el
ar
9
General safety instructions
Intended use
· Only use hair clippers to cut human hair, beard hair and eyebrows.
· Only use animal clippers to cut animal hair and animal fur.
Requirements on the user
· Read the operation manual in full and familiarise yourself with it before
the first use.
· This appliance is not intended for use by persons (including children)
with reduced physical, sensory or mental capabilities, or lack of expe-
rience and knowledge, unless they have been given supervision or
instruction concerning use of the appliance by a person responsible for
their safety. Children should be supervised to ensure that they do not
play with the appliance.
· Keep the appliance out of reach of animals and protected against the
effects of the weather.
Hazards
Please adhere to the following safety instructions!
Danger! Electric shock due to damage to appliance/plug-in
transformer.
f Do not use the appliance if it is not working correctly, if it is
damaged or if it has fallen into water. Repairs may only be per-
formed at an authorised service centre using original spare parts
in order to avoid hazards.
f Never use the appliance if the mains cable or plug-in trans-
former is damaged. A damaged mains cable or plug-in trans-
former may only be replaced with an original spare part by an
authorised service centre or another similarly qualified person in
order to avoid hazards.
f Only specialists properly trained in the handling of electrotechni-
cal appliances may repair electrical equipment.

ENGLISH
de
en
fr
it
es
pt
nl
sv
no
fi
tr
pl
cs
sk
hu
sl
ro
bg
ru
uk
el
ar
10
Danger! Electric shock due to penetration of liquid.
f Never touch electrical equipment that has fallen into water. Dis-
connect from the mains immediately.
f Never use electrical equipment in the bath or under the shower.
f Always position or store electrical equipment where it cannot fall
into water (e.g. washbasin). Prevent electrical equipment from
coming into contact with water and other liquids.
f Only use and store the appliance in dry rooms.
f As additional safety measure, it is recommended that a tested
residual current appliance (RCD) with a residual operating cur-
rent of not more than 30 mA be installed in the bathroom circuit.
Danger of explosion!
f Never use the appliance where aerosol (spray) products are
being used or where oxygen is released.
f Do not attempt to replace the battery.
f Do not expose the appliance to temperatures below 0°C and
above +40°C for any length of time. Avoid direct exposure to
sunlight.
Warning! Injuries due to incorrect handling.
f To prevent injury, never use the appliance if the blade set is
damaged.
f Always switch the appliance off before storage, as the appliance
can fall down due to the vibrations.
Handle with care! Damage due to incorrect power supply.
f Only operate the appliance with an alternating current and with
the voltage stated on the nameplate.
Handle with care! Injuries due to incorrect handling.
f Only use accessories recommended by the manufacturer.
f Only use the plug-in transformer that is included in the delivery
for charging the appliance. Only replace defect plug-in trans-
formers with original spare parts, which you can order via our
service centres.
f Never insert or allow objects to fall into the openings of the
appliance.

ENGLISH
de
en
fr
it
es
pt
nl
sv
no
fi
tr
pl
cs
sk
hu
sl
ro
bg
ru
uk
el
ar
11
General user information
Information about using the operation manual
f Before using the appliance for the first time, you must read
and understand the operation manual completely.
f Consider the operation manual as part of the product and
store it in a safe and accessible place.
f Include this operation manual if passing the appliance on
to a third party.
f In case of conflicts with national safety specifications or
instructions, the national requirements must be followed.
Explanation of symbols and notes
DANGER
Danger of electric shock which may result in serious
physical injury or death.
DANGER
Danger of explosion which may result in serious
physical injury or death.
WARNING
Warning of possible physical injury or a health risk.
CAUTION
Information about danger of material damage.
Note with useful information and tips.
Action to be taken by owner.
Carry out these actions in the sequence described.
f
1.
Product description
Description of parts (Fig. 1)
A Blade set
B On/off switch
C Charging indicator
D Charging stand
E Charging stand socket
F Oil for blade set
G Cleaning brush
H Attachment comb
I Plug-in transformer
J Appliance plug
Technical data
Hand-held appliance
Drive unit: DC motor
Battery: NiMH battery
Operating time: up to 100 minutes
Dimensions (LxWxH): 141 x 32 x 29 mm
Weight: approx. 132 g
Emission sound pressure level: max. 60 dB(A) @ 25 cm
Vibration: < 2,5 m/s
2
Charging stand
Dimensions
with accessories (LxWxH): 72 x 96 x 58 mm
Weight: approx. 61 g
Plug-in transformer
Type adapter 6000
Power consumption: max. 12 W
Operating voltage: 100 – 240 V / 50 – 60 Hz
The appliance is safety insulated and radio screened. It meets
the requirements of EU Electromagnetic Compatibility Directive
2004/108/EC and Machinery Directive 2006/42/EC.
f When disconnecting the appliance from the mains, never pull on
the mains cable or on the appliance itself.
f Do not wind the mains cable around the appliance.
f Keep the mains cable and appliance away from hot surfaces.
f Make sure that the mains cable is not twisted or kinked when
charging or storing.
f Do not use disposable batteries. Batteries should only be
replaced at authorised service centres.

ENGLISH
de
en
fr
it
es
pt
nl
sv
no
fi
tr
pl
cs
sk
hu
sl
ro
bg
ru
uk
el
ar
12
Operation
Preparation
Keep the packaging material for safe storage or
transport later.
f Check that the contents are complete.
f Check all the parts for possible transport damage.
Safety
Handle with care! Damage due to incorrect power
supply.
f Only operate the appliance with an alternating cur-
rent and with the voltage stated on the nameplate.
Charging the battery
Before the appliance is used for the first time, it
should be charged for approx. 2 hours!
1. Connect the appliance plug (J) on the plug-in transformer to
the charging stand socket (E) (Fig. 2
ⓐ
).
Battery overcharging is prevented thanks to intelligent
charge management.
2. Connect the plug-in transformer to the mains socket
(Fig. 2
ⓑ
).
3. Switch off the appliance using the on/off switch (Fig. 3
ⓑ
).
4. Place the appliance on the charging station (Fig. 2)
· During charging, the charging indicator (C) flashes
at evenly spaced intervals. When the battery is
fully charged, the charging indicator flashes at a
different rate (10 on / 1 off).
· After the appliance has been removed from the
charging stand, the display goes out (power sav-
ing mode).
· It takes no more than 120 minutes for the appli-
ance to charge to full capacity.
Battery operation
1. Switch on the appliance using the on/off switch and switch
off after use (Fig. 3
ⓐ/ⓑ
).
· With the battery fully charged, the appliance can
be operated for up to 100 minutes. This capacity
is attained after approx. 5 - 10 charging cycles.
· In case of insufficient maintenance of the
blade set, the operating time can be reduced
considerably.
Operation
Cutting with the attachment comb
The appliance can also be operated with an attachment comb.
f The attachment comb has 5 detent positions for adjusting
the length of cut.
f The further the attachment comb is pushed in (retracted),
the shorter the length of cut.
The length of cut can be adjusted from 3 mm
(Fig. 5
ⓐ
) to 6 mm (Fig. 5
ⓑ
).
Attaching/removing the attachment comb
1. Slide the attachment comb on to the blade set in the direc-
tion of the arrow until it reaches the limit stop (Fig. 4
ⓐ
).
2. The attachment comb can be removed by pushing it in the
direction of the arrow (Fig. 4
ⓑ
).
Maintenance
Cleaning and care
Danger! Electric shock due to penetration of
liquid.
f Switch off the appliance before any cleaning of
maintenance takes place.
f Do not immerse the appliance in water!
f Do not allow any liquid to get inside the appliance.
f Only place the appliance back on the charging
station if it is completely dry.
Handle with care! Danger from aggressive
chemicals.
Aggressive chemicals could damage the appliance
and accessories.
f Never use solvents or scouring agents.
f Only use cleaning agents and blade set oil recom-
mended by the manufacturer.
Hygienic spray and blade set oil are available from
your dealer or our service centre.
f Remove the attachment comb (Fig. 4
ⓑ
) after every use
and lift the blade set out of the housing (Fig. 6
ⓐ
). Use the
cleaning brush to remove any cut hairs from the housing
opening and from the blade set (Fig. 7). The cleaning lever
can also be pressed. This allows the cut hairs that accumu-
late between the bottom blade and the top blade to be eas-
ily removed using the cleaning brush (EASY CLEANING).
f The charging contacts on the appliance and on the charging
stand should always be kept clean.
f Only wipe the appliance with a soft, slightly damp cloth.
f The blade set using the hygienic spray.
f Oil the blade set with the blade set oil (Fig. 8).
f For a good and long-lasting cutting performance, it
is important to oil the blade set frequently

ENGLISH
de
en
fr
it
es
pt
nl
sv
no
fi
tr
pl
cs
sk
hu
sl
ro
bg
ru
uk
el
ar
13
f If the cutting performance deteriorates after long
use despite regular cleaning and oiling, the blade
set should be replaced.
Changing the blade set
Warning! Injuries and material damage due to
incorrect handling.
f Switch off the appliance before changing the
blade set.
1. Switch off the appliance using the on/off switch (Fig. 3
ⓑ
).
2. Slide the blade set off the housing in the direction of the
arrow (Fig. 6
ⓐ
). Remove the blade set.
3. Replace the blade set by hooking it into the housing and
pressing it down until it clicks into position (Fig. 6
ⓑ
).
Problem elimination
Blade set is cutting badly.
Blade set is pulling hair out.
Battery life is too short.
Cause: Blade set is dirty.
f Clean and oil the blade set (Fig. 7/8).
Cause: Blade set is worn out.
f Replace the blade set (Fig. 6).
Skin injury
Cause: Too much pressure on the skin.
f Less pressure on the skin.
Cause: Cutting angle is too high.
f Hold appliance more flatly to the skin.
Charging indicator light does not light up.
Cause: The appliance must be switched off for charging.
f Check whether the appliance is switched off. (Fig. 3
ⓑ
).
Cause: Charging contacts are dirty.
f Clean the charging contacts on the appliance and on the
charging stand.
Cause: Defective power supply.
f Make sure that there is a faultless contact between the
plug-in transformer and the socket. Check the mains cable
for possible damage.
f Check the power supply.
Disposal
Handle with care! Environmental damage in the
case of incorrect disposal.
f Discharge batteries prior to disposal!
f Correct disposal will ensure environmental protec-
tion and prevent any potentially harmful impact on
people or the environment.
Adhere to the relevant legal requirements when disposing of
the appliance.
Information on the disposal of electrical and electronic
appliances in the European Community:
Within the European Community, national regulations
are specified for the disposal of electrical appliances,
based on EU Waste Electrical and Electronic Equip-
ment Directive 2002/96/EC (WEEE). In accordance
with this, the appliance can no longer be disposed of
with the local or domestic waste.
The appliance will be accepted free of charge by local
collection points or recycling centres.

FRANÇAIS
de
en
fr
it
es
pt
nl
sv
no
fi
tr
pl
cs
sk
hu
sl
ro
bg
ru
uk
el
ar
14
Consignes de sécurité générales
Utilisation conforme
· Utilisez les tondeuses à cheveux et poils exclusivement pour la coupe
de cheveux, de poils de barbe et de sourcils humains.
· Utilisez les tondeuses pour animaux exclusivement pour couper les
poils et les pelages d’animaux.
Exigences envers l’utilisateur
· Avant la première mise en service, lisez intégralement le mode d’em-
ploi et familiarisez-vous avec l’appareil.
· Cet appareil n’est pas prévu pour une utilisation par des personnes
(enfants compris) dont les capacités physiques, sensorielles ou
mentales sont amoindries ou manquant d’expériences et de connais-
sances, sauf si elles sont surveillées ou ont reçu des instructions sur
l’utilisation de l’appareil de la part d’une personne responsable de leur
sécurité. Les enfants doivent être gardés sous surveillance pour éviter
qu’ils ne jouent avec l’appareil.
· Rangez l’appareil hors de portée des animaux et protégé contre les
intempéries.
Risques
Tenez compte des consignes de sécurité suivantes !
Danger ! Électrisation due à des détériorations de l’appareil /
du bloc d’alimentation à fiches.
f N’utilisez pas l’appareil s’il ne fonctionne pas correctement, s’il
est endommagé ou s’il est tombé dans l’eau. Faites effectuer
les réparations exclusivement par un SAV autorisé et avec des
pièces détachées d’origine, afin de prévenir les risques.
f N’utilisez jamais l’appareil si le câble ou le bloc d’alimentation à
fiches sont endommagés. Afin de prévenir tous risques, le câble
électrique ou le bloc d’alimentation à fiches endommagé ne doit
être remplacé que par un centre de service agréé ou une per-
sonne qualifiée similaire, et uniquement par une pièce détachée
d’origine.
f Les appareils électriques ne doivent être réparés que par des
spécialistes ayant une formation en électrotechnique.

FRANÇAIS
de
en
fr
it
es
pt
nl
sv
no
fi
tr
pl
cs
sk
hu
sl
ro
bg
ru
uk
el
ar
15
Danger ! Électrisation liée à la pénétration de liquides.
f Ne touchez en aucun cas un appareil électrique tombé dans
l’eau. Débranchez immédiatement la prise secteur.
f N’utilisez jamais un appareil électrique dans la baignoire ou
sous la douche.
f Rangez ou stockez toujours les appareils électriques de sorte
à ce qu’ils ne puissent pas tomber dans l’eau (par ex. lavabo).
Évitez tout contact d’un appareil électrique avec de l’eau ou tout
autre liquide.
f Utilisez et rangez l’appareil uniquement dans des endroits secs.
f La mise en place d’un dispositif de protection contrôlé à courant
différentiel résiduel (RCD) ayant un courant de déclenchement
n’excédant pas 30 mA est recommandée à titre de mesure de
sécurité supplémentaire dans le circuit électrique de la salle de
bain.
Risques d’explosion !
f N’utilisez jamais l’appareil dans un environnement dans lequel
des aérosols sont utilisés ou dans lequel de l’oxygène est libéré.
f N’essayez pas de changer la batterie vous-même.
f N’exposez pas l’appareil pendant une durée prolongée à des
températures inférieures à 0 °C ou supérieures à +40 °C. Évitez
l’exposition aux rayons directs du soleil.
Avertissement ! Blessures liées à une utilisation
non-conforme.
f Pour votre sécurité, n’utilisez jamais l’appareil avec une tête de
coupe endommagée.
f Éteignez toujours l’appareil avant de le poser, puisque les vibra-
tions émises par l’appareil pourraient provoquer sa chute.
Attention ! Dommages liés à une tension d’alimentation
erronée.
f Utilisez l’appareil exclusivement sur du courant alternatif avec la
tension indiquée sur la plaque signalétique.

FRANÇAIS
de
en
fr
it
es
pt
nl
sv
no
fi
tr
pl
cs
sk
hu
sl
ro
bg
ru
uk
el
ar
16
Attention ! Dommages liés à une utilisation non-conforme.
f Utilisez exclusivement les accessoires recommandés par le
fabricant.
f Pour charger l’appareil, utilisez exclusivement le bloc d’alimen-
tation à fiches fourni. Ne remplacez les blocs d’alimentation à
fiches défectueux que par des pièces détachées d’origine que
vous pourrez obtenir auprès de notre service après-vente.
f N’introduisez jamais et ne laissez jamais tomber des objets dans
les ouvertures de l’appareil.
f Lorsque vous débranchez l’appareil, ne tirez jamais sur le câble
électrique ou l’appareil.
f N’enroulez jamais le câble électrique autour de l’appareil.
f Tenez l’appareil et le câble électrique éloignés des surfaces
chaudes.
f Ne chargez pas et ne stockez pas l’appareil avec un câble vrillé
ou pincé.
f N’utilisez pas de batteries non rechargeables. Faites remplacer
vos batteries uniquement par votre SAV.
ATTENTION
Indication de risques de dommages matériels.
Indication avec des informations utiles et des astuces.
Vous êtes invité(e) à une action.
Exécutez ces actions dans l’ordre décrit.
f
1.
Conseils d’utilisation généraux
Informations concernant l’utilisation du mode d’emploi
f Avant la première mise en service de l’appareil, vous devez
avoir lu et compris intégralement le mode d’emploi.
f Vous devez considérer le mode d’emploi comme partie
intégrante du produit et le conserver soigneusement et à un
endroit facilement accessible.
f Joignez ce mode d’emploi à l’appareil lorsque vous le
remettez à des tiers.
f En cas de conflits avec les dispositions et consignes de
sécurité nationales, celles-ci sont prioritaires et doivent être
respectées.
Explication des symboles et consignes
DANGER
Danger par électrisation pouvant entraîner des bles-
sures graves ou la mort.
DANGER
Danger par explosion pouvant entraîner des blessures
graves ou la mort.
AVERTISSEMENT
Avertissement contre des blessures éventuelles ou un
risque pour la santé.

FRANÇAIS
de
en
fr
it
es
pt
nl
sv
no
fi
tr
pl
cs
sk
hu
sl
ro
bg
ru
uk
el
ar
17
Description du produit
Désignation des éléments (Fig. 1)
A Tête de coupe
B Interrupteur marche/arrêt
C Témoin de charge
D Socle de recharge
E Prise du socle de recharge
F Huile pour la tête de coupe
G Brosse de nettoyage
H Contre-peigne
I Bloc d’alimentation à fiches
J Prise
Caractéristiques techniques
Appareil portatif
Moteur : moteur CC
Batterie : batterie NIMH
Durée de fonctionnement
sur batterie : jusqu’à 100 min
Dimensions (Lxlxh) : 141 x 32 x 29 mm
Poids : env. 132 g
Niveau de pression
acoustique des émissions : max. 60 dB(A) @ 25 cm
Vibrations : < 2,5 m/s
2
Socle de recharge
Dimensions
avec accessoires (Lxlxh) : 72 x 96 x 58 mm
Poids : env. 61 g
Bloc d’alimentation à fiches
Modèle : adaptateur 6000
Puissance absorbée : max. 12 W
Tension d’utilisation : 100 – 240 V / 50 – 60 Hz
L’appareil est équipé d’une double isolation et d’un antiparasi-
tage. Il satisfait les exigences de la directive UE Compatibilité
Électromagnétique 2004/108/CE et la directive relative aux
machines 2006/42/CE.
Fonctionnement
Préparation :
Conservez les matériels d’emballage pour un range-
ment ou transport sûr ultérieur.
f Contrôlez l’intégralité de la livraison.
f Contrôlez toutes les pièces quant à des dommages de
transport.
Sécurité
Attention ! Dommages liés à une tension d’alimen-
tation erronée.
f Utilisez l’appareil exclusivement sur du courant
alternatif avec la tension indiquée sur la plaque
signalétique.
Charger la batterie
Avant la première utilisation, le temps de charge est
d’environ 2 heures !
1. Mettez la prise (J) du bloc d’alimentation à fiches dans la
prise du socle de recharge (E) (Fig. 2
ⓐ
).
Les surcharges de la batterie sont empêchées par un
système de gestion de charge intelligent.
2. Branchez le bloc d’alimentation à fiches dans la prise sec-
teur (Fig. 2
ⓑ
).
3. Éteignez l’appareil en utilisant l’interrupteur marche / arrêt
(Fig. 3
ⓑ
).
4. Posez l’appareil dans le chargeur (Fig. 2).
· Le témoin de charge (C) clignote de manière
régulière pendant la charge. Lorsque la batterie
est entièrement chargée, le témoin de charge cli-
gnote à un autre rythme (10 allumé / 1 éteint)
· Lorsque l’appareil est retiré du socle de recharge,
l’indicateur s’éteint (mode d’économie d’énergie).
· Le temps de charge est alors de 120 minutes
pour atteindre la capacité maximale.
Fonctionnement sur batterie
1. Mettez l’appareil en marche avec l’interrupteur marche/arrêt
et éteignez-le après utilisation (Fig. 3
ⓐ
/
ⓑ
).
· Lorsque la batterie est complètement chargée,
l’appareil peut être utilisé jusqu’à 100 minutes.
Cette capacité est atteinte après 5 - 10 cycles de
charge environ.
· La durée d’utilisation peut considérablement
diminuer en cas d’entretien insuffisant de la tête
de coupe.
Utilisation
Couper avec les contre-peignes
L’appareil peut également être utilisé avec un contre-peigne.
f Pour le réglage de la longueur de coupe, le contre-peigne
peut être réglé sur 5 positions.
f Plus le contre-peigne est poussé, plus la longueur de coupe
est courte.
La longueur de coupe peut être réglée de 3 mm
(Fig. 5
ⓐ
) à 6 mm (Fig. 5
ⓑ
).
Mettre en place/enlever le contre-peigne
1. Glissez le contre-peigne sur la tête de coupe dans le sens
de la flèche, jusqu’à la butée (Fig. 4
ⓐ
).
2. Le contre-peigne peut être retiré en tirant dans le sens de la
flèche (Fig. 4
ⓑ
).

FRANÇAIS
de
en
fr
it
es
pt
nl
sv
no
fi
tr
pl
cs
sk
hu
sl
ro
bg
ru
uk
el
ar
18
Entretien
Nettoyage et entretien
Danger ! Électrisation liée à la pénétration de
liquides.
f Éteignez l’appareil avant de procéder au net-
toyage et à l’entretien.
f Ne plongez pas l’appareil dans l’eau.
f Ne laissez pas de liquides pénétrer à l’intérieur
de l’appareil.
f Ne posez l’appareil sur le socle de recharge que
lorsqu’il est parfaitement sec.
Attention ! Dommages liés à des produits
chimiques agressifs.
Les produits chimiques agressifs peuvent endomma-
ger l’appareil et les accessoires.
f N’utilisez pas de solvants et d’abrasifs.
f Utilisez exclusivement le détergent et l’huile pour
tête de coupe recommandés par le fabricant.
Vous pouvez vous procurer le spray hygiénique ainsi
que l’huile pour tête de coupe auprès de votre reven-
deur ou de notre SAV.
f Après chaque utilisation, retirez le contre-peigne (Fig. 4
ⓑ
)
et rabattez la tête de coupe en l’écartant du boîtier
(Fig. 6
ⓐ
). À l’aide de la brosse de nettoyage, retirez le
reste des cheveux dans l’ouverture du boîtier et dans la
tête de coupe (Fig. 7). Appuyez de plus sur le levier de net-
toyage. Les restes de cheveux entre le peigne de la tête de
coupe et la lame peuvent ainsi facilement être enlevés avec
la brosse de nettoyage (EASY CLEANING).
f Veillez à ce que les contacts de charge du socle de
recharge et de l’appareil soient toujours propres.
f Essuyez l’appareil uniquement avec un chiffon doux, éven-
tuellement légèrement humide.
f Nettoyez la tête de coupe avec le spray hygiénique.
f Lubrifiez la tête de coupe avec l’huile pour tête de coupe
(Fig. 8).
f Pour une capacité de coupe performante et
durable, il est important d’huiler souvent la tête
de coupe.
f Si après une longue durée d’utilisation et malgré
un nettoyage et une lubrification tous deux régu-
liers, la capacité de coupe diminue, il convient de
changer la tête de coupe.
Changement de tête de coupe
Avertissement ! Blessures et dommages matériels
liés à une utilisation non-conforme.
f Débranchez l’appareil avant le remplacement de
la tête de coupe.
1. Éteignez l’appareil en utilisant l’interrupteur marche / arrêt
(Fig. 3
ⓑ
).
2. Appuyez sur la tête de coupe en partant du boîtier dans le
sens de la flèche (Fig. 6
ⓐ
). Retirez la tête de coupe.
3. Pour remettre la tête de coupe en place, mettez le crochet
dans le logement du boîtier et poussez jusqu’à ce qu’elle
s’emboîte (Fig. 6
ⓑ
).
Élimination des problèmes
La tête de coupe ne coupe pas correctement.
La coupe de la tête de coupe n’est pas nette.
La durée de fonctionnement de la batterie est trop courte.
Cause : La tête de coupe est encrassée.
f Nettoyez et huilez la tête de coupe (Fig. 7/8).
Cause : La tête de coupe est usée.
f Remplacez la tête de coupe (Fig. 6).
Blessures de la peau
Cause : Pression trop importante sur la peau.
f Appuyez moins fort sur la peau.
Cause : Angle de coupe trop raide.
f Placez l’appareil plus en parallèle.
Le témoin de charge ne s’allume pas.
Cause : L’appareil doit être éteint pendant la charge.
f Vérifiez si l’appareil est éteint. (Fig. 3
ⓑ
).
Cause : Les contacts de charge sont encrassés.
f Nettoyez les contacts de charge du socle de recharge et
de l’appareil.
Cause : Alimentation électrique défectueuse.
f Vérifiez le bon contact entre le bloc d’alimentation à fiches
et la prise secteur. Vérifiez le câble électrique quant à
d’éventuelles détériorations.
f Vérifiez l’alimentation électrique.
Élimination
Attention ! Dommages environnementaux en cas
de mise au rebut erronée.
f Déchargez les batteries avant de les jeter !
f Le traitement conforme des déchets protège
l’environnement et empêche les impacts possibles
sur l’homme et l’environnement.
Lors de la mise au rebut de l’appareil, respectez les réglemen-
tations légales en vigueur.
Informations concernant la mise au rebut d’appareils élec-
triques et électroniques dans la Communauté Européenne :
Au sein de la Communauté Européenne, des réglemen-
tations nationales reposant sur la directive UE 2002/96/
CE relative aux appareils électroniques (WEEE) défi-
nissent la mise au rebut des appareils électriques. Selon
celle-ci, l’appareil ne doit plus être jeté dans les ordures
communales ou ménagères. L’appareil peut être remis
gratuitement aux centres de collecte communaux ou aux
entreprises de traitement de déchets.

ITALIANO
19
de
en
fr
it
es
pt
nl
sv
no
fi
tr
pl
cs
sk
hu
sl
ro
bg
ru
uk
el
ar
Avvertenze generali sulla sicurezza
Uso conforme alle norme
· Utilizzare i tagliacapelli esclusivamente per tagliare i capelli, i peli della
barba e le sopracciglia.
· Utilizzare le tosatrici per animali unicamente per tagliare il pelo di
animali.
Requisiti dell’utente
· Prima della prima messa in funzione, leggere per intero le istruzioni
per l’uso e familiarizzarsi con l’apparecchio.
· Questo apparecchio non è destinato all’impiego da parte di persone
(ivi inclusi anche i bambini) con ridotte capacità fisiche, sensoriali
o psichiche o, ancora, che non abbiano esperienza o competenza
nell’uso del medesimo, a meno che non vengano sorvegliati o rice-
vano istruzioni sull’uso dell’apparecchio da una persona che è respon-
sabile della loro sicurezza. Sorvegliare i bambini onde accertare che
non utilizzino l’apparecchio come un giocattolo.
· Conservare l’apparecchio lontano dalla portata di animali e protetto
dagli agenti atmosferici.
Pericoli
Osservare le seguenti istruzioni di sicurezza!
Pericolo! Folgorazione causata da danni all’apparecchio/ali-
mentatore switching.
f Mai utilizzare l’apparecchio se non funziona correttamente, se è
danneggiato o se è caduto nell’acqua. Per evitare pericoli, fare
eseguire le riparazioni esclusivamente in un centro di assistenza
autorizzato utilizzando parti di ricambio originali.
f Mai utilizzare l’apparecchio con un cavo elettrico o con un ali-
mentatore switching da rete danneggiati. Per evitare pericoli, un
cavo elettrico o un alimentatore switching da rete danneggiato
devono essere sostituiti con un ricambio originale solo da un
centro di assistenza autorizzato o da una persona con una qua-
lifica equivalente.
f Gli apparecchi elettrici devono essere riparati esclusivamente da
personale specializzato con formazione elettrotecnica.

ITALIANO
20
de
en
fr
it
es
pt
nl
sv
no
fi
tr
pl
cs
sk
hu
sl
ro
bg
ru
uk
el
ar
Pericolo! Folgorazione causata dall’infiltrazione di liquido.
f Non toccare in nessun caso un apparecchio elettrico caduto in
acqua. Staccare subito la spina dalla rete.
f Non usare mai gli apparecchi elettrici nella vasca da bagno o
sotto la doccia.
f Riporre e custodire gli apparecchi elettrici sempre in modo che
non possano cadere in acqua (ad es. nel lavandino). Evitare che
gli apparecchi elettrici vengano a contatto con l’acqua o con altri
liquidi.
f Usare e conservare l’apparecchio solo in ambienti asciutti.
f Come ulteriore misura di sicurezza si raccomanda l’installazione,
nell’impianto elettrico del bagno, di un circuito di sicurezza per
correnti di guasto (RCD) testato, con una corrente di intervento
non superiore a 30 mA.
Pericolo di esplosione!
f Non utilizzare mai l’apparecchio in ambienti in cui si fa uso di
prodotti aerosol (spray) o nei quali si liberi ossigeno.
f Non tentare di sostituire la batteria personalmente.
f Non esporre l’apparecchio per un tempo prolungato a tempe-
rature inferiori ai 0° o superiori ai +40°C. Evitare l’irradiazione
solare diretta.
Avvertenza! Lesioni causate da un uso improprio.
f Per evitare lesioni, mai utilizzare l’apparecchio con testina
danneggiata!
f Spegnere sempre l’apparecchio prima di riporlo, poiché l’appa-
recchio può cadere a causa delle vibrazioni.
Cautela! Danni causati da un’alimentazione di tensione errata.
f Usare l’apparecchio esclusivamente con corrente alternata e
con la tensione indicata sulla targhetta.
Cautela! Danni causati da un uso improprio.
f Utilizzare esclusivamente gli accessori consigliati dal produttore.
La pagina sta caricando ...
La pagina sta caricando ...
La pagina sta caricando ...
La pagina sta caricando ...
La pagina sta caricando ...
La pagina sta caricando ...
La pagina sta caricando ...
La pagina sta caricando ...
La pagina sta caricando ...
La pagina sta caricando ...
La pagina sta caricando ...
La pagina sta caricando ...
La pagina sta caricando ...
La pagina sta caricando ...
La pagina sta caricando ...
La pagina sta caricando ...
La pagina sta caricando ...
La pagina sta caricando ...
La pagina sta caricando ...
La pagina sta caricando ...
La pagina sta caricando ...
La pagina sta caricando ...
La pagina sta caricando ...
La pagina sta caricando ...
La pagina sta caricando ...
La pagina sta caricando ...
La pagina sta caricando ...
La pagina sta caricando ...
La pagina sta caricando ...
La pagina sta caricando ...
La pagina sta caricando ...
La pagina sta caricando ...
La pagina sta caricando ...
La pagina sta caricando ...
La pagina sta caricando ...
La pagina sta caricando ...
La pagina sta caricando ...
La pagina sta caricando ...
La pagina sta caricando ...
La pagina sta caricando ...
La pagina sta caricando ...
La pagina sta caricando ...
La pagina sta caricando ...
La pagina sta caricando ...
La pagina sta caricando ...
La pagina sta caricando ...
La pagina sta caricando ...
La pagina sta caricando ...
La pagina sta caricando ...
La pagina sta caricando ...
La pagina sta caricando ...
La pagina sta caricando ...
La pagina sta caricando ...
La pagina sta caricando ...
La pagina sta caricando ...
La pagina sta caricando ...
La pagina sta caricando ...
La pagina sta caricando ...
La pagina sta caricando ...
La pagina sta caricando ...
La pagina sta caricando ...
La pagina sta caricando ...
La pagina sta caricando ...
La pagina sta caricando ...
La pagina sta caricando ...
La pagina sta caricando ...
La pagina sta caricando ...
La pagina sta caricando ...
La pagina sta caricando ...
La pagina sta caricando ...
La pagina sta caricando ...
La pagina sta caricando ...
La pagina sta caricando ...
La pagina sta caricando ...
La pagina sta caricando ...
La pagina sta caricando ...
La pagina sta caricando ...
La pagina sta caricando ...
La pagina sta caricando ...
La pagina sta caricando ...
La pagina sta caricando ...
La pagina sta caricando ...
La pagina sta caricando ...
La pagina sta caricando ...
La pagina sta caricando ...
La pagina sta caricando ...
La pagina sta caricando ...
La pagina sta caricando ...
La pagina sta caricando ...
La pagina sta caricando ...
La pagina sta caricando ...
La pagina sta caricando ...
La pagina sta caricando ...
La pagina sta caricando ...
La pagina sta caricando ...
La pagina sta caricando ...
-
 1
1
-
 2
2
-
 3
3
-
 4
4
-
 5
5
-
 6
6
-
 7
7
-
 8
8
-
 9
9
-
 10
10
-
 11
11
-
 12
12
-
 13
13
-
 14
14
-
 15
15
-
 16
16
-
 17
17
-
 18
18
-
 19
19
-
 20
20
-
 21
21
-
 22
22
-
 23
23
-
 24
24
-
 25
25
-
 26
26
-
 27
27
-
 28
28
-
 29
29
-
 30
30
-
 31
31
-
 32
32
-
 33
33
-
 34
34
-
 35
35
-
 36
36
-
 37
37
-
 38
38
-
 39
39
-
 40
40
-
 41
41
-
 42
42
-
 43
43
-
 44
44
-
 45
45
-
 46
46
-
 47
47
-
 48
48
-
 49
49
-
 50
50
-
 51
51
-
 52
52
-
 53
53
-
 54
54
-
 55
55
-
 56
56
-
 57
57
-
 58
58
-
 59
59
-
 60
60
-
 61
61
-
 62
62
-
 63
63
-
 64
64
-
 65
65
-
 66
66
-
 67
67
-
 68
68
-
 69
69
-
 70
70
-
 71
71
-
 72
72
-
 73
73
-
 74
74
-
 75
75
-
 76
76
-
 77
77
-
 78
78
-
 79
79
-
 80
80
-
 81
81
-
 82
82
-
 83
83
-
 84
84
-
 85
85
-
 86
86
-
 87
87
-
 88
88
-
 89
89
-
 90
90
-
 91
91
-
 92
92
-
 93
93
-
 94
94
-
 95
95
-
 96
96
-
 97
97
-
 98
98
-
 99
99
-
 100
100
-
 101
101
-
 102
102
-
 103
103
-
 104
104
-
 105
105
-
 106
106
-
 107
107
-
 108
108
-
 109
109
-
 110
110
-
 111
111
-
 112
112
-
 113
113
-
 114
114
-
 115
115
-
 116
116


Moser 1591Q Operating Instructions Manual
- Tipo
- Operating Instructions Manual
in altre lingue
- slovenčina: Moser 1591Q
- română: Moser 1591Q