Hoover HO786VX WIFI Manuale utente
- Categoria
- Microonde
- Tipo
- Manuale utente

CANDY HOOVER GROUP S.R.L. • Via Privata Eden Fumagalli • 20047 Brugherio Milano Italy
OVENS
USER INSTRUCTIONS
GB
FORNI
ISTRUZIONI PER L’USO
IT
ANKASTRE FIRIN
KULLANMA KILAVUZU
TR
TROUBY
NÁVOD K OBSLUZE
CZ

CONTENUTO
Indicazioni Di Sicurezza
1. Avvertenze Generali
1.1 Dichiarazione Di Conformità
1.2 Informazioni Sulla Sicurezza
1.3 Installazione
1.4 Inserimento Del Mobile
1.5 Importante
1.6 Allacciamento Elettrico
1.7 Dotazione Del Forno (secondo Modello)
1.8 Rimozione e pulizia delle griglie
2. Consıglı Utili
2.1 Griglie Forno - Sistema Di Arresto
2.2 La Cottura Al Grıll
2.3 Secondo Modello U-See
2.4 Pulizia E Manutenzione
2.5 Servizio Assistenza Clienti
3. Descrizione Del Display
3.1 Prima Di Utilizzare Il Forno Per La Prima Volta
3.2 Come Utilizzare Il Forno
3.3 Programmazione
3.4 Suggerimenti Per La Cottura
3.5 Regolazione Del Contrasto Del Display
4. Dispositivo Di Protezione
5. Funzıone Wifi
IT
.......................................................03
.........................................................04
..............................................04
..............................................04
.......................................................................04
.......................................................04
.........................................................................04
.......................................................04
............................05
.........................................05
......................................................................05
......................................05
...............................................................05
....................................................05
......................................................05
................................................06
......................................................07
..................08
....................................................08
...............................................................09
..............................................09
.............................10
..................................................10
......................................................................10
CONTENTS
Safety Instructions
1. General Warnings
1.1 Declaration Of Compliance
1.2 Safety Hints
1.3 Installation
1.4 Fitting The Oven Into The Kitchen Unit
1.5 Important
1.6 Connecting To The Power Supply
1.7 Oven Equipment (according To The Model)
1.8 Removing and cleaning wire racks
2. Useful Tips
2.1 Shelf Safety System
2.2 Grilling
2.3 According to the Model U-See
2.4 Cleaning And Maintenance
2.5 Service Centre
3. Descrıptıon Of The Dısplay
3.1 Before Usıng The Oven For The Fırst Tıme
3.2 How To Use The Oven
3.3 The Programmatıon
3.4 Cookıng Tıps
3.5 Adjustıng The Dısplay Contrast
4. Chıld Safety
5. Wıfı Feature
GB
.................................................................11
...............................................................11
................................................11
.......................................................................12
..........................................................................12
..............................12
............................................................................12
......................................12
.......................12
....................................12
..........................................................................13
...........................................................13
................................................................................13
............................................13
...............................................13
....................................................................13
................................................14
.......................15
.......................................................15
...........................................................16
......................................................................16
..........................................16
.........................................................................17
........................................................................17
İÇİNDEKİLER
Güvenlik Uyarıları
1. Genel Uyarılar
1.1 Uygunluk Beyanı
1.2 Güvenlik İpuçları
1.3 Kurulum
1.4 Fırının Mutfak Ünitesine Montajı
1.5 Önemli Not
1.6 Cihazın Elektrik Bağlantısının Yapılması
1.7 Fırın Ekipmanları (modele Göre)
1.8 Yan Izgaraların Çırarılması Ve Temizlenmesi
2. Faydalı İpuçları
2.1 Raf Güvenliği Sistemi
2.2 Izgara
2.3 U-see Modele Göre
2.4 Cihazın Temizlenmesi Ve Bakımı
2.5 Servis Merkezi
3. Ekran Açıklaması
3.1 Fırını İlk Kez Kulanmadan Önce
3.2 Fırının Kullanımı
3.3 Programlama
3.4 Pişirme İpuçları
3.5 Ekran Kontrastının Ayarlanması
4. Çocuk Emniyeti
5. Wifi Özelliği
Garanti Belgesi
TR
.....................................................................18
.....................................................................18
................................................................18
................................................................18
..............................................................................19
.........................................19
.........................................................................19
............................19
........................................19
....................19
....................................................................20
.........................................................20
................................................................................20
............................................................20
.......................................20
....................................................................20
................................................................21
........................................22
.................................................................22
.....................................................................23
..................................................................23
.........................................23
...................................................................24
.........................................................................24
......................................................................25
OBSAH
BEZPEČNOSTNÍ POKYNY
1. Všeobecná Upozornění
1.1 Prohlášení O Shodě
1.2 Bezpečnostní Tipy
1.3 Instalace
1.4 Vestavění Trouby Do Kuchyňské Linky
1.5 Důležité
1.6 Připojení K Elektrické Síti
1.7 Vybavení Trouby ( Podle Modelu)
1.8 Vyjmutí A Čištění Drátěných Úrovní Roštů
2. Užitečné Tipy
2.1 Bezpečnostní Systém Roštu
2.2 Grilování
2.3 Podle Modelu U-See
2.4 Čištění A Údržba
2.5 Servisní Středisko
3. Popis Displeje
3.1 Před Prvním Použitím Trouby
3.2 Použití Trouby
3.3 Programování
34. Typy K Pečení
35 . Nastavení Kontrastu Displeje
4. Dětský Zámek
5. Wifi
CZ
...................................................26
.....................................................27
.........................................................27
............................................................27
............................................................................27
.............................27
............................................................................27
.................................................27
.....................................27
.......................28
....................................................................28
.............................................28
...........................................................................28
.........................................................28
...............................................................28
.............................................................28
....................................................................29
...........................................30
...................................................................30
...................................................................31
...................................................................31
............................................31
.....................................................................32
......................................................................................32

• ATTENZIONE: l'apparecchio e le parti accessibili diventano calde durante l'uso. Prestare attenzione a
non toccare le parti calde.
• I bambini al di sotto di 8 anni dovrebbero essere tenuti a distanza se non continuamente supervisionati.
• L'apparecchio può essere usato da bambini dagli 8 anni in su e persone con ridotte capacità fisiche,
sensoriali o mentali o senza esperienza e conoscenza del prodotto se supervisionate o dando loro
istruzioni riguardo al funzionamento dell'apparecchio in maniera sicura e coscente del rischio possibile.
• I bambini non dovrebbero giocare con l'apparecchio.
• La pulizia e la manutenzione non dovrebbero essere fatte da bambini senza supervisione
• Durante l’uso l’apparecchio diventa molto caldo. Si dovrebbe fare attenzione a non toccare gli elementi
riscaldanti all’interno del forno.
• ATTENZIONE: Le parti accessibili possono diventare molto calde durante l’uso. I bambini dovrebbero
essere tenuti a distanza.
• Non usare per la pulizia materiali ruvidi abrasivi o raschietti metallici affilati per pulire le porte di vetro del
forno dato che possono graffiare la superficie e causare la frantumazione del vetro.
• Spegnere il forno prima di rimuovere lo schermo di protezione e, dopo la pulizia, rimontarlo secondo le
istruzioni.
• Usare solo la sonda termica raccomandata per questo forno.
• Non utilizzare un pulitore a vapore.
• ATTENZIONE: Assicurarsi che l’apparecchio sia spento prima di sostituire la lampada per evitare la
possibilità di scosse elettriche.
• Il mezzo di disconnessione deve essere incorporato nel cablaggio fisso in accordo con le leggi di
cablaggio.
• Le istruzioni devono indicare quale tipo di cavo debba essere utilizzato, tenendo presente la
temperatura della superficie posteriore dell’apparecchio.
• Se il cavo di alimentazione è danneggiato, esso deve essere sostituito da un cavo o un assieme speciali
disponibili presso il costruttore o il suo servizio assistenza tecnica.
• ATTENZIONE: Al fine di evitare ogni pericolo dovuto al riarmo accidentale del dispositivo termico di
interruzione, il presente apparecchio non deve essere alimentato con un dispositivo di manovra esterno,
quale un temporizzatore oppure essere connesso a un circuito che viene regolarmente alimentato o
disalimentato dal servizio.
• ATTENZIONE: Le parti accessibili possono diventare calde quando il grill è in uso. I bambini dovrebbero
essere tenuti a distanza.
• Gli eccessi di materiale tracimato devono essere tolti prima della pulizia.
• Durante la Pyrolisi le superfici possono scaldarsi più del solito è pertanto consigliato tenere i bambini a
distanza.
INDICAZIONI DI SICUREZZA
03 IT

1. AVVERTENZE GENERALI
Vi ringraziamo per aver scelto uno dei nostri prodotti, per ottenere da questo elettrodomestico le migliori prestazioni consigliamo di:
• Leggere attentamente le avvertenze contenute nel presente libretto.
• Conservare con cura questo libretto per ogni ulteriore consultazione.
Alla prima accensione del forno può svilupparsi fumo di odore acre, causato dal primo riscaldamento del collante dei pannelli d’isolamento
avvolgenti il forno. Si tratta di un fenomeno assolutamente normale e, in caso si verificasse, occorre attendere la cessazione del fumo prima di
introdurre le vivande.
Il forno è per sua natura un apparecchio che diventa caldo, in modo particolare in corrispondenza del cristallo porta.
Dichiarazione di conformità: questo apparacchio, nelle parti
progettate per venire a contatto con cibi, è conforme con le
regolamentazioni espresse nelle direttive EEC 89/109.
Apponendo la marcatura su questo prodotto, dichiariamo, sotto
la nostra responsabilità, di ottemperare a tutti i requisiti relativi alla
tutela di sicurezza, salute e ambiente previsti dalla legislazione
europea in essere per questo prodotto.
Inserire la spina in una presa di corrente munita di un terzo contatto
corrispondente alla presa di terra, che deve essere collegata in modo
efficiente.
Per i modelli sprovvisti di spina, montare sul cavo una spina
normalizzata che sia in grado di sopportare il carico indicato in targa. Il
conduttore di messa a terra e contraddistinto dai colori giallo-verde.
Tale operazione dovrà essere eseguita da personale professional-
mente qualificato.
In caso di incompatibilità tra la presa e la spina dell’apparecchio fare
sostituire la presa con altra di tipo adatto, da personale professional-
mente qualificato. Si può effettuare anche l’allacciamento alla rete
interponendo tra l’apparecchio e la rete un interruttore omnipolare
dimensionato al carico e rispondente alle norme in vigore. Il cavo di
terra giallo-verde non deve essere interrotto dall’interruttore. La presa
o l’interruttore omnipolare usati per l’allacciamento devono essere
facilmente accessibili ad elettrodomestico installato.
Importante: in fase di installazione, posizionare il cavo di
alimentazione in modo che in nessun punto si raggiungano
temperature superiori di 50°C alla temperatura ambiente.
L’apparecchio è conforme ai requisiti di sicurezza previsti dagli istituti
normativi. La sicurezza elettrica di questo apparecchio è assicurata
soltanto quando lo stesso è correttamente collegato ad un efficace
impianto di messa a terra come previsto dalle vigenti norme di
sicurezza elettrica, (in caso di dubbio, richiedere un controllo accurato
dell’impianto da parte di personale professionalmente qualificato).
Importante: la ditta costruttrice resta sollevata da ogni
responsabilità per eventuali danni a persone o cose, derivanti
dal mancato allacciamento della linea di terra.
ATTENZIONE: la tensione e la frequenza di alimentazione sono
indicate in targa matricola (figura in ultima pagina). Verificare
che la portata elettrica dell’impianto e delle prese di corrente
siano adeguate alla potenza massima dell’apparecchio indicate
in targa. In caso di dubbio rivolgersi ad una persona
professionalmente qualificata.
1.6 ALLACCIAMENTO ELETTRICO
04 IT
1.1 DICHIARAZIONE DI CONFORMITÀ
1.2 INFORMAZIONI SULLA SICUREZZA
•Questo apparecchio dovrà essere destinato solo all’uso per il quale è
stato espressamente concepito, e cioè per la cottura di alimenti.
Ogni altro uso (ad esempio riscaldamento ambiente) è da
considerarsi improprio e quindi pericoloso. Il costruttore non può
essere considerato responsabile per eventuali danni derivanti da usi
impropri, erronei ed irragionevoli.
•L’uso di un qualsiasi apparecchio elettrico comporta
l’osservanza di alcune regole fondamentali.
In particolare:
-non tirare il cavo di alimentazione per staccare la spina dalla presa di
corrente
-non toccare l’apparecchio con mani o piedi bagnati o umidi
-non usare l’apparecchio a piedi nudi
-in generale è sconsigliabile l’uso di adattatori, prese multiple e
prolunghe.
- In caso di guasto e/o di cattivo funzionamento dell’apparecchio,
spegnerlo e non manometterlo.
•In caso di danneggiamento del cavo, provvedere tempestivamente
alla sua sostituzione secondo le seguendi indicazioni:
aprire il coperchio morsettiera, togliere il cavo di alimentazione e
sostituirlo con uno corrispondente, (tipo H05RR-F, H05VVF,
H05V2V2-F) e adeguato alla portata dell’apparecchio.
Tale operazione dovrà essere eseguita da personale
professionalmente qualificato. Il conduttore di terra (giallo-verde),
deve obbligatoriamente essere più lungo di circa 10 mm rispetto ai
conduttori di linea.
Per l’eventuale riparazione rivolgersi solamente ad un centro di
assistenza tecnica autorizzato e richiedere l’utilizzo di ricambi
originali.
Il mancato rispetto di quanto sopra può compromettere la sicurezza
dell’apparecchio.
•Non rivestire le pareti del forno con fogli d'alluminio da cucina o
fogli monouso commerciali, perche potrebbero fondersi a
contatto con le superfici in smalto caldo e danneggiare le
superfici in smalto all'interno del forno.
1.3 INSTALLAZIONE
L’installazione è a carico dell’acquirente e la Casa Costruttrice è
esonerata da questo servizio; gli eventuali interventi richiesti alla
Casa Costruttrice che dipendono da una errata installazione non sono
compresi nella garanzia.
L’installazione deve essere effettuata secondo le istruzioni da
personale professionalmente qualificato. Una errata installazione può
causare danni a persone, animali o cose, nei confronti dei quali il
costruttore non può essere considerato responsabile.
Per garantire un buon funzionamento dell’apparecchio da incasso è
necessario che il mobile sia di caratteristiche adatte. I pannelli dei
mobili adiacenti il forno dovranno essere in materiale resistente al
calore. In particolare nel caso di mobili in legno impiallicciato le colle
dovranno essere resistenti alla temperatura di 120°C: materiali
plastici o collanti non resistenti a questa temperatura sono causa di
deformazioni o scollature. In conformità alle norme di sicurezza, una
volta incassato l’apparecchio, non debbono essere possibili eventuali
contatti con le parti elettriche. Tutte le parti che assicurano la
protezione debbono essere fissate in modo tale da non poter essere
tolta senza l’aiuto di qualche utensile.
Per garantire una buona areazione è necessario eliminare la
parete posteriore del vano; inoltre il pianale di appoggio deve
avere una luce posteriore di almeno 45 mm.
1.4 INSERIMENTO DEL MOBILE
Inserire l’apparecchio nel vano del mobile (sottopiano o in colonna). Il
fissaggio si esegue con 4 viti attraverso i fori della cornice, visibili
aprendo la porta.(vedere ultima pagina). Per consentire la migliore
aerazione del mobile, i forni devono essere incassati rispettando le
misure e le distanze indicate nella figura in ultima pagina.
Nota: per i forni da abbinamento con piano cottura è indispensabile
rispettare le istruzioni contenute nel libretto allegato all’
apparecchiatura da abbinare.
1.5 IMPORTANTE

05 IT
La leccarda serve a raccogliere i grassi che
colano durante la cottura con il grill. Deve
essere utilizzata solamente con il grill, il
girarrosto o il turbo girarrosto, secondo il
modello.
Attenzione: in tutti gli altri modi di cottura, la leccarda deve essere tolta
dal forno.
Non usare mai la leccarda per cuocere gli arrosti perché ne
risulterebbe un eccessivo sviluppo di fumo e vapori e il forno si
sporcherebbe inultimente.
Pizza set é l'idéale per la cottura delle
pizze. Il set deve essere utilizzato in
abbinamento alla funzione Pizza.
La griglia piatta da combinare con la
leccarda per tutti i tipi di grigliate. Una
presina è fornita per permettere di estrarre
l’insieme dal forno senza scottarsi.
Non lasciare mai la presina nel forno.
Gli accessori devono essere tolti dal forno se non vengono
utilizzati.
2. CONSIGLI UTILI
2.1 GRIGLIE FORNO - SISTEMA DI ARRESTO
Il forno è dotato di un nuovo sistema di
arresto griglie. Questo sistema consente di
estrarre le griglie quasi completamente
senza che queste fuoriescano dal forno
mantenendole perfettamente in piano,
consentendo di verificare e mescolare il
cibo con la massima tranquillità e
sicurezza.
Per estrarre le griglie è sufficiente, come
indicato sul disegno, alzarle, prendendole
dalla parte anteriore e tirarle.
2.2 LA COTTURA AL GRILL
Questo tipo di cottura consente la doratura rapida dei cibi. A questo
scopo consigliamo di inserire la griglia generalmente nel 3° o 4°
ripiano, secondo le dimensioni dei cibi (Fig. pag. 8). Quasi tutte le
carni possono essere cotte al grill, fanno eccezione alcune carni
magre di selvaggina ed i polpettoni. La carne ed il pesce da cucinare
al grill vanno leggermente unti con olio.
1.8 Rimozione e pulizia delle griglie
1. Svitare in senso antiorario i dadi zigrinati
2. Rimuovere le griglie tirandole verso se stessi
3. Pulire le griglie lavandole in lavastoviglie o con una spugna
bagnata e asciugandole subito dopo
4. Dopo aver pulito le griglie, installarle nuovamente
5. Fissare i dadi zigrinati
A
Vantaggi del sistema :
•Visibilità forno ottimale,
•Durata prolungata nel tempo,
•Consumo energetico estremamemente
basso -95% dei tradizionali sistemi di illuminazione forni,
•Elevato rendimento,
•Design high tech.
“Apparecchio con luce LED bianca di classe 1M secondo la IEC
60825- 1:1993 + A1:1997 + A2:2001 (equivalente a EN 60825-1: 1994
+ A1:2002 + A2:2001) ; massima potenza ottica emessa =459nm <
150uW. Non osservare direttamente con strumenti ottici.”
2.3 SECONDO MODELLO
E’ un sistema che si sostituisce all’illuminazione con tradizionali
lampadine ad incandescenza; nella controporta del forno,
completamente in vetro temprato, sono stati inseriti 14 Led, di
altissima qualità a luce bianca, che illuminano l’interno del forno con
una luce diffusa permettendo una visione della cottura senza ombre,
su più livelli.
Il design creato per il supporto dei 14 Led regala un elegante effetto
high-tech
1.7 DOTAZIONE DEL FORNO (secondo modello)
Prima di utilizzare gli accessori del
forno per la prima volta è necessario
pulirli. Per questa operazione si
consiglia di utilizzare una spugna.
Successivamente risciacquare ed
asciugare gli accessori.
La griglia semplice serve da supporto per
teglie, pirofile, stampi per i dolci.
La griglia porta-piatto serve in particolare per le grigliate di carne
poiché sostiene anche la leccarda che raccoglie i grassi che colano.
Grazie ai loro profili speciali, le griglie restano sempre in orizzontale,
anche quando vengono estratte verso l'esterno. Non c'é nessun
rischio quindi che i tegami scivolino o si ribaltino.
2.4 PULIZIA E MANUTENZIONE
Pulire le superfici in acciaio inox e smaltate con acqua tiepida e
sapone, oppure con appositi prodotti in commercio, evitando
assolutamente l’uso di polveri abrasive che danneggerebbero le
superfici e le parti estetiche.
La pulizia del forno è molto importante e deve essere effettuata ogni
volta che questo viene usato. Infatti, sulle pareti si depositano grassi
sciolti durante la cottura che potrebbero, alla successiva accensione,
produrre odori sgradevoli che nuocerebbero al buon esito della
cottura. Per la pulizia usare acqua calda e detersivo, sciacquando
accuratamente.
Per eliminare questo fastidioso intervento, su tutti i modelli possono
essere inseriti pannelli autopulenti, offerti come accessori opzionali:
vedere apposito paragrafo "FORNO AUTOPULENTE CATALITICO".
Usare detersivi e pagliette d’acciaio per le griglie inox. La pulizia delle
superfici in cristallo temperato deve essere eseguita quando le
superfici sono fredde. Eventuali rotture dovute alla non osservanza di
questa regola elementare non rientrano nei termini di garanzia.
La lampada forno può essere sostituita disinserendo elettricamente
l’apparecchio e svitando l’ampolla che la racchiude, sostituendo la
lampada non funzionante con una analoga resistente alle alte
temperature.

2.5 SERVIZIO ASSISTENZA CLIENTI
CERTIFICATO DI GARANZIA CONVENZIONALE: cosa fare?
Il Suo prodotto è garantito, alle condizioni e nei termini riportati sul
certificato inserito nel prodotto ed in base alle previsioni del
decreto legislativo 24/02, nonché del decreto legislativo 6
settembre 2005, n. 206, per un periodo di 24 mesi decorrenti dalla
data di consegna del bene.
Così come riportato nei testi dei Decreti Legislativi citati, il
certificato di garanzia dovrà essere da Lei conservato,
debitamente compilato, per essere mostrato al Servizio
Assistenza Tecnica Autorizzato, in caso di necessità, unitamente
ad un documento fiscalmente valido rilasciato dal rivenditore al
momento dell’acquisto (bolla di consegna, fattura, scontrino
fiscale, altro) sul quale siano indicati il nominativo del rivenditore,
la data di consegna, gli estremi identificativi del prodotto ed il
prezzo di cessione. Resta pure inteso che, salvo prova contraria,
poiché si presume che i difetti di conformità che si manifestano
entro sei mesi dalla consegna del bene esistessero già a tale data,
a meno che tale ipotesi sia incompatibile con la natura del bene o
con la natura del difetto di conformità, il Servizio diAssistenza
Tecnica Autorizzato Gias, verificato il diritto all’intervento, lo
effettuerà senza addebitare il diritto fisso di intervento a domicilio,
la manodopera ed i ricambi. Per contro, nel successivo periodo di
diciotto mesi di vigenza della garanzia, sarà invece onere del
consumatore che intenda fruire dei rimedi accordati dalla garanzia
stessa provare l’esistenza del difetto di conformità del bene sin dal
momento della consegna; nel caso in cui il consumatore non fosse
in grado di fornire detta prova, non potranno essere applicate le
condizioni di garanzia previste e pertanto il Servizio di Assistenza
Tecnica Autorizzato Gias effettuerà l’intervento addebitando al
consumatore tutti i costi
relativi.
ESTENSIONE DELLA GARANZIA FINO A 5 ANNI: come?
Le ricordiamo inoltre che sullo stesso certificato di garanzia
convenzionale Lei troverà le informazioni ed i documenti
necessari per prolungare la garanzia dell’apparecchio sino a 5
anni e così, in caso di guasto, non pagare il diritto fisso di
intervento a domicilio, la manodopera ed i ricambi.
Per qualsiasi informazione necessitasse, La preghiamo rivolgersi
al numero telefonico del Servizio Clienti 199.12.13.14.
ANOMALIE E MALFUNZIONAMENTI: a chi rivolgersi?
Per qualsiasi necessità il centro assistenza autorizzato è a Sua
completa disposizione per fornirLe i chiarimenti necessari;
comunque qualora il Suo prodotto presenti anomalie o mal
funzionamenti, prima di rivolgersi al Servizio Assistenza
Autorizzato, consigliamo vivamente di effettuare i controlli indicati
sopra.
UN SOLO NUMERO TELEFONICO PER OTTENERE
ASSISTENZA
Qualora il problema dovesse persistere, componendo il “Numero
Utile” sotto indicato, sarà messo in
contatto direttamente con il
ServizioAssistenza
TecnicaAutorizzato che opera nella
Sua zona di residenza. Attenzione, la
chiamata è a pagamento; il costo verrà
comunicato, tramite messaggio vocale, dal Servizio clienti
dell’operatore telefonico utilizzato. Dettagli sono presenti sul sito
internet www.candy-group.com
MATRICOLA DEL PRODOTTO. Dove si trova?
E’ indispensabile che comunichi al Servizio Assistenza Tecnica
Autorizzato la sigla del prodotto ed il numero di matricola (16
caratteri che iniziano con la cifra 3) che troverà sul certificato di
garanzia oppure sulla targa matricola del prodotto (figura in ultima
pagina). In questo modo Lei potrà contribuire ad evitare trasferte
inutili del tecnico, risparmiando oltretutto i relativi costi.
Questo apparecchio è contrassegnato in
conformità alla Direttiva europea 2012/19/EU
sulle apparecchiature elettriche ed elettroniche
(WEEE). I WEEE contengono sia le sostanze
inquinanti (che possono provocare
conseguenze negative sull'ambiente) che
componenti di base (che possono essere
riutilizzati). È importante che i WEEE siano
soggetti a rattamenti specifici, per rimuovere e smaltire
correttamente tutti gli inquinanti e recuperare e riciclare tutti i
materiali.
I singoli possono giocare un ruolo importante nell'assicurare
che i WEEE non diventino un problema ambientale; è
essenziale seguire alcune regole di base:
• I WEEE non devono essere trattati come rifiuti domestici.
• I WEEE devono essere portati ai punti di raccolta appositi
gestiti dal comune o da società registrate. In molti Paesi, per i
WEEE grandi, potrebbe essere presente la raccolta
domestica.
• Quando si acquista un nuovo apparecchio, quello vecchio
potrebbe essere restituito al rivenditore che deve acquisirlo
gratuitamente su base singola, sempre che l'apparecchio sia
del tipo equivalente e abbia le stesse funzioni di quello
acquistato.
06 IT

3. DESCRIZIONE DEL DISPLAY
Display: orario, programmazione della modalità di
cottura, indicatori luminosi, temperatura di cottura
e posizionamento delle mensole.
Impostazioni: temperatura, programmazione del ciclo di cottura e della fine
del ciclo di cottura, regolabile ruotando il selettore verso “-“ oppure “+”
Per confermare l'impostazione: premere il pulsante
PULSANTE PER REGOLARE CONFERMARE
Indicatore luminoso
Chiusura sportello forno
Indicatore luminoso
Dispositivo di protezione del forno
Display Booster
Pre-riscaldamento
Stato operativo del forno
e livello consigliato
Girarrosto
PYRO
Indicatore luminoso:
incremento della temperatura
Orologio /
Programmazione /
Temperatura di cottura
Simbolo programma: cottura
Tempo Timer
fine del ciclo di cottura
Indicatore luminoso
WIFI
07 IT

1-Ruotare il selettore del forno impostandolo sulla funzione di cottura
desiderata. Vengono visualizzati gli elementi di riscaldamento che
verranno utilizzati per il metodo di cottura scelto.
2-Viene quindi visualizzata la temperatura appropriata per il metodo di
cottura selezionato. La temperatura può tuttavia essere impostata su
qualsiasi valore compreso entro l'intervallo indicato (vedere la tabella
precedente). Per modificare la temperatura, ruotare il pulsante
centrale e premerlo appena il timer visualizza la temperatura corretta.
La temperatura visualizzata sul display è fissa, ma può comunque
essere modificata in fase di cottura. Il forno avvia il ciclo di cottura e
inizia a riscaldarsi. L'indicatore luminoso lampeggia fino al
raggiungimento della temperatura selezionata. Al termine
dell'operazione, il forno emette un avviso acustico e l'indicatore
luminoso si accende fisso.
3-Per programmare il tempo di cottura e l'ora di fine del ciclo di cottura,
è sufficiente ruotare il selettore dei programmi e posizionarlo sul
“tempo di cottura” o “l'ora di fine del ciclo di cottura” desiderati. L'icona
del “tempo di cottura” o “dell'ora di fine del ciclo di cottura” inizia a
lampeggiare. Utilizzare il pulsante centrale per modificare le
impostazioni e controllare che il timer visualizzi i tempi desiderati.
Dopo aver effettuato queste operazioni, riportare il selettore in
posizione di “arresto” per confermare la nuova impostazione.
Per ulteriori informazioni sulla programmazione, fare riferimento
al Capitolo 5.3 - PROGRAMMAZIONE.
4 - Al termine del ciclo di cottura, riportare il selettore delle funzioni in
posizione di arresto. L'indicatore luminoso inizia nuovamente a
lampeggiare e continua a rimanere acceso anche dopo che il forno è
stato spento, fino a quando la temperatura non si abbassa a
sufficienza.
• MODALITÀ DI COTTURA
ELEMENTO RISCALDANTE INFERIORE In questa
modalità viene utilizzato l'elemento inferiore. Questa modalità è
ideale per cuocere tutti i piatti a base di pasta; ad esempio flan,
quiche, paté e qualsiasi pietanza che richieda più calore e irradiazione
dal basso.
Tenere sempre lo sportello del forno chiuso durante la cottura.
ELEMENTO RISCALDANTE INFERIORE + VENTOLA -
L'uso combinato dell'elemento riscaldante inferiore e della ventola è
ideale per la cottura di torte di frutta, crostate, quiche e dolci.
ELEMENTO RISCALDANTE INFERIORE + SUPERIORE -
In questa modalità di cottura vengono utilizzati entrambi gli elementi
riscaldanti, ossia quello inferiore e superiore. Questo metodo è ideale
per gli arrosti e le pietanze più tradizionali, come la carne rossa, il
roastbeef, le cosce di agnello, la selvaggina, il pane e le pietanze
avvolte in fogli di alluminio.
ELEMENTO RISCALDANTE INFERIORE + SUPERIORE
+ VENTOLA - In questa modalità vengono utilizzati entrambi gli
elementi riscaldanti, ossia quello superiore e inferiore, ma viene
contemporaneamente fatta circolare aria calda all'interno del forno. È
consigliabile utilizzare questo metodo per cucinare carne bianca,
torte salate, pesce e verdura. Questo metodo assicura una maggiore
penetrazione del calore e richiede un tempo di pre-riscaldamento
minore. L'uso della ventola consente di cucinare temporaneamente
tipi di alimenti diversi, perché consente di distribuire uniformemente il
calore senza il rischio che si mescolino sapori e odori. Quando si
cucinano più tipi di alimenti contemporaneamente, è consigliabile
incrementare di 10 minuti il tempo di cottura.
ELEMENTO RISCALDANTE CIRCOLARE + VENTOLA In
questa modalita di cottura vengono contemporaneamente utilizzati gli
elementi riscaldanti inferiore, superiore e circolare, che provvede a far
circolare aria calda all'interno del forno. Questa modalita di cottura e
indicata per le stesse pietanze indicate nella sezione relativa alla
cottura con ventola.
GRILL In questa modalità di cottura viene utilizzato solo
l'elemento riscaldante superiore. Questa modalità di cottura è
particolarmente indicata per i piatti grigliati, gli spiedini e i piatti
gratinati. Il grill deve essere pre-riscaldato a una temperatura alta per
5 minuti. Per ottenere risultati di cottura ottimali e rendere la carne più
succulenta, è consigliabile collocarla a una certa distanza dal grill
anche se i tempi di cottura sono più lunghi. I filetti di carne rossa e
pesce devono essere collocati direttamente sul ripiano con la
vaschetta di gocciolamento posizionata sotto al ripiano inferiore.
3.1 PRIMA DI UTILIZZARE IL FORNO PER LA
PRIMA VOLTA
PULIZIA PRELIMINARE
-Pulire sempre il forno prima di utilizzarlo per la prima volta:
-Pulire le superfici esterne con un panno morbido leggermente
inumidito.
-Lavare tutti gli accessori e pulire l'interno del forno con del detergente
per piatti ed acqua calda.
-Verificare che il forno sia vuoto, impostare la temperatura massima e
lasciarlo acceso per almeno 1 ora per rimuovere tutti gli odori
normalmente presenti nei forni nuovi. Verificare che la cucina sia ben
ventilata durante l'esecuzione di queste operazioni.
PROMEMORIA
Controllare che il timer funzioni correttamente
Premere il pulsante del timer per verificare che funzioni.
Arresto del forno
Può essere necessario effettuare questa informazione se si seleziona
un comando errato. Per arrestare il forno, ruotare all'indietro il selettore
e portarlo in posizione di arresto.
Blocco dei comandi
Per bloccare i comandi del forno, selezionare il dispositivo di protezione
del forno. Per ulteriori informazioni, consultare la sezione intitolata
“Programmazione del dispositivo di sicurezza”.
Ventola di raffreddamento
Lo scopo della ventola è proteggere il pannello di controllo e l'elettronica
dal calore. La ventola si avvia automaticamente e si arresta al momento
in cui viene spento il forno.
Luce del forno
Ruotando il selettore della luce, è possibile spegnere la luce del forno
quando questo non è in uso. La luce è sempre accesa quando il forno è
in uso e si accende quando si apre lo sportello.
•IMPOSTAZIONE DELL'OROLOGIO
L'orologio deve sempre essere reimpostato quando si collega il forno
all'alimentazione elettrica o dopo un'interruzione prolungata
dell'alimentazione elettrica.
Per impostare l'orologio
1- Ruotare il selettore dei comandi e impostarlo sul simbolo
dell'orologio;
2- utilizzare il pulsante centrale per impostare l'orologio e ruotare
la manopola in direzione “-” o “+”;
3- riportare la manopola di comando in posizione di ARRESTO.
3.2 COME UTILIZZARE IL FORNO
•MODALITÀ MANUALE
I metodi di cottura consigliati per la modalità manuale sono descritti
nella seguente tabella, che riporta anche la temperatura consigliata
per ciascun metodo di cottura. La temperatura può tuttavia essere
impostata su qualsiasi valore compreso entro l'intervallo indicato.
10:30
Parte inferiore+Ventole
Parte inferiore
Modalita di
funzionamento secondo
il modello di forno
Temperatura
pre-impostata
°C
Temperatura
pre-determinata °C
Funzione
Booster*
210
160
50-220
50-220
Booster
Parte inferiore+Parte superiore+Ventole
Elemento di ris caldamento
circolare + Ventole
Grill
Grill+Ventole
Grill+Girarrosto+Ventole
Sbrinamento
Mantenere in caldo
*Booster: aumento rapido della temperatura.
210
180
L2
190
240
40
60
50-230
50-230
L1-L3
50-200
180-240
No
No
Booster
Booster
**il forno deve avere questa funzione
Parte inferiore+Parte superiore
220 50-240
Pizza
230
230
**
Booster
08 IT

3.3 PROGRAMMAZIONE
SIMBOLI VISUALIZZATI
SUL DISPLAY
Timer attivo
Programmazione
dell'ora di fine cottura
Programmazione dell'ora di
fine cottura
Protezione del forno attiva
Chiusura dello sportello del forno
TIMER:
Il funzionamento del timer è indipendente dal forno e non ha alcun
effetto sugli elementi riscaldanti. Il suo scopo è fungere
semplicemente da promemoria.
•Spostare la manopola in posizione timer. Sul display vengono
visualizzati prima il simbolo del timer, quindi le cifre 00:00.
•Appena i minuti iniziano a lampeggiare, ruotare il pulsante centrale,
posizionarlo sul numero di minuti desiderato e premere nuovamente il
pulsante per confermare.
•Appena le ore iniziano a lampeggiare, ruotare il pulsante centrale,
posizionarlo sul numero di ore desiderato, quindi premere
nuovamente il pulsante per confermare.
•Spostare la manopola in posizione di arresto. Alla scadenza
dell'intervallo impostato, il tempo di cottura scompare dal display.
Viene generato un segnale acustico per 15 secondi e l'icona del timer
inizia a lampeggiare (per disattivare l'icona prima dell'intervallo di 15
secondi, premere il pulsante centrale).
PROGRAMMAZIONE DEL TEMPO DI COTTURA:
Il tempo di cottura è pre-programmato per numerose ricette. Se
necessario, è possibile impostare un tempo di cottura in modalità
Manuale, Scongelamento o Riscaldamento.
•Spostare la manopola in posizione di cottura. Sul display viene
visualizzata l'icona del tempo di cottura. Successivamente, vengono
visualizzati il tempo di cottura per le varie ricette oppure 00:00 per le
altre funzioni del forno.
Selettore
dei programmi
È consigliabile salare la carne solo al termine della cottura, perché il
sale favorisce gli schizzi di grasso, che sporca il forno e produce molto
fumo.
I tagli di carne bianca, di maiale, vitello e pesce possono essere inseriti
freddi nel forno. Benché questo accorgimento allunghi i tempi di cottura,
consente di cuocere meglio la porzione centrale del taglio di carne
perché il calore a disposizione più tempo per penetrare nel taglio di
carne.
Per cucinare in modo corretto la carne rossa, è indispensabile pre-
riscaldare in modo appropriato il forno.
GRILL
•Prima di utilizzare il grill
Rimuovere la carne dal congelatore qualche ora prima della cottura.
Collocare la carne su più strati di carta da cucina per mantenere
inalterato il sapore delle pietanze ed evitare che la porzione centrale
rimanga cruda. Aggiungere pepe e spezie alla carne prima di grigliarla,
ma non aggiungere sale per mantenere la carne più succosa e tenera.
Applicare un leggero strato di olio alla carne, preferibilmente con un
pennello da cucina largo. Quindi, cospargere altro pepe e spezie (timo,
ecc.) sulla carne.
•Durante la cottura:
Non perforare mai la carne mentre la si gira, perché ciò provoca la
dispersione del sugo e rende la carne più secca.
COTTURA DI DOLCI
Evitare di usare teglie lucide perché riflettono il calore e possono
rovinare la cottura. Se il dolce cuoce troppo rapidamente, coprirlo con
carta oleata o carta d'alluminio. Attenzione: applicare la carta
d'alluminio in modo che il lato lucido sia rivolto verso il dolce perché
altrimenti il calore viene riflesso dalla superficie lucida e non penetra nel
dolce.
Evitare di aprire lo sportello durante i primi 20-15 minuti
L'apertura dello sportello del forno potrebbe provocare lo
“sgonfiamento” di sufflè, brioche, pandispagna, ecc. Per controllare se
il dolce è perfettamente cotto, è sufficiente punzecchiare il centro con la
lama di un coltello o un ago da maglia in metallo. Se l'ago estratto è
asciutto, il dolce è pronto e la cottura può definirsi conclusa. Se l'ago
che si estrae dal dolce è umido o se ci sono pezzetti di dolce attaccati,
proseguire la cottura, abbassando leggermente la temperatura del
forno per evitare che il dolce si bruci.
3.4 SUGGERIMENTI PER LA COTTURA
STOP
GRILL+ VENTOLA In questa modalità di cottura viene
utilizzato l'elemento riscaldante superiore insieme alla ventola per
fare circolare aria calda all'interno del forno. È consigliabile pre-
riscaldare il forno solo per le carni rosse, ma non per quelle bianche. Il
grill è ideale per le pietanze con un maggiore spessore, come la carne
di suino o pollo. Gli alimenti da grigliare devono essere collocati al
centro del ripiano intermedio. Collocare la vaschetta di
gocciolamento sotto al ripiano per raccogliere l'eventuale grasso che
gocciola in fase di cottura. Per ottenere risultati ottimali, non collocare
gli alimenti troppo vicino al grill e girare la carne a metà del ciclo di
cottura.
GRILL+ GIRARROSTO+ VENTOLA - L'uso simultaneo
dell'elemento riscaldante superiore e della ventola e del girarrosto
consentono di cucinare le pietanze in modo uniforme senza che si
secchi e diventi insapore. Il girarrosto è programmato per continuare
a ruotare per circa cinque minuti dopo la cottura, in modo da
consentire l'uso del calore residuo del forno. Quando si utilizza il
girarrosto, non è necessario pre-riscaldare il forno.
SCONGELAMENTO Questa modalità si attiva quando si
sposta il selettore in questa posizione. La ventola fa circolare aria
calda attorno all'alimento congelato e ne consente quindi uno
scongelamento rapido senza alcuna alterazione del sapore originale.
La temperatura è preimpostata su 40°C e non può essere modificata.
RISCALDAMENTO Questa modalità è quella consigliata
per riscaldare alimenti pre-cotti (che devono essere posizionati sul
secondo ripiano in basso dall'alto) o per scongelare pasta o pizza
congelata (in questo caso è necessario utilizzare il ripiano più basso).
La temperatura è preimpostata su 60°C e non può essere modificata.
PIZZA Questa funzione consente di far circolare aria calda
all'interno del forno ed è particolarmente indicata per pietanze come
pizze o dolci.
WIFI
•Appena i minuti iniziano a lampeggiare, ruotare il pulsante centrale,
posizionarlo sul numero di minuti desiderato e premere nuovamente il
pulsante per confermare.
•Appena le ore iniziano a lampeggiare, ruotare il pulsante centrale,
posizionarlo sul numero di ore desiderato, quindi premere
nuovamente il pulsante per confermare.
•Riportare la manopola in posizione di arresto per confermare il nuovo
tempo di cottura. Alla scadenza dell'intervallo impostato, il tempo di
cottura scompare dal display. Viene generato un segnale acustico per
15 minuti e i simboli del tempo di cottura e di arresto iniziano a
lampeggiare.
•Riportare la manopola in posizione di arresto. Se non si effettua
questa operazione, i simboli del tempo di cottura e di arresto
continuano a lampeggiare.
PROGRAMMAZIONE DELL'ORA DI FINE COTTURA:
Il tempo di cottura e di fine cottura è pre-programmato per molte ricette.
Se necessario, è possibile tempi diversi in modalità Manuale,
Scongelamento o Riscaldamento.
•Spostare la manopola in posizione di fine cottura. Viene visualizzato il
simbolo di arresto. Vengono visualizzati i tempi di fine cottura per varie
ricette oppure 00:00 per le altre funzioni o l'ora del giorno.
•Ruotare il selettore dei programmi per confermare l'ora di fine cottura.
•Appena i minuti iniziano a lampeggiare, ruotare il pulsante centrale e
impostarlo sul numero di minuti desiderato, quindi premerlo
nuovamente per confermare.
•Appena le ore iniziano a lampeggiare, ruotare il pulsante centrale e
impostarlo sul numero di ore desiderato, quindi premerlo nuovamente
per confermare. Nota: quando si imposta un avvio differito, l'ora di fine
cottura viene visualizzata sul display insieme ai simbolo del tempo di
cottura e di arresto, ed è possibile selezionare solo la modalità Ricetta.
Il forno calcola automaticamente l'ora di inizio e l'ora di fine in base al
tempo di cottura, spegnendosi automaticamente al termine del ciclo di
cottura. Al termine del ciclo di cottura, viene generato anche un avviso
acustico della durata di 15 secondi e sul display iniziano a lampeggiare
i simbolo del tempo di cottura e di arresto.
•Ruotare il selettore delle funzioni e impostarlo in posizione di arresto.
Se non si effettua questa operazione, i simboli continuano a
lampeggiare sul display.
09 IT

4. DISPOSITIVO DI PROTEZIONE
Questa funzione deve sempre essere attivata se nell'abitazione ci
sono dei bambini, perché impedisce loro di accendere il forno o di
modificare i programmi pre-impostati. Questa funzione di sicurezza
impedisce l'uso del pannello di controllo mentre il forno è in funzione.
È possibile impostare due livelli di sicurezza:
LIVELLO 1 : blocco del selettore dei comandi e il pulsante centrale.
•Per attivare la funzione: ruotare il selettore dei comandi e impostarlo
sulla funzione di protezione.
•Risultato: i selettori vengono disattivati*.
•Per disattivare la funzione: ruotare il selettore dei comandi e
impostarlo su 0.
•LIVELLO 2 : blocco dei selettori delle funzioni.
•Per attivare la funzione: ruotare il selettore delle funzioni e
impostarlo sulla funzione di sicurezza, quindi premere e tenere
premuto il pulsante per 3 secondi.
•Risultato: tutti i comandi vengono disattivati*.
•Per disattivare la funzione: effettuare le operazioni descritte per la
procedura di attivazione. Ruotare il selettore delle funzioni e
impostarlo sulla funzione di protezione, quindi premere e tenere
premuto il pulsante centrale per 3 secondi.
*Nota : per motivi di sicurezza, anche se tutti i comandi sono bloccati,
è comunque spegnere il forno impostando il selettore su 0.
5. FUNZIONE WIFI
CONFIGURAZIONE WIFI
• Ruotare il selettore programmi sulla posizione WiFi ( il simbolo “@”
lampeggia).
• Una volta che il forno connesso ad un router il simbolo “@” rimane è
acceso.
• In caso di mancata connessione il simbolo “@” continua a
lampeggiare (vedere il paragrafo gestione spia @).
• Se il selettore programmi viene ruotato su WiFi, il forno può essere
controllato solo da remoto (il selettore funzioni e l’encoder sono
disabilitati).
• Nelle altre posizioni di cottura, il forno non è controllabile dall’esterno
ma fornisce i parametri di funzionamento se interrogato.
RESET
Per resettare il WiFi, ruotare il selettore programmi su WiFi (non ci
deve essere un programma in corso) e premere il tasto encoder per 3
secondi.
Dopo 3 secondi compare sul display la scritta”rSt” ed il simbolo “@”
inizia a lampeggiare.
GESTİONE SPİA “@”
• Quando il forno è spento, la spia è spenta
• Quando il selettore programmi è in posizione WiFi la spia lampeggia
(1’’ accesa e 1’’ spenta) se il forno è in modalita acces point
(collegamento punto a punto) mentre è accesa fissa se il forno è
collegato ad un router.
• Quando il forno è acceso in posizione WiFi e sta cercando di
collegarsi ad un router, la spia lampeggia (3’’ accesa e 1’’ spenta).
• Quando il forno è acceso ma non in posizione Wi-Fi (sola lettura) la
spia lampeggia (1’ accesa e 3’’ spenta).
HOOVER WIZARD:
Per informazioni dettagliate su COME CONNETTERE
il tuo elettrodomestico Wizard e su COME USARLO
al meglio, vai su http://www.hooverwizard.com o
visita il sito dedicato al Servizio Clienti Wizard
http://wizardservice.candy-hoover.com
È possibile regolare il contrasto del display in qualsiasi momento.
L'impostazione predefinita è “C5”. Per regolare il contrasto, attenersi
alla seguente procedura:
Ruotare il selettore dei programmi e impostarlo su “Luce”, quindi
ruotare il selettore delle funzioni e impostarlo su “O”. Premere il
pulsante centrale per 3 secondi e attendere che venga visualizzato il
messaggio“CX” sul display, dove X è il livello di contrasto. Ruotare il
pulsante centrale per regolare il contrasto. È possibile impostare un
qualsiasi valore compreso tra 1 e 9. Premere nuovamente il pulsante
centrale per 3 secondi per confermare.
3.5 REGOLAZIONE DEL CONTRASTO DEL
DISPLAY
10 IT

11 GB
WARNING: The appliance and its accessible parts become hot during use. Care should be taken to avoid
touching heating elements.
• Children under 8 Year of age must be kept away from the appliance unless they are continuously
supervised.
• This appliance can be used by children aged from 8 years and above and persons with reduced
physical, sensory or mental capabilities or lack of experience and knowledge if they have been given
supervision or instruction concerning use of the appliance in a safe way and understand the hazards
involved.
• Children must not play with the appliance.
• Cleaning and user maintenance shall not be made by children without supervision.
• During use the appliance becomes hot. Care should be taken to avoid touching heating elements inside
the oven.
WARNING: Accessible parts may become hot during use. Young children must be kept away.
• Do not use harsh abrasive cleaners or sharp metal scrapers to clean the oven door glass since they can
scratch the surface, which may result in shattering of the glass.
• The oven must be switched off before removing the guard, after cleaning, the guard must be replaced in
accordance with the instructions.
• Only use the temperature probe recommended for this oven.
• Do not use a steam cleaner for cleaning operations.
• WARNING: Avoid possibility of electric shock - ensure the appliance is switched off before replacing the
lamp.
• The means for disconnection must be incorporated in the fixed wiring in accordance with the wiring
rules.
• The instructions state the type of cord to be used, taking into account the temperature of the rear surface
of the appliance.
• If the supply cord is damaged, it must be replaced by a special cord or assembly available from the
manufacturer or its service agent.
• CAUTION: In order to avoid a hazard due to inadvertent resetting of the thermal cutout, this appliance
must not be supplied through an external switching device, such as a timer, or connected to a circuit that
is regularly switched on and off by the utility.
CAUTION: Accessible parts may be hot when the grill is in use. Young children must be kept away.
• Excess spillage must be removed before cleaning.
• During self-cleaning pyrolytic operation the surfaces may get hotter than usual and children MUST be
kept away.
SAFETY INSTRUCTIONS
1. GENERAL WARNINGS
Thank you for choosing one of our products. To get the most out of your oven we recommend that you:
• Read the notes in this manual carefully: they contain important instructions on how to install, use and service this oven safely.
• Keep this booklet in a safe place for easy, future reference.
When the oven is first switched on it may give out acrid smelling fumes. This is because the bonding agent for insulating panels around the
oven has been heated up for the first time.
This is a completely normal, if it does occur you merely have to wait for the fumes to clear before putting the food into the oven.
An oven by its very nature becomes very hot. Especially the glass of the oven door.
The parts of this appliance that may come into contact with foodstuffs comply with the provisions of EEC Directive 89/109.
By placing the mark on this product, we are confirming compliance to all relevant European safety, health and environmental
requirements which are applicable in legislation for this product.
1.1 DECLARATION OF COMPLIANCE
When you have unpacked the oven, make sure that it has not been damaged in any way. If you have any doubts at all, do not use it: contact a
professionally qualified person. Keep packing materials such as plastic bags, polystyrene, or nails out of the reach of children as they are
dangerous.

The pizza set is designed for pizza cooking.
In order to obtain the best results the set
must be used together with Pizza function.
The tray holder
The tray holder shelf is ideal for grilling.
Use it in conjunction with the drip tray. A
handle is included to assist in moving the
both accessories safely. Do no leave the
handle inside the oven.
12 GB
1.3 INSTALLATION
Installation is the customer’s responsibility. The manufacturers have
no obligation to carry this out. If the assistance of the manufacturer is
required to rectify faults arising from incorrect installation, this
assistance is not covered by the guarantee.
The installation instructions for professionally qualified personal must
be followed. Incorrect installation may cause harm or injury to people,
animals or belongings. The manufacturer cannot be held responsible
for such harm or injury.
If the oven is to work properly, the kitchen housing must be suitable.
The panels of the kitchen unit that are next to the oven must be made
of a heat resistant material. Ensure that the glues of units made of
veneered wood can withstand temperatures of at least 120 °C.
Plastics or glues that cannot withstand such temperatures will melt
and deform the unit. Once the oven has been lodged inside the unit,
the electrical parts must be completely insulated. This is a legal safety
requirement. All guards must be firmly fixed into place so that it is
impossible to remove them without using special tools.
Remove the back of the kitchen unit to ensure an adequate
current of air circulates around the oven. The hob must have a
rear gap of at least 45 mm.
It is necessary to do an initial cleaning of the equipment before
the first use of each of them.Wash them with a sponge. Rinse and
dry off.
1.7 OVEN EQUIPMENT (according to the model)
1.4 FITTING THE OVEN INTO THE KITCHEN UNIT
Fit the oven into the space provided in the kitchen unit; it may be fitted
underneath a work top or into an upright cupboard. Fix the oven in
position by screwing into place, using the four fixing holes in the frame.
(Fig.on last page).
To locate the fixing holes, open the oven door and look inside.To allow
adequate ventilation, the measurements and distances indicated in
the diagram on last page must be adhered to when fixing the oven.
Note: For ovens that are combined with a hob unit the instructions
contained in the manual for the hob unit must be followed.
1.5 IMPORTANT
The simple shelf can take baking
trays and dishes.
The tray holder shelf is especially
good for grilling things. Use it with the
drip tray.
The special profile of the shelves
means they stay horizontal even when
pulled right out. There is no risk of a
dish sliding or spilling.
The drip tray catches the juices from grilled foods. It is only used with
the Grill, Rotisserie, or Fan Assisted Grill ; remove it from the oven for
other cooking methods.
Never use the drip tray as a roasting tray
as this creates smoke and fat will spatter
your oven making it dirty.
1.8 Removing and cleaning wire racks
1- Remove the knurled nuts by turning them counter clockwise.
2- Remove the wire racks by pulling them towards yourself.
3- To clean the wire racks either put
them in the dishwasher or use a wet
sponge, ensuring that they are dried
afterwards.
4- After the cleaning process install the
wire racks in reverse order.
5- Replace the knurled nuts.
A
Plug into the power supply. Ensure first that there is a third contact that
acts as earthing for the oven. The oven must be properly earthed.
If the model of oven is not fitted with a plug, fit a standard plug to the
power cable. It must be able to bear the power supply indicated on the
specifications plate. The earthing cable is yellowgreen. The plug must
be fitted by a properly qualified person. If the socket and the plug are
incompatible the socket must be changed by a properly qualified
person.A properly qualified person must also ensure that the power
cables can carry the current required to operate the oven.
An ON/OFF switch may also be connected to the power supply. The
connections must take account of the current supplied and must
comply with current legal requirements. The yellow-green earthing
cable must not be governed by the ON/OFF switch. The socket or the
ON/OFF switch used for connecting to the power supply must be
easily accessible when the oven has been installed.
Important: During installation, position the power cable in such a way
that it will not be subjected to temperatures of above 50°C at any point.
The oven complies with safety standards set by the regulatory bodies.
The oven is safe to use only if it has been adequately earthed in
compliance with current legal requirements on wiring safety. You must
ensure that the oven has been adequately earthed.
The manufacturers cannot be held responsible for any harm or
injury to persons, animals or belongings caused by failure to
properly earth the oven.
WARNING: the voltage and the supply frequency are showed on
the rating plate (fig. on last page).
The cabling and wiring system must be able to bear the maximum
electric power required by the oven. This is indicated on the
specifications plate. If you are in any doubt at all, use the services of a
professionally qualified person.
1.6 CONNECTING TO THE POWER SUPPLY
1.2 SAFETY HINTS
•The oven must be used only for the purpose for which it was
designed: it must only be used for cooking food. Any other use, e.g. as
a form of heating, is an improper use of the oven and is therefore
dangerous.
•The manufacturers cannot be held responsible for any damage
caused by improper, incorrect or unreasonable use. When using any
electrical appliance you must follow a few basic rules.
– Do not pull on the power cable to remove the plug from the socket.
– Do not touch the oven with wet or damp hands or feet.
– Do not use the oven unless you are wearing something on your feet.
– It is not generally a good idea to use adapters, multiple sockets for
several plugs and cable extensions.
– If the oven breaks down or develops a fault switch it off at the mains
and do not touch it.
•If the cable is damaged it must be replaced promptly.
When replacing the cable, follow these instructions. Remove the
power cable and replace it with one of the H05RRF, H05VV-F,
H05V2V2-F type. The cable must be able to bear the electrical current
required by the oven. Cable replacement must be carried out by
properly qualified technicians. The earthing cable (yellow-green) must
be 10 mm longer than the power cable.
Use only an approved service centre for repairs and ensure that only
original parts are used. If the above instructions are not adhered to the
manufacturers cannot guarantee the safety of the oven.
•Do not line the oven walls with aluminium foil or single-use
protection available from stores. Aluminium foil or any other
protection, in direct contact with the hot enamel, risks melting
and deteriorating the enamel of the insides.

13 GB
2. USEFUL TIPS
2.1 SHELF SAFETY SYSTEM
The oven features a new shelf safety
system.
This allows you to pull out the oven
shelves when inspecting the food
without danger of food spillages or
shelves falling accidentally out of the
oven.
To remove the shelves pull out and lift.
2.2 GRILLING
Grilling makes it possible to give food a rich brown colour quickly.
For browning we recommend that you insert the grill onto the
fourth level, depending on the proportions of the food (see fig.
page 7).
Almost all food can be cooked under the grill except for very lean
game and meat rolls.
Meat and fish that are going to be grilled should first be lightly
doused with oil.
2.4 CLEANING AND MAINTENANCE
Clean the stainless steel and enamelled surfaces with warm,
soapy water or with suitable brand products. On no account use
abrasive powders that may damage surfaces and ruin the oven’s
appearance. It is very important to clean the oven each time that it
is used. Melted fat is deposited on the sides of the oven during
cooking. The next time the oven is used this fat could cause
unpleasant odours and might even jeopardise the success of the
cooking. Use hot water and detergent to clean; rinse out
thoroughly.
To make this chore unnecessary all models can be lined with
catalytic self-cleaning panels: these are supplied as an optional
extra (see the section SELF-CLEANING OVEN WITH
CATALYTIC LINING).
Use detergents and abrasive metal pads like «brillo pads» for the
stainless steel grills.
The glass surfaces facia panel, oven door and warming
compartment door must be cleaned when they are cold. Damage
that occurs to them because this rule was not adhered to are not
covered by the guarantee.
To replace the interior light:
• switch off the mains power supply and unscrew bulb. Replace
with an identical bulb that can withstand very high temperatures.
2.5 SERVICE CENTRE
Before calling the Service Centre
If the oven is not working, we recommend that:
you check that the oven is properly plugged into the power supply.
If the cause of the fault cannot be detected:
disconnect the oven from the mains, do not touch the oven and call
the after sales service.
Before calling the Service Centre remember to make a note of
the serial number on the specifications plate (see fig. On last
page).
The oven is supplied with a guarantee certificate that ensures that
it will be repaired free of charge by the Service Centrel.
2.3 According to the model
Is an illumination system which replaces the traditional «
light bulb ». 14 LED lights are integrated within the door. These
produce white high quality illumination which enables to view the
inside of the oven with clarity without any shadows on all the
shelves.
Advantages :
System,
besides providing excellent illumination inside the oven, lasts
longer than the traditional light bulb its easier and to maintain and
most of all saves energy.
• Optimum view
• Long life illumination
• Very low energy consumption, -95% in
comparison with the traditional
illumination High
“Appliance with white light LED of the 1M Class according to IEC
60825- 1:1993 + A1: 1997 + A2: 2001 (equivalent to EN 60825-1:
1994 + A1: 2002 + A2: 2001); the maximum light power emitted
λ459nm < 150uW.
Not observed directly with optical instruments. “
This appliance is marked according to the
European directive 2012/19/EU on Waste
Electrical and Electronic Equipment (WEEE).
WEEE contains both polluting substances
(which can cause negative consequences for the
environment) and basic components (which can
be re-used). It is important to have WEEE
subjected to specific treatments, in order to
remove and dispose properly all pollutants, and recover and
recycle all materials.
Individuals can play an important role in ensuring that WEEE
does not become an environmental issue; it is essential to
follow some basic rules:
• WEEE shall not be treated as household waste.
• WEEE shall be handed over to the relevant collection points
managed by the municipality or by registered companies. In
many countries, for large WEEE, home collection could be
present.
• When you buy a new appliance, the old one may be returned
to the retailer who has to collect it free of charge on a one-to-
one basis, as long as the equipment is of equivalent type and
has the same functions as the supplied equipment.

3. DESCRIPTION OF THE DISPLAY
Display panel : time, programming of cooking mode,
indicator lights, cooking temperature function and
shelf positioning
Settings: temperature, programming cooking and end of cooking time -
Regulated by turning the button towards “ - ” or “ + ”
To confirm setting: press the button.
BUTTON FOR REGULATION AND CONFIRMATION
Indicator light
Indicator light
Child safety device
Booster display:
Pre-heating
Oven functionning display
and recommended level
position
Turnspit
PYRO
Closing of the oven door
Indicator light:
rising temperature
Clock /
Programmation /
Cooking temperature
Programme symbol display: cooking
Time Cooking timer
Cooking end
Indicator light
WIFI
14 GB

3.1 BEFORE USING THE OVEN FOR THE
FIRST TIME
• PRELIMINARY CLEANING
-Clean the oven before using for the first time:
-Wipe over external surfaces with a damp soft cloth.
-Wash all accessories and wipe inside the oven with a solution of hot water
and washing up liquid.
-Set the empty oven to the maximum temperature and leave on for about 1
hour, this will remove any lingering smells of newness. Ensure that the
room is well ventilated while this is being done.
• THINGS TO REMEMBER
Confirmation of operation on timer
Modification must be confirmed by pressing the button.
Stopping the oven:
This may be necessary if you have input an incorrect instruction.
To stop the oven .... turn back the function selector knob to the Stop
Position.
Child safety device:
To lock the oven controls, select the child safety device. Refer to the
section entitled “Programming - The child safety device”.
The cooling fan :
This protects the control panel and electronics from heat damage.
It begins and then stops automatically even when the oven is switched off.
Oven lighting :
By turning to the light symbol, you can switch on the oven light when it is
not in use.
When the oven is in use, the light stays on during all of the oven functions
and when the door is opened.
• CLOCK SETTING
When the oven is connected to the electricity supply or after a long power
cut, the clock must be re-set.
To set the clock :
1 - Turn the control knob to the “Clock” symbol :
2 - Set the clock with the central button by turning to the “-” or “+”,
3 - Turn back the control knob to the STOP position.
3- A cooking time and an end of cooking time can be programmed by
turning the programme selector knob to “cooking time” or “end of cooking
time”.
The “cooking time” or “end of cooking time” display starts flashing. Using
the central button, modify the settings as required and on the timer
confirm.
When you have done this, do not forget to turn the programme selector
knob back to “stop position” to confirm the new setting.
For more details about programming, refer to the chapter 5.3 entitled
PROGRAMMATION.
4- At the end of the cooking cycle, turn the function selector knob back to
“stop position”.
The indicator flashes again, it will remain also turned on after having
extinguished the oven and it will estinguish when the inside temperature of
the oven is sufficiently low.
• COOKING MODE
All cooking should be carried out with the door closed.
BOTTOM + FAN - The combination of the bottom heating
element and fan is ideal for fruit flans, tarts, quiches and pastries. It
prevents food from becoming too dry and encourages bread dough to rise.
Place the shelf in the bottom position in the oven.
BOTTOM - Using the lower element. Ideal for cooking all pastry
based dishes. Use this for flans, quiches, tarts, pâté and any cooking that
needs more heat and radiation from below.
BOTTOM + TOP - Both top and bottom heating elements are in
use. This method is ideal for all traditional roasting and baking.When
cooking red meat, roast beef, leg of lamb, game, bread or foil wrapped
foods.
BOTTOM + TOP + FAN - Both top and bottom heating elements
are used in conjunction with the fan, which circulates hot air throughout the
oven.We recommend this method for poultry, pastries, fish and
vegetables. By using this method better heat penetration is achieved and
cooking and preheating times are also reduced. The fan cooking option
allows you to cook different foods together at different positions in the oven
all at the same time, providing even heat distribution but without the risk of
mingling tastes and smells. When cooking different foods at the same time
allow a further 10 minutes.
CIRCULAR HEATING ELEMENT + FAN - Air that has been
heated is blown by the fan onto the different levels. It is ideal for cooking
different types of food at the same time (e.g. Meet and fish) without mixing
tastes and smell. It cooks very gently and is ideal for sponge cakes,
pastries, etc.
GRILL - Using the top heating element. Success is guaranteed
for mixed grills, kebabs and gratin dishes. The grill should be pre-heated to
a high temperature for 5 minutes. White meats should always be placed at
some distance from the grill element, the cooking time is slightly longer but
the meat will be more succulent. Red meat and fish fillets can be placed
directly onto the shelf with the drip tray placed beneath on lower shelf
position.
GRILL + FAN - The top heating element is used in conjunction
with the fan which circulates the hot air around the oven. Pre heating is
recommended for red meats but is not necessary for white meats. Grilling
is ideal for cooking thicker food items such as pork or poultry. Food to be
grilled should be placed directly at the centre of the middle shelf.
By sliding the drip tray underneath the shelf it will ensure that any juices are
collected. For best results always make sure that the food is not too close
to the grill element and turn the food over half way through the cooking
time.
GRILL + TURNSPIT + FAN - The advantage of using the top
oven element at the same time as the fan and rotisserie is that the food is
evenly cooked, preventing it from becoming dry and tasteless. The
rotisserie is programmed to continue rotating for approximately five
minutes after cooking, making full use of the residual oven heat.No pre-
heating is required for rotisserie cooking.
DEFROST - When the dial is set to this position. The fan
circulates hot air around the frozen food so that it defrosts in a few minutes
without the protein content of the food being changed or altered.
The temperature is preset in 40°C constant, no regulation is possible.
KEEP WARM - This is reccomended to reheat precooked
foodstuff, positioning the shelf on the second level from top, or to defrost
bread pizza or pastry by positioning the shelf on the lower level.
The temperature is preset in 60°C constant, no regulation is possible.
PIZZA - With this function hot air circulated in the oven to ensure
perfect result for dishes such as pizza or cake.
WIFI
3.2 HOW TO USE THE OVEN
•THE MANUAL MODE
The cooking methods suggested in manual mode are set out in the table
below. A temperature is also suggested for each cooking method. This can
be modified within a pre-determined range.
1- Turn the oven selector knob to the function required to the cooking.
The heating elements in operation for the selected cooking method are
displayed.
2- The appropriate temperature according to the cooking method selected
is displayed. It can be modified within a pre-determined range - see the
table above.
To modify the temperature setting, turn the central button and on the timer
confirm the setting by pressing the same button.
... the temperature display is fixed but can be modified during the cooking
cycle.
The oven will start cooking and will start to heat up.
The indicator light flashes until the selected temperature has been
reached. An audible signal sounds at the end of this operation and the
indicator light becomes fixed.
10:30
Bottom + Fan
Bottom
Function Mode
according to the oven
model
Pre-set
Temperature
o
C
Pre-determined
o
Temperature C
Function
Booster*
210
160
50-220
50-220
Booster
Bottom + Top + Fan
Circular Heating Element + Fan
Grill
Grill + Fan
Grill + Turnspit + Fan
Defrost
Keep Warm
*Booster: rapid temperature raised
210
180
L2
190
240
40
60
50-230
50-230
L1-L3
50-200
180-240
No
No
Booster
Booster
**Oven must have this function
Bottom + Top 220 50-240
Booster
Pizza
230
230
**
15 GB

3.3 THE PROGRAMMATION
DISPLAY SYMBOLS
Timer in operation
Cooking time programming
End of cooking time programming
Child safety device operational
Locking oven door
THE TIMER:
The timer works independently of the oven and has no effect on the
heating elements. It is simply a reminder.
•Turn the knob to the Timer position. The Timer symbol will appear.
The digits 00:00 will appear on the display.
•The minutes will then flash, turn the central button to the required
number of minutes and confirm by pressing the same button.
•The hours will flash, turn the central button to the required number of
hours and confirm by pressing the same button.
•Turn the knob back to the Stop position.
When the time is up, the cooking time will disappear. An audible signal
will sound for 15 seconds and the Timer display will flash (to stop it
before the 15 seconds are up, just press the central button).
PROGRAMMING THE COOKING TIME:
Various recipes are pre-programmed with a cooking time. In Manual
mode, Defrosting or Keep warm Mode can be pre-set, if required.
•Turn the knob to the Cooking time position. The Cooking time symbol
will appear.A pre-programmed cooking time for the various recipes will
appear, or 00:00 for other functions of the oven.
•With the minutes flashing, turn the central button to the required
number of minutes confirm by pressing the same button.
•With the hours flashing, turn the central button to the required number
of hours and confirm by pressing the same button.
•Turn the programme selector knob back to the Stop position to
confirm the new cooking time.
When the time is up, the cooking time will disappear from the display.
An audible signal will sound for 15 seconds and the Cooking time and
STOP symbols will flash.
•Turn the programme function knob back to Stop. If you do not do this,
the Cooking time and STOP symbols will continue flashing.
PROGRAMMING THE END OF COOKING TIME:
Various recipes are pre-programmed with a cooking time and
therefore with an end of cooking time. In Manual Mode, Defrosting or
Keep warm mode can be pre-set, if required.
•Turn the knob to the End of cooking position.The STOP symbol will
appear. A pre-programmed end of cooking time for the various recipes
will appear, or 00:00 for other oven functions or the time of day will be
shown.
•Turn the programme selector knob to confirm the end time.
•The minutes will flash. Turn the central button to indicate the required
number of minutes, and confirm your choice by pressing the same
button.
•The hours will then flash.Turn the central button to indicate the
required number of hours, and confirm your choice by pressing the
same button.
NB : With a delayed start, the end of programme time will appear on
the display with the “Cooking time” and “STOP” symbols, and only the
function Recipe mode of the oven remains.
The oven automatically calculates the start time (end time minus
cooking time).
At the end of the cycle the oven switches itself off automatically. For 15
seconds, an audible signal lets you know that the cycle has ended and
the “Cooking time” and STOP symbols will flash.
•Turn the function selector knob to Stop. Unless you do this, the
symbols will continue flashing.
Selecteur
programmation
It is better not to salt meats until after cooking as salt encourages the
meat to spatter fat. This will dirty the oven and make a lot of smoke.
Joints of white meat, pork, veal, lamb and fish can be put into the oven
cold. The cooking time is longer than in a preheated oven, but it cooks
through to the centre better as the heat has more time to penetrate the
joint.
Correct preheating is the basis of successful red meat cookery.
GRILLS
• Before loading the grill:
Remove the meat from the refrigerator a few hours before grilling. Lay
it on several layers of kitchen paper. This improves seizing, making it
tastier and avoids it staying cold at the centre.
Add pepper and spices to the meat before grilling, but add any salt
after cooking. This way it will seize better and stay juicy. Baste all the
food to be cooked with a little oil. This is best done with a wide flat
basting brush.Then sprinkle with more pepper and herbs (thyme,
etc.).
• During cooking:
Never pierce the food during cooking even when you turn it. This lets
the juice out and it becomes dry.
BAKING
Avoid using shiny tins, they reflect the heat and can spoil your cakes. If
your cakes brown too quickly, cover them with greaseproof paper or
aluminium foil.
Caution: The correct way to use foil is with the shiny side in towards
the cake. If not the heat is reflected by the shiny surface and does not
penetrate the food.
Avoid opening the door during the first 20 to 25 minutes of
cooking:
Soufflés, brioches, sponge cakes, etc. will tend to fall.You can check if
cakes are done by pricking the centre with a knife blade or metal
knitting needle. If the blade comes out nice and dry, your cake is ready
and you can stop cooking. If the blade comes out moist or with bits of
cake attached, continue baking but slightly lower the thermostat so
that it is finished off without burning.
3.4 COOKING TIPS
The display contrast can be adjusted at any time.
The default setting is “C5”. To adjust the setting, carry out the
following:
•Turn the programme selector to “Light” and the function selector to
“0”. Press in the central key for 3 seconds and “CX” will appear on the
display (where X = the contrast level).
Turn the central key to adjust the contrast setting. The settings go from
1 to 9. Confirm the new setting by pressing the central key for 3
seconds.
3.5 ADJUSTING THE DISPLAY CONTRAST
STOP
16 GB

4. CHILD SAFETY
This function is essential, especially when children are around. It
prevents children from switching the oven on or altering the preset
programmes.
This safety system locks the oven control panel while it is operating.
There are two levels of safety :
LEVEL 1 : Locking selector control knob and the central button.
•To activate : Turn the programmation control knob to child safety.
•Action : The control knobs are inactive*.
•To deactivate : Turn the programmation control knob to 0.
LEVEL 2 : Locking function selector knobs
•To activate : Turn the function selector knob to child safety and keep
the central button pressed in for 3 seconds.
•Action : All the controls are inactive*.
•To dactivate : the same procedure as for activating. Turn the function
selector knob to child safety and keep the central button Pressed in for
3 seconds.
*Note : In all cases, for reasons of safety, even when the controls are
locked, the oven can be switched off by turning the selector knob to 0.
5. WIFI FEATURE
WIFI CONFIGURATION
• Turn the oven selector knob to the WiFi position (the “@” symbol
flashes).
• When the oven is connected to a wireless router and the WiFi
function is selected the “@’” symbol stays on continuously,
• If the oven is not connected to a wireless router the “@” symbol
flashes. (see section on “@” symbol management).
• If the Wifi function is selected, the oven can only be remotely
controlled (function selector and encoder are disabled);
• In the other cooking positions the oven cannot be externally
controlled.
RESET
To reset the WiFi , turn the oven selector knob to the WifI position while
no program is running and push the encoder for 3 seconds.
After 3 seconds, on the display will appear "rSt" and the "@" symbol
starts to flash.
"@" SYMBOL MANAGEMENT
• When the oven is off, the symbol is off;
• When the oven selector knob is in the Wi-Fi position, the symbol
flashes (1" on, and 1" off) if this oven is in “access point” mode
(connected point-to-point), while stays steadily on if the oven is in
“client” mode (connected to a router);
• When the oven selector knob is turned on to the Wi-Fi position and
the oven is trying to connect to a router, the symbol flashes (3 " on, and
1" off);
• When the oven selector knob is turned on but not on Wi-Fi position
(read-only), the symbol flashes (1 "on and 3" off).
HOOVER WIZARD:
For detailed information about HOW TO CONNECT
your Wizard appliance and HOW TO USE it at its best,
go to http://www.hooverwizard.com or visit the
dedicated Wizard Customer Service website
http://wizardservice.candy-hoover.com
17 GB

12 GB
UYARI: Cihaz ve aparatları kullanım sırasında ısınır. Isınmış parçalara dokunmaktan kaçınınız.
• 8 yaşın altındaki çocukları cihazdan uzakta tutmalı ve sürekli denetlemelisiniz.
• Bu cihaz, 8 yaş ve üzeri çocuklar ve fiziksel, duyusal veya zihinsel yetenekleri veya bilgi ve tecrübe
açısından yetersiz kişiler tarafından ancak yetişkin bir bireyin denetiminde ve cihazın nasıl
kullanılacağına dair verilen talimatların uygulanması durumunda ve oluşabilecek tehlikleri kavradıkları
takdirde güvenle kullanılabilir.
• Çocuklar cihazla oynamamalıdırlar.
• Cihazın temizlik ve bakımı gözetmen olmaksızın çocuklar tarafından yapılmamalıdır.
• Kullanım sırasında cihaz ısınabilir. Fırının içindeki ısıtma elemanlarının dokunurken dikkatli
olunmalıdır.
UYARI: Erişilebilir parçalar kullanım sırasında ısınabilir. Küçük çocuklar uzak tutulmalıdır.
• Fırın kapak camını temizlerken kuvvetli aşındırıcı temizleyiciler veya keskin metal kazıyıcılar
kullanmayın çünkü bu camın kırılmasına veya yüzeyin çizilmesine neden olabilir.
• Koruma çıkarılmadan önce fırın kapatılmalıdır ve temizlikten sonra koruma parçası talimatlara uygun
olarak yerine koyulmalıdır.
• Sadece bu fırın için önerilen sıcaklık probu kullanın.
• Fırını temizlemerken buharlı temizleyiciler kullanmayınız.
UYARI: Lambayı değiştirmeden önce elektrik çarpması olasılığını önlemek için cihazın kapalı
olduğundan emin olun.
• Bağlantının sağlanamaması kablolama kurallarına göre kabloların bağlanmamasından
kaynaklanmıştır.
• Talimatlarda kullanılacak prizin tipi cihazın arka kısmındaki sıcaklık düşünülerek belirtilmelidir.
• Elektrik kablosu hasarlı ise, özel bir kablo ya da üretici veya yetkili servisin uygun gördüğü kablo ile
değiştirilmelidir.
Uyarı: Termal ısı kesici dikkatsizce yerleşiminden doğacak zararları engellemek için, bu cihaz kaynağı
zamanlayıcı veya sürekli açık ya da kapalı olacak devre gibi dış devre cihazlarına bağlanmamalıdır.
DİKKAT: Erişilebilir parçalar sıcak olabilir ızgara kullanılırken Küçük çocuklar uzak tutulmalıdır.
• Dökülen artıklar temizliğe başlamadan önce çıkarılmalıdır.
• Kendi kendine temizlik pirolitik işlemi sırasında yüzey normalden sıcak olabilir, bu nedenle bu işlem
esnasında çocuklar uzak tutulmalıdır.
GÜVENLİK UYARILARI
18 TR
1. GENEL UYARILAR
Ürünlerimizden birini tercih etmiş olduğunuz için teşekkür ederiz. Fırınınızdan en yüksek faydayı sağlayabilmeniz için size şu önerilerde bulunuyoruz:
•Bu kullanma kılavuzundaki notları dikkatli bir şekilde okuyun: bu notlar, fırının monte edilmesine, kullanılmasına ve servisine ilişkin önemli talimatlar
içerir.
•Bu kullanma kılavuzunu, daha sonra başvurmak üzere, kolayca erişebileceğiniz güvenli bir yerde saklayın.
•Cihaz çalışırken erişilebilir tüm parçaları ısınır. Isınan kısımlara dokunmamaya özen gösteriniz.
•Fırın ilk defa çalıştırıldığında yanık kokan dumanlar çıkartabilir. Bunun nedeni, fırının etrafındaki yalıtım panellerinin tutkallarının ilk defa ısınmasıdır.
Bu tamamen normaldir ve sadece yiyecekleri fırın içerisine koymadan önce dumanın sona ermesini beklemeniz yeterlidir.
Bir fırın doğası gereği son derece yüksek sıcaklıklara kadar ısınabilir. Özellikle de fırın kapağının camı son derece kızgın olabilir.
Bu cihazın yiyecekler ile temas edebilecek parçaları 89/109 sayılı EEC
yönergesinin koşullarına uygundur.
işareti ile bu cihazın, Avrupa direktiflerine uygunluğunun ve yasa
tarafından belirlenmiş güvenlik, sağlık ve çevresel gerekliliklerin yerine
getirilmesinin bize ait olduğunu kabul ediyoruz.
Fırını ambalajından çıkardığınızda, herhangi bir şekilde hasar görmemiş
olduğundan emin olun. Herhangi bir şüpheye düşmeniz durumunda,
cihazı kullanmayın: profesyonel uzman bir kişiye başvurun.
Naylon torbalar, polistiren veya çiviler gibi ambalaj malzemelerini
çocukların erişemeyecekleri yerlere kaldırın, çünkü bunlar çocuklar için
tehlikeli olabilir.
1.1 UYGUNLUK BEYANI
1.2 GÜVENLİK İPUÇLARI
Fırın sadece tasarlanmış olduğu amaç için kullanılmalıdır: fırın sadece
yiyeceklerin pişirilmesi için kullanılmalıdır.
Fırının diğer bir kullanım, örneğin, ısınma amacı için, kullanılması uygun
olmayan bir kullanım şeklidir ve bu nedenle tehlikelidir.
Üreticiler, cihazın uygun olmayan, yanlış veya makul olmayan
kullanımından dolayı herhangi bir şekilde sorumlu tutulamaz.
Herhangi bir elektrikli cihazı kullanırken bazı basit kurallara
uyulması gerekir.
-Cihazın fişini elektrik prizinden çekerken elektrik kablosundan tutarak
çekmeyin.
-Elleriniz veya ayaklarınız ıslak yada nemliyken fırına dokunmayın.
-Ayaklarınıza bir şey giymeden (çıplak ayaklarla) fırını kullanmayın.
-Genellikle adaptörlerin, çoklu prizlerin veya uzatma kablolarının
kullanılması önerilmez.
-Fırının arızalanması veya bozukluğunun ortaya çıkması durumunda,
cihazın şebeke elektriği beslemesini kapatın ve cihaza dokunmayın.
Cihazın elektrik kablosunun hasar görmüş olması durumunda, bunun
acilen değiştirilmesi gerekir. Cihazın elektrik kablosu değiştirilirken
aşağıdaki talimatlara uyulmalıdır.
Elektrik kablosunu sökün ve bunun yerine H055RR-F, H05VV-E,
H05V2V2 tipi kauçuk içerisinde yalıtılmış olan aynı uzunlukta bir yeni
elektrik kablosu takın. Elektrik kablosu fırının gerektirdiği elektrik
akımına dayanabilmelidir. Cihazın elektrik kablosu konusunda uzman
teknisyenler tarafından değiştirmelidir.
Elektrik kablosunun topraklama iletkeni (sarı-yeşil) diğer elektrik
kablosu iletkenlerinden 10 mm daha uzun olmalıdır.
Cihazı sadece yetkili servis merkezlerinde tamir ettirin ve sadece orijinal
parçaların kullanılmasını sağlayın. Yukarıdaki talimatlara uyulmaması
durumunda üretici fırının güvenliğini garanti edemez.
•Fırının yan duvarlarını aluminyum folyo veya dükkanlardan
alınabilen tek kullanımlık koruma malzemeleriyle kaplamayın.
Aluminyum folyo veya diğer koruma malzemeleri sıcak emaye ile
doğrudan temas ettiğinde erime ve iç taraftaki emayeyi bozma riski
oluşturur.

1.5 ÖNEMLİ NOT
19 TR
1.3 KURULUM
Cihazın monte edilmesi müşterinin sorumluluğundadır. Üretici bunu
gerçekleştirmekle yükümlü değildir. Yanlış montajdan kaynaklanan
arızaların onarılması için üreticinin yardımı talep edildiğinde, bu
yardım garanti dahilinde olmayacaktır.
Profesyonel uzman personel için hazırlanmış olan montaj
talimatlarına uyulmalıdır. Cihazın yanlış monte edilmesi, insanlara,
hayvanlara veya eşyalara zarar verebilir, insanların veya hayvanların
yaralanmasına neden olabilir. Üretici böyle bir zarar veya
yaralanmadan sorumlu tutulamaz.
1.6 CİHAZIN ELEKTRİK BAĞLANTISININ YAPILMASI
Fırının düzgün çalışması için mutfak içerisinde konulduğu yuva uygun
olmalıdır.
Mutfak dolaplarının fırının hemen bitişiğindeki panelleri ısıya
dayanıklı malzemeden üretilmiş olmalıdır. Kaplamalı ahşaptan
yapılmış mutfak dolaplarında en az 120°C sıcaklığa kadar
dayanabilen tutkal kullanılmış olduğundan emin olun. Bu sıcaklıklara
dayanamayacak plastikler veya tutkallar erir ve dolabın deforme
olmasına neden olur. Fırının mutfak dolabı içerisine
yerleştirilmesinden sonra, elektrikli parçalar tamamen yalıtılmalıdır.
Bu, yasal bir güvenlik koşuludur. Bütün koruyucular, özel aletler
kullanılmadan sökülmeler mümkün olmayacak şekilde, sıkıca
yerlerine tespit edilmiş olmalıdır.
Fırın civarında yeterli hava dolaşımının sağlanabilmesi için,
mutfak dolabının arkalığını sökün. Ocağın arkasında en az 45 mm
yer bırakılmalıdır.
Fırının elektrik fişini prize takın. Önce priz üzerinde topraklama
görevini gören üçüncü bir kontağın bulunduğundan emin olun. Fırın
uygun şekilde topraklanmalıdır.
Fırının modelinde elektrik kablosunun ucuna bağlı bir elektrik fişi takılı
değilse, elektrik kablosuna standart bir elektrik fişi takın. Takılan fişin
cihazın tip etiketi üzerindeki özelliklerde belirtilen elektrik akımı ve
gerilimi değerlerine dayanabilecek kapasitede olması gerekir.
Topraklama kablosu sarı-yeşil renklidir. Fişin uzman bir kişi tarafından
takılması gerekir.
Fiş ile priz birbirine uymuyorsa, elektrik prizinin uzman bir kişi
tarafından değiştirilmesi gerekir. Uzman kişinin ayrıca elektrik
kablolarının fırını çalıştırmak için yeterli akımı kaldırabileceğini garanti
etmesi de gerekir.
Ayrıca elektrik şebekesine bir AÇMA/KAPATMA anahtarı da
bağlanabilir. Bağlantılar yapılırken çekilecek akım dikkate alınmalı ve
bölgenizde yürürlükte bulunan yasal koşullara uyulmalıdır. Sarı-yeşil
topraklama kablosu AÇMA/KAPATMA anahtarı tarafından kontrol
edilmemelidir.
Elektrik prizine veya cihazın elektrik kablosunun bağlandığı AÇMA/
KAPATMA anahtarına fırının montajı tamamlandıktan sonra kolayca
erişilebilmelidir.
Önemli Not: Montaj esnasında cihazın elektrik kablosunu hiçbir
noktasının 50°C sıcaklığın üzerindeki bir sıcaklığa maruz kalmayacak
şekilde konumlandırın.
Fırın düzenleyici kurumların saptamış olduğu güvenlik standartlarına
uygundur. Fırın, ancak elektrik bağlantılarının güvenliğine ilişkin yerel
yasal düzenlemelere uygun şekilde topraklanmış olması durumunda
güvenli bir şekilde kullanılabilir. Fırının gereğince topraklanmış
olduğundan emin olmalısınız.
Üretici, cihazın gereğince topraklanmamış olmasından dolayı
insanların, hayvanların veya eşyaların zarar görmesinden ya da
insanların veya hayvanların yaralanmasından sorumlu
tutulamaz.
1.4 FIRININ MUTFAK ÜNİTESİNE MONTAJI
Fırını mutfak ünitesindeki yerine yerleştiriniz; fırın mutfak ünitesinde
tezgah altına ya da dik bir mutfak dolabı içerisine yerleştirilebilir.
Fırını ön çerçevesindeki 4 adet vida deliğini kullanarak yerleştirdiğiniz
şekilde mutfak ünitesine vidalayarak sabitleyiniz. (Son sayfadaki
resme bakınız.)
Sabitleme vida delikleri için fırın kapısını açınız ve çerçevenin
yanlarına bakınız. Uygun havalandırmanın sağlanması için klavuzun
son sayfasındaki resimde belirtilen montaj ölçülerine göre fırını monte
ediniz.
Not: Ankastre ocaklı fırınlar için ocak klavuzunda belirtilen kurallara
da muhakkak uyunuz.
1.7 FIRIN EKİPMANLARI (modele göre)
Fırın ekipmanlarını ilk kullanımdan önce temizleyiniz. Sünger ile
temizleyip yıkadıktan sonra kurulayınız.
Normal tel raf pişirme kapları veya
tabakları için kullanılır.
Tepsi taşıyıcı tel raf özellikle ızgaralar
için dizayn edilmiştir. Bu rafı damlama
tepsisi ile birlikte kullanınız.
Tel raflar özel yapısı sayesinde fırından
dışarı doğru çekildiğinde bile yatay pozisyonda kalmaya devam eder.
Kabın kayma ve yiyeceklerin dökülme riski yoktur.
Damlama tepsisi, ızgara yapılan yiyecek-
lerden damlayan sıvıları toplamak için
kullanılır. Bu ekipman sadece ızgara ve
fanlı ızgara fonksiyonları ile kullanılır;
diğer pişirme fonksiyonlarında tepsiyi
fırından alınız.
Koku yapması ve yağların tepsiden sıçrayarak fırını kirletmesi
nedeniyle damlama tepsisini kesinlikle pişirme için kullanmayınız.
Pizza pişirme seti pizza pişirmek için
tasarlanmıştır. İyi sonuç almak için Pizza
fonksiyonu ile birlikte pizza tepsisini kullanınız.
Tepsi Tutacağı
Tepsi tutacağı ızgara tepsisi için idealdir ve
damlama tepsisi ile birlikte kullanılmalıdır.
Tutacak fırın içerisinde bırakılmamalıdır.
1.8 YAN IZGARALARIN ÇIRARILMASI VE TEMİZLENMESİ
1- Sağ ve soldaki (A) yuvarlak, tırtıklı somunları, saatin tersi yönde
çevirerek açın.
2- Tel rafları fırın duvarına ters yönde, kendinize doğru çekerek
çıkarın.
3- Tel rafları bulaşık deterjanı, ılık su ve yumuşak bir bez ya da
sünger kullanarak temizleyip kuru bir bezle kurulayın.
4- Temizlik işlemi ardından, tel rafları yerine takın.
5- Tırtıklı somunları sıkın.
A
UYARI: Cihazın gerilimi (voltajı) ve şebeke frekansı tip etiketi
üzerinde belirtilmiştir (arka kapaktaki resme bakınız).
Kabloların ve kablo bağlantısı sisteminin fırının gereksinim duyacağı
maksimum elektrik gücünü kaldıracak yeterlilikte olması gereklidir.
Bu güç cihazın tip etiketi üzerinde belirtilmiştir.
Şüpheye düşmeniz durumunda, profesyonel bir uzmandan yardım
talep edin.

20 TR
2.1 RAF GÜVENLİĞİ SİSTEMİ
Fırınınız yeni bir raf güvenliği özelliğine
sahiptir. Bu sistem sayesinde pişirdiğiniz
yiyecekleri kontrol etmek için fırın raflarını
yiyeceklerin dökülmesi veya rafın düşme
tehlikesi olmadan dışarıya doğru güvenli
bir şekilde çekebilirsiniz.
Rafları tamamen çıkartmak için dışarı
çektikten sonra kaldırın.
2.2 IZGARA
Izgara yiyeceklere hızla zengin bir kahverengileşme
kazandırılabilme-sine olanak sağlar. Yiyeceklerin kahverengileşerek
kızarmaları için bunların yiyeceklerin orantılarına bağlı olarak
dördüncü seviyeye konulmalarını öneriyoruz (şekil 15’teki şekle
bakınız). Yağsız av hayvanları ile rulo etler haricinde kalan hemen
hemen tüm yiyecekler ızgarada pişirilebilir. Izgara yapılacak olan et ve
balıkların üzerine önce hafif sıvı yağ sürülmelidir.
2.4 CİHAZIN TEMİZLENMESİ VE BAKIMI
Paslanmaz çelik ve emaye yüzeyleri ılık sabunlu su veya uygun
markalı ürünler kullanarak temizleyin. Hiçbir zaman yüzeylere zarar
verebilecek ve cihazın görünümünü bozabilecek aşındırıcı tozlar
kullanmayın. Fırının her kullanıldıktan sonra temizlenmesi önemlidir.
Eriyen yağlar pişirme esnasında fırının yanları üzerinde birikir.
Fırının bir sonraki kullanımında bu yağlar arzu edilmeyen ve hoş
olmayan kokulara neden olabilir ve hatta pişirilen yiyeceğin başarısını
tehlikeye atabilir. Cihazı temizlemek için sıcak su ve deterjan kullanın;
daha sonra iyice durulayın. Bu zorlu işi gereksiz hale getirebilmek
üzere bütün modellere katalitik kendi kendini temizleyen paneller:
bunlar isteğe bağlı ilave aksesuar olarak temin edilebilir. Paslanmaz
çelikten yapılmış ızgara raflarını temizlemek için deterjan ve bulaşık
telleri gibi aşındırıcı metal teller kullanın. Üst kısım, fırın kapası ve kapı
iç yüzeyi gibi cam yüzeyler soğukken temizlenmelidir. Bu kurala
uyulmaması sonucu ortaya çıkan hasarlar garanti kapsamına girmez.
Dahili aydınlatma lambasının ampulünü değiştirmek için: cihazın
elektrik beslemesini kesin (fişini prizden çekin) ve vidalı duylu ampulü
döndürerek yerinden çıkartın. Çok yüksek sıcaklıklara dayanabilen
aynı tipteki yeni bir ampulü yerine takın.
2.3 MODELE GÖRE
2.5 SERVİS MERKEZİ
Servis merkezini aramadan önce
Eğer fırın çalışmıyorsa, şunları yapmanızı öneririz:
-Fırının fişinin elektrik prizine sıkı bir şekilde takılmış olduğundan emin
olacak şekilde fişi kontrol edin.
Arızanın saptanamaması durumunda:
Fırının fişini elektrik prizinden çekin. Fırına dokunmayın ve satış
sonrası servisi arayın.
Servis merkezini aramadan önce cihazın tip etiket üzerinde yer
alan seri numarasını bir yere not etmeyi unutmayın (arka
kapaktati resme bakınız).
Cihaz ile birlikte cihazın Servis merkezinde ücretsiz olarak tamir
edilmesini sağlayacak bir garanti belgesi verilir.
Klasik “elektrik ampulünün” yerine geçen bir aydınlatma sistemidir. 14
adet LED (pirolitik olmayan modeller için) veya 10 adet Yüksek Güçlü
LED (pirolitik modeller için) lamba, kapıya entegredir. Bu lambalar,
fırının içini, hiçbir raf üzerine gölge düşmeden, net bir şekilde
görmenizi sağlayan yüksek kalitede beyaz ışık vermektedir.
Avantajları:
Bu sistem, fırın içinde mükemmel aydınlatma sağlamanın yanı sıra,
klasik ampullerden daha uzun süre dayanır, kullanımı ve bakımı daha
kolaydır ve her şeyden önemlisi, enerji tasarrufu sağlar.
-Optimum görüş
-Uzun ömürlü aydınlatma
-Çok düşük enerji tüketimi; klasik yüksek aydınlatma sistemlerine
kıyasla %95 daha düşük.
2. FAYDALI İPUÇLARI
Bu cihaz, Atık Elektrikli ve Elektronik Cihazlar
(AEEE) hakkındaki 2012/19/EU Avrupa Birliği
Yönergesine uygun biçimde işaretlenmiştir.
AEEE, hem kirletici maddeleri (bunlar çevre
üzerinde olumsuz etkilere neden olabilir) hem de
temel bileşenleri (bunlar yeniden kullanılabilir)
içerir. Tüm kirleticilerin düzgün bir şekilde
bertaraf edilmesi ve atılması ve tüm
malzemelerin geri kazanılıp ve dönüştürülmesi için AEEE'nin
özel işlemlere tabi tutulması önemlidir.
Kişiler, AEEE'nin bir çevre sorununa dönüşmemesini
sağlamakta önemli bir rol üstlenir; bazı basit kuralların
izlenmesi gerekir:
• AEEE'lere ev atıkları olarak davranılmamalıdır.
• AEEE'ler, belediye veya kayıtlı şirketler tarafından yönetilen
ilgili toplama noktalarına teslim edilmelidir. Pek çok ülkede,
büyük AEEE'ler için evden toplama hizmeti verilir.
• Yeni bir cihaz satın aldığınızda, eskisi satıcıya verilebilir ve
satıcı yeni teslim ettiği cihaz başına bir adet olmak üzere
ücretsiz olarak bu cihazı teslim alabilir, bunun için alınacak
ekipmanın teslim edilen ekipman ile aynı türden ve aynı
fonksiyonlara sahip olması gerekir.
La pagina si sta caricando...
La pagina si sta caricando...
La pagina si sta caricando...
La pagina si sta caricando...
La pagina si sta caricando...
La pagina si sta caricando...
La pagina si sta caricando...
La pagina si sta caricando...
La pagina si sta caricando...
La pagina si sta caricando...
La pagina si sta caricando...
La pagina si sta caricando...
La pagina si sta caricando...
La pagina si sta caricando...
La pagina si sta caricando...
La pagina si sta caricando...
-
 1
1
-
 2
2
-
 3
3
-
 4
4
-
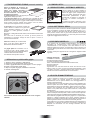 5
5
-
 6
6
-
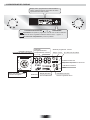 7
7
-
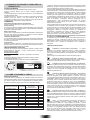 8
8
-
 9
9
-
 10
10
-
 11
11
-
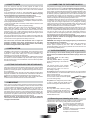 12
12
-
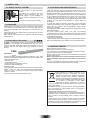 13
13
-
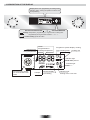 14
14
-
 15
15
-
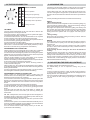 16
16
-
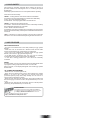 17
17
-
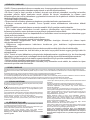 18
18
-
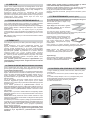 19
19
-
 20
20
-
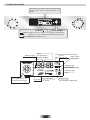 21
21
-
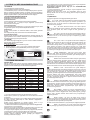 22
22
-
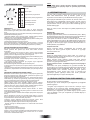 23
23
-
 24
24
-
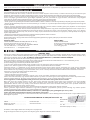 25
25
-
 26
26
-
 27
27
-
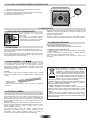 28
28
-
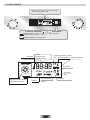 29
29
-
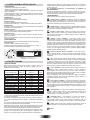 30
30
-
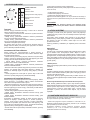 31
31
-
 32
32
-
 33
33
-
 34
34
-
 35
35
-
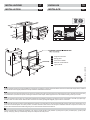 36
36


Hoover HO786VX WIFI Manuale utente
- Categoria
- Microonde
- Tipo
- Manuale utente
Documenti correlati
Altri documenti
-
Candy FXH 895 X Manuale utente
-
-
-
-
-
-
Candy FCP502W Manuale utente
-
Candy FCP602W/E Manuale utente
-
-
Electrolux EOB53001R Manuale utente