Krups F897 ZP Manuale utente
- Categoria
- Macchine da caffè
- Tipo
- Manuale utente
Questo manuale è adatto anche per


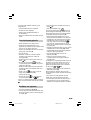
l
c
d
e
f
k
b
j
h
i
g
a

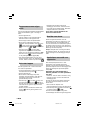
19
18 19 20
21 22 23
10
11
12
1 2 3
4 5 6
7 8 9

21 14 23
24 25 26
19
13 15
16 17 18
2120
22

28 29 30
31 33
23 24
25 26 27
29
32

6
Nespresso.897.som.PM6 18/02/04, 10:206

7
Nespresso Art. 897
Nespresso Art. 580
Deutsch 8
English 14
Français 20
Nederlands 26
Español 32
Italiano 38
Danmark 44
Nespresso.897.som.PM6 18/02/04, 10:207

8
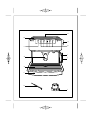
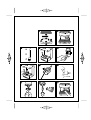
Beschreibung
a Herausnehmbarer Wasserbehälter
b Warmhaltefläche für Tassen
c EIN / AUS-Taste mit roter
Kontrolleuchte
d Kapselhalter
e Abstellgitter
f Auffangschale
g Drehventil
h Funktionstasten mit grünen
Kontrolleuchten
i Schwenkbare Dampf- und
Heißwasserdüse
j Aufschäumhilfe
k Düsenreiniger
l Kapselkäfigschlüssel
Sicherheitshinweise
•Lesen Sie diese Bedienungsanleitung vor der
Inbetriebnahme Ihrer Espressomaschine
aufmerksam durch.
•Schließen Sie das Gerät nur an eine geerdete
Schutzleiter-Steckdose an. Überprüfen Sie,
daß die auf dem Typenschild dieses Gerätes
angegebene Spannung mit der Ihres
Stromnetzes übereinstimmt.
•Bei falschem Anschluß erlischt die
Garantie.
•Benutzen Sie das Gerät niemals im Freien.
•Stellen Sie das Gerät nicht auf heiße Flächen
(z.B. Herdplatte) oder in der Nähe von
offenen Flammen ab.
•Entfernen Sie den mit Kaffeemehl gefüllten
Kapselhalter nicht während des Durchlaufes,
da das Gerät unter Druck steht.
•Benutzen Sie das Gerät nicht, wenn
Abstellgitter und Auffangschale nicht in
Position sind.
•Stellen Sie sicher, daß der Kapselhalter gut
festgezogen ist bevor Sie mit der
Kaffeezubereitung beginnen.
•Bei Problemen während des Brühvorgangs
und vor der Reinigung des Gerätes muß der
Netzstecker gezogen werden.
• Ziehen Sie den Stecker nicht durch Ziehen
am Netzkabel und legen Sie dieses nicht
über scharfe Kanten oder über Ecken.
• Vermeiden Sie einen Kontakt des Netzkabels
oder Ihrer Hände mit den heißen Teilen des
Gerätes (Tassenvorwärmplatte, Kapselhalter,
Dampfdüse, Brühkopf)
• Tauchen Sie das Gerät niemals in Wasser
oder andere Füssigkeiten.
• Halten Sie Kinder vom Gerät fern und lassen
Sie das Netzkabel nicht herunterhängen.
• Halten Sie sich an die Entkalkungshinweise
in der Bedienungsanleitung.
• Benutzen Sie das Gerät keinesfalls, wenn es
beschädigt ist, nicht korrekt funktioniert
oder wenn der Stecker oder das Netzkabel
beschädigt sind. In solchen Fällen wenden
Sie sich bitte sofort an den Krups-
Kundendienst (siehe Adressen im Krups-
Serviceheft), da Spezialwerkzeug
erforderlich ist.
• Das Gerät darf nicht von Ihnen geöffnet
werden.
• Außer der Reinigung und normalen
Gebrauchsprüfung, müssen alle anderen
Arbeiten an dem Gerät vom Krups-
Kundendienst ausgeführt werden.
• Zu Ihrer eigenen Sicherheit sollten Sie nur
original Krups Zubehör-und Ersatzteile
passend zu Ihrem Gerät verwenden.
• Der Hersteller kann nicht für Schäden
verantwortlich gemacht werden, die durch
nicht bestimmungsgemäße Verwendung
oder falsche Bedienung verursacht werden.
Zubehör
Für ein optimales Kaffee-Ergebnis ist dieses
Gerät mit einem umfangreichen Zubehör
ausgestattet.
• 4 Nespresso-Tassen
• 4 x 10 Nespresso-Kapseln
• 1 Kapselkäfigschlüssel
• 1 Düsenreiniger
Deutsch
ART. 897.PM6.5 18/02/04, 10:108

9
Für weitere Informationen betreffend
Kaffeesorten oder zur Nachbestellung von
Kaffeekapseln wenden Sie sich bitte an Ihren
Nespresso-Club.
Gerät vorbereiten
Die Abdeckung des Wasserbehälters
hochziehen und den Wasserbehälter
entnehmen (1). Wasserbehälter mit frischem
Wasser füllen (2).
Max. Fassungsvermögen :
1,8 l = 25 Espressotassen.
• Wasserbehälter wieder einsetzen und fest
an-drücken, damit sich das Bodenventil
öffnet (3).
• Abdeckung herunterdrücken.
Um ein gutes Kaffee-Ergebnis zu erlangen,
sollten Sie folgende Punkte beachten:
• Vor jedem Gebrauch sollte der
Wasserbehälter mit frischem Wasser gefüllt
werden.
• Wechseln Sie das Wasser täglich.
• Verwenden Sie kein Mineralwasser oder
destilliertes Wasser.
• Reinigen Sie den Wasserbehälter
mindestens einmal pro Woche.
Vor dem ersten Gebrauch
• Netzstecker einstecken.
•Den leeren Kapselhalter in den Haltering
einsetzen. Beim Einsetzen des Kapselhalters
muß der Griff ca. 90° nach links zeigen. Griff
nach rechts festziehen (4).
•Wasserbehälter füllen.
•Je ein möglichst großes Gefäß unter den
Kapselhalter und die ausgeschwenkte
Dampf- / Heißwasserdüse stellen (5).
•Drehventil auf Pos.
stellen (6).
• Ein / Aus-Taste
drücken. Die rote
Betriebskontrolleuchte blinkt und alle
grünen Kontrolleuchten leuchten konstant
(7).
Sobald die rote Kontrolleuchte konstant
leuchtet, ist die Maschine betriebsbereit (8).
• Durch Druck auf die
Taste läuft das
Wasser durch den Wasserkreislauf (9).
• Wiederholen Sie den Vorgang fünfmal.
•Taste
drücken und Drehventil auf Pos.
stellen (10). Ca. 0,5 l Wasser durchlaufen
lassen und Drehventil auf
stellen.
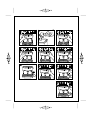
Espresso zubereiten
• Wasserbehälter füllen (1) (2) (3).
•Zum Vorwärmen den Kapselhalter in die
Maschine einsetzen (ohne Kapsel) (4).
• Drehventil auf Position
drehen (6). Gerät
einschalten.
•Die rote Kontrolleuchte blinkt und alle
grünen Kontrolleuchten leuchten konstant
(7). Sobald die rote Kontrolleuchte konstant
leuchtet ist die Maschine betriebsbereit (8).
•Spülen Sie durch Druck auf die Taste
das
System täglich, mit eingesetztem leeren
Kapselhalter, vor dem ersten und nach dem
letzten Espresso durch, um zu vermeiden,
daß sich Espressomehl ablagert (9).
• Kapselhalter entnehmen. Kapsel immer
kopfüber in den Kapselhalter setzen (11).
Jede Kapsel enthält gemahlenen Frischkaffee
für eine Tasse Espresso.
• Kapselhalter wieder in den Haltering
einsetzen und gut anziehen, so daß der Griff
rechtwinklig zur Maschinenfront steht oder
leicht nach rechts zeigt (12).
•Vorgewärmte Tasse (siehe Absatz
”Espressotassen vorwärmen”) unter den
Kapselhalter stellen.
Ihr Gerät ist bereits zur Zubereitung von
Espresso (kleine Tasse, 50 ml) oder Cappuc-
cino (große Tasse, 120 ml) vorprogrammiert.
Durch Drücken der Taste
oder
bereiten Sie nun Ihren Espresso zu (13).
•Nach Beendigung der Espressozubereitung
den Kapselhalter entnehmen und die
gebrauchte Kapsel entfernen (14).
ART. 897.PM6.5 18/02/04, 10:109

10
Nach der Espressozubereitung blinkt die rote
Kontrolleuchte, um die Betriebstemperatur
wieder zu erreichen. Die Zubereitung weiterer
Espresso ist jedoch jederzeit möglich.
•Damit Sie Ihren nächsten Espresso bei
optimalen Temperaturverhältnissen
zubereiten können, setzen Sie den leeren
Kapselhalter direkt wieder in den Haltering
ein.
Individuelle Programmierung
Falls Sie die vorprogrammierten Füllmengen
für große oder kleine Tassen verändern
wollen, gehen Sie bitte wie folgt vor:
•Gerät einschalten. Kapsel in den
Kapselhalter setzen und den Kapselhalter in
das Gerät einsetzen. Tasse unter den
Kapselhalter stellen.
•Sobald die rote Kontrolleuchte konstant
leuchtet, Taste drücken. Die grüne
Kontrolleuchte der
-Taste blinkt und die
grünen Konstrolleuchten für kleine und
große Tassen leuchten konstant (15).
•Die Taste
so lange gedrückt halten, bis
die von Ihnen gewünschte Espressomenge
erreicht ist (16).
•Drücken Sie zum Speichern dieser Menge
und zum Beenden des Programmier-
vorgangs die Taste (17). Wiederholen
Sie diesen Vorgang zur Programmierung
einer großen Tasse, indem Sie die Taste
betätigen.
Die Heißwasserzubereitung
Mit diesem Gerät können Sie Heißwasser für
Tee, Instantkaffee, Brühe etc. zubereiten.
•Wasserbehälter füllen und Drehventil auf
Position
stellen.
•Gerät einschalten.
•Sobald die rote Kontrolleuchte konstant
leuchtet, Dampf- / Heißwasserdüse
ausschwenken und ein Gefäß darunter
stellen.
•Taste drücken und Drehventil auf
Pos.
stellen (18). Sollten Sie innerhalb
der nächsten 2 Min. das Drehventil nicht
betätigen, so schaltet das Gerät wieder in
den normalen Modus zurück.
• Sobald genügend Wasser im Gefäß ist,
Drehventil wieder auf Position
zurückstellen.
• Gefäß entfernen und die Dampf-/
Heißwasserdüse nach innen zum
Abstellgitter schwenken, damit
nachtropfendes Wasser in die Auffangschale
laufen kann.
Vorsicht! Die Dampf-/Heißwasserdüse ist
sehr heiß.
Die Dampfzubereitung
Der Heißdampf kann zum Aufschäumen von
Milch für Cappuccino sowie zum Anwärmen
der Espressotassen und zum Erhitzen von
Flüssigkeiten benutzen werden. Das
Klopfgeräusch während der
Heißdampfzubereitung entsteht durch die
Intervall-Steuerung der Wasserpumpe.
Hinweis: Vor jeder Dampfzubereitung muß
die gebrauchte Kapsel aus dem Kapselhalter
entfernt werden, um ein Austrocknen des
Kaffees und somit ein Verstopfen der Düse zu
vermeiden.
Milchaufschäumen für
Cappuccino-Zubereitung
Außer der Zubereitung von Espressokaffee
können Sie mit diesem Gerät die für Cappuc-
cino benötigte Milch aufschäumen. Um ein
optimales Aufschäumergebnis zu erreichen,
sollten Sie die separate Aufschäumhilfe
verwenden. Stecken Sie die Aufschäumhilfe
auf die Dampf- / Heißwasserdüse (19).
Achtung! Die Aufschäumhilfe darf nur
zum Milchaufschäumen verwendet
werden.
ART. 897.PM6.5 18/02/04, 10:1010

11
• Gießen Sie ca. 100 ml fettarme Milch in
einen schmalen kleinen Krug (max. 0,5 l
Fassungsvermögen), der unter die
Dampfdüse der Maschine passen muß. Die
Milch sollte gut gekühlt sein. Ebenfalls
sollten Sie auch ein kaltes Gefäß benutzen.
Nicht vorher mit warmem Wasser ausspülen.
• Bereiten Sie zuerst den Espresso zu. Dazu
sollte die Cappuccino-Tasse nur maximal zur
Hälfte mit Espresso gefüllt sein. Kapsel aus
dem Kapselhalter entfernen und den leeren
Kapselhalter wieder einsetzen.
•Drehventil auf
stellen.
•Taste drücken (20).
Die rote Betriebskontrolleuchte und die grüne
Dampfkontrolleuchte blinken. Sobald die rote
Kontrolleuchte konstant leuchtet, hat das
Gerät die zur Dampferzeugung notwendige
Temperatur erreicht. Sollten Sie innerhalb der
nächsten 2 Min. das Drehventil nicht
betätigen, so schaltet das Gerät wieder in den
normalen Modus zurück.
• Die Dampf- / Heißwasserdüse in das Gefäß
mit der Milch eintauchen.
•Halten Sie hierzu den Krug so unter die
Dampfdüse, daß das Düsenteil ganz in die
Milch eintaucht (21).
• Drehventil auf Position
drehen.
• Während des Aufschäumens den Krug ruhig
halten.
• Die Düse darf nicht den Krugboden
berühren, um den Dampfaustritt nicht zu
behindern. Nach Beendigung des
Aufschäumens, Drehventil auf Position
stellen. Gefäß entfernen und Düse über das
Abstellgitter schwenken.
• Den Dampfvorgang kurz wiederholen, damit
eventuelle Milchreste aus der Düse entfernt
werden.
• Aufschäumhilfe von der Dampf- / Heißwas-
serdüse abziehen und reinigen. (siehe Absatz
”Reinigen”)
• Die Dampf- / Heißwasserdüse sofort nach
dem Milchaufschäumen mit einem feuchten
Tuch reinigen.
Espressotassen vorwärmen
Für den ersten Espresso des Tages sollten Sie
die Espressotassen mit Heißwasser
vorwärmen. Bei weiterem Gebrauch können
Sie die Tassen auf der Warmhalteplatte
vorwärmen.
Espressotassen mit Heißwasser vorwärmen:
• Drehventil auf Postion stellen.
• Den Kapselhalter ohne Kapsel einsetzen.
• Gerät einschalten.
• Tasse(n) unter den Kapselhalter stellen.
• Sobald die rote Kontrolleuchte konstant
leuchtet, Taste
oder Taste
drücken.
Heißwasser in die Tasse(n) laufen lassen.
Flüssigkeiten erhitzen
• Drehventil auf Pos.
stellen.
Gerät einschalten. Taste drücken.
Die rote Betriebskontrolleuchte und die grüne
Dampfkontrolleuchte blinken.
Sobald die rote Kontrolleuchte konstant
leuchtet, hat das Gerät die zur
Dampferzeugung notwendige Temperatur
erreicht. Sollten Sie innerhalb der nächsten 2
Min. das Drehventil nicht betätigen, so
schaltet das Gerät wieder in den normalen
Modus zurück.
•Dampf- / Heißwasserdüse ausschwenken
und in das Gefäß mit der Flüssigkeit
eintauchen. Drehventil auf Pos.
stellen
(22).
• Nach Erhitzen der Flüssigkeit, Drehventil auf
Pos.
zurückstellen.
Wichtig:
Wenn Sie im Anschluß an den Dampfbetrieb
sofort wieder Espresso zubereiten wollen,
muß die Espressomaschine unbedingt wieder
auf die Kaffeetemperatur abgekühlt werden.
Dazu entweder den Kapselhalter ohne Kapsel
in den Nespresso-Brühkopf einsetzen, ein
Gefäß darunter stellen und 1 bis 2 Tassen
ART. 897.PM6.5 18/02/04, 10:1011

12
Wasser durch den Kaffeeausfluß laufen
lassen, oder warten, bis die rote
Kontrolleuchte konstant leuchtet.
Reinigen
•Geben sie die Zubehörteile ihrer
Espressomaschine nicht in die Spülmaschine.
•Nach dem Gebrauch ist der Wasserbehälter
zu leeren.
•Nach jeder Kaffee- bzw. Dampf- zubereitung
entspannt sich das Heizsystem
(Zischgeräusch). Das dadurch
herausgedrückte Wasser läuft in die
Auffangschale.
•Nach ca. 20-maliger Espressozubereitung
sollte die Auffangschale entleert und
gereinigt werden.
•Abstellgitter abnehmen und reinigen (23).
•Vor dem Wiedereinsetzen der Auffangschale
mit Abstellgitter darauf achten, daß das
separate Kunststoffteil wieder hinten in die
Auffangschale eingesetzt wird.
•Der Kapselhalter läßt sich am besten
reinigen, indem Sie ihn ohne Kapsel ins
Gerät einsetzen und Taste
drücken.
•Der Kapselhalter wird dadurch kurzzeitig
unter Druck gereinigt.
•Der Kapselhalter ist spülmaschinengeeignet
und sollte mindestens einmal pro Woche in
der Spülmaschine gereinigt werden.
Die Dampf- / Heißwasserdüse direkt nach dem
Milchaufschäumen mit einem feuchten Tuch
reinigen.
•Sollte die Düse verstopft sein, kann mit einer
Münze das Dampfrohr abgeschraubt und
mit einer Nadel die Düse gereinigt werden.
Beim Wiedereinsetzen des Dampfrohres auf
die Gummiringe achten (24).
Zur gründlichen Reinigung kann die
Aufschäumhilfe auseinandergenommen
werden. Dazu die beiden Teile A und C von
dem Metallröhrchen B abziehen (25). Alle 3
Teile in warmem Wasser ausspülen. Sollte die
kleine Ansaugöffnung in Teil A verstopft sein,
kann diese mit einer feinen Nadel
durchstoßen werden.
Zur gründlichen Reinigung kann der
Kapselkäfig entnommen werden.
Hierzu den Netzstecker ziehen, den
Wasserbehälter und die Auffangschale mit
Abstellgitter entnehmen.
•Stellen Sie die Maschine auf den Kopf (26).
•Setzen Sie den Kapselkäfigschlüssel auf den
Kapselhalter (27).
• Schrauben Sie nun mit dem Kapselhalter
und dem Kapselkäfigschlüssel gegen den
Uhrzeigersinn den Kapselkäfig ab (28).
•Spülen Sie den Kapselkäfig gut mit frischem
Wasser aus. Reinigen Sie die beiden Löcher
auf der Düse des Kapselkäfigs mit Hilfe des
Düsenreinigers (29).
Vorsichtig beim Gebrauch des
Düsenreinigers, da bei falschem Gebrauch
Verletzungsgefahr besteht.
•Blasen Sie in Pfeilrichtung (von unten noch
oben) in den Kapselkäfig hinein, damit die
beiden Löcher von Unreinheiten befreit
werden (30).
• Reinigen Sie die Wasserzufuhr des
Kapselkäfigs mit Hilfe des Bohrers, der sich
am Düsenreiniger befindet (31).
•Wiederholen Sie die oben genannten
Vorgänge ein zweites Mal.
• Setzen Sie den Kapselkäfig nach dem
Reinigen in den Kapselkäfigschlüssel. Achten
Sie darauf, daß die Teile A, B und C, wie in
der Abb. (32) gezeigt, zusammengezetzt
werden.
•Drehen Sie nun den Kapselkäfigschlüssel,
zusammen mit dem eingesetzten
Kapselkäfig, mit der Hand in das Gerät ein
(nicht zu fest anziehen, den Kapselhalter
hierzu nicht benutzen) (33).
Entkalken
Für eine optimale Funktion Ihres Gerätes und
für die Espresso-Qualität ist es
empfehlenswert, Ihr Krups “Nespresso
System” regelmäßig (spätestens alle sechs
Monate) zu entkalken. Dies hängt jedoch von
der Wasserqualität Ihrer Region ab. Für nähere
Informationen wenden Sie sich bitte an Ihren
ART. 897.PM6.5 18/02/04, 10:1012

13
Nespresso-Club, welcher für Sie ein spezielles
Entkalkungsset entwickelt hat.
Diesem Gerät sind 1 Kapselkäfigschlüssel und
1 Düsenreiniger beigepackt. Diese beiden Teile
verwenden Sie bitte immer beim
Entkalkungsvorgang.
Achtung!
Benutzen Sie keinen Essig als Entkalker.
Problemlösungen
Problem:
Zu niedrige Kaffeetemperatur.
Lösung:
• siehe Absatz ”Espressotassen vorwärmen”
• Lassen sie den Kapselhalter immer ohne
Kapsel im Gerät eingesetzt.
Problem:
Lautes Pumpengeräusch.
Lösung:
• Stellen Sie sicher, daß der Wasserbehälter
gefüllt ist.
• Stellen Sie sicher, daß der Wasserbehälter
richtig eingesetzt ist.
Problem:
Zu wenig Schaum beim Milchaufschäumen.
Lösung:
• Dampf- / Heißwasserdüse reinigen bzw.
Aufschäumhilfe reinigen.
• Milch darf nicht zu alt oder zu warm sein
(soll Kühlschranktemperatur haben).
Problem:
Kaffee läuft nicht aus.
Lösung:
• Prüfen, ob der Wasserbehälter gefüllt ist.
• Prüfen, ob der Wasserbehälter richtig
eingesetzt ist.
• Prüfen, ob der Kapselhalter verstopft ist.
•Prüfen, ob der Kapselkäfig verschmutzt ist.
Entnehmen Sie dazu den Kapselhalter und
drücken Sie die Taste . Sollte das Wasser
nicht frei durchlaufen (zwei gut sichtbare
Strahlen), muß der Kapselkäfig entnommen
und gereinigt werden siehe Absatz
“Reinigen”)
• Prüfen, ob die Maschine entkalkt ist.
Problem:
Kaffee läuft seitlich am Kapselhalter herunter.
Lösung:
• Prüfen Sie, ob der Kapselhalter richtig
eingesetzt und angezogen ist.
• Kapselhalter reinigen.
Für weitere Fragen wenden sie sich bitte an
Ihren Nespresso Club.
Entsorgung
Die Verpackung besteht komplett aus
umweltverträglichen Materialien, die den
örtlichen Recyclestellen übergeben werden
sollten. Entsorgungsmöglichkeiten für
Altgeräte erfahren Sie bei Ihrer
Stadtverwaltung.
ART. 897.PM6.5 18/02/04, 10:1013

14
English
Description
a Removable water tank
b Hot plate for cups
c ON/OFF indicator switch (red)
d Capsule holder
e Grid
f Drip tray
g Selector for hot water/steam
h Function keys with indicator lights
(green)
i Steam/hot water nozzle
j Cappuccino accessory
k Cleaning needle
l Special hexagonal key (for dismantling
the capsule cage)
Safety recommendations
•Please read these instructions carefully
before first using your espresso maker. Only
use an earthed plug to connect the
appliance. Check that the voltage shown on
the appliance’s indicator plate corresponds
to that of your electricity wiring system.
Wiring instructions for U.K and Ireland only :
APPLIANCES WITH FITTED PLUG
Important : For your convenience this
appliance is supplied complete with a plug
incorporating a 13 amp fuse.
In the event of replacing a fuse in the plug
supplied, a 13 amp fuse approved by ASTA to
BS1362 must be used.
If the socket outlets are not of the 13A BS
1363 type, and therefore do not accept the
plug connected to this appliance, cut off the
plug.
When cut off, this plug is a shock hazard if
inserted into a socket outlet and must
therefore be disposed of safely.
If the fuse cover is detachable, never use the
plug with the cover omitted. Replacement
covers can be obtained from your service
agent.
Fit the appropriate plug according to the
instructions in paragraph «Fitting a plug».
With alternative plugs a 15 amp fuse must be
fitted either in the plug or adaptor or at the
main fuse box.
APPLIANCES WITHOUT FITTED PLUG
FITTING A PLUG - IMPORTANT
The wires in the mains lead are coloured in
accordance with the following code:
GREEN & YELLOW : EARTH
BLUE : NEUTRAL
BROWN : LIVE
As the colours in the mains lead of this
appliance may not correspond with the
coloured markings identifying the terminals in
your plug, proceed as follows:
The wire which is coloured GREEN & YELLOW
must be connected to the terminal in the plug
which is marked with the letter ‘E’ or by the
earth symbol
or coloured green or green
and yellow. The wire which is coloured BLUE
must be connected to the terminal which is
marked with the letter ‘N’ or coloured black.
The wire which is coloured BROWN must be
connected to the terminal which is marked
with the letter ‘L’ or coloured red.
This appliance is manufactured to conform to
the Low Voltage Electrical Equipment (Safety)
Regulations 1989 and is designed to comply
with BS 3456. It complies with the
requirements of the EEC Directive (89/336/
EEC).
• Do not place your espresso maker on a hot
surface (electric warming plate, for example)
or close to a flame.
• Do not remove the capsule holder
containing the coffee while water is running
through, as the appliance is under pressure
at this time.
• Do not use the appliance if the drip tray and
the grid are not in place.
• Unplug your appliance if there is any
problem while the coffee is running through
or prior to cleaning it.
• Do not unplug the appliance by pulling on
the cord and do not place the cord on a
sharp edge or the corner of an item of
furniture.
• Do not allow the cable or your hands to
come into contact with the hot parts of the
appliance (cup warming plate, capsule
holder, steam nozzle).
ART. 897.PM6.5 18/02/04, 10:1014

15
• Never immerse the appliance in water.
• Keep out of reach of children and do not
allow the cord to hang down.
• Follow the descaling instructions.
• Do not use the appliance if it is damaged or
if the cord is in poor condition.
• If the cord or any other specific part
becomes defective, these must be replaced
by a Krups approved service centre. You
should never, under any circumstances, open
the appliance yourself.
• Check that the capsule holder is firmly in
place before making coffee.
Accessories
For best results, the appliance is delivered with
a set of accessories.
• 4 Nespresso cups
• 4 varieties of Nespresso coffee (4x10
capsules)
• 1 special hexagonal key (for dismantling the
capsule holder)
• 1 cleaning needle
For further information on the different
varieties of coffee available, or to order
capsules, you should contact your Nespresso
Club. Details on your appliance or in the «
Welcome Pack ».
Setting-up the appliance
• Lift the water tank lid and remove the water
tank (1).
• Fill the water tank with fresh water (2).
Maximum capacity is
1.8 l = about 25 espresso cups.
•Replace the water tank and press down
firmly into position, so that the lower valve
opens (3).
• Close the lid again.
For a good cup of espresso, it is
recommended tha you observe the following
points:
• Empty the water tank after use.
• Change the water every day.
• Do not use mineral water or distilled water.
• Clean the water tank at least once a week.
Before using your espresso
maker for the first time
• Plug in the appliance.
• Introduce the empty capsule holder into the
fixing ring : to do this, position the handle at
about 90° to the left, then thighten up by
pulling the handle firmly to the right (4).
§ Fill the water tank.
• Place a container, large enough, under the
capsule holder and another under the steam
nozzle (5).
• Turn the steam/hot water button to the
position
(6).
•Press the ON/OFF key
, the red operating
indicator light will flash and all the green
indicator lights will come on (7).
Once the red operating indicator light stops
flashing the appliance is ready to be used (8).
•By pressing the key
, the water will run
through the system (9).
•Repeat this operation five times.
•Press the
and turn the steam/hot water
button to the
position (10). Allow about
half a litre of water to run through and then
turn the steam/hot water button to the
position.
Preparation of Espresso
• Fill the water tank (1) (2) (3).
• Preheat the capsule holder, put it in position
on the machine, but without the capsule (4).
• Turn the steam/hot water button to the
position
(6).
• Press the ON/OFF key
, the red operating
light will flash and all the green indicator
lights will come on (7). Once the red
operating light stops flashing the machine is
ready for use (8).
ART. 897.PM6.5 18/02/04, 10:1015

16
We recommend turning the function selector
to
before the first coffee and after the last
coffee of the day in order to quickly rinse the
system with the capsule holder empty to
prevent coffee particles sticking together (9).
•Remove the capsule holder. Insert the
capsule upside down in the capsule holder
(11). Each capsule contains a single dose of
fresh coffee for a cup of espresso.
•Replace the capsule holder (12).
•Place the preheated cup (see the section on
”pre-heating cups”) under the capsule
holder.
Your appliance is already pre-programmed for
the preparation of espresso (small cup, 50 ml)
or cappuccino (large cup, 120 ml). You can
choose whichever you want by pressing
either the key
or the key
(13).
•Once the espresso is finished, remove the
capsule holder and throw away the used
capsule (14).
After the preparation of espresso, the red
indicator light will flash until the optimum
operating temperature is. However, the
preparation of further espresso is possible at
any time.
•To ensure that your next espresso is prepared
at the optimum temperature, replace the
empty capsule holder to retain its heat.
Individual Programming
To modify the pre-programmed quantities of
coffee, please proceed as follows:
•Switch on the appliance, insert a capsule
into the capsule holder and place a cup
under it.
•As soon as the red operating light stops
flashing, press the memory key
.
•The
-green control light will lit up as well
as the green indicator light for
and
(15).
•Press and hold down the
key until the
desired quantity of espresso has been
reached (16).
•Now press the
-key to memorise the
quantity (17).
• To programme the quantity for a large cup,
just repeat this procedure using the
key..
Preparation of Hot Water
With this appliance, you can prepare hot
water for liquids
• Fill the water tank and turn the selector for
hot water/steam to the
position.
• Switch on the appliance. As soon as the red
operating indicator light stops flashing,
swing out the steam and hot water nozzle
and place a suitable container under it.
•Press the
key and turn the selector for
hot water/steam to the
position (18). If
you do not activate the selector within 2
minutes, the appliance will return to its
normal operating mode.
• As soon as there is sufficient water in the
container, return the selector to the
position.
• Remove the container and swing the steam/
hot water nozzle inwards over the cup grid
so that any further drops of water can fall
into the drip tray.
Take care! The steam and hot water
nozzle is very hot.
Making steam
Steam makes the milk frothy for a cappuc-
cino, and also preheats cups or any kind of
liquid; the noise you hear during this
operation is caused by the intermittent
running of the water pump.
Please note :
Before making steam, make sure that the
capsule holder on the machine is empty to
prevent the coffee becoming dried out and
blocking the hole in the coffee outlet.
Frothing milk for a cappuccino
You can make the milk frothy in order to whip
up a cappuccino. For best results, use the
ART. 897.PM6.5 18/02/04, 10:1016

17
accessory specially designed forthis purpose.
Fit it onto the steam nozzle (19).
Please note ! This accessory must only be
used for this purpose.
• Pour about 100 ml of skimmed milk into a
small high-sided container (maximum
capacity 0.5 L) which will fit beneath the
steam nozzle.
The container as well as the milk should be
chilled (do not rinse the container in hot water
before use).
• First prepare an espresso, but only fill the
cup halfway.
•Turn the steam/hot water button to
and
press the
key (20).
The red operating control light and the green
steam control light will both flash. As soon as
the red operating control light stops flashing,
the appliance has reached the optimum
temperature for the production of steam. If
you do not actuate the steam/hot water
button in the next 2 minutes, the appliance
will return to its normal operating mode.
• Dip the steam nozzle into the container
holding the milk.
• During the preparation, keep the end of the
steam nozzle in the milk (21).
•Turn the steam/hot water button to the
position. The nozzle must not touch the
bottom of the container. Once the operation
is finished, return the button to the position
.
•Remove the container and swing the steam
nozzle towards the drip tray
• Repeat the steam making operation for a
moment in order to eliminate the residue of
the milk which might remain in the end of
the nozzle. Remove the cappuccino
accessory to clean it. Wipe down the steam
nozzle with a damp cloth immediately after
the frothing.
Preheating cups
For the first espresso of the day, you should
pre-heat the cups with hot water. For further
use, the cups can be pre-heated on the
warming plate.
To pre-heat cups with water, proceed as if
making an espresso but without putting a
coffee capsule in the capsule holder.
Heating liquids
• Turn the steam/hot water button
to the
position and press the key
.
The red operating control light and the green
steam control light will both flash. As soon as
the red operating control light stops flashing,
the appliance has reached the optimum
temperature for the production of steam. If
you do not activate the steam/hot water
button within 2 minutes, the appliance will
return to its normal operating mode.
• Immerse the steam nozzle and dip it into the
container holding the liquid. During this
operation, keep the end of the steam nozzle
in the liquid.
•Turn the steam/hot water button to the
position
(22).
Make sure that the nozzle does not touch the
bottom of the container.
• Once the operation is completed, return the
button to the
position.
•Remove the container and swing the steam
nozzle towards the drip tray.
Important:
If you want to make espresso immediately
after making a cappuccino or heating liquid,
the appliacne must be allowed to cool down
to the coffee temperature. To do this :
. Either place the capsule holder in position
without a capsule, put a container below the
coffee outlet and run about 2 cups of water
through via the coffee outler
. or wait until the red operating control light
stops flashing.
Cleaning
•Empty the water tank after each use.
•Never wash your espresso machine
accessories in the dishwasher.
ART. 897.PM6.5 18/02/04, 10:1017

18
Each time you make coffee or steam, the
heating system expands (emitting a whistle)
and the water which escapes then runs into
the drip tray.
•After about 20 cups of coffee, the drip tray
must be emptied and clean. Remove the grid
and clean it too (23).
•Before replacing the tray and grid, make
sure that the plastic part par is correctly
positioned at the back of the drip tray.
The capsule holder can be cleaned as per the
rinsing operatin and under the tap. The
capsule holder can be cleaned in the
dishwasher and must be cleaned at least once
a week.
•Clean the steam nozzle using a damp
sponge after each use.
•If the nozzle is blocked, unscrew the pipe using
a coin and unblock the nozzle with a needle.
• When replacing the pipe, take care that the
rubber seal is correctly positioned (24).
To clean the «cappuccino » accessory :
•Seperate parts A and C from the metal stem
B (25).
•Wash all 3 parts in warm water.
If the small opening at the end of A is
blocked, you can unlock it with a needle.
For more thorough cleaning, the capsule cage
can be removed :
• Unplug the appliance, remove the water
tank and the drip tray.
•Place the machine up-side down (26).
•Unscrew the capsule cage with the special
key, anti-clockwise (27) (28).
•Rinse the capsule cage thoroughly under
running water and clean the two perfora-
tions using the unblocking tool (29).
Be careful when using the unblocking
tool, as careless handling could cause
injury.
•Blow in the direction indicated by the arrow
(from bottom to top) in order to clear the
from any impurity (30).
•Clean the water inlet of the capsule cage
using the special mesh found on the end of
the unblocking tool (delivered with the
machine) (31).
• Clean the two perforations again using the
unblocking tool.
• After cleaning put the capsule cage into
special hexagonal key. Make sure that the
parts A, B and C are assembled as shown in
the diagram (32).
• Screw it down again. Do not tighten too
hard, and do not use the capsule holder for
this purpose (33).
Descaling
To ensure that your appliance is working at its
best and for the best quality coffe, it is
strongly recommended that you regularly
descale your Krups Nespresso System (more or
less frequently, depending on the hardness of
your water, but at least once every six
months).
If you require further details, please contact
your Nespresso Club, which can provide you
with a complete descaling kit. The appliance is
delivered with a special hexagonal key and a
cleaning needle ; these tools can also be
useful when descaling your appliance.
Please note!
You should never, in any circumstance,
use vinegar !
Solutions to some problems
Problem:
The coffee temperature is too low .
Solution:
• Refer to the section “Pre-heating Cups”
• Preheat the empty capsule holder by running
through some hot water before making the
coffee.
Problem:
The pump is making a loud noise.
Solution:
•Make sure there is water in the tank.
ART. 897.PM6.5 18/02/04, 10:1018

19
•Check that the water tank is correctly fitted.
Problem:
The milk for the cappuccino is not frothy
enough.
Solution:
• Clean the steam nozzle and, if need be, the
« cappuccino » accessory. Only use fresh
milk at room temperature.
Problem:
The coffee is not running through.
Solution:
• Check whetehr the capsule holder is
blocked.
• Check that the water tank is correctly fitted.
• Check that the capsule cage is not blocked.
Remove the capusle holder, place a contai-
ner and press the key
.
• If the water does not run freely (two clearly
visible jets of water), clean and unblock the
capsule (see section ”Cleaning”).
• Make sure the appliance does not need
descaling.
Problem:
The coffee is leaking around the sides of the
capsule holder.
Solution:
• Check that the capsule holder is in the
correct position and sufficiently tightened.
• Clean the capsule holder.
For more detailed information, please contact
your Nespresso Club.
Waste disposal
The packaging consists entirely of
environmentally-friendly materials, which
should be disposed of according to the local
recycling arrangements.
Disposal methods for old appliances can be
found by enquiring with the local authorities.
ART. 897.PM6.5 18/02/04, 10:1019

20
Français
Description
a Réservoir amovible
b Plateau chauffe tasses
c Voyant de mise en marche (rouge)
d Porte-capsule
e Grille
f Tiroir récolte gouttes
g Bouton vapeur/eau chaude
h Voyants de contrôle (verts)
i Buse vapeur/eau chaude
j Accessoire Cappuccino
k Outil de nettoyage
l Outil de démontage
Consignes de sécurité
•Avant la mise en marche de votre espresso,
lisez attentivement ce mode d’emploi. Ne
branchez l’appareil que sur une prise avec
terre. Vérifiez que la tension indiquée sur la
plaque signalétique de l’appareil corres-
ponde bien à celle de votre installation
électrique.
•Ne posez pas votre expresso sur une surface
chaude (plaque électrique par exemple) ou à
proximité d’une flamme.
•N’enlevez pas le porte-capsule contenant la
mouture durant le passage de l’eau car
l’appareil est alors sous pression.
•N’utilisez pas l’appareil lorsque le plateau
récolte-gouttes et la grille ne sont pas mis en
place.
•La prise doit être retirée en cas de problème
durant l’écoulement du café ou avant de
nettoyer votre appareil.
•Ne débranchez pas l’appareil en tirant sur le
cordon et ne placez pas le cordon sur l’angle
vif ou le coin d’un meuble.
•Evitez le contact du cordon ou de vos mains
avec les parties chaudes de l’appareil
(plateau chauffe-tasses, porte-capsule, buse
vapeur).
•Ne plongez jamais l’appareil dans l’eau.
• Tenez les enfants à distance et ne laissez pas
pendre le cordon.
• Conformez vous à la notice pour les
instructions de détartrage.
• Ne mettez pas en marche la machine si elle
est endommagée ou si le cordon est en
mauvais état.
• Si le cordon ou tout autre élément spécifique
devenait défectueux, ils devront seulement
être remplacés par le centre service agréé
Krups. En aucun cas, l’appareil ne doit être
ouvert par vos soins.
• Vérifiez que le porte-capsule est bien serré
avant de faire couler le café.
Accessoires
La machine est livrée avec une série d’acces-
soires:
• 4 tasses Nespresso
• 4 variétés de café Nespresso (4X10 capsules)
• 1 clé hexagonale pour démonter la cage à
capsule
• 1 outil de nettoyage
Pour toute information concernant les
différentes variétés de café Nespresso et pour
commander les capsules, adressez-vous à
votre Club Nespresso, dont l’adresse figure sur
votre machine ou dans le “Welcome-pack“.
Préparation de l’appareil
• Levez le couvercle du réservoir et enlevez-le
pour le remplir (1) (2).
Contenance maximale
1,8 L = 25 tasses d' espresso.
• Remettez le réservoir en place et appuyez
bien pour que la soupape inférieure s'ouvre
(3).
•Refermez le couvercle.
Pour obtenir un bon espresso, il est recom-
mandé de bien respecter les points suivants:
• Videz le réservoir d’eau après usage.
• Changez l'eau quotidiennement.
ART. 897.PM6.5 18/02/04, 10:1020
La pagina sta caricando ...
La pagina sta caricando ...
La pagina sta caricando ...
La pagina sta caricando ...
La pagina sta caricando ...
La pagina sta caricando ...
La pagina sta caricando ...
La pagina sta caricando ...
La pagina sta caricando ...
La pagina sta caricando ...
La pagina sta caricando ...
La pagina sta caricando ...
La pagina sta caricando ...
La pagina sta caricando ...
La pagina sta caricando ...
La pagina sta caricando ...
La pagina sta caricando ...
La pagina sta caricando ...
La pagina sta caricando ...
La pagina sta caricando ...
La pagina sta caricando ...
La pagina sta caricando ...
La pagina sta caricando ...
La pagina sta caricando ...
La pagina sta caricando ...
La pagina sta caricando ...
La pagina sta caricando ...
La pagina sta caricando ...
La pagina sta caricando ...
La pagina sta caricando ...
-
 1
1
-
 2
2
-
 3
3
-
 4
4
-
 5
5
-
 6
6
-
 7
7
-
 8
8
-
 9
9
-
 10
10
-
 11
11
-
 12
12
-
 13
13
-
 14
14
-
 15
15
-
 16
16
-
 17
17
-
 18
18
-
 19
19
-
 20
20
-
 21
21
-
 22
22
-
 23
23
-
 24
24
-
 25
25
-
 26
26
-
 27
27
-
 28
28
-
 29
29
-
 30
30
-
 31
31
-
 32
32
-
 33
33
-
 34
34
-
 35
35
-
 36
36
-
 37
37
-
 38
38
-
 39
39
-
 40
40
-
 41
41
-
 42
42
-
 43
43
-
 44
44
-
 45
45
-
 46
46
-
 47
47
-
 48
48
-
 49
49
-
 50
50


Krups F897 ZP Manuale utente
- Categoria
- Macchine da caffè
- Tipo
- Manuale utente
- Questo manuale è adatto anche per
in altre lingue
- English: Krups F897 ZP User manual
- français: Krups F897 ZP Manuel utilisateur
- español: Krups F897 ZP Manual de usuario
- Deutsch: Krups F897 ZP Benutzerhandbuch
- Nederlands: Krups F897 ZP Handleiding
- dansk: Krups F897 ZP Brugermanual
Documenti correlati
-
Krups YY1461 Manuale del proprietario
-
-
-
-
-
Krups MELODY 2 Manuale del proprietario
-
Nescafe Dolce Gusto Genio Manuale utente
-
Krups Dolce Gusto CIRCOLO AUTOMATIC Manuale del proprietario