
User Guide
English ( 3 – 16 )
Guía del usuario
Español ( 17 – 30 )
Guide d’utilisation
Français ( 31 – 44 )
Guida per l’uso
Italiano ( 45 – 58 )
Benutzerhandbuch
Deutsch ( 59 – 72 )
Appendix
English ( 74 )

2

3
User Guide (English)
Introduction
Thank you for purchasing the APC mini mk2. At Akai Professional, we know how
serious music is to you. That’s why we design our equipment with only one thing in
mind—to make your performance the best it can be.
Box Contents
APC mini mk2 USB Cable
Ableton Live Lite (download) User Guide
Software Download Cards Safety & Warranty Manual
Support
For the latest information about this product (documentation, technical
specifications, system requirements, compatibility information, etc.) and product
registration, visit akaipro.com.
For additional product support, visit akaipro.com/support.

4
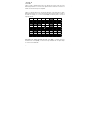
Setup
1. On your computer, open Ableton Live.
2. Use the included USB cable to connect APC mini mk2's USB port to an
available USB port on your computer (powered on).
3. In Ableton Live, open the Preferences:
• Windows: Options > Preferences
• MacOS: Live > Preferences
4. Click the Link/MIDI Tab.
5. Click an available Control Surface drop-down menu and select APC mini
mk2.
6. Click an available Input drop-down menu and select APC mini mk2.
7. Click an available Output drop-down menu and select APC mini mk2.
8. Make sure that the Track option under MIDI Input is enabled for APC mini
mk2 (Port 2).
9. Close the Preferences window.
You can now use APC mini mk2 with Ableton Live.

5
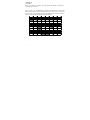
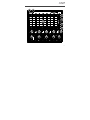
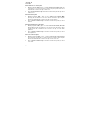
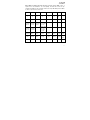
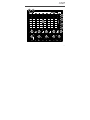
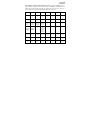
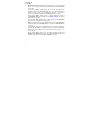
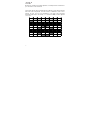
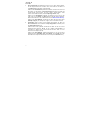
Features
1
2
3
45
6
7
8
4 4 4
3 3 3
7
7
7

6
1. USB Port: Use a standard USB cable to connect this port to a USB port on
your computer. The computer's USB port provides power to APC mini mk2.
This connection is also used to send and receive MIDI data to and from your
computer.
2. Kensington© Lock Slot: You may use this Kensington lock slot to secure the
APC mini mk2 to a table or other surface.
3. Clip Stop Buttons: Normally, you can press one of these buttons to stop the
clip in the corresponding track—represented by the column of eight Clip
Buttons just above it.
You can change their functions by pressing and holding Shift and then
pressing one of the Scene Launch buttons labeled Soft Keys: Clip Stop,
Solo, Mute, Rec Arm, or Select. Each button puts the Clip Stop Buttons in a
different mode:
• Clip Stop Mode: The Clip Stop Buttons will stop their corresponding
tracks (the default mode).
• Solo Mode: The Clip Stop Buttons will solo their corresponding tracks.
• Mute Mode: The Clip Stop Buttons will mute their corresponding tracks.
• Record-Arm Mode: The Clip Stop Buttons will record-arm their
corresponding tracks.
• Select Mode: The Clip Stop Buttons will select their corresponding
tracks.
Press and hold Shift and press one of the right four Clip Stop Buttons (, ,
, ) to shift the viewable 8x8 matrix of clips. In Ableton Live's Session View,
this is indicated by a red rectangle around the clips.

7
4. Faders: Normally, you can use these faders to control various parameters in
Ableton Live.
Press and hold Shift and press one of the left four Clip Stop Buttons labeled
Fader CTRL (Volume, Pan, Send, Device) to put APC mini mk2's Faders in
the corresponding mode:
• Volume Mode: The eight faders will control the volume levels of the first
eight tracks in Ableton Live.
• Pan Mode: The eight faders will control the panning positions of the first
eight tracks in Ableton Live.
• Send Mode: The eight faders will control the levels of Send A for the first
eight tracks in Ableton Live. Repeat this action to set the faders to control
the levels of subsequent sends (e.g., Send B, Send C, etc.).
• Device Mode: The eight faders will control the eight Macro Controls of
the current device in Ableton Live.
5. Master Fader: Use this fader to control the Master track volume in Ableton
Live.
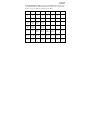
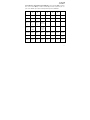
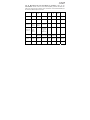
6. Clip Buttons: While in Ableton Live's Session View, use these buttons in this
8x8 matrix to launch clips. Each Clip Button represents a single clip slot. The
eight columns represent eight tracks while the eight rows represent eight
scenes. In Clip Launch Mode, the buttons' colors will match the clip colors in
Ableton Live. If there is nothing loaded to a clip slot in Ableton Live, the
matching button will remain unlit.
You can launch the entire scene by pressing the Scene Launch buttons to the
right of the row of clips.

8
7. Scene Launch Buttons: Normally, you can press one of these buttons to
launch the corresponding scene—represented by the row of eight Clip
Buttons to its left.
Press and hold Shift and then press one of the top five buttons labeled Soft
Keys to change the function of the Clip Stop Buttons, which can then stop,
solo, record-arm, mute, or select their corresponding tracks (see #3. Clip Stop
Buttons above).
Press and hold Shift and press the sixth or seventh buttons to enter Drum or
Note modes for the Clip Buttons. See Advanced Operation to learn more
about these modes.
Press and hold Shift and then press the eighth (last) button (Stop All Clips) to
stop all clips when they reach the end.
8. Shift: Press and hold this button and then press a Scene Launch button to
change the function of the Clip Stop Buttons (see #3. Clip Stop Buttons
above).
Press and hold this button and then press one of the right four Clip Stop
Buttons (, , , ) to shift the viewable 8x8 matrix of clips. In Ableton Live's
Session View, this is indicated by a red rectangle around the clips.
Press and hold Shift and press one of the left four Clip Stop Buttons (Volume,
Pan, Send, Device) to put APC mini mk2's Faders in the corresponding mode
(see #4. Faders above).

9
Basic Operation
Refer to this section to learn how to do basic tasks in Ableton Live using APC mini
mk2.
Important: Before doing any of the following, set up APC mini mk2 as a controller in
Ableton Live (described in the Setup section above).
To launch a clip, press one of the Clip Buttons (in the 8x8 matrix) that is dimly lit,
which means there is a clip loaded to that slot but is not playing. The Clip Button will
be brightly lit when it is playing.
To stop a clip:
1. Press and hold Shift and press the first Scene Launch Button (Clip Stop).
This puts the Clip Stop Buttons at the bottom of the 8x8 matrix of Clip Buttons
in Clip Stop Mode.
2. Press the Clip Stop Button in the same track (column) as the clip you want to
stop.
To launch a scene, press one of the eight Scene Launch Buttons to the right of the
8x8 matrix of Clip Buttons.
To move around the matrix of clips, press and hold Shift and press one of the right
four Clip Stop Buttons (, , , ) to shift the viewable 8x8 matrix. In the software,
this is represented by a red rectangle around the clips.

10
To solo a track:
1. Press and hold Shift and press the second Scene Launch Button (Solo). This
puts the Clip Stop Buttons at the bottom of the 8x8 matrix of Clip Buttons in
Solo Mode.
2. Press the Clip Stop Button in the same column as the track you want to solo.
To mute a track:
1. Press and hold Shift and press the third Scene Launch Button (Mute). This
puts the Clip Stop Buttons at the bottom of the 8x8 matrix of Clip Buttons in
Mute Mode.
2. Press the Clip Stop Button in the same column as the track you want to mute.
To record-arm a track:
1. Press and hold Shift and press the fourth Scene Launch Button (Rec Arm).
This puts the Clip Stop Buttons at the bottom of the 8x8 matrix of Clip Buttons
in Record-Arm Mode.
2. Press the Clip Stop Button in the same column as the track you want to
record-arm.
To select a track:
1. Press and hold Shift and press the fifth Scene Launch Button (Select). This
puts the Clip Stop Buttons at the bottom of the 8x8 matrix of Clip Buttons in
Select Mode.
2. Press the Clip Stop Button in the same column as the track you want to
select.

11
To stop all clips, press and hold Shift and press the eighth (last) Scene Launch
Button (Stop All Clips).
To adjust volumes, press and hold Shift and press the first Clip Stop Button
(Volume) to put APC mini mk2's Faders in Volume Mode. The first eight Faders will
control the volume levels of the first eight tracks in Ableton Live.
To adjust panning, press and hold Shift and press the second Clip Stop Button
(Pan) to put APC mini mk2's Faders in Pan Mode. The first eight Faders will control
the panning positions of the first eight tracks in Ableton Live.
To adjust send levels, press and hold Shift and press the third Clip Stop Button
(Send) to put APC mini mk2's Faders in Send Mode. The first eight Faders will
control the levels of Send A for the first eight tracks in Ableton Live.
Tip: Repeat this action to set the faders to control the levels of subsequent sends
(e.g., Send B, Send C, etc.).
To adjust devices, press and hold Shift and press the fourth Clip Stop Button
(Device) to put APC mini mk2's Faders in Device Mode. The first eight Faders will
control the eight Macro Controls of the current device in Ableton Live.

12
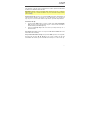
Advanced Operation
Drum Mode
APC mini mk2’s Drum Mode splits the matrix of Clip Buttons into 4x4 quadrants that
align with Ableton’s 16 slot Drum Rack, starting with the lower-left quadrant.
To enter Drum Mode, press and hold Shift and press the sixth Scene Launch
Button.
Note Mode
APC mini mk2’s Note Mode changes the layout of the Clip Button matrix to be used
to play notes like a chromatic keyboard. The note scale, octave, and layout of the
Clip Buttons can all be adjusted directly from APC mini mk2.
To enter Note Mode, press and hold Shift and press the seventh Scene
Launch Button (Note).
While in Note Mode, the Clip Button colors will change to reflect the selected scale
notes. Scale root notes will be lit red, while other notes in the scale will be lit amber.
When a Clip Button is pressed, all Clip Buttons of the same note and octave will be
lit bright green, while all Clip Buttons of the same note in other octaves will be lit
light green.

13
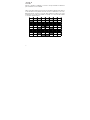
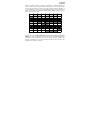
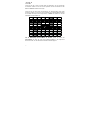
To edit the Note Mode settings, press and hold both Shift and the seventh Scene
Launch Button (Note). The matrix of Clip Buttons will change to the following layout,
which you can use to adjust various settings for Note Mode:
Db Eb Gb Ab Bb
C D E F G A B
Separate
Rows by
3rd
Separate
Rows by
4th
Separate
Rows by
5th
Separate
Rows by
6th
Separate
Rows by
7th
Separate
Rows by
Octave
Show/Hide
Non-Scale
Notes
Chromatic Major Melodic
Minor
Harmonic
Minor
Major
Pentatonic
Minor
Pentatonic Dorian Phrygian
Lydian Mixolydian Aeolian Locrian Blues Flamenco Hungarian
Whole
Tone
OCT -2 OCT -1 OCT 0 OCT 1 OCT 2 OCT 3 OCT 4 OCT 5

14
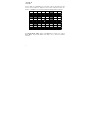
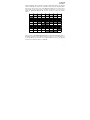
When any parameter is changed, the Clip Buttons will display an animation to
confirm the selected choice.
Use the top two rows of Clip Buttons to change the desired root note of the scale.
When pressed, the new selection will light green. Press and hold a root note button
to see the name of the currently selected scale displayed in the matrix. For instance,
if C is selected, the matrix would appear like the following:

15
Use the first four columns in the fourth and fifth rows of Clip Buttons to change the
note layout. Each row of notes can be separated by a 3rd, 4th, 5th, 6th, 7th, or an
Octave. Press and hold one of these buttons to display the selected value in the
matrix. For instance, if Separate Rows by 5th is selected, the pad matrix would
appear like the following:
Press the Show/Hide Non-Scale Notes Button to enable or disable notes not in the
currently selected scale from appearing in the pad rows. When disabled, Clip
Buttons for non-scale notes will be unlit.
Use the sixth and seventh rows of Clip Buttons to select the scale type. Press and
hold one of these buttons to display the scale name in the matrix as scrolling letters.

16
Use the eighth row of Clip Buttons to set the base octave for the pads. Press and
hold one of these buttons to display the current octave setting in the matrix. For
instance, if -1 Octave is selected, the pad matrix would appear like the following:
To exit Note Mode editing, release both Shift and the seventh Scene Launch
Button (Note), and the Clip Buttons will change color to reflect the updated
selections.

17
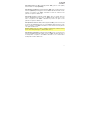
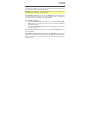
Guía del usuario (Español)
Introducción
Gracias por comprar el APC mini mk2. En Akai Professional, sabemos que usted se
toma la música en serio. Por eso es que diseñamos nuestros equipos con una sola
cosa en mente—hacer que pueda tocar su mejor interpretación.
Contenido de la caja
APC mini mk2 Cable USB
Ableton Live Lite (descarga) Guía del usuario
Tarjetas de la descarga de software Manual sobre la seguridad y garantía
Soporte
Para obtener la información más reciente acerca de este producto (documentación,
especificaciones técnicas, requisitos de sistema, información de compatibilidad,
etc.) y registrarlo, visite akaipro.com.
Para obtener soporte adicional del producto, visite akaipro.com/support.

18
Instalación
1. En su ordenador, abra Ableton Live.
2. Use el cable USB incluido para conectar el puerto USB del APC mini mk2 a un
puerto USB disponible en su ordenador (encendido).
3. En Ableton Live, abra Preferences (Preferencias):
• Windows: Options > Preferences (Opciones > Preferencias)
• MacOS: Live > Preferences (Live > Preferencias)
4. Clique la pestaña Link/MIDI.
5. Clique un menú desplegable Control Surface (Superficie de control)
disponible y seleccione APC mini mk2.
6. Clique un menú desplegable Input (Entrada) disponible y seleccione APC mini
mk2.
7. Clique un menú desplegable Output (Salida) disponible y seleccione APC mini
mk2.
8. Asegúrese de que la opción Track dentro de MIDI Input esté activada para el
APC mini mk2 (Port 2).
9. Cierre la ventana Preferences (Preferencias).
De esta forma puede utilizar ahora el APC mini mk2 con Ableton Live.

19
Características
1
2
3
45
6
7
8
4 4 4
3 3 3
7
7
7

20
1. Puerto USB: Use un cable USB estándar para conectar este puerto a un
puerto USB disponible en su ordenador. El puerto USB del ordenador
suministra corriente al APC mini mk2. Esta conexión también se utiliza para
enviar y recibir datos MIDI desde y hacia su ordenador.
2. Ranura del bloqueo Kensington: Puede utilizar esta ranura de bloqueo
Kensington a fin de sujetar el APC mini mk2 a una mesa u otra superficie.
3. Botones de detener clip: Normalmente, puede pulsar uno de estos botones
para detener el clip de la pista correspondiente—representada por la columna
de ocho botones de clip que está inmediatamente encima del mismo.
Puede cambiar sus funciones manteniendo pulsado Shift y luego usando uno
de los botones de lanzamiento de escena etiquetados como Soft Keys: Clip
Stop, Solo, Mute, Rec Arm o Select. Cada botón pone a los botones de
parada de clip) en un modo diferente:
• Modo Detener clip: Los botones de detener clip detienen sus pistas
correspondientes (es el modo predeterminado).
• Modo Solo: Los botones de detener clip permiten realizar un solo de sus
pistas correspondientes.
• Modo Silencio: Los botones de detener clip silencian sus pistas
correspondientes.
• Modo Armar grabación: Los botones de detener clip permiten armar la
grabación de sus pistas correspondientes.
• Modo Selección: Los botones de detener clip permiten seleccionar sus
pistas correspondientes.
Mantenga pulsado Shift y pulse uno de los cuatro botones de detener clip de
la derecha (, , , ) para desplazar la matriz 8x8 de clips visible. En la
vista de sesión de Ableton Live, esto se indica mediante un rectángulo rojo
alrededor de los clips.
La pagina si sta caricando...
La pagina si sta caricando...
La pagina si sta caricando...
La pagina si sta caricando...
La pagina si sta caricando...
La pagina si sta caricando...
La pagina si sta caricando...
La pagina si sta caricando...
La pagina si sta caricando...
La pagina si sta caricando...
La pagina si sta caricando...
La pagina si sta caricando...
La pagina si sta caricando...
La pagina si sta caricando...
La pagina si sta caricando...
La pagina si sta caricando...
La pagina si sta caricando...
La pagina si sta caricando...
La pagina si sta caricando...
La pagina si sta caricando...
La pagina si sta caricando...
La pagina si sta caricando...
La pagina si sta caricando...
La pagina si sta caricando...
La pagina si sta caricando...
La pagina si sta caricando...
La pagina si sta caricando...
La pagina si sta caricando...
La pagina si sta caricando...
La pagina si sta caricando...
La pagina si sta caricando...
La pagina si sta caricando...
La pagina si sta caricando...
La pagina si sta caricando...
La pagina si sta caricando...
La pagina si sta caricando...
La pagina si sta caricando...
La pagina si sta caricando...
La pagina si sta caricando...
La pagina si sta caricando...
La pagina si sta caricando...
La pagina si sta caricando...
La pagina si sta caricando...
La pagina si sta caricando...
La pagina si sta caricando...
La pagina si sta caricando...
La pagina si sta caricando...
La pagina si sta caricando...
La pagina si sta caricando...
La pagina si sta caricando...
La pagina si sta caricando...
La pagina si sta caricando...
La pagina si sta caricando...
La pagina si sta caricando...
La pagina si sta caricando...
La pagina si sta caricando...
-
 1
1
-
 2
2
-
 3
3
-
 4
4
-
 5
5
-
 6
6
-
 7
7
-
 8
8
-
 9
9
-
 10
10
-
 11
11
-
 12
12
-
 13
13
-
 14
14
-
 15
15
-
 16
16
-
 17
17
-
 18
18
-
 19
19
-
 20
20
-
 21
21
-
 22
22
-
 23
23
-
 24
24
-
 25
25
-
 26
26
-
 27
27
-
 28
28
-
 29
29
-
 30
30
-
 31
31
-
 32
32
-
 33
33
-
 34
34
-
 35
35
-
 36
36
-
 37
37
-
 38
38
-
 39
39
-
 40
40
-
 41
41
-
 42
42
-
 43
43
-
 44
44
-
 45
45
-
 46
46
-
 47
47
-
 48
48
-
 49
49
-
 50
50
-
 51
51
-
 52
52
-
 53
53
-
 54
54
-
 55
55
-
 56
56
-
 57
57
-
 58
58
-
 59
59
-
 60
60
-
 61
61
-
 62
62
-
 63
63
-
 64
64
-
 65
65
-
 66
66
-
 67
67
-
 68
68
-
 69
69
-
 70
70
-
 71
71
-
 72
72
-
 73
73
-
 74
74
-
 75
75
-
 76
76


in altre lingue
Documenti correlati
Altri documenti
-
Akai APC mini mk2 Guida utente
-
Akai APC Key 25 Manuale utente
-
Akai LPD8 Guida utente
-
-
Akai APC20 Manuale del proprietario
-
-
Novation Launchpad X Guida utente
-
M-Audio Axiom AIR Mini 32 Manuale del proprietario
-
M-Audio Keystation 88 MK3 Guida utente
-