
TM-3000 Video TitleMaker 3000 Instruction Manual • MANL-0612-02 • ©1996 Videonics, Inc.
The Videonics logo, Thumbs Up, and Videonics Video TitleMaker are registered trademarks of
Videonics, Inc. TM-3000, MX-1 Digital Video Mixer and Edit Suite are trademarks of Videonics,
Inc. Product and brand names may be trademarks or registered trademarks of their respective
companies and are hereby acknowledged. Television screens are simulated. Subject to change
withoutnotice.Thisdeviceisnottobeusedfortheunauthorizedcopyingofcopyrightedmaterial.
Videonics, Inc. • 1370 Dell Avenue • Campbell, CA 95008 USA • 408-866-8300
Model TM-3000
Instruction Manual

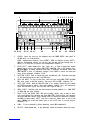
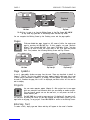
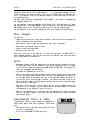
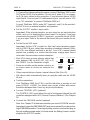
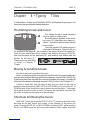
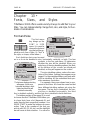
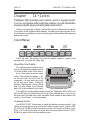
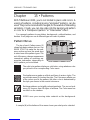
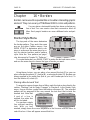
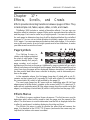
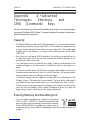
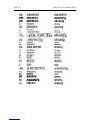
CONTROLS
12345
6789
11 12 13 14 15 16 17 18 19 20 21 22
10
25
2423
IN OUTSTYLE
FONT &
SIZE
undo
movecopy
COLOR PATTERN
COLOR PATTERN COLOR PATTERN COLOR STYLE
mark
start mark
end
POWER
DEMO
PLAY PLAY
page
down
page
up
posn
new
line
shift
new
page
shift
page
index
OK
caps
lock
tab
delete
cmd
!
1
Q
@
2
#
3
$
4
%
5
^
6
&
7
*
8
(
9
)
0
—
–
+
=
W
E
R
T
Y
U
I
|
\
O
P
{
[
A
Z
S
D
F
G
H
J
K
L
:
;
"
'
X
C
V
B
NM
<
,
>
.
?
/
}
]
¡
´
`
¨
˜
^
°
"
Ø —
¢ £ ¥ ® ™
© • Œ
«»
Æ ß § ♥ ✓ ◆
■
■
‘
’
Ç
“
”
¿
accent
EFFECTSFONT BACKGROUNDLETTER OUTLINE BORDERS
markposition caps lock
^
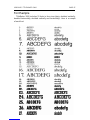
1. POWER. Power key turns on the keyboard once the POWER SWITCH (rear panel of
TM-3000 unit) is in ON position.
DEMO. Demonstrates features. Press ACCENT + DEMO for English version; SHIFT +
DEMO for International version. You can also copy the demo into the editing area, to
modify it or study how its effects were accomplished. (Chapter 5)
2. MENU KEYS. Menus change color, font, style, etc., of lines or pages that contain
marked text or cursor. Use either MARK START, MARK END, TAB, or the bracket keys,
( [ )( [ )
( [ )( [ )
( [ ) and ( ] )( ] )
( ] )( ] )
( ] ) , to change sub-menus; arrow keys to highlight the desired choice; and
NEW LINE/OK or PLAY to implement changes. Press UNDO to cancel the menu and
leave titles unchanged. (Chapters 11-18)
3. POSITION LIGHT. Used in conjunction with the POSN key (10). Indicates that page
or line positioning may be done (see POSN key).
4. COPY and MOVE. To copy or move text, mark the text using MARK START and MARK
END, move cursor to desired location, then press COPY or MOVE. (Chapters 7-9)
5. CAPS LOCK LIGHT. When the CAPS LOCK light is on, typing a letter key (A-Z) causes
the SHIFTed version to appear. Other keys (numbers, symbols, etc.) are unaffected.
Press the CAPS LOCK key to turn the CAPS LOCK light on and off.
6. MARK LIGHT. Indicates that the mark function has been enabled (i.e., MARK START
or MARK END has been pushed).
7. MARK START and MARK END. Mark text to modify, delete, copy, or move it. Posi-
tion cursor before first character and press MARK START. Position after last character
and press MARK END. Notice cursor becomes wider to remind you something is marked.
Use UNDO to remove marks. SHIFT, used with a mark key, marks start or end of the
page; COMMAND plus a mark key marks start or end of all text in current project.
(Chapters 7-9)
8. UNDO. If you accidentally delete something, press UNDO immediately.
9. DELETE. Erases marked text, if any. Otherwise, erases the character before the cursor.

10. POSN (POSITION). Press and release POSN, followed by up or down arrow keys, to
position text at the top, bottom, or center of the page. Press and release POSN, then
left or right arrow, to position text at right, left, or center page. (Chapter 10)
11. TAB. “Smart tab” positions cursor to match spaces in previous line of text. Also used
to choose which submenu is active. (Chapter 6)
12. SHIFT and CAPS LOCK. Hold SHIFT to type capital letters. CAPS LOCK capitalizes all
typing until pressed again. Note that some fonts have only capital letters. SHIFT is also
used to modify the function of other keys. (Chapter 6, Appendix A)
13. CMD (COMMAND). Modifies function of other keys. (Appendix A and Chapter 18)
14. Z (CLOCK). CMD (Command) + Z displays clock menu. Use to set current time dis-
play format, set current time and set internal timed trigger for projects. (Chapter 18)
15. ACCENT. Hold ACCENT while typing a letter key to type the special symbols (•,©,¢,etc.)
printed in blue. Use with power key to activate DEMO. Use with accent marks fol-
lowed by a letter to type accented international characters such as é, ü, å, etc. (Chap-
ter 5 & 6)
16. PLAY. After you create titles using the Editing Screen, press either PLAY key (#16 or
#21) to play the titles for display or recording. CMD (Command) + PLAY always plays
from first page in project. If no text is marked, PLAY displays the next page. If text is
marked, PLAY loops through marked pages. Once playing begins: Press PLAY again to
go to next page; use SHIFT and PLAY to play backwards; press arrow keys to manually
step forward or backwards. NEW LINE/OK ends play and returns to Editing Screen.
(Chapter 20)
17. X (DATE). CMD (Command) + X displays date menu. Use to set current date display
format and set current date. (Chapter 18)
18. SPACE BAR. Adds space to text. Pauses the page that is playing.
19. PAGE INDEX. Displays an index in which each page occupies one line, making it easy
to look through all pages and projects. Projects are created and named using PAGE
INDEX. (Chapter 8)
20. NEW PAGE. Starts a new page of text. CMD (Command) + NEW PAGE starts a new
project when Page Index is on screen. (Chapters 7-8)
21. PLAY. Identical to item 16.
22. ARROW KEYS. Use the four individual arrow keys to move the cursor on screen; to
change highlights in a menu; and, when playing text, to go forward and backward.
SHIFT makes arrow act on one page at a time; CMD (Command) with UP or DOWN
goes to top or bottom of all text. CMD (Command) + SHIFT + UP or DOWN moves
you between projects. (Chapters 6, 11, and 19)
23. PAGE UP and PAGE DOWN. Used to re-position cursor a page at a time. PAGE UP
places cursor at the first line of the page, PAGE DOWN places cursor at the last line in
the page.
24. NEW LINE/OK. Ends a line of text and starts a new one. Also accepts settings of
menus, returns to Editing Screen from Page Index and Play Screens. (Chapter 6)
25. LEFT and RIGHT BRACKET. Use the left and right bracket to change sub-menus.
MARK START, MARK END, and TAB will do the same.

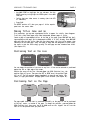
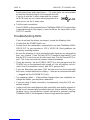
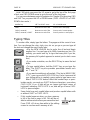
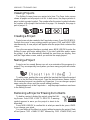
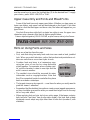
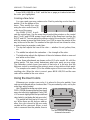
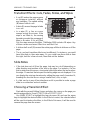
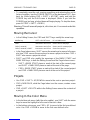
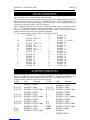
REAR PANEL
NOTE: S-video (Y/C) and composite (RCA-style) video jacks are provided. Use same type
for input and output — for instance, if your video source only has RCA jacks, use RCA for
both even if the recorder has S-video.
A. VIDEO IN. Optional. Connect either S-video or RCA type cable from video source.
B. VIDEO OUT. Connect either S-video or RCA type cable (same as used for input) to
recorder or monitor.
C. AUDIO IN and OUT. Audio connections are provided for convenience; the audio
signals pass straight through without modification.
D. PREVIEW OUT. Optional. When used in live title setup, permits you to modify titles
and typing is not seen on main output.
Important: Leave unconnected when not in use.
(Chapter 21)
E. CONTROL (GPI). Allows remote trigger of titles using switch or controller with GPI
(“General Purpose Interface”) output.
Warning: Always turn power off before connecting
or disconnecting GPI jack.
(Chapter 20)
F. POWER. Connect TitleMaker 3000 power supply.
Important: Do not use power sup-
plies designed for any other equipment.
G. POWER SWITCH. Controls the power supply. When the POWER SWITCH is turned
on and the keyboard power is turned off, video is routed from the VIDEO IN to the
VIDEO OUT and no titles are added. Note: keyboard must have been cycled on and off
since the last time the unit was powered on at the POWER SWITCH in order for video
pass-through to work.
H. Upside-down legends make it easy to make connections without turning unit around.

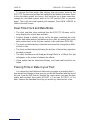
Contents
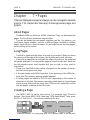
Chapter 7 • Pages..............................30
About Pages......................................................3 0
Long Pages........................................................3 0
Creating a Page...............................................3 0
Page Symbols...................................................3 1
Navigating Pages and Projects with the
Page Index .....................................................3 1
Deleting a Page ...............................................3 2
Inserting a Page...............................................3 2
Moving and Copying Pages........................3 3
Chapter 8 • Projects .........................34
About Projects ..................................................3 4
Examples of How Projects are Used.......3 4
Viewing Projects ..............................................3 5
Creating a Project ...........................................3 5
Naming a Project.............................................3 5
Removing a Project or
Erasing its Contents....................................3 5
Moving Between Projects.............................3 6
Copying or Moving Text
Between Projects .........................................3 6
Chapter 9 • Changing Titles ............37
Undo.....................................................................3 7
Simple Changes...............................................3 7
Marking Text for Major Changes...............3 7
Marking Whole Lines and Pages ..............3 8
Deleting Marked Text.....................................3 8
Replacing Marked Text.................................3 8
Moving and Copying Text............................3 9
Chapter 10 • Positioning Text.........41
Positioning Horizontally:
Left, Right, Center........................................4 1
Positioning Vertically:
Up, Down, Center ........................................4 1
Additional Positioning Hints ........................4 2
Chapter 11 • How to Use Menus .....43
Concept...............................................................4 3
Sub-menus.........................................................4 3
Highlights and Choices.................................4 3
Using the Menus..............................................4 4
Chapter 12 •
How Characteristics Affect Text ....45
Concept...............................................................4 5
How Characteristics Affect
Lines and Pages...........................................4 5
Chapter 1 • Introduction ....................1
In a Hurry?............................................................ 1
Helpful Hints........................................................ 1
What is a Video Titler?..................................... 1
What is TitleMaker 3000? ............................... 1
Basic Applications............................................ 2
Equipment............................................................ 3
Chapter 2 • QuickStart .......................4
Chapter 3 • Connections ..................11
Connections: Overall Concept...................1 1
What You’ll Need .............................................1 1
Types of Input and Output Jacks..............1 2
Types of Cables Used
with TitleMaker 3000...................................1 2
IN and OUT Markings....................................1 3
Connection Diagram ......................................1 4
Connecting Power...........................................1 4
Turning Power On and Off: Video
Pass-Through and Data Protection.......1 4
Connecting Outputs and Monitors ...........1 5
Connecting a Video Source ........................1 7
Troubleshooting Hints....................................1 8
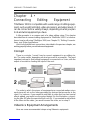
Chapter4 •
Connecting Editing Equipment........19
Concept...............................................................1 9
Videonics Equipment Arrangements.......1 9
Single-Source Editing Setup.......................2 0
Use with Video Processors..........................2 1
Multiple Source Editing
with a Video Mixer........................................2 1
GPI Control.........................................................2 1
Chapter 5 • Using the Demo ............23
Using the Demo ...............................................2 3
International Demo..........................................2 3
Locked Demo....................................................2 3
Using the Demo as a Guided Tour...........2 3
Using the Demo to Create Titles ...............2 4
Chapter 6 • Typing Titles .................25
The Editing Screen and Cursor .................2 5
Moving Around the Screen..........................2 5
Shortcuts for Moving the Cursor................2 5
Typing Titles ......................................................2 6
Columns (Tabs)................................................2 7
Typing Special and
Accented Characters .................................2 7

Contents
Changes..............................................................4 6
Copying Characteristics...............................4 7
Chapter 13 •
Fonts, Sizes, and Styles....................48
Font and Size ....................................................4 8
Upper-Case-Only and
Fonts and Mixed Fonts...............................4 9
Hints on Using Fonts and Sizes.................4 9
Font Style............................................................5 0
Hints on Using Styles.....................................5 1
Chapter 14 • Colors...........................52
Color Menus ......................................................5 2
Using the User Colors ...................................5 3
Hints on Using Colors....................................5 4
Chapter 15 • Patterns.......................55
Pattern Menus...................................................5 5
Selecting Different Rainbow
and Pixel Patterns........................................5 6
Mixing Video into a Background Pattern 56
Hints on Using Patterns ................................5 6
Chapter 16 • Borders ........................58
Border Style Menu ..........................................5 8
Complex Borders ............................................5 9
Removing borders ..........................................5 9
Chapter 17 •
Effects, Scrolls, and Crawls ............60
Page Symbols...................................................6 0
Effects Menus ...................................................6 0
Transition Effects: Cuts, Fades, Slides,
and Wipes.......................................................6 0
Slide Notes.........................................................6 1
Choosing a Transition Effect.......................6 1
Setting the Transition Speed.......................6 2
Displaying the Page.......................................6 2
Setting Duration ...............................................6 2
Infinite Duration................................................6 3
Scroll and Crawl...............................................6 3
Scroll and Crawl Notes..................................6 3
Hints on Using Effects...................................6 4
Chapter 18 •
Clock and Date Features..................65
Setting the Clock and Date Formats........6 5
Setting the Clock and Date .........................6 5
Clock and Date Notes ...................................6 5
Displaying a Project at a Pre-Determined
Date and Time...............................................6 6
Repeating Triggers.........................................6 6
Internal Timed Trigger Notes......................6 7
Displaying the Real Time Clock
and Date..........................................................6 7
Real Time Clock and Date Notes..............6 8
Placing Time or Date in Your Text ............6 8
Chapter 19 •
Superimposing Titles ........................69
Superimposing Titles on Video ..................6 9
Superimposing Titles on Video
with a Transparent Pattern .......................6 9
Making Titles Come and Go........................7 0
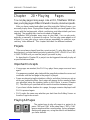
Chapter 20 • Playing Titles..............71
Projects................................................................7 1
Important Concepts........................................7 1
Playing All Pages.............................................7 1
Playing Some Pages ......................................7 2
Playing Backwards .........................................7 2
Pause...................................................................7 2
Search (Cue and Review)............................7 2
Manual Play (Slide Projector Mode).........7 3
Continuous Play (Video Billboard)............7 4
Leaving Play to Edit Again...........................7 4
Chapter 21 • Editing, Presentations,
and Other Applications.....................75
Applications.......................................................7 5
Video Editing.....................................................7 5
Presentations ....................................................7 8
Live Titles............................................................8 0
Chapter 22 • Preview........................81
About Preview...................................................8 1
Using a PREVIEW Monitor ...........................8 1
Forcing Preview Mode...................................8 1
AppendixA •
Advanced Techniques, Shortcuts, and
Command Keys...................................82
Capacity..............................................................8 2
Erasing Memory and Resetting Unit........8 2
Moving the Cursor...........................................8 3
Projects................................................................8 3
Moving In the Color Menu............................8 3
Using the Demo ...............................................8 4
Play Modes ........................................................8 4

Miscellaneous Hints .......................................8 5
AppendixB • Font Listing ................86
Character Set....................................................8 6
Font Sample................................................ 87-88
SPECIAL CHARACTERS...............................8 9
ACCENTED CHARACTERS.........................8 9
AppendixC • Glossary ................90-93
Index ....................................................94
Contents

VIDEONICS TITLEMAKER 3000 PAGE 1
Chapter 1 • Introduction
CongratulationsonyourpurchaseofVideonicsTitleMaker3000™.
WithTitleMaker3000, you canaddbrilliant, full colortitlestoall
yourvideos.Itswidechoiceoffonts,sizes,styles,colors,borders,
backgrounds, fades, wipes, scroll, crawl, and more make the
TitleMaker3000acreativetoolforanyonewhousesvideo.
In a Hurry?
If you want to get started quickly, see the Quick Start section, Chapter 2.
Helpful Hints
TitleMaker3000isa sophisticated video production tool. Some of the words
and concepts used in this manual may be new to you. Specialized terms indi-
cated by italics are defined in the Glossary section of this manual.
You can find complete descriptions of titling concepts and techniques as
they apply to TitleMaker 3000 by referring to the Table of Contents and the
Index.
For More Information...
...send in your registration card so we can keep you informed of new de-
velopments and send you our newsletter*. Note that Videonics does not sell
its mailing list. Your name and address will remain confidential.
WhatisaVideoTitler?
Atitler(alsocalled a titlegenerator,charactergenerator,orCG)createsletters
and numbers (characters) on a video signal that can be displayed on a televi-
sion or monitor, or be recorded by a VCR.
WhatistheTitleMaker3000?
TitleMaker 3000 is a video titler with many additional capabilities. With
TitleMaker 3000, you can:
• Create high-quality video titles over a solid color or patterned background,
orsuperimposed (“genlocked”) overavideopicture.
• Create and hold over 16,000 characters of text, divided into hundreds of
pages.
• Divide your pages into projects.
*The newsletter and other services are available for Videonics customers in the U.S. and
Canada. Elsewhere, contact your Videonics distributor or retailer.

PAGE 2 VIDEONICS TITLEMAKER 3000
• Copy and move text, to revise titles without retyping.
• Position text anywhere on the page, including automatic centering.
• Choose from a wide variety of fonts and sizes.
• Choose different styles. You can change letter spacing, make the letters
bold, and add outlines or shadows to the titles.
• Apply a pattern and any of a million colors to titles, backgrounds, outlines,
and borders.
• Usetransitions (fades andwipes)tostartor end each page of titles.
• Use scrollsand crawls to move titles on or off the screen.
• Use a real-time clock to superimpose a running clock onto all backgrounds,
including live “video.”
• Have a project start playing automatically at a specified date and time.
BasicApplications
TitleMaker 3000 can be used in live or taped settings. Chapter 21, “Editing,
Presentations, and Other Applications,” describes these functions in more
detail and explains how they are accomplished with TitleMaker 3000.
• You can add titles as you copy or edit tapes. The original tape remains
untouched — titles are added to the edited copy. TitleMaker 3000 works
with VCRs and camcorders of all videotape formats as long as the equip-
ment used has composite or S-video outputs. You can superimpose titles
on live video or on colored backgrounds, using fades and wipes to transi-
tion between plain video and video with titles.
For example, you might start a basketball video with a solid color screen
with the title of the video. The names of the players could scroll onto the
background. Then the titles could fade away. As the players run onto the
court, their names appear, superimposed over the image at the bottom of
the screen. The last name fades away as play begins. A player makes a
difficult basket and the crowd roars! The score appears over a wildly-col-
ored, animated background pattern and scrolls off the screen as play con-
tinues.
• You can present a running slate of on-screen titles for display, video-DJ,
point-of-sale, or “video-billboard” applications. You can place titles on top
of colored or patterned backgrounds or on live or taped video material.
Forexample, a hotel hasmonitorsin the lobby. Avideodescribing the hotel’s
facilitiesplays.Meanwhile,informationabouttheday’sscheduledeventsaresu-
perimposedusingtheTitleMaker3000withmessageslike“BusinessEffectiveness
Seminar:Ballroom G.” At dinnertime, thehotelmanagerchanges the titles to
advertisetherestaurantspecials:“PrimeRibSpecialtodayintheMezzanineGrill.”
AnotherexampleistheuseofTitleMaker3000forbusinesspresentations.Instead
ofusingtransparencies orcharts, youcan createtitles, usingthecolors,back-

VIDEONICS TITLEMAKER 3000 PAGE 3
grounds,effects,andotherfeaturestoemphasizetheimportantpointsandmake
thepresentationdynamicandexciting.Youcanalsousethesuperimposefeature
tocombinethepresentationwithvideofootage,suchasshotsofanewproductor
ofthefactorysites.
Equipment
Your Video TitleMaker Package comes with:
• TM-3000 Unit
• Keyboard
• Power supply
• This manual
• Product registration card.
You may need to purchase cables to connect audio and video equipment
to the TitleMaker. Your Videonics dealer can help you identify the cables you
need.

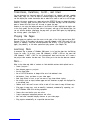
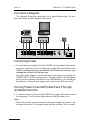
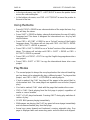
PAGE 4 VIDEONICS TITLEMAKER 3000
L
AB C
D
VIDEO
IN
AUDIO
IN
VIDEO
OUT
AUDIO
OUT
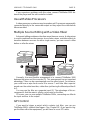
Chapter 2 • QuickStart
Whetheryou’reavideoexpertlookingforjustthebasicstepsora
beginnerwhowantsinstantgratification,thischapterwillhaveyou
titling in minutes!
This chapter describes just the basics. Many features and applications are
skipped or mentioned only briefly. For more information, or if you encounter
problems, refer to the table of contents or the index to locate a more complete
discussion elsewhere in the manual.
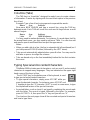
Connections
Rear Panel: Connect the power supply ( C) to a working wall outlet and connect the other
end to TitleMaker 3000’s POWER jack.
Connect TitleMaker 3000’s OUT jacks to the VIDEO and AUDIO IN jacks of a VCR (B).
Connect a television or monitor to the VCR in the normal fashion, so you can see the VCR’s
output. Leave the PREVIEW OUT jack unconnected unless you are using a PREVIEW monitor
(Chapter 22). Turn the television and VCR on.
Connect a camcorder, VCR or other source (A) to TitleMaker 3000’s video and audio IN
jacks if you plan to superimpose titles over video. Turn on the video source and start the
tape rolling.
Note: The illustration shows the use of composite (RCA-style) jacks for the video connections.
You can use S-video (Y/C) jacks instead. It is important to use the same type of jacks for the
input and the output. In other words, if your input is connected via the S-video jack, the output
should also use S-video; if it uses the composite jack, the output should use composite too. An
on-screen warning will alert you if you attempt to use the S-video output and composite input.
Note: The audio connections are for convenience only — the audio signals are not affected by
the unit.
Keyboard: Connect the keyboard to the jack on TitleMaker 3000’s front panel.
TypicalTitleMaker3000connection

VIDEONICS TITLEMAKER 3000 PAGE 5
❶
❷
Power On/Off
There is a power switch on the rear panel and a POWER key on the keyboard.
TM-3000 Unit: Press the POWER SWITCH (D) on the rear panel; the power
light on the front panel comes on for a moment and then goes out. Simulta-
neously, the three lights on the keyboard (upper right hand corner) flash on
and off.
Keyboard: Press the POWER key on the keyboard (upper left hand corner) and the power
light comes on. You should see a screen (called the Editing Screen) on the OUTPUT moni-
tor, similar to the one in the illustration below.
Press POWER again to turn power off. Titles are retained in TitleMaker 3000’s memory even
if the unit is unplugged.
When power is off, and the power switch remains on, the OUTPUT monitor shows the
video source that is plugged into VIDEO IN.
Note: When turning the unit off, power off the keyboard and then the rear panel switch,Note: When turning the unit off, power off the keyboard and then the rear panel switch,
Note: When turning the unit off, power off the keyboard and then the rear panel switch,Note: When turning the unit off, power off the keyboard and then the rear panel switch,
Note: When turning the unit off, power off the keyboard and then the rear panel switch,
making sure the power light is out before you unplug the unit.making sure the power light is out before you unplug the unit.
making sure the power light is out before you unplug the unit.making sure the power light is out before you unplug the unit.
making sure the power light is out before you unplug the unit.
Demo
To start the demo, press ACCENT while you press DEMO (POWER). The demo is a built-in
project that demonstrates a wide range of the TM-3000 features and effects. To run the
international version of the demo, press SHIFT + DEMO. If no demo appears, check the
connections. Press any key to stop the demo.
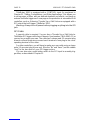
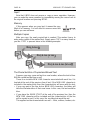
Instant Titles
Creating basic titles is simple. Start with
the Editing Screen. The screen may not
look exactly like this but it should have at
least the blinking
cursor
(1). Press POWER
once or twice if the cursor is not displayed.
The cursor indicates where characters you
type will appear. Page symbols ( 2, de-
scribed later) separate pages of titles.
Type some titles. They appear at the cur-
sor location. Press either of the two PLAY
keys on the keyboard when you are fin-
ished. The Editing Screen disappears and
the finished titles fill the screen. Congratu-
lations — you have created your first titles!
Press NEW LINE/OK to return to the Edit-
ing Screen.
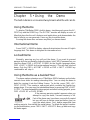
The Editing Screen and the Play Screen
You have just seen how the screen changes appearance, depending on whether you are
creating titles or displaying them. The
Editing Screen
(the one with the cursor) is used to
create or change titles. The
Play Screen
shows just the titles, with no cursor or other items.
It is the screen you use to display and record the completed titles.
POWER
DEMO

PAGE 6 VIDEONICS TITLEMAKER 3000
Sherlock
Holmes 221B Baker Street
Sherlock
Holmes
221B Baker Street
Edit Screen Play Screen
The PLAY key is used to go from the Editing Screen to the Play Screen. NEW LINE/OK
(or any letter key) goes back to the Editing Screen from the Play Screen.
You can recognize the Editing Screen by the flashing cursor and the page symbols.
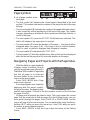
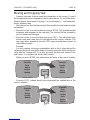
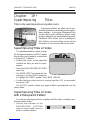
Pages
Titles are divided into
pages.
A page is a full screen of titles. You create a new
page by pressing the NEW PAGE key. In this example, we typed “Sherlock
Holmes,” then pressed NEW PAGE, then typed “221B Baker Street.” We then
used the up arrow to move the curser back to the first page and pressed
PLAY. This produces the following Editing Screen and Play Screens:
Edit Screen Play Screen Pg 1 Play Screen Pg 2
Page Symbols
A row of
page symbols
divides one page from the next. These are described in detail in
Chapter 7. Briefly: The first two symbols and their numbers identify which page this is and
to which project (described in Chapter 8) it belongs. The next symbols tell which effect will
be used to introduce the page; how it will be displayed; and which effect will be used to
end its display.
Projects
You can create separate
projects
(Chapter 8). Each project has its own pages
which are protected from alteration while you are working on another project.
This way several people can use the same unit, or one person can work on
several distinct jobs.
The PAGE INDEX key is used to access projects. It displays all the pages in all
the projects. By moving the cursor up and down through the Page Index screen, you can
begin work on any page, in any project. Press NEW LINE/OK to return to the Editing Screen.
Entering Text
To create a title, simply type some letters and they will appear at the cursor’s location.
new
page
page
index
Sherlock
Holmes
Sherlock
Holmes
PLAY
new
line OK
PLAY

VIDEONICS TITLEMAKER 3000 PAGE 7
❹
❷
❶
❸
• To type a capital letter, hold SHIFT as you type. Press
CAPS LOCK to type all capital letters (keyboard LED will
light). Press it again to type in normal upper and lower
case (keyboard LED will go out).
• To type special characters (such as the ones printed in
blue on the keys), press ACCENT and a letter at the same
time. For instance, press ACCENT and Q to produce “¢.”
• To type an accented letter, simultaneously press AC-
CENT and the key with the desired accent mark,
then
press
the letter to be accented. For example, press ACCENT and
3 together; then release them and press the A key. You will
see the letter “à.”
Lines
Press NEW LINE/OK to end a line of text and begin a new line.
Moving the Cursor
If you want to add text somewhere other than where the cursor is, use the arrow keys to
move the cursor. Press PAGE UP or PAGE DOWN to move a page at a time or you can hold
SHIFT as you press the UP or DOWN arrow keys. SHIFT with the LEFT or RIGHT arrow key
moves the cursor to the start or end of the line.
Note: You cannot move the cursor past the end of the last line of text. If you want to type past
the last character in a line, position the cursor at the end of the line and type. If you want to
type beyond the last characters on the screen, position the cursor at the end of the line and
press NEW LINE/OK to create blank lines. The cursor moves down as you add lines.
Editing the Text
To
insert
text, use the arrow keys to move the cursor to the desired location and type. New
characters are added at the cursor’s location.
To
delete
text, position the cursor after the characters you want to remove and press DE-
LETE. The character before the cursor is removed. To delete large blocks of text at once,
mark the text and press delete.
To
replace
text, delete the existing text, then type the new text.
Oops!
If you accidentally delete something,
immediately
press UNDO. It restores the text that was
deleted by the last press of the DELETE key.
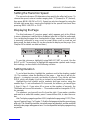
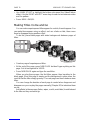
Using Menus to Change Colors, Fonts, etc.
You can change
characteristics
(such as fonts,
colors and font styles) using the
menu keys
at
the top of the keyboard. To do this, position the
cursor anywhere in the line you wish to change
and press the appropriate menu key.
For instance, press the LETTER COLOR key (in
the top row). A menu of colors appears.
This menu has two
sub-menus
— one at the top
of the screen ( ) and one at the bottom ( Õ).
Each sub-menu contains choices you can use to
caps
lock
shift
accent
new
line OK

PAGE 8 VIDEONICS TITLEMAKER 3000
change your titles. Use the left or right bracket ( [, ] ) to choose which sub-menu is active.
In this example, the bottom sub-menu is active (Tab, MARK START and MARK END also
work). If you wanted to use the top sub-menu instead, you would press any of the previ-
ously mentioned keys.
One item in the active menu is highlighted. In this example, a color choice is highlighted by
the triangular pointers ( Ã).
Use the
arrow keys
to move the highlight to a different color. The sample patch ( À) shows
the selected color. Press NEW LINE/OK or PLAY to choose the color you have highlighted.
NEW LINE/OK returns you to the editing screen; PLAY will play the resulting page.
All the characters in the line that contained the cursor will change to the selected color.
More Changes
Use menus to:
• Change font style and size, letter color and pattern, letter outline color and pattern, as
well as background color and pattern.
• Add borders to lines or pages and change their type, color, and pattern.
• Have effects start and end a page of titles.
• Display current time and/or date.
• Make text scroll and crawl.
Each menu works much in the same way: If there are sub-menus, use MARK START to
switch between sub-menus. Then use the arrow keys to highlight your choice and press
PLAY or NEW LINE/OK to implement it.
Notes
• Background, Pattern, and Effect menus affect the entire page that contains the cursor.
The other menus affect only the contents of the line that contains the cursor. If groups
of text lines or pages are marked using MARK START and MARK END, the changes will
affect the lines/pages that are marked.
• You cannot mix characteristics on a line.
• When you are editing text using the Editing Screen, several pages may be on the screen
at once (with page symbols between them). Note that the backgrounds and borders of
all the pages appear in the pattern and color of the page that contains the cursor. As
you move the cursor from one page to another, the patterns and colors used in the
entire screen will change. To see the patterns and color that are set for a particular page,
move the cursor to that page.
• Each page can use one type of pixel pattern and one type of rainbow pattern (see
Chapter 15). So, for example, if you set some letters to use rainbow pattern 11, then set
the background to use rainbow 14, both will use 14.
• When you type something new, it will have the same characteristics as the preceding
letter. If you want to type in a different style, use the menu key to make a new choice
and continue typing.
Superimposing Titles on Video
To superimpose titles on video, change the background to
VIDEO (rather than a solid color or pattern). Follow these
steps:
• Position the cursor on the page that contains the titles
you wish to superimpose.
• Press the BACKGROUND PATTERN menu key.

VIDEONICS TITLEMAKER 3000 PAGE 9
• Use MARK START to highlight the top sub-menu. Use the
RIGHT arrow key to highlight the VIDEO symbol. Press NEW
LINE/OK.
• Confirm that your video source is running (start the VCR
or camcorder).
• Press PLAY.
The OUTPUT monitor will show your page of titles superim-
posed over the source video.
Making Titles Come and Go
In a production, you may want superimposed titles to appear for a while, then disappear.
To do this, place blank pages with video backgrounds between pages of titles.
Create a page of superimposed titles. At the end of the page, press NEW PAGE but don’t
type anything on this page. Set its background to VIDEO, if it isn’t already. Press NEW PAGE
again and type the next titles. When you play these pages, the first titles appear, then
transition to the blank page. Since this page is empty and the background is plain video,
the result is that the titles simply go away. The next page can then introduce more titles.
(See Chapter 19.)
Positioning Text on the Line
You can change the position of the text on any line. A line can be centered or positioned
against the left or right edge of the screen.
Position the cursor on the line.
Press and release
the POSN (Position) key, the
position light will go on. Then press the LEFT or RIGHT arrow, the position light
will go off. The line position changes immediately to show the new choice: left,
center, or right justification. The page symbol is not affected. (See Chapter 10.)
Positioning Text on the Page
The page symbol shows how text is positioned vertically on the page. It can be positioned
at the top, center, or bottom of the page. To change the position,
press and release
the
POSN (Position) key, then press the UP or DOWN arrow on the keypad. You will see the
text in its new position when you press PLAY.
San
Francisco
San
Francisco
Abelard
&
Heloise
Abelard
&
Heloise
Abelard
&
Heloise
Gable
&
Lombard Gable
&
Lombard Gable
&
Lombard
posn

PAGE 10 VIDEONICS TITLEMAKER 3000
Transitions, Durations, Scroll, and Crawl
You can determine how long each page will be displayed (its
duration)
and what
transition
effects
(fade, wipe, etc.) will be used to introduce (begin) and remove (end) the page. You
can also display the current time and/or date or make titles
scroll
or
crawl
on or off the page.
Position the cursor anywhere on a page and use the EFFECTS IN menu to change the page’s
duration, scrolling, speed, and the effect that will introduce the page. Use the Effects Out
menu to choose the effect that will be used to remove the page.
Duration is set using the bottom sub-menu of the Effects In menu. Highlight the digits next
to the clock symbol (on the left-hand side of the menu), and type in the desired time. You
can set infinite duration (displaying the page until you press PLAY again) by highlighting
the infinity symbol. (See Chapter 17.)
Playing the Pages
When the pages are complete, move the cursor to the start of the first page and press PLAY.
Shortcut: To play all the pages in the project, press CMD (Command) + PLAY.
Each page will be
played, in sequence, using the selected durations and effects. To play just some of the
pages, play manually, or use other specialized play options. (See Chapter 20.)
Learning More
A convenient way to become a TitleMaker 3000 expert is to load the demo into the Editing
Screen for study. To do this, press CMD (Command) + ACCENT + COPY at the same time
(CMD (Command) + SHIFT + COPY for the international demo) and the unit will create a
new project that contains the demo text. This allows you to see how the demo was created.
More...
Refer to the index and table of contents to find detailed sections which explain how to:
• Create “projects.”
• Move between pages or projects.
• Use the Page Index.
• Use a PREVIEW monitor to change titles out of the audience’s view.
• Add borders, lines, and boxes to your video pages.
• Mark large blocks of text so you can move or copy them without typing.
• Use effects (such as wipes) between pages and set durations so pages are displayed for
a pre-defined time.
• Combine scroll and crawl to move titles on and off the screen in many different ways.
• Play pages in many ways, such as manually, backwards, automatically repeating, etc.
• Use TitleMaker 3000 with editing equipment.
• Choose colors and define your own colors.
• Create transparent background patterns and colors.
• Add “real-time” time/date display features to your video pages.
• Play projects automatically at a specified date and time.

VIDEONICS TITLEMAKER 3000 PAGE 11
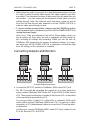
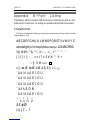
AB
2
C
B
3
AC
B
1
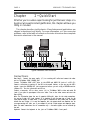
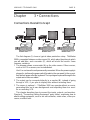
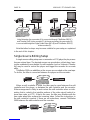
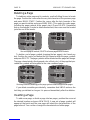
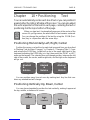
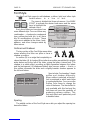
Chapter 3 • Connections
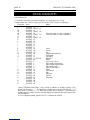
ConnectionsOverallConcept
The first diagram (1) shows a typical video production setup. TitleMaker
3000 is connectedbetween a videosource (A),which plays the picturetowhich
you will add titles, and a recorder (C), which will record the results. Some
common variations:
1The diagram shows a camcorder (A) as the video source. Other sources,
suchas a VCR or camera, can besubstituted.
Hint:Youcanleavetheunitpermanentlyconnected.Whenthepowersupplyis
pluggedin,justleavethepowerswitch(locatedontherearpanel)intheonposi-
tionandturnpoweroffatthekeyboard.Theinputsignalispassedthroughtothe
outputandnotitlesareadded.
2The output can be connected directly to a monitor (B), instead of going
through a VCR, if you plan to display titles without recording them.
3The source is optional — TitleMaker 3000 can operate without a source,
generating titles on its own backgrounds and outputting them to a moni-
tor or recording VCR.
This chapter describes how to connect the inputs, outputs, and monitors.
Chapter 4, “Connecting Editing Equipment” goes further, explaining how to
attach editing equipment, such as an edit controller, video mixer, video pro-
cessor, or effects unit.

PAGE 12 VIDEONICS TITLEMAKER 3000
What You’ll Need
AVideo source (optional). Anystandard video source with composite (RCA-
style) or S-video (Y/C) outputs can be used, including VCRs, camcorders,
cameras, video disc players, video production equipment (such as a mixer,
processor, or another titler), and computers with television outputs. If no
source is used, TitleMaker 3000 will create titles on its own backgrounds.
BOUTPUT monitor. The monitor will be connected to a recording VCR in
most cases. Required connections depend on the VCR. You can use any
arrangement that will allow you to view tapes played on the VCR.
CRecord VCR. In a live setup, in which the results will be displayed without
being recorded, the VCR is optional, but most setups will include the VCR.
•Preview monitor (optional). If used, this monitor must have a composite
(RCA-style)videoinput.UseofthePREVIEWmonitorisdescribedinChap-
ter 22, “Preview.”
• Video Cables. You will need one video cable to connect the TM-3000 out-
put to the Record VCR and one to connect the Record VCR to the OUTPUT
monitor. You may also need a cable for the input, if a video source is used,
and for the PREVIEW monitor, if used. The nextsection describes the types
ofcables.
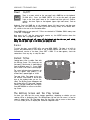
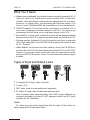
TypesofInputandOutputJacks
1Composite (RCA-style) video and audio
2S-video (Y/C)
3BNC video, used in some professional equipment
4RF cables (Coaxial cable and twin-lead antenna cable)
Note: European video equipment often has SCART plugs. Adapters are
commonly available to connect SCART-equipped units to the RCA jacks
provided on the TitleMaker.
Audio
RF cables carry the audio signal along with the video. All the others re-
quire a separate RCA-style audio cable.
S-VIDEO AUDIO
AUDIOVIDEO ANTENNA
ANT
INPUT
AUDIOVIDEO
❶❷❸❹

VIDEONICS TITLEMAKER 3000 PAGE 13
TypesofCablesUsedwithTitleMaker 3000
•INPUT and OUTPUT. You can use S-video (Y/C) or composite (RCA-style)
jacks for the input and output.
S-video (Y/C) jacks deliver somewhat better performance than composite
(RCA-style) jacks, but only if they are used for both the input and output.
In other words: Use S-video (Y/C) jacks if your source and recorder are
both equipped with them; use only the composite (RCA-style) jacks if ei-
therlacks S-video jacks.
If you are using the S-video output jacks, you must
use S-video for the input. If you try to use the S-
video output and the composite (RCA) input, an
on-screenwarning appears to remind you to useS-
video in.
•Record VCR to OUTPUT monitor. If you are using a Record VCR, the
OUTPUT monitor can be connected to the VCR using an RF (antenna/
cable type) cable, composite (RCA-style) cable, or S-video (Y/C) cable, de-
pending on what types of jacks are available on the VCR and monitor. If
you have a choice, S-video is generally better than composite and compos-
ite is better than RF.
•PREVIEW. If you are using a PREVIEW monitor, it must be connected via
a composite (RCA-style) cable.
•BNC. If you plan to use equipment with BNC jacks, you will also need
RCA-BNC adapters.
•Audio. The audio jacks on TitleMaker 3000 are simple pass-through con-
nectors, provided to make connections between two video devices conve-
nient. AUDIO IN is routed directly to AUDIO OUT, unmodified by the
unit.
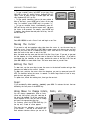
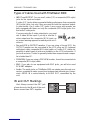
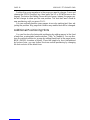
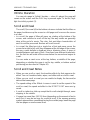
IN and OUT Markings
Hint: Always connect the OUT jack
of one device to the IN jack of the next.
Never connect two OUTs together.
IN
OUT IN
OUT
La pagina si sta caricando...
La pagina si sta caricando...
La pagina si sta caricando...
La pagina si sta caricando...
La pagina si sta caricando...
La pagina si sta caricando...
La pagina si sta caricando...
La pagina si sta caricando...
La pagina si sta caricando...
La pagina si sta caricando...
La pagina si sta caricando...
La pagina si sta caricando...
La pagina si sta caricando...
La pagina si sta caricando...
La pagina si sta caricando...
La pagina si sta caricando...
La pagina si sta caricando...
La pagina si sta caricando...
La pagina si sta caricando...
La pagina si sta caricando...
La pagina si sta caricando...
La pagina si sta caricando...
La pagina si sta caricando...
La pagina si sta caricando...
La pagina si sta caricando...
La pagina si sta caricando...
La pagina si sta caricando...
La pagina si sta caricando...
La pagina si sta caricando...
La pagina si sta caricando...
La pagina si sta caricando...
La pagina si sta caricando...
La pagina si sta caricando...
La pagina si sta caricando...
La pagina si sta caricando...
La pagina si sta caricando...
La pagina si sta caricando...
La pagina si sta caricando...
La pagina si sta caricando...
La pagina si sta caricando...
La pagina si sta caricando...
La pagina si sta caricando...
La pagina si sta caricando...
La pagina si sta caricando...
La pagina si sta caricando...
La pagina si sta caricando...
La pagina si sta caricando...
La pagina si sta caricando...
La pagina si sta caricando...
La pagina si sta caricando...
La pagina si sta caricando...
La pagina si sta caricando...
La pagina si sta caricando...
La pagina si sta caricando...
La pagina si sta caricando...
La pagina si sta caricando...
La pagina si sta caricando...
La pagina si sta caricando...
La pagina si sta caricando...
La pagina si sta caricando...
La pagina si sta caricando...
La pagina si sta caricando...
La pagina si sta caricando...
La pagina si sta caricando...
La pagina si sta caricando...
La pagina si sta caricando...
La pagina si sta caricando...
La pagina si sta caricando...
La pagina si sta caricando...
La pagina si sta caricando...
La pagina si sta caricando...
La pagina si sta caricando...
La pagina si sta caricando...
La pagina si sta caricando...
La pagina si sta caricando...
La pagina si sta caricando...
La pagina si sta caricando...
La pagina si sta caricando...
La pagina si sta caricando...
La pagina si sta caricando...
La pagina si sta caricando...
La pagina si sta caricando...
La pagina si sta caricando...
-
 1
1
-
 2
2
-
 3
3
-
 4
4
-
 5
5
-
 6
6
-
 7
7
-
 8
8
-
 9
9
-
 10
10
-
 11
11
-
 12
12
-
 13
13
-
 14
14
-
 15
15
-
 16
16
-
 17
17
-
 18
18
-
 19
19
-
 20
20
-
 21
21
-
 22
22
-
 23
23
-
 24
24
-
 25
25
-
 26
26
-
 27
27
-
 28
28
-
 29
29
-
 30
30
-
 31
31
-
 32
32
-
 33
33
-
 34
34
-
 35
35
-
 36
36
-
 37
37
-
 38
38
-
 39
39
-
 40
40
-
 41
41
-
 42
42
-
 43
43
-
 44
44
-
 45
45
-
 46
46
-
 47
47
-
 48
48
-
 49
49
-
 50
50
-
 51
51
-
 52
52
-
 53
53
-
 54
54
-
 55
55
-
 56
56
-
 57
57
-
 58
58
-
 59
59
-
 60
60
-
 61
61
-
 62
62
-
 63
63
-
 64
64
-
 65
65
-
 66
66
-
 67
67
-
 68
68
-
 69
69
-
 70
70
-
 71
71
-
 72
72
-
 73
73
-
 74
74
-
 75
75
-
 76
76
-
 77
77
-
 78
78
-
 79
79
-
 80
80
-
 81
81
-
 82
82
-
 83
83
-
 84
84
-
 85
85
-
 86
86
-
 87
87
-
 88
88
-
 89
89
-
 90
90
-
 91
91
-
 92
92
-
 93
93
-
 94
94
-
 95
95
-
 96
96
-
 97
97
-
 98
98
-
 99
99
-
 100
100
-
 101
101
-
 102
102
-
 103
103


in altre lingue
- English: Videonics TM-3000 User manual
Altri documenti
-
Philips DVDR7300H Manuale utente
-
Yamaha DRX-2 Manuale del proprietario
-
Yamaha MCX-2000 Manuale del proprietario
-
 Wiley 978-1-1180-2240-5 Scheda dati
-
-
-
LG RH277H-P1L Manuale utente
-
-
 Powis Parker FASTBACK 15 Manuale utente
-
Hitachi DZ-GX3300E(SWC) Manuale utente

