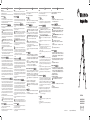
Manfrotto Compact Action Kit de Trépied Manuale utente
- Categoria
- Treppiedi
- Tipo
- Manuale utente
Questo manuale è adatto anche per
La pagina sta caricando ...

GB I F D
EINLEITUNG
Dieses Stativ wurde für den Gebrauch mit digitalen Foto- und Videokameras entwickelt und
verfügt über einen speziellen Hybrid Foto-/Video-Kugelkopf. Das Stativ ist besonders kompakt
und leicht, so dass es sich bequem tragen und transportieren lässt.
VOR DEM GEBRAUCH
UND
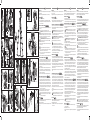
1. Nehmen Sie das Stativ aus dem Stoffbeutel.
2. Stellen Sie das Stativ auf, in dem Sie die Beine ausklappen (1). Entsichern Sie den Kopf, indem
Sie das Feststellrad rückwärts drehen (2), bringen Sie den Kopf in eine waagerechte Position
(3) und drehen Sie das Feststellrad nach vorne, um den Kopf wieder zu verriegeln (4).
ANBRINGEN DER KAMERA AN DEN KOPF UND
3. Betätigen Sie den Hebel (1) und entnehmen Sie die runde Schnellwechselplatte aus der
Mitte der Oberseite des Kopfes (2).
4. Schrauben Sie die Platte an das ¼”-Gewinde Ihrer Kamera und ziehen Sie sie im Uhrzeigersinn fest.
SONY NEX 5R/5T: für eine verbesserte Leistung mit diesem Kameramodell ist es
empfehlenswert, den speziell entwickelten Adapter zu verwenden, der mit Ihrem Stativ
geliefert wurde. Positionieren Sie den Adapter unter der Kamera und vergewissern Sie sich,
dass das Loch so positioniert ist, dass Sie den Adapter auf die Stativhalterung montieren
können. Stellen Sie außerdem sicher, dass die Pfeile auf dem Adapter in Richtung des
Objektivs zeigen. Bringen Sie dann die Schnellwechselplatte mit der ¼”-Universalschraube an.
**KOMPAKTKAMERAS mit Stativgewinde in außermittiger Position: um die
angegebene Leistung zu gewährleisten, muss sich das ¼-Gewinde der Kamera in
einem Mindestabstand von 13 mm von der Seitenkante befinden.
5. Legen Sie die Kamera auf den Kopf, so dass die Platte wieder in ihrem Loch an der Obersei
-
te des Kopfes einrastet (1) und schließen Sie den Hebel wieder(2).
6.
Wenn die Kamera am Kopf angebracht ist, können die folgenden Situationen
auftreten:
A. Der Hebel lässt sich leicht schließen, aber die Kamera ist nicht stabil angebracht: lösen
Sie den Hebel (1), drehen Sie den Regulierungsring nach unten/+ (2), dann schließen Sie
den Hebel wieder.
B. Der Hebel ist zu fest, um ihn zu schließen: öffnen Sie den Hebel wieder (1), drehen Sie
den Regulierungsring nach oben /- (2), dann schließen Sie den Hebel wieder.
Wiederholen Sie diese Schritte, bis der Hebel einwandfrei schließt und die Kamera fest am
Kopf gehalten wird.
HÖHENVERSTELLUNG DES STATIVS
UND
7. Um die Höhe des Stativs einzustellen, verfügt jedes Bein über Teleskopabschnitte, die ein-
oder ausgezogen werden können. Öffnen Sie den Hebel am Verriegelungsbund des Beins,
schieben Sie den inneren Teil hinein oder ziehen sie ihn heraus, bis die gewünschte Länge
erreicht ist, schließen Sie dann den Verriegelungshebel wieder. Die Beinabschnitte sollten
von oben nach unten verlängert werden (breitester Abschnitt zuerst, schmalster Abschnitt
zuletzt), um die erforderliche Stativhöhe zu erreichen. Der überwiegende Gebrauch der
Beinabschnitte mit größerem Durchmesser macht das Stativ stabiler.
8. Zur Verbesserung der Stabilität des Stativs sollte die Mittelsäule nur im Ausnahmefall als
letztes Mittel zur Höhenverstellung verwendet werden oder als Mittel zur Erreichung der
maximalen Höhe des Stativs. Um die Säule zu verlängern, entriegeln Sie den Knopf, drehen
ihn gegen den Uhrzeigersinn, um die Säule (1) zu lösen, und ziehen dann die Säule bis auf
die gewünschte Höhe heraus (2).
9. Um die Mittelsäule in der gewünschten Höhe zu verriegeln, schließen Sie den Knopf, in dem
Sie ihn im Uhrzeigersinn drehen.
GEBRAUCH DES KOPFES: FOTO- UND VIDEOFUNKTIONEN
UND
10.
und 11. Der Kopf kann für Fotografie oder Videoaufnahmen verwendet werden. Der wesentliche
Unterschied besteht darin, dass bei Videoaufnahmen vermieden werden soll, dass die Kamera
seitlich kippt, damit Sie jede gewünschte Panoramabewegung stabilisieren können. Dies ermög
-
licht es Ihnen, ein sich bewegendes Motiv zu verfolgen oder einen Schwenk über eine Landschaft
zu machen und die Kamera dabei in horizontaler Position zu halten. Der Kopf hat eine spezielle
Videoeinstellung, die dafür sorgt, dass die Kamera bei solchen Bewegungen in horizontaler
Stellung bleibt. Auf der anderen Seite werden für die Fotografie in der Regel die völlig freien
Bewegungen in allen Achsen bevorzugt, da auf diese Weise jeder beliebige Rahmen und jede
Bildkomposition erfasst werden kann und die Kamera auch ins Hochformat gedreht werden kann.
12. Um die Einstellung PHOTO zu nutzen, drehen Sie den Hebel gegen den Uhrzeigersinn in
eine horizontale Position.
13. Um die Einstellung VIDEO zu verwenden, drehen Sie den Hebel im Uhrzeigersinn in eine
senkrechte Position.
Wenn Sie von der Einstellung PHOTO zur Einstellung VIDEO wechseln möchten, vergewissern
Sie sich bitte zunächst, dass der Griff wie in Abb. 13 (1) gezeigt, positioniert ist. Dann
drehen die den Hebel auf die Position VIDEO (2). Dies ist die Originaleinstellung des Kopfes.
NACH DEM GEBRAUCH UND
14. Klappen Sie die Stativbeine wieder zusammen (1). Verschließen Sie den Kopf durch Drehen
des Rades (2) nach hinten und positionieren Sie den Kopf dann vertikal (3).
15. Legen Sie das Stativ wieder in den Stoffbeutel.
16. Die Tasche kann auch als praktische Schultertasche benutzt werden, um das Stativ schnell
und sicher zu tragen.
1 2
3 4 5 6A 6B
7 8 9
10 11 12 13
14 15 16
INTRODUCTION
Ce trépied est conçu pour être utilisé avec des appareils photo ou des caméras vidéo et pos-
sède un système de rotule hybride unique permettant une utilisation facile en photo/vidéo.
Ce trépied est extrêmement compact et léger, très facile à utiliser et transporter.
A FAIRE AVANT UTILISATION
ET
1. Retirer le trépied de son sac.
2. Dépliez les jambes du trépied (1). Déverrouillez la rotule en tournant le bouton rotatif (2), posi-
tionnez la rotule à l’horizontal (3) puis tournez le bouton rotatif pour la verrouiller à nouveau (4).
COMMENT ATTACHER L’APPAREIL PHOTO À LA ROTULE ET
3. Poussez le levier (1) et retirez le plateau rapide de son logement (2).
4. Vissez le plateau à votre appareil photo avec le pas de vis ¼”, en tournant dans le sens des
aiguilles d’une montre.
SONY NEX 5R/5T: afin d’améliorer les performances avec ce modèle d’appareil
photo, il est conseillé d’utiliser l’adaptateur spécialement conçu à cet usage, et
inclus avec votre trépied. En dessous de l’appareil photo, assurez-vous que le trou est
positionné de telle manière qu’il permette la fixation sur le trépied. Assurez-vous également
que la flèche de l’adaptateur est alignée avec l’optique de l’appareil, puis attachez le plateau
rapide avec la vis universelle ¼”.
**APPAREIL PHOTO COMPACT avec pas de vis trépied désaxé: afin d’assurer
une performance maximum, la vis ¼” de votre appareil photo doit être à une
distance minimum de 13 mm du bord latéral.
5. Placez l’appareil photo sur la rotule en repositionnant le plateau rapide dans son logement
(1) puis poussez le levier de verrouillage(2).
6. Lorsque l’appareil photo est positionné sur la rotule, les situations suivantes peuvent
se produire:
A. Le verrouillage du plateau se fait bien, mais l’appareil photo n’est pas stable: rouvrir le
levier (1), tournez le bouton de serrage vers le + (2), puis fermez le levier à nouveau.
B. Le levier est trop serré pour se fermer : rouvrir le levier (1), tournez le bouton de serrage
vers le - (2), puis fermez le levier à nouveau.
Répétez ces étapes jusqu’à ce que le levier ferme parfaitement et que l’appareil photo soit
fermement verrouillé sur la rotule.
COMMENT RÉGLER LA HAUTEUR DU TRÉPIED
ET
7. Pour ajuster rapidement la hauteur du trépied, chaque jambe possède des sections
télescopiques qui peuvent être déployées: ouvrir les leviers sur chaque sections de jambe,
déployez la section jusqu’à l’extension désirée puis refermez le levier afin de verrouiller
l’ensemble. Les sections doivent être déployées dans l’ordre, du sommet vers la base
(les sections larges en premier, les plus fines en dernier) afin d’obtenir la hauteur désirée.
L’utilisation des sections larges en priorité par rapport aux sections fines rend le trépied plus
stable lors d’un faible besoin de hauteur.
8. Pour améliorer la stabilité du trépied, la colonne centrale doit uniquement être utilisée
comme ajustement de la hauteur totale ou bien comme le moyen d’obtenir la hauteur maxi
-
mum du trépied. Pour la déployer, desserrez le verrouillage, tournez le dans le sens contraire
des aiguilles d’une montre (1) puis soulevez la colonne jusqu’à la hauteur désirée (2).
9. Pour bloquer la colonne centrale à la hauteur désirée, fermer le verrouillage en le tournant
dans le sens des aiguilles d’une montre.
COMMENT UTILISER LA ROTULE: FONCTIONS PHOTO ET VIDÉO
ET
10. et 11. Ainsi que le point 11. La rotule peut être utilisée pour la photographie ou la video.
Lors de l’utilisation vidéo, vous pouvez stopper le mouvement de bascule pour réaliser des
mouvements panoramiques parfaits. Vous pourrez alors suivre un sujet en mouvement ou
bien réaliser un panoramique sur un paysage. La rotule dispose d’un programme vidéo
qui assure un retour horizontal de la caméra après certains mouvements. A l’opposé,
un mouvement totalement libre de la rotule sera généralement préféré en photographie,
permettent ainsi des cadrages et des compositions spécifiques, mais également la
possibilité de positionner facilement l’appareil photo en mode portrait.
12. Pour utiliser le mode PHOTO, tournez le sélecteur dans le sens inverse des aiguilles d’une
montre pour le remettre en position horizontale.
13. Pour utiliser le mode VIDEO, tournez le sélecteur dans le sens des aiguilles d’une montre
pour le remettre en position verticale.
Quand vous souhaitez passer du mode PHOTO au mode VIDEO, assurez-vous en
premier que la poignée est positionnée comme montré sur la figure 13 (1), puis
tournez le secteur en position vidéo (2).
APRÈS UTILISATION
ET
14. Pliez les jambes du trépied (1). Repliez la rotule en tournant le bouton rotatif (2), puis
positionnez-là verticalement (3).
15. Replacez le trépied dans son sac dédié
16. Le sac peut aussi être utilisé comme sac d’épaule pour transporter le trépied rapidement et
facilement.
1 2
3 4 5 6A 6B
7 8 9
10 11 12 13
14 15 16
INTRODUCTION
This tripod is designed for use with digital photo and video cameras, and has a unique hybrid
photo/video ball head.
The tripod is extremely compact and lightweight, making it easy to carry and transport.
BEFORE USE
&
1. Remove the tripod from its fabric bag.
2. Stand the tripod by unfolding its legs (1). Unlock the head by rotating the locking dial
backwards (2), bring the head to a horizontal position (3) and turn the locking dial towards
the front to re-lock the head (4).
HOW TO ATTACH YOUR CAMERA TO THE HEAD
&
3. Open lever (1) and take the round quick release plate out from the centre space at the top
of the head (2).
4. Screw the plate to your camera’s ¼“ thread, turning it clockwise to tighten.
SONY NEX 5R/5T: for improved performance with this model of camera, it is best to
use the specifically designed adaptor included with your tripod. Position the adaptor
underneath the camera, ensuring the hole is positioned to allow access to the tripod mount.
Ensure also that the arrows on the adaptor are facing the direction of the lens and then
attach the quick release plate using the ¼” universal screw.
**COMPACT CAMERAS with tripod thread in off-centre position: to guarantee
the declared performance, the ¼ thread of your camera must be at a minimum
distance of 13 mm from the lateral edge.
5. Put the camera on the head so that the plate slots back into its hole at the top of the head
(1) and close the lever (2).
6.
When the camera is attached to the head, the following situations can arise:
A. The lever closes easily, but the camera is not stable: reopen the lever (1), turn the regu
-
lating dial towards the bottom/+ (2), then close the lever again.
B. The lever is too tight to close: reopen the lever (1), turn the regulating dial towards the
top/- (2), then close the lever again.
Repeat these steps until the lever closes perfectly and the camera is firmly held on the head.
HOW TO REGULATE THE HEIGHT OF THE TRIPOD &
7. To adjust the height of the tripod, each leg has telescopic sections that can be released and
extended: open the lever on the leg locking collar, slide the inner section in or out until the
desired extension is reached, then close the locking lever again. Leg sections should be
extended in order, from top to bottom (widest section first, narrowest section last), to reach
the required tripod height. Using predominantly the leg sections with larger diameters makes
the tripod more stable.
8. To improve stability, the tripod’s centre column should be only really be used as the final
means of height adjustment, or as a way of reaching the tripod’s maximum extension. To
extend it, unlock the knob, turn it anti-clockwise to release the column (1), then pull the
column upwards to the desired height (2).
9. To lock the centre column at the desired height, close the knob by turning it clockwise.
HOW TO USE THE HEAD: PHOTO AND VIDEO FUNCTIONS
&
10. and 11. The head can be used for photography or video. In general, the main difference is
that, when shooting video, you will want to avoid the camera tilting sideways so that you
can stabilise any panoramic movements you choose to make. This allows you to follow a
moving subject more accurately or make a pan across the landscape that stays horizontal
in-camera. The head has a special video setting that ensures the camera remains horizontal
during such movements. On the other hand, totally free movement against all axes is usually
preferred for photography, since this allows any frame or composition to be captured, and
the camera to be rotated to portrait orientation.
12. To use the PHOTO setting, turn the selector anti-clockwise to a horizontal position.
13. To use the VIDEO setting, turn the selector clockwise to a vertical position.
When you wish to swap from PHOTO to VIDEO setting, please first ensure that the
handle is positioned as shown in fig. 13 (1), the rotate the selector to the VIDEO (2)
position. This is how the head is supplied.
AFTER USE
&
14. Fold the tripod’s legs back into the centre (1). Reclose the head by turning the dial (2) back-
wards, and then positioning the head vertically (3).
15. Return the tripod to its fabric bag.
16. The bag can also be used as a practical shoulder bag for transporting the tripod quickly and
easily.
1 2
3 4 5 6A 6B
7 8 9
10 11 12 13
14 15 16
14
2
5
13
3
7
12
10
11
15 16
1
6B
98
2
1
2
1
3
3
4
1
2
2
1
2
2
1
1
1
2
2
1
6A
INTRODUZIONE
Questo treppiede è progettato per l’uso con fotocamere e videocamere digitali, grazie all’esclu-
siva testa a sfera foto/video.
Il treppiede è estremamente compatto e leggero per facilitarne il trasporto in ogni circostanza.
PRIMA DELL’UTILIZZO
E
1. Estrarre il treppiede dalla borsa in tessuto.
2. Divaricare le 3 gambe del treppiede (1). Ruotare la ghiera all’indietro (2), sbloccare la testa e
portarla nella posizione orizzontale (3); ruotare la ghiera in avanti per fissarla (4).
COME ATTACCARE LA FOTOCAMERA/VIDEOCAMERA ALLA TEST
A
3. Aprire la leva (1) ed estrarre la piastrina posta al centro della testa (2).
4. Montare la piastrina sulla propria fotocamera/videocamera, avvitandola in senso orario al
filetto da ¼’ della macchina.
SONY NEX 5R/5T: per utilizzare al meglio questo modello di fotocamera, utilizzare lo
speciale adattatore incluso nella confezione. Posizionare l’adattatore sotto la
macchina in corrispondenza del filetto da ¼, facendo attenzione che le frecce siano rivolte
verso l’obiettivo. Avvitare poi la piastrina al filetto da ¼.
**FOTOCAMERE COMPATTE con attacco per il treppiede in posizione non
centrale: per garantire un uso corretto del prodotto, il filetto da ¼ deve trovarsi a una
distanza minima di 13 mm dal bordo della fotocamera.
5. Riposizionare la piastrina nella propria sede (1) e richiudere la leva (2).
6.
Una volta posizionata la camera, si possono verificare due situazioni:
A. La leva si chiude facilmente ma la fotocamera/videocamera non è stabile: riaprire la leva
(1), girare la ghiera di regolazione verso il basso/+ (2) e richiudere la leva.
B. La leva è troppo dura per essere richiusa: riportarla in posizione aperta (1), girare la
ghiera di regolazione verso l’alto/- (2) e richiudere la leva.
Ripetere l’operazione fino a che la leva non si chiuderà perfettamente e la fotocamera/
videocamera risulterà saldamente fissata al treppiede.
COME REGOLARE LE ALTEZZE
E
7. Per regolare l’altezza del treppiede, ogni gamba dispone di sezioni telescopiche che si
possono liberare: aprire la leva sul manicotto di bloccaggio e, una volta raggiunta l’altezza
richiesta, bloccarla. Allungare le sezioni nell’ordine dall’alto verso il basso (lasciando per
ultima la sezione più sottile) fino a raggiungere l’altezza desiderata. Impiegando le sezioni di
maggiore diametro, il treppiede risulterà più stabile.
8. Per la migliore stabilità, è preferibile usare la colonna centrale di un treppiede come ultima
regolazione dell’altezza, oppure per raggiungere la massima estensione possibile. Sbloccare
la manopola, girandola in senso antiorario, per liberare la colonna centrale (1), e regolare
l’altezza come desiderato (2).
9. Richiudere la manopola, girandola in senso orario, per bloccare la colonna nella posizione
corretta.
COME UTILIZZARE LA TESTA: FUNZIONE FOTO E VIDEO
E
10. e 11. La testa può essere utilizzata con una funzionalità fotografica o videografica. La dif-
ferenza principale è che, in genere, per il video si desidera evitare l’inclinazione laterale per
stabilizzare i movimenti in panoramica: questo consente di seguire con maggiore regolarità
il passaggio di un soggetto in movimento o di effettuare panoramiche sul paesaggio man-
tenendo la posizione orizzontale. La testa dispone di un’impostazione speciale per limitare
ad un solo asse i movimenti in panoramica. Per l’impiego fotografico, invece, in genere si
preferisce la libertà di movimento su tutti gli assi: si può così ottenere la massima libertà di
inquadratura, consentendo anche le riprese in verticale.
12. Per utilizzare la funzione FOTO, ruotare il selettore in senso antiorario e portarlo in posizione
orizzontale.
13. Per utilizzare la funzione VIDEO, ruotare il selettore in senso orario e portarlo in posizione
verticale.
Quando si desidera cambiare l’impostazione da foto a video, assicurarsi prima che
l’impugnatura sia disposta come illustrato in figura 13 (1) e ruotare poi il selettore
nella posizione “VIDEO” (2). Questa è la configurazione di base della testa.
DOPO L’UTILIZZO
E
14. Richiudere le 3 gambe del treppiede verso l’interno (1). Richiudere la testa ruotando la ghiera
all’indietro (2) e riportando la testa in posizione verticale (3).
15. Riporre il treppiede nella sua custodia.
16. È possibile utilizzare la custodia come una pratica tracolla per trasportare il treppiede in
modo facile e veloce.
1 2
3 4 5 6A 6B
7 8 9
10 11 12 13
14 15 16
4
SONY NEX 5R/5T
min.13 mm
**OTHERS
-
 1
1
-
 2
2


Manfrotto Compact Action Kit de Trépied Manuale utente
- Categoria
- Treppiedi
- Tipo
- Manuale utente
- Questo manuale è adatto anche per
in altre lingue
- English: Manfrotto Compact Action Kit de Trépied User manual
- français: Manfrotto Compact Action Kit de Trépied Manuel utilisateur
- español: Manfrotto Compact Action Kit de Trépied Manual de usuario
- Deutsch: Manfrotto Compact Action Kit de Trépied Benutzerhandbuch
- русский: Manfrotto Compact Action Kit de Trépied Руководство пользователя
- 日本語: Manfrotto Compact Action Kit de Trépied ユーザーマニュアル