
使用产品前请阅读使用说明,了解本型号的正确操作方法,
并保留备用。
此标志适用于在中国销售的电子电气产品,
SJ/T11364《电子电气产品有害物质限制使用标识
要求》,表示该产品在使用完结后可再利用。数
字表示的是环境保护使用期限,只要遵守与本产
品有关的安全和使用上的注意事项,从制造日算
起在数字所表示的年限内,产品不会产生环境污
染和对人体、财产的影响。
产品适当使用后报废的方法请遵从电子电气产品
的回收、再利用相关法令。详细请咨询各级政府
主管部门。
产品中有害物质的名称及含量
本表格依据SJ/T 11364的规定编制。
表示该有害物质在该部件所有均质材料中的含量
均在GB/T26572标准规定的限量要求以下。
表示该有害物质至少在该部件的某一均质材料中
的含量超出GB/T26572标准规定的限量要求。
因为在现有技术下还没有可替代的物质。
有毒物质
Cable and Ear Pads for HDJ-CUE1
Câble et coussinets d'oreille pour HDJ-CUE1
Kabel und Ohrpolster für HDJ-CUE1
Cavo e cuscinetti auricolari per HDJ-CUE1
Kabel en oorkussens voor HDJ-CUE1
Cable y almohadillas de auriculares para HDJ-CUE1
Cabo e Almofadas para os HDJ-CUE1
Кабель и амбушюры для наушников HDJ-CUE1
HDJ-CUE1 的耳機線和耳墊
HDJ-CUE1 的耳机线和耳垫
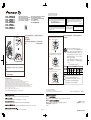
< 连接耳机线 >
1. 以图中所示的角度握住电缆插头的凸
出部分,然后插入电缆插头。
2. 将电缆插头的凸出部分顺时针旋转约
45 度至图中所示的位置,以锁定电缆
插头。
< 断开耳机线 >
将电缆插头的凸出部分逆时针旋转约
45 度,然后拔出电缆插头。
HC-CP08-M
HC-CP08-Y
HC-CP08-G
HC-CP08-L
HC-CP08-V
© 2020 日本阿法希达公司。版权所有。
产品产地 : 中国制造
出版日期 : 2020年5月1日
产品执行标准号 :
产品规格
HC-CP08
生产者 :
地址 : 日本神奈川县横滨市西区港未来4丁目4番5号 横滨i-MARK PLACE 6楼
销售商 :
地址 : 中国上海市长宁区娄山关路523号金虹桥国际中心6楼01单元
AT_001_Zhcn
HC-CP08
<DRB1785-A>
© 2020 AlphaTheta Corporation. All rights reserved.
© 2020 AlphaTheta Corporation. Tous droits de reproduction et de traduction réservés.
6F, Yokohama i-Mark Place, 4-4-5 Minatomirai, Nishi-ku, Yokohama, Kanagawa 220-0012 JAPAN
6F, Йокогама i-Mark Place, 4-4-5 Минатомирай, Ниси-ку, Йокогама, Канагава 220-0012 ЯПОНИЯ
Artemis Building, Odyssey Business Park, West End Road, South Ruislip, Middlesex, HA4 6QE, U.K. TEL: +44-203-7617-220
2050 W. 190th Street, Suite 109, Torrance, CA 90504, U.S.A. TEL: +1 (424) 488-0480
AT_001_all_01
1
2
凸出部分
凸出部分
凸出部分
使用产品前请阅读使用说明,了解本型号的正确操作方法,
并保留备用。
使用注意事项
如果使用中感觉任何瘙痒或皮肤不适,请立即停止使用。
耳垫 ...........................聚氨酯 (皮革涂饰)
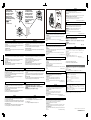
拆卸
捏住耳垫的一部分并将其从壳体上撕下。
* 已经将耳垫装入外壳(壳体)的槽内,因此易于拆卸。
安装
为了易于安装耳垫,将新替换耳垫的一部分插入外壳(壳
体)的槽内并进行循环。
Informational Note for Customers in EAEU.
Information-l’attention des clients de EAEU.
Информация для потребителей в ЕАЭС.
Manufactured date : Month / Year
Date de fabrication : Mois / Année
Дата производства: месяц/год
Примечание:
Корпорация АльфаТета устанавливает следующую продолжительность
срока службы официально поставляемых на Российский рынок товаров.
Аудио и видеооборудование: 7 лет
Переносное аудиооборудование: 6 лет
Другое оборудование (наушники, микрофон и т.д.): 5 лет
Примечание:
Корпорация АльфаТета устанавливает следующую продолжительность
срока слу жбы официально поставляемых на Российский рынок товаров.
сумки, кейсы, чехлы: 5 лет.
Информация для покупателей в ЕАЭС:
Уполномоченной организацией в соответствии с требованиями ТР ТС
004/2011, 020/2011, 017/2011 является ООО "ПИОНЕР РУС", Россия,
105064, г. Москва, Нижний Сусальный переулок, дом 5, строение 19, т.
(495) 9568901
D3-7-10-8b_A1_Ru
For FAQs and other support information for this product, visit the above site.
Pour les FAQ et autres informations de support sur ce produit, consultez le site ci-dessus.
Häufig gestellte Fragen und weitere Support-Informationen für dieses Produkt finden Sie auf der oben genannten Seite.
Per la sezione FAQ e altre informazioni di supporto per questo prodotto, visitare il sito indicato sopra.
Bezoek de bovenstaande website voor vaak gestelde vragen en andere informatie over ondersteuning voor dit product.
Para consultar las preguntas más frecuentes y otras informaciones de asistencia para este producto, visite el sitio indicado anteriormente.
Para obter informações sobre as FAQs e outras informações de apoio relativas a este produto, consulte o site indicado acima.
Ответы на часто задаваемые вопросы и другую дополнительную информацию о данном изделии см. на указанном выше сайте.
如需本產品的FAQ與其他支援資訊,請造訪以上網站。
关于此产品的常见问题和其他支持信息,请访问以上网站。
pioneerdj.com/support/

1
2
English
<To attach the cable>
1. Hold the convex part of the cable plug at the angle shown in the diagram and insert
the cable plug.
2. Rotate the convex part of the cable plug approximately 45 degrees clockwise to the
position shown in the diagram to lock the cable plug.
<To detach the cable>
Rotate the convex part of the cable plug approximately 45 degrees counterclockwise and
then pull out the cable plug.
Français
<Pour attacher le câble>
1. Tenez la partie convexe de la fiche du câble à l’angle indiqué sur le schéma et insérez
la fiche du câble.
2. Tournez la partie convexe de la fiche du câble d’environ 45 degrés dans le sens
horaire jusqu’à la position indiquée sur le schéma pour verrouiller la
fiche du câble.
<Pour détacher le câble>
Tournez la partie convexe de la fiche du câble d’environ 45 degrés dans le sens
antihoraire, puis débranchez la fiche du câble.
Deutsch
<Anschließen des Kabels>
1. Halten Sie den konvexen Teil des Kabelsteckers in einem Winkel wie in der Abbildung
dargestellt und stecken Sie ihn an.
2. Drehen Sie den konvexen Teil des Kabelsteckers um etwa 45 Grad im Uhrzeigersinn,
wie in der Abbildung dargestellt, um ihn zu verriegeln.
<Abtrennen des Kabels>
Drehen Sie den konvexen Teil des Kabelsteckers um etwa 45 Grad entgegen dem
Uhrzeigersinn und ziehen Sie ihn heraus.
Italiano
<Per collegare il cavo>
1. Tenere la parte convessa della spina del cavo secondo l'angolo indicato in figura,
quindi inserirla.
2. Ruotare la parte convessa della spina del cavo di circa 45 gradi in senso orario nella
posizione indicata in figura per bloccare la spina del cavo.
<Per scollegare il cavo>
Ruotare la parte convessa della spina del cavo di circa 45 gradi in senso antiorario,
quindi estrarre la spina del cavo.direzione indicata dalla freccia.
<Conexión del cable>
1. Sujete la parte convexa de la clavija del cable en el ángulo que se muestra en el
diagrama e inserte la clavija del cable.
2. Gire la parte convexa de la clavija del cable aproximadamente 45 grados en el sentido
de las agujas del reloj hasta la posición que se muestra en el diagrama para bloquearla.
<Desconexión del cable>
Gire la parte convexa de la clavija del cable aproximadamente 45 grados en el sentido
contrario a las agujas del reloj y, a continuación, tire de ella para extraerla.
Español
Nederlands
<Vastmaken van de kabel>
1. Houd het convexe gedeelte van de stekker vast onder de hoek die is afgebeeld, en
steek de stekker in.
2. Draai het convexe gedeelte van de stekker ongeveer 45 graden met de wijzers van de
klok mee naar de getoonde positie om de stekker te vergrendelen.
<Losmaken van de kabel>
Draai het convexe gedeelte van de stekker ongeveer 45 graden tegen de wijzers van de
klok in, en trek de stekker eruit.
<Чтобы подсоединить шнур>
1. Возьмитесь за выступающую часть разъема кабеля под углом, как показано на
рисунке, и вставьте разъем в гнездо.
2. Поверните выступающую часть разъема кабеля по часовой стрелке
приблизительно на 45 градусов в положение, показанное на
рисунке, чтобы заблокировать разъем.
<Чтобы отсоединить шнур>
Поверните выступающую часть разъема кабеля против часовой стрелки
приблизительно на 45 градусов и выньте разъем кабеля из гнезда.
русский
Português
中文
<Para ligar o cabo>
1. Segure a parte convexa da ficha do cabo no ângulo mostrado no diagrama e insira a
ficha do cabo.
2. Rode a parte convexa da ficha do cabo aproximadamente 45 graus no sentido dos
ponteiros do relógio para a posição mostrada no diagrama para bloquear a ficha do
cabo.
<Para retirar o cabo>
Rode a parte convexa da ficha do cabo aproximadamente 45 graus no sentido contrário
ao dos ponteiros do relógio e puxe a ficha do cabo para a retirar.
< 安裝連接線 >
1. 將纜線插頭的突起部分按照圖中所示之角度握住,並插入纜線插頭。
2. 將纜線插頭的突起部分以順時鐘方向轉動約45 度,至圖中所示的位置以將其鎖上。
< 拔除連接線 >
將纜線插頭的突起部分以逆時針方向轉動約45 度,將其拔出。
Informational Note for Customers in Japan Only.
Note d'information pour les clients Japonais seulement.
1
2
To attach the cable
Pour attacher le câble
Anschließen des Kabels
Per collegare il cavo
Conexión del cable
Vastmaken van de kabel
Чтобы подсоединить шнур
Para ligar o cabo
安裝連接線
To detach the cable
Pour détacher le câble
Abtrennen des Kabels
Per scollegare il cavo
Desconexión del cable
Losmaken van de kabel
Чтобы отсоединить шнур
Para retirar o cabo
拔除連接線
Convex part
Partie convexe
Konvexer Teil
Parte convessa
Parte convexa
Convex gedeelte
Выступающая часть
Parte convexa
突起部分
English
<Removal>
Hold a part of the ear pad and remove it by peeling it off the housing case.
*The ear pad is just fitted into the groove of the housing (case) and can therefore be easily removed.
<Installation>
To easily attach the ear pad, insert a part of the new replacement ear pad into the groove of the
housing (case) and loop on.
Precautions for use
If any itching or skin discomfort occurs occurs during use, cease use immediately.
Ear pad.......................................................................................................Polyurethane (leather finish)
Français
<Dépose>
Prenez la garniture d’écouteur d’un côté et retirez-la en la décollant de son logement.
*La garniture d’écouteur est simplement prise dans l’encoche du logement et peut donc être retirée
facilement.
<Installation>
Pour installer facilement la garniture d’écouteur, insérez une partie de la garniture d’écouteur neuve dans
le’ncoche du logement et mettez la garniture en place.
Précautions à l'utilisation
Si vous ressentez des démangeaisons ou un inconfort lors de l’utilisation, cessez immédiatement
d’utiliser le casque.
Coussinet ······································································································ Polyuréthane (finition cuir)
Deutsch
<Entfernen>
Ein Teil das Earpads halten und es durch Drehen aus dem Gehäuse entfernen.
*Das Earpad ist genau in die Nut des Gehäuses eingepasst und lässt sich deshalb
leicht entfernen.
<Anbringen>
Um das Earpad leicht anzubringen, ein Teil des neuen Austausch-Earpads in die Nut
des Gehäuses einführen und fixieren.
Hinweise für den Gebrauch
Sollten während der Nutzung Juckreiz oder Hautbeschwerden auftreten, so beenden Sie den Gebrauch
sofort.
Ohrpolster.........................................................................................................Polyurethan (Lederoptik)
Italiano
<Rimozione>
Tenere ferma una parte del cuscinetto auricolare e rimuoverlo sfilandolo dalla ghiera.
*ll cuscinetto auricolare viene soltanto fissato nella scanalatura della ghiera, quindi
può essere facilmente rimosso.
<Installazione>
Per fissare facilmente il cuscinetto auricolare, inserire una parte del nuovo
cuscinetto sostitutivo nella scanalatura della ghiera e stringerla con un nobo.
Precauzioni
In caso di prurito o fastidio alla pelle durante l'uso del prodotto, interrompere immediatamente l'uso.
Cuscini per orecchie................................................................................... Poliuretano (finitura in pelle)
<Extracción>
Sujete la almohadilla pour el borde y tire de ella para retirarla del alojamiento de los auriculares.
*La almohadilla está simplemente insertada en la ranura del alojamiento, por lo que
puede retirarse con facilidad.
<Instalación>
Para colocar fácilmente una nueva almohadilla en los auriculares, introduzca un
extremo de la misma en la ranura del alojamiento y termine de montar el resto.
Precauciones al usar
Si nota escozor o irritación cutánea durante la utilización, deje inmediatamente de utilizarlos.
Almohadillas ..........................................................................................Poliuretano (acabado en cuero)
Español
Nederlands
<Verwijderen>
Houd een deel van het oorkussen vast en verwijder het door het van de behuizing los te maken.
*Slechts een klein gedeelte van het oorkussen is in de groef van de behuizing
aangebracht zodat het gemakkelijk kan worden verwijderd.
<Aanbrengen>
Voor eenvoudige bevestiging van het ookussen moet een deel van het nieuwe ookussen in de groef
van de behuizing worden ingevoegd, en vervolgens de rest om de behuizing worden gewikkeld.
Voorzorgsmaatregelen
Wanneer zich jeuk of andere huidirritaties voordoen gedurende het gebruik, stop dan meteen met het
gebruik.
Oorkussentje ...................................................................................... Polyurethaan (lederen afwerking)
<Снятие>
Взяться за край амбушюра и отделить его от наушника.
*Амбушюр просто вставлен в канавку наушника и поэтому его можно легко снять.
<Установка>
При присоединении вставить край нового сменного амбушюра в канавку и надеть амбушюр на
наушник.
Правила предосторожности при эксплуатации
В случае появления раздражения или других неприятных ощущений на коже во время
пользования наушниками, немедленно прекратите их использование.
Чшная накладка................................................................. Полиуретан (отделка из кожзаменителя)
русский
Português
中文
<Retirar>
Segure num ponto da almofada e retire-a puxando-a da cavidade onde está inserida.
*A almofada está apenas encaixada na ranhura da cavidade, sendo portanto fácil
removê-la.
<Instalação>
Para a instalar facilmente, introduza uma parte da almofada nova na ranhura da
cavidade e vá premindo a almofada até ela ficar totalmente encaixada.
Precauções
Se ocorrer alguma comichão ou desconforto na pele, deixe de usar imediatamente.
Almofadas auriculares............................................................................... Poliuretano (acabamento de couro)
< 拔除方式 >
請手握耳墊的一部分,並以外翻的方式將由耳罩外殼上拆下。
* 因耳墊的只是住卡式耳罩(外殼)的溝槽中,所以可輕易拆除。
< 安裝方式 >
將要更換之新耳墊的其中一部份來入耳罩(外殼)的溝槽中,並轉動耳墊將其入,即可輕易完成安裝。
使用注意事項
使用頭戴耳機時,若感覺皮膚不適,請立即停止使用。
耳墊
............................................................................................................................
聚氨酯(皮革型)
Printed in China / Imprimé en Chine / Сделано в Китае
HC-CP08
<DRB1785-A>
-
 1
1
-
 2
2


Pioneer HC-CP08 Manuale del proprietario
- Tipo
- Manuale del proprietario
in altre lingue
- English: Pioneer HC-CP08 Owner's manual
- français: Pioneer HC-CP08 Le manuel du propriétaire
- español: Pioneer HC-CP08 El manual del propietario
- Deutsch: Pioneer HC-CP08 Bedienungsanleitung
- русский: Pioneer HC-CP08 Инструкция по применению
- Nederlands: Pioneer HC-CP08 de handleiding
- português: Pioneer HC-CP08 Manual do proprietário
- 日本語: Pioneer HC-CP08 取扱説明書