
SV
Installationshandbok
PT
Guia de instalação
NO
Installeringsveiledning
LT
Įdiegimo vadovas
LV
Instalācijas rokasgrāmata
FI
Asennusopas
ET
Installimisjuhend
NL
Installatiehandleiding
DA
Installationsvejledning
CA
Guia d'instal·lació
ES
Guía de instalación
IT
Guida di installazione
DE
Installationshandbuch
FR
Guide d'installation
EN
Installation Guide
www.hp.com/support/ljm1130series
LASERJET PROFESSIONAL M1130 MFP
SERIES
AR

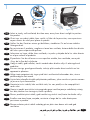
10% - 80%
10 - 32.5°C
(50 - 91°F)
PP
LQF
KHV
PP
LQF
KHV
PP
LQF
KHV
7.84 kg
17.3 lb
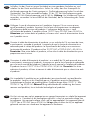
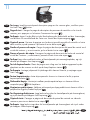
SV
Placera enheten på ett stabilt underlag på en plats utan damm och med god
ventilation.
PT
Escolha uma área limpa, arejada, resistente e longe da luz solar direta para
posicionar o produto.
NO
Plasser produktet på et stabilt, godt ventilert og støvfritt sted, borte fra direkte sollys.
LT
Gaminiui padėti pasirinkite tvirtą pagrindą gerai ventiliuojamoje nedulkėtoje vietoje,
kuri būtų atokiau nuo tiesioginių saulės spindulių.
LV
Novietojiet ierīci stabilā, labi ventilētā vietā, kur nav putekļu un ko neapspīd tieši
saules stari.
FI
Sijoita laite tukevalle alustalle pölyttömään paikkaan, johon aurinko ei paista suoraan
ja jossa on hyvä ilmanvaihto.
ET
Valige toote paigutamiseks tugev pind hästi ventileeritud tolmuvabas alas, otsese
päikesevalguse eest eemal.
NL
Kies een stevige, goed geventileerde, stofvrije plek zonder direct zonlicht om het
apparaat te plaatsen.
DA
Vælg et stabilt, godt udluftet, støvfrit område uden direkte sollys til anbringelse af
produktet.
CA
El producte s’ha de col·locar en una superfície estable, ben ventilada, sense pols
i lluny de la llum del sol directa.
ES
Seleccione un lugar sólido, bien ventilado, sin polvo y alejado de la luz solar directa
en el que colocar el producto.
IT
Per posizionare il prodotto, scegliere un'area ben ventilata, lontana dalla luce diretta
del sole e poco esposta alla polvere.
DE
Stellen Sie das Gerät an einem gut belüfteten, staubfreien Ort auf einem stabilen
Untergrund auf.
FR
Choisissez un endroit stable, bien ventilé, à l’abri de la poussière, non exposé aux
rayons directs du soleil pour placer le produit.
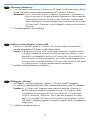
EN
Select a sturdy, well-ventilated, dust-free area, away from direct sunlight to position
the product.
1
1
AR
La pagina si sta caricando...
La pagina si sta caricando...

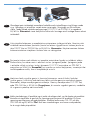
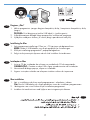
NL
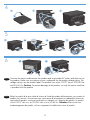
Sluit het netsnoer aan op het apparaat en een geaard stopcontact en schakel het apparaat
vervolgens in. Controleer of de voedingsbron geschikt is voor het maximale voltage van
het apparaat. Het maximale voltage vindt u op het apparaatlabel. Het apparaat gebruikt
110-17 Vac of 0-40 Vac en 50/60 Hz. Letop: gebruik alleen het bij het apparaat
geleverde netsnoer om schade aan het apparaat te voorkomen.
DA
Slut strømkablet til produktet og en jordforbundet jævnstrømskontakt, og tænd derefter
for produktet. Sørg for, at din strømkilde passer til produktets angivne strømforbrug.
Strømforbruget er angivet på produktetiketten. Produktet bruger enten 110-17 V~ eller
0-40 V~ og 50/60 Hz. Advarsel! Brug udelukkende den netledning, der leveres
sammen med produktet, for at forhindre beskadigelse af produktet.
CA
Connecteu el cable d’alimentació al producte i a un endoll de CA amb presa de terra;
a continuació, encengueu el producte. Assegureu-vos que la font d'energia és adequada
per a la tensió nominal del producte. Trobareu la tensió nominal a l'etiqueta del producte.
El producte fa servir 110-17 VCA o 0-40 VCA i 50/60 Hz. Precaució: Per evitar
malmetre el producte, utilitzeu únicament el cable d'alimentació que se subministra amb
el producte.
ES
Conecte el cable de alimentación al producto y a un enchufe de CA con toma de tierra;
a continuación, encienda el producto. Asegúrese de que la fuente de alimentación es
adecuada para el voltaje del producto. La especicación del voltaje se encuentra en
la etiqueta del producto. El producto utiliza 110-17 VAC o 0-40 VAC y 50/60 Hz.
Precaución: Para evitar daños al producto, utilice sólo el cable de alimentación que se
proporciona con el mismo.
IT
Collegare il cavo di alimentazione tra il prodotto e la presa CA con messa a terra,
quindi accendere il prodotto. Accertarsi che la fonte di alimentazione sia adeguata
all'indicazione della tensione del prodotto. L'indicazione della tensione si trova
sull'etichetta del prodotto. Il prodotto utilizza 110-17 Vca o 0-40 Vca e 50/60 Hz.
Attenzione: per evitare danni al prodotto, utilizzare solo il cavo di alimentazione fornito
con il prodotto stesso.
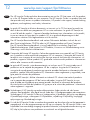
DE
Schließen Sie das Gerät mit einem Netzkabel an einer geerdeten Steckdose an, und
schalten Sie das Gerät anschließend ein. Stellen Sie sicher, dass Ihre Stromquelle für
die Betriebsspannung des Geräts geeignet ist. Die Betriebsspannung nden Sie auf dem
Geräteetikett. Das Gerät verwendet entweder 110 bis 17 Volt Wechselspannung oder
0 bis 40 Volt Wechselspannung und 50/60 Hz. Achtung: Um Schäden am Gerät zu
vermeiden, verwenden Sie ausschließlich das Netzkabel, das im Lieferumfang des Geräts
enthalten ist.
4
La pagina si sta caricando...
La pagina si sta caricando...
La pagina si sta caricando...
La pagina si sta caricando...

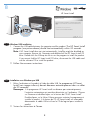
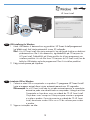
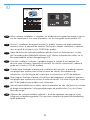
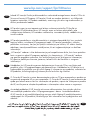
HP Smart Install
InstallazioneUSBconWindows
Collegare il cavo USB tra il computer e il prodotto. Il programma HP Smart Install
(vedere l'immagine precedente) viene avviato automaticamente in 30 secondi.
Nota: se il programma HP Smart Install non viene avviato automaticamente, è possibile
che sul computer sia disabilitato AutoPlay. Accedere a Risorse del computer e
fare doppio clic sull'unità CD HP Smart Install. Fare doppio clic sul le SISetup.
exe per eseguire il programma di installazione del prodotto. Se l'unità CD HP
Smart Install non viene rilevata, scollegare il cavo USB e utilizzare il CD del
software per installare il prodotto.
Seguire le istruzioni riportate sullo schermo.
1.
.
IT
WindowsUSBInstallation
Schließen Sie das Gerät mit einem USB-Kabel am Computer an. HP Smart Install
(siehe obenstehendes Bild) sollte innerhalb von 30 Sekunden automatisch
gestartet werden.
Hinweis: Wenn HP Smart Install nicht automatisch gestartet wird, ist möglicherweise
die AutoPlay-Funktion auf dem Computer deaktiviert. Durchsuchen Sie
„Arbeitsplatz“, und doppelklicken Sie auf das HP Smart Install-CD-Laufwerk.
Doppelklicken Sie auf die Datei „SISetup.exe“, um das Programm zum
Installieren des Geräts auszuführen. Falls Sie das HP Smart Install-CD-
Laufwerk nicht nden können, trennen Sie das USB-Kabel, und verwenden
Sie zum Installieren des Geräts die Software-CD.
Befolgen Sie die Anweisungen auf dem Bildschirm.
1.
.
DE
La pagina si sta caricando...
La pagina si sta caricando...
La pagina si sta caricando...
La pagina si sta caricando...
La pagina si sta caricando...

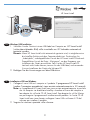
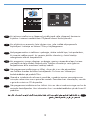
InstalaciónenMac
Inserte el CD de instalación del software en la unidad de CD del equipo.
NOTA: Conecte el cable USB y encienda el producto antes de realizar la instalación.
En el cuadro de diálogo emergente que aparece, haga clic en el programa de
instalación.
Siga las instrucciones que aparecen en pantalla para instalar el controlador de la
impresora.
1.
.
3.
ES
InstallazioneconMac
Inserire il CD di installazione del software nell'unità CD del computer.
NOTA: collegare il cavo USB e accendere il prodotto prima dell'installazione.
Nella nestra di dialogo a comparsa, fare clic sul programma di installazione.
Seguire le istruzioni visualizzate sullo schermo per installare il driver della stampante.
1.
.
3.
IT
MacInstallation
Legen Sie die Softwareinstallations-CD in das CD-Laufwerk des Computers ein.
HINWEIS: Verbinden Sie vor der Installation das USB-Kabel, und schalten Sie das
Gerät ein.
Klicken Sie im angezeigten Dialogfeld auf das Installationsprogramm.
Befolgen Sie zur Installation des Druckertreibers die Installationsanweisungen auf dem
Bildschirm.
1.
.
3.
DE
InstallationsousMac
Introduisez le CD d'installation du logiciel dans le lecteur de CD de l'ordinateur.
REMARQUE: Connectez le câble USB et mettez le produit sous tension avant
l'installation.
Dans la boîte de dialogue qui s'afche, cliquez sur le programme d'installation.
Suivez les instructions à l’écran pour installer le pilote de l'imprimante.
1.
.
3.
FR
Macinstallation
Insert the software installation CD into the computer CD drive.
NOTE: Connect the USB cable and turn the product on before installation.
In the pop-up dialog box, click the installer program.
Follow the onscreen instructions to install the printer driver.
1.
.
3.
EN
15
La pagina si sta caricando...
La pagina si sta caricando...

NL
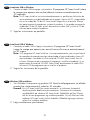
Wanneer de software-installatie voltooid is, drukt het apparaat een pagina af met
uitleg over het bedieningspaneel. Zie voor meer informatie de gebruikershandleiding
op de product-cd.
DA
Når softwareinstallationen er udført, udskriver produktet en side, der beskriver, hvordan
du bruger kontrolpanelet. Se brugervejledningen på produkt-cd'en, hvis du vil have
ere oplysninger.
CA
Quan hagueu nalitzat el procés d'instal·lació del programari, el producte imprimeix
una pàgina que explica com utilitzar el tauler de control. Consulteu la guia de l'usuari
del CD del producte per a obtenir més informació.
ES
Cuando haya nalizado el proceso de instalación del software, el producto imprime
una página que explica cómo utilizar el panel de control. Para obtener más
información, consulte la guía del usuario que se encuentra en el CD del producto.
IT
Una volta installato il software, il prodotto esegue la stampa di una pagina che
descrive come utilizzare il pannello di controllo. Per ulteriori informazioni, vedere la
guida per l'utente sul CD del prodotto.
DE
Nach Abschluss der Softwareinstallation gibt das Gerät ein Dokument aus, in dem
die Verwendung des Bedienfelds erläutert wird. Weitere Informationen nden Sie im
Benutzerhandbuch auf der dazugehörigen CD.
FR
Une fois l'installation du logiciel terminée, le produit imprime une page expliquant
comment utiliser le panneau de contrôle. Pour de plus amples informations, reportez-
vous au guide d'utilisateur sur le CD-ROM du produit.
EN
When software installation is complete, the product prints a page that explains how to
use the control panel. For more information, see the user guide on the product CD.
1
10
La pagina si sta caricando...

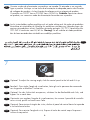
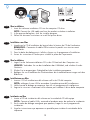
SV
Testkopia. Lägg beskrivningssidan för kontrollpanelen på skannerglaset och tryck sedan
på knappen Starta kopiering .
PT
Cópiadeteste. Carregue a página de descrição do painel de controle no vidro do
scanner e pressione o botão Iniciar cópia .
NO
Testkopieringsfunksjonen. Legg beskrivelsessiden for kontrollpanelet på skannerglasset,
og trykk deretter på knappen Start kopiering .
LT
Kopijavimo patikrinimas. Valdymo pulto aprašymo lapą padėkite ant skenerio stiklo ir
paspauskite mygtuką Pradėti kopijuoti .
LV
Pārbaudiet kopiju. Novietojiet vadības paneļa apraksta lapu uz skenera stikla un
nospiediet pogu Sākt kopēšanu.
FI
Testaakopiotoiminto. Aseta ohjauspaneelin kuvaussivu skannerin lasille ja paina
kopiointipainiketta .
ET
Testkoopia. Asetage juhtpaneeli kirjeldusega leht skanneri klaasile ja vajutage nuppu
Start Copy .
NL
Testdekopieerfunctie. Plaats de pagina met uitleg over het bedieningspaneel op de
glasplaat van de scanner en druk op de knop Kopiëren starten .
DA
Testkopi Læg siden med beskrivelsen af kontrolpanelet på scannerglaspladen, og tryk
derefter på knappen Start kopiering .
CA
Proveuelprocésdecòpia. Carregueu la pàgina de descripció del tauler de control al
cristall de l'escàner i, a continuació, premeu el botó Inicia una còpia .
ES
Pruebeelprocesodecopia. Cargue la página de descripción del panel de control en el
cristal del escáner y, a continuación, pulse el botón Iniciar copia .
IT
Copiadiprova. Caricare la pagina con la descrizione del pannello di controllo sul vetro
dello scanner, quindi premere il pulsante di avvio della copia .
DE
Testkopie: Legen Sie das Blatt mit der Beschreibung des Bedienfelds auf das Scannerglas,
und drücken Sie anschließend die Taste zum Starten des Kopiervorgangs .
FR
Pagedetest. Chargez la page de description du panneau de contrôle sur la vitre du
scanner, puis appuyez sur le bouton Commencer la copie .
EN
Testcopy. Load the control-panel description page on the scanner glass, and then press
the Start Copy button.
0
11
AR

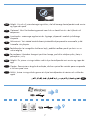
NL
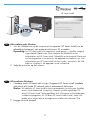
U vindt de HP LaserJet Guide en andere documentatie op de cd-rom die met het apparaat is
meegeleverd, of in de programmamap van HP op uw computer. De HP LaserJet Guide is een
hulpmiddel voor eenvoudige toegang tot productinformatie, onlineproductondersteuning van
HP, hulp bij het oplossen van problemen en overheids- en veiligheidsinformatie.
DA
Vejledningen til HP LaserJet og anden dokumentation ndes på den cd, der leveres
sammen med produktet, eller også kan du nde den i HP-programmappen på computeren.
Vejledningen til HP LaserJet Guide er et hjælpeværktøj til produktet, der giver nem adgang
til produktoplysninger, websupport til HP-produkter, vejledning til fejlnding, lovpligtige
oplysninger og sikkerhedsoplysninger.
CA
La guia d’HP LaserJet i d’altra informació es troba al CD subministrat amb el producte
o a la carpeta de programes HP del vostre ordinador. La guia d’HP LaserJet és una
guia d'ajuda per al producte que permet accedir fàcilment a informació del producte,
assistència tècnica Web del producte HP, guia per a la solució de problemes i informació
sobre reglament i seguretat.
ES
La guía de HP LaserJet y otra documentación se incluyen en el CD suministrado con el
producto o en la carpeta de programas HP de su equipo. La guía de HP LaserJet es
una guía de ayuda para el producto que permite acceder fácilmente a información del
producto, soporte Web del producto HP, información sobre reglamento y seguridad y una
guía para la solución de problemas.
IT
Il manuale dell'utente HP LaserJet e l'altra documentazione sono reperibili nel CD fornito
con il prodotto o nella cartella dei programmi HP sul computer. Il manuale dell'utente HP
LaserJet è uno strumento di assistenza che fornisce accesso facilitato alle informazioni sul
prodotto, supporto Web ai prodotti HP, guida alla risoluzione dei problemi e informazioni
relative alla sicurezza e alle normative.
DE
Das HP LaserJet Benutzerhandbuch und weitere Dokumente benden sich auf der mit
dem Gerät mitgelieferten CD-ROM oder im HP Programmordner auf Ihrem Computer.
Das HP LaserJet Benutzerhandbuch ist eine Produkthilfe für einfachen Zugriff auf
Produktinformationen, Web-Support für HP-Produkte, Hinweise zur Fehlerbehebung sowie
Zulassungs- und Sicherheitsinformationen.
FR
Le guide HP LaserJet et d’autres documents se trouvent sur le CD livré avec le produit ou
dans le dossier dédié aux programmes HP sur votre ordinateur. Le guide HP LaserJet est
un outil d'aide du produit ; il permet d'accéder facilement aux informations sur le produit,
à une assistance en ligne pour les produits HP, à un guide de dépannage et à des
informations relatives à la réglementation et à la sécurité.
EN
The HP LaserJet Guide and other documentation are on the CD that came with the product
or in the HP Program folder on your computer. The HP LaserJet Guide is a product help tool
that provides easy access to product information, HP product web support, troubleshooting
guidance, and regulatory and safety information.
www.hp.com/support/ljm1130series
1
1
La pagina si sta caricando...
La pagina si sta caricando...
-
 1
1
-
 2
2
-
 3
3
-
 4
4
-
 5
5
-
 6
6
-
 7
7
-
 8
8
-
 9
9
-
 10
10
-
 11
11
-
 12
12
-
 13
13
-
 14
14
-
 15
15
-
 16
16
-
 17
17
-
 18
18
-
 19
19
-
 20
20
-
 21
21
-
 22
22
-
 23
23
-
 24
24


HP LaserJet Pro M1136 Multifunction Printer series Manuale utente
- Tipo
- Manuale utente
- Questo manuale è adatto anche per
in altre lingue
- English: HP LaserJet Pro M1136 Multifunction Printer series User manual
- français: HP LaserJet Pro M1136 Multifunction Printer series Manuel utilisateur
- español: HP LaserJet Pro M1136 Multifunction Printer series Manual de usuario
- Deutsch: HP LaserJet Pro M1136 Multifunction Printer series Benutzerhandbuch
- Nederlands: HP LaserJet Pro M1136 Multifunction Printer series Handleiding
- português: HP LaserJet Pro M1136 Multifunction Printer series Manual do usuário
- dansk: HP LaserJet Pro M1136 Multifunction Printer series Brugermanual
- eesti: HP LaserJet Pro M1136 Multifunction Printer series Kasutusjuhend
- svenska: HP LaserJet Pro M1136 Multifunction Printer series Användarmanual
- suomi: HP LaserJet Pro M1136 Multifunction Printer series Ohjekirja
Documenti correlati
-
HP LaserJet Pro M1217nfw Multifunction Printer series Guida d'installazione
-
HP LaserJet Pro M1213nf/M1219nf Multifunction Printer series Manuale utente
-
HP LaserJet Pro P1560 Printer series Manuale utente
-
-
-
HP LaserJet Pro M1536 Multifunction Printer series Guida d'installazione
-
-
-
HP LaserJet Pro CP1520 series Manuale del proprietario
-