
www.zyxel.com
QUICK START GUIDE
P-660HN series
Wireless N ADSL2+
Modem Router
Firmware v3.70
Edition 1, 10/2008
DEFAULT LOGIN DETAILS
IP Address: http://192.168.1.1
User Password: user
Admin Password: 1234
CONTENTS
ENGLISH 3
DEUTSCH 13
ESPAÑOL 23
FRANÇAIS 33
ITALIANO 43
NEDERLANDS 53
SVENSKA 63
Copyright 2008 ZyXEL Communications Corporation
C

2

ENGLISH
ENGLISH
3
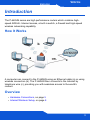
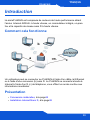
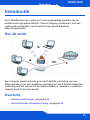
Introduction
The P-660HN series are high performance routers which combine high-
speed ADSL2+ Internet access, a built-in switch, a firewall and high-speed
wireless networking capability.
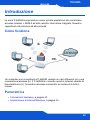
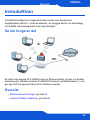
How It Works
A computer can connect to the P-660HN using an Ethernet cable (a) or using
wireless connection (b). The P-660HN then connects to the Internet by
telephone wire (c), providing you with seamless access to the world’s
content.
Overview
• Hardware Connections, on page 5
• Internet/Wireless Setup, on page 8
a
b
c
ENGLISH

ENGLISH
4
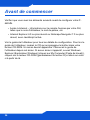
Before You Begin
Make sure you have the following things before you set up your P-660HN.
• Internet access - account information provided by your ISP, such as user
name, password, and so on.
• Internet Explorer 6.0 or later or Netscape Navigator 7.0 or later, with
JavaScript enabled.
See the User’s Guide for all configuration details. To read the User’s Guide,
insert the CD that came in the box into your CD-ROM drive. A screen should
pop up. Navigate to the User’s Guide from this screen. If a screen does not
pop up, open Windows Explorer (click My Computer), click on the CD-ROM
drive (usually drive D) and navigate to it from there.

ENGLISH
ENGLISH
5
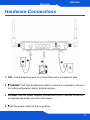
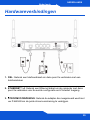
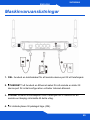
Hardware Connections
1. DSL: Use a telephone wire to connect this port to a telephone jack.
2. ETHERNET 1-4: Use an Ethernet cable to connect a computer to this port
for initial configuration and/or Internet access.
3. POWER: Use the power adaptor provided with your P-660HN to connect
an appropriate power source to this socket.
4. Push the power switch to the on position.

ENGLISH
6
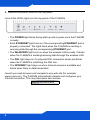
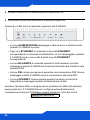
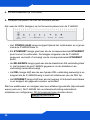
5. Remove the plastic sheet on the top panel.
Look at the LEDs (lights) on the top panel of the P-660HN.
• The POWER light blinks during start-up and is green once the P-660HN
is ready.
• Each ETHERNET light turns on if the corresponding ETHERNET port is
properly connected. The lights blink when the P-660HN is sending or
receiving data through the corresponding ETHERNET port.
• The WLAN/WPS light turns on when the wireless LAN is ready. It blinks
when the P-660HN is sending/receiving data through the wireless LAN.
• The DSL light stays on if a physical DSL connection exists and blinks
when the P-660HN is initializing the DSL line.
• The INTERNET light stays on when Internet access is available and
blinks when there is data transmitted.
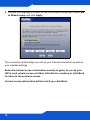
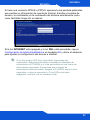
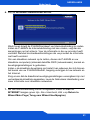
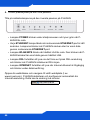
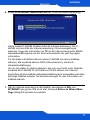
Launch your web browser and navigate to any web site (for example,
www.zyxel.com). The P-660HN automatically detects and configures your
Internet connection. This may take about two minutes.

ENGLISH
ENGLISH
7
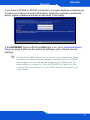
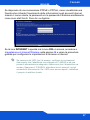
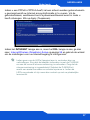
If you have a PPPoE or PPPoA connection, a screen displays prompting you
to enter your Internet account information. Enter the username, password
and/or system password exactly as provided. Click Apply.
If the INTERNET light is off but the DSL light is on, go to Internet/Wireless
Setup on page 8 and use the wizard to configure your Internet access
settings.
If none of the LEDs (lights) are on, check your connections. Make
sure that you have the power adaptor connected to the P-660HN
and plugged in to an appropriate power source. Make sure the
power source is turned on. Turn the P-660HN off, wait for a few
seconds and turn it back on. If the LEDs are still off, contact your
local vendor.

ENGLISH
8
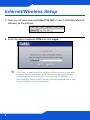
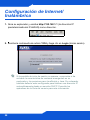
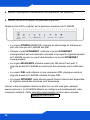
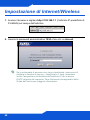
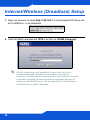
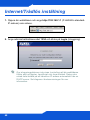
Internet/Wireless Setup
1. Open your browser and enter http://192.168.1.1 (the P-660HN's default IP
address) as the address.
2. Enter the admin password 1234 and click Login.
If the login screen does not display, make sure you allow web
browser pop-up windows, JavaScripts and Java permissions.
Your computer should be also set to get an IP address
automatically from a DHCP server. See the appendices in your
User’s Guide for more information.

ENGLISH
ENGLISH
9
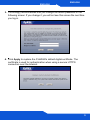
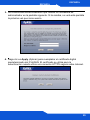
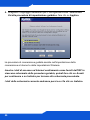
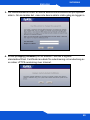
3. It is strongly recommended that you change the admin password in the
following screen. If you change it, you will not see this screen the next time
you log in.
4. Click Apply to replace the P-660HN’s default digital certificate. The
certificate is used for authentication when using a secure HTTPS
connection over the Internet.

ENGLISH
10
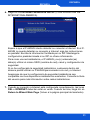
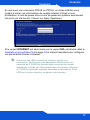
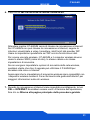
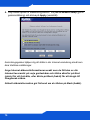
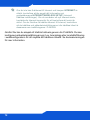
5. Choose the language you want to use for the web configurator. Select Go
to Wizard setup and click Apply.
The connection wizard helps you set up your Internet connection as well as
your wireless settings.
Enter the Internet access information exactly as given to you by your
ISP in each wizard screen and then click Next to continue or click Back
to return to the previous screen.
Current screen information will be lost if you click Back.

ENGLISH
ENGLISH
11
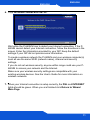
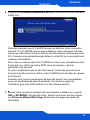
6. Click INTERNET/WIRELESS SETUP.
Wait while the P-660HN tries to detect your Internet connection. If the P-
660HN cannot detect your Internet connection, follow the directions in the
screen. Enter the information provided by your ISP. Keep the default
settings if your ISP did not provide some information.
To create a wireless network the P-660HN and your wireless computer(s)
must all use the same SSID (network name), channel and security
settings.
If you do not set wireless security, anyone within range could use your P-
660HN to access your network and the Internet.
Make sure your wireless security settings are compatible with your
existing wireless devices. See the User’s Guide for more information on
wireless networks.
7. When your Internet connection is setup correctly, the DSL and INTERNET
lights should be green. When you are finished click Return to Wizard
Main Page.

ENGLISH
12
If you cannot access the Internet and the INTERNET light is off,
make sure you enter the correct information in the INTERNET/
WIRELESS SETUP wizard screens. If you are using a new
Internet account, contact your ISP to make sure it is active. If you
are trying to access the Internet wirelessly, make sure the wireless
and security settings in your wireless client are the same as the
settings in the P-660HN.
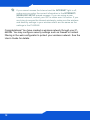
Congratulations! You have created a wireless network through your P-
660HN. You may configure security settings such as firewall or content
filtering in the web configurator to protect your wireless network. See the
User’s Guide for details.

DEUTSCH
DEUTSCH
13
Einführung
Die Hochleistungsrouter der Serie P-660HN vereinen ADSL2+-
Hochgeschwindigkeitsinternet, einen integriertes Switch, eine Firewall und
Hochgeschwindigkeits-Drahtlosnetzwerkfähigkeit.
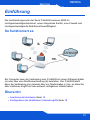
So funktioniert es
Ein Computer kann die Verbindung zum P-660HN mit einem Ethernet-Kabel
(a) oder über eine Drahtlosverbindung (b) herstellen. Der P-660HN stellt
dann die Verbindung zum Internet über ein Telefonkabel (c) her, so dass Sie
über nahtlosen Zugriff auf alle weltweit verfügbaren Inhalte haben.
Übersicht
• Anschluss der Hardware Seite 15
• Konfiguration des (drahtlosen) Internetzugriffs Seite 18
a
b
c
DEUTSCH

DEUTSCH
14
Vorbereitung der Installation
Folgende Informationen benötigen Sie für die Installation des P-660HN.
• Internetzugriff - Kontoinformationen wie Benutzername, Passwort usw.,
die Sie von Ihrem Provider erhalten.
• Internet Explorer 6.0 und Oder Versionen oder Netscape Navigator 7.0
und Oder Versionen mit aktiviertem JavaScript.
Ausführliche Informationen zur Konfiguration finden Sie im
Benutzerhandbuch. Um das Benutzerhandbuch zu lesen, legen Sie die
enthaltene CD in das CD-ROM-Laufwerk Ihres Computers ein. Auf dem
Bildschirm erscheint ein Fenster. Rufen Sie über dieses Fenster das
Benutzerhandbuch auf. Sollte dieses Fenster nicht angezeigt werden, rufen
Sie Windows Explorer auf (klicken Sie auf Arbeitsplatz), klicken Sie auf das
CD-ROM-Laufwerk (normalerweise Laufwerksbezeichnung D:), und klicken
Sie dann auf die Datei des Benutzerhandbuchs.

DEUTSCH
DEUTSCH
15
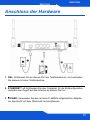
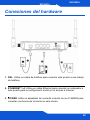
Anschluss der Hardware
1. DSL: Schliessen Sie an diesen Port ein Telefonkabel an, und verbinden
Sie dieses mit einer Telefonbuchse.
2. ETHERNET 1-4: Schliessen Sie den Computer für die Erstkonfiguration
und/oder den Zugriff auf das Internet an diesen Port an.
3. POWER: Verwenden Sie den mit dem P-660HN mitgelieferten Adapter,
um das Gerät mit dem Stromnetz anzuschliessen.

DEUTSCH
16
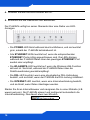
4. Schalten Sie den Ein/Aus-Schalter auf On.
5. Entfernen Sie die Plastikfolie vom Bedienfeld.
Der P-660HN verfügt an seiner Oberseite über eine Reihe von LED-
Anzeigen.
• Die POWER-LED blinkt während des Hochfahrens, und sie leuchtet
grün, sobald der P-660HN betriebsbereit ist.
• Alle ETHERNET-LEDs leuchtet auf, wenn die entsprechenden
ETHERNET-Ports richtig angeschlossen sind. Die LEDs blinken,
während der P-660HN Daten über den jeweiligen ETHERNET-Port
sendet oder empfängt.
• Die WLAN/WPS-LED leuchtet auf, wenn die Wireless-LAN-Funktion
aktiviert ist. Sie blinkt, während der P-660HN Daten über die
Drahtlosverbindung sendet/empfängt.
• Die DSL-LED leuchtet, wenn eine physikalische DSL-Verbindung
besteht, und sie blinkt, wenn der P-660HN die DSL-Leitung initialisiert.
• Die INTERNET-LED leuchtet, wenn eine Internetverbindung besteht,
und sie blinkt, wenn Daten übertragen werden.
Starten Sie Ihren Internetbrowser und navigieren Sie zu einer Website (z.B.
www.zyxel.com). Der P-660HN erkennt und konfiguriert automatisch die
Internetverbindung. Das dauert etwa zwei Minuten.

DEUTSCH
DEUTSCH
17
Bei einem PPPoE- oder PPPoA-Anschluss werden Sie auf dem Bildschirm
dazu aufgefordert, die Daten zu Ihrem Internetkonto einzugeben. Geben Sie
den Benutzernamen, das Kennwort und/oder den Dienstnamen genauso ein,
wie es Ihr Internetdienstanbieter vorgegeben hat. Klicken Sie auf Apply
(Übernehmen).
Wenn die INTERNET-LED nicht leuchtet, während die DSL-LED leuchtet,
gehen Sie zum Abschnitt Konfiguration des (drahtlosen) Internetzugriffs auf
Seite 18, und konfigurieren Sie die Einstellungen für Ihren Internetzugriff mit
dem Assistenten.
Wenn keine der LEDs leuchtet, prüfen Sie noch einmal alle
Kabelverbindungen. Stellen Sie sicher, dass der Netzadapter
richtig an den P-660HN und an eine geeignete Netzsteckdose
angeschlossen wurde. Stellen Sie sicher, dass die Stromquelle
eingeschaltet ist und richtig funktioniert. Schalten Sie dann den P-
660HN aus und nach einigen Sekunden wieder an. Wenn die
LED-Anzeigen weiterhin nicht leuchten, wenden Sie sich an Ihren
Händler.

DEUTSCH
18
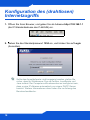
Konfiguration des (drahtlosen)
Internetzugriffs
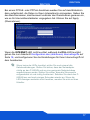
1. Öffnen Sie Ihren Browser, und geben Sie als Adresse http://192.168.1.1
(die IP-Standardadresse des P-660HN) ein.
2. Geben Sie das Standardpasswort 1234 ein, und klicken Sie auf Login
(Anmelden).
Sollte das Anmeldefenster nicht angezeigt werden, stellen Sie
sicher, dass Ihr Webbrowser Pop-up-Fenster, JavaScripts und
Java zulässt. Der Computer sollte ausserdem so konfiguriert sein,
dass er eine IP-Adresse automatisch von einem DHCP-Server
bezieht. Weitere Informationen dazu finden Sie im Anhang des
Benutzerhandbuchs.

DEUTSCH
DEUTSCH
19
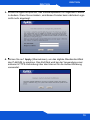
3. Es wird dringend empfohlen, das Standardpasswort im folgenden Fenster
zu ändern. Wenn Sie es ändern, wird dieses Fenster beim nächsten Login
nicht mehr angezeigt.
4. Klicken Sie auf Apply (Übernehmen), um das digitale Standardzertifikat
des P-660HN zu ersetzen. Das Zertifikat wird bei der Verwendung einer
sicheren HTTPS-Verbindung über das Internet für die Authentifizierung
verwendet.

DEUTSCH
20
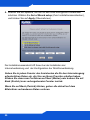
5. Wählen Sie die Sprache, die Sie für den Web-Konfigurator verwenden
möchten. Wählen Sie Go to Wizard setup (Zum Installationsassistenten),
und klicken Sie auf Apply (Übernehmen).
Der Installationsassistent hilft Ihnen bei der Installation der
Internetverbindung und der Konfiguration der Drahtlosverbindung.
Geben Sie in jedem Fenster des Assistenten die für den Internetzugang
erforderlichen Daten ein, die Sie von Ihrem Provider erhalten haben.
Klicken Sie dann zum Fortfahren auf Next (Weiter) oder kehren Sie mit
Back (Zurück) zum vorhergehenden Fenster zurück.
Wenn Sie auf Back (Zurück) klicken, gehen alle aktuell auf dem
Bildschirm vorhandenen Daten verloren.
La pagina si sta caricando...
La pagina si sta caricando...
La pagina si sta caricando...
La pagina si sta caricando...
La pagina si sta caricando...
La pagina si sta caricando...
La pagina si sta caricando...
La pagina si sta caricando...
La pagina si sta caricando...
La pagina si sta caricando...
La pagina si sta caricando...
La pagina si sta caricando...
La pagina si sta caricando...
La pagina si sta caricando...
La pagina si sta caricando...
La pagina si sta caricando...
La pagina si sta caricando...
La pagina si sta caricando...
La pagina si sta caricando...
La pagina si sta caricando...
La pagina si sta caricando...
La pagina si sta caricando...
La pagina si sta caricando...
La pagina si sta caricando...
La pagina si sta caricando...
La pagina si sta caricando...
La pagina si sta caricando...
La pagina si sta caricando...
La pagina si sta caricando...
La pagina si sta caricando...
La pagina si sta caricando...
La pagina si sta caricando...
La pagina si sta caricando...
La pagina si sta caricando...
La pagina si sta caricando...
La pagina si sta caricando...
La pagina si sta caricando...
La pagina si sta caricando...
La pagina si sta caricando...
La pagina si sta caricando...
La pagina si sta caricando...
La pagina si sta caricando...
La pagina si sta caricando...
La pagina si sta caricando...
La pagina si sta caricando...
La pagina si sta caricando...
La pagina si sta caricando...
La pagina si sta caricando...
La pagina si sta caricando...
La pagina si sta caricando...
La pagina si sta caricando...
La pagina si sta caricando...
La pagina si sta caricando...
La pagina si sta caricando...
-
 1
1
-
 2
2
-
 3
3
-
 4
4
-
 5
5
-
 6
6
-
 7
7
-
 8
8
-
 9
9
-
 10
10
-
 11
11
-
 12
12
-
 13
13
-
 14
14
-
 15
15
-
 16
16
-
 17
17
-
 18
18
-
 19
19
-
 20
20
-
 21
21
-
 22
22
-
 23
23
-
 24
24
-
 25
25
-
 26
26
-
 27
27
-
 28
28
-
 29
29
-
 30
30
-
 31
31
-
 32
32
-
 33
33
-
 34
34
-
 35
35
-
 36
36
-
 37
37
-
 38
38
-
 39
39
-
 40
40
-
 41
41
-
 42
42
-
 43
43
-
 44
44
-
 45
45
-
 46
46
-
 47
47
-
 48
48
-
 49
49
-
 50
50
-
 51
51
-
 52
52
-
 53
53
-
 54
54
-
 55
55
-
 56
56
-
 57
57
-
 58
58
-
 59
59
-
 60
60
-
 61
61
-
 62
62
-
 63
63
-
 64
64
-
 65
65
-
 66
66
-
 67
67
-
 68
68
-
 69
69
-
 70
70
-
 71
71
-
 72
72
-
 73
73
-
 74
74


in altre lingue
- français: ZyXEL P-660HN-F1Z Guide de démarrage rapide
- español: ZyXEL P-660HN-F1Z Guía de inicio rápido
- Deutsch: ZyXEL P-660HN-F1Z Schnellstartanleitung
- Nederlands: ZyXEL P-660HN-F1Z Snelstartgids
- svenska: ZyXEL P-660HN-F1Z Snabbstartsguide
Documenti correlati
-
ZyXEL P-660HN-F3Z Guida Rapida
-
ZyXEL P-660HNU-F1 Guida Rapida
-
-
ZyXEL P-661HNU-F1 Guida Rapida
-
ZyXEL NBG4604 Manuale del proprietario
-
-
ZyXEL PM7320-B0 Guida utente
-
ZyXEL LTE7480-M804 4G LTE-A Outdoor Router Manuale del proprietario
-
-