La pagina si sta caricando...

2
Precautions before assembly
Before you begin to assemble the stand, please keep the following in mind:
• To assemble the stand, two people are needed. Failing to do so may damage the piano
and cause injury.
• When placing the piano on the stand, be careful not to pinch your hands.
• Be sure to follow the steps in order, and make sure that the parts are assembled in the
correct orientation and position.
• Do not apply weight to the edge of the piano before tightening the screws, otherwise
the piano may fall down.
Précautions avant le montage
Pour monter le support, tenez compte des instructions suivantes.
• Pour monter le support, il faut être à deux. Faute de quoi, vous risquez d’endommager le
piano et de vous blesser.
• Lorsque vous placez le piano sur le support, veillez à ne pas vous coincer les mains.
• Effectuez les opérations dans l’ordre préconisé et veillez à monter les pièces au bon endroit
et dans le bon sens.
• N’exercez aucune pression sur le bord du piano avant de serrer les vis car vous risquez de
faire tomber le piano.
Hinweise zum Zusammenbau
Bitte lesen Sie sich vor dem Zusammenbau des Ständers folgende Punkte durch:
• Für den Zusammenbau werden zwei Personen benötigt. Sonst könnte das Piano näm-
lich beschädigt werden und/oder Sie verletzen.
• Achten Sie beim Zusammenbau des Ständers darauf, dass Sie sich nicht die Finger
quetschen.
• Verwenden Sie jederzeit die richtigen Teile und bauen Sie sie den Anweisungen ent-
sprechend ein.
• Legen Sie keine schweren Gegenstände usw. auf die Pianovorderseite, solange nicht
alle Schrauben festgedreht sind. Sonst kippt das Piano eventuell vom Ständer.
Precauzioni prima del montaggio
Prima di iniziare a montare il supporto, vi preghiamo di osservare le seguenti precauzioni:
• Per il montaggio occorrono due persone. Eseguire il montaggio da soli può causare danni
al pianoforte o alla persona stessa.
• Quando il pianoforte viene posizionato sul supporto, fate attenzione a non schiacciarvi le dita.

3
• Assicuratevi di montare le parti nell’orientamento giusto, e seguite le istruzioni nell’ordine dato.
• Non esercitate pressione sui bordi del pianoforte prima di stringere le viti, o potreste far
cadere il pianoforte.
La pagina si sta caricando...

5
Assembly instructions / Instructions de montage / Zusammenbau
des Ständers / Procedura di assemblaggio /
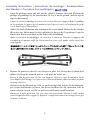
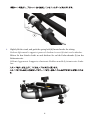
1. Open the packing carton and take out the contents. Remove the stand (B) from the
package by grabbing it by the four brackets (a). Lay it on the ground, with the legs on
top (see illustration).
Ouvrez le carton d’emballage et retirez-en le contenu. Retirez le support (B) de l’emballage
en le tenant par les quatre tiges de maintien (a). Déposez-le sur le sol en plaçant les pieds
vers le haut (voyez l’illustration).
Öffnen Sie den Lieferkarton und entnehmen Sie seinen Inhalt. Halten Sie den Ständer
(B) an den vier Halterungen (a) fest und holen Sie ihn aus der Verpackung. Legen Sie
ihn mit den Beinen nach oben auf die Erde (siehe Abbildung).
Aprite lo scatolone di imballaggio, ed estraetene il contenuto. Prendete il supporto (B)
tenendolo per le quattro staffe (a). Posizionatelo a terra, con le gambe rivolte verso l’alto
(vedi figura).
2. Remove the protective sheet. In case they are in place, free the brackets (a) from their
holders (x). Keep the removed parts in a safe place for future use.
Retirez le film de protection. Si elles sont bloquées, libérez les tiges de maintien (a) de
leurs dispositifs de blocage (x). Conservez les éléments démontés dans un endroit sûr pour
un usage ultérieur.
Entfernen Sie den Kratzschutz. Falls sie noch befestigt sind, müssen Sie die Halterun-
gen (a) aus den Bindern (x) lösen. Am besten bewahren Sie alle entfernten Teile an
einem sicheren Ort auf, weil Sie sie später eventuell noch einmal brauchen.
Rimuovete il foglio protettivo. Nel caso siano stati posizionati, liberate le staffe (a) dai
relativi dispositivi di bloccaggio (x). Riponete i componenti rimossi in un luogo sicuro, per
un futuro riutilizzo.

6
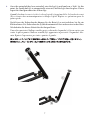
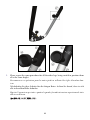
3. Slightly lift the stand, and push the spring bolt (b) located under the tubing.
Soulevez légèrement le support et poussez le boulon à ressort (b) situé sous la tubulure.
Heben Sie den Ständer leicht an und drücken Sie auf die Federschraube (b) an der
Rohrunterseite.
Sollevate leggermente il supporto, ed azionate il bullone a molla (b) situato sotto il tubo-
lare.

7
4. Once the spring bolt has been extended, raise the leg (c), until you hear a ‘click’. At this
point, the spring bolt (c) is automatically retracted, and the leg is fixed in place. Please
repeat the same procedure for all four legs.
Quand le boulon à ressort s’est étiré, relevez le pied (c) jusqu’au déclic. Le boulon à ressort
(b) se rétracte alors automatiquement et bloque le pied. Répétez ces opérations pour les
quatre pieds.
Nach Lösen der Federschraube können Sie das Bein (c) so weit anheben, bis Sie ein
Klicken hören. Die Federschraube (b) klickt automatisch fest und arretiert so das Bein.
Wiederholen Sie diesen Schritt für die übrigen Beine.
Una volta sganciato il bullone a molla, aprite e distendete la gamba (c), fino a sentire uno
scatto. A questo punto il bullone a molla (b) è agganciato in posizione e la gamba è bloc-
cata. Ripetete l’operazione per tutte e quattro le gambe.
La pagina si sta caricando...

9
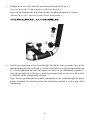
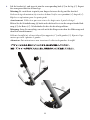
Bloquez le pied à la longueur voulue. Pour trouver la position correcte, alignez l’orifice de
la partie coulissante du pied (c’) avec un des orifices (e) de la partie fixe du pied (c”). La
dernière position n’est pas un orifice rond mais en demi-lune (e’). Une fois la partie cou-
lissante du pied au bon endroit, serrez la vis (d) pour la bloquer. L’orifice est automatique-
ment centré.
Remarque: La première position (l’orifice inférieur) correspond à la hauteur du clavier
d’un piano à queue. La quatrième position (la demi-lune) permet de jouer debout.
Verriegeln Sie die Beine in der gewünschten Höhe. Um die gewünschte Position zu
finden, müssen Sie eine Bohrung der beweglichen Beinpartie (c’) über einer Bohrung
(e) des statischen Beinteils (c”) anordnen. Die letzte Position sieht aus wie ein Halb-
mond (e’). Drehen Sie die Schraube (d) nach Anwahl der richtigen Beinposition wie-
der fest. Die Bohrung wird dabei automatisch mittig angeordnet.
Anmerkung: Die erste Position (die untere Bohrung) entspricht der Standardhöhe einer
Flügelklaviatur. Die vierte Position (der Halbmond) erlaubt das Spielen im Stehen.
Bloccate la gamba sulla lunghezza desiderata. Per individuare la posizione corretta, alli-
neate il foro nella parte mobile (c’) con uno dei fori (e) nella parte fissa della gamba (c”).
L’ultima posizione non ha come riferimento un foro, ma un segnaposto a mezzaluna (e’).
Una volta posizionata correttamente la parte mobile della gamba, tirate la vite (d) per
fissarla. Il foro verrà centrato automaticamente.
Nota: La prima posizione (il foro più in basso) corrisponde all’altezza standard del piano-
forte acustico. La quarta posizione (il simbolo della mezzaluna) è utile per suonare in piedi.

10
7. Please repeat the same procedure for all the other legs, being careful to position them
all at the same height.
Recommencez ces opérations pour les autres pieds en veillant à les régler à la même hau-
teur.
Wiederholen Sie diese Schritte für die übrigen Beine. Achten Sie darauf, dass sie sich
alle in derselben Höhe befinden.
Ripetete l’operazione per tutte e quattro le gambe, facendo attenzione a posizionarle tutte
alla stessa altezza.

11
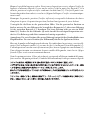
8. Lift the bracket (a), and insert it into the corresponding hole (e”) in the leg (c”). Repeat
the same procedure for all four legs.
Warning: Be careful not to pinch your fingers between the leg and the bracket!
Soulevez la tige de maintien (a) et insérez-la dans l’orifice correspondant (e”) du pied (c”).
Répétez ces opérations pour les quatre pieds.
Avertissement: Veillez à ne pas vous coincer les doigts entre le pied et la tige!
Heben Sie die Stützhalterung (a) hoch und schieben Sie sie in die entsprechende Boh-
rung (e”) des Beins (c”). Wiederholen Sie dies für die übrigen Beine.
Warnung: Seien Sie vorsichtig, um sich nicht die Finger zwischen der Halterung und
dem Bein einzuklemmen!
Sollevate la staffa (a), ed inseritela nel foro apposito (e”) nella gamba (c”). Ripetete l’ope-
razione per tutte e quattro le gambe.
Attenzione: Fate attenzione a non incastrarvi le dita tra la gamba e la staffa!

12
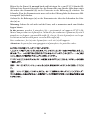
9. Turn the stand (B) upside down, so that the feet are laying on the floor. Place the con-
cave side of the bracket (f) toward you – the KORG logo (g) must be visible on your
side.
Retournez le support (B): les pieds doivent reposer sur le sol. Placez la partie concave de
la traverse (f) vers vous: vous devez voir le logo KORG (g).
Drehen Sie den Ständer (B) um, so dass die Beine den Boden berühren. Die konkave
Seite der Halterung (f) muss zu Ihnen hin zeigen. Sie müssen das KORG-Logo (g) also
sehen können.
Rovesciate il supporto (B), in modo che i piedi poggino a terra. Posizionate la parte con-
cava della staffa (f) verso di voi – il logo KORG (g) deve essere visibile dalla vostra parte.
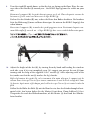
10. Adjust the height of the feet (h), by turning them by hand and leveling the stand on
each side, even if it is not completely even. We suggest you prevent the nut (i) from
turning with the help of the supplied 11/16” wrench (j). After adjusting each of the
feet, make sure that the nut (i) touches the leg’s border.
Réglez la hauteur des pieds (h) en les tournant à la main afin que le support soit de
niveau. Pour éviter que l’écrou (i) ne tourne, maintenez-le avec la clé de serrage de 17mm
(j) fournie. Après avoir réglé chaque pied, veillez à ce que l’écrou (i) soit contre le tube du
pied.
Stellen Sie die Höhe der Füße (h) mit der Hand so ein, dass der Ständer komplett hori-
zontal steht. Am besten halten Sie die Mutter (i) mit dem 17mm-Schlüssel (j) fest.
Überprüfen Sie nach der Höhenkorrektur, ob die Mutter (i) den Rand des Ständer-
beins berührt.

13
Regolate l’altezza dei piedini (h) ruotandoli a mano per livellare ed adattare il supporto a
qualsiasi superficie, anche sconnessa. È consigliabile tenere fermo il dado (i) con la chiave
di serraggio da 17 (j) fornita di serie. Dopo la regolazione, riportate il dado (i) a toccare il
bordo della gamba.
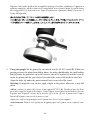
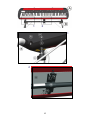
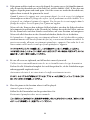
11. Using two people, lift the piano (A), and attach it to the ST-SV1 stand (B). While one
person prevents the piano from falling down, the other should make the small rubber
foot (k) under the piano line-up to the concave side of the bracket (f), and the screw (l)
under the piano with the space left on the side of the convex side of the bracket (m).
Align the holes (n) under the piano to match the screws (o) of the stand.
Warning: During this step, do not apply weight to the piano, otherwise it may fall
down.
A deux, soulevez le piano (A) et fixez-le au support ST-SV1 (B). Tandis qu’une des deux
personnes empêche le piano de tomber, l’autre aligne le petit pied en caoutchouc (k) sous
le piano avec la partie concave de la traverse (f) et la vis (l) sous le piano avec l’espace
latéral de la partie convexe de la traverse (m).
Alignez les orifices (n) pratiqués sous le piano avec les vis (o) du support.
Avertissement: Durant cette opération, n’appuyez pas sur le piano car il risque de tom-
ber.

14
Heben Sie das Piano (A) zu zweit hoch und befestigen Sie es am ST-SV1 Ständer (B).
Während eine Person sicherstellt, dass das Piano nicht vom Ständer fallen kann, muss
die andere den Gummifuß (k) an der Unterseite in die Halterung (f) schieben. Die
Schraube (l) an der Pianounterseite muss sich in der Öffnung links des konvexen Hal-
terungsteils (m) befinden.
Ordnen Sie die Bohrungen (n) an der Pianounterseite über den Schrauben des Stän-
ders (o) an.
Warnung: Lehnen Sie sich nicht auf das Piano, weil es momentan noch vom Ständer
kippen könnte.
In due persone, prendete il pianoforte (A), e posizionatelo sul supporto ST-SV1 (B).
Mentre una persona tiene il pianoforte, l’altra deve far combaciare il gommino (k) sotto il
pianoforte con la parte concava della staffa (f), e la vite (l) sotto il pianoforte con lo spa-
zio lasciato ad un lato della parte convessa della staffa (m).
Fate combaciare i fori (n) sotto il pianoforte con le viti (o) del supporto.
Attenzione: In questa fase non appoggiatevi al pianoforte, che potrebbe cadere.

15
1 2
2
1
La pagina si sta caricando...
La pagina si sta caricando...

18
Precauzioni dopo il montaggio
Attenzione durante il trasporto. Separate il pianoforte dal supporto, e trasportate le due parti
separatamente. Dopo il trasporto, consultate le istruzioni per riunire il pianoforte al supporto.
Allentamento delle viti. Dopo il montaggio, con il passar del tempo le viti del supporto potreb-
bero allentarsi, facendolo oscillare. Se questo dovesse verificarsi, stringete nuovamente tutte le
viti.
Smontaggio. Per smontare piano e supporto, seguite le istruzioni di montaggio al contrario.
Per una maggior protezione, suggeriamo di rimettere al loro posto anche il foglio protettivo e i
dispositivi di bloccaggio (x) delle staffe (vedi passo 1).


© KORG Italy 2010. All rights reserved
Address
KORG ITALY SpA
Via Cagiata, 85
I-60027 Osimo (An)
Italy
Web
www.korg.com
www.korgpa.com
www.korg.co.jp
www.korg.co.uk
-
 1
1
-
 2
2
-
 3
3
-
 4
4
-
 5
5
-
 6
6
-
 7
7
-
 8
8
-
 9
9
-
 10
10
-
 11
11
-
 12
12
-
 13
13
-
 14
14
-
 15
15
-
 16
16
-
 17
17
-
 18
18
-
 19
19
-
 20
20


Korg SV1 Manuale del proprietario
- Tipo
- Manuale del proprietario
- Questo manuale è adatto anche per
in altre lingue
- English: Korg SV1 Owner's manual
- français: Korg SV1 Le manuel du propriétaire
- Deutsch: Korg SV1 Bedienungsanleitung
