home HM-ST-B200W Steam Cleaner Manuale utente
- Tipo
- Manuale utente

User Manual
HM-ST-B200W
Steam Cleaner

2

3
ENGLISH 4
DEUTSCH 14
ČESKY 25
SLOVENSKY 35
MAGYAR 45
FRANÇAIS 55
ITALIANO 65
ROMÂNĂ 75
WARRANTY & SUPPORT 85
GARANTIE & BETREUUNG 85
ZÁRUKA & PODPORA 85
ZÁRUKA & PODPORA 85
GARANCIA & TÁMOGATÁS 85
GARANTIE ET SUPPORT 85
GARANZIA E ASSISTENZA 85
GARANȚIE ȘI ASISTENȚĂ 85

4
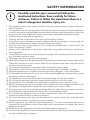
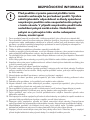
SAFETY INFORMATION
Carefully read this user´s manual and follow the
mentioned instructions. Save carefully for future
reference. Failure to follow the instructions there is a
risk of a dangerous situation, injury, etc.
1. This appliance must not be used by children. Keep the appliance and its power cord out of
reach of children.
2. This appliance may be used by persons with reduced physical, sensory or mental capabilities,
or lack of experience and knowledge, provided they have been given supervision or instruction
concerning use of the appliance in a safe manner and understand the potential hazards.
3. Children must not play with the appliance.
4. Cleaning and user maintenance must not be performed by children.
5. If the power cord is damaged, it must be replaced by the manufacturer, its service agent or
similarly qualied persons in order to avoid a dangerous situation.
6. Use only clean water in this appliance. Do not use non-potable water or other liquid. The
maximum capacity is 300ml.
7. Always pull out the plug from the power socket after using, before cleaning or maintenance
of the appliance.
8. Do not direct the steam jet or water directly onto equipment containing electrical component,
e.g., the interior space of ovens.
9. The lling hole must not be open during usage.
10. When lling, always turn the appliance off rst and disconnect the plug from the power socket.
Follow the instructions in this manual. Never ll the appliance with water when the plug is
inserted in the power socket.
11. Do not leave the appliance unattended while connected to power supply.
12. The appliance must not be used if it fell, there are visible signs of damage, or it leaks.
13. Keep the appliance out of children when the appliance is plugged, or it is cooling down.
14. To reduce the risk of the electric shock, do not immerse the appliance, its power cord or power
cord plug in water or other liquid.
15. This appliance is for household use and inside the building. Do not use it outdoor.
16. Do not use the appliance near bath, shower, swimming pool, or sink with water.
17. This appliance is not intended to be operated by an external timer or remote control.
18. Before connecting the plug to the power outlet, make sure that the voltage indicated on the
type plate of the appliance corresponds to the voltage in your mains socket.
19. Plug the power cord into a properly grounded electrical outlet. We recommend connecting
the appliance to a separate electrical circuit. Do not use extension cables.
20. Do not place the appliance near re or other heat sources. Place the appliance away from
surfaces or objects sensitive to steam or moisture.
21. Do not let the power cord hang over the edge of the counter or table. Do not let the power
supply touch the electric or gas plate or any hot surface.
22. Use the appliance only with the supplied accessories. The use of accessories that are not
intended for this appliance or are not specied by the manufacturer as suitable may cause a
dangerous situation.
23. Always ensure the appliance is correctly assembled before plugging it in.
24. Do not use the appliance to clean sockets, switches, electronics, etc. There is a risk of dangerous
situation and damage to property.

5
25. Never use the appliance in places where explosives, ammable substances, etc. are used or
stored.
26. Do not touch the appliance or power cord with wet or moisture hands.
27. Clean the appliance after each use. Always allow the appliance to cool down completely
before cleaning.
28. Always disconnect the power cord from the power socket when you do not use it, when you
leave it unattended, before cleaning, moving, assembling, or disassembling.
29. Do not cover the appliance while in use.
30. Always disconnect the power cord by grasping the plug, not by pulling on the power cord.
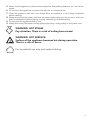
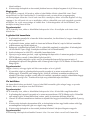
WARNING: HOT STEAM.
Pay attention. There is a risk of scaling from steam!
WARNING: HOT SURFACE.
Surface of the appliance becomes hot during operation.
There is a risk of burns.
For household use only and inside building.

6
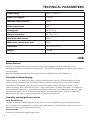
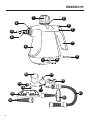
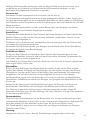
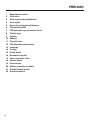
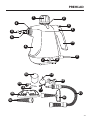
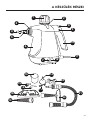
OVERVIEW
12
3
4
5
6
8
9
10
11
12
13 14
15
16 17
18
19
20
21
22
7

7
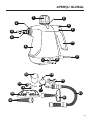
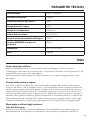
1 Safety cap
2 Filling tube
3 Thread for attaching the long exible hose
4 Steam nozzle
5 Connector for attaching accessories
6 Steam cleaner body
7 Power on LED light
8 Steam button
9 Safety lock
10 Handle
11 Power cord
12 Ready LED light
13 Measuring cup
14 Funnel
15 Round brush
16 Angle nozzle
17 O-ring (2 pcs)
18 Window wiper
19 Concentrator
20 Brush nozzle cloth
21 Long exible hose
22 Brush nozzle
OVERVIEW

8
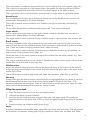
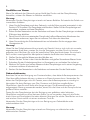
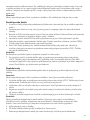
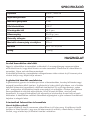
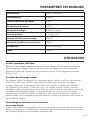
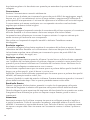
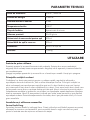
TECHNICAL PARAMETERS
Power supply 230 V~, 50/60 Hz
Power consumption 1 000 W
Maximum steam pressure 3 bary
Steam temperature 100 °C
Heating time Asi 4 minuty
Amount of pressure 20–30 g / min
Total water tank volume 350 ml
MAX water volume in the tank 250 ml
Dimensions 30 x 13 x 23,5 cm
Weight 1,08 kg
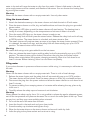
USE
Before rst use
Remove the appliance and its accessories from the packaging. Before disposing of the
packaging, be sure to remove all components. Check that the appliance and any accessories are
not damaged.
Wipe the appliance surface and accessories with a slightly damp cloth. Wipe dry.
Principles of steam cleaning
Steam cleaner is suitable for a quick, regular, and effective cleaning of hard surfaces at home
without using chemicals. The principle of steam cleaning is based on quick transformation of
cold water to hot steam which is pushed out of the steam cleaner through a nozzle. It is so-
called dry steam that is formed only from a very small amount of water. Dry steam is suitable for
removing dirt and grease, it is gentle to the treated surfaces as the surface only moistens. High
temperature steam can kill all bacteria and sterilize the treated surfaces. Thanks to supplied
attachments, the steam can penetrate even in hart-to-reach places.
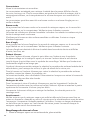
Assembly and using the accessories
Long exible hose
Screw the exible hose and tighten rmly. You can use the exible hose both separately and
you can attach the concentrator, round brush, angle nozzle, or brush nozzle to the connector to
extend the reach of the attached accessory.
Concentrator
Screw the concentrator and tighten rmly.

9
The concentrator is suitable to remove dirt from hard-to-reach places, from corners, gaps, etc.
The close the concentrator is to the treated place, the greater the cleaning efciency will be
because the temperature and steam volume are at their highest at the steam output.
The concentrator can be combined with a round brush or angle nozzle to get better results.
Round brush
You can attach the round brush on the steam cleaner connector, exible hose connector, or
concentrator. Always ensure it is rmly attached.
The brush is used to remove stubborn dirt. Stubborn dirt can be removed more easily by
brushing.
Do not clean the sensitive or delicate surfaces by brush. They may be damaged.
Angle nozzle
You can attach the angle nozzle on the steam cleaner connector, exible hose connector, or
concentrator. Always ensure it is rmly attached.
The angle nozzle is used to remove dirt from hard-to-reach or narrow places, from corners, etc.
Brush nozzle
To attach the brush nozzle, align a white dot on the nozzle with a symbol of open lock on the
steam cleaner and turn the nozzle clockwise till the white dot is aligned with a symbol of closed
lock. Check the nozzle is correctly attached and it does not move.
The brush nozzle is used to remove dirt and dust from washable surfaces in the bathroom, to
clean mirrors, working desk in the kitchen, etc.
Attach the cloth on the brush nozzle to remove dirt and dust from sensitive surfaces, e.g., from
curtains or furniture, etc.
The cloth is washable so that you can re-use it. Pay attention when removing the cloth from the
nozzle after use as the cloth may be very hot.
Window wiper
Attach the window wiper to brush nozzle so that the protrusions at the bottom of the wiper t
to the openings at the bottom of the nozzle. And then attach the upper part of the wiper to the
nozzle until it clicks.
The window wiper is used to wipe steam and water from windows, glass door, or wall tiles.
Warning:
Always make sure the steam cleaner is switched off and unplugged when you attach or remove
the accessory. Before removing the accessory, wait at least 5 minutes to cool down. The
accessory becomes hot during use. There is a risk of injury or scalding from hot steam or water.
Never remove the accessory when the steam cleaner is used.
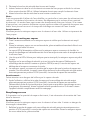
Filling the water tank
1. Place the steam cleaner on a at, dry, and stable surface.
2. Unscrew the safety cap anti-clockwise.
3. Insert the funnel in the tank neck and pour clean and cold water inside. The maximum
possible volume of the water tank is 250 ml. Use the supplied measuring cup to ll the water
tank.
4. Screw the safety cap clockwise and tighten rmly.
Note:
It is recommended to use distilled water, especially if you have very hard water. That will prevent
the formation of limescale. Always pour only the maximum volume into the water tank. More

10
water in the tank will cause hot water to drip from the nozzle. If there is little water in the tank,
not enough pressure will be created, and therefore little steam. You can shorten the heating time
by pouring warm water.
Warning:
Never use the steam cleaner with an empty water tank. Use only clean water.
Using the steam cleaner
1. Attach the desired accessory to the steam cleaner and check the tank is ll with water.
2. Place the steam cleaner on a at, dry, and stable surface and insert the plug to a grounded
power socket.
3. The power on LED lights up and the steam cleaner will start heating. The heating time is
usually 4 minutes, depending on the temperature and volume of water in the tank.
4. Once the ready LED lights up, the steam cleaner is ready to use.
5. Press the safety lock and then press the steam button. Release the safety lock and it will stay
at OPEN position. The steam button is unlocked, and steam starts to ow.
6. The steam cleaner will produce steam as soon as you keep the steam button pressed. Once
it is released, the steam will stop, and the safety lock will automatically pop up to LOCK
position. The steam button will be locked.
Warning:
Be careful while using not to get scalded from the hot steam.
7. After use, release the steam button and the safety lock will automatically pop up to LOCK
position. The steam button will be locked. Disconnect the plug from the power socket.
Before other manipulation (lling water, changing accessory), allow it to cool down for at
least 5 minutes. Before cleaning, allow it to cool down completely.
Filling water
If you notice decrease in pressure and steam amount while using, it is necessary to add water to
the tank.
Warning:
Never use the steam cleaner with an empty water tank. There is a risk of total damage.
1. Release the steam button and the safety lock will automatically pop up to LOCK position.
The steam button will be locked. Place the steam cleaner on a at, dry, and stable surface.
2. Disconnect the plug from the power socket and allow the steam cleaner to cool down for at
least 5 minutes.
3. To prevent scalding from escaping steam or hot water while releasing the cap, place a dry
cloth over it.
4. Carefully release the safety cap and unscrew it anti-clockwise.
Warning:
Never release the safety cap by force. If it is not possible to release by regular, adequate power,
wait till the temperature and pressure decrease. Do not touch the metal parts of the cap. These
are very hot, and they may cause scalding when misused.
5. Pour out the rest of the water from the tank.
6. Insert the funnel in the tank neck and pour clean inside.
7. Screw the safety cap clockwise and tighten rmly.
8. Wipe the hot water drops on the steam cleaner and around it with dry cloth.
9. Insert the plug to the power socket and continue in using.

11
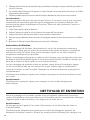
Using instructions
When cleaning the window panels, pay attention the outside low temperature may lead to
excessive glass tension which can even cause its cracking. Therefore, do not use the steam
cleaner for cleaning windows when the outside temperature is too low.
When cleaning glass, window, or similar fragile surfaces, avoid long cleaning at one place. It
is recommended to use brush nozzle with cloth which distributes the heat and steam to larger
surface.
When cleaning glued, or painted surfaces, try the steam cleaner in smaller place rst not to lose,
or remove the paint due to heat and moisture. Clean such surfaces only for a short time and
wipe dry immediately.
Do not use the steam cleaner to clean parquet, or unsealed wood.
Warning:
Do not use the steam cleaner to clean electric or electronic devices.
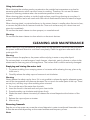
CLEANING AND MAINTENANCE
Before cleaning or any maintenance, always switch off the appliance, disconnect the plug from
the power outlet and allow it to cool down completely. Clean the appliance after each use to
prolong its life.
Warning:
Never immerse the appliance, the power cable and plug in water or any other liquid.
Do not use plastic or metal scrapers, harsh cleaners, chemicals, petrol, solvents or other similar
substances to clean any parts of the appliance. The surface nish could be seriously damaged.
Emptying and rinsing the water tank
1. To prevent scalding from escaping steam or hot water while releasing the cap, place a dry
cloth over it.
2. Carefully release the safety cap and unscrew it anti-clockwise.
Warning:
Never release the safety cap by force. If it is not possible to release by regular, adequate power,
wait till the temperature and pressure decrease. Do not touch the metal parts of the cap. These
are very hot, and they may cause scalding when misused.
3. Pour out the rest of the water from the tank.
4. Insert the funnel in the tank neck and pour clean inside.
5. Screw the safety cap clockwise and tighten rmly.
6. Shake the steam cleaner intensively to release the mineral deposits at the bottom of the
tank.
7. Release the cap and pour out water.
8. Allow to dry.
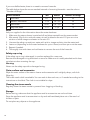
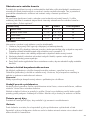
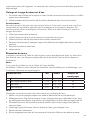
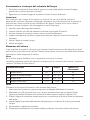
Removing limescale
Regular use of tap water can cause the mineral deposits in water to settle and limescale to form.
It must be removed depending on the water hardness and frequency of use.
Note:

12
If you use distilled water, there is no need to remove limescale.
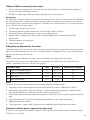
The table below shows the recommended intervals of removing limescale – see the column
“Number of llings”.
Water hardness °dH mmol/l Number of llings
ISoft water 0–7 0 – 1,3 35
II Medium hard water 7–14 1,4 – 2,5 30
III Hard water 14–21 2,6 – 3,8 25
IV Very hard water > 21 > 3,9 15
Note:
Ask your supplier for the information about the water hardness.
1. Make sure the steam cleaner is switched off and disconnected from the power socket.
2. Mix around 10g of citric acid with water, stir well to dissolve the acid. Or you can mix a
solution of white vinegar and water in the ratio 2:3.
3. Unscrew the safety cup and pour water with acid or vinegar solution into the water tank.
4. Leave on (depending on the water hardness for up to 6 hours) and then pour out the water.
5. Repeat if needed.
6. Thoroughly rinse with clean and cold water to remove the rest of the limescale.
Safety cap o-ring
If the safety cap o-ring is damaged, it must be replaced for a new one.
Remove the damaged o-ring and attach a new one. Make sure it is safely attached and it does
not obstruct when screwing the cap.
Warning:
Never use the safety cap with a damaged o-ring.
Outer surface and accessories
Wipe the outer surface of the steam cleaner and accessories with a slightly damp, soft cloth.
Wipe dry.
The brush nozzle cloth is washable. You can wash it after each use, or if needed according to the
instructions on the label. The cloth is not suitable for dryer.
Cleaning the steam nozzle
Regularly clean the steam nozzle to prevent from clogging or blocking.
Storage
Before storing, make sure that the appliance and its accessories are cool and clean.
Store the appliance and its accessories in a dry and well-ventilated place out of the reach of
children or pets.
Do not place any objects on the appliance.

13
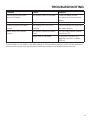
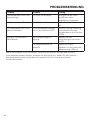
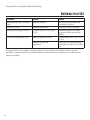
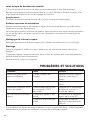
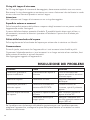
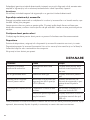
TROUBLESHOOTING
Problem Cause Solution
Insufcient pressure and
amount of steam.
The steam nozzle is blocked. Clean the steam nozzle
according to the instructions
above.
No steam. Tank is empty. Fill the water tank.
Enable to press the steam
button.
The safety lock is in LOCK
position.
Press the safety lock and then
the steam button.
Water drops from steam
output.
The steam cleaner has been
tilted.
Do not tilt the steam cleaner
more than 30°.
Water tank is overlled. Fill the tank only with the
maximum amount of water
(300 ml).
If the problem is not listed in the table above or if the problem persists, switch off the appliance,
disconnect the plug from the electrical outlet and contact an authorized service centre.

14
SICHERHEITSHINWEISE
Lesen Sie vor dem Gebrauch dieses
Benutzerhandbuch sorgfältig durch und bewahren
es für den künftigen Gebrauch auf. Der Hersteller
trägt keine Verantwortung für Schäden, die auf
eine falsche Anwendung oder die Nichtbeachtung
der in dieser Anleitung angeführten Anweisungen
zurückzuführen sind. Unsachgemäßer Gebrauch
oder Nichtbeachtung der Anweisungen führen zum
Erlöschen der Garantie. Wenn Sie die Anweisungen
nicht befolgen, riskieren Sie eine gefährliche
Situation, Verletzungen usw.
1. Dieses Gerät darf nicht von Kindern bedient werden. Bewahren Sie das Gerät und das
Netzkabel außerhalb der Reichweite von Kindern auf.
2. Dieses Gerät kann von Personen mit verminderten physischen und mentalen Fähigkeiten
oder mangelnden Erfahrungen und Kenntnissen verwendet werden, sofern diese
beaufsichtigt sind oder über die sichere Anwendung des Geräts belehrt wurden und
mögliche Gefahren verstehen.
3. Kinder dürfen nicht mit dem Gerät spielen.
4. Die Reinigung und Wartung, die durch den Benutzer durchgeführt werden, darf nicht
von Kindern durchgeführt werden..
5. Wenn das Netzteil beschädigt ist, muss es vom Hersteller, seinem Servicetechniker
oder einer ähnlich qualizierten Person ersetzt werden, um gefährliche Situationen zu
vermeiden.
6. Füllen Sie nur sauberes Wasser in das Gerät. Verwenden Sie kein Brauchwasser oder
eine andere Flüssigkeit. Das maximale Volumen beträgt 300 ml.
7. Ziehen Sie nach dem Gebrauch, vor der Reinigung oder Wartung des Geräts immer den
Stecker aus der Steckdose.
8. Flüssigkeit oder Dampf darf nicht in Richtung zum Gerät ießen, das elektrische
Komponenten enthält, wie z.B. das Innere des Backofens.
9. Die Einfüllöffnung darf während des Gebrauchs nicht geöffnet sein.
10. Schalten Sie das Gerät vor dem Einfüllen des Wassers immer zuerst aus und
ziehen Sie den Stecker aus der Steckdose. Befolgen Sie die Anweisungen in dieser
Gebrauchsanweisung. Füllen Sie niemals Wasser in das Gerät, wenn der Stecker in der
Steckdose steckt.
11. Lassen Sie das Gerät nicht unbeaufsichtigt, wenn es an das Stromnetz angeschlossen ist.
12. Das Gerät darf nicht benutzt werden, wenn es heruntergefallen ist, sichtbare Anzeichen
von Beschädigungen aufweist oder undicht ist.
13. Verhindern Sie, dass Kinder Zugang zum Gerät haben, wenn es unter Spannung steht
oder abkühlt.
14. Um ein Stromschlagrisiko zu vermeiden, dürfen Sie das Gerät, das Netzkabel oder den
Netzstecker nicht in Wasser oder andere Flüssigkeiten tauchen.
15. Dieses Gerät ist ausschließlich für den Gebrauch im Haushalt und innerhalb von

15
Gebäuden vorgesehen. Verwenden Sie es nicht im Freien.
16. Verwenden Sie das Gerät nicht in der Nähe einer Badewanne, eines Schwimmbeckens
oder eines Waschbeckens mit Wasser.
17. Das Gerät ist nicht für den Betrieb über eine externe Zeitschaltuhr oder eine
Fernbedienung vorgesehen.
18. Vergewissern Sie sich vor dem Einstecken des Netzsteckers in die Steckdose, dass
die auf dem Typenschild des Geräts angegebene Spannung mit der Spannung Ihrer
Steckdose übereinstimmt.
19. Stecken Sie den Netzstecker in eine ordnungsgemäß geerdete Steckdose. Wir
empfehlen, das Gerät an einen separaten Stromkreis anzuschließen. Verwenden Sie
keine Verlängerungskabel.
20. Stellen Sie das Gerät nicht in der Nähe von Feuer oder anderen Wärmequellen auf.
Stellen Sie das Gerät weit entfernt von Oberächen oder Gegenständen auf, die
empndlich auf Dampf oder Feuchtigkeit reagieren.
21. Lassen Sie das Netzkabel nicht über die Kante einer Arbeitsplatte oder eines Tisches
hängen. Vermeiden Sie, dass das Netzkabel nicht mit einem Elektro- oder Gaskochfeld
oder einer heißen Oberäche in Berührung kommt.
22. Verwenden Sie das Gerät nur mit dem mitgelieferten Zubehör. Die Verwendung von
Zubehör, das nicht für dieses Gerät bestimmt ist oder vom Hersteller nicht als geeignet
angegeben wurde, kann zu einer gefährlichen Situation führen.
23. Bevor Sie das Gerät an das Stromnetz anschließen, vergewissern Sie sich immer, dass es
richtig zusammengebaut ist.
24. Verwenden Sie das Gerät nicht zum Reinigen von Steckdosen, Schaltern, elektronischen
Geräten usw. Es besteht die Gefahr einer gefährlichen Situation und der Beschädigung
von Eigentum.
25. Verwenden Sie das Gerät niemals an Orten, an denen Sprengstoffe, entammbare
Stoffe usw. verwendet oder gelagert werden.
26. Berühren Sie das Gerät oder das Netzteil nicht mit nassen oder feuchten Händen.
27. Reinigen Sie das Gerät nach jedem Gebrauch. Lassen Sie das Gerät immer vollständig
abkühlen, bevor Sie es reinigen.
28. Ziehen Sie den Netzstecker aus der Steckdose und trennen Sie das Gerät vom Stromnetz,
wenn Sie es nicht benutzen, wenn es unbeaufsichtigt bleibt, bevor Sie es reinigen,
umstellen und zusammen- oder auseinanderlegen.
29. Decken Sie das Gerät nicht ab, während es in Betrieb ist.
30. Ziehen Sie das Netzkabel immer am Stecker aus der Steckdose, nicht am Netzkabel.
HINWEIS: HEISSER DAMPF.
Seien Sie besonders vorsichtig, es besteht die Gefahr von
Verbrennungen durch Dampf!
HINWEIS: HEISSE OBERFLÄCHE.
Die Oberäche erwärmt sich während des Gebrauchs. Es
besteht die Gefahr von Verbrennungen.
Ausschließlich für den Gebrauch im Haushalt und in innerhalb
von Gebäuden vorgesehen.

16
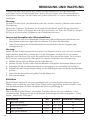
ÜBERSICHT
12
3
4
5
6
8
9
10
11
12
13 14
15
16 17
18
19
20
21
22
7

17
1 Sicherheitsverschluss
2 Einfüllöffnung
3 Gewinde zur Befestigung von Zubehör
4 Dampfdüse
5 Endstück zur Befestigung von Zubehör
6 Körper des Dampfreinigers
7 LED-Anzeige zum Einschalten des Dampfreinigers
8 Dampftaste
9 Sicherung
10 Griff
11 Netzkabel
12 LED-Bereitschaftsanzeige
13 Messbecher
14 Trichter
15 Runde Bürste
16 Endstück mit Gelenk
17 Dichtungs-O-Ringe (2 Stück)
18 Fensterabstreifer
19 Konzentrator
20 Überzug für Bürstendüse
21 Langer exibler Schlauch
22 Bürstendüse
ÜBERSICHT

18
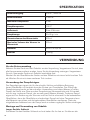
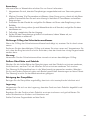
SPEZIFIKATION
Stromversorgung 230 V~, 50/60 Hz
Stromverbrauch 1 000 W
Maximaler Dampfdruck 3 bar
Dampftemperatur 100 °C
Aufheizzeit Etwa 4 Minuten
Dampfmenge 20–30 g / min
Gesamtvolumen des Wassertanks 350 ml
Maximales Volumen des Wassers im
Wassertank 250 ml
Ausmaße 30 x 13 x 23,5 cm
Gewicht 1,08 kg
VERWENDUNG
Vor der Erstverwendung
Nehmen Sie das Gerät und sein Zubehör aus der Verpackung. Vergewissern Sie sich, dass
alle Komponenten entfernt wurden, bevor Sie die Verpackung entsorgen. Vergewissern
Sie sich, dass weder Gerät noch Zubehör beschädigt sind.
Wischen Sie die Oberäche des Geräts und des Zubehörs mit einem leicht feuchten Tuch
ab. Wischen Sie sie mit einem sauberen Tuch trocken.
Verwendung des Dampfreinigers
Der Dampfreiniger eignet sich für die schnelle, übliche und effektive Reinigung
harter Oberächen im Haushalt ohne den Einsatz von Chemikalien. Das Prinzip der
Dampfreinigung beruht auf der schnellen Umwandlung von kaltem Wasser in heißen
Dampf, der durch eine Düse aus dem Dampfreiniger herausgedrückt wird. Es handelt
sich um sog. trockenen Dampf, der aus sehr wenig Wasser entsteht. Trockener Dampf
eignet sich zur Entfernung von Schmutz und Fett und ist schonend für die behandelten
Oberächen, da er die Oberäche nur befeuchtet. Dampf mit hoher Temperatur kann
alle Bakterien vernichten und die behandelten Oberächen sterilisieren. Dank der
mitgelieferten Aufsätzen kann der Dampf auch an schwer zugänglich Stellen eindringen.
Montage und Verwendung von Zubehör
Langer exibler Schlauch
Schrauben Sie den exiblen Schlauch auf und ziehen Sie ihn fest an. Sie können die

19
exiblen Schläuche allein verwenden oder auf das Endstück einen Konzentrator, eine
runde Bürste, ein Endstück mit Gelenk oder eine Bürstendüse aufsetzen, um die
Reichweite des aufgesetzten Zubehörs zu erhöhen.
Konzentrator
Schrauben Sie den Konzentrator auf und ziehen Sie ihn fest an.
Der Konzentrator bekämpft Schmutz an schwer zugänglichen Stellen, Ecken, Fugen usw.
Je näher der Konzentrator an der zu behandelnden Stelle ist, desto stärker ist die Wirkung
des Dampfes, da die Temperatur und die Dampfmenge an der Austrittsstelle die höchsten
Werte erreichen.
Sie können den Konzentrator mit der runden Bürste oder dem Endstück mit Gelenk
kombinieren, um noch bessere Ergebnisse zu erzielen.
Runde Bürste
Sie können die runde Bürste auf das Endstück des Dampfreinigers, auf das Endstück des
exiblen Schlauchs oder auf den Konzentrator aufsetzen. Vergewissern Sie sich immer,
dass sie richtig aufgesetzt ist.
Die Bürste ist zum Entfernen von anhaftendem Schmutz geeignet. Mit den Bürsten lässt
sich dieser Schmuitz besser entfernen.
Verwenden Sie die Bürste niemals zum Reinigen empndlicher oder feiner Oberächen.
Es besteht die Gefahr einer Beschädigung.
Endstück mit Gelenk
Sie können das Endstück mit Gelenk auf das Endstück des Dampfreinigers, auf das
Endstück des exiblen Schlauchs oder auf den Konzentrator aufsetzen. Vergewissern Sie
sich immer, dass es richtig aufgesetzt ist.
Das Endstück mit Gelenk eignet sich zum Entfernen von Schmutz an schwer zugänglichen
oder engen Stellen, Ecken usw.
Bürstendüse
Richten Sie zum Anbringen der Bürstendüse den weißen Punkt auf der Düse auf das
Symbol des offenen Schlosses am Dampfreiniger aus und drehen Sie dann die Düse im
Uhrzeigersinn, bis der weiße Punkt auf das Symbol des geschlossenen Schlosses zeigt.
Vergewissern Sie sich dass die Düse richtig aufgesetzt ist und sich nicht bewegt.
Die Bürstendüse eignet sich zum Entfernen von Schmutz und Staub von abwaschbaren
Oberächen im Badezimmer sowie zum Reinigen von Spiegeln und Arbeitsächen in der
Küche usw.
Setzen Sie den Überzug auf die Bürstendüse auf, wenn Sie Schmutz und Staub von
empndlichen Oberächen wie Vorhängen oder Möbeln usw. entfernen wollen.
Der Überzug ist waschbar und kann somit mehrmals verwendet werden. Seien Sie
besonders vorsichtig, wenn Sie den Überzug nach dem Gebrauch von der Düse entfernen,
da der Überzug sehr heiß ist.
Fensterabzieher
Setzen Sie den Fensterabzieher auf die Bürstendüse auf, so dass die Vorsprünge an der
Unterseite des Abziehers in die Löcher an der Unterseite der Düse passen. Befestigen Sie
dann den oberen Teil des Abziehers an der Düse, bis Sie einen Klickton hören.
Der Fensterabzieher eignet sich zum Abwischen von Dampf und Wasser von Fenstern,
Glastüren oder Fliesen.
Warnung:
Vergewissern Sie sich immer, dass der Dampfreiniger ausgeschaltet und von der

20
Stromversorgung getrennt ist, wenn Sie Zubehörteile anbringen oder entfernen. Warten
Sie vor dem Abnehmen des Zubehörs mindestens 5 Minuten, bis es abkühlt. Das Zubehör
erwärmt sich während des Gebrauchs. Es besteht Verletzungs- oder Verbrennungsgefahr
durch heißen Dampf oder Wasser. Entfernen Sie niemals Zubehör, wenn der
Dampfreiniger in Betrieb ist.
Einfüllen des Behälters
1. Stellen Sie den Dampfreiniger auf eine ebene, trockene und feste Oberäche.
2. Schrauben Sie den Sicherheitsverschluss gegen den Uhrzeigersinn ab.
3. Stecken Sie den Trichter in den Hals des Behälters und gießen Sie sauberes, kaltes Wasser
hinein. Die maximale Wassermenge im Behälter beträgt 250 ml. Dosieren Sie das Wasser mit
dem mitgelieferten Messbescher.
4. Schrauben Sie den Sicherheitsverschluss im Uhrzeigersinn an und ziehen Sie sie fest an.
Bemerkung:
Wir empfehlen die Verwendung von destilliertem Wasser, insbesondere wenn Sie sehr
hartes Wasser haben. So vermeiden Sie die Entstehung von Kalk. Füllen Sie immer nur die
maximale Wassermenge in den Behälter. Mehr Wasser im Behälter führt dazu, dass heißes
Wasser aus der Dampfdüse tropft. Wenn nicht genügend Wasser im Behälter ist, bildet
sich wenig Druck und somit wenig Dampf. Sie können die Aufheizzeit verkürzen, indem
Sie heißes Wasser verwenden.
Warnung:
Verwenden Sie den Dampfreiniger niemals mit leerem Behälter. Füllen Sie immer nur
sauberes Wasser in den Behälter.
Verwendung des Dampfreinigers
1. Befestigen Sie das erforderliche Zubehör am Dampfreiniger und prüfen Sie, ob der Behälter
mit Wasser gefüllt ist.
2. Stellen Sie den Dampfreiniger auf eine ebene, trockene und feste Oberäche und stecken
Sie den Netzstecker in eine geerdete Steckdose.
3. Die LED-Betriebsanzeige leuchtet auf und der Dampfreiniger erwärmt sich. Die Aufwärmzeit
beträgt in der Regel 4 Minuten, was jeweils abhängig von der Temperatur und dem
Wasservolumen im Behälter ist.
4. Sobald die grüne LED-Bereitschaftsanzeige zu leuchten beginnt, ist der Dampfreiniger
betriebsbereit.
5. Drücken Sie die Sicherung und dann die Dampftaste. Lösen Sie die Sicherung, und sie bleibt
in der Position OPEN. Die Dampftaste wird entriegelt und der Dampf beginnt zu ießen.
6. Der Dampfreiniger gibt so lange Dampf ab, wie Sie die Dampftaste gedrückt halten. Sobald
Sie die Taste lösen, stoppt der Dampf und die Sicherung wird automatisch in die Position
LOCK versetzt. Die Dampftaste wird blockiert.
Warnung:
Seien Sie vorsichtig, damit Sie sich nicht am heißem Dampf verbrennen.
7. Lassen Sie die Dampftaste nach dem Gebrauch los, und die Sicherung wird automatisch in
die Position LOCK versetzt. Die Dampftaste wird blockiert. Ziehen Sie den Stecker aus der
Steckdose. Lassen Sie den Dampfreiniger mindestens 5 Minuten abkühlen, bevor Sie ihn
wieder benutzen (Wasser nachfüllen, Zubehör wechseln). Lassen Sie ihn vor der Reinigung
vollkommen abkühlen.
La pagina si sta caricando...
La pagina si sta caricando...
La pagina si sta caricando...
La pagina si sta caricando...
La pagina si sta caricando...
La pagina si sta caricando...
La pagina si sta caricando...
La pagina si sta caricando...
La pagina si sta caricando...
La pagina si sta caricando...
La pagina si sta caricando...
La pagina si sta caricando...
La pagina si sta caricando...
La pagina si sta caricando...
La pagina si sta caricando...
La pagina si sta caricando...
La pagina si sta caricando...
La pagina si sta caricando...
La pagina si sta caricando...
La pagina si sta caricando...
La pagina si sta caricando...
La pagina si sta caricando...
La pagina si sta caricando...
La pagina si sta caricando...
La pagina si sta caricando...
La pagina si sta caricando...
La pagina si sta caricando...
La pagina si sta caricando...
La pagina si sta caricando...
La pagina si sta caricando...
La pagina si sta caricando...
La pagina si sta caricando...
La pagina si sta caricando...
La pagina si sta caricando...
La pagina si sta caricando...
La pagina si sta caricando...
La pagina si sta caricando...
La pagina si sta caricando...
La pagina si sta caricando...
La pagina si sta caricando...
La pagina si sta caricando...
La pagina si sta caricando...
La pagina si sta caricando...
La pagina si sta caricando...
La pagina si sta caricando...
La pagina si sta caricando...
La pagina si sta caricando...
La pagina si sta caricando...
La pagina si sta caricando...
La pagina si sta caricando...
La pagina si sta caricando...
La pagina si sta caricando...
La pagina si sta caricando...
La pagina si sta caricando...
La pagina si sta caricando...
La pagina si sta caricando...
La pagina si sta caricando...
La pagina si sta caricando...
La pagina si sta caricando...
La pagina si sta caricando...
La pagina si sta caricando...
La pagina si sta caricando...
La pagina si sta caricando...
La pagina si sta caricando...
La pagina si sta caricando...
La pagina si sta caricando...
La pagina si sta caricando...
La pagina si sta caricando...
-
 1
1
-
 2
2
-
 3
3
-
 4
4
-
 5
5
-
 6
6
-
 7
7
-
 8
8
-
 9
9
-
 10
10
-
 11
11
-
 12
12
-
 13
13
-
 14
14
-
 15
15
-
 16
16
-
 17
17
-
 18
18
-
 19
19
-
 20
20
-
 21
21
-
 22
22
-
 23
23
-
 24
24
-
 25
25
-
 26
26
-
 27
27
-
 28
28
-
 29
29
-
 30
30
-
 31
31
-
 32
32
-
 33
33
-
 34
34
-
 35
35
-
 36
36
-
 37
37
-
 38
38
-
 39
39
-
 40
40
-
 41
41
-
 42
42
-
 43
43
-
 44
44
-
 45
45
-
 46
46
-
 47
47
-
 48
48
-
 49
49
-
 50
50
-
 51
51
-
 52
52
-
 53
53
-
 54
54
-
 55
55
-
 56
56
-
 57
57
-
 58
58
-
 59
59
-
 60
60
-
 61
61
-
 62
62
-
 63
63
-
 64
64
-
 65
65
-
 66
66
-
 67
67
-
 68
68
-
 69
69
-
 70
70
-
 71
71
-
 72
72
-
 73
73
-
 74
74
-
 75
75
-
 76
76
-
 77
77
-
 78
78
-
 79
79
-
 80
80
-
 81
81
-
 82
82
-
 83
83
-
 84
84
-
 85
85
-
 86
86
-
 87
87
-
 88
88


home HM-ST-B200W Steam Cleaner Manuale utente
- Tipo
- Manuale utente
in altre lingue
Documenti correlati
Altri documenti
-
SIGURO SGR-ST-D400W Manuale utente
-
Euroflex monster SC50 Manuale utente
-
Polti Polti Vaporetto MV 60.20 Manuale utente
-
-
-
-
-
-
-