
Quick‐
start
2006/42/EG
NO
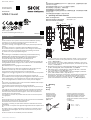
SAFETY
Power supply: Class 2
UL Environmental Rating: Enclosure type 1
8023047:
Q U I C K S T A R T d e
en
These instructions are only valid in connection with the 8023047 operating
instructions. You can find the operating instructions at www.sick.com
This variant only works with the FlexChain Host.
Connection, mounting, and configuration may only be performed by trained spe‐
cialists.
Not a safety component in accordance with the EU Machinery Directive.
Do not install the sensor in places exposed to direct sunlight or other weather
conditions unless this is expressly permitted in the operating instructions.
For outdoor use only with appropriate safeguard.
de
Diese Anleitung ist ausschließlich in Verbindung mit der Betriebsanleitung
8023046 gültig. Die Betriebsanleitung finden Sie unter www.sick.com
Diese Variante funktioniert ausschließlich mit dem FlexChain Host.
Anschluss, Montage und Einstellung nur durch Fachpersonal.
Kein Sicherheitsbauteil gemäß EU-Maschinenrichtlinie.
Installieren Sie den Sensor nicht an Orten, die direkter Sonneneinstrahlung oder
sonstigen Wettereinflüssen ausgesetzt sind, ausser dies ist in der Betriebsanlei‐
tung ausdrücklich erlaubt.
Beim Außeneinsatz nur mit geeigneter Schutzmaßnahme.
it
Le presenti istruzioni sono valide solo in abbinamento alle istruzioni per l’uso
8023047. Le istruzioni per l’uso sono disponibili su www.sick.com
Questa variante funziona esclusivamente con il FlexChain Host.
Collegamento, montaggio e regolazione solo a cura di personale tecnico specializ‐
zato.
Non è un componente di sicurezza ai sensi della direttiva macchine UE.
Non installare il sensore in luoghi esposti all’irraggiamento solare diretto o ad altri
influssi meteorologici, se non espressamente consentito nelle istruzioni per l’uso.
In caso di impiego all'esterno, utilizzare solo con misure protettive adeguate.
fr
Cette notice n’est valable qu’avec la notice d’instruction 8023047. Elle est dispo‐
nible sur le site Internet www.sick.com
Cette variante fonctionne exclusivement avec le FlexChain Host.
Confier le raccordement, le montage et le réglage uniquement au personnel qua‐
lifié.
Il ne s’agit pas d’un composant de sécurité au sens de la directive machines CE.
N’installez pas le capteur à des endroits directement exposées aux rayons du
soleil ou à d’autres conditions météorologiques, sauf si cela est explicitement
autorisé dans la notice d’instruction.
Une utilisation en extérieur est possible seulement avec les mesures de protec‐
tion appropriées.
es
Estas instrucciones solo son válidas junto con las instrucciones de uso 8023047.
Encontrará las instrucciones de uso en www.sick.com
Esta variante solo funciona con el FlexChain Host.
La conexión, el montaje y el ajuste deben efectuarlos exclusivamente técnicos
especialistas.
No se trata de un componente de seguridad según la Directiva de máquinas de la
UE.
No instale el sensor en lugares directamente expuestos a la radiación solar o a
otras influencias climatológicas, salvo si las instrucciones de uso lo permiten
expresamente.
Al usar en exterior sólo con medida de protección adecuada.
zh
本指南仅在结合使用操作指南 8023047 的情况下有效。查看操作指南可访问
www.sick.com 网页
此变型仅在结合使用 FlexChain Host 的情况下起作用。
仅允许由专业人员进行接线、安装和设置。
非欧盟机械指令中定义的安全部件。
请勿将传感器安装在阳光直射或受其它气候影响的位置,除非操作指南中明确
允许这一行为。
只有采取合适的保护措施才允许在户外应用。
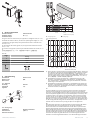
1 Operating and status indicators
Bedien- und Anzeigeelemente Elementos de mando y visualización
Elementi di comando e di visualizzazione 操作及显示元件
Éléments de commande et d'affichage
21 (0.83)
0.5
(0.02)
3 (0.12)
12 (0.47)
18.3 (0.72)
9.7 (0.38)
0.5
(0.02)
25.4 (1.0)
9.7
(0.38)
7.6
(0.3)
2.8
(0.11)
28.5 (1.12)
31.5 (1.24)
11.4
(0.45)
1
6
2
3
4 5
1
Center of optical axis, sender /Mitte Optikachse, Sender / Centro asse ottico
trasmettitore / Centre de l’axe optique émetteur / Centro del eje óptico del
emisor / 发射器光轴中心
2
Center of optical axis, receiver / Mitte Optikachse, Empfänger / Centro asse
ottico ricevitore / Centre de l’axe optique récepteur / Centro del eje óptico del
receptor / 接收器光轴中心
3
M3 threaded mounting hole / Befestigungsgewinde M3 / Filettatura di serrag‐
gio M3 / Taraudage M3 / Rosca de fijación M3 / 安装螺纹 M3
4
LED indicator green / Anzeige-LED grün /Indicatore LED verde / LED d’état
verte / LED indicador verde / 绿色 LED 指示灯
5
LED indicator yellow / Anzeige-LED gelb / Indicatore LED giallo / LED d’état
jaune / LED indicador amarillo / 黄色 LED 指示灯
6
Potentiometer: adjusting the sensing range / Potentiometer: Einstellung des
Schaltabstands / Potenziometro: impostazione della distanza di lavoro /
Potentiomètre : réglage de la distance de commutation / Potenciómetro:
ajuste de la distancia de conmutación / 电位计:用于调节触发感应距离
2 Mounting
Montage Montaje
Montaggio 安装
Montage
Tightening torque
Anzugsdrehmoment
Coppia di serraggio
Couple de serrage
Par de apriete
拧紧力矩
Ambient temperature in operation
Umgebungstemperatur im Betrieb
Temperatura ambiente nell'esercizio
Température ambiante en service
Temperatura ambiente durante el funcio‐
namiento
运行环境温度
< 0,4 Nm
–25°C ... +55 °C
–13°F ... +131 °F
8023045.12E8 / 2019-01-11/de GTB6-C Guest | SICK 1
8023045.12E8 / 2019-01-11
www.sick.com
GTB6-C Guest
SICK AG
E
rwin-Sick
-Straße 1
D-79183 Waldkirch

3 Electrical installation
Elektrische Installation Instalación eléctrica
Installazione elettrica 电气安装
Installation électrique
The guests must be connected to port A/port B in a voltage-free state (U
V
= 0 V).
Anschluss der Guests an Port A / Port B muss spannungsfrei erfolgen (U
v
= 0 V).
Il collegamento dei guest alla porta A/porta B deve avvenire in assenza di ten‐
sione (U
V
= 0 V).
Le raccordement des invités (guests) au port A/port B doit s’effectuer hors ten‐
sion (U
v
= 0 V).
La conexión de los guests al puerto A/puerto B debe realizase sin tensión (V
S
= 0
V).
必须在无电压状态(U
V
= 0 V)下连接端口 A/端口 B 上的客设备。
3.1 DC
GTB6-C
1 CAN-High
2 CAN-Low
3 12 V
out
4 GND
2
1
4
3
4 Commissioning
Inbetriebnahme Puesta en servicio
Messa in servizio 调试
Mise en service
4.1 Alignment
Ausrichtung Alineación
Orientamento 校准
Alignement
L
D
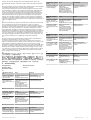
4.2 Sensing range
Schaltabstand Distancia de conmutación
Distanza di lavoro 感应距离
Distance de commutation
–
+
x
+~
15 %
y
0 200
(7.87)
100
(3.94)
300
(11.81)
140 200
250
Sensing range max. Sensing range
5 35 140
7 35
14001 53
Distance in mm (inch)
500
(1.97)
100
(3.94)
150
(5.91)
200
(7.87)
250
(9.84)
300
(11.81)
Distance in mm (inch)
25
20
10
5
0
15
% of sensing distance
3
2
1
18%/90%
6%/90%
90%/90%
1
Object with 90 % remission (based on standard white DIN 5033) / Tastgut mit
90 % Remission (bezogen auf Standard-Weiß DIN 5033) / Oggetto con il 90%
di remissione (riferito al bianco standard DIN 5033) / Objet avec 90 % de
réémission (par rapport au blanc standard selon DIN 5033) / Material con un
90% de reflexión (sobre el blanco estándar según DIN 5033) / 具有 90 % 反
射比的扫描对象(指 DIN 5033 规定的标准白)
2
Schaltabstand auf grau, 18% Remission / Schaltabstand auf grau, 18%
Remission / Schaltabstand auf grau, 18% Remission / Schaltabstand auf
grau, 18% Remission / Schaltabstand auf grau, 18% Remission / Schaltab‐
stand auf grau, 18% Remission
2
Schaltabstand auf schwarz, 6% Remission / Schaltabstand auf schwarz, 6%
Remission / Schaltabstand auf schwarz, 6% Remission / Schaltabstand auf
schwarz, 6% Remission / Schaltabstand auf schwarz, 6% Remission / Schalt‐
abstand auf schwarz, 6% Remission
en
The green LED lights up once the sensor has been connected to the FlexChain
host. Perform an AutoAssign on the FlexChain host, the sensor is recognized.
The sensor is optimally aligned with the object by swiveling the sensor horizontally
and vertically. When aligned correctly, the yellow LED lights up continuously. Turn
the potentiometer to the minimum sensing distance, then increase the sensing
distance setting until the LED indicator lights up. Increase the sensing distance
setting a little further to ensure reliable detection. Remove the object. The yellow
LED goes out, meaning the background is not detected. If the yellow LED remains
lit, the sensing distance setting must be reduced and/or the application must be
checked. Then test the function by moving an object into the light beam.
de
Nach Anschluss des Sensors am FlexChain Host leuchtet die grüne LED. Führen
Sie am FlexChain Host einen AutoAsign durch, der Sensor wird erkannt.
Durch horizontales und vertikales Schwenken wird der Sensor optimal auf das
Objekt ausgerichtet. Bei optimaler Ausrichtung leuchtet die gelbe LED konstant.
Drehen Sie den Potentiometer auf minimale Tastweite, dann die Einstellung der
Tastweite solange höher drehen bis die Anzeige LED leuchtet. Die Einstellung der
Tastweite etwas weiter erhöhen um eine sichere Detektion zu gewährleisten. Ent‐
fernen Sie das Objekt, die gelbe LED erlischt, d.h. der Hintergrund wird nicht
detektiert. Leuchtet die gelbe LED weiterhin, muss die Einstellung der Tastweite
8023045.12E8 / 2019-01-11/de GTB6-C Guest | SICK 2

reduziert werden, bzw. die Applikation muss überprüft werden. Testen Sie
anschließend die Funktion, indem Sie ein Objekt in den Lichtstrahl verschieben.
it
Dopo aver collegato il sensore al FlexChain Host, il LED verde si accende. Eseguire
un AutoAsign sul FlexChain Host, il sensore viene riconosciuto.
Il sensore può essere allineato in modo ottimale all'oggetto muovendolo in dire‐
zione orizzontale e verticale. In caso di allineamento ottimale, il LED giallo resta
acceso in modo fisso. Ruotare il potenziometro sulla distanza di rilevamento
minima, quindi aumentare gradualmente l'impostazione della distanza di rileva‐
mento finché il LED non si accende. Incrementare leggermente l'impostazione
della distanza di rilevamento per garantire un rilevamento sicuro. Rimuovere
l'oggetto; se il LED giallo si spegne lo sfondo non viene rilevato. Se il LED giallo
resta acceso, è necessario ridurre l'impostazione della distanza di rilevamento o
controllare l'applicazione. Verificare quindi il corretto funzionamento spostando un
oggetto nel raggio luminoso.
fr
Après le raccordement du capteur à l'hôte FlexChain, la LED verte s’allume. Effec‐
tuez un AutoAssign au niveau de l'hôte FlexChain, le capteur est détecté.
En le pivotant horizontalement et verticalement, le capteur est aligné de façon
optimale sur l’objet. Lorsque l’alignement est correct, la LED jaune est allumée en
permanence. Tournez le potentiomètre sur la distance de détection minimale,
ensuite augmenter le réglage de la distance de détection jusqu’à ce que l’affi‐
chage LED s’allume. Augmenter un peu plus le réglage de la distance de détection
afin d’assurer une détection fiable. Retirez l’objet, l’affichage LED jaune s’éteint,
c.à.d. que l’arrière-plan n’est pas détecté. Si la LED jaune est toujours allumée, il
faut réduire le réglage de la distance de détection ou contrôler l’application. Tes‐
tez ensuite le fonctionnement en déplaçant un objet dans le faisceau.
es
Al conectar el sensor en el FlexChain Host el LED se ilumina verde. Realice un
AutoAsign en el FlexChain Host, se reconoce el sensor.
Con el giro horizontal y vertical se alinea el sensor óptimamente respecto al
objeto. Con alineación óptima el LED se ilumina amarillo de modo constante. Gire
el potenciómetro al alcance de detección mínimo, a continuación ir girando
aumentando el alcance de detección hasta que se ilumine el indicador LED. Para
garantizar una detección segura, seguir aumentando ligeramente el alcance de
detección. Retire el objeto, el LED indicador amarillo se apaga, es decir el fondo
no se detecta. Si continua encendido el LED amarillo, se deberá reducir el ajuste,
o bien comprobar la aplicación. A continuación compruebe la función despla‐
zando un objeto hacia el haz de luz.
zh
将传感器连接到 FlexChain 主机之后,绿色 LED 亮起。请在 FlexChain 主机
上执行自动分配,传感器将被识别。
通过水平和垂直转动,将传感器准确对准物体。当准确对准时,黄色 LED 持
续亮起。将电位计旋至最小检测距离,然后提高检测距离设定,直到 LED 指
示灯亮起。稍稍继续提高检测距离设定,以确保检测可靠。如果移除物体,则
黄色 LED 将熄灭,即不会检测到背景。如果黄色 LED 继续亮起,则应降低扫
描距离设定,或者检查应用情况。随后将物体移入光束,以测试功能。
5 Troubleshooting
Störungsbehebung Resolución de problemas
Eliminazione difetti 故障排除
Élimination des défauts
en
LED indicator/fault pat‐
tern
Cause Measures
Yellow LED of the GTB6-C
lights up, no object in the
path of the beam.
The sensing range distance is
too large
Hintergrundeinfluss ist zu groß.
Check application
Reduce the sensing range
Yellow LED of the GTB6-C
does not light up, an
object is in the path of the
beam.
Object is too small or the beam
is being reflected and diverted
away from it.
Remission capability of the
object is insufficient
Distance between the sensor
and the object is too long or
sensing range is set too short
Check application
Increase the sensing range
de
Anzeige-LED / Fehlerbild Ursache Maßnahme
gelbe LED des GTB6-C
leuchtet, kein Objekt im
Strahlengang
Schaltabstand ist auf zu gro‐
ßen Abstand eingestellt
Hintergrundeinfluss ist zu groß.
Applikation prüfen
Schaltabstand verringern
Gelbe LED des GTB6-C
leuchtet nicht, Objekt ist
im Strahlengang
Objekt zu klein.
Remissionsvermögen des
Objektes ist zu gering
Abstand zwischen Sensor und
Objekt ist zu groß oder Schalt‐
abstand ist zu gering einge‐
stellt
Applikation prüfen
Schaltabstand vergrößern
it
Indicatore LED / figura di
errore
Causa Provvedimento
Il LED giallo di GTB6-C è
acceso, nessun oggetto
nella traiettoria del raggio.
La distanza di lavoro è impo‐
stata a una distanza eccessiva
Hintergrundeinfluss ist zu groß.
Controllare l'applicazione
Diminuire la distanza di com‐
mutazione
Indicatore LED / figura di
errore
Causa Provvedimento
Il LED giallo di GTB6-C non
è acceso, oggetto nella
traiettoria del raggio.
L’oggetto è troppo piccolo o
viene riflesso.
Il fattore di riflessione
dell'oggetto è troppo basso
La distanza tra sensore e
oggetto è troppo grande o la
distanza di commutazione ha
un'impostazione troppo bassa
Controllare l'applicazione
Aumentare la distanza di com‐
mutazione
fr
LED d'état / image du
défaut
Cause Mesure
La LED jaune du GTB6-C
s’allume , pas d’objet
dans la trajectoire du fais‐
ceau.
La distance de commutation
est réglée sur une distance
trop grande
Hintergrundeinfluss ist zu groß.
Vérifier l'application
Réduire la portée
La LED jaune du GTB6-C
ne s’allume pas, objet
dans la trajectoire du fais‐
ceau.
Objet trop petit ou il est
contourné.
Le pouvoir réfléchissant de
l'arrière-plan est trop faible
La distance entre le capteur et
l'objet est trop grande ou la
portée est trop faible
Vérifier l'application
Augmenter la portée
es
LED indicador / imagen
de error
Causa Acción
El LED amarillo del GTB6-
C se ilumina, no hay
ningún objeto en la trayec‐
toria del haz.
La distancia de conmutación
está ajustada a una distancia
excesiva
Hintergrundeinfluss ist zu groß.
Comprobar la aplicación
Reducir la distancia de conmu‐
tación
El LED amarillo del GTB6-
C no se ilumina, el objeto
se encuentra en la trayec‐
toria del haz.
El objeto es demasiado
pequeño o provoca reflexión.
La capacidad de remisión del
objeto es insuficiente
La distancia entre el sensor y el
objeto es excesiva o la distan‐
cia de conmutación ajustada
es insuficiente
Comprobar la aplicación
Aumentar la distancia de con‐
mutación
zh
LED 指示灯 / 故障界面 原因 措施
GTB6-C 的黄色 LED 亮
起,光路中无物体。
触发感应距离设置过大
Hintergrundeinfluss ist zu
groß.
检查应用
降低开关距离
GTB6-C 的黄色 LED 未亮
起,光路中有物体。
物体过小或光线被反射。
物体的反射能力过低
传感器和物体之间的间距过大或
开关距离设置的过小
检查应用
增大开关距离
8023045.12E8 / 2019-01-11/de GTB6-C Guest | SICK 3
-
 1
1
-
 2
2
-
 3
3


in altre lingue
- English: SICK GTB6-C
- français: SICK GTB6-C
- español: SICK GTB6-C
- Deutsch: SICK GTB6-C
Documenti correlati
-
SICK GL6-C Guest Quickstart
-
-
-
-
-
-
-