
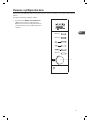
L20GSS10E
STAINLESS STEEL MICROWAVE WITH GRILL
INSTRUCTION MANUAL
GB
FORNO A MICROONDE D’ACCIAIO INOSSIDABILE CON GRILL
MANUALE DI ISTRUZIONI
NEREZOVÁ MIKROVLNNÁ TROUBA S GRILEM
NÁVOD
MIKROVLNNÁ RÚRA Z NEHRDZAVEJÚCEJ OCELE S GRILOM
NÁVOD NA OBSLUHU
IT
CZ
SK

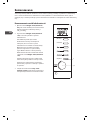
Contents
GB
Unpacking .........................................................................................................3
Product Overview ..............................................................................................4
Using Aluminium Foil in Your Microwave ..........................................................5
Getting Ready ...................................................................................................6
Introducing Microwave Cooking ........................................................................7
Cooking with a Microwave .........................................................................7
Checking your Cooking Utensils .................................................................8
Microwave Heating Categories ...................................................................9
Steam ......................................................................................................10
Condensation ...........................................................................................10
Checking your Microwave ........................................................................10
Clock Setting ...................................................................................................11
Setting the Child Lock .....................................................................................12
Microwave Cooking .........................................................................................13
Grill or Combination Cooking...........................................................................14
Delay Start Cooking (Programme Set in Advance) ...........................................16
Auto Cooking ...................................................................................................17
Quick Start Cooking .........................................................................................19
Defrosting .......................................................................................................20
Defrost by Weight ....................................................................................20
Querying the Cooking Function .......................................................................21
Cleaning your microwave ................................................................................22
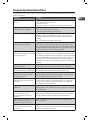
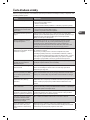
Frequently Asked Questions ............................................................................23
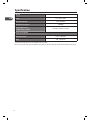
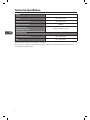
Specication ...................................................................................................24
Safety First! .....................................................................................................91
Indice
IT
Disimballaggio ................................................................................................25
Panoramica del prodotto .................................................................................26
Uso della pellicola d’alluminio nel forno a microonde .....................................27
Operazioni preliminari ....................................................................................28
Introduzione alla cottura al microonde ...........................................................29
Cucinare con il forno a microonde ............................................................29
Controllo degli utensili usati per la cucinare .............................................30
Categorie di cottura al microonde ............................................................31
Vapore .....................................................................................................32
Condensa .................................................................................................32
Pulizia del forno a microonde ..................................................................32
Impostazione dell’orologio ..............................................................................33
Impostazione del blocco per i bambini ............................................................34
Cottura al microonde .......................................................................................35
Cottura grill o combinata ................................................................................36
Avvio ritardato della cottura (programma impostato in anticipo) ...................38
Cottura automatica .........................................................................................39
Cottura rapida .................................................................................................41
Scongelamento ...............................................................................................42
Scongelamento a peso .............................................................................42
Controllo della funzione di cottura ..................................................................43
Pulizia del forno a microonde ..........................................................................44
FAQ ..................................................................................................................45
Speciche tecniche..........................................................................................46
Prima la sicurezza! ..........................................................................................92
Obsah
CZ
Vybalování ......................................................................................................47
Přehled výrobku ..............................................................................................48
Použití hliníkové fólie v mikrovlnné troubě .....................................................49
Příprava...........................................................................................................50
Představení vaření v mikrovlnné troubě ..........................................................51
Vaření s mikrovlnnou troubou ..................................................................51
Kontrola kuchyňského náčiní ...................................................................52
Kategorie mikrovlnného ohřevu ..............................................................53
Pára .........................................................................................................54
Kondenzace .............................................................................................54
Kontrola mikrovlnné trouby .....................................................................54
Nastavení hodin ..............................................................................................55
Nastavení dětského zámku .............................................................................56
Mikrovlnné vaření ...........................................................................................57
Gril nebo kombinované vaření ........................................................................58
Vaření s prodlevou (program nastavený předem) ............................................60
Automatické vaření .........................................................................................61
Rychlé zahájení vaření.....................................................................................63
Rozmrazování .................................................................................................64
Rozmrazování podle hmotnosti ...............................................................64
Dotazy na funkci vaření ...................................................................................65
Čištění mikrovlnné trouby ...............................................................................66
Často kladené dotazy ......................................................................................67
Technické údaje ...............................................................................................68
Bezpečnost především! ...................................................................................93
Obsah
SK
Rozbalenie ......................................................................................................69
Prehľad výrobku ..............................................................................................70
Používanie hliníkovej fólie v mikrovlnnej rúre .................................................71
Príprava...........................................................................................................72
Úvod do mikrovlnného varenia .......................................................................73
Varenie pomocou mikrovlnného žiarenia .................................................73
Kontrola riadov na varenie .......................................................................74
Kategórie mikrovlnného ohrevu ..............................................................75
Para .........................................................................................................76
Kondenzácia ............................................................................................76
Kontrola mikrovlnnej rúry ........................................................................76
Nastavenie hodín ............................................................................................77
Nastavenie rodičovského zámku .....................................................................78
Mikrovlnné varenie .........................................................................................79
Grilovanie alebo kombinované varenie ...........................................................80
Varenie s oneskoreným štartom (nastavenie programu v predstihu) ...............82
Automatické varenie .......................................................................................83
Varenie s rýchlym štartom...............................................................................85
Rozmrazovanie ................................................................................................86
Rozmrazovanie na základe hmotnosti .....................................................86
Otázka ohľadne funkcie varenia ......................................................................87
Čistenie mikrovlnnej rúry ................................................................................88
Často kladené otázky.......................................................................................89
Technické špecikácie .....................................................................................90
Bezpečnosť je na prvom mieste! .....................................................................94

3
GB
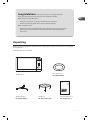
Congratulations on the purchase of your new Logik Microwave.
These operating instructions will help you use it properly and safely.
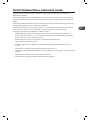
Before using your Logik Microwave
• Read these instructions carefully and retain for future reference.
• Remove all packaging labels. Please dispose of them properly.
Before calling for service
• Review the section on Troubleshooting. This will help you to solve some general
problems by yourself and reduce the need to ask for the help of professional
technicians.
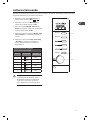
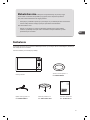
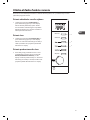
Unpacking
Remove all packaging from the unit. Retain the packaging. If you dispose of it please do so according to
local regulations.
The following items are included:
The Main Unit
Glass Turntable x 1
P.N.: XGALK20MBP11
Turntable Ring x 1
P.N.: XGALK20MBP12
Grill Rack x 1
P.N.: XGALL20GSS10P41
Instruction Manual x 1
P.N.: L20GSS10E-001
Microwave
Grill/Combi
Stop/Clear

4
GB
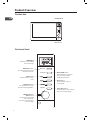
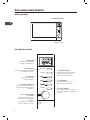
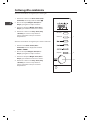
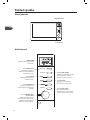
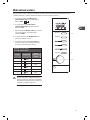
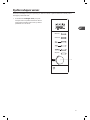
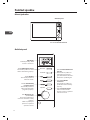
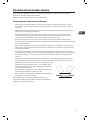
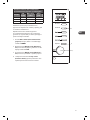
Product Overview
The Main Unit
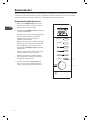
The Control Panel
Control Panel
LED Display
Shows the clock, cooking
time and setting.
Microwave button
Use this button to select the
microwave function.
Clock button
Use this button to set the
clock.
Auto Cook button
Use this button to choose
the auto menu programmes.
Weight / Time dial
(Start button)
Use this dial to set weight
and cooking time.
It can also be used to start /
restart cooking.
Grill / Combi button
Use this button to select the
grill, microwave and grill
combination function.
Preset button
Use this button to preset
cooking time.
Stop / Clear button
Use this button to stop cooking
and clear cooking settings.
Door button
Microwave
Grill/Combi
Stop/Clear
Microwave
Grill/Combi
Stop/Clear

5
GB
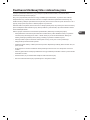
Using Aluminium Foil in your Microwave
It is safe to use aluminium foil in your microwave as long as you follow these safety guidelines.
As with all metal, microwave energy cannot pass through foil, but provided that you keep the foil
away from the side of the microwave it will not cause sparks and there will not be any damage to your
microwave.
Using foil is a good way of shielding parts of food that you do not want to cook as quickly as others –
perhaps where the food is narrower and would otherwise overcook.
Place the foil over the area you want to shield, taking care that the foil will not touch the sides of the
microwave when the turntable rotates. Only use one piece of foil at a time so that you do not get sparks
between the separate pieces.
Follow these guidelines when using foil in your microwave:
• Remove foil lids from containers before using in the microwave. Some lids are made of card with a foil
covering – these should be removed too. Use a microwave safe transparent lid if possible.
• Stir food during cooking if the container has a lid or film cover.
• Always use the glass turntable.
• Use shallow containers with a large surface area. Do not use containers that are more than 1.25in
(3.5cm) deep.
• Use gloves when handling hot foil containers.
• Do not completely cover food with foil. The microwave energy cannot pass through the foil so the food
will not cook.
• Do not let aluminium foil touch the inside of the microwave.
• Do not use more than one piece of foil in the microwave at the same time.

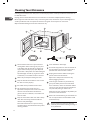
6
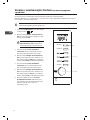
GB
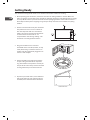
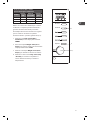
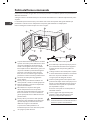
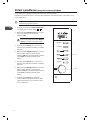
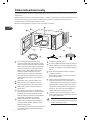
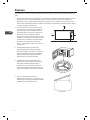
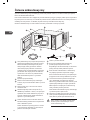
2. Choose a flat work surface for your microwave
away from heat sources such as radiators or
fires and away from cold areas. You should
allow a 10cm space all around the microwave
and 30cm above so that warm air can
escape from the vents during cooking – This
microwave is not designed to be built in.
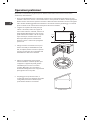
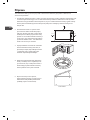
Getting Ready
This microwave is designed for home use. It should not be used for commercial catering.
1. After unpacking your microwave, check that it has not been damaged whilst in the box. Make sure
there are no dents, and the door closes properly. A damaged microwave could allow microwave energy
to escape. Make sure that you have taken out all of the packaging from the inside of the microwave.
Please dispose of the plastic wrappings/ bags safely and keep out of the reach of babies and young
children.
3. Plug your microwave into a standard
household electrical socket (230 volt, 13 amp
rated). Avoid using a socket that also has an
adaptor and other equipment plugged in. Do
not use a multi adaptor.
4. Put the turntable ring inside the microwave
and place the glass turntable on top of the
ring. The turntable is shaped to sit securely on
the spindle. You must always use the turntable
and ring whenever you use the microwave.
Underside View
30cm
10cm10cm
Microwave
Grill/Combi
Stop/Clear
5. To protect your work surface, we recommend
that you fix some non-slip cushion pads (not
included) to the underside of the microwave.

7
GB
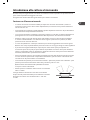
Introducing Microwave Cooking
Always remember the basic safeguards you should follow when using any cooking equipment or handling
hot food.
See below for basic guidelines in microwave cooking.
Cooking with a Microwave
• Cooking with a microwave is much faster than conventional cooking and, whilst you should make sure
that food is fully cooked, you should be careful not to overcook it.
• Microwave energy can heat unevenly so stirring to distribute heat is very important. Always stir from
the outside, inwards.
• If you are cooking a number of individual foods at the same time, such as baked potatoes or small
cakes, arrange them evenly on the turntable so that they cook evenly. Never stack food in your
microwave.
• Turn larger foods such as meat roasts and poultry during cooking so that the top and bottom cook
evenly. It is also recommended to turn pieces of meat or poultry, especially if they have not been
deboned.
• Meat and poultry which is cooked for 15 minutes or more will brown lightly in it’s own fat. Anything
cooked for a shorter time can be brushed with a browning sauce to give an appetising colour.
• Strips of aluminium foil can be used to cover the thinner pieces of food to stop them overcooking
before the thicker parts of the food have had a chance to cook. Use the foil sparingly and wrap around
the food or container carefully to stop it touching the inside of the microwave which could cause
sparks.
• Microwave cook food using microwave energy that is similar to naturally occurring radio waves.
Normally, these “waves” would fade as they dispersed into the atmosphere but in a microwave they are
concentrated onto food causing it to heat up.
• Microwave energy cannot pass through metal – so it cannot escape from inside your microwave – but
it can pass through materials like glass, porcelain, plastic and paper.
These materials are used in the manufacture of microwave safe
cooking equipment.
• Microwave safe cooking equipment will still get hot as the food
it contains heats up.
The microwave energy focuses on the moisture in the food
causing lots of tiny vibrations. The vibrations get so great that the
moisture – and the food – heat up.

8
GB
Checking your Cooking Utensils
Most heat-resistant, non-metallic cooking utensils are safe to use in your microwave. If you are not sure if
you can use a utensil in your microwave, follow this simple test:
1. Put the utensil into the microwave next to a cup of water – use a cup that you know is microwave safe.
Close the door.
2. Turn the microwave on for 30 seconds only.
3. After 30 seconds, carefully check to see if the water has warmed up.
4. If the water has not warmed up but the utensil has, the utensil is not microwave safe and should not be
used in the microwave.
5. Do not use your hands to touch the utensils as it may already be hot.

9
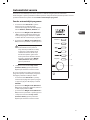
GB
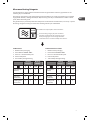
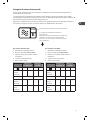
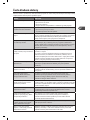
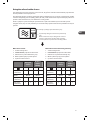
Microwave Heating Categories
Your microwave has been tested and labelled to meet the government’s voluntary agreement on the
reheating of pre-cooked food.
The heating characteristics and output power levels of microwave are usually calculated using a relatively
large portion of food (a 1000 gram load, IEC 705) but many packs of pre-cooked food are sold in smaller
packs, often about 350 grams.
The government, in partnership with food companies and microwave manufacturers, have set up a system
of heating categories to help you choose the reheating time for pre-cooked food.
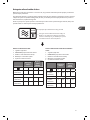
800W
E
800W is the output power of the microwave.
E is the heating category for your microwave.
Check the cooking times for category E on the
food’s packaging to see how long it should be
cooked for. Please see below example for reference.
To Microwave:
1. Remove outer packaging.
2. Pierce film lid SEVERAL TIMES.
3. Place on a microwaveable plate.
4. Heat on full power.
5. Turn halfway through heating.
Heating
Category
Wattage
(IEC705)
B D 650W 750W
Full power (in
minutes)
2 2 2 2
Turn Turn Turn
Full power
(in minutes)
2 1.5 2 1.5
Standing time
(in minutes)
1 1 1 1
To Microwave from frozen:
1. Remove outer packaging.
2. Pierce film lid SEVERAL TIMES.
3. Place on a microwaveable plate.
4. Heat on full power.
5. Turn halfway through heating.
Heating
Category
Wattage
(IEC705)
B D 650W 750W
Full power (in
minutes)
3 2.5 3 2.5
Turn Turn Turn
Full power
(in minutes)
4 3.5 4 3.5
Standing time
(in minutes)
1 1 1 1

10
GB
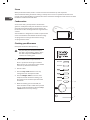
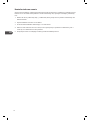
Steam
When you microwave food, steam is created as water in the food heats up and evaporates.
The steam formed during microwave cooking is entirely safe. It has to escape from the microwave to
prevent pressure from building up inside the microwave. It does this through the vents on the back of the
microwave and from around the door.
Condensation
As the steam cools, you may find the condensation
gathers in small pools inside your microwave and on the
work surface beneath the door and vents. Always dry
the microwave after cooking foods with a high moisture
content.
Your microwave is designed to let steam escape from the
vents and around the door without microwave energy
escaping. There is no danger of microwave energy
escaping with the steam.
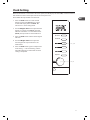
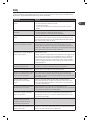
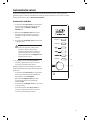
Checking your Microwave
Check your microwave after unpacking.
For your safety, the microwave stops if
the door is opened during cooking. Close
the door and press the Start button to
continue the cooking cycle.
1. Press the Door button to open the door.
Place a cup of water on the glass turntable.
Make sure the cup is microwave safe (it should
not have any decorative metal trim).
2. Close the door.
3. Press the Stop / Clear button to clear any
settings that have already been made.
4. Press the Weight / Time dial once to start a
simple 30-second microwave cooking cycle.
This allows you to check the operation of the
microwave.
5. When the cooking cycle has finished, the
water should be hot (be careful when you take
the cup out of the microwave). Press the Stop
/ Clear button to clear any settings.
3, 5
4
1
Microwave
Grill/Combi
Stop/Clear
Microwave
Grill/Combi
Stop/Clear

11
GB
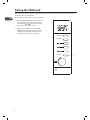
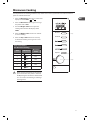
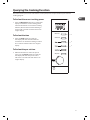
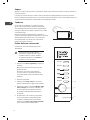
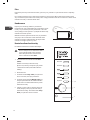
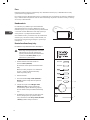
Clock Setting
When the microwave is connected to the mains power, the LED display will show 1:01, and the microwave
will sound once. Please ensure you have set the clock prior to use.
Please follow the steps below to set the clock.
1. Press the Clock button once and the LED
display will also show Hr:12. Press it again
and the LED display will show Hr:24. This
indicate it is in clock setting mode.
2. Turn the Weight / Time dial to adjust the hour
figures. For 12-hour clock (Hr:12), the input
time has to be within 1-12. For 24-hour clock
(Hr:24), the input time has to be within 0-23.
3. Press the Clock button and the minute figures
will flash.
4. Turn the Weight / Time dial to adjust the
minute figures. The input time has to be
within 00-59.
5. Press the Clock button again to complete the
clock setting. “ : ” will start flashing and the
time will illuminate to confirm that the clock
setting is completed.
Microwave
Grill/Combi
Stop/Clear
1, 3, 5
2, 4

12
GB
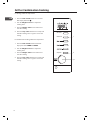
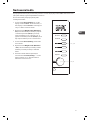
Setting the Child Lock
This feature prevents the electronic operation of the microwave by locking the operation of the control
panel until you have cancelled it.
Please follow the steps below to set the child lock.
1. Press the Stop / Clear button for 3 seconds
and microwave will sound. The LED display
will also show
to indicate that the
microwave has set the child lock.
2. To release the child lock, press the Stop
/ Clear button again for 3 seconds and the
microwave will sound to indicate that the
microwave has released the child lock.
1, 2
Microwave
Grill/Combi
Stop/Clear

13
GB
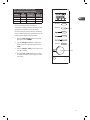
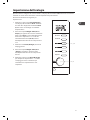
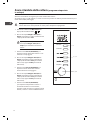
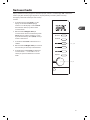
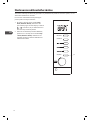
Microwave Cooking
For simple Microwave Cooking, follow the steps below. For instance, If you want to use 80% microwave
power to cook for 20 minutes.
1. Press the Microwave button once and the LED
display will show 100%,
and .
2. Press the Microwave button again to change
the power level to 80%.
3. Turn the Weight / Time dial to adjust the
cooking time until the LED display shows
20:00.
4. Press the Weight / Time dial once to confirm
and start cooking.
5. Press the Stop / Clear button once to stop
and hold the cooking. Press again to cancel
the setting.
Power Level Control
(For Microwave Cooking)
Order LED Display
Microwave
Power
1
100%
100%
2
80%
80%
3
60%
60%
4
40%
40%
5
20%
20%
6
00%
00%
When removing food from the microwave,
please ensure that the power is switched
off. Operating the microwave without food
in it can result in overheating and damage
the magnetron.
5
3, 4
1, 2
Microwave
Grill/Combi
Stop/Clear

14
GB
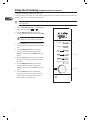
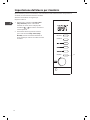
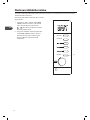
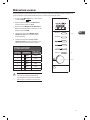
Grill or Combination Cooking
For Grilling, follow the steps below.
1. Press the Grill / Combi button once and the
LED display will show
.
2. Turn the Weight / Time dial to adjust the
cooking time.
3. Press the Weight / Time dial to confirm and
start the cooking.
4. Press the Stop / Clear button once to stop and
hold the cooking. Press it again to cancel the
setting.
For Combination Cooking, follow the steps below.
1. Press the Grill / Combi button till the LED
display will show COMB1 or COMB2.
2. Turn the Weight / Time dial to adjust the
cooking time.
3. Press the Weight / Time dial to confirm and
start the cooking.
4. Press the Stop / Clear button once to stop and
hold the cooking. Press it again to cancel the
setting.
1
4
2, 3
Microwave
Grill/Combi
Stop/Clear

15
GB
Grill / Combination Button Control
(For Grill and Combination Cooking)
Order
LED
Display
Microwave
Power
Grill
Power
1 G 0% 100%
2 C-1 30% 70%
3 C-2 55% 45%
Please note there are only 2 modes of
combination cooking and their microwave and
grill powers are shown in the table above.
For instance: If you want to do 55% microwave
power and 45% grill power cooking (C-2) for 10
minutes, please follow the steps below.
1. Press the Grill / Combi button till the LED
display will show COMB2.
2. Turn the Weight / Time dial to adjust the
cooking time until the LED display shows
10:00.
3. Press the Weight / Time dial to confirm and
start the cooking.
4. Press the Stop / Clear button once to stop
and hold the cooking. Press again to cancel
the setting.
4
2, 3
1
Microwave
Grill/Combi
Stop/Clear

16
GB
Delay Start Cooking (Programme Set in Advance)
For Delay Start Cooking, follow the steps below.
For instance: The current time is 7 o’clock (morning) and you want to cook with 100% microwave power for
5 minutes at 6 o’clock and 30 minutes (afternoon).
Defrost programme cannot be set in Delay Start Cooking. Ensure the door is closed prior to setting
the programme.
1. Press the Microwave button once and the LED
display will show 100%,
and .
2. Turn the Weight / Time dial to adjust the
cooking time until the LED display shows 5:00.
Do not press the Weight / Time dial to
confirm and start cooking at this point.
3. Press the Preset button to preset the starting
time for the cooking. The hour figure will flash
first.
4. Turn the Weight / Time dial to adjust the
starting time until the LED display shows
6:00 (for 12-hour clock) or 18:00 (for 24-hour
clock).
5. Press the Preset button to preset the starting
time for the cooking. The minute figure will
flash first.
6. Turn the Weight / Time dial to adjust the
starting time until the LED display shows
6:30 (for 12-hour clock) or 18:30 (for 24-hour
clock).
7. Press the Preset button to complete the
setting. The microwave will sound when the
count down reaches the starting time and
cooking will start automatically.
1
3, 5, 7
2, 4, 6
Microwave
Grill/Combi
Stop/Clear

17
GB
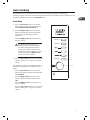
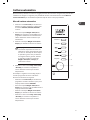
Auto Cooking
This feature allows you to cook most of your food based on the food category and the weight.
Select the category and choose the default weight of the food. For quick reference of the cooking time and
the default weight, please refer to the Auto Menu table.
Auto Menu
1. Press the Auto Cook button to select Auto
Menu cooking function. The LED display will
show AUTO 01, AUTO 02, AUTO 03 etc.
2. Turn the Weight / Time dial to choose the
default weight for your chosen programme.
Please refer to the Auto Menu table for
information.
3. Press the Weight / Time dial to confirm and
start the cooking.
For AUTO 07-09 programmes, the
microwave will pause and sound after
2/3 of the cooking time has elapsed.
simply, open the door and rotate the
food for better grilling effect. Then, close
the door and press the Weight / Time
dial to continue the cooking.
4. Press the Stop / Clear button once to stop and
hold the cooking. Press it again to cancel the
setting.
For example if you want to cook 300g of fish using
Auto Menu programme. Please follow the steps
below.
• Press the Auto Cook button to select Auto
Menu programme for fish. The LED display will
show AUTO 06 .
• Turn the Weight / Time dial to choose the
default weight until the LED display shows
300.
• Press the Weight / Time dial to confirm and
start the cooking.
• Press the Stop / Clear button once to stop and
hold the cooking. Press it again to cancel the
setting.
4
2, 3
1
Microwave
Grill/Combi
Stop/Clear

18
GB
The density and thickness of food can affect its cooking time. Ensure all food is piping hot
and cooked thoroughly before serving. It is essential that food is checked during and after the
recommended cooking time, even if Auto Menu was used.
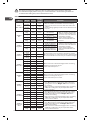
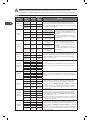
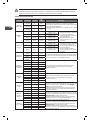
Auto Menu Table
Menu Weight Display
Cooking
Time
Comments
AUTO 01
Milk / Coffee
1 - cup
(~200ml)
1 1’30”
• Only use suitable microwavable containers and cling
film in the microwave. Pierce the film with a fork before
cooking.
• Check cooking regularly to make sure the water does not
boil over.
2 - cup
(~400ml)
2 2’40”
3 - cup
(~600ml)
3 3’50”
AUTO 02
Rice
150g 150g 19’00”
150g of rice + 300ml
of cold water
• Only use suitable microwavable
containers and cling film in the
microwave. Pierce the film with
a fork before cooking.
• Check cooking regularly to
make sure the water does not
boil over.
300g 300g 22’00”
300g of rice + 600ml
of cold water
450g 450g 25’00”
450g of rice + 900ml
of cold water
600g 600g 28’00”
600g of rice + 1200ml
of cold water
AUTO 03
Spaghetti
100g 100g 22’00”
100g of spaghetti +
800 ml of cold water
• Only use suitable microwavable
containers and cling film in the
microwave. Pierce the film with
a fork before cooking.
• Check cooking regularly to
make sure the water does not
boil over.
200g 200g 27’00”
200g of spaghetti +
1600 ml of cold water
300g 300g 32’00”
300g of spaghetti +
2400 ml of cold water
AUTO 04
Potatoes
1 - potato
(~230g)
1 5’00”
For best results, pierce the potatoes’ skin before cooking.
Once the potatoes are cooked, wrap them in aluminium foil
for at least 5 minutes to ensure they are cooked thoroughly.
2 - potato
(~460g)
2 9’00”
3 - potato
(~690g)
3 13’00”
AUTO 05
Auto reheat
200g 200g 1’30”
Make sure food is cooked thoroughly before consuming.
Additional cooking time may be
required for thicker pieces.
300g 300g 2’00”
400g 400g 2’30”
500g 500g 3’00”
600g 600g 3’30”
700g 700g 4’00”
800g 800g 4’30”
AUTO 06
Fish
200g 200g 3’00”
Make sure food is cooked thoroughly before consuming.
Additional cooking time may be
required for thicker pieces of fish.
300g 300g 4’20”
400g 400g 5’40”
500g 500g 7’00”
600g 600g 8’20”
AUTO 07
Chicken
800g 800g 33’00”
• The microwave will pause and sound after 2/3 cooking
time. Open the door and rotate the chicken for better
grilling effect. Press the Weight / Time dial to continue
the cooking.
• Make sure food is cooked thoroughly before consuming.
Additional cooking time may be required for thicker
pieces of chicken.
1000g 1000g 36’00”
1200g 1200g 39’00”
1400g 1400g 42’00”
AUTO 08
Beef / Mutton
200g 200g 12’00”
• The microwave will pause and sound after 2/3 cooking
time. Open the door and rotate the beef/ mutton for
better grilling effect. Press the Weight / Time dial to
continue the cooking.
• Make sure food is cooked thoroughly before consuming.
Additional cooking time may be required for thicker
pieces of beef / mutton.
300g 300g 15’00”
400g 400g 18’00”
500g 500g 21’00”
600g 600g 24’00”
AUTO 09
Skewered
Meat
100g 100g 9’00”
• The microwave will pause and sound after 2/3 cooking
time. Open the door and rotate the skewered meat for
better grilling effect. Press the Weight / Time dial to
continue the cooking.
• Make sure food is cooked thoroughly before consuming.
Additional cooking time may be required for thicker
pieces of skewered meat.
200g 200g 12’00”
300g 300g 15’00”
400g 400g 18’00”
500g 500g 21’00”

19
GB
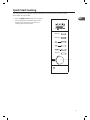
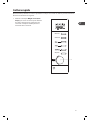
Quick Start Cooking
This feature allows you to quickly cook your food for 30 seconds with 100% microwave power.
Please follow the steps below.
1. Press the Weight / Time dial to start the quick
start cooking. Press the button again to add
another 30 seconds. You may increase the
cooking time up to 10 minutes.
Microwave
Grill/Combi
Stop/Clear
1

20
GB
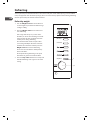
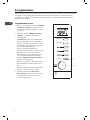
Defrosting
You may wish to place the frozen food on a microwave safe plate or dish before placing it on the defrost
rack (not supplied in this microwave package). This is to ensure that any liquids released during defrosting
will not spill and dirty the interior of the microwave.
Defrost by weight
1. Turn the Weight / Time dial anticlockwise to
set the weight of your food. The default range
is 100g to 1800g.
2. Press the Weight / Time dial to confirm and
start defrosting.
TIPS: Large items may be icy in the centre.
Therefore, to ensure even thawing, turn them
over from time to time and break them into
smaller pieces during defrosting.
The microwave will sound and pause after
2/3 running time. Open the door and rotate
the food. Close the door and then press the
Weight / Time dial to restart defrosting.
Place roasts fat-side down or whole poultry
breast side down.
Drain liquids during defrosting as the juices
from food can get hot and cook the food.
3. Press the Stop / Clear button once to stop and
hold the defrosting. Press again to cancel the
setting.
3
1, 2
Microwave
Grill/Combi
Stop/Clear
La pagina si sta caricando...
La pagina si sta caricando...
La pagina si sta caricando...
La pagina si sta caricando...
La pagina si sta caricando...
La pagina si sta caricando...
La pagina si sta caricando...
La pagina si sta caricando...
La pagina si sta caricando...
La pagina si sta caricando...
La pagina si sta caricando...
La pagina si sta caricando...
La pagina si sta caricando...
La pagina si sta caricando...
La pagina si sta caricando...
La pagina si sta caricando...
La pagina si sta caricando...
La pagina si sta caricando...
La pagina si sta caricando...
La pagina si sta caricando...
La pagina si sta caricando...
La pagina si sta caricando...
La pagina si sta caricando...
La pagina si sta caricando...
La pagina si sta caricando...
La pagina si sta caricando...
La pagina si sta caricando...
La pagina si sta caricando...
La pagina si sta caricando...
La pagina si sta caricando...
La pagina si sta caricando...
La pagina si sta caricando...
La pagina si sta caricando...
La pagina si sta caricando...
La pagina si sta caricando...
La pagina si sta caricando...
La pagina si sta caricando...
La pagina si sta caricando...
La pagina si sta caricando...
La pagina si sta caricando...
La pagina si sta caricando...
La pagina si sta caricando...
La pagina si sta caricando...
La pagina si sta caricando...
La pagina si sta caricando...
La pagina si sta caricando...
La pagina si sta caricando...
La pagina si sta caricando...
La pagina si sta caricando...
La pagina si sta caricando...
La pagina si sta caricando...
La pagina si sta caricando...
La pagina si sta caricando...
La pagina si sta caricando...
La pagina si sta caricando...
La pagina si sta caricando...
La pagina si sta caricando...
La pagina si sta caricando...
La pagina si sta caricando...
La pagina si sta caricando...
La pagina si sta caricando...
La pagina si sta caricando...
La pagina si sta caricando...
La pagina si sta caricando...
La pagina si sta caricando...
La pagina si sta caricando...
La pagina si sta caricando...
La pagina si sta caricando...
La pagina si sta caricando...
La pagina si sta caricando...
La pagina si sta caricando...
La pagina si sta caricando...
La pagina si sta caricando...
La pagina si sta caricando...
La pagina si sta caricando...
La pagina si sta caricando...
-
 1
1
-
 2
2
-
 3
3
-
 4
4
-
 5
5
-
 6
6
-
 7
7
-
 8
8
-
 9
9
-
 10
10
-
 11
11
-
 12
12
-
 13
13
-
 14
14
-
 15
15
-
 16
16
-
 17
17
-
 18
18
-
 19
19
-
 20
20
-
 21
21
-
 22
22
-
 23
23
-
 24
24
-
 25
25
-
 26
26
-
 27
27
-
 28
28
-
 29
29
-
 30
30
-
 31
31
-
 32
32
-
 33
33
-
 34
34
-
 35
35
-
 36
36
-
 37
37
-
 38
38
-
 39
39
-
 40
40
-
 41
41
-
 42
42
-
 43
43
-
 44
44
-
 45
45
-
 46
46
-
 47
47
-
 48
48
-
 49
49
-
 50
50
-
 51
51
-
 52
52
-
 53
53
-
 54
54
-
 55
55
-
 56
56
-
 57
57
-
 58
58
-
 59
59
-
 60
60
-
 61
61
-
 62
62
-
 63
63
-
 64
64
-
 65
65
-
 66
66
-
 67
67
-
 68
68
-
 69
69
-
 70
70
-
 71
71
-
 72
72
-
 73
73
-
 74
74
-
 75
75
-
 76
76
-
 77
77
-
 78
78
-
 79
79
-
 80
80
-
 81
81
-
 82
82
-
 83
83
-
 84
84
-
 85
85
-
 86
86
-
 87
87
-
 88
88
-
 89
89
-
 90
90
-
 91
91
-
 92
92
-
 93
93
-
 94
94
-
 95
95
-
 96
96


in altre lingue
- English: Logik L20GSS10E User manual
- slovenčina: Logik L20GSS10E Používateľská príručka
Altri documenti
-
Sandstrom SCB2510E Manuale utente
-
Hotpoint-Ariston MWHA 2824 B Manuale del proprietario
-
Whirlpool MWH 338 SX Guida utente
-
LG MH6883AAF Manuale del proprietario
-
Candy CMG2394DS Manuale utente
-
Candy CMW 7217 DS RU Manuale utente
-
Candy CMXG 30DS Manuale utente
-
Candy CMXC 30DCVB Manuale utente
-
AEG MBB1756S-M Manuale utente