
Contents
1 Your phone 1
2 Getting started 3
3 Making a call 5
4 Answering a call 6
5 Using the contact list 7
6 Menu navigation 8
7 Messages 9
8 Internet menu 13
9 Sounds 16
10 Extras 19
11 Settings 28
12 Services 30
13 Troubleshooting 32
14 Safety information 35


1
1
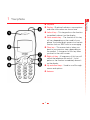
Your phone
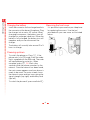
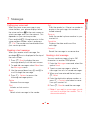
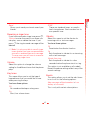
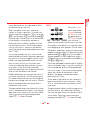
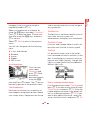
1 Your phone
n Earpiece
o Display – Graphical indicators, menu options
and other information are shown here.
p Left soft key – This key performs the function
immediately above it on the display
q Quick access key – The function of this key
will vary depending on the model of your
phone. It provides quick access to a certain
function such as SIM Toolkit or messaging.
r Clear key – This erases text or takes you
back to your previous step, depending on
the context. A long press of this key takes
you back to the main screen.
s Right soft key – A long press of this key will
switch the telephone on and off. It also
performs the function immediately above it
on the display.
t Up and down keys – Used to scroll through
menus and options.
u Antenna

2
1
Your phone
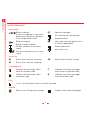
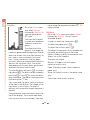
Symbol description
Main screen
Battery indicator
Empty icon indicates a very weak
battery level. Solid icon indicates a
fully charged battery level
Battery charging
Signal strength indicator
No bars indicates a very weak
signal.
Four bars indicates a very strong
signal
m New text message
All incoming calls are diverted
Keypad locked
l New voice mail message (this icon
is network dependent)
Silent mode active
Alarm clock set
In calls list
n Shows that a call was incoming
o Shows that a call was outgoing
x Shows that a call was missed
In messages list
Indicates the messages which
have not yet been read
Indicates the messages which
have been read
k Indicates the smiley messages
which have not yet been read
j Indicates the smiley messages
which have been read
Lists
In lists shows the option that is currently activated
Internet
Returns you to the previous screen Displays the current Homepage

3
2
Getting started
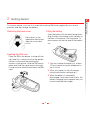
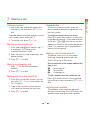
2 Getting started
To use your phone, you must first insert the miniature SIM card supplied by your service
provider, and then charge the battery.
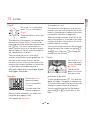
Removing the back cover
Press down on the
area below the clip and
slide the cover back.
Lift off.
Inserting the SIM card
Place the SIM in the phone, starting with the
right side first, making sure that the golden
contacts of the card are touching the
contacts of the phone. Hold the SIM card in
place and slide the metal plate to the right,
in order to cover the left hand side of the SIM
card.
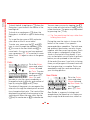
Fitting the battery
Insert the battery with the label facing down.
Align the tabs on the battery with the tabs on
the back of the phone. Clip into place. To
remove press on the clip and lift the battery
out.
1 You must charge the battery for at least
12 hours before using the telephone for
the first time.
2 Allow your battery to fully discharge
occasionally before recharging it.
3 When the battery is completely
discharged it may take some time for the
battery charging icon to appear after you
have connected the charger.

4
2
Getting started
Charging the battery
Insert the connector on the charger lead into
the connector at the base of the phone. Plug
the charger into a mains AC socket. When
charging commences, the battery icon will
change into a charger cable icon. When the
battery is fully charged, the battery icon will
reappear and you can disconnect the
charger.
The battery will normally take around 2 to 3
hours to charge.
Powering up/down
To switch the phone on: Press d. If the
phone asks for a PIN code: Enter the code
that is supplied with the SIM card. The code
will be displayed as asterisks. When
complete, press
g, OK. Wait a few
seconds while the phone searches for the
network. Once the network has been found,
the main screen appears and your phone is
ready to be used. The main screen shows
the network name and two icons giving the
signal strength (top right) and battery level
(top left).
To switch the phone off, press and hold
d.
Removing the front cover
It is possible to personalise your telephone
by replacing the covers. Use the tool
provided with your new cover as illustrated
below.

5
3
Making a call
3 Making a call
Dialling a number
1 Key in the area code and number that
you want to call then press
g, Call to
dial.
To delete the entire number and return to the
main screen, press and hold
c.
2 To end the call, press d, End.
Making an international call
1 Press and hold 0 until the plus sign "+"
is displayed. This replaces the
international access code.
2 Enter the country code, area code, and
phone number.
3 Press
g, Call to dial.
Making an emergency call
1 Enter 112 (or the local emergency
number).
2 Press
g, Call to dial.
Making calls from the contact list
1 Press ; from the main screen, you can
also press
d, Contacts then select the
Search option.
2 Type in the first letters of the name or
scroll and find the one that you want.
3 Press
g, Call to dial.
Speed dialling
Allows you to dial a number simply by
pressing and holding the assigned key from
the main screen.
To assign a contact list entry to a key:
Press
; to enter the contacts list and scroll
to the appropriate entry. Press and hold one
of the keys 2 to 9 until the key number
appears on the left of the screen beside the
name. This indicates that the speed dial is
successfully assigned.
Making a call from the calls list
The phone stores a list of your recent
incoming, outgoing and missed calls.
The list stores up to 30 entries.
An icon on the left of the screen indicates the
type of call:
n Incoming call
x Missed call
o Outgoing call
To dial a number from the redial/calls list:
Press
: to access the list. Scroll and find
the one that you want and press
g, Call to
dial.
Adjusting the loudness
The earpiece volume may be adjusted
during a conversation. Press
: to make the
speech louder and
; to make it quieter.

6
4
Answering a call
4 Answering a call
To answer a call, press g, Accept. To reject a call, press d, Reject.
Call waiting
This feature means you are informed of a
second incoming call by an audible tone in
the earpiece.
Press
d, Reject to reject the second call.
Press
g, Accept to put the current call on
hold and activate the second call.
To end the active call and return to the held
call, press
d, End.
To switch between calls, press
g, Options
and then select the Swap option.
☛ Note: Your network may not support call
waiting. If it does not, accepting a
second call will end the first call. You will
not be able to switch.
In call options
When you are in a call, you can press g,
Options. These could be:
Contacts
Gives you access to the contact list.
Hold/Unhold
Puts the active call on hold/reactivates the
held call.
Mute/Unmute
Switches the microphone off/on.
Send message
Allows you to send a text message.
SIMToolkit
Gives you access to the SIM Toolkit.
Swap
Swaps between the current call and the
call on hold.
End all
Ends all calls.

7
5
Using the contact list
5 Using the contact list
The names and numbers you enter into your contact list are stored on the SIM card.
To access your contact list entries, press
; from the main screen.
Storing a name and number
1 Press d, Contacts from the main
screen.
2 Use the up and down keys
: and ; to
scroll to the Add new option, then press
g, Select.
3 Enter the area code and phone number,
then press
g, OK.
4 Enter the name you wish to store in the
contact list, then press
g, OK. Use the
keypad as explained in the table in the
Messages section to enter the characters
and to switch between lower case, upper
case, and numeric modes.
5 Enter the chatname that you wish to
assign to the contact.
Correcting an entry
Pressing c deletes the character
immediately to the left of the cursor.
Pressing and holding
c deletes all of the
text that you have entered.
Contact list options
When you have selected a name you can
open a list of options by pressing
d,
Options which will allow you to change,
delete, give details and send a message.
Fixed names
This service allows you to restrict your
outgoing calls to certain selected numbers
from your SIM card. This feature is
dependent on your service provider. Your
phone will ask for the PIN2 code to activate
this function. You can obtain this code from
your service provider. When this feature is
activated, a new contact list is made visible
in place of your standard one. Only numbers
from this contact list can be dialled. You can
add numbers to this contact list in the same
way as adding numbers to your normal
contact list, with the exception that you have
to enter the PIN2 code.
Broadcast messages
Your service provider may offer Cell
Broadcast. This could be information on the
traffic, weather, events, or local information
which is broadcast by the network to all
mobiles in a specific area. When you
activate this feature, you may receive
messages about the selected topic. Contact
your service provider for more details.

8
6
Menu navigation
6 Menu navigation
To enter the main menu, press g, Menu from the main screen.
Scrolling
You can scroll from one menu to another
using the front keys
: and ;. When you
find the menu that you are looking for, press
g, Select to go in. Press End, back or c
to return to the previous level.
SIM Toolkit
Your service provider may offer some
special services or applications. The name
of the menu may change to indicate the type
of service, for example “Information”.
For more details, please contact your
service provider.

9
7
Messages
7 Messages
Calling your voice mail
When you have a new message in your
voice mailbox, your phone displays either
the voice mail icon
l in the main screen or
a text message sent from the network. This
depends on your service provider.
Press and hold
1. If the phone asks for the
voice mailbox number, enter it and press
g, Call. The number can be obtained from
your service provider.
Reading a text message
When you receive a text message, the
envelope
m icon is displayed at the top of
the main screen.
1 Press
g, Read to display the new
message directly from the main screen.
2 To read old messages select Read from
the Messages menu.
3 Use the up and down keys
: and ; to
scroll through the message.
4 Press
d, Options to access the
following message options:
Delete
Removes the message.
Chat
Initiates a chat session.
Reply
Sends a text message to the sender.
Call
Calls the sender (or, if there is a number in
quotes in the message, this number is
called instead).
Save no.
Adds the sender’s phone number to your
contact list.
Time/date
Displays the date and time of the
message.
Forward
Sends the message to someone else.
Sending a text message
You can send messages of up to 160
characters to another GSM phone.
1 Enter the Messages menu and select the
option Send.
2 Type in a new message or select a
message from a list of saved messages.
3 When you have entered the text, press
g, Send.
4 Enter the destination phone number, or
press
d, Contacts and select a name
from your contact list.
5 Press
g, Send to send the message.
☛ Note: If you reply to a message, you do
not have to re-enter the number. This is
done automatically.

10
7
Messages
Sending a Smiley SMS
Send a picture with your text message to
compatible phones. All other phones will
display an Internet style Smiley. Choose
g,
Smiley.
1. Emotions
2. Celebrations
3. Sports
4. Animals
5. Others
Select the Smiley you would like to use from
one of these categories and press
g,
Select. The text is restricted to 156
characters to allow space for the Smiley.
Reading a Smiley SMS
When you choose a message that has a
Smiley in it, the Smiley appears on the
screen for 3 seconds or until a key is
pressed. Then the message appears. After
this time the message reads as normal. A
message with a smiley attached has a k
icon if new and a
j if read.
Reading a Games SMS
The multiplayer games use text messages
to communicate with other players. When
you receive a games SMS pressing
g,
Read will take you to the games menu.
Press
g, Select and proceed as instructed
in the appropriate game section.
Message settings
This menu offers three options:
Centre number
Allows you to enter or change the service
centre number for text messaging.
Voice mail
Allows you to enter or change your voice
mail number.
Characters
Allows you to choose whether you want to
enter text in GSM (Latin characters) or
Unicode (Non Latin characters) mode.
Unicode characters take up more room on
your phone so the length of your text
messages is restricted to half the usual
number of characters.
Chat
Sendo chat allows you to send messages to
another user and view both sent and
received SMS messages for chat
participants in a convenient Chat screen.
Starting a chat session
Enter the Messages menu and select the
Chat option.
Enter your chatname on the My chatname
screen (this screen will not appear if you
have already created a chatname).
You will then need to enter the number of the
person with whom you would like to chat, or

11
7
Messages
alternatively you can press d, Contacts to
go into the contact list.
Enter his/her chatname on the Enter
chatname screen (this screen will not
appear if you have already created a
chatname for this person).
Editing a chatname
You can edit a chatname for a contact by
selecting the desired name in the contact
list and pressing
d, Options. Select the
Change option and edit the chatname.
You can edit your chatname by selecting My
number from the Contacts menu. Select the
Consult option and then press
d, Options.
Select the change option and edit the
chatname.
Having a chat
To send a chat message enter the text in the
chat editor field and then press
g, Send.
The sent text will then appear in the chat
history field and is sent to the other chat
participant as a standard SMS message.
Chat options
Press d, Options from the Chat screen to
view the chat options.
You have three options:
Swap
Changes the active area between the text
entry field and the chat history field.
Font size
Select between normal and small font on
the Chat screen.
Exit
Exit the chat session.
Predictive Text Input
To save time when you are writing a text
message, your phone has a feature which
guesses the letters that you are typing and
tries to complete the word.
This input method allows you to simply
press each key once. For example, to write
the name “Ross”, press
7, then 6, then
7 , then 7 just once each.
The word may change as you type, but don’t
worry about what is on the screen until you
have finished the word. Sometimes different
words share the same sequence of key
presses. If the finished word is wrong, press
0 to scroll through other possibilities. If the
word that you are looking for is still not there,
press * repeatedly to change the text
mode to
a and enter the word again.
After you have completed a word, press the
space key
# to enter the next word. Press
and hold
# to pick a symbol to insert from
the character table.
Some intelligent punctuation (including full
stops, hyphens and apostrophes) are also
available on
1. The punctuation mark is
completed when you enter the next
keystroke.

12
7
Messages
Changing the editing mode
The current editing mode is indicated at the
bottom of the screen by one of these icons:
a Lower case text mode
b Upper case text mode
q Numeric mode
h T9 Text Input (lower case)
i T9 Text Input (upper case)
You can switch between upper case, lower
case, and numeric modes by repeatedly
pressing
*. You can switch to predictive
T9 Text Input by repeatedly pressing
*.
These are the characters which come on to
the screen when you press the numeric
keypad. They are featured in the table
below:
To enter two characters on the same key,
enter the first one and then wait for the
cursor to reappear before entering the
second.
Example: To enter the name “Ross” when
you are in lower case mode:
Press
* to enter upper case mode,
Press
7 three times, to display "R", you will
then return to lower case mode.
Press
6 three times, to display "o".
Press
7 four times, to display "s".
Then press
7 four times, to display "s".
Entering symbols
A long press on # displays a table
showing all the symbols available to you.
Scroll down the table to display more
symbols.
To enter a symbol:
1 Scroll to the row containing the symbol
you want.
2 Press the numeric key (
1 to 9) to
reach the symbol you want.
Example: To enter the symbol
e, scroll to the
6th row then press
9.
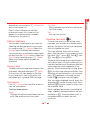
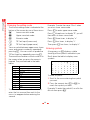
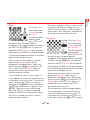
Key List of characters available
1 1 . , @ ‘ ? ! “ : ; ¿ ¡
2 a b c 2 à ä å æ ç
3 d e f 3 é è
4g h i 4 ì
5j k l 5
6 m n o 6 ñ ò ö ø
7p q r s 7 ß
8 t u v 8 ü ù
9 w x y z 9
00
#Space
123456789
.,-!?@():
&‘ “ /_;$%+
*=<>#£¥∆ ¤
§ √ ί »ÀŒ—”÷
ÿŸ
¿ìà äåæç
éèÄ
ÅÉò
ñÆe

13
8
Internet menu
8 Internet menu
To access the Internet menu, select Internet
from the main menu. To select a menu
option use the corresponding numeric key
or navigate using the
: or ; keys and
press g, OK.
The following menu options are available:
1 Homepage - Connect to the
Internet server and enter your
homepage.
2 Favourites - Store up to 8 of your
favourite Internet sites for easy
access.
3 Add favourite - Add to your list of
favourites.
4 Open page - Open a WAP page.
5 Refresh page - Refresh the current
WAP page while in a WAP session.
6 Settings - Configure your WAP
settings.
7 Help - Provides help and advice on
using Mobile Explorer.
0 Exit - Returns to the main menu.
☛ Note: When in a WAP session you can
access the Internet menu by pressing
the Quick Access key.
Connecting to an Internet page
To begin a WAP session, either select the
Homepage option on the Internet menu to
open your homepage, or select the Open
page option from the Internet menu and
then enter the WAP address. Select the Go
option and press
g, OK.
Configuring your connection profiles
In order to configure your Internet settings
select the Settings option from the Internet
menu and then select the Profiles option.
Each of your connection profiles will be
listed. To edit an existing profile select the
relevant profile name and press
g, Edit.
To create a new profile select the Create
Connection option and press
g, OK. Enter
a name for the new connection and select
Create.
One of your connection profiles can be
selected as the default by choosing the
relevant profile, pressing
g, Edit and
selecting Set as default from the menu.
Press
g, OK to confirm your choice.
☛ Note: Some of these settings may not be
required for your network. Contact your
Service Provider for required Internet
connection information.
Entering your Dial-up Settings
Choose the Dial-up Settings option and then
enter the relevant information into all
required fields. Once you have entered all
the necessary information select Update
and press
g, OK.

14
8
Internet menu
Entering your Internet (HTTP) settings
Choose the Internet (HTTP) Settings option
and then enter the relevant information into
all required fields. Once you have entered
all the necessary information select Update
and press
g, OK.
Entering your Mobile (WAP) settings
Choose the Mobile (WAP) Settings option
and then enter the relevant information into
all required fields. Once you have entered
all the necessary information select Update
and press
g, OK.
☛ Tip: When entering an IP/Gateway
address press
* to enter a full stop.
Configuring your homepage
In order to configure your homepage select
Settings from the Internet menu and then
select the Homepage option.
You have three options:
Default
Returns to the default homepage settings.
If a default homepage has not been
provided please contact your Service
Provider.
Current
When in a WAP session this option sets
the current WAP page as the homepage.
User Specified
Sets the entered WAP address as the
homepage.
☛ Note: To create a user specified
homepage you must enter a WAP
address in the Homepage URL field.
Once you have selected your desired option
select Update and press
g, OK.
Images
In order to change your image settings
select the Settings option from the Internet
menu and then choose the Images option.
You have four options:
Scale
Scales large images to fit the size of the
screen.
All
Displays all images regardless of size.
Small
Only displays those images small enough
to be displayed fully on the screen.
None
Does not display any images.
☛ Note: Turning off or reducing image size
will speed up download time.
Password
In order to change your password settings
select the Settings option from the Internet
menu and then select the Password option.

15
8
Internet menu
You have two options:
Require password
You are required to enter a password
each time you enter an authenticated WAP
site.
Cache password
Saves your passwords once entered on
authenticated WAP sites.
Once you have selected your desired option
go to Update and press
g, OK.
In order to delete your saved passwords go
to Clear and press
g, OK.
Favourites
The Favourites menu allows you to save up
to 8 WAP addresses, providing you with
quick access to your favourite sites.
There are two ways to create a favourite:
Creating a favourite from the Internet menu
In order to create a favourite select the
Favourites option from the Internet menu.
Select the Add favourite option and press
g, OK. Enter the desired name and WAP
address. Select Add and press g,OK.
The new favourite will now appear in your list
of favourites.
Creating a favourite from a WAP page
In order to create a favourite from a WAP
page press the Quick Access key to go to
the Internet menu. Select the Add favourite
option. The name of your WAP page will
appear at the top of the screen.
Enter the desired name for the favourite,
select Add and press g, OK. The new
favourite will now appear in your list of
favourites.
Editing and deleting a favourite
To edit a favourite
Select the Favourites option from the
Internet menu. Select the favourite you
would like to edit and press
g, Edit.
Change the favourite information, name or
URL, select Update and press
g, OK.
The favourite is updated.
To delete a favourite
Select the Favourites option from the
Internet menu. Select the favourite you
would like to delete and press
g, Edit.
Select Delete favourite and press
g, OK.

16
9
Sounds
9 Sounds
This menu allows you to configure the various tones that the phone plays when you receive a
call or a new text message, or some other event occurs.
Ringer
Select this option to set the ringing tone for
incoming calls.
Ringer tone composer
Go into the Sounds menu and press g,
Composer.
Change your ringer tones to personalise
your phone. Create your own tones with our
ring tone composer.
You have two entry methods.
Text
Notes are entered textually
Graphic
Notes are entered on a musical score
Both entry methods use the same key
presses unless stated.
In this menu the keys represent the following
notes:
1 C 5 G
2 D 6 A
3 E 7 B
4 F
8 Enters a rest (text mode)
; Enters a rest (graphic mode)
9 Changes the scale of the note
between the range 1-4
0 Changes the duration of the note.
Each press decreases the duration
of the note between the range: full
note, half note, quarter note, eighth
note, sixteenth note and thirty-
second note.
# Changes a normal note to a sharp
and a sharp back to a normal note.
* Changes a normal note to a dotted,
double dotted or 2/3 note.
c Erases the previous note. A long
press will clear all notes.
☛ Tip: A short press of the : and ; keys
will move you between notes in either
entry mode.
Once you have composed the tone press
g, Options to enter the menu screen. The
available options are:
Tempo
Allows you to choose from a list of tempos
at which to play your tone.
Play
Allows you to play your melody.
Save
Allows you to save your melody.
Delete
Allows you to delete the tone.

17
9
Sounds
Send
Allows you to send your tone to one of your
friends.
Receiving a ringer tone
If you have received a ringer tone press g,
Options to enter the menu from where you
can play, save or delete the tone. If you
press
c the ring tone and message will be
deleted.
☛ Note: It is only possible to save 5 ringer
tones whether you have composed them
yourself or received them as a message.
To save more you will have to overwrite
an existing ringer tone.
Volume
Select this option to change the volume
setting for the different tones that the phone
plays.
Key tones
This menu allows you to set the type of
keypad tones that you would like to hear
when pressing the keys.
You have three options:
Off
No sound emitted upon a key press.
On
Short, low volume tones.
DTMF
These are standard tones, as used in
touch tone phones. Each number has its
own specific tone.
Vibrator
Select this menu to set the vibrator for
incoming calls or text messages.
You have three options:
Off
Deactivates the vibrator function.
On
Sets the phone to vibrate for an incoming
call or text message.
Vibrate then ring
Sets the phone to vibrate for a few
seconds before the phone starts to ring.
This option is not available on all models.
None of the above settings affects any of the
sounds settings.
Events
This option allows you to set the alert tones
to on or off for the following options:
New message • New broadcast • Low
battery • Low credit
This is only with certain subscriptions.

18
9
Sounds
Equalizer
Enter the Sounds menu and select
Equalizer.
This menu allows you to alter the earpiece
audio settings of your phone.
Choose from these 3 settings for optimum
audio quality:
• Treble • Normal • Bass
La pagina si sta caricando...
La pagina si sta caricando...
La pagina si sta caricando...
La pagina si sta caricando...
La pagina si sta caricando...
La pagina si sta caricando...
La pagina si sta caricando...
La pagina si sta caricando...
La pagina si sta caricando...
La pagina si sta caricando...
La pagina si sta caricando...
La pagina si sta caricando...
La pagina si sta caricando...
La pagina si sta caricando...
La pagina si sta caricando...
La pagina si sta caricando...
La pagina si sta caricando...
La pagina si sta caricando...
La pagina si sta caricando...
La pagina si sta caricando...
La pagina si sta caricando...
-
 1
1
-
 2
2
-
 3
3
-
 4
4
-
 5
5
-
 6
6
-
 7
7
-
 8
8
-
 9
9
-
 10
10
-
 11
11
-
 12
12
-
 13
13
-
 14
14
-
 15
15
-
 16
16
-
 17
17
-
 18
18
-
 19
19
-
 20
20
-
 21
21
-
 22
22
-
 23
23
-
 24
24
-
 25
25
-
 26
26
-
 27
27
-
 28
28
-
 29
29
-
 30
30
-
 31
31
-
 32
32
-
 33
33
-
 34
34
-
 35
35
-
 36
36
-
 37
37
-
 38
38
-
 39
39
-
 40
40
-
 41
41


in altre lingue
- English: SENDO S230 User manual
Altri documenti
-
LG A7150.TIMSV Manuale utente
-
-
Panasonic X200 Manuale del proprietario
-
-
-
LG C2200 Manuale utente
-
LG B2050.INDBK Manuale utente
-
-
LG KG320S Manuale utente
-
Doro HandlePlus 326i gsm Manuale del proprietario