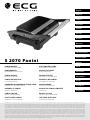
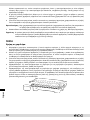
ECG S 2070 Panini Maker Manuale utente
- Categoria
- Barbecue
- Tipo
- Manuale utente

S 2070 Panini
English
Deutsch
Čeština
Eesti keel
Español
Français
Hrvatski
Bosanski
Italiano
Latviešu valoda
Lietuvių kalba
Magyar
Polski
Slovenčina
Slovenščina
Srpski
Crnogorski
Ελληνικά
Always read the safety&use instructions carefully before using your appliance for the rst time. The user´smanual must be always included. Bitte lesen Sie vor der Inbetriebnahme des Produktes diese Anleitung und
die darin enthaltenen Sicherheitshinweise aufmerksam durch. Die Bedienungsanleitung muss dem Gerät immer beigelegt sein. Před uvedením výrobku do provozu si důkladně pročtěte tento návod abezpečnostní
pokyny, které jsou vtomto návodu obsaženy. Návod musí být vždy přiložen kpřístroji. Enne seadme esmakordset kasutamist lugege ohutus- ja kasutusjuhised alati hoolikalt läbi. Kasutusjuhend peab alati kaasas
olema. Siempre lea cuidadosamente las instrucciones de seguridad yde uso antes de utilizar su artefacto por primera vez. Siempre debe estar incluido el manual del usuario. Avant de mettre le produit en service,
lisez attentivement le présent mode d’emploi et les consignes de sécurité contenues dans le présent mode d'emploi. Le mode d’emploi doit toujours être fourni avec le produit. Uvijek pročitajte sigurnosne upute
iupute za uporabu prije prvog korištenja vašeg uređaja. Upute moraju uvijek biti priložene. Leggere sempre con attenzione le istruzioni di sicurezza ed uso prima di utilizzare l’apparecchio per la prima volta. Il manuale
dell’utente deve essere sempre incluso. Pirms ierīces pirmās lietošanas reizes vienmēr rūpīgi izlasiet drošības un lietošanas norādījumus. Rokasgrāmata vienmēr jāpievieno ierīcei. Prieš naudodamiesi prietaisu
pirmąjį kartą, visuomet atidžiai perskaitykite saugos ir naudojimo instrukcijas. Kartu su gaminiu visada privalo būti jo naudotojo vadovas. Atermék használatba vétele előtt gyelmesen olvassa el ezt a használati
útmutatót és az útmutatóban található biztonsági rendelkezéseket. A használati útmutatót tartsa a készülék közelében. Przed pierwszym użyciem urządzenia prosimy o uważne zapoznanie się z instrukcjami
dotyczącymi bezpieczeństwa i użytkowania. Instrukcja obsługi musi być zawsze dołączona. Pred uvedením výrobku do prevádzky si dôkladne prečítajte tento návod a bezpečnostné pokyny, ktoré sú v tomto
návode obsiahnuté. Návod musí byť vždy priložený kprístroju.
Pred vklopom izdelka temeljito preberite ta navodila in varnostne napotke, ki so navedeni vteh navodilih. Navodila morajo biti vedno priložena
knapravi.
Uvek pažljivo pročitajte uputstva za sigurnost iupotrebu pre upotrebe uređaja po prvi put. Korisničko uputstvo mora uvek biti priloženo.
Πριν χρησιμοποιήσετε τη συσκευή σας για πρώτη φορά,
διαβάστε οπωσδήποτε τις οδηγίες ασφάλειας και χρήσης. Το εγχειρίδιο χρήστη πρέπει να περιλαμβάνεται πάντα στη συσκευασία.
PANINI MAKER
INSTRUCTION MANUAL
KARSTMAIŽU PANNA
INSTRUKCIJŲ VADOVAS
PANINIMAKER
BEDIENUNGSANLEITUNG
PANINI KEPTUVAS
ROKASGRĀMATA
PANINI MAKER
NÁVOD KOBSLUZE
PANINI KÉSZÍTŐ
HASZNÁLATI ÚTMUTATÓ
PANINI VALMISTAJA
KASUTUSJUHEND
OPIEKACZ DO PANINI
INSTRUKCJA OBSŁUGI
SANDWICHERA PARA EMPAREDADOS ITALIANOS «PANINI»
MANUAL DE INSTRUCCIONES
PANINI MAKER
NÁVOD NA OBSLUHU
APPAREIL À PANINI
MODE D’EMPLOI
APARAT ZA PANINI SENDVIČE
NAVODILA
PANINI TOSTER
UPUTE ZA UPORABU
PANINI TOSTER
UPUTSTVO ZA UPOTREBU
PIASTRA PER PANINI
MANUALE DI ISTRUZIONI
ΤΟΣΤΙΈΡΑ/ΨΗΣΤΙΈΡΑ
ΕΓΧΕΙΡΙΔΙΟ ΟΔΗΓΙΩΝ

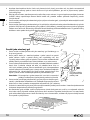
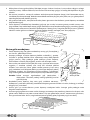
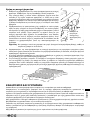
DESCRIPTION / BESCHREIBUNG / POPIS / KIRJELDUS / DESCRIPCIÓN /
DESCRIPTION / OPIS / DESCRIZIONE / APRAKSTS / APRAŠYMAS / AKÉSZÜLÉK
RÉSZEI / OPIS / POPIS / OPIS / OPIS / ΠΕΡΙΓΡΑΦΗ
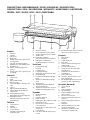
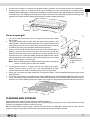
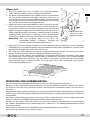
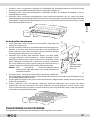
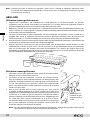
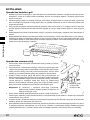
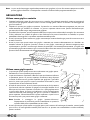
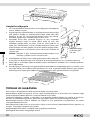
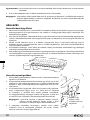
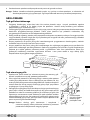
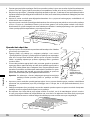
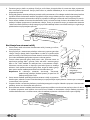
1
qa 0 9 8 7 6 5
2 3 4
English
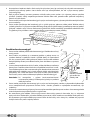
1. Left arm
2. Handle
3. Top cover
4. Right arm
5. Button to open the grill to 180°
6. Closing hook
7. Top non-stick baking plate
8. Bottom non-stick baking plate
9. Bottom part
10. Power / Standby light (red /
green)
11. Drip tray for excess grease (2 pcs
included)
Deutsch
1. Linker Arm
2. Gri
3. Obere Abdeckung
4. Rechter Arm
5. Taste zum Önen des Grills auf
180°
6. Sperre
7. Obere Antihaft-Backäche
8. Untere Antihaft-Backäche
9. Unterer Teil
10. Anzeige für Speisung /
Betriebsbereitschaft (rot/grün)
11. Abtropfschale für
überschüssiges Fett (2x in der
Verpackung)
Čeština
1. Levé rameno
2. Madlo
3. Horní kryt
4. Pravé rameno
5. Tlačítko k otevření grilu
dopolohy 180°
6. Uzavírací háček
7. Horní nepřilnavá pečicí deska
8. Spodní nepřilnavá pečicí deska
9. Spodní část
10. Kontrolka napájení /
připravenosti (červená/zelená)
11. Odkapávací nádobka na
přebytečný tuk (2× v balení)
Eesti keel
1. Vasakpoolne tugi
2. Käepide
3. Pealmine kaas
4. Parempoolne tugi
5. Nupp grilli avamiseks kuni 180°
6. Sulgemishoob
7. Pealmine nakkekindla kattega
plaat
8. Alumine nakkekindla kattega
plaat
9. Alumine osa
10. Toite/Ooterežiimi näidikutuli
(punane/roheline)
11. Tilgaaluse ülemäärase rasvaine
kogumiseks (komplektis 2 tk)
Español
1. Brazo izquierdo
2. Mango
3. Cubierta superior
4. Brazo derecho
5. Botón para abrir la parrilla a 180°
6. Gancho de cierre
7. Plancha de cocción superior
anti-adherente
8. Plancha de cocción inferior anti-
adherente
9. Parte inferior
10. Luz de encendido/espera (roja/
verde)
11. Bandeja para goteo de exceso de
grasa (se incluyen 2 piezas)
Français
1. Bras gauche
2. Poignée
3. Capot supérieur
4. Bras droit
5. Touche d’ouverture du grill en
position 180°
6. Crochet de fermeture
7. Plaque de cuisson supérieure
antiadhésive
8. Plaque de cuisson inférieure
antiadhésive
9. Partie inférieure
10. Contrôle d’alimentation / état
prêt (rouge/vert)
11. Bac d’égouttage pour l’excès de
graisse (2× dans l’emballage)
Hrvatski, Bosanski
1. Lijeva poluga
2. Ručka
3. Gornji poklopac
4. Desna poluga
5. Tipka za potpuno otvaranje
grilla na 180°
6. Kvačica za zatvaranje
7. Gornja neprianjajuća ploča za
pečenje
8. Donja neprianjajuća ploča za
pečenje
9. Donji dio
10. Pokazivač napajanja (crveni)
ipripravnosti (zeleni)
11. Posuda za cijeđenje suviška
masnoće (2× upakiranju)

Italiano
1. Braccio sinistro
2. Maniglia
3. Coperchio superiore
4. Braccio destro
5. Pulsante per aprire la griglia
a180°
6. Gancio di chiusura
7. Piastra di cottura antiaderente
superiore
8. Piastra di cottura antiaderente
inferiore
9. Parte inferiore
10. Spia di alimentazione /standby
(rossa / verde)
11. Vassoio raccogli gocce per
l’eccesso di grasso (2 pezzi
inclusi)
Latviešu valoda
1. Kreisā svira
2. Rokturis
3. Augšējais vāks
4. Labā svira
5. Poga grila atvēršanai līdz 180°
6. Aizvēršanas āķis
7. Augšējā piedegumdrošā
cepšanas plātne
8. Apakšējā piedegumdrošā
cepšanas plātne
9. Apakšējā daļa
10. Jaudas / Gaidīšanas režīma
indikators (sarkans / zaļš)
11. Pilēšanas trauks liekajiem
taukiem (iekļauti 2 gabali)
Lietuvių kalba
1. Kairioji svirtis
2. Rankena
3. Viršutinis dangtis
4. Dešinioji svirtis
5. Mygtukas griliui atidaryti 180°
6. Uždarymo kablys
7. Viršutinė neprideganti kepimo
plokštė
8. Apatinė neprideganti kepimo
plokštė
9. Apatinė dalis
10. Maitinimo / parengties lemputė
(raudona / žalia)
11. Riebaų pertekliaus išlašėjimo
dėklas (2 vnt. komplekte)
Magyar
1. Bal kar
2. Fogantyú
3. Felső fedél
4. Jobb kar
5. Gomb agrill teljes kinyitásához
180°-ban
6. Záró kampó
7. Felső tapadásmentes sütőlap
8. Alsó tapadásmentes sütőlap
9. Alsó rész
10. Tápellátás (piros) és készenléti
(zöld) kijelző
11. Zsírgyűjtő edény (2 db
acsomagolásban)
Polski
1. Lewa płyta grzewcza
2. Uchwyt
3. Pokrywa górna
4. Prawa płyta grzewcza
5. Przycisk do otwierania grilla pod
kątem 180°
6. Hak zamykający
7. Górna nieprzywierająca płyta do
pieczenia
8. Dolna nieprzywierająca płyta do
pieczenia
9. Dolna część
10. Wskaźnik zasilania / gotowości
(czerwony/zielony)
11. Tacka ociekowa na nadmiar
tłuszczu (2 sztuki wopakowaniu)
Slovenčina
1. Ľavé rameno
2. Držadlo
3. Horný kryt
4. Pravé rameno
5. Tlačidlo na otvorenie grilu
dopolohy 180°
6. Uzatvárací háčik
7. Horná nepriľnavá doska na
pečenie
8. Spodná nepriľnavá doska na
pečenie
9. Spodná časť
10. Kontrolka napájania/
pripravenosti (červená/zelená)
11. Odkvapkávacia nádobka na
prebytočný tuk (2× vbalení)
Slovenščina
1. Levi vzvod
2. Ročaj
3. Zgornji pokrov
4. Desni vzvod
5. Tipka za odprtje žara vpoložaj
180°
6. Zapiralni kavelj
7. Zgornja nelepljiva plošča za
pečenje
8. Spodnja nelepljiva plošča za
pečenje
9. Spodnji del
10. Kontrolna lučka napajanja/
pripravljenosti (rdeča/zelena)
11. Posodica za odvečno maščobo
(2× vpakiranju)
Srpski, Crnogorski
1. Leva poluga
2. Ručka
3. Gornji poklopac
4. Desna poluga
5. Dugme za potpuno otvaranje
grila na 180°
6. Osigurač za zatvaranje
7. Gornja neprianjajuća ploča za
pečenje
8. Donja neprianjajuća ploča za
pečenje
9. Donji deo
10. Indikator napajanja (crveni)
ispremnosti (zeleni)
11. Posuda za ceđenje viška
masnoće (2× upakovanju)
Ελληνικά
1. Αριστερός βραχίονας
2. Λαβή
3. Επάνω κάλυμμα
4. Δεξιός βραχίονας
5. Κουμπί για άνοιγμα της
ψηστιέρας στις 180°
6. Άγκιστρο κλεισίματος
7. Επάνω αντικολλητική πλάκα
ψησίματος
8. Κάτω αντικολλητική πλάκα
ψησίματος
9. Κάτω τμήμα
10. Φωτεινή ένδειξη Λειτουργίας/
Αναμονής (κόκκινη/πράσινη)
11. Δίσκος στάλαξης για περίσσεια
λίπους (περιλαμβάνονται
2τεμάχια)

English
4
PANINI MAKER
SAFETY INSTRUCTIONS
Read carefully and keep for future use!
Warning: The safety measures and instructions contained in this
manual do not include all conditions and potential situations. The user
must be aware that common sense, caution, and care are factors that
cannot be integrated into aproduct. These factors must be ensured by
the user(s) using and operating this equipment. We are not liable for any
damages caused during shipping, by incorrect use, voltage uctuation
or the modication or adjustment of any part of the appliance.
To protect against arisk of re or electric shock, basic precautions shall
be taken while using electrical appliances, including the following:
1. Make sure the voltage in your outlet corresponds to the voltage
provided on the appliance label and that the socket is correctly
grounded. The outlet must be installed in accordance with applicable
electrical codes according to EN.
2. Never use the appliance when the power cord is damaged. All
repairs, including cord replacements, must be carried out at
aprofessional service centre! Do not remove the protective covers
from the appliance; there is arisk of electric shock!
3. The appliance must not come into direct contact with water or other
liquids in order to prevent apotential electric shock.
4. The appliance should not be left unattended when in operation.
5. We recommend that you do not leave the appliance with plugged
in power cable unattended. Disconnect the cord from the electrical
outlet prior to any maintenance. Do not remove the power cord
from the outlet by yanking the cord. Unplug the power cord from
the outlet by grasping the plug.
6. Do not use the appliance outside or in awet environment. Do not
touch the power cord or the appliance with wet hands. There is arisk
of electric shock.
7. Pay closer attention when using the appliance near children.
8. Do not allow the power cord to touch hot surfaces or run the cord
over sharp edges.

English
5
9. The temperature of surfaces near the operating appliance can be
hotter than usual. Place the appliance out of the reach of other
objects so as to ensure free circulation of air necessary for its correct
operation.
10. Do not touch the grilling plates during or after use or hot parts of the
baked product, until is cools o. Only touch the handle to prevent
from burning yourself.
11. Do not immerse the appliance or the baking plates in water and do
not wash them under running water.
12. Keep the appliance away from hot surfaces and sources of heat (for
example, hot plates).
13. Use only in accordance with instructions provided in this manual. The
manufacturer is not liable for any damage caused by the improper
use of this appliance.
14. Do not connect the appliance to electrical outlets with remote
switch or remotely controlled timer.
15. This appliance is specied for household use.
16. This appliance can be used by children aged eight and older and
by the physically, sensory or mentally impaired or by individuals
with insucient experience and knowledge, if supervised or trained
to use the appliance in a safe manner and understand potential
dangers. Children may not play with the appliance. Cleaning
and maintenance operations performed by the user shall not be
carried out by children, if they are not older than 8 years and under
supervision. Children under the age of 8 shall keep away from the
appliance and its power supply.
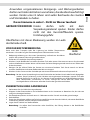
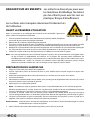
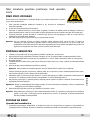
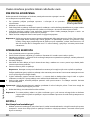
Do not immerse in water!
DANGER FOR CHILDREN: Children may not play with the packaging
material. Do not let children play with the
plastic bags. Risk of suocation.

English
6
The surfaces so marked become hot during use.
BEFORE FIRST USE
After transporting or storing in cold conditions, allow the device to warm up at
room temperature for at least 2 hours.
1. Read the manual before use and save it for future reference.
2. Remove packaging from the device.
3. Wipe the baking surfaces with adamp cloth or sponge with alittle dishwashing
detergent and then clean water. Do not use abrasive cleaners or scrubbers.
4. Wipe the external surface of the appliance using wet cloth. Do not immerse the appliance in water and
do not pour water on the grilling plates.
5. Dry the body and the surfaces of the appliance maker with adish cloth or paper towel.
Note: You may note aslight odour of smoke when you use the panini maker for the rst time. This is normal
for most appliances with heating elements and does not present athreat to safety of your appliance.
For this reason, we recommend that plates are “burned” without food prior to rst use, until the odour
or smoke is reduced. When burning it o keep the panini maker closed.
PREPARING SANDWICHES
1. First, prepare the pastry lled with ingredients.
2. Close the panini maker and plug it in. Note that both the red and green lights turn on.
3. It takes about 3–5 minutes to reach the baking temperature, then the green light goes out.
4. Open the lid.
5. To achieve an even better golden brownish color, you can lightly smear the bread surface that is in
contact with the plate.
6. Put the bread on the grilling plate.
Note: Do not overll the bread, the lling could spill onto the grilling areas.
Carefully close the upper grilling plate so that the panini maker is completely closed. Do not close the
panini maker by force or you could damage it.
7. The light comes on again. Bake for 3–8 minutes until golden, or until the light goes out again. The baking
time depends on the ingredients used and your personal taste.
8. When your meal is ready, open the lid of the panini maker using the handle. To remove the food, use
aplastic spatula.
Warning: Never use metal tools or sharp kitchen utensils. You could damage the non-stick surface of the
baking plates.
9. Unplug the cord from the outlet after you are nished using the panini maker.
Note: The green indicator light ashes on and o, signalling readiness for grilling, depending how is the
correct temperature of the grilling plates maintained. The correct temperature is indicated by the
indicator light going o.
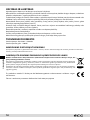
GRILLING
Use as acontact grill
1. Cook burgers, boneless or thin pieces of meat or other food according to the recipe and place them on
the lower grilling plate. Place the drip tray under the groove draining excess fat.
2. Close the top grilling plate. The plate has aoating hinge that is designed to evenly press the food to be
cooked. The top plate must be laid freely to ensure that the food is properly grilled.
3. When your meal is ready, open the lid of the panini maker using the handle. To remove the food, use
aplastic spatula. Never use metal tongs or aknife as they can damage the non-stick surface of the plates.
Hot surface!

English
7
4. Use the panini maker as acontact grill to cook burgers, boneless or thin pieces of meat and vegetables.
5. Use the panini maker as a contact grill for quick cooking or if you are looking for a healthy grilling
method. When cooking on acontact grill, the food is ready quickly, as you cook the food from both sides
simultaneously. The ribbing of the grill plates allows the natural fat and grease to ow out through the
groove in the corner of the bottom plate directly into the prepared container.
Use as an open grill
1. You can use the panini maker also as an open grill. Place it on aclean
at surface.
2. The upper baking plate is ush with the lower baking plate in the
open position. The top and bottom plates are arranged to form one
large grilling surface. You can open the panini maker to this position
by releasing the top part with the button on the right arm.
3. Using your left hand, pull the top toward you, press the top release
button, and push the handle away from you until you lay the top
plate on the table. Now you can grill like on an open grill. Be sure to
place the drip trays under the outlets of the two grease drains. When
you close the top again, the lock will lock the top and you can use the
panini maker again as acontact grill.
Note: When handling the grill (opening/closing/position setting) be
careful, since the plate surfaces can be hot.
4. Use the panini maker as an open grill for the cooking of burgers,
steaks, boneless poultry meat (it is not recommended to cook
chicken with bone as it does not cook evenly), sh and vegetables.
5. Open grill is the most versatile method of using panini makers. You have double the grilling area in the
open position.
6. On an open grill, you can simultaneously prepare dierent types of food without aecting taste or smell,
or you can prepare larger quantities of the same type of food. You can also cook pieces of meat of various
thickness at various cooking times on an open grill, so you can prepare each piece of meat to your liking.
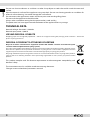
CLEANING AND STORAGE
Unplug the panini maker and let it cool down before cleaning.
Remove the food residue from the baking areas by gently wiping the plates with damp cloth with alittle
dishwashing detergent and then with clean water.
Moisten the baked-in residue using asolution of warm water and detergent and remove it using aplastic
spatula, or place awet paper towel on the grilling plates to soak the baked-in residue.
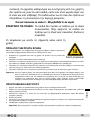
Press the button
to open the grill
to 180°

English
8
Do not use abrasive cleaners or scrubbers or other sharp objects or tools that could scratch the non-stick
surface.
Wipe the external surface of the appliance using wet cloth. Do not use cleaning powders or scrubbers for
external surface cleaning. You could damage the surface nish.
Do not immerse the appliance in water and do not pour water on the grilling plates.
Do not wash the appliance in the dishwasher.
Always make sure before storing that the panini maker is cool and dry.
The power cord can be wrapped around the bottom of the appliance for easy storage.
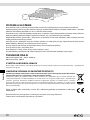
TECHNICAL DATA
Nominal voltage: 220–240 V~ 50/60 Hz
Nominal input power: 1,200 W
USE AND DISPOSAL OF WASTE
Wrapping paper and corrugated paperboard – deliver to scrapyard. Packing foil, PE bags, plastic elements – throw into
plastic recycling containers.
DISPOSAL OF PRODUCTS AT THE END OF LIFETIME
Disposal of electric and electronic equipment (valid in EU member countries and other European
countries with an implemented recycling system)
The represented symbol on the product or package means the product shall not be treated as domestic waste.
Hand over the product to the specied location for recycling electric and electronic equipment. Prevent
negative impacts on human health and the environment by properly recycling your product.
Recycling contributes to preserving natural resources. For more information on the recycling of this product,
refer to your local authority, domestic waste processing organization or store, where you purchased the
product.
This product complies with EU directive requirements on electromagnetic compatibility and
electrical safety.
The instruction manual is available at website www.ecg-electro.eu.
Changes in text and technical parameters reserved.
08/05

Deutsch
9
PANINIMAKER
SICHERHEITSHINWEISE
Bitte aufmerksam lesen und für den künftigen Gebrauch gut
aufbewahren!
Warnung: Die in dieser Anleitung aufgeführten
Sicherheitsvorkehrungen und Hinweise umfassen nicht alle Umstände
und Situationen, zu denen es kommen könnte. Der Anwender muss
begreifen, dass der gesunde Menschenverstand, Vorsicht und Sorgfalt
zu Faktoren gehören, die sich in kein Produkt einbauen lassen. Diese
Faktoren müssen durch den Anwender bzw. mehrere Anwender bei
der Verwendung und Bedienung dieses Gerätes gewährleistet werden.
Wir haften nicht für Schäden, die durch Transport, eine unsachgemäße
Verwendung, Spannungsschwankungen sowie eine Änderung oder
Modikation des Gerätes entstehen.
Um Bränden oder Stromunfällen vorzubeugen, müssen bei
der Verwendung von elektrischen Geräten u.a. folgende
Vorsichtsmaßnahmen eingehalten werden:
1. Vergewissern Sie sich, dass die Spannung in Ihrer Steckdose mit
der Spannung auf dem Etikett übereinstimmt und die Steckdose
ordnungsgemäß geerdet wurde. Die Steckdose muss gemäß
gültiger elektrotechnischer Norm (EN) installiert werden.
2. Verwenden Sie das Gerät nicht, falls das Stromkabel beschädigt
ist. Sämtliche Reparaturen und das Auswechseln des Stromkabels
muss ein Fachservice durchführen! Demontieren Sie niemals die
Schutzabdeckungen des Gerätes. Dies könnte zu einem Stromunfall
führen!
3. Schützen Sie das Gerät vor direktem Kontakt mit Wasser und
sonstigen Flüssigkeiten, um Stromunfällen vorzubeugen.
4. Das Gerät sollte während des Betriebes nicht unbeaufsichtigt
gelassen werden.
5. Das Verbrauchsgerät sollte nicht unbeaufsichtigt gelassen werden,
falls dieses an das Stromnetz angeschlossen ist. Vor der Wartung
Stromkabel aus der Steckdose ziehen. Ziehen Sie nicht am Kabel, um

Deutsch
10
den Stecker aus der Steckdose zu ziehen. Ziehen Sie am Stecker, um
das Kabel aus der Steckdose zu ziehen.
6. Verwenden Sie das Gerät nicht im Freien oder in einer feuchten
Umgebung. Stromkabel oder Gerät nicht mit nassen Händen
berühren. Es könnte zu einem Stromunfall kommen.
7. Seien Sie aufmerksam, falls Sie das Gerät in der Nähe von Kindern
verwenden.
8. Das Stromkabel darf nicht mit heißen Teilen in Berührung kommen
oder über scharfe Kanten führen.
9. Die Oberächentemperatur in der Nähe des Gerätes könnte höher
als gewöhnlich sein. Platzieren Sie das Verbrauchsgerät außer
Reichweite von anderen Gegenständen, um eine freie Luftzirkulation
zu gewährleisten, die für seine richtige Funktionsweise erforderlich
ist.
10. Berühren Sie während der Verwendung und danach nicht die
Backächen oder die heißen Teile der Geräteabdeckung. Warten Sie
bis das Gerät abgekühlt ist. Berühren Sie nur den Gri, damit Sie sich
nicht Verbrennen.
11. Gerät sowie Backächen niemals ins Wasser tauchen oder unter
ießendem Wasser waschen.
12. Gerät niemals an eine heiße Oberäche oder in die Nähe von
Wärmequellen (z.B. Herdplatte) platzieren.
13. Verwenden Sie das Gerät gemäß den in dieser Anleitung aufgeführten
Hinweisen. Der Hersteller übernimmt keine Haftung für Schäden,
die durch unsachgemäße Anwendung entstehen.
14. Gerät niemals an eine Steckdose mit Fernschaltung oder Zeitschalter
anschließen.
15. Das Gerät ist für den Haushaltsgebrauch bestimmt.
16. Kinder im Alter von 8 Jahren und älter sowie Personen mit
verminderten physischen, sensorischen und mentalen Fähigkeiten
oder mangelnden Erfahrungen und Kenntnissen, dürfen dieses
Gerät nur unter Aufsicht benutzen oder nachdem diese über einen
gefahrlosen Gebrauch belehrt wurden und mögliche Gefahren
verstehen. Kinder dürfen nicht mit dem Gerät spielen. Die seitens des

Deutsch
11
Anwenders vorgenommenen Reinigungs- und Wartungsarbeiten
dürfen nur Kinder ab 8 Jahren vornehmen, die überdies beaufsichtigt
werden. Kinder unter 8 Jahren sind außer Reichweite des Gerätes
und Stromkabels zu halten.
Do not immerse in water! – Nicht ins Wasser tauchen!
GEFAHR FÜR KINDER: Kinder dürfen nicht mit dem
Verpackungsmaterial spielen. Kinder dürfen
nicht mit den Kunststobeuteln spielen.
Erstickungsgefahr.
Oberächen mit dieser Markierung werden im Laufe
des Betriebes heiß.
VOR DER ERSTVERWENDUNG
Gerät nach dem Transport oder der Lagerung bei kühlen Temperaturen
mindestens 2 Stunden lang bei Zimmertemperatur akklimatisieren lassen.
1. Bedienungsanleitung vor der ersten Verwendung aufmerksam durchlesen
und für den späteren Gebrauch gut aufbewahren.
2. Entfernen Sie sämtliches Verpackungsmaterial.
3. Wischen Sie die Backächen mit einem feuchten Tuch oder einem Schwamm mit etwas Geschirrmittel
und anschließend mit reinem Wasser ab. Benutzen Sie keine Reinigungsmittel mit abrasiven Teilen oder
Drahtschwämme.
4. Reinigen Sie die äußere Fläche des Gerätes nur mit einem feuchten Tuch. Gerät niemals ins Wasser
tauchen. Backächen nicht unter ießendem Wasser reinigen!
5. Wischen Sie das Gerät und den Gerätekörper mit einem Küchentuch oder einem Papiertuch ab.
Bemerkung: Bei der ersten Verwendung kann vom Paninimaker ein leichter Geruch oder Rauch abgegeben
werden. Diese Erscheinung ist bei Geräten mit eingebauten Heizkörpern normal und stellt
keinerlei Gefahr für Ihr Gerät dar. Aus diesem Grund empfehlen wir die Backächen zunächst
ohne Lebensmittel „ausbrennen“ zu lassen, solange der Geruch oder der Rauch nicht
zurückgeht. Beim Ausbrennen sollte der Paninimaker geschlossen bleiben.
ZUBEREITUNG EINES SANDWICHES
1. Vorbereiten Sie das Gebäck mit Ingredienzen.
2. Klappen Sie den Paninimaker zu und schließen diesen an das Stromnetz an. Bemerken Sie, dass die rote
und grüne Anzeigen leuchten.
3. Die Betriebstemperatur wird nach etwa 3–5 Minuten erreicht. Danach erischt die grüne Anzeige.
4. Deckel önen.
5. Damit das Gebäck eine goldbraune Farbe hat, empfehlen wir die Seite des Gebäcks, die mit der Backäche
in Berührung kommt, mit etwas Butter zu beschmieren.
6. Legen Sie das Gebäck auf die Backäche.
Bemerkung: Sie sollten den Paninimaker nicht überfüllen, die Füllung könnte in die Backächen
auslaufen.
Heiße
Oberäche!

Deutsch
12
Klappen Sie die obere Backäche zu. Der Paninimaker sollte gut geschlossen sein. Paninimaker niemals
mit Gewalt schließen, da dieser beschädigt werden könnte.
7. Die Anzeige leuchtet wieder auf. Backen Sie etwa 3–8 Minuten bis zur Goldfärbung oder nachdem die
Anzeige wieder erlischt. Die Zubereitungsdauer hängt von den benutzten Ingredienzen und Ihrem
persönlichen Geschmack ab.
8. Sobald die Speise fertig ist, heben Sie den Deckel des Paninimakers mit Hilfe des Gries hoch. Benutzen
Sie zum Herausnehmen eine Holzspatel.
Hinweis: Benutze Sie keine Utensilien aus Metall oder scharfe Küchengegenstände. Sie könnten die
antihaftbeschichtete Oberäche der Backächen beschädigen.
9. Paninimaker nach dem Gebrauch vom Stromnetz trennen.
Bemerkung: Beim Braten leuchtet und erlischt die grüne Anzeige der Betriebsbereitschaft, und zwar in
Abhängigkeit von der Temperatur der Backächen. Die richtige Temperatur wird durch das
Löschen des Anzeigelichtes indiziert.
GRILLEN
Verwendung als Kontaktgrill
1. Zubereiten Sie Hamburger, entbeinte oder dünnen Fleischstücke und sonstige Lebensmittel nach
dem Rezept und legen auf die untere Backäche. Geben sie die Abtropfschale unter die Rinne für
überschüssiges Fett.
2. Schließen Sie die obere Backäche. Die Platte hat ein schwimmendes Scharnier, damit die Platte das
zubereitete Gericht gleichmäßig zudeckt. Die obere Platte muss locker anliegen, damit das zubereitete
Gericht richtig gegrillt wird.
3. Sobald die Speise fertig ist, heben Sie den Deckel des Paninimakers mit Hilfe des Gries hoch. Benutzen
Sie zum Herausnehmen eine Holzspatel. Benutzen Sie niemals matallische Zangen oder Messser, da
diese die Antihaft-Oberäche der Kochplatten beschädigen könnten.
4. Benutzen Sie den Panini Maker als Kontaktgrill für die Zubereitung von Hamburgern, entbeinten oder
dünnen Fleischstücken und Gemüse.
5. Benutzen Sie den Panini Maker als Kontaktgrill für die schnelle Zubereitung von Gerichten oder für
gesundes Grillen. Mit dem Kontaktgrill wird das Gericht schnell fertig, da das zubereitete Gericht von
beiden Seiten gleichzeitig gegrillt wird. Die gerippten Grillplatten sorgen für eine richtige Abführung
von Fett und Saucen, die mit Hilfe von Rillen in der Ecke der unteren Platte in die Abtropfschale abgeführt
werden.

Deutsch
13
Oener Grill
1. Der Panini Maker kann auch als oener Grill verwendet werden.
Legen Sie diesen auf eine saubere und gerade Oberäche.
2. Die obere Grillplatte bendet sich in oener Position in einer Ebene
mit der unteren Backplatte. Die obere und untere Platte sind so
angeordnet, damit sie eine große Grilläche bilden. Der Panini Maker
kann in diese Position versetzt werden, nachdem der obere Teil mit
der Taste auf dem rechten Arm freigegeben wird.
3. Ziehen Sie mit der linken Hand den oberen Teil an sich heran, drücken
die Taste zur Freigabe des oberen Teils und pressen den Gri von sich,
bis der obere Teil auf dem Tisch liegt. Jetzt können Sie wie auf einem
oenen Grill grillen. Vergessen Sie nicht die Abtropfschalen unter die
Abführwege beider Rillen zu platzieren. Sobald der obere Teil erneut
zugeklappt wird, wird dieser via Sicherung in dieser Position xiert
und der Panini Maker kann erneut als Kontaktgrill verwendet werden.
Bemerkung: Seien Sie vorsichtig, wenn Sie mit dem Grill
manipulieren (Önen / Schließen / Einstellen der
Position); die Backächen könnten heiß sein.
4. Benutzen Sie den Panini Maker als oenen Grill für die Zubereitung von Hamburgern, Steaks, entbeinten
Geügeleisch (wir empfehlen jedoch nicht Hühnereisch mit Knochen zuzubereiten, da dieses nicht
gleichmäßig durchgebraten wird), Fisch und Gemüse.
5. Das Grillen auf einem oenen Grill stellt die vielseitigste Methode bei der Verwendung des Panini
Makers. In oener Position steht eine doppelte Grilläche zur Verfügung.
6. Sie können auf dem oenen Grill gleichzeitig verschiedene Lebensmittel zubereiten, ohne dabei
Geschmack oder Aroma einzelner Lebensmittel zu beeinussen. Sie können auch größere Mengen
der selben Lebensmittel zubereiten. Auf dem oenen Grill können verschieden starke Fleischstücke
unterschiedlich lange zubereitet werden. Auf diese Weise kann jedes Fleischstück nach eigenem
Geschmack zubereitet werden.
REINIGUNG UND AUFBEWAHRUNG
Vor der Reinigung Stromkabel herausziehen und warten, bis der Paninimaker abgekühlt ist.
Möchten Sie die anhaftenden Lebensmittelreste von den Backächen entfernen, benutzen Sie hierfür
ein feuchtes Tuch oder einen Schwamm mit etwas Geschirrmittel. Anschließend sollten Sie reines Wasser
benutzen.
Eingebackene Lebensmittelreste mit Warmwasser und Spülmittel anfeuchten und mit einer Kunststospachtel
entfernen ggf. auf die Backäche ein befeuchtetes Papiertuch legen, um die eingebackenen Lebensmittelreste
einzuweichen.
Benutzen Sie keine Reinigungsmittel mit abrasiven Teilen, Drahtschwämme, scharfe Gegenstände oder
Utensilien, welche die antihaftbeschichtete Oberäche beschädigen könnten.
Reinigen Sie die äußere Fläche des Gerätes nur mit einem feuchten Tuch. Benutzen Sie zur Reinigung
der äußeren Oberächen keine Scheuermittel oder Drahtbürsten. Die Oberächenbehandlung könnte
beschädigt werden.
Gerät niemals ins Wasser tauchen. Backächen nicht unter ießendem Wasser reinigen!
Gerät nicht in der Geschirrspülmaschine waschen.
Der Grill kann mit
der Taste bis 180°
geönet werden

Deutsch
14
Das Gerät sollte vor der Lagerung abgekühlt und trocken sein.
Das Stromkabel kann praktisch um den unteren Teil des Gerätes gewickelt werden.
TECHNISCHE ANGABEN
Nennspannung: 220–240 V~ 50/60 Hz
Anschlusswert: 1200 W
VERWENDUNG UND ENTSORGUNG DER VERPACKUNG
Verpackungspapier und Wellpappe – zum Altpapier geben. Verpackungsfolie, PET-Beutel, Plastikteile – in den
Sammelcontainer für Plastik.
ENTSORGUNG DES PRODUKTES NACH ABLAUF DER LEBENSDAUER
Die Entsorgung der verwendeten elektrischen und elektronischen Geräte (gültig in den
Mitgliedsländern der EU und weiteren europäischen Ländern mit dem eingeführten System der
Abfalltrennung)
Das abgebildete Symbol auf dem Produkt oder auf der Verpackung bedeutet, dass das Produkt nicht
als Hausmüll abgegeben werden soll. Das Produkt geben Sie an einem Ort ab, der für das Recycling von
elektrischen und elektronischen Geräten bestimmt ist. Die richtige Entsorgung des Produktes schützt Sie vor
negativen Einüssen auf die menschliche Gesundheit und des Lebensraumes.
Das Recycling des Materials trägt zum Schutz der Naturressourcen bei. Mehr Informationen über das Recycling
dieses Produktes gibt Ihnen die Kommunalbehörde, Organisationen für die Bearbeitung von Hausabfall oder
die Verkaufsstelle, in der Sie das Produkt erworben haben.
Dieses Produkt erfüllt die Anforderung der EU-Richtlinien über elektromagnetische
Kompatibilität und elektrische Sicherheit.
Bedienungsanleitung s. www.ecg-electro.eu.
Eine Änderung des Textes und der technischen Parameter vorbehalten.
08/05

Čeština
15
PANINI MAKER
BEZPEČNOSTNÍ POKYNY
Čtěte pozorně auschovejte pro budoucí potřebu!
Varování: Bezpečnostní opatření apokyny uvedené vtomto návodu
nezahrnují všechny možné podmínky asituace, ke kterým může dojít.
Uživatel musí pochopit, že faktorem, který nelze zabudovat do žádného
zvýrobků, je zdravý rozum, opatrnost apéče. Tyto faktory tedy musí být
zajištěny uživatelem/uživateli používajícími aobsluhujícími toto zařízení.
Neodpovídáme za škody způsobené během přepravy, nesprávným
používáním, kolísáním napětí nebo změnou či úpravou jakékoliv části
zařízení.
Aby nedošlo ke vzniku požáru nebo kúrazu elektrickým proudem, měla
by být při používání elektrických zařízení vždy dodržována základní
opatření, včetně těch následujících:
1. Ujistěte se, že napětí ve vaší zásuvce odpovídá napětí uvedenému
na štítku zařízení aže je zásuvka řádně uzemněná. Zásuvka musí být
instalována podle platné elektrotechnické normy ČSN.
2. Nepoužívejte spotřebič, pokud je přívodní kabel poškozen. Veškeré
opravy včetně výměny napájecího přívodu svěřte odbornému
servisu! Nedemontujte ochranné kryty zařízení, hrozí nebezpečí
úrazu elektrickým proudem!
3. Chraňte zařízení před přímým kontaktem svodou ajinými tekutinami,
aby nedošlo kpřípadnému úrazu elektrickým proudem.
4. Spotřebič by neměl být ponechán během chodu bez dozoru.
5. Doporučujeme nenechávat spotřebič se zasunutým přívodním
kabelem vzásuvce bez dozoru. Před údržbou vytáhněte přívodní
kabel ze síťové zásuvky. Vidlici nevytahujte ze zásuvky taháním za
kabel. Kabel odpojte ze zásuvky uchopením za vidlici.
6. Nepoužívejte spotřebič venku nebo ve vlhkém prostředí. Nedotýkejte
se přívodního kabelu nebo spotřebiče mokrýma rukama. Hrozí
nebezpečí úrazu elektrickým proudem.
7. Dbejte zvýšené pozornosti, pokud používáte spotřebič v blízkosti
dětí.

Čeština
16
8. Přívodní kabel se nesmí dotýkat horkých částí ani vést přes ostré
hrany.
9. Teplota povrchů vblízkosti přístroje může být během jeho chodu
vyšší než obvykle. Spotřebič umístěte mimo dosah ostatních
předmětů tak, aby byla zajištěna volná cirkulace vzduchu potřebná
kjeho správné činnosti.
10. Během použití apo něm se nedotýkejte pečicích ploch ani horkých
částí krytu výrobku, dokud výrobek nevychladne. Dotýkat se můžete
pouze madla, abyste se vyvarovali popálení.
11. Přístroj ani pečicí plochy neponořujte do vody a neomývejte
proudem tekoucí vody.
12. Spotřebič nepokládejte na horký povrch ani jej nepoužívejte
vblízkosti zdroje tepla (např. plotýnky sporáku).
13. Používejte pouze vsouladu spokyny uvedenými vtomto návodu.
Výrobce neodpovídá za škody způsobené nesprávným použitím
tohoto zařízení.
14. Spotřebič nezapojujte do zásuvek se vzdáleným spínáním nebo
ovládaným časovými spínači.
15. Spotřebič je určen pro použití vdomácnosti.
16. Tento spotřebič mohou používat děti ve věku 8 let astarší aosoby
se sníženými fyzickými, smyslovými či mentálními schopnostmi
nebo nedostatkem zkušeností aznalostí, pokud jsou pod dozorem
nebo byly poučeny opoužívání spotřebiče bezpečným způsobem
a rozumí případným nebezpečím. Děti si se spotřebičem nesmějí
hrát. Čištění a údržbu prováděnou uživatelem nesmějí provádět
děti, pokud nejsou starší 8 let apod dozorem. Děti mladší 8 let se
musí držet mimo dosah spotřebiče ajeho přívodu.
Do not immerse in water! – Neponořovat do vody!
NEBEZPECÍ PRO DĚTI: Děti si nesmějí hrát s obalovým materiálem.
Nenechte děti hrát si s plastovými sáčky.
Nebezpečí udušení.

Čeština
17
Takto označené povrchy se stávají během používání
horkými.
PŘED PRVNÍM POUŽITÍM
Po přepravě nebo skladování v chladných podmínkách je třeba nechat přistroj
alespoň 2 hodiny aklimatizovat při pokojové teplotě.
1. Před použitím si pečlivě přečtěte návod auložte knahlédnutí vbudoucnu.
2. Odstraňte zpřístroje obalový materiál.
3. Otřete pečicí plochy vlhkým hadříkem nebo houbou strochou běžného čisticího prostředku na nádobí
anásledně čistou vodou. Nepoužívejte čisticí prostředky sabrazivy ani drátěnky.
4. Vnější povrch spotřebiče otřete pouze vlhkou utěrkou. Přístroj neponořujte do vody anepouštějte vodu
přímo na pečicí plochy!
5. Plochy itělo spotřebiče osušte utěrkou nebo papírovým ubrouskem.
Poznámka: Při prvním zahřívání panini makeru můžete zaznamenat jemný zápach nebo dým. Tento jev
je běžný uvětšiny spotřebičů stopnými tělesy anepředstavuje ohrožení bezpečnosti vašeho
spotřebiče. Z tohoto důvodu doporučujeme plotny před prvním použitím „vypálit“ bez
potravin, dokud zápach nebo dým nezeslábne. Při vypalování nechte panini maker uzavřený.
PŘÍPRAVA SENDVIČŮ
1. Předem si připravte pečivo naplněné ingrediencemi.
2. Panini maker zavřete azapojte jej do zásuvky. Povšimněte si, že se rozsvítí červená i zelená kontrolka.
3. Dosažení pečicí teploty trvá přibližně 3–5 minut, zelená kontrolka poté pohasne.
4. Odklopte víko.
5. Abyste dosáhli ještě lepší zlatavě nahnědlé barvy, můžete povrch pečiva, který je vkontaktu sdeskou,
lehce natřít máslem.
6. Pečivo položte na opékací desku.
Poznámka: Pečivo nepřeplňujte, náplň by mohla vytéct na pečicí plochy.
Opatrně přiklopte horní pečicí plochu tak, aby došlo k úplnému uzavření panini makeru. Nezavírejte
panini maker násilím, jinak může dojít kjeho poškození.
7. Kontrolka se opět rozsvítí. Pečte 3–8 minut do zlatova, nebo až kontrolka opět zhasne. Čas pečení závisí
na použitých přísadách avaší osobní chuti.
8. Když je pokrm hotov, otevřete pomocí madla víko panini makeru. Kvyjmutí pokrmu použijte plastovou
špachtli.
Upozornění: Nikdy nepoužívejte kovové náčiní nebo ostré kuchyňské nástroje. Mohli byste tak poškodit
nepřilnavý povrch pečicích ploch.
9. Po ukončení používání panini maker odpojte ze zásuvky ve zdi.
Poznámka: Během opékání se rozsvěcuje azhasíná zelená kontrolka signalizující připravenost kopékání
podle toho, jak je udržována správná teplota pečicích ploch. Správná teplota je indikována
pohasnutím kontrolky.
GRILOVÁNÍ
Použití jako kontaktní gril
1. Připravte hamburgery, vykostěné nebo tenké kousky masa nebo jiných potravin podle receptu apoložte
je na spodní opékací desku. Odkapávací nádobku umístěte pod drážku odvádějící přebytečný tuk.
Horký povrch!

Čeština
18
2. Uzavřete horní opékací desku. Deska má plovoucí závěs, který je navržen tak, aby deska rovnoměrně
přitlačila připravovaný pokrm. Horní deska musí být volně položena, jen tak se připravovaný pokrm
správně ugriluje.
3. Když je pokrm hotov, otevřete pomocí madla víko panini makeru. Kvyjmutí pokrmu použijte plastovou
špachtli. Nikdy nepoužívejte kovové kleště nebo nůž, protože mohou poškodit nepřilnavý povrch
varných desek.
4. Panini maker používejte jako kontaktní gril pro přípravu hamburgerů, vykostěných nebotenkých kousků
masa azeleniny.
5. Panini maker používejte jako kontaktní gril krychlé přípravě pokrmů nebo pokud hledáte zdravý způsob
grilování. Při přípravě na kontaktním grilu je pokrm rychle hotový, protože připravovaný pokrm grilujete
zobou stran současně. Žebrování grilovacích desek umožňuje přirozené odtékání tuku avypečené šťávy
drážkou vrohu spodní desky přímo do připravené nádoby.
Použití jako otevřený gril
1. Panini maker můžete použít také jako otevřený gril. Položte jej na
čistý rovný povrch.
2. Horní pečicí deska je v otevřené poloze v jedné rovině se spodní
pečicí deskou. Horní a spodní desky jsou uspořádány tak, aby
vytvořily jednu velkou grilovací plochu. Panini maker můžete do této
polohy otevřít po uvolnění horní částí tlačítkem na pravém rameni.
3. Levou rukou přitáhněte horní část ksobě, stiskněte tlačítko kuvolnění
horní části a zatlačte rukojeť od sebe, až položíte horní část na
stůl. Nyní můžete grilovat jako na otevřeném grilu. Nezapomeňete
umístit odkapávací nádobky pod vývody obou drážek odvádějících
přebytečný tuk. Jakmile horní část opět zavřete, pojistka horní část
zajistí apanini maker můžete opět používat jako kontaktní gril.
Poznámka: Při manipulaci s grilem (otevírání / zavírání/ nastavování
polohy) buďte opatrní; pečicí plochy mohou být horké.
4. Panini maker používejte jako otevřený gril pro přípravu hamburgerů,
steaků, vykostěného drůbežího masa (nedoporučujeme připravovat
kuřecí maso skostí, protože se nepropeče rovnoměrně), ryb azeleniny.
5. Grilování na otevřeném grilu je nejvšestrannější metodou použití panini makeru. Votevřené poloze máte
kdispozici dvojnásobnou plochu pro grilování.
6. Na otevřeném grilu můžete současně připravovat různé druhy potravin, aniž by se vzájemně ovlivnila
chuť nebo vůně, případně můžete připravovat větší množství stejného druhu potravin. Na otevřeném
grilu také můžete připravovat různě silné kousky masa různou dobu, můžete tak připravit každý kousek
masa podle svých představ.
Po stisku tlačítka
lze gril otevřít do
polohy 180°

Čeština
19
ČIŠTĚNÍ AULOŽENÍ
Před čištěním vždy vytáhněte přívodní kabel ze zásuvky apočkejte, až panini maker zchladne.
Pečicí plochy zbavte zbytků potravin jemným otřením ploch vlhkým hadříkem nebo houbou s trochou
běžného čisticího prostředku na nádobí anásledně čistou vodou.
Připečené zbytky navlhčete roztokem teplé vody asaponátu aodstraňte pomocí plastové špachtle, nebo na
pečicí plochy položte navlhčenou papírovou utěrku, aby se připečené zbytky odmočily.
Nepoužívejte čisticí prostředky sabrazivy ani drátěnky či jiné ostré předměty nebo nástroje, které by mohly
poškrábat nepřilnavý povrch.
Vnější povrch spotřebiče otřete pouze vlhkou utěrkou. Na vnější povrchy nepoužívejte čistící prášky nebo
drátěnky. Mohli byste poškodit povrchovou úpravu.
Přístroj neponořujte do vody anepouštějte vodu přímo na pečicí plochy!
Přístroj neumývejte v myčce nádobí.
Před uložením se vždy ujistěte, že je přístroj studený asuchý.
Pro snazší skladování lze napájecí šňůru ovinout kolem spodní části přístroje.
TECHNICKÉ ÚDAJE
Jmenovité napětí: 220–240 V~ 50/60 Hz
Jmenovitý příkon: 1200 W
VYUŽITÍ ALIKVIDACE ODPADU
Balicí papír a vlnitá lepenka – odevzdat do sběrných surovin. Přebalová folie, PE sáčky, plastové díly – do sběrných
kontejnerů na plasty.
LIKVIDACE VÝROBKU PO UKONČENÍ ŽIVOTNOSTI
Likvidace použitých elektrických a elektronických zařízení (platí v členských zemích EU a dalších
evropských zemích se zavedeným systémem třídění odpadu)
Vyobrazený symbol na produktu nebo na obalu znamená, že sproduktem by nemělo být nakládáno jako
s domovním odpadem. Produkt odevzdejte na místo určené pro recyklaci elektrických a elektronických
zařízení. Správnou likvidací produktu zabráníte negativním vlivům na lidské zdraví a životní prostředí.
Recyklace materiálů přispívá kochraně přírodních zdrojů. Více informací orecyklaci tohoto produktu Vám
poskytne obecní úřad, organizace pro zpracování domovního odpadu nebo prodejní místo, kde jste produkt
zakoupili.
Tento výrobek splňuje požadavky směrnic EU o elektromagnetické kompatibilitě a elektrické
bezpečnosti.
Návod kobsluze je kdispozici na webových stránkách www.ecg-electro.eu.
Změna textu atechnických parametrů vyhrazena.
08/05

Eesti keel
20
PANINI VALMISTAJA
OHUTUSJUHISED
Tutvuge põhjalikult ning säilitage edaspidiseks kasutamiseks!
Hoiatus: Juhendis sisalduvad ohutusabinõud ja juhised ei hõlma
kõiki võimalikke tingimusi ja olukordasid. Kasutaja peab teadvustama,
et terve mõistus, tähelepanu ja ettevaatus on tegurid, mida ei saa
toodetesse integreerida. Seetõttu peab need tegurid tagama seadme
kasutaja. Me ei vastutata transportimisel, mittenõuetekohasest
kasutamisest, toitepinge kõikumisest või seadme mistahes osade
vahetamisest või muutmisest põhjustatud kahjude eest.
Tulekahju või elektrilöögi riski eest kaitseks tuleb elektriseadmete
kasutamisel rakendada põhilisi ettevaatusabinõusid, sealhulgas
alljärgnevaid:
1. Veenduge, et toitevõrgu pinge vastab seadme andmesildil
näidatud pingega ning, et pistikupesa on nõuetekohaselt
maandatud. Pistikupesa tuleb paigaldada vastavalt kehtivatele EL
elektrieeskirjadele.
2. Ärge kunagi kasutage kahjustatud toitejuhtmega seadet. Kõik
remondid, sealhulgas toitejuhtme asendused, teostatakse vastavas
teeninduskeskuses! Ärge eemaldage seadme kaitsekatteid, see võib
põhjustada elektrilööki!
3. Elektrilöögi ärahoidmiseks vältige seadme otsest kokkupuudet
veega või muude vedelikega.
4. Ärge jätke töötavat seadet järelevalveta.
5. Ärge jätke toitevõrku ühendatud seadet järelevalveta. Enne
mistahes hoolduse teostamist ühendage toitejuhe vooluvõrgust
lahti. Toitevõrgust lahtiühendamisel ärge tõmmake toitejuhtmest.
Toitevõrgust lahtiühendamisel tõmmake pistikust.
6. Ärge kasutage seadet välistingimustes või märjas keskkonnas.
Ärge puudutage toitekaablit või toodet märgade kätega. See võib
põhjustada elektrilöögi.
7. Seadme kasutamisel laste läheduses olge eriti ettevaatlikud.
8. Ärge laske toitejuhtmel kokku puutuda kuumade pindadega ning
ärge jätke seda teravatele servadele.
La pagina si sta caricando...
La pagina si sta caricando...
La pagina si sta caricando...
La pagina si sta caricando...
La pagina si sta caricando...
La pagina si sta caricando...
La pagina si sta caricando...
La pagina si sta caricando...
La pagina si sta caricando...
La pagina si sta caricando...
La pagina si sta caricando...
La pagina si sta caricando...
La pagina si sta caricando...
La pagina si sta caricando...
La pagina si sta caricando...
La pagina si sta caricando...
La pagina si sta caricando...
La pagina si sta caricando...
La pagina si sta caricando...
La pagina si sta caricando...
La pagina si sta caricando...
La pagina si sta caricando...
La pagina si sta caricando...
La pagina si sta caricando...
La pagina si sta caricando...
La pagina si sta caricando...
La pagina si sta caricando...
La pagina si sta caricando...
La pagina si sta caricando...
La pagina si sta caricando...
La pagina si sta caricando...
La pagina si sta caricando...
La pagina si sta caricando...
La pagina si sta caricando...
La pagina si sta caricando...
La pagina si sta caricando...
La pagina si sta caricando...
La pagina si sta caricando...
La pagina si sta caricando...
La pagina si sta caricando...
La pagina si sta caricando...
La pagina si sta caricando...
La pagina si sta caricando...
La pagina si sta caricando...
La pagina si sta caricando...
La pagina si sta caricando...
La pagina si sta caricando...
La pagina si sta caricando...
La pagina si sta caricando...
La pagina si sta caricando...
La pagina si sta caricando...
La pagina si sta caricando...
La pagina si sta caricando...
La pagina si sta caricando...
La pagina si sta caricando...
La pagina si sta caricando...
La pagina si sta caricando...
La pagina si sta caricando...
La pagina si sta caricando...
La pagina si sta caricando...
La pagina si sta caricando...
La pagina si sta caricando...
La pagina si sta caricando...
La pagina si sta caricando...
La pagina si sta caricando...
La pagina si sta caricando...
La pagina si sta caricando...
La pagina si sta caricando...
La pagina si sta caricando...
La pagina si sta caricando...
La pagina si sta caricando...
La pagina si sta caricando...
-
 1
1
-
 2
2
-
 3
3
-
 4
4
-
 5
5
-
 6
6
-
 7
7
-
 8
8
-
 9
9
-
 10
10
-
 11
11
-
 12
12
-
 13
13
-
 14
14
-
 15
15
-
 16
16
-
 17
17
-
 18
18
-
 19
19
-
 20
20
-
 21
21
-
 22
22
-
 23
23
-
 24
24
-
 25
25
-
 26
26
-
 27
27
-
 28
28
-
 29
29
-
 30
30
-
 31
31
-
 32
32
-
 33
33
-
 34
34
-
 35
35
-
 36
36
-
 37
37
-
 38
38
-
 39
39
-
 40
40
-
 41
41
-
 42
42
-
 43
43
-
 44
44
-
 45
45
-
 46
46
-
 47
47
-
 48
48
-
 49
49
-
 50
50
-
 51
51
-
 52
52
-
 53
53
-
 54
54
-
 55
55
-
 56
56
-
 57
57
-
 58
58
-
 59
59
-
 60
60
-
 61
61
-
 62
62
-
 63
63
-
 64
64
-
 65
65
-
 66
66
-
 67
67
-
 68
68
-
 69
69
-
 70
70
-
 71
71
-
 72
72
-
 73
73
-
 74
74
-
 75
75
-
 76
76
-
 77
77
-
 78
78
-
 79
79
-
 80
80
-
 81
81
-
 82
82
-
 83
83
-
 84
84
-
 85
85
-
 86
86
-
 87
87
-
 88
88
-
 89
89
-
 90
90
-
 91
91
-
 92
92


ECG S 2070 Panini Maker Manuale utente
- Categoria
- Barbecue
- Tipo
- Manuale utente
