
RM338PX/RM338PAX/RM338PUX
PROJI
Projection Clock
User Manual

- 1 -
CONTENTS
EN........................................................................................................................................................ 2
IT ......................................................................................................................................................... 16
FR ........................................................................................................................................................ 28
DE........................................................................................................................................................ 40
ES ........................................................................................................................................................ 52
POR ..................................................................................................................................................... 64
NL ........................................................................................................................................................ 76
SWE .................................................................................................................................................... 88
TC ........................................................................................................................................................ 100
SC........................................................................................................................................................ 110
EN
INTRODUCTION
Thank you for purchasing the Oregon Scientic™ PROJI Projection Clock (model: RM338PX/
RM338PAX/RM338PUX). This device bundles precise time keeping, alarm and temperature
monitoring features into a single tool you can use from the convenience of your home. Keep this
manual handy as you use your new product. It contains practical step-by-step instructions, as
well as technical specications and warnings you should know.
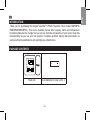
PACKAGE CONTENTS
Main unit AAA batteries for main unit x 2

EN
- 2 -
EN
INTRODUCTION
Thank you for purchasing the Oregon Scientic™ PROJI Projection Clock (model: RM338PX/
RM338PAX/RM338PUX). This device bundles precise time keeping, alarm and temperature
monitoring features into a single tool you can use from the convenience of your home. Keep this
manual handy as you use your new product. It contains practical step-by-step instructions, as
well as technical specications and warnings you should know.
PACKAGE CONTENTS
Main unit AAA batteries for main unit x 2

EN
- 3 -
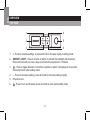
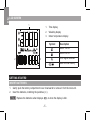
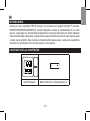
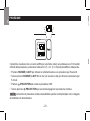
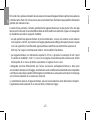
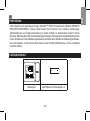
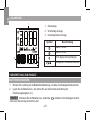
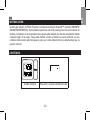
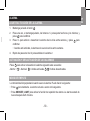
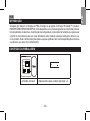
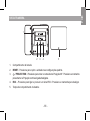
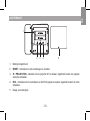
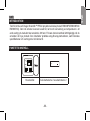
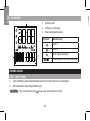
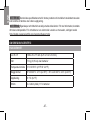
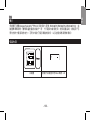
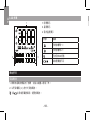
OVERVIEW
TOP VIEW
4
5
6
1
2
3
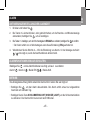
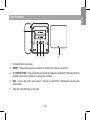
1. + - Press to increase settings, or press and hold to increase rapidly in setting mode.
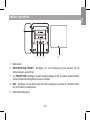
2. SNOOZE | LIGHT - Press to snooze an alarm or activate the backlight and projection.
Press and hold until you hear a beep to activate the projection for 5 minutes.
3. - Press to toggle between current time, calendar or alarm 1/2 displays for 5 seconds.
Press and hold to enter setting mode.
4. – - Press to decrease settings, press and hold to decrease settings rapidly.
5. Projection lens
6. - Press to turn on/off alarms, press and hold to enter alarm setting mode.

EN
- 4 -
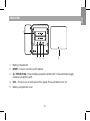
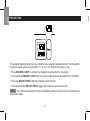
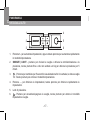
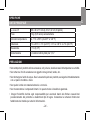
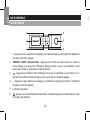
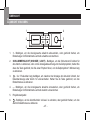
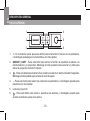
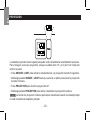
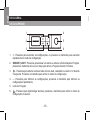
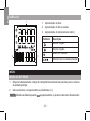
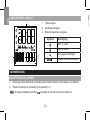
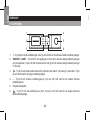
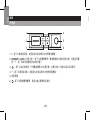
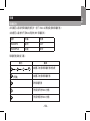
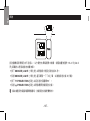
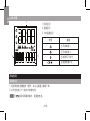
REAR VIEW
1
23 4
5
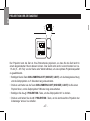
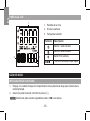
1. Battery compartment
2. RESET - Press to reset the unit to default.
3. / PROJECTION - Press to ip the projection content in 90°. Press and hold to toggle
continuous projection on/off.
4. RCC – Press to turn on and search RCC signal. Press and hold to turn off.
5. Battery compartment cover

EN
- 5 -
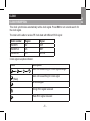
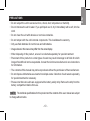
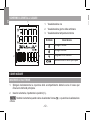
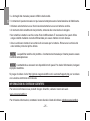
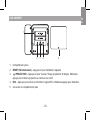
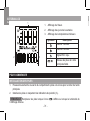
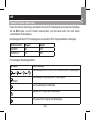
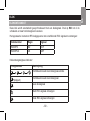
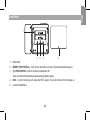
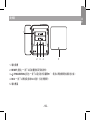
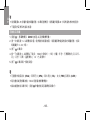
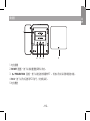
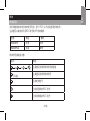
LCD SCREEN
1
23
1. Time display
2. Weekday display
3. Indoor temperature display
Symbol Description
Alarm 1 is on.
Alarm 2 is on.
RCC signal received
Main unit low battery
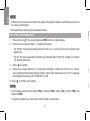
GETTING STARTED
INSERT BATTERIES
1. Gently push the battery compartment cover downwards to remove it from the main unit.
2. Insert the batteries, matching the polarities (+/-).
NOTE Replace the batteries when displays , or when the display is dim.

EN
- 6 -
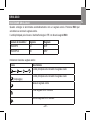
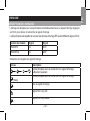
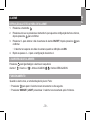
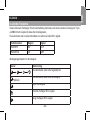
CLOCK
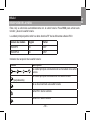
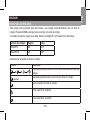
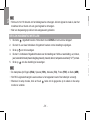
CLOCK RECEPTION
This clock synchronizes automatically with a clock signal. Press RCC to turn on and search for
the clock signal.
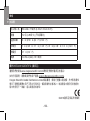
The main unit is able to receive RF clock data with different RCC signal:
Model number Region Signal
RM338PX EU DCF
RM338PUX UK MSF
RM338PAX US WWVB
Clock signal reception indicator:
Icons Description
Main unit is searching for clock signal strength
(ash)
Main unit is searching for clock signal
No clock signal
Strong RCC signal received
Weak RCC signal received

EN
- 7 -
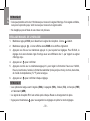
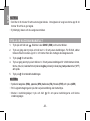
NOTE
• It takes 2-10 minutes to receive the clock signal. If the signal is weak, it could take up to 24 hours
to receive a valid signal.
• Not applicable to Asia and non-designated areas.
SET THE CLOCK MANUALLY
1. Press and hold . The screen displays ZONE and the number ashes.
2. Press once or press and hold +/- to adjust the setting.
• For EU/UK, the time-zone offset sets the clock up to +/- 23 hours from the received clock
signal time.
• For US, the time-zone setting is Atlantic (A); Mountain (M); Pacic (P); Central (C); Eastern
(E); Newfoundland (N).
3. Press to conrm.
4. Press once or press and hold +/- to adjust the setting for 12/24h hour format, hour, minute,
year, calendar format (month-day/day-month), month, date, temperature unit (°C/°F) , language
and daylight saving time (DST) (ON/OFF) for US.
5. Press to conrm each setting.
NOTE
• The language options are English (ENG), Spanish (SPA), Italian (ITA), French (FRE) and
German (GER).
• The signal reception is on after each reset or battery replacement.
• While in the setting mode, press and hold to save the settings and leave the setting mode.
• The daylight saving time (DST) is set to OFF when the RCC is turned off, or when the time/
year, month or date is changed.
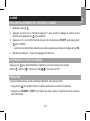
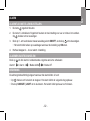
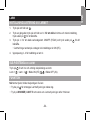
ALARM
SETTING/ADJUSTING ALARM TIME
1. Press and hold .
2. Press once or press and hold +/- to adjust the hour and minute setting, then press to
conrm.
3. Press +/- to toggle the weekday alarm ON/OFF, then press to conrm.
• The alarm rings only on weekdays when the setting is ON.
4. Repeat step 2 – 4 for alarm 2 setting.
TURN ON/OFF ALARMS:
Press to turn on/off the alarm in sequence:
Alarm1 > Alarm 2 > Both ON > Both OFF.
OPERATION
When the alarm rings, the backlight will ash. You may:
• Press to stop. The alarm will ring again on the next day.
• Press SNOOZE | LIGHT to snooze. The alarm rings again after 8 minutes.

EN
- 8 -
• While in the setting mode, press and hold to save the settings and leave the setting mode.
• The daylight saving time (DST) is set to OFF when the RCC is turned off, or when the time/
year, month or date is changed.
ALARM
SETTING/ADJUSTING ALARM TIME
1. Press and hold .
2. Press once or press and hold +/- to adjust the hour and minute setting, then press to
conrm.
3. Press +/- to toggle the weekday alarm ON/OFF, then press to conrm.
• The alarm rings only on weekdays when the setting is ON.
4. Repeat step 2 – 4 for alarm 2 setting.
TURN ON/OFF ALARMS:
Press to turn on/off the alarm in sequence:
Alarm1 > Alarm 2 > Both ON > Both OFF.
OPERATION
When the alarm rings, the backlight will ash. You may:
• Press to stop. The alarm will ring again on the next day.
• Press SNOOZE | LIGHT to snooze. The alarm rings again after 8 minutes.

EN
- 9 -
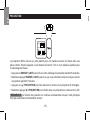
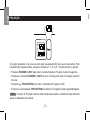
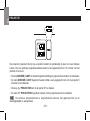
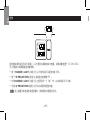
PROJECTION
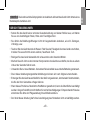
The projector displays the time on your ceiling for easy viewing in a darkened room. For the optimal
projection results, place the unit within 1.5 - 2 m (5 - 6.5 ft) from the ceiling or wall.
• Press SNOOZE | LIGHT to activate the backlight and projection for 5 seconds.
• Press and hold SNOOZE | LIGHT until you hear a beep to activate the projection for 5 minutes.
• Press / PROJECTION to ip the projection content by 90°.
• Press and hold / PROJECTION to toggle the continuous projection on/off.
NOTE The continuous projection function is disabled when the main unit is not connected to
the power adapter.
PRECAUTIONS
• Do not subject the unit to excessive force, shock, dust, temperature or humidity.
• Do not immerse the unit in water. If you spill liquid over it, dry it immediately with a soft, lint-free
cloth.
• Do not clean the unit with abrasive or corrosive materials.
• Do not tamper with the unit’s internal components. This invalidates the warranty.
• Only use fresh batteries. Do not mix new and old batteries.
• Images shown in this manual may differ from the actual display.
• When disposing of this product, ensure it is collected separately for special treatment.
• Placement of this product on certain types of wood may result in damage to its nish for which
Oregon Scientic will not be responsible. Consult the furniture manufacturer’s care instructions
for information.
• The contents of this manual may not be reproduced without the permission of the manufacturer.
• Do not dispose old batteries as unsorted municipal waste. Collection of such waste separately
for special treatment is necessary.
• Please note that some units are equipped with a battery safety strip. Remove the strip from the
battery compartment before rst use.
NOTE The technical specications for this product and the contents of the user manual are subject
to change without notice.

EN
- 10 -
PRECAUTIONS
• Do not subject the unit to excessive force, shock, dust, temperature or humidity.
• Do not immerse the unit in water. If you spill liquid over it, dry it immediately with a soft, lint-free
cloth.
• Do not clean the unit with abrasive or corrosive materials.
• Do not tamper with the unit’s internal components. This invalidates the warranty.
• Only use fresh batteries. Do not mix new and old batteries.
• Images shown in this manual may differ from the actual display.
• When disposing of this product, ensure it is collected separately for special treatment.
• Placement of this product on certain types of wood may result in damage to its nish for which
Oregon Scientic will not be responsible. Consult the furniture manufacturer’s care instructions
for information.
• The contents of this manual may not be reproduced without the permission of the manufacturer.
• Do not dispose old batteries as unsorted municipal waste. Collection of such waste separately
for special treatment is necessary.
• Please note that some units are equipped with a battery safety strip. Remove the strip from the
battery compartment before rst use.
NOTE The technical specications for this product and the contents of the user manual are subject
to change without notice.

EN
- 11 -
NOTE Features and accessories will not be available in all countries. For more information,
please contact your local retailer. To download an electronic version of the user manual, please
visit http://global.oregonscientic.com/customerSupport.php.
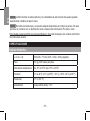
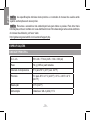
SPECIFICATIONS
MAIN UNIT
L x W x H 108 x 26 x 77 mm (4.25 x 1.02 x 3.03 in)
Weight 112 g
Temperature range -5°C to 50°C (23°F to 122°F)
Accuracy 0°C to 40°C: ±1°C (±2.0°F) < 0°C and >40°C: ±2°C (± 4.0°F)
Resolution 0.1°C (0.2°F)
Power 2 x UM-4 (AAA) 1.5 V batteries
ABOUT OREGON SCIENTIFIC
Visit our website www.oregonscientic.com to learn more about Oregon Scientic products.
For any enquiry, please contact our Customer Services at info@oregonscientic.com.
Oregon Scientic Global Distribution Limited reserves the right to interpret and construe any contents,
terms and provisions in this user manual and to amend it, at its sole discretion, at any time without
prior notice. To the extent that there is any inconsistency between the English version and any other
language versions, the English version shall prevail.

EN
- 12 -
EU-DECLARATION OF CONFORMITY
Hereby the manufacturer, Oregon Scientic Global Distribution Limited, declares that the
radio equipment type PROJI Projection Clock (model: RM338PX/RM338PAX/RM338PUX) is
in compliance with 2014/53/EU Directive. The full text of the EU Declaration of Conformity is
available at the following Internet address : http://global.oregonscientic.com/customerSupport.php
All EU countries, Switzerland CH
and Norway N
Countries RED Approval Complied
DISPOSAL INFORMATION FOR USERS
Pursuant to and in accordance with Article 14 of the Directive 2012/19/EU of the
European Parliament on waste electrical and electronic equipment (WEEE), and
pursuant to and in accordance with Article 20 of the Directive 2013/56/EU of the
European Parliament on batteries and accumulators and waste batteries.
The barred symbol of the rubbish bin shown on the equipment indicates that, at
the end of its useful life, the product must be collected separately from other waste.
Please note that the batteries/rechargeable batteries must be removed from the equipment
before it is given as waste. To remove the batteries/accumulators refer to the specifications
in the user manual. Therefore, any products that have reached the end of their useful
life must be given to waste disposal centers specializing in separate collection of waste
electrical and electronic equipment, or given back to the dealer when purchasing a new
WEEE, pursuant to and in accordance with Article 14 as implemented in the country.

EN
- 13 -
The adequate separate collection for the subsequent start-up of the equipment sent to
be recycled, treated and disposal of in an environmentally compatible way contributes
to preventing possible negative effects on the environment and health and optimizes the
recycling and reuse of components making up the apparatus.
Abusive disposal of the product by the user involves application of the administrative
sanctions according to the laws in force.
FCC STATEMENT
This device complies with Part 15 of the FCC Rules. Operation is subject to the following two
conditions: (1) This device may not cause harmful interference, and (2) This device must accept
any interference received, including interference that may cause undesired operation.
WARNING Changes or modications not expressly approved by the party responsible for
compliance could void the user’s authority to operate the equipment.
This equipment has been tested and found to comply with the limits for a Class B digital device,
pursuant to Part 15 of the FCC Rules. These limits are designed to provide reasonable protection
against harmful interference in a residential installation.
NOTE This equipment generates, uses and can radiate radio frequency energy and, if not
installed and used in accordance with the instructions, may cause harmful interference to radio
communications. However, there is no guarantee that interference will not occur in a particular
installation. If this equipment does cause harmful interference to radio or television reception,
which can be determined by turning the equipment off and on, the user is encouraged to try to
correct the interference by one or more of the following measures:

EN
- 14 -
• Reorient or relocate the receiving antenna.
• Increase the separation between the equipment and receiver.
• Connect the equipment into an outlet on a circuit different from that to which the receiver is
connected.
• Consult the dealer or an experienced radio/TV technician for help.
This Class B digital apparatus complies with Canadian ICES- 3(B)/NMB-3(B)
DECLARATION OF CONFORMITY
The following information is not to be used as contact for support or sales. Please call our customer
service number (listed on our website at www.oregonscientic.com), or on the warranty card for
this product) for all inquiries instead.
We
Name: Oregon Scientic Inc.
Address: Brea Corporate Park 3020 Saturn St. Suite 200 Brea, CA 92821
Telephone No.:
1 (888) 950-8889

EN
- 15 -
declare that the product
Product No.: RM338PX/RM338PAX/RM338PUX
Product Name: PROJI Projection Clock
Manufacturer: Oregon Scientic Global Distribution Limited
Address: Block C, 9/F, Kaiser Estate, Phase 1, 41 Man Yue St.,
Hung Hom, Kowloon, Hong Kong
is in conformity with Part 15 of the FCC Rules. Operation is subject to the following two conditions:
1) This device may not cause harmful interference. 2) This device must accept any interference
received, including interference that may cause undesired operation.

IT
- 16 -
IT
INTRODUZIONE
Grazie per aver acquistato PROJI Orologio con proiezione di Oregon Scientic™ (modello:
RM338PX/RM338PAX/RM338PUX). Questo dispositivo riunisce le caratteristiche di un orario
preciso, una sveglia e il controllo della temperatura in un singolo strumento che potete utilizzare
dalla comodità della vostra sede. Vogliate tenere questo manuale a portata di mano mentre usate
il vostro nuovo prodotto. Esso contiene istruzioni pratiche passo passo, come pure le speciche
tecniche e le avvertenze di cui dovreste essere a conoscenza.
CONTENUTO DELLA CONFEZIONE
Unità Principale Batterie AAA per l’unità principale x 2

IT
- 17 -
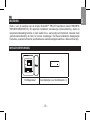
PANORAMICA
VISTA DALL’ALTO
4
5
6
1
2
3
1. Premete + - per aumentare impostazioni, oppure tenete premuto per aumentare rapidamente
in modalità impostazione.
2. SNOOZE | LIGHT - premere per rinviare la sveglia o attivare la retroilluminazione e la
proiezione, tenere premuto no a che non sentiate un bip per attivare la proiezione per 5
minuti.
3. - Premere per cambiare per 5 secondi la visualizzazione fra l’ora attuale, la data o sveglia
1/2. Tenete premuto per entrare in modalità impostazione.
4. Premere – - per diminuire le impostazioni, tenete premuto per diminuire rapidamente le
impostazioni.
5. Lenti di proiezione
6. - Premere per accendere/spegnere le sveglie, tenere premuto per entrare in modalità
impostazione sveglia.
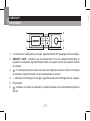
VISTA POSTERIORE
1
23 4 5
1. Compartimento batterie
2. RESET [RIPRISTINO] – Premere per ripristinare le impostazioni di default.
3. /PROJECTION – Premere per ruotare la proiezione di 90°. Tenere premuto per
accendere/spegnere la proiezione.
4. RCC - Premere per accendere e cercare il segnale RCC. Tenete premuto per spegnere.
5. Coperchio compartimento batterie

IT
- 18 -
VISTA POSTERIORE
1
23 4
5
1. Compartimento batterie
2. RESET [RIPRISTINO] – Premere per ripristinare le impostazioni di default.
3. /PROJECTION – Premere per ruotare la proiezione di 90°. Tenere premuto per
accendere/spegnere la proiezione.
4. RCC - Premere per accendere e cercare il segnale RCC. Tenete premuto per spegnere.
5. Coperchio compartimento batterie

IT
- 19 -
SCHERMO A CRISTALLI LIQUIDI
1
23
1. Visualizzazione ora
2. Visualizzazione giorno della settimana
3. Visualizzazione temperatura interna
Simbolo Descrizione
Sveglia 1 attiva.
Sveglia 2 attiva.
Segnale RCC ricevuto
Batteria scarica unità principale
COME INIZIARE
INSERIRE LE BATTERIE
1. Spingere delicatamente la copertura dello scompartimento batterie verso il basso per
rimuoverlo dall'unità principale.
2. Inserire le batterie, rispettando le polarità (+/-).
NOTA Sostituire le batterie quando viene visualizzata l’icona , o quando la visualizzazione
è oca.
OROLOGIO
RICEZIONE OROLOGIO
Questo orologio si sincronizza automaticamente con un segnale orario. Premere RCC per
accendere e cercare il segnale orario.
L'unità principale può ricevere i dati dell'orologio in RF con diversi segnali RCC:
Numero di modello:r Regione Segnale
RM338PX EU DCF
RM338PUX UK MSF
Indicatore ricezione segnale orario:
Icone Descrizione
L’unità principale sta cercando il segnale orario
(lampeggia)
L’unità principale sta cercando il segnale orario
Nessun segnale orario
Forte segnale RCC ricevuto
Debole segnale RCC ricevuto
La pagina sta caricando ...
La pagina sta caricando ...
La pagina sta caricando ...
La pagina sta caricando ...
La pagina sta caricando ...
La pagina sta caricando ...
La pagina sta caricando ...
La pagina sta caricando ...
La pagina sta caricando ...
La pagina sta caricando ...
La pagina sta caricando ...
La pagina sta caricando ...
La pagina sta caricando ...
La pagina sta caricando ...
La pagina sta caricando ...
La pagina sta caricando ...
La pagina sta caricando ...
La pagina sta caricando ...
La pagina sta caricando ...
La pagina sta caricando ...
La pagina sta caricando ...
La pagina sta caricando ...
La pagina sta caricando ...
La pagina sta caricando ...
La pagina sta caricando ...
La pagina sta caricando ...
La pagina sta caricando ...
La pagina sta caricando ...
La pagina sta caricando ...
La pagina sta caricando ...
La pagina sta caricando ...
La pagina sta caricando ...
La pagina sta caricando ...
La pagina sta caricando ...
La pagina sta caricando ...
La pagina sta caricando ...
La pagina sta caricando ...
La pagina sta caricando ...
La pagina sta caricando ...
La pagina sta caricando ...
La pagina sta caricando ...
La pagina sta caricando ...
La pagina sta caricando ...
La pagina sta caricando ...
La pagina sta caricando ...
La pagina sta caricando ...
La pagina sta caricando ...
La pagina sta caricando ...
La pagina sta caricando ...
La pagina sta caricando ...
La pagina sta caricando ...
La pagina sta caricando ...
La pagina sta caricando ...
La pagina sta caricando ...
La pagina sta caricando ...
La pagina sta caricando ...
La pagina sta caricando ...
La pagina sta caricando ...
La pagina sta caricando ...
La pagina sta caricando ...
La pagina sta caricando ...
La pagina sta caricando ...
La pagina sta caricando ...
La pagina sta caricando ...
La pagina sta caricando ...
La pagina sta caricando ...
La pagina sta caricando ...
La pagina sta caricando ...
La pagina sta caricando ...
La pagina sta caricando ...
La pagina sta caricando ...
La pagina sta caricando ...
La pagina sta caricando ...
La pagina sta caricando ...
La pagina sta caricando ...
La pagina sta caricando ...
La pagina sta caricando ...
La pagina sta caricando ...
La pagina sta caricando ...
La pagina sta caricando ...
La pagina sta caricando ...
La pagina sta caricando ...
La pagina sta caricando ...
La pagina sta caricando ...
La pagina sta caricando ...
La pagina sta caricando ...
La pagina sta caricando ...
La pagina sta caricando ...
La pagina sta caricando ...
La pagina sta caricando ...
La pagina sta caricando ...
La pagina sta caricando ...
La pagina sta caricando ...
La pagina sta caricando ...
La pagina sta caricando ...
La pagina sta caricando ...
La pagina sta caricando ...
La pagina sta caricando ...
La pagina sta caricando ...
La pagina sta caricando ...
La pagina sta caricando ...
-
 1
1
-
 2
2
-
 3
3
-
 4
4
-
 5
5
-
 6
6
-
 7
7
-
 8
8
-
 9
9
-
 10
10
-
 11
11
-
 12
12
-
 13
13
-
 14
14
-
 15
15
-
 16
16
-
 17
17
-
 18
18
-
 19
19
-
 20
20
-
 21
21
-
 22
22
-
 23
23
-
 24
24
-
 25
25
-
 26
26
-
 27
27
-
 28
28
-
 29
29
-
 30
30
-
 31
31
-
 32
32
-
 33
33
-
 34
34
-
 35
35
-
 36
36
-
 37
37
-
 38
38
-
 39
39
-
 40
40
-
 41
41
-
 42
42
-
 43
43
-
 44
44
-
 45
45
-
 46
46
-
 47
47
-
 48
48
-
 49
49
-
 50
50
-
 51
51
-
 52
52
-
 53
53
-
 54
54
-
 55
55
-
 56
56
-
 57
57
-
 58
58
-
 59
59
-
 60
60
-
 61
61
-
 62
62
-
 63
63
-
 64
64
-
 65
65
-
 66
66
-
 67
67
-
 68
68
-
 69
69
-
 70
70
-
 71
71
-
 72
72
-
 73
73
-
 74
74
-
 75
75
-
 76
76
-
 77
77
-
 78
78
-
 79
79
-
 80
80
-
 81
81
-
 82
82
-
 83
83
-
 84
84
-
 85
85
-
 86
86
-
 87
87
-
 88
88
-
 89
89
-
 90
90
-
 91
91
-
 92
92
-
 93
93
-
 94
94
-
 95
95
-
 96
96
-
 97
97
-
 98
98
-
 99
99
-
 100
100
-
 101
101
-
 102
102
-
 103
103
-
 104
104
-
 105
105
-
 106
106
-
 107
107
-
 108
108
-
 109
109
-
 110
110
-
 111
111
-
 112
112
-
 113
113
-
 114
114
-
 115
115
-
 116
116
-
 117
117
-
 118
118
-
 119
119
-
 120
120
-
 121
121


Oregon Scientific PROJI Manuale del proprietario
- Categoria
- Sveglie
- Tipo
- Manuale del proprietario
in altre lingue
- English: Oregon Scientific PROJI Owner's manual
- français: Oregon Scientific PROJI Le manuel du propriétaire
- español: Oregon Scientific PROJI El manual del propietario
- Deutsch: Oregon Scientific PROJI Bedienungsanleitung
- Nederlands: Oregon Scientific PROJI de handleiding
- português: Oregon Scientific PROJI Manual do proprietário
- 日本語: Oregon Scientific PROJI 取扱説明書
Documenti correlati
-
 Oregon Scientific RM338P-BK Manuale del proprietario
-
 Oregon Scientific OSRM313PNF-WHI Manuale del proprietario
-
 Oregon Scientific RM313PNF Manuale utente
-
Oregon Scientific Oregon Projection Temperature Alarm Clock Manuale utente
-
Oregon Scientific Time Projection Alarm Clock Manuale del proprietario
-
Oregon Scientific RM510 Manuale del proprietario
-
 Oregon Scientific GLAZE Manuale utente
-
Oregon Scientific OSRM120 Manuale del proprietario
-
 Oregon Scientific GLAZE Manuale del proprietario
-
 Oregon Scientific OSRM938-BLA Manuale del proprietario


