
f r igorifico / fridge / frigorifero
LIBRO DE INSTRUCCIONES
INSTRUCTION BOOK
LIBRETTO ISTRUZIONI
2222 363-61
ERN 3420
E
GB
I

13
WARNINGS
It is most important that this instruction book should be retained with the appliance for future
reference. Should the appliance be sold or transferred to another owner, or should you move house
and leave the appliance, always ensure that the book is supplied with the appliance in order that the
new owner can be acquainted with the functioning of the appliance and the relevant warnings.
If this appliance featuring magnetic door seals is to replace an older appliance having a spring lock
(latch) on the door or lid, be sure to make that spring lock unusable before you discard the old
appliance. This will prevent it from becoming a death-trap for a child.
These warnings are provided in the interest of safety.You must read them carefully before installing or
using the appliance.
General Safety
• This appliance is designed to be operated by
adults. Children should not be allowed to tamper
with the controls or play with the product.
• It is dangerous to alter the specifications or
modify this product in any way.
• Before any cleaning or maintenance work is carried
out, be sure to switch off and unplug the appliance.
• This appliance is heavy. Care should be taken
when moving it
• Ice lollies can cause frost burns if consumed
straight from the appliance.
• Take utmost care when handling your
appliance so as not to cause any damages to
the cooling unit with consequent possible
fluid leakages.
• The appliance must not be located close to
radiators or gas cookers.
• Avoid prolonged exposure of the appliance to
direct sunlight.
• There must be adequate ventilation round the
back of the appliance and any damage to the
refrigerant circuit must be avoided.
• For freezers only (except built-in models): an
ideal location is the cellar or basement.
• Do not use other electrical appliances (such
as ice cream makers) inside of refrigerating
appliances.
Service/Repair
• Any electrical work required to install this
appliance should be carried out by a qualified
electrician or competent person
• This product should be serviced by an authorized
Service Centre, and only genuine spare parts
should be used.
• Under no circumstances should you attempt to
repair the appliance yourself. Repairs carried out
by inexperienced persons may cause injury or
more serious malfunctioning. Refer to your local
Service Centre, and always insist on genuine
spare parts.
• This appliance contains hydrocarbons in its
cooling unit; maintenance and recharging must
therefore only be carried out by authorized
technicians.
Use
• The domestic refrigerators and freezers are
designed to be used specifically for the storage
of edible foodstuffs only.
• Best performance is obtained with ambient
temperature between +18°C and +43°C (class T);
+18°C and +38°C (class ST); +16°C and +32°C
(class N); +10°C and +32°C (class SN). The
class of your appliance is shown on its rating
plate.
Warning: when the ambient temperature is not
included within the range indicated for the class
of this appliance, the following instructions must
be observed: when the ambient temperature
drops below the minimum level, the storage
temperature in the freezer compartment cannot
be guaranteed; therefore it is advisable to use the
food stored as soon as possible.
• Frozen food must not be re-frozen once it has
been thawed out.
• Manufacturers’ storage recommendations should
be strictly adhered to. Refer to relevant
instructions.
• The inner lining of the appliance consists of
channels through which the refrigerant passes. If
these should be punctured this would damage the
appliance beyond repair and cause food loss. DO
NOT USE SHARP INSTRUMENTS to scrape off
frost or ice. Frost may be removed by using the
scraper provided. Under no circumstances should
solid ice be forced off the liner. Solid ice should be
allowed to thaw when defrosting the appliance.
• Do not place carbonated or fizzy drinks in the
freezer as it creates pressure on the container,
which may cause it to explode, resulting in
damage to the appliance.
28
D338
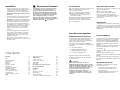
Accessori vano frigorifero
Ripiani e Mensole
I ripiani e le mensole possono essere tolti per la
pulizia.
Per lo stoccaggio d’alimenti di diverse dimensioni, si
possono posizionare i ripiani e le mensole ad
altezze differenti. Per rimuovere i ripiani, rialzarli
posteriormente e toglierli. Per rimuovere le mensole
spingerle nel senso della freccia fino a quando non
si libera.
Per un miglior utilizzo dello spazio, i semiripiani
anteriori possono sovrapporsi a quelli posteriori.
Per permettere una corretta circolazione
dell’aria, non si deve togliere il ripiano vetro sopra il/i
cassetto/i verdura e la mensola inferiore della porta.
Allarme acustico con porta aperta
Un allarme acustico vi segnala quando la porta
rimane aperta per circa 5 minuti.
La condizione di allarme porta aperta viene indicata
da:
- lampeggio del simbolo (1);
- illuminazione rossa del display;
- suono del cicalino.
Per fermare l’allarme acustico, premere il tasto (C).
Al ripristino delle condizioni normali (porta chiusa):
- il segnale acustico si spegne.

14
CONTENTS
Warnings 13
Use 15
Cleaning the interior 15
Control panel 15
Dispaly 15
Operation 16
Activation of function 16
Switching off 16
Temperature regulation 16
Shopping function 16
Fresh food refrigeration 16
Door open acoustic alarm 16
Movable shelves 17
Positioning the door shelves 17
Hints 17
Hints for refrigeration 17
Maintenance 18
Periodic cleaning 18
Periods of no operation 18
Interior light 18
Defrosting 18
Customer service and spare parts 19
Technical information 19
Installation 19
Location 19
Electrical connection 20
Shelf holders 20
Door Reversibility 20
Instruction for totally built-in appliances 21
Environment Protection
This appliance does not contain gasses which
could damage the ozone layer, in either its
refrigerant circuit or insulation materials.The
appliance shall not be discarded together with
the urban refuse and rubbish. Avoid damaging
the cooling unit, especially at the rear near the
heat exchanger. Information on your local
disposal sites may be obtained from municipal
authorities.The materials used on this appliance
marked by the symbol are recyclable.
Installation
• During normal operation, the condenser and
compressor at the back of the appliance heat up
considerably. For safety reasons, minimum
ventilation must be as shown in the instructions.
Attention: keep ventilation openings clear of
obstruction.
• Care must be taken to ensure that the appliance
does not stand on the electrical supply cable.
Important: if the supply cord is damaged, it must
be replaced by a special cord or assembly availa-
ble from the manufacturer or its service agent.
• If the appliance is transported horizontally, it is
possible that the oil contained in the compressor
flows in the refrigerant circuit. It is advisable to
wait at least two hours before connecting the
appliance to allow the oil to flow back in the
compressor.
• There are working parts in this product which
heat up. Always ensure that there is adequate
ventilation as a failure to do this will result in
component failure and possible food loss. See
installation instructions.
• Parts which heat up should not be exposed.
Wherever possible the back of the product should
be against a wall.
Funzionamento
Dopo aver inserito la spina nella presa di corrente, se il
display non e’ illuminato premere il tasto (A),
accensione apparecchiatura.
Appena accesa l'apparecchiatura, si avranno le
seguenti segnalazioni sul pannello comandi:
• Il simbolo (2) sara' positivo ad indicare che la
temperatura e' positiva.
Posizionando la manopole di regolazione frigo (D) in
una posizione intermedia, l'apparecchiatura e'
predisposta per fornire la seguente temperatura:
circa +5°C nel frigorifero.
Spegnimento
Lo spegnimento si ottiene tenendo premuto il tasto (A)
per piu’ di un 1 secondo. Dopo di cio’ verra’ segnalato
un conto alla rovescia della temperatura da -3 -2 -1 .
Quando si spegne l'apparecchiatura si spegne anche
il display (B).
Attivazione delle funzioni
Ogni volta che si preme il tasto C si attivano in senso
orario le seguenti funzioni :
Simbolo 4 : la funzione shopping
Nessun Simbolo : funzionamento normale
Non possono essere attivate piu’ funzioni
contemporaneamente, per disattivare le funzioni
premere piu’ volte il tasto finche’ non compare
nessuna icona.
Uso del vano frigorifero
Regolazione della temperatura
La temperatura è regolata automaticamente e può
essere aumentata (meno freddo) ruotando la
manopola verso il massimo oppure diminuita (più
freddo) ruotandola verso il minimo.
La posizione corretta, comunque, va individuata
tenendo conto che la temperatura interna dipende da
questi fattori:
• La temperatura ambiente
• La frequenza di apertura delle porte
• La quantita' di alimenti conservati
• La collocazione dell'apparecchio
Si suggerisce di impostare la manopola nella
posizione intermedia per avere una temperatura
interna di circa +5°C.
Importante
Sulle posizioni di massimo freddo, con
temperatura ambiente elevata, ed una notevole
quantità di alimenti, il funzionamento può essere
continuo, con formazione di brina o ghiaccio
sulla parete posteriore della cella. In tal caso è
necessario ruotare la manopola su una
posizione di minor freddo, in modo da
consentire lo sbrinamento automatico e, di
conseguenza, un minor consumo di energia
elettrica.
Funzione Shopping
Se si deve introdurre una gran quantita' di cibi caldi, ad
esempio dopo aver fatto la spesa, si consiglia di
attivare la funzione Shopping per raffreddarli piu'
velocemente e per evitare un innalzamento della
temperatura degli altri alimenti gia' contenuti nel
frigorifero.
La funzione shopping si attiva premendo il tasto C (se
necessario piu’ volte) finche’ non appare l’icona
corrispondente
La funzione shopping si spegne automaticamete dopo
circa 6 ore.
Durante la funzione shopping si attiva
automaticamente anche il ventilatore interno del vano
frigorifero.
E' possibile disattivare la funzione in ogni momento
premendo il tasto C (vedi paragrafo “Attivazione delle
Funzioni”).
Refrigerazione dei cibi
Per utilizzare nel modo migliore lo scomparto
refrigerante è necessario:
- non introdurre nella cella vivande calde;
- coprire o avvolgere gli alimenti, specie se
contengono aromi;
- disporre gli alimenti in modo che l’aria possa
circolare liberamente attorno ad essi.
27

15
Cleaning the interior
Before using the appliance for the first time, wash
the interior and all internal accessories with luke-
warm water and some neutral soap so as to remove
the typical smell of a brand-new product, then dry
thoroughly.
USE
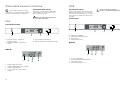
Control panel
Do not use detergents or abrasive
powders, as these will damage the finish.
A
B
C
D
A - Applince button ON/OFF
B - Temperature and function indicator
C - Function button
D - Fridge Thermostat knob
1
2
3
4
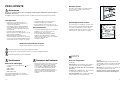
DISPLAY
1. Door open alarm indicator
2. Positive or negative Temperature indicator
3. Temperature indicator
4. If on the shopping function is on
26
Uso
Pulizia delle parti interne
Prima dell’uso e del collegamento elettrico pulire
tutte le parti interne con acqua tiepida e sapone
neutro o bicarbonato di sodio.
Non usare detersivi nè polveri abrasive
che sono dannose alle finiture.
Prima della messa in funzione
Lasciare l’apparecchiatura in posizione
verticale almeno 2 ore prima di metterla in funzione
per dar modo all’olio di refluire nel compressore.
Pannello di controllo
A
B
C
D
A - Tasto di accensione / spegnimento
dell'apparecchiatura
B - Display di visualizzazione temperature e
funzioni
C - Tasto di attivazione delle funzioni
D - Manopola di regolazione della temperatura frigo
1
2
3
4
DISPLAY
1. Indicatore allarme porta aperta
2. Indicatore di temperatura positiva o negativa
3. Indicatore della temperatura
4. Se acceso indica che e' attiva la funzione
shopping

Fresh food refrigeration
To obtain the best performance:
• do not store warm food or evaporating liquids in
the refrigerator;
• do cover or wrap the food, particularly if it has a
strong flavour.
• Position food so that air can circulate freely round
it.
16
Temperature regulation
The temperature is automatically regulated and can
be increased to achieve a higher temperature
(warmer) by rotating the thermostat knob towards
minimum or reduced (colder) by rotating the knob
towards maximum.
However, the exact setting should be chosen
keeping in mind that the temperature inside the
refrigerator depends on:
• room temperature;
• how often the door is opened;
• the quantity of food stored;
• location of appliance.
We suggest placing the knob in the middle position to
obtain an internal temperature of approximately +5° C.
Important
If the ambient temperature is high or the
appliance is fully loaded, and the appliance is
set to the lowest temperatures, it may run
continuously causing frost to form on the rear
wall. In this case the dial must be set to a higher
temperature to allow automatic defrosting and
therefore reduced energy consumption.
Use of the fridge compartment
Operation
After plugging the plug into the power outlet, if the
display is not illuminated, press key (A), appliance on.
As soon as the appliance is turned on, the following
signals will appear on the control panel:
• symbol (2) will be positive, indicating that the
temperature is positive.
Place the refrigerator adjustment knobs (D) in a
middle position, and the appliance will be set up to
provide the following temperature:
roughly +5°C in the refrigerator.
Shopping Function
If you need to insert a large amount of warm food, for
example after doing the grocery shopping, we suggest
activating the Shopping function to chill the products
more rapidly and to avoid warming the other food
which is already in the refrigerator and/or freezer.
The shopping function is activated by pressing key C
(several times if necessary) until the corresponding
icon appears
The shopping function shuts off automatically after
approximately 6 hours.
It is possible to de-activate the function at any time by
pressing key C (see paragraph "Function Activation").
Switching off
The appliance is shut off by holding down key (A) for
more than 1 second. After this, a countdown of the
temperature from -3 -2 -1 will be shown.
When the appliance is shut off, display (B) also goes
off.
Activation of functions
Each time key C is pressed, the following functions are
activated in a clockwise direction:
Symbol 4 : shopping function
No Symbol: Normal operation
Door open acoustic alarm
An acoustic alarm will sound when the door is left
open for around 5 minutes.
The door open alarm conditions are indicated by:
- flashing symbol (1);
- red display illumination;
- beeping sound.
Press the button (C) to stop the acoustic alarm.
When normal conditions are restored (door closed):
- the acoustic alarm will stop.
25
Indice
Per l’utente 24
Avvertenze 24
Smaltimento 24
Protezione dell’ambiente 24
Prima della messa in funzione 26
Pulizia delle parti interne 26
Uso 26
Pannello di controllo 26
Display 26
Funzionamento 27
Attivazione delle funzioni 27
Spegnimento 27
Vano frigorifero 27
Uso del vano frigorifero 27
Regolazione della temperatura 27
Funzione shopping 27
Refrigerazione dei cibi 27
Allarme acustico con porta aperta 28
Accessori vano frigorifero 28
Ripiani e mensole 28
Manutenzione 29
Pulizia 29
Sbrinamento 29
Lampada di illuminazione 29
Rumorosità 30
Se qualcosa non va 30
Centri Assistenza 31
Dati tecnici 31
Per l’installatore 31
Avvertenze 31
Installazione 32
Collegamento elettrico 32
Posizionamento 32
Fermi-ripiani 32
Reversibilita’ della porta 33
Istruzioni per l’incasso integrale 33
Consigli pratici 36
Consigli per la refrigerazione 37
Consigli per il risparmio energetico 37

17
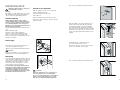
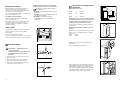
Positioning the door shelves
To permit storage of food packages of various sizes,
the door shelves can be placed at different heights.
To make these adjustments proceed as follows:
Gradually pull the shelf in the direction of the arrows
until it comes free, then reposition as required.
Movable shelves
The walls of the refrigerator are equipped with a
series of runners so that the shelves can be
positioned as desired.
D338
HINTS
Hints for refrigeration
Useful hints:
Meat (all types): wrap in polythene bags and place
on the glass shelf above the vegetable drawer.
For safety, store in this way only one or two days
at the most.
Cooked foods, cold dishes, etc..: these should be
covered and may be placed on any shelf.
Fruit and vegetables: these should be thoroughly
cleaned and placed in the special drawer(s)
provided.
Butter and cheese: these should be placed in
special airtight containers or wrapped in aluminium
foil or polythene bags to exclude as much air as
possible.
Milk bottles: these should have a cap and should
be stored in the bottle rack on the door.
Bananas, potatoes, onions and garlic, if not
packed, must not be kept in the refrigerator.
24
Avvertenze
Queste sono avvertenze di sicurezza. La preghiamo quindi di leggerle attentamente prima d’installare e
di utilizzare l’apparecchio.
Consigliamo di conservare questo libretto per future consultazioni e di fornirlo all’eventuale futuro proprietario.
Uso domestico
•
I frigoriferi e/o congelatori domestici sono
destinati unicamente alla conservazione e/o
congelazione degli alimenti.
•
Quest’apparecchiatura è stata progettata per
essere utilizzata da persone adulte e per uso
domestico, secondo le istruzioni contenute nel
presente libretto.
• Controllare prima dell’installazione che
l’apparecchiatura non sia danneggiata. In caso di
danno chiamare il rivenditore.
•
Mai riparare l’apparecchiatura da soli. Le
riparazioni effettuate da persone non competenti
possono provocare dei danni. Contattare il Centro
di Assistenza più vicino ed esigere solo ricambi
originali
.
• Non introdurre apparecchi elettrici all’interno
dell’apparecchiatura (ad es. gelatiera).
• Dopo l’installazione assicurarsi che il cavo di
alimentazione non si trovi sotto l’apparecchiatura.
Sicurezza bambini
• I componenti dell’imballaggio (es. sacchi,pellicole,
polistirolo) possono essere pericolosi per i
bambini. Pericolo di soffocamento!
• In caso di smaltimento dell’apparecchiatura
tagliare il cavo di alimentazione e rendere la
chiusura porta inservibile, in modo che i bambini
non possano rimanere chiusi
nell’apparecchiatura.
PER L’UTENTE
Guida all’uso del libretto istruzioni
I seguenti simboli guideranno nella lettura del libretto:
Informazioni legate alla sicurezza nell’uso dell’apparecchiatura
Consigli per l’uso corretto dell’apparecchiatura e per ottenerne le migliori prestazioni.
Informazioni legate alla protezione dell’ambiente
Smaltimento
Materiali di imballaggio
• I materiali contrassegnati dal simbolo sono
riciclabili.
>PE<=politilene
>PS<=polistirolo
>PP<=polipropilene
Tutti i materiali d’imballaggio sono reciclabili.
Informazioni sui centri di raccolta vengono forniti
dall’autorità comunale.
Protezione dell’ambiente
Questa apparecchiatura non contiene, nel circuito
refrigerante e nell’isolamento, gas refrigeranti
nocivi per l’ozono. L’apparecchiatura non deve
essere smaltita con rifiuti urbani e rottami. Deve
essere evitato il danneggiamento del circuito
refrigerante, soprattutto nella parte posteriore
vicino al condensatore grigliato. Informazioni sui
centri di raccolta vengono forniti dall’autorità
comunale.

18
Defrosting
Frost is automatically eliminated from the evaporator
of the refrigerator compartment every time the motor
compressor stops, during normal use. The defrost
water drains out through a trough into a special
container at the back of the appliance, over the
motor compressor, where it evaporates.
It is important to periodically clean the defrost
water drain hole in the middle of the refrigerator
compartment channel to prevent the water
overflowing and dripping onto the food inside.
Use the special cleaner provided, which you will
find already inserted into the drain hole.
D037
MAINTENANCE
Periods of non-operation
When the appliance is not in use for long periods,
take the following precautions:
remove the plug from the wall socket;
remove all food;
defrost and clean the interior and all accessories;
leave the door ajar to allow air to circulate to prevent
unpleasant smells.
Interior light
If it becomes necessary to replace the lamp, press
on the rear hook and at the same time
slide the cover in the direction indicated by the arrow.
Attention:
Replace the lamp with one of the same power (the
maximum power is shown on the light diffuser).
Unplug the appliance before carrying out
any maintenance operation.
Warning
This appliance contains hydrocarbons in its cooling
unit; maintenance and recharging must therefore
only be carried out by authorized technicians.
Periodic cleaning
Many proprietary kitchen surface cleaners
contain chemicals that can attack/damage the
plastics used in this appliance. For this reason it
is recommended that the outer casing of this
appliance is only cleaned with warm water with a
little washing-up liquid added.
Clean the inside with warm water and bicarbonate of
soda.
Rinse and dry thoroughly.
Clean the condenser (black grill) and the
compressor at the back of the appliance with a
brush or a vacuum cleaner. This operation will
improve the performance of the appliance and save
electricity consumption.
Important:
Never use sharp metal tools to scrape off frost
from the evaporator as you could damage it.
Do not use a maechanical device or any artificial
means to speed up the thawing process other
than those recommended by the manufacturer.
23
PR33
Hc
Ha
Fix cover (Hc) on guide (Ha) until it clips into place.
PR167
Ha
Hb
8mm
PR167/1
Hd
Hb
PR168
Hb
Open the appliance door and the furniture door at
90°. Insert the small square (Hb) into guide (Ha).
Put together the appliance door and the furniture
door and mark the holes as indicated in the figure.
Remove the squares and drill holes with ø 2 mm at 8
mm from the outer edge of the door. Place the small
square on the guide again and fix it with the screws
supplied.
Should the lining up of the furniture door be
necessary, use the clearance of slots.
At the end of operations, it is necessary to check if
the door of the furniture closes properly.
Fix cover (Hd) on guide (Hb) until it clips into place.

19
CUSTOMER SERVICE AND SPARE PARTS
If the appliance is not functioning properly, check
that:
• the plug is firmly in the wall socket and the mains
power switch is on;
• there is an electricity supply (find out by plugging
in another appliance);
• the thermostat knob is in the correct position.
• If there are water drops on the bottom of the
cabinet, check that the defrost water drain
opening is not obstructed (see “Defrosting”
section).
• If your appliance is still not working properly after
making the above checks, contact the nearest
service centre.
To obtain fast service, it is essential that when you
apply for it you specify the model and serial number
of your appliance which can be found on the
guarantee certificate or on the rating plate located
inside the appliance, on the bottom left-hand side.
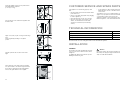
TECHNICAL INFORMATION
330
0,482
176
Fridge Net Capacity lt.
Energy Consumption kWh/24h
Energy Consumption kWh/annuo
The Technical info are on the rating plate situated on the left inside the appliance.
INSTALLATION
Location
The appliance should be installed well away from
sources of heat such as radiators, boilers, direct
sunlight etc.
For building into kitchen units follow the special “
Building-in” instructions given.
Attention
It must be possible to disconnect the appliance from
the mains power supply; the plug must therefore be
easily accessible after installation.
22
PR266
Ha
Hb
Hc
Hd
2
1
m
m
2
1
m
m
ca. 50 mm
90°
90°
ca. 50 mm
Apply covers (C-D) on joint cover lugs and into hinge
holes.
Snap vent grille (B) and hinge cover (E) into
position.
Separate parts Ha, Hb, Hc, Hd as shown in the
figure
Place guide (Ha) on the inside part of the furniture
door, up and down as shown in the figure and mark
the position of external holes. After having drilled
holes, fix the guide with the screws supplied.
D724
Fasten the appliance with 4 screws provided in the
kit included with the appliance
(I = short) (P = long)
Press in the joint covers between the appliance and
the kitchen unit.
I
P
B
E
C
D

20
Shelf holders
Your appliance is equipped with shelf retainers that
make it possible to secure the shelves during
transportation.
To remove them proceed as follows:
Raise the shelf from the back, push it in the direction
of the arrow until it is freed and remove the retainers.
Electrical connection
Before plugging in, ensure that the voltage and
frequency shown on the serial number plate
correspond to your domestic power supply. Voltage
can vary by ±6% of the rated voltage.
For operation with different voltages, a suitably sized
auto-transformer must be used.
The appliance must be earthed.
The power supply cable plug is provided with a
contact for this purpose.
If the domestic power supply socket is not earthed,
connect the appliance to a separate earth in
compliance with current regulations, consulting a
specialist technician.
B
A
The Manufacturer declines all responsibility if
the above safety precautions are not observed.
This appliance complies with the following
E.E.C. Directives:
- 87/308 EEC of 2/6/87 relative to radio interference
suppression.
- 73/23 EEC of 19.2.73 (Low Voltage Directive) and
subsequent modifications;
- 89/336 EEC of 3.5.89 (Electromagnetic
Compatibility Directive) and subsequent
modifications.
Door Reversibility
The appliance is supplied with the door
opening to the right.
For door opening in the opposite direction,
perform the following actions prior to
installation
1. Unscrew the upper pin and remove the spacer
2. Remove the door.
3. Reinsert the door and screw the pin and the
spacer back in place on the opposite side.
4. Unscrew the lower pin and remove the spacer;
replace them on the opposite side.
21
Instructions for totally built-in
appliances
Dimensions of the recess
Height (1) 1780 mm
Depth (2) 550 mm
Width (3) 560 mm
The appliance’s door has been locked in position
for transport by means of pins on both sides. Ac-
cording to the door opening direction, remove
relevant pins at the top and at the bottom.
For safety reasons, minimum ventilation must be as
shown in Fig.
Attention: keep ventilation openings clear of ob-
struction.
Furthermore, it is necessary that the niche is provid
with a conduct of ventilation having the following
dimensions:
depth 50 mm
width 540 mm
PR01
540
50
3
2
1
50 mm
min.
200 cm
2
200 cm
2
min.
D567
D023
1
2
Fit the appliance in the niche by making sure that it
stands against the interior surface of the unit on the
side where the door hinges of the appliances are
fitted. Insert the appliance until the upper strip butts
up against the unit (1) and make sure that the lower
hinge is in line with the surface of the unit (2).
13mm
D740
Ø 2,5
Drill the unit using a Ø 2.5 mm drill (10 mm max.
penetration);
Fix the square fitting to the appliance.
-
 1
1
-
 2
2
-
 3
3
-
 4
4
-
 5
5
-
 6
6
-
 7
7
-
 8
8
-
 9
9


in altre lingue
- English: Electrolux ERN3420 User manual
Documenti correlati
-
Electrolux ERN29801 Manuale utente
-
Electrolux ERN34800 Manuale utente
-
Electrolux ERP34900X Manuale utente
-
-
-
-
Electrolux IK1910SZR Manuale utente
-
-
-