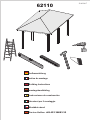
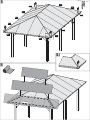
Karibu Holzpavillon Cordoba Istruzioni per l'uso
- Tipo
- Istruzioni per l'uso

62110 22.02.2017
Aufbauanleitung
notice de montage
Building Instructions
montagehandleiding
Instrucciones de construcción
Istruzioni per il montaggio
Montážní návod
Service-Hotline: +49 421 38693 33

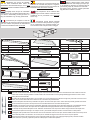
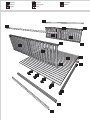
4 x W1a 1300 x 95 x 18 mm ID 42687
6 x W2 890 x 90 x 40 mm ID 19215
2 x W3 2646 x 115 x 55 mm ID 19203
2 x W5 2100 x 115 x 115 mm ID 19185
4 x S2 1859 x 606 x 40 mm ID 19197
1 x S3 2421 x 606 x 40 mm ID 42264
2 x E2 1820 x 90 x 40 mm ID 16480
4 x B1 750 x 115 x 55 mm ID 16478
1 x K1 588 x 115 x 115 mm ID 38480
6 x D3
1900 x 845 x 18 mm
ID 11076
2 x 10 m² ID 37962
4 x ID 11750
300 x ID 3948
62110
130 x 4 x 35 mm ID 3687
50 x 4 x 50 mm ID 3688
5 x 6 x 100 mm ID 11749
50 x 6 x 160 mm ID 9252
4 x ID 9253
4 x 13,5 x 44 mm ID 12011
16 x ID 14041
Vergleichen Sie zuerst die Material-
liste mit Ihrem Paketinhalt! Bitte haben Sie
Verständnis, dass Beanstandungen nur im nicht
aufgebauten Zustand bearbeitet werden können!
Vergelijk eerst de lijst van materialen
met de inhoud van uw pakket! Reclamaties kun-
nen alleen in behandeling worden genomen zo-
lang de onderdelen nog niet zijn gemonteerd!
Commencez par comparer la liste du
matériel avec le contenu de votre paquet! Sachez
que nous traitons uniquement les réclamations
concernant le matériel à l’état non monté!
En primer lugar, compare la lista de ma-
terial con el contenido del paquete. Rogamos
entienda que las reclamaciones sólo pueden ser
tramitadas antes de montar el objeto!
First compare the list of materials with
your package contents! Please understand that
complaints can be processed in the non-built
status only!
Confrontate questa distinta materiali
prima con il contenuto del pacchetto! Vi preghia-
mo di comprendere che eventuali reclami pos-
sono essere accolti solo prima del montaggio!
Nejprve překontrolujte obsah balení
podle materiálového listu! Mějte pochopení pro
to, že případnou reklamací se můžeme zabývat
pouze tehdy, když díly nebudou smontované!
Za pomoci tohoto seznamu můžete jednotlivé
díly přiřadit k montážnímu návodu.
Die Pfosten dieses Produkts sollten fest mit dem Untergrund verbunden werden. Dazu empfehlen wir H-Pfostenanker. Diese sollten erst nach dem
Aufbau dieses Produkts endgültig mit Beton versehen werden. Die H-Pfostenanker und das zugehörige Befestigungsmaterial sind nicht im Liefer-
umfang dieses Produkts enthalten.
Les poteaux de cet article doivent être xés au sol. A cet effet, nous vous recommandons les systèmes d’ancrage en H (accessoires non fournis avec le
produit). Ceux-ci doivent être scellés avec du béton une fois la construction du produit terminée.
The posts of this product should be rmly connected to the ground. We recommend H-post anchors. These should only be nally provided with concrete
after the construction of this product. The H-post anchors and associated fasteners are not included with this product.
De berichten van dit product moet op de grond vastgemaakt. Wij bevelen ook het H-bericht ankers. Deze dienen echter pas na de uiteindelijke structuur
van het product met beton worden. De H-paal ankers en de bijbehorende bevestigingsmaterialen worden niet meegeleverd met dit product.
Los mensajes de este producto debe jarse al suelo. También te recomendamos anclas H-post. Estos deben ser proporcionados sólo después de la
estructura nal del producto de hormigón. Los anclajes H-correos y los materiales de jación asociados no están incluidos con este producto.
I messaggi di questo prodotto devono essere ssati al suolo. Noi raccomandiamo anche ancore H-post. Questi dovrebbero essere forniti solo dopo che la
struttura nale del prodotto con calcestruzzo. Le ancore H-post ed i materiali di ssaggio associati non sono inclusi con questo prodotto.
Sloupky tohoto produktu by měla být stanovena na zem. Doporučujeme také H-post kotvy. Ty by měly být poskytnuty pouze po konečnou strukturu
výrobku s betonem. H-post kotvy a příslušné upevňovací materiály nejsou součástí tohoto produktu.

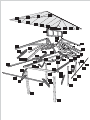
K 1
E 2
S 3
S 1
S 1
S 2
K 1
E 2
B 1
W 2
W 2
B 1
W 5
B 1
B 1
D 1
D 1
D 2
D 2
D 1 D 1 D 2
D 2
D 1
D 1 D 2
D 2
D 3
D 3
D 3
S 1
S 1
E 2
S 2
S 2
E 2
E 1
E 1
E 1
E 1
W 2
W 2
W 5
W 5
W 5
W 5
W 5
B 1
B 1
B 1
B 1
W 1a
W 1a
W 1
W 1
W 1a
W 1
W 1
W 3
W 4
W 4
W 3

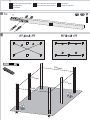
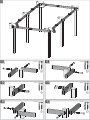
02
01 6x
2646mm
2646mm
5177mm
5177mm
*
W 5
!!! B=B !!!
B
BB
B
!!! A=A !!!
AA
Nicht im Lieferumfang enthalten
Niet bijgeleverd
Not included
* Non comprises dans la livraison
No forman parte del suministro
Non incluso
V ceně není zahrnuto

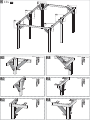
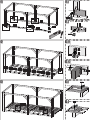
03.4
03.3
03.5
03.6
03.1
03.2
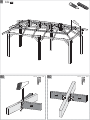
03
W 3
W 3
W 3
03.1
03.2
03.3
03.4
03.5
03.6
W 4
W 3
W 4
90°
Ø12 mm Ø12 mm
Ø12 mm
Ø12 mmØ12 mm
Ø12 mm

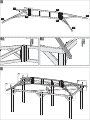
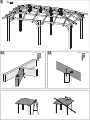
04.2
04.1
04.2
04.3
04.4
04.5
04.6
04
04.1 04.4
04.5
04.3 04.6
6×100
Ø5 mm 6×100
Ø5 mm
6×100
Ø5 mm
6×100
Ø5 mm
6×100
Ø5 mm 6×100
Ø5 mm
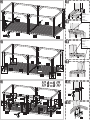
B 1
12x

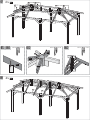
06
05
S 1
S 1
05.1
K 1
S 1
K 1
S 3
06.1
06.1
06.1
06.1
06.1
S 1
05.1 6×160
Ø5 mm 6×160
Ø5 mm

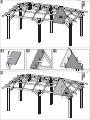
07
08
07.2 6×160
Ø5 mm
07.1
07.1
07.1
07.1
07.1
07.1
07.2
07.2
E 2
6x
S 2
4x
07.1 / 08.1 08.2
6×160
Ø5 mm
E 2
E 2
E 2
E 2
08.1
08.1
08.1
08.1
08.2 08.2
6×160
Ø5 mm

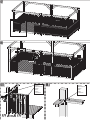
09 W 2
14x
865mm
09.1 09.2
09.2 4×35
Ø3 mm
09.1 4×50
Ø3 mm
W 2
W 2
W 2

10 E 1
8x
10.1
10.2
10.210.1 4×50
Ø3 mm 6×160
Ø5 mm
E 1
E 1

11
12
4×50
Ø3 mm
4×50
Ø3 mm
D 1
11.1
11.2
D 2
12.1
11.1 11.2 12.1
20mm
!
20mm
20mm

D 2
D 2
D 1
D 1
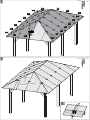
13
D 1
D 2 D 1
D 1
D 2
D 2
4×50
Ø3mm
D 3
D 3
D 3
D 2
D 3
D 3
D 1
D 2
D 1
D 3
14
ca 880mm
14.1
14.1
4×50
Ø3 mm
4×50
Ø3 mm

W 1
W 1
W 1a
W 1a
W 1
W 1
15
16
15.1
ca 10cm
W 1
W 1
W 1
W 1
W 1a
W 1a
4×50
Ø3 mm
15.1

!
ca 10cm
17
18
ca 10cm

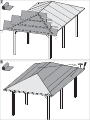
Montage Bitumendachbelag
Roong felt installation
Montage de toiture en bitume
Montage dakvilt
Montage bitumen underpap
Montaje de tela asfáltica
Copertura bituminosa
montáž střešní krytiny
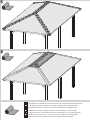
Achtung, dies ist nur ein Verlegebeispiel!
Der Bitumendachbelag dient zur Ersteindeckung und sollte nach 2 Monaten durch ein eigenes Produkt ergänzt werden. Die Anzahl der Bahnen richten sich nach Ihrer Hausgröße.
Verbindungen zwischen den Bahnen sind mit einer Überlappung von ca. 10 cm auszuführen. Das Dach ist nicht begehbar. Die Konstruktion ist für eine Gesamtbelastung
(Schnee, Wind) und nicht für eine Punktbelastung ausgelegt. Zur Montage empfehlen wir eine bauseitige Abstützung des Daches von unten. Die Abdichtung der Dachächen zu
angrenzenden Bauteilen mit Bitumendichtmasse ist bauseits zu lösen! Sofern es sich um ein Haus mit Satteldach handelt, sollte bei der Verwendung von Dachschindeln keine
Voreindeckung mit Dachpappe vorgenommen werden. Hier sollte lediglich an den beiden Traufseiten ein 20 cm breiter Streifen mit Überstand angebracht werden. Bei Häusern mit
einem Tonnendach, verlegen Sie bitte einen Bitumenbelag unter die Schindeln. Bei einem Flachdach ist die Verlegung von Dachschindeln nicht möglich!
Note! This description is only an example!
The bitumen roong is used for initial cover and should be supplemented by a separate product according to customers choice after two months. The number of bitumen strips
to be used depends on your actual house size. When joining rolls of roong felt end to end, the overlap must be aproxximately 10cm. The roof is not safe to walk on. The roof is
designed for a total load (snow, wind) and not for a point load. We recommend you to always support the roof from below during installation. The sealing of the roof surfaces to
adjacent components with bitumen sealant has to be effected by the customer! If it is a saddle-roofed house, do not use roong tiles for roong. In this case, a 20 cm wide strip of
bitumen with overhang should be installed on both sides of the eaves. For houses with a tonne roof, please install a bitumen roong under the shingles. In the case of a at roof
the laying of roof shingles is not possible!
Attention, il s’agit uniquement d’un exemple de pose!
La revêtement se comprend comme dotation initiale. Il est donc recommandé de le complement par un produit de votre choix après 2 mois. Le nombre de bandes de bitume
utilisés dépend de la dimension de la maison. La jointure des bandes de bitume doit être réalisée avec un chevauchement de 10 cm. Ne pas marcher sur le toit! La construction est
appropriée pour une charge totale (neige, vent) et ne pas une charge ponctuelle sur un point précis. Lors du montage, il vous est recommandé de soutenir le toit d‘en dessous.
L‘imperméabilisation des surfaces de toit aux composants adjacents avec un mastic de bitume doit être effectuée par le client! Lorsque vous utilisez des bardeaux pour couvrir une
maison avec un toit à deux versants, ne jamais utiliser toiture en bitume ci-dessous. Pour les maisons avec toit en berceau, poser du carton bitumé sous les bardeaux. Pour les
maisons de toit plat de la pose de bardeaux de toiture n‘est pas possible!
Let op, dit is slechts een montagevoorbeeld!
De bitumen dakbedekking wordt gebruikt voor initiële en moet worden aangevuld met een afzonderlijke produkt na 2 maanden. Het aantal dakviltbanen is afhankelijk van de
grootte van uw huis. Verbindingen tussen de stroken uit te voeren met een overlapping van ongeveer 10 cm. Het dak is niet beloopbaar. De constructie is ontworpen voor een
totaalbelasting (sneeuw, wind) en niet voor een puntbelasting. Voor de montage adviseren we te voorzien in een zelf aan te brengen steun voor het dak van onderen. De afdichting
van de dakoppervlakken van aangrenzende componenten met bitumen afdichtmiddel op te lossen door de klant! Als het gaat om huis met een zadeldak, mag geen Voreindeckung
worden gemaakt met dakleer in het gebruik van dakbedekking gordelroos. Hier, moet alleen de twee dakrand zijden een 20cm brede strook dakleer aan te leggen met een
overstek. Voor huizen met een dak vat installeer dan een dakleer onder de gordelroos. Met een plat dak leggen shingles is niet mogelijk!
Bemærk, dette er kun et monteringseksempel!
Den inddækning tjener kun til midlertidig inddækning og skal senest efter 2 måneder erstattes med et hertil egnet produkt. Antallet af påkrævede ruller af tagbeklædning afhænger
af husets faktiske størrelse. Ved sammenføjning af tagdækning ruller ende til ende, skal overlapningen være 10 cm. Når du kun bruger 4 baner af tagpap, skal du altid dække den
vandrette kantbjælke med rullerne fra begge sider. Taget er ikke sikkert at gå på. Taget er designet til en total belastning (sne, vind) og ikke for en punktbelastning. Vi anbefaler at du
altid støtter taget nedenunder under installationen. Tætningen af tagaderne til vindbrættet i forenderne skal løses af kunden! Når du bruger tagshingles til at inddække et hus med
gavltag, skal du altid bruge underpap tagbeklædningen. Her lægges et 20 cm bredt bånd af tagbeklædning med overlæg på begge sider. Monter altid underpap tagbeklædningen
under tagshingles til huse med et buet tag. Ved adt tag kan tagshingles ikke anvendes!
Cuidado, éste es sólo un ejemplo de instalación!
La cubierta de betún se utiliza para inicial y debe complementarse con un producto separado después de 2 meses. La cantidad de tiras de tela asfáltica depende del tamaño de
su caseta. Las juntas de tela en una tira se realizan solapando la tela asfáltica 10 cm. El techo no es transitable. La construcción está preparada para cargas totales (nieve, viento)
y no para cargas puntuales. Para el montaje se recomienda apuntalar el techo por debajo. A menos que haya una casa de techo a dos aguas, sin Voreindeckung debe hacerse
con tela asfáltica en el uso de tejas para techos. En este caso, sólo los dos aleros partes deben ser de una amplia franja de 20 cm de tela asfáltica que deben colocarse con un
voladizo. Para las casas con el techo abovedado y por favor, instale un techo sintió debajo de las tejas. Con un techo plano por el que las tejas no es posible!
Attenzione, questo è solo un esempio di posa!
La copertura bitume è utilizzato per iniziale e deve essere completato da un prodotto separato dopo 2 mesi. La quantità dei rulli di cartone catramato dipende dalle dimensioni della
casa. Il concatenamento tra i nastri deve essere effettuata con una sovrapposizione di circa 10 cm. Non salire sul tetto. La costruzione è progettata per un carico diffuso (neve,
vento) e non per una concentrazione puntuale del peso. Per il montaggio si consiglia un supporto del tetto con una costruzione posta sotto di esso. Se si dispone di una casa con
un tetto a capanna e si desidera utilizzare tegole di copertura, deve essere posato senza fogli di bitume. Qui, un largo 20 cm striscia di bitume deve essere montato esclusivamente
ad entrambi i lati della grondaia sporgente 20 cm. Per le case con fogli di bitume per tetti a botte sotto il fuoco di Sant‘Antonio da installare. Si prega di non utilizzare il fuoco di
Sant‘Antonio Dackdeckung con un tetto piatto.
Pozor, toto je jen příklad, kterým!
Bitumen se používá pro počáteční a by měl být doplněn samostatný produkt po 2 měsících.
Počet Dachpappbahnen závisí na velikosti domu. Spojení mezi asfaltem pásu má být provedena s přesahem asi 10 cm. Při použití pouze čtyři běhy ne Firstbahn použití, boční
panely s ležel přes hřeben. Střecha není přístupný. Konstrukce je (sníh, vítr) a není určen pro bodové zatížení na celkové zatížení. Pro montáž doporučujeme znovu podporu na
místě střechy zespodu. Utěsnění střešních oblastí do podhledů na čelních plochách je na místě řešit! Máte-li dům se sedlovou střechou, je třeba žádné Asfaltové pásy umístěny
pod šindele. Zde je 20 cm široký pás střešní plsť je pouze na obou stranách okapového se supernatantem odloženou. Pro rodinné domy s valenou střechou prosím ležel lepenkový
pod šindelem. Pro ploché střechy domů pokládka střešních šindelů není možné!

Die Eindeckung muss spätestens nach 2 Monaten durch ein geeignetes Produkt ergänzt werden
De vervanging mag niet later zijn dan twee maanden aangevuld met een geschikt product
The replacement must be no later than two months supplemented by a suitable product
Le remplacement ne doit pas être plus tard deux mois complétés par un produit adapté
El reemplazo debe ser no más tarde de dos meses complementan con un producto adecuado
La sostituzione deve essere entro e non oltre due mesi completate da un prodotto adatto
Pokrytí střechy musí být nejpozději po 2 měsících nahrazeno vhodným produktem.
19
20

H-Pfostenanker montieren
Ancres de béton installer
Install concrete anchors
Betonankers installeren
Anclas concretas instalan
Ancora di calcestruzzo installano
Instalovat betonové kotvy
Eine Grube für jeden Pfosten ausheben.
Creusez un trou pour chaque montant.
Dig a hole for each column.
Een put voor elke staander graven.
Cavar un agujero por cada poste.
Creare un foro per ogni montante.
Jáma pro každé pracovní místo dig.
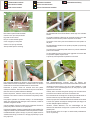
Der H-Pfostenanker kann auf dem Brett in seiner Lage noch verändert
werden.
Les parties métalliques inférieures des montants peuvent encore être
ajustées en fonction de leurs position respective sur les liteaux.
The position of the column joists can be altered due to their position on
the plank.
De staanderdragers kunnen door de positie op de plank qua positie nog
veranderd worden.
La posición de los portapostes puede variarse a su posición mediante la
posición sobre la tabla.
Le parti metalliche possono essere ancora aggiustate in funzione della
loro posizione rispettiva sopra la tavola.
H-post kotvy může být změněn na palubě na svém místě.
Das Holzprodukt aufstellen. Die Pfosten in die H-Pfostenanker stellen.
Etwas Abstand zwischen Pfostenende und Metall lassen. Die Pfosten
durchbohren um sie mit den H-Pfostenankern zu verschrauben.
Positionnez le pavillon. Placez les montants dans leurs parties
métalliques inférieures. Percez les montants an de pouvoir ensuite les
xer et les visser aux parties inférieures métalliques.
Position the pavilion. Insert the columns into the joists in the process.
Drill holes in the columns in order to connect them to the joists by means
of screws.
Het paviljoen opstellen. De staanders daarbij in de staanderdragers
stellen. Om de staanders met de dragers vast te schroeven, moeten de
staanders doorgeboord worden.
Colocar el pabellón. Colocar los postes en los portapostes. Perforar los
postes para poderlos atornillar con los portapostes.
Posizionare il padiglione. Piazzare i montanti nelle loro parti metalliche. Per
collegare i montanti con le parti metalliche è necessario perforare i montanti.
Umístěte dřevěného výrobku. Sloupky v H-post kotvy zeptat. Nechá se
vzdálenost mezi sloupy a koncem kovu. Sloupky propíchnout je s H-post
kotvy, aby šroub.
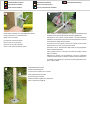
Eine Maschinenschraube vorsichtig durch die Öffnung des
H-Pfostenankers einschlagen bis sie auf der anderen Seite wieder austritt.
Introduisez doucement dans le trou de la partie métallique, à l’aide
d’un marteau, une vis d’assemblage à écrou, et cela jusqu’à ce qu’elle
apparaisse de l’autre côté.
Carefully drill a drill screw through the opening in the concrete anchor
and into the wood until the screw comes out the other side.
Een machineschroef voorzichtig door de opening van het betonanker in
het hout inslaan tot ze op de andere zijde naar buiten treedt.
Introducir por percusión cuidadosamente un bulón ordinario en la madera
a través de la apertura del anclaje de hormigón hasta que salga por el
otro lado. Después aplanar el hormigón.
Introdurre, facendo attenzione, una vite d’assemblaggio nel foro
dell’ancora di calcestruzzo nel legno no a quando essa non fuoriesce
dall’altra parte.
Šroub stroj lehce otočit, až se objeví na druhé straně prostřednictvím
otvoru v H-post kotvy.
1. 2.
3. 4.
Ø14mm M14
80cm
40cm
40cm

H-Pfostenanker montieren
Ancres de béton installer
Install concrete anchors
Betonankers installeren
Anclas concretas instalan
Ancora di calcestruzzo installano
Instalovat betonové kotvy
Die Schraube mit Mutter und 2 Unterlegscheiben xieren.
Vissez et serrez les vis à l’aide de boulons.
Attach nuts to the screws.
De schroeven met moeren xeren.
Fijar los tornillos con las tuercas.
Fissare le viti con l’aiuto dei bulloni.
Šroub s maticí nebo 2 podložkami opravit.
Fertig einbetonierter Pfosten.
Montant installé et bétonné.
The posts are completely set in concrete.
Klaar ingebetonneerde staander.
Poste hormigonado acabado.
Montante installato e gettato nel calcestruzzo.
Hotovo vybetonován příspěvek.
Füllen Sie Beton in das ausgegrabene Loch. Der H-Pfostenanker bleibt
weiterhin mit der Leiste xiert. Danach den Beton glattstreichen.
Remplissez les trous creusés à l’aide de béton. Les parties inférieures
métalliques des montants doivent encore rester maintenues en place à
l’aide des liteaux. Nivelez ensuite le béton.
Fill the holes you have dug with concrete. The concrete anchor remains
attached to the slat. Then, smooth out the concrete.
Giet beton in de put. Het betonanker blijft verder met de lijst gexeerd.
Daarna de beton gladmaken.
Llene el agujero cavado con hormigón. El anclaje de hormigón continúa
jado con el listón.
Riempire il foro incavato con del calcestruzzo. L’ancora in calcestruzzo
continua a rimanere ssata con il listello. Livellare in seguito il calcestruzzo.
Vyplnit beton do vykopané díry. H-post kotvy zůstane připevněna k baru.
Poté, co beton hladké.
5. 6.
7.

Aufbauanleitung
Building Instructions
notice de montage
montagehandleiding
Montagevejledning
Instrucciones de construcción
Istruzioni per il montaggio
Montážní návod
+49 421 38693 33
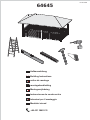
64645 11.01.2019

44 x L1
750 x 58 x 18mm
ID 61074
2 x L2
2415 x 95 x 18mm
ID 18139
24 x L3 2565 x 95 x 18mm ID 64762
2 x L4 2415 x 140 x 26mm ID 64746
2 x L5
678 x 58 x 36mm
ID 61663
4 x L6 2415 x 58 x 36mm ID 64759
5 x L7 2300 x 115 x 55mm ID 64756
2 x L8 2565 x 115 x 55mm ID 64761
10 x ID 59443
120 x 4 x 25 mm ID 5841
800 x 4 x 30 mm ID 3686
230 x 4 x 50 mm ID 3688
70 x 6 x 120 mm ID 9205
64645
22 x 50 x 50 mm ID 21292
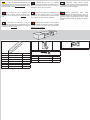
Vergleichen Sie zuerst die Material-liste mit
Ihrem Paketinhalt! Bitte haben Sie Verständnis, dass
Beanstandungen nur im nicht aufgebauten Zustand
bearbeitet werden können!
First compare the list of materials with
your package contents! Please understand that
complaints can be processed in the non-built status
only!
Commencez par comparer la liste du
matériel avec le contenu de votre paquet! Sachez que
nous traitons uniquement les réclamations concernant
le matériel à l’état non monté!
Vergelijk eerst de lijst van materialen
met de inhoud van uw pakket! Reclamaties kunnen
alleen in behandeling worden genomen zolang de
onderdelen nog niet zijn gemonteerd!
Start med at kontrollere materialelisten med
indholdet af den leverede pakke! Vi gør venligst
opmærksom på at reklamationer kun kan behandles
for materialer som ikke er blevet bearbejdet!
En primer lugar, compare la lista de material
con el contenido del paquete. Rogamos entienda
que las reclamaciones sólo pueden ser tramitadas
antes de montar el objeto!
Confrontate questa distinta materiali
prima con il contenuto del pacchetto! Vi preghiamo di
comprendere che eventuali reclami possono essere
accolti solo prima del montaggio!
Nejprve překontrolujte obsah balení
podle materiálového listu! Mějte pochopení pro to, že
případnou reklamací se můžeme zabývat pouze tehdy,
když díly nebudou smontované! Za pomoci tohoto
seznamu můžete jednotlivé díly přiřadit k montážnímu
návodu.
La pagina si sta caricando...
La pagina si sta caricando...
La pagina si sta caricando...
La pagina si sta caricando...
-
 1
1
-
 2
2
-
 3
3
-
 4
4
-
 5
5
-
 6
6
-
 7
7
-
 8
8
-
 9
9
-
 10
10
-
 11
11
-
 12
12
-
 13
13
-
 14
14
-
 15
15
-
 16
16
-
 17
17
-
 18
18
-
 19
19
-
 20
20
-
 21
21
-
 22
22
-
 23
23
-
 24
24


