
1
2
3
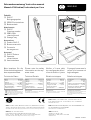
Bitte beachten Sie die
Sicherheitshinweise auf
dem separaten Blatt.
Please note the safety
information on the sep-
arate sheet.
Vérifier, s‘il vous plait,
les consignes de sécuri-
té sur la feuille ci-jointe.
Si prega di osservare le
norme di sicurezza sul
foglio allegato.
Zubehör
(1) DUO-P
Reinigungspulver
(2) SEBO-Fleckenbürste
(3) Bodenschale
Attachments
(1) DUO-P
Cleaning powder
(2) SEBO-Spot
cleaning brush
(3) Storage tray
Accessoires
(1) Poudre DUO-P
(2) Brosse manuelle
(3) Couvercle
de rangement
Accessori
(1) DUO-P Polvere
(2) Spazzola
smacchiatore
(3) Vaschetta base
Breite ........................... 355 mm
Höhe ............................. 119 mm
Gewicht ...............................5 kg
Antriebsmotor ............ 200 Watt
Anschlussleitung .............12,2 m
Bürstendrehzahl ........400U/min
2-Bürstensystem
Technische Daten Technical Details Détails techniques Détails techniques
Width ............................355 mm
Heigth ...........................119 mm
Weight ................................. 5 kg
Brush Motor ................ 200 Watt
Cable ............................... 12.2 m
2 Brush System
Brush revolutions ..... 400U/min
Largeur ........................355 mm
Hauteur.........................119 mm
Poids ................................... 5 kg
Moteur de brosses ......200 Watt
Longeur du cable ........... 12,2 m
Vitesse de rotation
des 2 brosses ............ 400U/min
Larghezza .....................355 mm
Altezza ..........................119 mm
Peso .................................... 5 kg
Motore trascinamento . 200 Watt
Cavo alimentazione ........ 12,2 m
Numero giri spazzola . 400U/min
2 Spazzola controrotanti
Hinweis zur Entsorgung
Sie können dieses Gerät kostenlos an
jeder öffentlichen Sammelstelle abge-
ben. Weitere Informationen erhalten
Sie durch Ihre Kommune.
SEBO FRANCE, Z. A. les Belles Vues, 1, Rue Félix Potin – B.P. 24,
91291 Arpajon Cedex, Tél: 01. 69.26.18.30, Fax : 01.60.83.80.11
www.sebo-france.com
SEBO
ITALIA SRL Viale Della Repubblica, 14/16 20010 CORNAREDO -MI-
Tel +39.02.33404227 Fax +39.02.33400682
www.seboitalia.it info@seboitalia.it
SEBO (UK) Ltd - The Merlin Centre
Cressex Business Park, High Wycombe, Bucks HP12 3QL.
Phone: 0 14 94 - 46 55 33 , Fax: 0 14 94 - 46 10 44, www.sebo.co.uk
©2013 SEBO Stein&Co. GmbH ®Registered Trademark. Subject to change.
SEBO Stein&Co. GmbH, Wülfrather Straße 47-49, 42553 Velbert, Germany
Telefon +49 (0) 20 53 / 89 81, Telefax +49 (0) 20 53 / 89 85, www.sebo.de
©2013 SEBO Stein&Co. GmbH ®Eingetragenes Warenzeichen. Technische Änderungen vorbehalten.
MADE IN GERMANY
SEBO South Africa,
2 Kilburn-et, Horison, 1730
Phone: 086 111 4250, Fax: 011 763 4033
www.sebo.co.za
0981GR - 07.2013
Note on disposal
For disposal of used appliances, please follow
the advice of your local authority.
Appareils Usagés
Concernant les appareils usagés, suivez SVP
les règles de votre autorité locale.
Informazione per lo smaltimento
Questo apparecchio può essere smaltito a costo
zero nell’apposita discarica pubblica.
Ulteriore informazione presso gli uffici del vo-
stro comune.
Gebrauchsanweisung/ Instruction manual
Manuel d’Utilisation/ Instruzioni per l‘uso
MADE IN GERMANY
MADE IN GERMANY
SEBO DUO
La pagina si sta caricando...

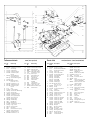
Pièces détaches
230V (Europa/CH)
1 1030UL Bride de serrage
2 0106ER Vis 3,9 x 13 A2
3 3116 Protège câble
5 3137dg Interrupteur
6 3136hg Couvercle d’interrupteur
7 0127ER Vis Taptite M4x10
9 5260dg Câble électrique
5351dg Câble électrique (CH)
11 3142HG Poignée plastique
12 05111ER Interrupteur de mise en
marche (incl. Pos. 5 + 6)
13 0105ER Vis 3,9 x 19
14 5352hg Clips de brosse manuelle
15 0129ER Vis Taptite M4x12
16 3115 Tube alu
17 3118hg Support de câble
19 3027hg Plaquette AR de marche
20 3113hg Embase plastique
21 1020UL Connection électrique
plastique
22 0103ER Vis 3,9 x 16
23 3122EA Tube, alu compl.(D,NL,FR)
3122EB Tube alu, cpl. (CH)
25 3033hg Couvercle inférier de
rangement
26 2007mg Pare-chocs
27 3005 Brosse
28 3002hg Plaque centrale
29 0112ER Vis M4 x 12 A2
30 3010hg Plaque de brosse gauche
31 3001hg Plaque supérieure
32 3032 Plaquette de blocage
33 0502 Domino
34 3047ER Moteur 230 V
05084S Charbon moteur de brosse
35 01020ER Vis 3,9 x 21
37 3038 Courroie crantée moteur
38 0116ER Vis M4 x 30 A2
39 3004SE Carter superieur
40 0808 Fil électrique
45 3147 Axe d’entrainement
49 3111hg Rotule complet de manche
50 3051 Palier complet de fixation
51 3014 Pouli moteur 19
52 3030 Palier support
54 3042 Courroie crantée
secondaire
60 3039 Fixation supérieure
65 3146 Axe d’entrainement
70 3052hg Entrainement cpl. de
brosse
71 3017 Pignon dentelé,cpl.
73 0503 Condenseur
Pos. Part Description
No.
Pos. Part Description
No.
Parti di ricambio
230V (IT/CH)
1 1030UL Fascetta
2 0106ER Vite 3,9 x 13 A2
3 3116 Cavo interno
5 3137dg Interruttore
6 3136hg Porta interruttore
7 0127ER Vite Taptite M4x10
9 5590dg Cavo 2 x 1
11 3142HG Impugnature
12 05111ER Interruttore
(incl. Pos. 5 + 6)
13 0105ER Vite 3,9 x 19
14 5352hg Pinza porta accessori
15 0129ER Vite Taptite M4x12
16 3115 Manico
17 3118hg Gangio portacavo
19 3027hg Coperchio contatti
20 3113hg Spina manico
21 1020UL Copertura contatti
22 0103ER Vite 3,9 x 16
23 3122 EI Manico, compl.
25 3033hg Vaschetta base
26 2007mg Paracolpi
27 3005 Spazzola
28 3002hg Piastra base
29 0112ER Vite M4 x 12 A2
30 3010hg Porta cuscinetto destro
31 3001hg Copri spazzola DUO
32 3032 Molla
33 0502 Mammuth 2-poli
34 3047ER Motore DUO 230 V
05084S Carboncino
35 01020ER Vite 3,9 x 21
37 3038 Cinghia HTD 3M
38 0116ER Vite M4 x 30 A2
39 3004SE Calotta superiore DUO
40 0808 Spina pitta
41 0149ER Spessore 18/25
45 3147 Asse motore
49 3111hg Snodo completa
50 3051 Bronzina completa
51 3014 Puleggia motore
52 3030 Copri cuscinetto
54 3042 Cinghia dentata HTD
60 3039 Porta bronzina
65 3146 Asse motore
70 3052hg Porta cuscinetto sin.
compl.
71 3017ER Rondella cinghia, cpl.
73 0503 Condensatore
Pos. Parti- Description
No.
Pos. Parti- Description
No.
2
8
1
3
4
77
6
5
12
11
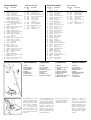
1) Stiel
2) EIN-Schalter
3) Leitungshaken
4) Stielstecker
5) Gelenk
6) Rundbürste
7) Bodenschale
8) Fleckenbürste
Den Rastknopf (11) drü-
cken und den Stiel in das
Gelenk (12) stecken. Der
Rastknopf muss sichtbar
nach außen kommen,
wenn der Stiel arretiert
ist. In der senkrechten
Stellung rastet der Stiel
ein. Zum Arbeiten den
Stiel einfach nach hinten
drücken.
1) Handle
2) On -off switch
3) Cable hook
4) Handle connector
5) Swivel neck
6) Brush
7) Storage tray
8) Spot cleaning brush
Press the plunger (11) and
insert the handle into the
swivel neck (12). With the
plunger released the han-
dle should remain firmly
engaged. Pushing the
handle forward sets the
handle into the storage
position. Pulling back re-
leases the handle into the
operating position.
Preparation
1 ) Manico
2) Interruttore
3) Gangio portacavo
4) Spina manico
5) Snodo
6) Spazzolino elicoidale
7) Vaschetta base
8) Spazzolino
smacchiatore
Spingere il bottone di
blocco (11) e inserire il
manico nello snodo (12).
Il pulsante di blocco deve
scattare all‘esterno, ap-
pena il blocco è effettuato.
Snodo e manico si bloc-
cano in posizione verti-
cale. Per I‘uso spingere
semplicemente iI manico
indietro.
Inbetriebnahme
Preparation
1) Manche
2) Interrupteur mise en
marche
3) Support de câble
4) Prise de connection
5) Nez d’ articulation
6) Brosses (2)
7) Convercle de rangement
8) Brosse manuelle
Enfoncer le bouton pus-
soir (11) pour connecter le
manche sur la rotule
mobile (12) du carter.
Messa in funzione

13
14
15
8
16
17
18
7
19
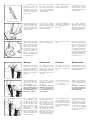
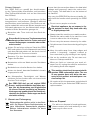
Zum Abnehmen der An-
schlußleitung (13) vom
Stiel, den unteren Lei-
tungshaken (14) nach
oben drehen. Beim Aufwi-
ckeln die Leitung nicht zu
stark spannen.
Beim Entnehmen des Ge-
rätes aus der Bodenscha-
le (8) mit der Fußspitze
auf die Lasche (15) treten
und das Gerat am Stiel
nach oben ziehen.
Nach Gebrauch das Gerät
wieder in die Bodenschale
stellen. Gehäusevorder-
kante unter die Lasche
(16) schieben und Gerät
am Stiel leicht nach un-
ten drücken. Durch die
Bodenschale werden die
Bürsten entlastet und
Reste des Reinigungspul-
vers aufgefangen.
The cable (13) should be
stored on the cable cleats
The lower cleat swivels
(14) for quick release of
the cable. Do not wind the
cable too tightly.
To remove the machine
from the storage tray (8)
press down the catch (15)
and lift the machine up-
wards by the handle.
After use replace the ma-
chine in the storage tray.
Défaire le câble électrique
(13) en faisant pivoter le
support supérieur (14).
A l’aide du pied dégager le
couvercle de rangement
(8) en appuyant sur le re-
bord (15).
Sortir l’appareil verticale-
ment.
Per svolgere il filo (13)
ruotare il gancio porta-
cavo (14) verso iI basso.
Nel riavvolgere il cavo non
tenderlo troppo.
Per togliere l’apparec-
chio dalla vaschetta base
(8) agire con la punta del
piede sulla apposite spor-
genza (15) e sollevare ver-
so l‘alto l’apparecchio.
Dopo l’uso riporre l’ap-
parecchio nella vaschetta
base inserendo la parte
anteriore dell’attrezzo
sotto la sporgenza (16)
e spingere l’apparecchio
con iI manico verso il bas-
so. Nella vaschetta base
gli spazzolini ruotano sol-
levati ed i residui di polve-
re restano raccolti.
Wartung
Zum Wechseln der Rund-
bürste (7) die beiden
Schrauben (17) am Bürs-
tenlager (18) lösen und
das Lager mit der Bürste
etwas aus dem Gehäuse
schwenken.
Das Bürstenlager abneh-
men und die Bürste in
Längsrichtung aus dem
Gehäuse ziehen.
Zur gründlichen Reini-
gung des SEBO DUO und
der Bürsten, empfiehlt es
sich, die Rundbürsten aus
dem Gerät zu nehmen!
Beim Wiedereinsetzen
der Rundbürste die Mit-
nahmeseite der Bürste
auf den Mitnehmer (19)
stecken und durch Dre-
hen beide Teile mitei-
nander verrasten. Das
Bürstenlager wieder
aufstecken und in das
Gehäuse schwenken, der
Steg auf dem Lager muss
dabei in die Gehäuserille
geschoben werden.
Maintenance
To change the brush
(7) first remove the two
screws (17) from the
Bearing Block (18) then
push forward the top of
the brush together with
the block.
Take the block off the
brush then lift the brush
upwards out of the brush
housing.
To thoroughly clean the
SEBO DUO and the brush
it is recommended that
the brushes are taken out
of the machine.
To replace the brush in-
sert the slotted end into
the housing first and lo-
cate the slots over the
drive cog (19) by turning
the brush. With the brush
located pull the brush
forward slightly to enable
the bearing block to be
replaced then push the
block back into its place
in the brush housing and
replace the two screws.
Entretien
Pour sortir les brosses
(7), dévisser les vis (17)
et enlever les plaquettes
(18).
Sortie la brosse en la ti-
rant vers sol sans forcer
sur l’entraîneur, la se-
couer et la frotter.
Pour le remontage, enfon-
cer le guide de la brosse
dans son entraîneur (19)
et positionner en faisant
pivoter légèrement celle-
ci. Remettre a plaque et
visser.
Manutenzione
Per sostituire le spazzole
tonde (7) svitare le viti (17)
del spostare spazzolino e
bronzina dalla sede.
Togliere il supporto bron-
zina e sfilare la spazzola
il senso longitudinale da
telaio.
Si consiglia l’asportazio-
ne delle due spazzole per
effettuare la pulizia a fon-
do del SEBO DUO.
Per rimontare le spazzole:
spingere il lato spazzola
con incastro sul trascina-
tore (19) ruotando la spaz-
zola fino a farli combacia-
re, rimontare il supporto
bronzina sulla spazzola
ed inserirle nell‘apposita
scanalatura.
La pagina si sta caricando...
La pagina si sta caricando...
-
 1
1
-
 2
2
-
 3
3
-
 4
4
-
 5
5
-
 6
6


Sebo Duo Manuale utente
- Tipo
- Manuale utente
- Questo manuale è adatto anche per
in altre lingue
- English: Sebo Duo User manual
- Deutsch: Sebo Duo Benutzerhandbuch