
USER GUIDE
C1150
USER GUIDE
C1150
Please read this manual carefully before operating your mobile phone.
Retain it for future reference.
USER GUIDE
C1150
P/N : MMBB0181205
(
1.0
)
G
ENGLISH
MALAY
1150_ΩÃ∞°Δ˙_cover 2005.10.24 5:43 PM Page 1

C1150
USER GUIDE
Please read this manual carefully
before operating your mobile phone.
Retain it for future reference.

Table of Contents
2
Guidelines for safe and efficient use 4
C1150 Features 7
Part of the phone 7
Open view 7
On-Screen icons 8
Getting started 9
Installing the SIM card and the battery 9
Inserting the SIM card 9
Removing the SIM card 9
Installing the battery 9
Charging the battery 10
Disconnecting the charger 10
General functions 11
Entering text 11
Menu tree 13
Messages 14
Write short message 14
Write multimedia message 14
Inbox 15
Outbox 16
Drafts 16
Listen to voice mail 17
Info message 17
Templates 17
Settings 18
Call register 20
Missed calls 20
Received calls 20
Dialled calls 20
Delete recent calls 20
Call charges 20
GPRS information 21
Profiles 22
Changing the profile 22
Customising profiles - Personalise 22
Customising profiles - Rename 22
Settings 23
Date & Time 23
Phone settings 23
Call settings 24
Security settings 25
Table of Contents

3
Network settings 26
GPRS setting 27
Reset settings 27
Organiser 28
Alarm clock 28
Scheduler 28
Phonebook 28
Fun & Tools 31
Favorites 31
Games 31
Calculator 31
My folder 31
Unit converter 32
World time 32
Voice recorder 32
Memory status 32
Internet 33
Home 33
Bookmarks 33
Profiles 33
Go to URL 34
Cache settings 34
Cookies settings 34
Security certification 35
Reset profiles 35
Browser version 35
On browsing menu 35
Java 36
Applications 36
Download 36
Profiles 36
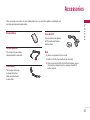
Accessories 37
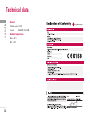
Technical data 38
Table of Contents

Guidelines for safe and efficient use
4
Introduction
Read these simple guidelines. Breaking the rules may be
dangerous or illegal. Further detailed information is given in this
manual.
Exposure to radio frequency energy
Radio wave exposure and Specific Absorption Rate (SAR)
information
This mobile phone model C1150 has been designed to comply
with applicable safety requirement for exposure to radio waves.
This requirement is based on scientific guidelines that include
safety margins designed to assure this safety of all persons,
regardless of age and health.
] The radio wave exposure guidelines employ a unit of
measurement known as the Specific Absorption Rate, or SAR.
Tests for SAR are conducted using standardized method with
the phone transmitting at its highest certified power level in all
used |frequency bands.
] While there may be differences between the SAR levels of
various LG phone models, they are all designed to meet the
relevant guidelines for exposure to radio waves.
] The SAR limit recommended by the international Commission
on Non-Ionizing Radiation Protection (ICNIRP), which is 2W/kg
averaged over ten (10) gram of tissue.
] The highest SAR value for this model phone tested by DASY4
for use at the ear is 0.676 W/kg (10g).
] SAR data information for residents in countries/regions that
have adopted the SAR limit recommended by the Institute of
Electrical and Electronics Engineers (IEEE), which is 1.6 W/kg
averaged over one (1) gram of tissue.
Product care and maintenance
Warning! Use only batteries, charger and accessories approved for
use with this particular phone model. The use of any other types
may invalidate any approval or warranty applying to the phone,
and may be dangerous.
] Do not disassemble this unit. Take it to a qualified service
technician when repair work is required.
] Keep away from electrical appliance such as a TV, radio or
personal computer.
] The unit should be kept away from heat sources such as
radiators or cookers.
] Do not drop.
] Do not subject this unit to mechanical vibration or shock.
] The coating of the phone may be damaged if covered with
wrap or vinyl wrapper.
] Use dry cloth to clean the exterior of the unit.
(Do not use solvent such as benzene, thinner or alcohol.)
] Do not subject this unit to excessive smoke or dust.
] Do not keep the phone next to credit cards or transport
tickets; it can affect the information on the magnetic strips.
] Do not tap the screen with a sharp object; otherwise, it may
damage the phone.
] Do not expose the phone to liquid or moisture.
] Use the accessories like an earphone cautiously.
Do not touch the antenna unnecessarily.

5
Guidelines for safe and efficient use
Fuse replacement
Always replace a blown fuse with a fuse of the same type and
size. Never use a fuse of a higher rating.
Efficient phone operation
To enjoy optimum performance with minimum power
consumption please:
] Hold the phone as you speak to any other telephone.
] If your mobile phone supports infrared, never direct the
infrared ray at anyone’s eye.
Electronics devices
All mobile phones may get interference, which could affect
performance.
] Do not use your mobile phone near medical equipment without
requesting permission. Avoid placing the phone over the
pacemaker, i.e. in your breast pocket.
] Some hearing aids might be disturbed by mobile phones.
] Minor interference may affect TVs, radios, PCs, etc.
Road safety
Check the laws and regulations on the use of mobile phones in
the areas when you drive.
] Do not use a hand-held phone while driving.
] Give full attention to driving.
] Use a hands-free kit, if available.
] Pull off the road and park before making or answering a call if
driving conditions so require.
] RF energy may affect some electronic systems in your motor
vehicle such as car stereo, safety equipment.
] When your vehicle is equipped with an air bag, do not obstruct
with installed or portable wireless equipment. It can cause
serious injury due to improper performance.
Blasting area
Do not use the phone where blasting is in progress. Observe
restrictions, and follow any regulations or rules.
Potentially explosive atmospheres
] Do not use the phone at a refueling point. Don’t use near fuel
or chemicals.
] Do not transport or store flammable gas, liquid, or explosives
in the compartment of your vehicle, which contains your
mobile phone and accessories.
In aircraft
Wireless devices can cause interference in aircraft.
] Turn off your mobile phone before boarding any aircraft.
] Do not use it on the ground without crew permission.
Children
Keep the phone in a safe place out of children’s reach. It
includes small parts which if detached may cause a choking
hazard.

Guidelines for safe and efficient use
6
Guidelines for safe and efficient use
Emergency calls
Emergency calls may not be available under all cellular
networks. Therefore, you should never depend solely on the
phone for emergency calls. Check with your local service
provider.
Battery information and care
] You do not need to completely discharge the battery before
recharging. Unlike other battery systems, there is no memory
effect that could compromise the battery’s performance.
] Use only LG batteries and chargers. LG chargers are designed
to maximize the battery life.
] Do not disassemble or short-circuit the battery pack.
] Keep the metal contacts of the battery pack clean.
] Replace the battery when it no longer provides acceptable
performance. The battery pack may be recharged hundreds of
times until it needs replacing.
] Recharge the battery if it has not been used for a long time to
maximize usability.
] Do not expose the battery charger to direct sunlight or use it in
high humidity, such as the bathroom.
] Do not leave the battery in hot or cold places, this may
deteriorate the battery performance.

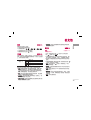
C1150 Features
7
C1150 Features
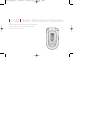
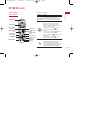
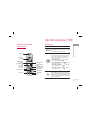
Keypad description
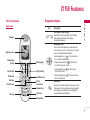
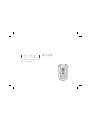
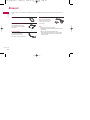
Parts of the phone
Open view
Earpiece
Star key
Favorites key
Send key
Profile key
Left soft key
Phone book
list key
Display screen
Message key
Right soft key
End/Power key
Clear/
Cancel key
Numeric key
Hash key
Microphone
Description
Key
Left soft key / Right soft key
Each of these keys performs the function
indicated by the text on the display
immediately above it.
Navigation keys
Use to scroll through menus and move the
cursor. You can also use these keys for quick
access to the following functions.
•
Up navigation key ( ): A shortcut key
to search the phonebook.
•
Down navigation key ( ): A shortcut
key to the Favorites menu.
•
Left navigation key ( ): A shortcut key
to the Profile menu.
•
Right navigation key ( ): A shortcut key to
the message inbox.
Send Key
You can dial a phone number and answer a call.
If you press this key without entering a number,
your phone shows the most recently dialled,
received and missed numbers.

8
C1150 Features
C1150 Features
Side keys
DescriptionKey
Up/Down side keys
When you open the flip, you can control the
volume of key tone in the standby mode and the
volume during a call.
DescriptionKey
Numeric keys
These keys are used mainly to dial in standby
mode and enter numbers or characters in
editing mode.
When you press these keys for a long time.
•
Used to call your voicemail box by .
• Used to call for international call by .
•
Used to call Speed dials by from to
.
~
END/PWR key
Used to end or reject a call. This key is also
used as Power Key by pressing this key for a
few seconds.
Clear key
Deletes a character by each press. Hold the
key down to clear all input. Also use this key to
go back to the previous screen. In addition, you
can view voice memo list when you press this
key shortly in a standby mode.
On-Screen icons
Icon/Indicator Description
Tells you the strength of the network signal.
Call is connected.
You can use GPRS service.
Shows that you are using a roaming
service.
Line 1/2 is in use for outgoing calls – if
you subscribe to the Two Line Service.
The alarm has been set and is on.
Tells you the status of the battery.
You have received a text message.
You have received a voice message.
You have received a push message.
You can view your schedule.
All audible signals are turned off.
General profile is activated.
Loud profile is activated.
Silent profile is activated.
Headset profile is activated.
Car profile is activated.
You can divert a call.

Getting started
Getting started
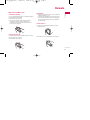
Installing the SIM card and the battery
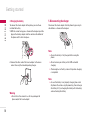
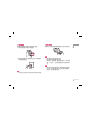
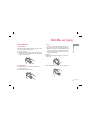
1. Inserting the SIM card
Locate the SIM card socket in the back of the phone. Follow the
steps below to install the SIM card.
1. Remove the battery if attached.
2. Slide the SIM card into the slot, under the silvery holders, with
the golden connectors facing down.
2. Removing the SIM card
Follow the steps below to Remove the SIM card.
1. Remove the battery if attached.
2. Take out the SIM card from the slot.
Notice
]
Removing the battery from the phone whilst it is switched
on may cause it to malfunction.
]
The metal contact of the SIM card can be easily
damaged by scratches. Pay special attention to the SIM
card when you handle and install. Follow the instructions
supplied with the SIM card.
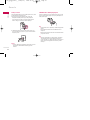
3. Installing the battery
1. Position the lugs on the bottom of the battery into the retaining
holder.
2. Then push the half of the battery into position.
9

10
Getting started
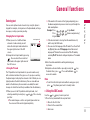
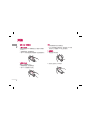
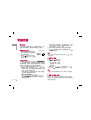
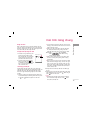
4. Charging the battery
To connect the travel adapter to the phone, you must have
installed the battery.
1. With the arrow facing you as shown in the diagram push the
plug on the battery adapter into the socket on the bottom of
the phone until it clicks into place.
2. Connect the other end of the travel adapter to the mains
socket. Use only the included packing charger.
Warning
]
Do not force the connector as this may damage the
phone and/or the travel adapter.
5. Disconnecting the charger
Disconnect the travel adapter from the phone by pressing its
side buttons as shown in the diagram.
Note
]
Ensure the battery is fully charged before using the
phone.
]
Do not remove your battery or the SIM card while
charging.
]
The moving bars of battery icon will stop when charging
is completed.
Note
]
In case the battery is not properly charged, please turn
the phone off and on using the power key, then recharge
the battery. Or try recharging the battery after detaching
and reattaching the battery.
Getting started

General functions
11
General functions
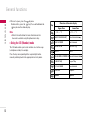
Entering text
You can enter alphanumeric characters by using the phone’s
keypad. For example, storing names in the phonebook, writing a
message, creating a personal greeting.
Changing the text input mode
1. When you are in a field that allows
characters to be entered, you will
notice the text input mode indicator in
the upper right corner of the LCD
screen.
2. Change the text input mode by pressing
. You can check the current text
input mode in the upper right corner of
the LCD screen.
]
Using the T9 mode
The T9 predictive text input mode lets you enter words easily
with a minimum number of key presses. As you press each key,
the phone begins to display the characters that it thinks you are
typing based on the built-in dictionary. You can also add new
words in the dictionary. As new words are added, the word
changes to reflect the most likely candidate from the dictionary.
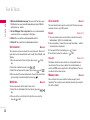
1. When you are in the T9 predictive text input mode, start
entering a word by pressing keys to . Press one key
per letter.
] The word changes as letters are typed. Ignore what’s on
the screen until the word is typed completely.
] If the word is still incorrect after typing completely, press
the down navigation key once or more to cycle through the
other word options.
Example: Press to type Good.
Press [down navigation key]
to type Home.
] If the desired word is missing from the word choice list,
add it using the ABC mode.
] You can select the language of the T9 mode. Press the left soft
key [Option], then select T9 languages. Select the desired
language of T9 mode. You can also turn off the T9 mode by
selecting T9 off. The default setting on the phone is T9 enabled
mode.
2. Enter the whole word before editing or deleting any
keystrokes.
3. Complete each word with a space by pressing the key.
To delete letters, press . Press and hold down to
erase entire words.
Note
]
To exit from the text input mode without saving your input,
press . The phone goes back to standby mode.
] Using the ABC mode
Use the to keys to enter your text.
1. Press the key labeled with the required letter:
] Once for the first letter
] Twice for the second letter.
] And so on.
OptionsInsert
text input mode

12
General functions
General functions
2. To insert a space, press the key once.
To delete letters, press the key. Press and hold down the
key to clear the whole display.
Note
]
Refer to the table below for more information on the
characters available using the alphanumeric keys.
] Using the 123 (Number) mode
The 123 mode enables you to enter numbers in a text message
(a telephone number, for example).
Press the keys corresponding to the required digits before
manually switching back to the appropriate text entry mode.
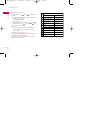
Characters in the order display
Key
Upper Case
. , / ? ! - : ' '' 1
A B C 2 Ä À Á Â Ã Å Æ Ç
D E F 3 Ë È É Ê
G H I 4 Ï Ì Í Î
G
J K L 5
M N O 6 Ñ Ö Ø Ò Ó Ô Õ Œ
P Q R S 7 ß
S
T U V 8 Ü Ù Ú Û
W X Y Z 9
Space 0
Lower Case
. , / ? ! - : ' '' 1
a b c 2 ä à á â ã å æ ç
d e f 3 ë è é ê
g h i 4 ï ì í î g
j k l 5
m n o 6 ñ ö ø ò ó ô õ œ
p q r s 7 ß
s
t u v 8 ü ù ú û
w x y z 9
Space 0
ˇ
ˇ
¸
¸

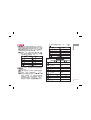
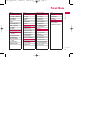
Menu tree
13
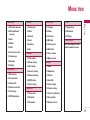
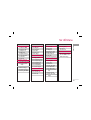
Menu tree
1. Messages
1.1 Write short message
1.2 Write multimedia
message
1.3 Inbox
1.4 Outbox
1.5 Drafts
1.6 Listen to voice mail
1.7 Info message
1.8 Templates
1.9 Settings
2. Call register
2.1 Missed calls
2.2 Received calls
2.3 Dialled calls
2.4 Delete recent calls
2.5 Call charges
2.6 GPRS information
3. Profiles
3.1 Vibrate only
3.2 Quiet
3.3 General
3.4 Loud
3.5 Headset
3.6 Car
4. Settings
4.1 Date & Time
4.2 Phone settings
4.3 Call settings
4.4 Security settings
4.5 Network settings
4.6 GPRS setting
4.7 Reset settings
5. Organiser
5.1 Alarm clock
5.2 Scheduler
5.3 Phonebook
6. Fun & Tools
6.1 Favorites
6.2 Games
6.3 Calculator
6.4 My folder
6.5 Unit converter
6.6 World time
6.7 Voice recorder
6.8 Memory status
7. Internet
7.1 Home
7.2 Bookmarks
7.3 Profiles
7.4 Go to URL
7.5 Cache settings
7.6 Cookies settings
7.7 Security certification
7.8 Reset profiles
7.9 Browser version
8. Java
8.1 Applications
8.2 Download
8.3 Profiles
9. SIM Service
This menu depends on SIM
and the network services.

14
Messages
Messages
This menu includes functions related to SMS (Short Message
Service), MMS (Multimedia Message Service), voice mail, as
well as the network’s service messages.
Write short message Menu 1.1
You can write and edit text message, checking the number of
message pages.
Note
]
The phone which supports EMS release 5 is available to
send colour pictures, sounds, text styles, etc.. The other
party may not receive pictures, sounds or text styles you
sent properly if the phone does not support such options.
Options
] Send: Sends text messages.
1. Enter numbers of recipient.
2. Press key to add more recipients.
3. You can add phone numbers in the phonebook.
4. Press after entering numbers.
]
Save: Stores messages in Drafts.
]
Font: You can select Size and Style of fonts.
] Colour: You can select Colour of foreground and background.
] Alignment: You can make the message contents aligned Left,
Centre or Right.
] Add T9 dictionary: You can add your own word. This menu can
be shown only when edit mode is Predictive
(T9Abc/T9abc/T9ABC).
]
T9 languages: Select the language for T9 input mode. You can
also deactivate T9 input mode by selecting 'T9 off'.
]
Exit: If you press Exit while writing a message, you can end the
writing message and back to the Message menu. The message
you have written is not saved.
Insert
] Symbol
: You can add special characters.
] Picture:
You can insert the Default graphics or graphics in My
pictures that are available for text messages.
]
Sound: You can insert sounds that are available for text
messages.
] Text templates:
You can use Text templates already set in the
phone.
] Phonebook: You can add phone numbers or e-mail addresses
in Phonebook.
] Signature: You can add your signature to the message.
Write multimedia message Menu 1.2
You can write and edit multimedia messages, checking
message size.
1. You can create a new message or choose one of the
multimedia message templates already made.
2. Press Insert to add Symbol, Picture, Sound,Record voice, Text
templates, Phonebook or Signature.

15
Messages
Options
] Send
: You can send multimedia messages to multiple recipients,
priorities your message, and make it sent later as well.
] Preview:
You can preview multimedia messages you wrote.
] Save:
You can save multimedia messages In drafts or as template.
]
Add slide: You can add a slide before or after current slide.
]
Move to slide: You can move to previous or next slide.
]
Delete slide: You can delete the current slide.
] Set slide format
- Set timer: You can set timer for slide, text, picture and sound.
- Swap text and picture: You can switch the position of
picture and text of the message.
] Remove media:
You can remove pictures or sounds in the
slide. This option can be shown only when any media exists.
] Add T9 dictionary:
You can add your own word. This menu can
be shown only when edit mode is Predictive
(T9Abc/T9abc/T9ABC).
]
T9 languages: Select the language for T9 input mode.
]
Exit: You can back to the Message menu.
Note
]
If you select the picture (15K) on writing multimedia
message, loading duration will take around 15 seconds at
least. Furthermore, you can't activate any key during
loading time. After 15 seconds, it is available to write
multimedia message.
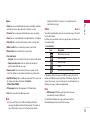
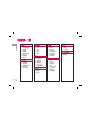
Inbox Menu 1.3
You will be alerted when you have received messages. They will
be stored in Inbox.
In Inbox, you can identify each message by icons. For detail, see
the icon directive.
If the phone shows ‘No space for SIM message’, you have to
delete only SIM messages from Inbox. If the phone displays ‘No
space for message’, you can make space of each repository as
deleting messages, media and applications.
Note
]
SIM message: SIM message means the message
exceptionally stored in SIM card.
For notified multimedia message, you have to wait for
downloading and processing of the message.
Icon Description
Multimedia message
Short message
SIM message
Read
Notified multimedia message
] Icon directive

16
Messages
Messages
Outbox Menu 1.4
You can view the list and contents of sent messages in this
menu and can also verify if the transmission was successful.
In each message, the following options are available by pressing
the left soft key [Options].
The messages of which transmission was completed has
the following options.
]
View: You can view the selected message.
]
Forward: You can forward the selected message to other
recipients.
]
Delete: Deletes the selected message from outbox.
]
View Information: You can view the information of selected
message: subject (only for multimedia message), the date and
time when you sent it, message type and size, the priority (only
for multimedia message), and recipients.
] Delete all: Deletes all the messages in the outbox folder.
The messages of which transmission is in progress has
the following options.
] View: You can view the selected message.
] Send: Select this to send it again.
] Cancel: Cancels transmitting of the message.
] Delete: Cancels transmitting the message and deletes the
message.
] View Information: You can view the information of selected
message: subject (only for multimedia message), the date and
time when you sent it, message type and size, the priority (only
for multimedia message), and recipients.
] Send all: Sends all the messages of which transmission is in
progress again.
] Cancel: Cancels all the message transmission.
] Delete all: Cancels all the message transmission and deletes
all of them.
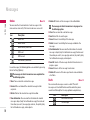
Drafts Menu 1.5
You can view the messages saved as a draft. The draft
messages are listed with the date and time when they were
saved. Scroll through the list using up/down navigation keys.
Icon Description
Multimedia message
Text message
Icon Description
MMS sent
MMS unsent
MMS delivery confirmed
SMS sent
SMS unsent
SMS delivery confirmed

17
Messages
Each draft has the following options. Press [Options].
] View: You can view the selected message.
] Edit: You can edit the selected message.
] Send: Selecte this to send the selected message.
] Delete: Deletes the selected message from the drafts folder.
] View information: You can view the information of selected
message: subject (only for multimedia message), the date and
time when saved, message type and size, the priority (only for
multimedia message).
] Delete all: Deletes all the messages from drafts folder.
Listen to voice mail Menu 1.6
This menu provides you with a quick way of accessing your
voice mailbox (if provided by your network). Before using this
feature, you must enter the voice server number obtained from
your network operator.
When new voice message is received, the symbol will be
displayed on the screen. Please check with your service
operator for details of their service in order to configure the
handset correctly.
Info message Menu 1.7
Info service messages are text messages delivered by the
network to GSM. They provide general information such as
weather reports, traffic news, taxis, pharmacies, and stock
prices. Each type of information has the number; therefore, you
can contact service provider as long as you have input the
certain number for the information. When you have received an
info service message, you can see the popup message to show
you that you have received a message or the info service
message is directly displayed. To view the message again or not
in standby mode, follow the sequence shown below;
Read
(Menu 1.7.1)
When you have received an info service message and select
Read to view the message, it will be displayed on the screen. You
can read another message by scrolling , or [Next].
Topics
(Menu 1.7.2)
]
Add new: You can add Info service message numbers in the
Phone memory with its nickname.
]
View list: You can see Info service message numbers which
you added. If you press [Options], you can edit and delete
info message category which you added.
]
Active list: You can select Info service message numbers in
the active list. If you activate an info service number, you can
receive messages sent from the number.
Templates Menu 1.8
After creating some templates (text, multimedia, signature), you
can use them by just selecting them when you send messages.
Text templates (Menu 1.8.1)
The following options are available.
]
View: Select this to view the selected template.
]
Edit: Use this to edit the selected template.

18
Messages
Messages
]
Write messages
- Write text message: Use this to send the selected template
message by SMS.
- Write multimedia message: Use this to send the selected
template message by MMS.
]
Add new: Use this to create a new template.
]
Delete: Deletes the selected template from the text template list.
]
Delete all: Deletes all templates.
Multimedia templates (Menu 1.8.2)
You can create a multimedia template after pressing the left soft
key [Add new]. And the multimedia templates you saved as a
template while creating a multimedia message in the Write
multimedia message (See page 14).
]
View: You can view the multimedia template.
]
Edit: You can edit the multimedia template.
]
Add new: Allows you to add a new multimedia template.
]
Write messages: You can write a multimedia message with the
multimedia template.
]
Delete: Deletes the selected template message from the
multimedia template list.
]
Delete all: Clears the multimedia template list.
Signature (Menu 1.8.3)
After creating the signature template, you can access the
following menus by pressing the left soft key [Options].
]
Edit: Use this to edit the signature.
]
Write messages: You can send your business card via SMS,
MMS or Bluetooth.
]
Delete: Use this to delete the signature.
Settings Menu 1.9
Text message (Menu 1.9.1)
]
Message types:
Text, Voice, Fax, Natl. paging, X.400, Email, ERMES
Usually, the type of message is set to Text. You can convert
your text into alternative formats. Contact your service
provider for the availability of this function.
] Validity period:
This network service allows you to set how
long your text messages will be stored at the message centre.
] Delivery report:
If you set to Yes, you can check whether your
message is sent successfully.
] Reply via same service centre:
When a message is sent, it
allows the recipients to reply and charge the cost of the reply
to your telephone bill.
] SMS centre:
If you want to send the text message, you can
receive the address of SMS centre through this menu.

19
Messages
Multimedia message (Menu 1.9.2)
] Priority:
You can send the message after setting the level of
priority: Low, Normal and High.
] Validity period:
This network service allows you to set how
long your text messages will be stored at the message centre.
] Delivery report:
If it is set to Yes in this menu, you can check
whether your message is sent successfully.
] Auto download
On: The messages are downloaded automatically on receipt.
Off: Requires you to confirm you want to download the
message.
Home network only: If you select this, messages are
downloaded automatically on receipt in your home network
area. And outside your home service area, it requires you to
confirm you to download the message.
]
Network settings: In order to download MMS from the server,
you need to set up a CSD or GPRS data connection. If you
select multimedia message server, you can set URL for
multimedia message server. You can set over 5 profiles to
connect service.
]
Permitted types
- Personal: Personal message.
- Advertisements: Commercial message.
- Information: Necessary information.
Voice mail centre (Menu 1.9.3)
You can receive the voicemail if this feature is supported by your
network service provider. When a new voicemail is arrived, the
symbol will be displayed on the screen. Please check with your
network service provider for details of their service in order to
configure the phone accordingly.
] Home:
You can listen to voice mails by selecting
Home.
] Roaming:
Even when you are in abroad, you can listen to voice
mails if roaming service is supported.
Info message
(Dependent to network and subscription) (Menu 1.9.4)
] Receive
If you select Yes, your phone will receive Info service
messages.
] Alert
Your phone will beep when you have received Info service
message numbers.
] Languages
Push messages (Menu 1.9.5)
You can set the option whether you will receive the message or not.
La pagina si sta caricando...
La pagina si sta caricando...
La pagina si sta caricando...
La pagina si sta caricando...
La pagina si sta caricando...
La pagina si sta caricando...
La pagina si sta caricando...
La pagina si sta caricando...
La pagina si sta caricando...
La pagina si sta caricando...
La pagina si sta caricando...
La pagina si sta caricando...
La pagina si sta caricando...
La pagina si sta caricando...
La pagina si sta caricando...
La pagina si sta caricando...
La pagina si sta caricando...
La pagina si sta caricando...
La pagina si sta caricando...
La pagina si sta caricando...
La pagina si sta caricando...
La pagina si sta caricando...
La pagina si sta caricando...
La pagina si sta caricando...
La pagina si sta caricando...
La pagina si sta caricando...
La pagina si sta caricando...
La pagina si sta caricando...
La pagina si sta caricando...
La pagina si sta caricando...
La pagina si sta caricando...
La pagina si sta caricando...
La pagina si sta caricando...
La pagina si sta caricando...
La pagina si sta caricando...
La pagina si sta caricando...
La pagina si sta caricando...
La pagina si sta caricando...
La pagina si sta caricando...
La pagina si sta caricando...
La pagina si sta caricando...
La pagina si sta caricando...
La pagina si sta caricando...
La pagina si sta caricando...
La pagina si sta caricando...
La pagina si sta caricando...
La pagina si sta caricando...
La pagina si sta caricando...
La pagina si sta caricando...
La pagina si sta caricando...
La pagina si sta caricando...
La pagina si sta caricando...
La pagina si sta caricando...
La pagina si sta caricando...
La pagina si sta caricando...
La pagina si sta caricando...
La pagina si sta caricando...
La pagina si sta caricando...
La pagina si sta caricando...
La pagina si sta caricando...
La pagina si sta caricando...
La pagina si sta caricando...
La pagina si sta caricando...
La pagina si sta caricando...
La pagina si sta caricando...
La pagina si sta caricando...
La pagina si sta caricando...
La pagina si sta caricando...
La pagina si sta caricando...
La pagina si sta caricando...
La pagina si sta caricando...
La pagina si sta caricando...
La pagina si sta caricando...
La pagina si sta caricando...
La pagina si sta caricando...
La pagina si sta caricando...
La pagina si sta caricando...
La pagina si sta caricando...
La pagina si sta caricando...
La pagina si sta caricando...
La pagina si sta caricando...
La pagina si sta caricando...
La pagina si sta caricando...
La pagina si sta caricando...
La pagina si sta caricando...
La pagina si sta caricando...
La pagina si sta caricando...
La pagina si sta caricando...
La pagina si sta caricando...
La pagina si sta caricando...
La pagina si sta caricando...
La pagina si sta caricando...
La pagina si sta caricando...
La pagina si sta caricando...
La pagina si sta caricando...
La pagina si sta caricando...
La pagina si sta caricando...
La pagina si sta caricando...
La pagina si sta caricando...
La pagina si sta caricando...
La pagina si sta caricando...
La pagina si sta caricando...
La pagina si sta caricando...
La pagina si sta caricando...
La pagina si sta caricando...
La pagina si sta caricando...
La pagina si sta caricando...
La pagina si sta caricando...
La pagina si sta caricando...
La pagina si sta caricando...
La pagina si sta caricando...
La pagina si sta caricando...
La pagina si sta caricando...
La pagina si sta caricando...
La pagina si sta caricando...
La pagina si sta caricando...
La pagina si sta caricando...
La pagina si sta caricando...
La pagina si sta caricando...
La pagina si sta caricando...
La pagina si sta caricando...
La pagina si sta caricando...
La pagina si sta caricando...
La pagina si sta caricando...
La pagina si sta caricando...
La pagina si sta caricando...
La pagina si sta caricando...
La pagina si sta caricando...
La pagina si sta caricando...
La pagina si sta caricando...
La pagina si sta caricando...
La pagina si sta caricando...
La pagina si sta caricando...
La pagina si sta caricando...
-
 1
1
-
 2
2
-
 3
3
-
 4
4
-
 5
5
-
 6
6
-
 7
7
-
 8
8
-
 9
9
-
 10
10
-
 11
11
-
 12
12
-
 13
13
-
 14
14
-
 15
15
-
 16
16
-
 17
17
-
 18
18
-
 19
19
-
 20
20
-
 21
21
-
 22
22
-
 23
23
-
 24
24
-
 25
25
-
 26
26
-
 27
27
-
 28
28
-
 29
29
-
 30
30
-
 31
31
-
 32
32
-
 33
33
-
 34
34
-
 35
35
-
 36
36
-
 37
37
-
 38
38
-
 39
39
-
 40
40
-
 41
41
-
 42
42
-
 43
43
-
 44
44
-
 45
45
-
 46
46
-
 47
47
-
 48
48
-
 49
49
-
 50
50
-
 51
51
-
 52
52
-
 53
53
-
 54
54
-
 55
55
-
 56
56
-
 57
57
-
 58
58
-
 59
59
-
 60
60
-
 61
61
-
 62
62
-
 63
63
-
 64
64
-
 65
65
-
 66
66
-
 67
67
-
 68
68
-
 69
69
-
 70
70
-
 71
71
-
 72
72
-
 73
73
-
 74
74
-
 75
75
-
 76
76
-
 77
77
-
 78
78
-
 79
79
-
 80
80
-
 81
81
-
 82
82
-
 83
83
-
 84
84
-
 85
85
-
 86
86
-
 87
87
-
 88
88
-
 89
89
-
 90
90
-
 91
91
-
 92
92
-
 93
93
-
 94
94
-
 95
95
-
 96
96
-
 97
97
-
 98
98
-
 99
99
-
 100
100
-
 101
101
-
 102
102
-
 103
103
-
 104
104
-
 105
105
-
 106
106
-
 107
107
-
 108
108
-
 109
109
-
 110
110
-
 111
111
-
 112
112
-
 113
113
-
 114
114
-
 115
115
-
 116
116
-
 117
117
-
 118
118
-
 119
119
-
 120
120
-
 121
121
-
 122
122
-
 123
123
-
 124
124
-
 125
125
-
 126
126
-
 127
127
-
 128
128
-
 129
129
-
 130
130
-
 131
131
-
 132
132
-
 133
133
-
 134
134
-
 135
135
-
 136
136
-
 137
137
-
 138
138
-
 139
139
-
 140
140
-
 141
141
-
 142
142
-
 143
143
-
 144
144
-
 145
145
-
 146
146
-
 147
147
-
 148
148
-
 149
149
-
 150
150
-
 151
151
-
 152
152
-
 153
153
-
 154
154


Documenti correlati
Altri documenti
-
Panasonic CSC95KH Istruzioni per l'uso
-
Toto washlet Guida d'installazione
-
Huawei MatePad Pro Guida Rapida
-
Grandstream GWN7701PA Guida d'installazione
-
Sony Xperia J ST26i Information Manual
-
Sony Ericsson W150i Walkman Dichiarazione di conformità
-
-
-
-
Domyos VM E SEAT Manuale utente