Samsung HW-N650 Manuale utente
- Categoria
- Ricevitori musicali Bluetooth
- Tipo
- Manuale utente
Questo manuale è adatto anche per

FULL MANUAL
Imagine the possibilities
Thank you for purchasing this Samsung product.
To receive more complete service, please register
your product at www.samsung.com/register
HW-N650
La pagina si sta caricando...
La pagina si sta caricando...
La pagina si sta caricando...

ENG - v
07 Connecting a Mobile Device 18
Connecting via Bluetooth
-------------------------
18
Using the Samsung Audio Remote App
-------------------------
21
– Installing the Samsung Audio Remote App
-------------------------
21
– Launching the Samsung Audio Remote App
-------------------------
21
08 Using the Remote Control 22
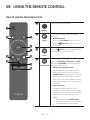
How to Use the Remote Control
-------------------------
22
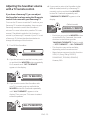
Adjusting the Soundbar volume with a TV remote control
-------------------------
25
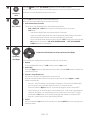
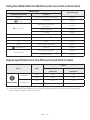
Using the Hidden Buttons (Buttons with more than one function)
-------------------------
26
Output specications for the different sound effect modes
-------------------------
26
09 Installing the Wall Mount 27
Installation Precautions
-------------------------
27
Wallmount Components
-------------------------
27
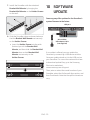
10 Software Update 29
Updating Procedure
-------------------------
30
If UPDATE is not displayed
-------------------------
30
11 Troubleshooting 31
12 Licence 32
13 Open Source Licence Notice 32
14 Important Notes About Service 32
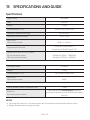
15 SpecicationsandGuide 33
Specications
-------------------------
33

ENG - 2
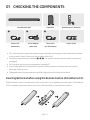
01 CHECKING THE COMPONENTS
VOL WOOFER
SOUNDBAR
SOUND
MODE
PAIR
Soundbar Main Unit Subwoofer Remote Control / Batteries
1 2 3
Power Cord
(Subwoofer)
AC/DC Adapter
(Main Unit)
Power Cord
(AC/DC Adapter)
Optical Cable
• For more information about the power supply and power consumption, refer to the label attached
to the product. (Label : Bottom of the Soundbar Main Unit)
• The power components are labelled (1, 2, 3). For more information about power connections,
see page 5.
• For Soundbar wall mounting components, see page 27.
• To purchase additional components or optional cables, contact a Samsung Service Centre or
Samsung Customer Care.
• The appearance of the accessories may differ slightly from the illustrations above.
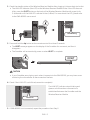
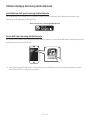
Inserting Batteries before using the Remote Control (AA batteries X 2)
Slide the battery cover in the direction of the arrow until it is completely removed. Insert 2 AA batteries
(1.5V) oriented so that their polarity is correct. Slide the battery cover back into position.
La pagina si sta caricando...
La pagina si sta caricando...
La pagina si sta caricando...
La pagina si sta caricando...
La pagina si sta caricando...
La pagina si sta caricando...
La pagina si sta caricando...
La pagina si sta caricando...
La pagina si sta caricando...
La pagina si sta caricando...
La pagina si sta caricando...
La pagina si sta caricando...
La pagina si sta caricando...
La pagina si sta caricando...
La pagina si sta caricando...

ENG - 18
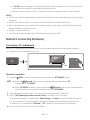
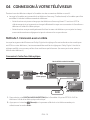
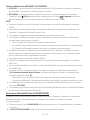
07 CONNECTING A MOBILE DEVICE
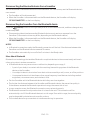
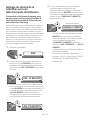
Connecting via Bluetooth
When a mobile device is connected using Bluetooth, you can hear stereo sound without the hassle of
cabling.
• You cannot connect more than one Bluetooth device at a time.
SOUND
MODE
PAIR
OR
Bluetooth device
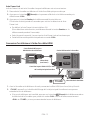
The initial connection
1. Press the PAIR button on the remote control to enter the “BT PAIRING” mode.
(OR)
a. Press the (Source) button on the right side panel and then select “BT”.
Change “BT” to “BT READY”.
b. When “BT READY” appears, press and hold the (Source) button on the right side panel
of the Soundbar for more than 5 seconds to display “BT PAIRING”.
2. On your device, select “[AV] Samsung Soundbar Nxxx N-Series” from the list that appears.
• When the Soundbar is connected to the Bluetooth device, [Bluetooth Device Name] → “BT”
appears in the front display.
3. Play music les from the device connected via Bluetooth through the Soundbar.
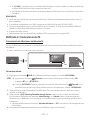
If the device fails to connect
• If a previously connected Soundbar listing (e.g. “[AV] Samsung Soundbar Nxxx N-Series”) appears
in the list, delete it.
• Then repeat steps 1 through 2.
NOTE
• After you have connected the Soundbar to your mobile device the rst time, use the “BT READY”
mode to reconnect.
La pagina si sta caricando...
La pagina si sta caricando...
La pagina si sta caricando...
La pagina si sta caricando...
La pagina si sta caricando...
La pagina si sta caricando...
La pagina si sta caricando...
La pagina si sta caricando...

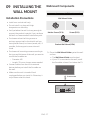
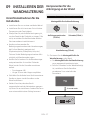
ENG - 27
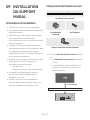
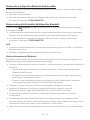
09 INSTALLING THE
WALL MOUNT
Installation Precautions
• Install on a vertical wall only.
• Do not install in a place with high
temperature or humidity.
• Verify whether the wall is strong enough to
support the product’s weight. If not, reinforce
the wall or choose another installation point.
• Purchase and use the xing screws or
anchors appropriate for the kind of wall you
have (plaster board, iron board, wood, etc.). If
possible, x the support screws into wall
studs.
• Purchase wall mounting screws according to
the type and thickness of the wall you want to
mount the Soundbar on.
– Diameter: M5
– Length: 35 mm or longer recommended.
• Connect cables from the unit to external
devices before you install the Soundbar on
the wall.
• Make sure the unit is turned off and
unplugged before you install it. Otherwise, it
may cause an electric shock.
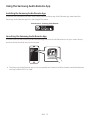
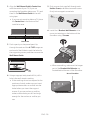
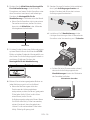
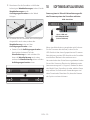
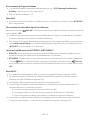
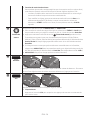
Wallmount Components
Wall Mount Guide
Holder-Screw (2 EA) Screw (2 EA)
Bracket-Wall Mount
(2 EA)
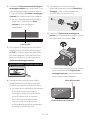
1. Place the Wall Mount Guide against the wall
surface.
• The Wall Mount Guide must be level.
• If your TV is mounted on the wall, install
the Soundbar at least 5 cm below the TV.
5 cm or more
La pagina si sta caricando...
La pagina si sta caricando...
La pagina si sta caricando...
La pagina si sta caricando...
La pagina si sta caricando...
La pagina si sta caricando...

ENG - 34
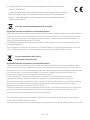
• Hereby, Samsung Electronics, declares that this equipment is in compliance
with Directive 2014/53/EU.
The full text of the EU declaration of conformity is available at the following
internet address: http://www.samsung.com go to Support > Search Product
Support and enter the model name.
This equipment may be operated in all EU countries.
[Correct disposal of batteries in this product]
(Applicable in countries with separate collection systems)
This marking on the battery, manual or packaging indicates that the batteries in this product should not be
disposed of with other household waste at the end of their working life. Where marked, the chemical
symbols Hg, Cd or Pb indicate that the battery contains mercury, cadmium or lead above the reference
levels in EC Directive 2006/66.
If batteries are not properly disposed of, these substances can cause harm to human health or the
environment.
To protect natural resources and to promote material reuse, please separate batteries from other types of
waste and recycle them through your local, free battery return system.
Correct Disposal of This Product
(Waste Electrical & Electronic Equipment)
(Applicable in countries with separate collection systems)
This marking on the product, accessories or literature indicates that the product and its electronic
accessories (e.g. charger, headset, USB cable) should not be disposed of with other household waste at the
end of their working life. To prevent possible harm to the environment or human health from uncontrolled
waste disposal, please separate these items from other types of waste and recycle them responsibly to
promote the sustainable reuse of material resources.
Household users should contact either the retailer where they purchased this product, or their local
government ofce, for details of where and how they can take these items for environmentally safe
recycling.
Business users should contact their supplier and check the terms and conditions of the purchase contract.
This product and its electronic accessories should not be mixed with other commercial wastes for disposal.
For information on Samsung’s environmental commitments and product specic regulatory obligations
e.g. REACH, WEEE, Batteries, visit:
http://www.samsung.com/uk/aboutsamsung/samsungelectronics/corporatecitizenship/data_corner.html
La pagina si sta caricando...
La pagina si sta caricando...
La pagina si sta caricando...

DEU - v
07 Anschliessen eines Mobilgeräts 18
Anschließen per Bluetooth
-------------------------
18
Samsung Audio Remote App verwenden
-------------------------
21
– Installieren der Samsung Audio Remote App
-------------------------
21
– Starten der Samsung Audio Remote App
-------------------------
21
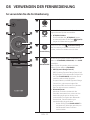
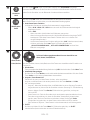
08 Verwenden der Fernbedienung 22
So verwenden Sie die Fernbedienung
-------------------------
22
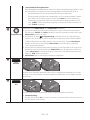
Anpassen der Soundbar-Lautstärke mit einer TV-Fernbedienung
-------------------------
25
Verwenden der verborgenen Tasten (Tasten mit mehr als einer funktion)
---------------------------
26
Ausgabe-spezikationen für die unterschiedlichen sound-effekt-modi
---------------------------
26
09 Installieren der Wandhalterung 27
Vorsichtsmaßnahmen für die Installation
-------------------------
27
Komponenten für die Anbringung an der Wand
-------------------------
27
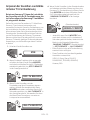
10 Softwareaktualisierung 29
Updateverfahren
-------------------------
30
Wenn UPDATE nicht angezeigt wird
-------------------------
30
11 Fehlerbehebung 31
12 Lizenz 32
13 Bekanntmachung zu Open Source Lizenzen 32
14 Wichtige Hinweise zum Kundendienst 32
15 SpezikationenundLeitfaden 33
Technische daten
-------------------------
33

DEU - 2
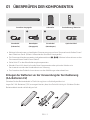
01 ÜBERPRÜFEN DER KOMPONENTEN
VOL WOOFER
SOUNDBAR
SOUND
MODE
PAIR
Soundbar-Hauptgerät Subwoofer Fernbedienung / Batterien
1 2 3
Stromkabel
(Subwoofer)
Netzadapter
(Hauptgerät)
Stromkabel
(Netzadapter)
Optisches Kabel
• Weitere Informationen zur benötigten Stromversorgung und zum Stromverbrauch nden Sie auf
dem Etikett am Gerät. (Etikett: Unterseite des Soundbar-Hauptgeräts)
• Die Stromanschlusskomponenten sind gekennzeichnet (1, 2, 3). Weitere Informationen zu den
Stromanschlüssen nden Sie auf Seite 5.
• Siehe Seite 27 zu den Wandhalterungskomponenten.
• Wenden Sie sich für den Kauf zusätzlicher Komponenten oder optionaler Kabel an ein
Servicezentrum oder den Kundendienst von Samsung.
• Das Aussehen des Zubehörs kann etwas von den Abbildungen oben abweichen.
Einlegen der Batterien vor der Verwendung der Fernbedienung
(AA-Batterien X 2)
Schieben Sie den Batteriedeckel in Pfeilrichtung, bis er vollständig entfernt ist.
Legen Sie 2 AA-Batterien (1,5V) so ausgerichtet ein, dass ihre Polarität richtig ist. Schieben Sie den
Batteriedeckel wieder vollständig zurück.
La pagina si sta caricando...
La pagina si sta caricando...
La pagina si sta caricando...
La pagina si sta caricando...
La pagina si sta caricando...
La pagina si sta caricando...
La pagina si sta caricando...
La pagina si sta caricando...
La pagina si sta caricando...
La pagina si sta caricando...
La pagina si sta caricando...
La pagina si sta caricando...
La pagina si sta caricando...
La pagina si sta caricando...
La pagina si sta caricando...

DEU - 18
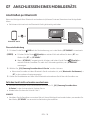
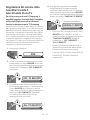
07 ANSCHLIESSEN EINES MOBILGERÄTS
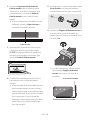
Anschließen per Bluetooth
Wenn ein Mobilgerät über Bluetooth verbunden wird, können Sie einen Stereoton ohne lästige Kabel
hören.
• Sie können nicht mehr als ein Bluetooth-Gerät gleichzeitig verbinden.
SOUND
MODE
PAIR
ODER
Bluetooth-Gerät
Die erste Verbindung
1. Drücken Sie die Taste PAIR auf der Fernbedienung, um in den Modus „BT PAIRING“ zu wechseln.
(ODER)
a. Drücken Sie die Taste (Quelle) am rechten Feld und wählen Sie dann „BT“ aus.
Ändern Sie „BT“ zu „BT READY “.
b. Wenn „BT READY “ angezeigt wird, drücken und halten Sie die Taste (Quelle) am
rechten Feld der Soundbar für mehr als 5 Sekunden gedrückt, um „BT PAIRING“
anzuzeigen.
2. Wählen Sie „[AV] Samsung Soundbar Nxxx N-Series“ aus der Liste aus.
• Wenn eine Soundbar mit dem Bluetooth-Gerät verbunden ist, wird [Bluetooth-Gerätename] →
„BT“ in der vorderen Anzeige angezeigt.
3. Geben Sie Musikdateien auf dem über Bluetooth verbundenen Gerät über die Soundbar aus.
Falls das Gerät nicht verbunden werden kann
• Falls die Auistung der zuvor verbundenen Soundbar (z. B. „[AV] Samsung Soundbar Nxxx
N-Series“) in der Liste erscheint, löschen Sie sie.
• Wiederholen Sie dann die Schritte 1 bis 2.
HINWEIS
• Nachdem Sie die Soundbar zum ersten Mal mit Ihrem Mobilgerät verbunden haben, verwenden Sie
den Modus „BT READY“ um erneut eine Verbindung herzustellen.
La pagina si sta caricando...
La pagina si sta caricando...
La pagina si sta caricando...
La pagina si sta caricando...
La pagina si sta caricando...
La pagina si sta caricando...
La pagina si sta caricando...
La pagina si sta caricando...

DEU - 27
09 INSTALLIEREN DER
WANDHALTERUNG
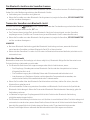
Vorsichtsmaßnahmen für die
Installation
• Installieren Sie nur an einer vertikalen Wand.
• Installieren Sie nicht an einem Ort mit hoher
Temperatur oder Feuchtigkeit.
• Überprüfen Sie, ob die Wand stark genug ist,
um das Gewicht des Produkts zu tragen. Falls
nicht, verstärken Sie die Wand oder wählen
Sie einen anderen Installationsort.
• Kaufen und verwenden Sie
Befestigungsschrauben oder Verankerungen,
die für Ihre Wandart geeignet sind
(Gipskartonplatte, Eisenplatte, Holz, etc.).
Fixieren Sie die Befestigungsschrauben falls
möglich mit Wandverankerungen.
• Kaufen Sie Schrauben für die Wandmontage
entsprechend der Art und der Dicke der
Wand, an der Sie die Soundbar montieren
wollen.
– Durchmesser: M5
– Länge: 35 mm oder länger empfohlen.
• Schließen Sie die Kabel vom Gerät an externe
Geräte an, bevor sie die Soundbar an der
Wand installieren.
• Stellen Sie sicher, dass das Gerät
ausgeschaltet und der Netzstecker gezogen
ist, bevor Sie es installieren. Andernfalls kann
es zu einem elektrischen Schlag kommen.
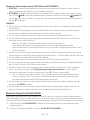
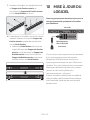
Komponenten für die
Anbringung an der Wand
Montagehilfe für die Wandhalterung
Aufhängungsschraube
(2 Stck.)
Schraube (2 Stck.)
Wandhalterung
(2 Stck.)
1. Platzieren Sie die Montagehilfe für die
Wandhalterung an der Wand.
• Die Montagehilfe für die Wandhalterung
muss waagerecht positioniert sein.
• Falls Ihr Fernseher an der Wand befestigt
ist, installieren Sie die Soundbar
mindestens 5 cm unterhalb des
Fernsehers.
5 cm oder mehr
La pagina si sta caricando...
La pagina si sta caricando...
La pagina si sta caricando...
La pagina si sta caricando...
La pagina si sta caricando...
La pagina si sta caricando...
La pagina si sta caricando...
La pagina si sta caricando...
La pagina si sta caricando...
La pagina si sta caricando...

FRA - v
07 Connexion à un Appareil Mobile 18
Connexion via Bluetooth
-------------------------
18
Utilisation de l’application Samsung Audio Remote
-------------------------
21
– Installation de l’application Samsung Audio Remote
-------------------------
21
– Lancement de l’application Samsung Audio Remote
-------------------------
21
08 Utilisation de la télécommande 22
Comment utiliser la télécommande
-------------------------
22
Réglage du volume de la Soundbar avec une télécommande de téléviseur --------------------------- 25
Utilisation des touches dissimulées (Touches avec plus d’une fonction)
-------------------------
26
Spécications de sortie pour les différents modes d’effets sonores
-------------------------
26
09 Installation du Support Mural 27
Précautions d’installation
-------------------------
27
Composants de xation au mur
-------------------------
27
10 Mise à jour du Logiciel 29
Procédure de mise à jour
-------------------------
30
Si UPDATE ne s’afche pas
-------------------------
30
11 Dépannage 31
12 Licence 32
13 Avis de Licence Libre 32
14 Remarque Importante à Propos du Service 32
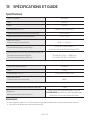
15 SpécicationsetGuide 33
Spécications
-------------------------
33

FRA - 2
01 CONTRÔLE DES COMPOSANTS
VOL WOOFER
SOUNDBAR
SOUND
MODE
PAIR
Unité principale Soundbar Caisson de basse Télécommande/Piles
1 2 3
Cordon d’alimentation
(Caisson de basse)
Adaptateur CA/CC
(Unité principale)
Cordon
d’alimentation
(Adaptateur CA/CC)
Câble optique
• Pour plus d’informations sur l’alimentation et la consommation électriques, reportez-vous à
l’étiquette collée sur le produit. (Étiquette : Bas de l’Unité Principale Soundbar)
• Les étapes de connexion de l’alimentation sont étiquetées (1, 2, 3). Pour plus d’informations sur
les connexions de l’alimentation, consultez la page 5.
• Pour les composants de xation murale de la Soundbar, consultez la page 27.
• Pour acheter des composants supplémentaires ou des câbles optionnels, contactez un Centre de
service Samsung ou le Service client de Samsung.
• L’aspect des accessoires peut légèrement différer des illustrations ci-dessus.
Insertion des piles avant l’utilisation de la télécommande (Piles AA X 2)
Faites glisser le couvercle des piles dans la direction de la èche jusqu’à ce qu’il soit complètement
retiré. Insérez 2 piles AA (1,5 V) orientées de sorte que la polarité soit correcte. Remettez le couvercle
en le faisant glisser dans sa position.
La pagina si sta caricando...
La pagina si sta caricando...
La pagina si sta caricando...
La pagina si sta caricando...
La pagina si sta caricando...
La pagina si sta caricando...
La pagina si sta caricando...
La pagina si sta caricando...
La pagina si sta caricando...
La pagina si sta caricando...
La pagina si sta caricando...
La pagina si sta caricando...
La pagina si sta caricando...
La pagina si sta caricando...
La pagina si sta caricando...

FRA - 18
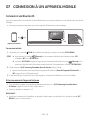
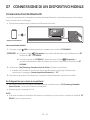
07 CONNEXION À UN APPAREIL MOBILE
Connexion via Bluetooth
Lorsqu’un appareil est connecté à l’aide de Bluetooth, vous pouvez écouter le son stéréo sans tracas de
câblage.
• Vous ne pouvez pas connecter plus d’un appareil Bluetooth en même temps.
SOUND
MODE
PAIR
OU
Appareil Bluetooth
Connexion initiale
1. Appuyez sur la touche PAIR de la télécommande pour passer au mode «BTPAIRING».
(OU)
a. Appuyez sur la touche (Source) sur le panneau côté droit puis sélectionnez «BT».
Changez «BT» sur «BT READY».
b. Lorsque «BT READY» apparaît, appuyez et maintenez enfoncée la touche (Source) sur le
panneau côté droit de la Soundbar pendant plus de 5 secondes pour afcher «BTPAIRING».
2. Sélectionnez «[AV] Samsung Soundbar Nxxx N-Series» dans la liste.
• Lorsqu’une Soundbar est connectée à l’appareil Bluetooth, [Nom de l’appareil Bluetooth] →
«BT» apparaît sur l’afchage avant.
3. Lisez des chiers musicaux à partir de l’appareil, connecté via Bluetooth, via la Soundbar.
Si la connexion de l’appareil échoue
• Si la liste de Soundbar connectées précédemment (par ex. «[AV] Samsung Soundbar Nxxx
N-Series» apparaît dans la liste, supprimez-la.
• Ensuite, répétez les étapes 1 à 2.
REMARQUE
• Après avoir connecté la Soundbar au appareil mobile pour la première fois, utilisez le mode «BT
READY» pour la reconnexion.
La pagina si sta caricando...
La pagina si sta caricando...
La pagina si sta caricando...
La pagina si sta caricando...
La pagina si sta caricando...
La pagina si sta caricando...
La pagina si sta caricando...
La pagina si sta caricando...

FRA - 27
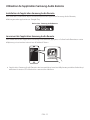
09 INSTALLATION
DU SUPPORT
MURAL
Précautions d’installation
• Installez sur un mur vertical uniquement.
• N’installez pas dans un endroit à température
élevée ou humide.
• Vériez si le mur est sufsamment robuste
pour supporter le poids du produit.
Sinon, renforcez le mur ou choisissez un autre
point d’installation.
• Achetez et utilisez les vis de xation ou les
ancrages appropriés pour le type de mur dont
vous disposez (plaque de plâtre, plaque
métallique, bois, etc.). Si possible, xez les vis
portantes dans les poteaux.
• Achetez les vis de support mural selon le type
et l’épaisseur du mur sur lequel vous
souhaitez monter la Soundbar.
– Diamètre: M5
– Longueur: 35 mm ou plus recommandés.
• Connectez les câbles depuis l’unité aux
appareils externes avant d’installer la
Soundbar sur le mur.
• Assurez-vous que l’unité est éteinte et
débranchée avant de l’installer. Sinon, cela
pourrait provoquer un choc électrique.
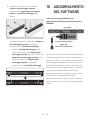
Composantsdexationaumur
Guidedexationmurale
Visdexation
(2 pièces)
Vis (2 pièces)
Supportdexationmurale
(2 pièces)
1. Placez le Guidedexationmurale contre le
mur.
• Le Guidedexationmurale doit être de
niveau.
• Si votre téléviseur est monté sur le mur,
installez la Soundbar à au moins 5 cm
sous le téléviseur.
5 cm minimum
La pagina si sta caricando...
La pagina si sta caricando...
La pagina si sta caricando...
La pagina si sta caricando...
La pagina si sta caricando...
La pagina si sta caricando...

FRA - 34
• Samsung Electronics déclare par la présente que cet équipement est conforme
à la directive 2014/53/UE.
Le texte complet de la déclaration de conformité de l’UE est disponible à
l’adresse Internet suivante : http://www.samsung.com, puis allez dans
Assistance > Sélectionner un produit et saisissez le nom de modèle.
Cet équipement peut fonctionner dans tous les pays de l’Union européenne.
[Elimination des batteries de ce produit]
(Applicable aux pays disposant de systèmes de collecte séparés)
Le symbole sur la batterie, le manuel ou l’emballage indique que les batteries de ce produit ne doivent pas
être éliminées en n de vie avec les autres déchets ménagers. L’indication éventuelle des symboles
chimiques Hg, Cd ou Pb signie que la batterie contient des quantités de mercure, de cadmium ou de plomb
supérieures aux niveaux de référence stipulés dans la directive CE 2006/66.
Si les batteries ne sont pas correctement éliminées, ces substances peuvent porter préjudice à la santé
humaine ou à l’environnement.
An de protéger les ressources naturelles et d’encourager la réutilisation du matériel, veillez à séparer les
batteries des autres types de déchets et à les recycler via votre système local de collecte gratuite des
batteries.
Les bons gestes de mise au rebut de ce produit (Déchets d’équipements électriques &
électroniques)
(Applicable aux pays disposant de systèmes de collecte séparés)
Ce symbole sur le produit, ses accessoires ou sa documentation indique que ni le produit, ni ses accessoires
électroniques usagés (chargeur, casque audio, câble USB, etc.) ne peuvent être jetés avec les autres
déchets ménagers. La mise au rebut incontrôlée des déchets présentant des risques environnementaux et
de santé publique, veuillez séparer vos produits et accessoires usagés des autres déchets. Vous favoriserez
ainsi le recyclage de la matière qui les compose dans le cadre d’un développement durable.
Les particuliers sont invités à contacter le magasin leur ayant vendu le produit ou à se renseigner auprès
des autorités locales pour connaître les procédures et les points de collecte de ces produits en vue de leur
recyclage. Les entreprises et particuliers sont invités à contacter leurs fournisseurs et à consulter les
conditions de leur contrat de vente. Ce produit et ses accessoires ne peuvent être jetés avec les autres
déchets.
Pour obtenir des informations sur les engagements environnementaux de Samsung et sur les obligations
réglementaires spéciques à l’appareil, par ex. la réglementation REACH WEEE, rendez-vous sur :
http://www.samsung.com/uk/aboutsamsung/samsungelectronics/corporatecitizenship/data_corner.html
La pagina si sta caricando...

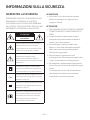
ITA - iii
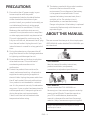
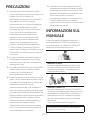
PRECAUZIONI
1. Assicurarsi che l’alimentazione CA della
propria abitazione sia conforme ai requisiti di
potenza riportati sull’adesivo di
identicazione situato sulla parte inferiore
del prodotto. Installare il prodotto
orizzontalmente, su un supporto adeguato
(mobile), vericando che vi sia spazio
sufciente per una corretta ventilazione 7 -
10 cm. Assicurarsi che le aperture di
ventilazione non siano coperte. Non
sistemare l’unità su amplicatori o altri
dispositivi che possono diventare caldi.
Questa unità è progettata per un uso
continuo. Per spegnere completamente
l’unità, scollegare il connettore CA dalla
presa di rete. Scollegare l’unità dalla presa se
si prevede di non utilizzarla per un periodo
prolungato.
2. Durante i temporali, scollegare la spina di
alimentazione dalla presa. I picchi di alta
tensione provocati dai fulmini potrebbero
danneggiare l’unità.
3. Non esporre l’unità alla luce diretta del sole o
ad altre fonti di calore. Questo potrebbe
causare il surriscaldamento e il
malfunzionamento dell’unità.
4. Tenere il prodotto lontano da fonti di umidità
(ad es. vasi) e calore eccessivo (ad es. fuoco) o
da apparecchi che generano un forte campo
magnetico o elettrico. In caso di
malfunzionamento dell’unità, scollegare il
cavo di alimentazione dalla presa di corrente.
Il prodotto non è destinato all’uso industriale.
Questo prodotto è destinato esclusivamente
all’uso personale. Se il prodotto o il disco
vengono conservati a basse temperature,
potrebbe formarsi della condensa.
Trasportando l’unità in inverno, attendere
circa 2 ore prima di utilizzarla, in modo che
ritorni a temperatura ambiente.
5. Le batterie utilizzate con questo prodotto
contengono sostanze chimiche dannose per
l’ambiente. Non smaltirle con i comuni riuti
domestici. Non gettare le batterie nel fuoco.
Non cortocircuitare, smontare o
surriscaldare le batterie. Una installazione
scorretta delle batterie può causarne
l’esplosione. Sostituire solo con batterie dello
stesso tipo o equivalenti.
INFORMAZIONI SUL
MANUALE
Il manuale utente è composto da due parti: il
presente MANUALE UTENTE semplicato in
formato cartaceo e un MANUALE COMPLETO
dettagliato che è possibile scaricare.
MANUALE UTENTE
Consultare questo manuale per istruzioni di
sicurezza, informazioni sull’installazione del
prodotto, i componenti, i collegamenti e le
speciche del prodotto.
MANUALE COMPLETO
È possibile accedere al MANUALE COMPLETO
nel centro di assistenza clienti Samsung online
scansionando il codice QR. Per visualizzare il
manuale sul proprio PC o dispositivo mobile,
scaricarlo dal sito Web Samsung in formato
documento.
(http://www.samsung.com/support)
Le caratteristiche e le speciche sono soggette a
modiche senza preavviso.

ITA - iv
SOMMARIO
01 Vericadeicomponenti 2
Inserimento delle batterie prima dell’utilizzo del telecomando
(2 batterie AA) ------------------------- 2
02 Panoramicadelprodotto 3
Pannello frontale / Pannello laterale destro della Soundbar ------------------------- 3
Pannello inferiore della Soundbar ------------------------- 4
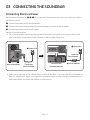
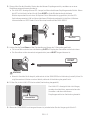
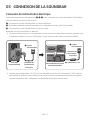
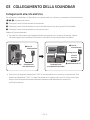
03 CollegamentodellaSoundbar 5
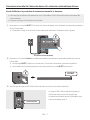
Collegamento alla rete elettrica
-------------------------
5
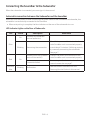
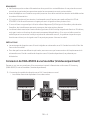
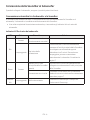
Connessione della Soundbar al Subwoofer
-------------------------
6
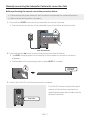
– Connessione automatica tra il subwoofer e la Soundbar
-------------------------
6
– Connessione manuale del subwoofer in caso di connessione
automatica non riuscita
-------------------------
7
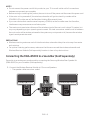
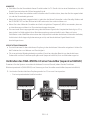
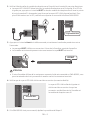
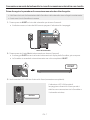
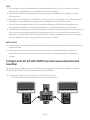
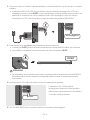
Collegamento del kit SWA-8500S (venduto separatamente) alla Soundbar
---------------------------
8
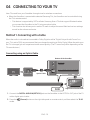
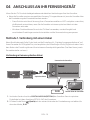
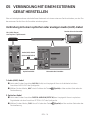
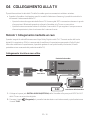
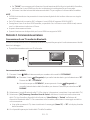
04 CollegamentoallaTV 10
Metodo 1. Collegamento mediante un cavo
-------------------------
10
– Collegamento tramite un cavo ottico
-------------------------
10
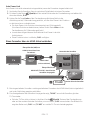
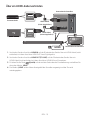
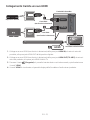
– Collegamento di una TV tramite un cavo HDMI
-------------------------
11
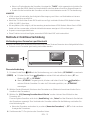
Metodo 2. Connessione wireless
-------------------------
12
– Connessione di una TV mediante Bluetooth
-------------------------
12
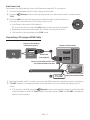
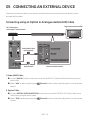
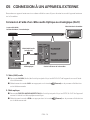
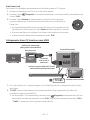
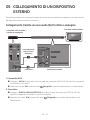
05 Collegamentodiundispositivoesterno 14
Collegamento tramite un cavo audio (AUX) ottico o analogico
-------------------------
14
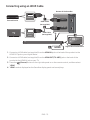
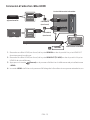
Collegamento tramite un cavo HDMI
-------------------------
15
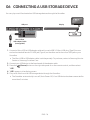
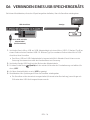
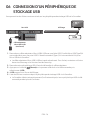
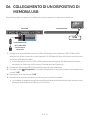
06 CollegamentodiundispositivodimemoriaUSB 16

ITA - v
07 Connessionediundispositivomobile 18
Connessione tramite Bluetooth
-------------------------
18
Utilizzo dell’app Samsung Audio Remote
-------------------------
21
– Installazione dell’app Samsung Audio Remote
-------------------------
21
– Avvio dell’app Samsung Audio Remote
-------------------------
21
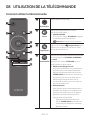
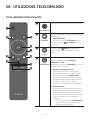
08 Utilizzodeltelecomando 22
Come utilizzare il telecomando
-------------------------
22
Regolazione del volume della Soundbar tramite il telecomando di una TV --------------------------- 25
Utilizzo dei pulsanti nascosti (pulsanti con più di una funzione)
-------------------------
26
Speciche di uscita per diverse modalità di effetti sonori
-------------------------
26
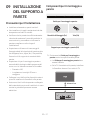
09 Installazionedelsupportoaparete 27
Precauzioni per l’installazione
-------------------------
27
Componenti per il montaggio a parete
-------------------------
27
10 Aggiornamentodelsoftware 29
Procedura per l’aggiornamento
-------------------------
30
Se non compare la scritta UPDATE
-------------------------
30
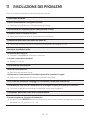
11 Risoluzionedeiproblemi 31
12 Licenza 32
13 Avvisodilicenzaopensource 32
14 Notaimportantesulservizio 32
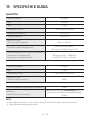
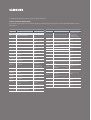
15 Specicheeguida 33
Speciche
-------------------------
33

ITA - 2
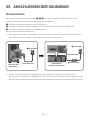
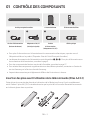
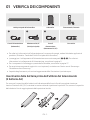
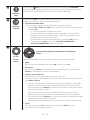
01 VERIFICA DEI COMPONENTI
VOL WOOFER
SOUNDBAR
SOUND
MODE
PAIR
UnitàprincipaledellaSoundbar Subwoofer Telecomando/Batterie
1 2 3
Cavodialimentazione
(Subwoofer)
AdattatoreCA/CC
(Unitàprincipale)
Cavodi
alimentazione
(AdattatoreCA/CC)
Cavoottico
• Per ulteriori informazioni sull’alimentazione e il consumo di energia, vedere l’etichetta applicata al
prodotto. (Etichetta : Fondo dell’Unità Principale della Soundbar)
• I passaggi per il collegamento all’alimentazione sono contrassegnati (1, 2, 3). Per ulteriori
informazioni sui collegamenti all’alimentazione, consultare la pagina 5.
• Per i componenti di montaggio a parete della Soundbar, consultare la pagina 27.
• Per acquistare componenti aggiuntivi o cavi opzionali, contattare un Centro servizi Samsung o
l’Assistenza clienti Samsung.
• L’aspetto degli accessori può variare leggermente dalle illustrazioni riportate sopra.
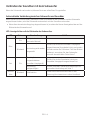
Inserimentodellebatterieprimadell’utilizzodeltelecomando
(2batterieAA)
Far scorrere il coperchio della batteria nella direzione della freccia no alla completa rimozione.
Inserire 2 batterie AA (1,5 V) orientate in maniera tale da rispettarne la polarità. Far scorrere il coperchio
della batteria no al raggiungimento della posizione iniziale.

ITA - 3
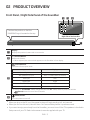
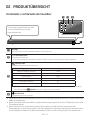
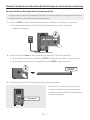
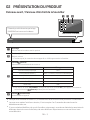
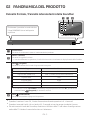
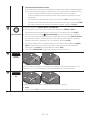
02 PANORAMICA DEL PRODOTTO
Pannellofrontale/PannellolateraledestrodellaSoundbar
Posizionare il prodotto in modo tale che
il logo SAMSUNG si trovi nella parte
superiore.
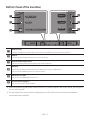
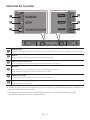
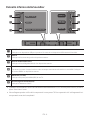
LatodestrodellaSoundbar
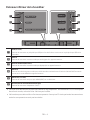
Visualizzazione
Consente di visualizzare lo stato e il modo attuale del prodotto.
Tasto+/-(Volume)
Consente di regolare il volume.
• Una volta effettuata la regolazione, il livello del volume viene visualizzato sul display frontale della Soundbar.
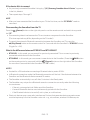
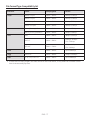
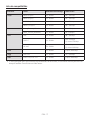
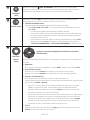
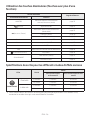
Tasto (Sorgente)
Consente di selezionare il modo di ingresso della sorgente.
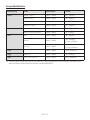
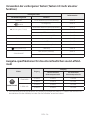
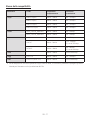
Mododiingresso Visualizzazione
Ingresso digitale ottico D.IN
Ingresso ARC (HDMI OUT) D.IN TV ARC (Conversione automatica)
Ingresso AUX AUX
Ingresso HDMI HDMI
Modo BLUETOOTH BT
Modo USB USB
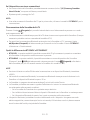
• Per attivare il modo “BTPAIRING”, cambiare la sorgente passando al modo “BT”, quindi tenere
premuto il tasto (Sorgente) per almeno 5 secondi.
Tasto (Alimentazione)
Consente di accendere e spegnere il dispositivo.
•
Quando si inserisce il cavo CA, il tasto di accensione diventa operativo in 4 - 6 secondi.
•
Quando si accende l’unità vi è un ritardo di 4 - 5 secondi prima che venga riprodotto il suono.
•
Per attivare solo l’audio del Soundbar, disattivare i diffusori della TV nel menu di congurazione
audio della TV. Vedere il manuale fornito con il televisore.
La pagina si sta caricando...
La pagina si sta caricando...
La pagina si sta caricando...
La pagina si sta caricando...
La pagina si sta caricando...
La pagina si sta caricando...
La pagina si sta caricando...
La pagina si sta caricando...
La pagina si sta caricando...
La pagina si sta caricando...
La pagina si sta caricando...
La pagina si sta caricando...
La pagina si sta caricando...
La pagina si sta caricando...
La pagina si sta caricando...
La pagina si sta caricando...
La pagina si sta caricando...
La pagina si sta caricando...
La pagina si sta caricando...
La pagina si sta caricando...
La pagina si sta caricando...
La pagina si sta caricando...
La pagina si sta caricando...
La pagina si sta caricando...
La pagina si sta caricando...
La pagina si sta caricando...
La pagina si sta caricando...
La pagina si sta caricando...
La pagina si sta caricando...
La pagina si sta caricando...
La pagina si sta caricando...
La pagina si sta caricando...
-
 1
1
-
 2
2
-
 3
3
-
 4
4
-
 5
5
-
 6
6
-
 7
7
-
 8
8
-
 9
9
-
 10
10
-
 11
11
-
 12
12
-
 13
13
-
 14
14
-
 15
15
-
 16
16
-
 17
17
-
 18
18
-
 19
19
-
 20
20
-
 21
21
-
 22
22
-
 23
23
-
 24
24
-
 25
25
-
 26
26
-
 27
27
-
 28
28
-
 29
29
-
 30
30
-
 31
31
-
 32
32
-
 33
33
-
 34
34
-
 35
35
-
 36
36
-
 37
37
-
 38
38
-
 39
39
-
 40
40
-
 41
41
-
 42
42
-
 43
43
-
 44
44
-
 45
45
-
 46
46
-
 47
47
-
 48
48
-
 49
49
-
 50
50
-
 51
51
-
 52
52
-
 53
53
-
 54
54
-
 55
55
-
 56
56
-
 57
57
-
 58
58
-
 59
59
-
 60
60
-
 61
61
-
 62
62
-
 63
63
-
 64
64
-
 65
65
-
 66
66
-
 67
67
-
 68
68
-
 69
69
-
 70
70
-
 71
71
-
 72
72
-
 73
73
-
 74
74
-
 75
75
-
 76
76
-
 77
77
-
 78
78
-
 79
79
-
 80
80
-
 81
81
-
 82
82
-
 83
83
-
 84
84
-
 85
85
-
 86
86
-
 87
87
-
 88
88
-
 89
89
-
 90
90
-
 91
91
-
 92
92
-
 93
93
-
 94
94
-
 95
95
-
 96
96
-
 97
97
-
 98
98
-
 99
99
-
 100
100
-
 101
101
-
 102
102
-
 103
103
-
 104
104
-
 105
105
-
 106
106
-
 107
107
-
 108
108
-
 109
109
-
 110
110
-
 111
111
-
 112
112
-
 113
113
-
 114
114
-
 115
115
-
 116
116
-
 117
117
-
 118
118
-
 119
119
-
 120
120
-
 121
121
-
 122
122
-
 123
123
-
 124
124
-
 125
125
-
 126
126
-
 127
127
-
 128
128
-
 129
129
-
 130
130
-
 131
131
-
 132
132
-
 133
133
-
 134
134
-
 135
135
-
 136
136
-
 137
137
-
 138
138
-
 139
139
-
 140
140
-
 141
141
-
 142
142
-
 143
143
-
 144
144
-
 145
145
-
 146
146
-
 147
147
-
 148
148
-
 149
149
-
 150
150


Samsung HW-N650 Manuale utente
- Categoria
- Ricevitori musicali Bluetooth
- Tipo
- Manuale utente
- Questo manuale è adatto anche per
in altre lingue
- English: Samsung HW-N650 User manual
- français: Samsung HW-N650 Manuel utilisateur
- Deutsch: Samsung HW-N650 Benutzerhandbuch
Documenti correlati
-
Samsung HW-T530 Manuale utente
-
Samsung HW-T550 Manuale utente
-
Samsung HW-N660 Manuale utente
-
Samsung HW-N550 Manuale utente
-
Samsung HW-R550 Manuale del proprietario
-
Samsung HW-N400 Guida Rapida
-
-
-
Samsung HW-N300 Manuale utente
-