
IDROPULITRICE AD ALTA PRESSIONE A CALDO pag. 10 IT
HOT HIGH-PRESSURE WASHER MACHINE pag. 16 EN
NETTOYEUR HAUTE PRESSION A CHAUD page 22 FR
HEIßWASSER-HOCHDRUCKREINIGER Seite 28 DE
HIDROLIPIADORA DE ALTA PRESIÓN EN CALIENTE pág. 34 ES
HIDROLIMPADORA DE ALTA PRESSÃO A QUENTE pág. 40 PT
HYDRAULINEN KORKEAPAINEPESURI sivu 46 FI
HEET WATER HOGEDRUCK REINIGER blz. 51 NL
VYSOKOTLAKÝ VODNÍ ČISTIČ PRO ČIŠTĚNÍ ZA TEPLA srt. 57 CS
VARMTVANDS HØJTRYKSRENSER sd. 62 DA
VISOKOTLAČNI VODNI ČISTILEC NA VROČO VODO str. 67 SL
VATTENKURANSTALT RENGÖRA HÖG - TRYCK PÅ VÄRMA sid. 72 SV
TOPLI VODENI PERAČ VISOKOG PRITISKA str. 77 HR
YÜKSEK BASINÇLI SICAK SULU YIKAMA MAKINESI sf. 82 TR
KÕRGSURVEPESUR
lk.
88 ET
HØYTRYKKSVASKER RU - ГИДРООЧИСТИТЕЛЬ ВЫСОКОГО ДАВЛЕНИЯ
side
94 NO
MYJKA WYSOKOCIŚNIENIOWA str.
100 PL
ГИДРООЧИСТИТЕЛЬ ВЫСОКОГО ДАВЛЕНИЯ
стр.
106 RU
1-123 AR
ATTENZIONE: leggere le istruzioni prima dell’ utilizzo.
WARNING: read the instructions carefully before use.
ATTENTION: lire attentivement les istructions avant l’usage.
ACHTUNG: die anweisungen bitte vor gebrauch sorgfältig lesen.
ADVERTENCIA: leer atentamente las advertencias antes el uso de aparado.
ATENÇÃO: ler atentamente as instruções antes da utilização.
HUOMIO: lue ohjeet ennen käyttöä.
LET OP: vóór gebruik de gebruiksaanwijzing aandachtig lezen.
POZOR: před použitím si přečtěte návod k obsluze. PAS PÅ! læs instruktionsbogen før
maskinen tages i brug. POZOR: pred uporabo preberite navodila.
VIKTIGT! läs
anvisningarna före användning.
PAŽNJA: prije upotrebe pročitajte upute.
DİKKAT: MAKİNAYI KULLANMADAN ÖNCE KULLANIM TALİMATLARINI OKUYUNUZ. ADVARSEL:
les bruksanvisningen før bruk. TÄHELEPANU: lugege juhised enne seadme kasutamist läbi
UWAGA: przed użyciem przeczytać instrukcje. ВНИМАНИЕ: перед использованием
прочитайте инструкцию по эксплуатации
FKX, Kappa,
RIO, Kappa A,
XTR, Fuego,

model:
Fuego
model:
XTR
FKX
Kappa
model:
Rio
Kappa A
4 X
8 X
4 X
2
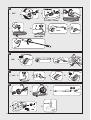
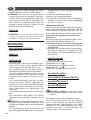
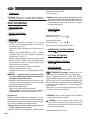
• ISTRUZIONI DI MONTAGGIO
• ASSEMBLY INSTRUCTIONS
• INSTRUCTION DE MONTAGE
• MONTAGEANLEITUNG
• INSTRUCCIONES DE MONTAJE
• MONTAGE-INSTRUCTIES
• INSTRUÇÃO DE MONTAGEM
• NÁVOD K MONTÁŽI
• MONTERINGSVEJELDNING
• ASENNUSOHJE
• NAVODILA ZA MONTAŽO
• MONTAGEINSTRUKTIONPÅ FÖRFRÅGAN
• UPUTE ZA MONTAŽU
• MONTAJ TALIMATLARI
• KOKKUPANEMISE JUHISED
• MONTERINGSVEILEDNING
• INSTRUKCJE MONTAŻU
• РУКОВОДСТВО ПО МОНТАЖУ

1 X
4 X
OPTIONAL
model:
XTR
FKX
Kappa
1.
4.
2.
5.
3.
6.
In base al modello si possono verificare delle differenze nella fornitura. Depending on the model,
there are differences in the scopes of delivery. Suivant le modèle, la fourniture peut varier. Je nach
Modell gibt es Unterschiede im Lieferumfang. Según el modelos, hay diferencias en el contenido
suministrado. Consoante o modelo, existem diferenças no volume de fornecimento. Mallien
varustetaso vaihtelee, katso kuvaus laatikon kyljestä. Afhankelijk van het model zijn er verschillen in
de leveringspakketten. Alt etter modell kan det være ulike leveringsomfang. Leveransomfånget
varierar allt efter modell. Afhængigt af modellen er der forskelle i leveringen. Στο παραδοτέο υλικό
υπάρχουν διαφορέ ανάλογα ε το οντέλο. Ovisno o modelu postoje razlike u sadržaju isporuke.
Glede na model prihaja do razlik v obsegu dobave. V závislosti na modelu se liší obsah dodávky.
Modele bağlı olarak teslimat kapsamında farklar olabilir. W zależności od modelu istnieją różnice w
zakresie dostawy. В данном руководстве по эксплуатации дано описание прибора с максимальной
комплектацией. Комплектация отличается в зависимости от модели. A szállítási terjedelem
modellenként eltérő (lásd a csomagoláson). Piegādātā komplektācija atšķiras atkarībā no putekļu sūcēja
modeļa. W zależności od modelu istnieją różnice w zakresie dostawy (patrz opakowanie). În funcţie
de model pachetele de livrare pot diferi (vezi ambalajul). Podľa modelu existujú rozdiely v rozsahu
dodávky (pozri obal). В обема на доставка има разлики в зависимост от модела (вижте опаковката).
3
• NAVODILA ZA MONTAŽO
• MONTAGEINSTRUKTIONPÅ FÖRFRÅGAN
• UPUTE ZA MONTAŽU
• MONTAJ TALIMATLARI
• KOKKUPANEMISE JUHISED
• MONTERINGSVEILEDNING
• INSTRUKCJE MONTAŻU
• РУКОВОДСТВО ПО МОНТАЖУ

OPTIONAL
1/2 inch • 13 mm
ON ( I )
OFF (0)
ON ( I )
OFF (0)
10
4
7
1
2
5
6
11
3
9
8
model:
Rio
4
• DESCRIZIONE DELL’APPARECCHIO
• DESCRIPTION OF THE MACHINE
• DESCRIPTION DU L’APPAREIL
• BESCHREIBUNG DES GERÄTS
• DESCRIPCIÓN DEL APARATO
• TOESTEL UITZICHT
• COMPONENTES DO APARELHO
• STANDARDNÍ PŘÍSLUŠENSTVÍ
• STANDARDUDSTYR
• VAKIOVARUSTEET
• OBSEG DOBAVE
• UTRUSTNING STANDARDUTRUSTNING
• SERIJSKA OPREMA
• STANDART DONANIM
• STANDARDVARUSTUS
• SERIETILBEHØR
• WYPOSAŻENIE SERYJNE
• БАЗОВАЯ КОМПЛЕКТАЦИЯ

OPTIONAL
SE PRESENTE
IF PRESENT
SI INCLUSE
WENN VORHANDEN
SI ESTUVIERA PRESENTE
INDIEN AANWEZIG
SE PRESENTE
JE-LI PŘÍTOMNÁ
SÅFREMT MASKINEN ER
FORSYNET DERMED
MIKÄLI VARUSTEENA
ČE JE V KOMPLETU
I FÖREKOMMANDE FALL
NEKI MODELI
MEVCUT İSE
KUI OLEMAS
DERSOM SLIK FINNES
JEŻELI WYSTĘPUJE
ЕСЛИ ЕСТЬ
5
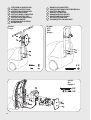
1
Interruttore bruciatore
2
Interruttore
elettropompa
ON/OFF
3
Serbatoio detergente
4
Uscita
5
Tubo ad alta pressione
6
Pistola
7
Lancia
8
Serbatoio gasolio
9
Cavo elettrico con spina
10
Entrata + filtro
11
Manico
1
Burner switch
2
ON/OFF
Electropump switch
3
Detergent tank
4
Water outlet
5
High pressure hose
6
Gun
7
Lance
8Diesel tank
9
Electric cable
10
Water inlet + filter
11 Handle
1
Interrupteur brûleur
2
Interrupteur
électropompe
ON/OFF
3
Réservoir de détergent
4
Sortie H.P.
5
Flexible haute pression
6
Pistolet
7
Lance
8
réservoir du DIESEL
9
Cable electrique avec prise
10
Entrée d’eau + filtre
11 Manche
1
Schalter Brenner
2
Schalter Elektropumpe
ON
3
Reinigungsmittelbehälter
4
Auslauf
5
Hochdruckschlauch
6
Pistole
7
Lanze
8Diesel
behälter
9
Anschlusskabel mit Stecker
10
Einlauf + Filter
11 Griff
1
Interruptor quemador
2
Interruptor eléctropompa
ON/OFF
3
Depósito detergente
4
Salida
5
Manguera de alta presión
6
Pistola
7
Lanza
8
Depósito Diesel
9
Cable eléctrico con enchufe
10
Entrada + filtro
11
Mango
1
Schakelaar van de verwarmer
2
UIT/ AAN
Schakelaar elektro pomp
ON/OFF
3
Reinigingsmiddeltank
4
Wateruitgang
5
Hogedrukslang
6
Pistool
7
Lans
8
Diesel tank
9
Eelectrische kabel
10
Wateringang + filter
11 Handvat

6
1
Interruptor queimador
2
Interruptor de
bomba eléctrica
ON/OFF
3
Reservatório detergente
4
Saida
5
Tubo flexível de alta pressão
6
Pistola
7
Lança
8
Reservatório Diesel
9
Cabo elétrico com ficha
10
Entrada + filtro
11 Alça
1
Přepínač hořáku
2
Přepínač elektrického čerpadla
ON/OFF
3
Nádrž se saponátem
4
Výstup
5
Vysokotlaká hadice
6
Pistole
7
Tryska
8
Diesel
9
Elektrická přívodní šňůra se zástrčkou
10
Vstup + filtr
11 Rukojeť
1
Afbryder til brænder
2
ON/OFF
Afbryder til elektrisk pumpe
3
Tank for rengøringsmiddel
4
Vandafgang
5
Højtryksslange
6
Pistol
7
Dyserør
8
Tank for Diesel
9
El-kabel med stik
10
Vandtilgang + filter
11 håndtag
1
Polttimen katkaisin
2
Sähköpumpun katkaisin
ON/OFF
3
Pesuainesäiliö
4
Veden ulostulo
5
Korkeapaineinen letku
6
Pesukahva
7
Suutin
8
Diesel
9
Sähköjohto ja pistotulppa
10
Veden sisäänmeno + suodatin
11 kahva
1
Stikalo gorilnika
2
ON/OFF
Stikalo elektročrpalke
3
Posoda za čistilo
4
Izstop
5
Visokotlačna cev
6
Pištola
7
Brizgalka
8
Diesel
9
Električna vrvica z vtičem
10
Vstop + filter
11 Ročaj
1
Strömbrytare brännare
2
ON/OFF
Strömbrytare elpump
3
Behållare till rengöringsmedel
4
Uttag (vatten)
5
Tryckslang
6
Pistol
7
Lans
8
Behållare till Diesel
9
Elkabel med stickpropp
10
Intag + filter (vatten)
11 handtag
1
Prekidač gorionika
2
ON/OFF
Prekidač električne pumpe
3
Spremnik deterdženta
4
Izlaz
5
Visokotlačno crijevo
6
Pištolj
7
Cijev s mlaznicom
8
Diesel
9
Električni kabel s utikačem
10
Ulaz + filtar
11 Drška
1
Brülör açma kapama düğmesi
2
Elektrikli pompa açma kapama düğmesi ON/OFF
3
Deterjan deposu
4
Çıkış
5
Yüksek basınçlı boru
6
Tabanca
7
Lans
8
Diesel deposu
9
Fişli elektrik kablosu
10
Giriş + filtre
11 Kulp

7
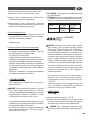
•Questa macchina è soggetta ad allacciamento sotto condizione: Zmax • The appliance shall
be connected to the electrical network providing that the impedence zmax • Cette machine
est soumise a un raccordement électrique sous condition du respect de l’impédence zmax
• Nach Berechnung ist die maximal zulässige Netzipedanz Zmax am Versorgungs-Anschlusspunkt
des Kunden • Esta máquina esta sujeta a conexi ón bajo condición: Zmax • Deze toestel is
onderworp aan een electrische verbinding op basis van een respekt van het impedantie zmax •
Esta maquina é sujeita à ligaçao sob condiçao: Zmax • Tento stroj podléhá připojení za následující
podmínky: Zmax • Elforsyningen, som maskinen tilsluttes, skal opfylde følgende krav: Zmax
• Η συσκευή προορίζεται για σύνδεση σε δίκτυο ε: Zmax • Sähkövirran, johon laite kytketään,
on täytettävä seuraavat ehdot: Zmax • Pri priključitvi aparata na omrežje je potrebno zagotoviti
naslednji pogoj: Zmax • Denna maskin ska anslutas enligt följande villkor: Zmax • Električno
napajanje na koje je uređaj priključen mora zadovoljavati sljedeći uvjet: Zmax • Bu makinenin
bağlandığı elektrik beslemesi sistemi, aşağıdaki şarta uygun olmalıdır: Zmax
Zmax = 0,256 Ohm
1
põleti lüliti
2
elektripumba lüliti ON/OFF
3
paak Pesuaine, uvahendi imemine
4
väljalaskeava
5
kõrgsurvevoolik
6
pesupüstol
7
pesutoru
8
paagi kütusega
9
toitejuhtme pistik
10
vee sissevõtuava + filter
11
kandesangast
1
Strømbryter for brenner
2
Strømbryter for elektrisk pumpe
3
tanken for rengjøringsmiddel
4
Utløp
5
Høytrykksslange
6
Spylepistol
7
Lanse
8
Tanken med drivstoff
9
Kabelen
10
Vanninnløp + filter
11
Håndtere
1
Przełącznik palnika
2
Przełącznik pompy elektryczney ON/OFF
3
zbiornik na detergent
4
Wylot
5
Wąż wysokociśnieniowy
6
Pistolet natryskowy
7
Lanca
8
zbiornik paliwem
9
przewodu elektrycznego.
10 Wlot + filtr
11
uchwyt
1
Выключатель горелки ON/OFF
2
Выключатель горелки
ON/OFF
3Бачок для моющего средства
4
Выпускное отверстие
5
Шланг высокого давления
6
Водяной пистолет
7
Копье
8
топливный бак топливом
9Соединительный кабель с вилкой
10
Впускное отверстие + фильтр
11
обрабатывать
Pучка

8
1/2 inch • 13 mm
5÷40°C
1.
2. 3. 4.
2.
OFF
ON
3. 4.
5. 6. 7.
9.
1.
8.
min 15 l/min
max 1 MPa
1 min
OFF
1. 2. 3.
5. 1. 2. 3. 4.
4. 5.
A
B
C
D
DIESEL

9
E
I
H
·
getto spillo/ventaglio
·
spread pattern/pencil jet
·
jet
variable
·
vario Duese
·
chorro regulable
·
jato variavel
·
pistemäinen/viuhkamainen suihku
·
dunne straal/
waaiervormige straal
·
vějířová/přímá tryska
·
nålesprøjt/
viftesprøjt
·
iglasti/pahljačasti curek vode
·
nål-/
sol ädersformad stråle
·
mlaznica-fi ni mlaz/raspršivač
·
jet püskürtme/jet fan waaiervormige straal vifteformet
stråle strumień wachlarzowy веерообразная струя
·
lancia turbo
·
turbo lance
·
lance turbo
·
turbo
lanze
·
lanza turbo
·
turbo lança
·
turbo suihkuputki
·
turbo Lans
·
tryska turbo
·
turbolanse
·
turbo
pištola
·
turbolans
·
turbo mlaznica
·
turbo lans
turbootsik turbo-lanse lanca turbo насадка турбо
OPTIONAL
1
2
1
2
1.
1.
2.
4.
3.
5.
OPTIONAL
SE PRESENTE
IF PRESENT
SI INCLUSE
WENN VORHANDEN
SI ESTUVIERA PRESENTE
INDIEN AANWEZIG
SE PRESENTE
JE-LI PŘÍTOMNÁ
SÅFREMT MASKINEN ER
FORSYNET DERMED
MIKÄLI VARUSTEENA
ČE JE V KOMPLETU
I FÖREKOMMANDE FALL
NEKI MODELI
model:
FKX
XTR
Fuego
model:
Rio
MEVCUT İSE
KUI OLEMAS
DERSOM SLIK FINNES
JEŻELI WYSTĘPUJE
ЕСЛИ ЕСТЬ

Istruzioni originali
IT
10
INDICE pag.
Introduzione 1
Simboli 1
Avvertenze di sicurezza 1
Uso 3
Cura e manutenzione 5
Condizioni di garanzia 5
Smaltimento 5
Rimedi in caso di malfunzionamento 6
illustrazioni 8-9
INTRODUZIONE
> UTILIZZO PREVISTO
·
L’apparecchio può essere usato per il lavaggio di su-
perfici in ambienti esterni, ogni qualvolta si richieda
l’uso di acqua in pressione per eliminare lo sporco.
· Con opportuni accessori opzionali si possono svol-
gere lavori di schiumatura, sabbiatura e lavaggi con
spazzola rotativa da applicare alla pistola.
· Le prestazioni e la semplicità d’uso dell’apparecchio
sono idonee ad un utilizzo NON PROFESSIONALE.
> DATI TECNICI
(vedi targhetta dati tecnici)
SIMBOLI
ATTENZIONE! Prestare attenzione
per motivi di sicurezza.
IMPORTANTE
BLOCCATO
APERTO
SE PRESENTE
Doppio isolamento (SE PRESENTE): è
una protezione supplementare dell’isola-
mento elettrico.
Attenzione: non toccare
Attenzione simbolo: non inalare
SICUREZZA
> AVVERTENZE GENERALI
•
01 ATTENZIONE: Apparecchio da utilizzarsi
solo all’aperto.
•
02 ATTENZIONE: Alla fine di ogni lavoro, scol-
legare sempre il collegamento elettrico e idri-
co.
•
03 ATTENZIONE: Non usare l’apparecchio se il
cavo elettrico o parti importanti dell’apparec-
chio risultano danneggiate, es. dispositivi di
sicurezza, tubo alta pressione pistola ecc.
•
04 ATTENZIONE: Questo apparecchio è stato
progettato per essere utilizzato con il deter-
gente fornito o prescritto dal costruttore, tipo
shampoo detergente neutro a base di tensio-
attivi biodegradabili anionici. L’impiego di altri
detergenti o sostanze chimiche può compro-
mettere la sicurezza dell’apparecchio.
•
05 ATTENZIONE: Non utilizzare l’apparecchio
in prossimità di persone, salvo il caso in cui
queste indossino abiti protettivi.
•
06 ATTENZIONE: Il getto della lancia non deve
essere indirizzato verso parti meccaniche con-
tenenti grasso lubrificante: in caso contrario il
grasso verrà disciolto e disperso sul terreno. I
pneumatici e le valvole d’aria dei pneumatici
devono essere lavati mantenendo una distanza
minima di 30 cm; in caso contrario essi potreb-
bero essere danneggiati dal getto d’acqua alta
pressione. Il primo segno di tale danneggia-
mento è dato dallo sbiadimento del pneuma-
tico. Pneumatici e valvole d’aria dei pneumatici
danneggiati sono pericolosi per la vita.
•
07ATTENZIONE: I getti ad alta
pressione possono essere perico-
losi se usati impropriamente. I get-
ti non devono essere diretti verso le persone,
gli animali, verso le apparecchiature elettriche
vive oppure verso l’apparecchio stesso.
•
08 ATTENZIONE: I tubi flessibili, gli accessori e
i raccordi per l’alta pressione, sono importan-
ti per la sicurezza dell’apparecchio. Utilizzare
solamente tubi flessibili, accessori e raccordi
prescritti dal costruttore (è estremamente im-
portante preservare l’integrità di questi com-
ponenti evitandone un uso improprio e preve-
nendoli da pieghe, urti, abrasioni).
•
09ATTENZIONE: Apparecchi non dotati di
- 1

IT
11
A.S.S. – Automatic Stop System: non devono ri-
manere in funzione per più di 2 minuti a pistola
rilasciata. L’acqua riciclata aumenta notevol-
mente di temperatura provocando gravi danni
alla pompa.
•
10ATTENZIONE: Ap-
parecchi dotati di
A.S.S – Automatic Stop System: è buona norma
non lasciarli in stand-by per più di 5 minuti.
•
11 ATTENZIONE: Spegnere completamente
l’apparecchio (interruttore generale in posizio-
ne (0)OFF) ogni qualvolta lo si lascia incustodi-
to.
•
12 ATTENZIONE: Ogni macchina viene col-
laudata nelle sue condizioni d’uso, per cui è
normale che alcune gocce d’acqua rimangano
presenti al suo interno.
•
13 ATTENZIONE: Fare attenzione a non dan-
neggiare il cavo elettrico. Se il cavo di alimen-
tazione è danneggiato deve essere sostituito
dal costruttore oppure dal servizio assistenza,
oppure da personale qulificato al fine di evitare
situazioni di pericolo.
•
14 ATTENZIONE: Macchina con fluido in pres-
sione. Impugnare la pistola saldamente per
prevenire la forza di reazione. Utilizzare solo
l’ugello di alta presione in dotazione alla mac-
china.
•
16 ATTENZIONE: Questo apparecchio non
è destinato all'utilizzo da parte di persone
(bambini compresi) con ridotte capacità fisi-
che, sensoriali o mentali o mancanza di espe-
rienza e conoscenza, a meno che non abbia-
no avuto istruzioni per l'uso o la supervisione
dell'apparecchio da parte di una persona re-
sponsabile della loro sicurezza.
•
17 ATTENZIONE
: I bambini devono essere
sorvegliati per assicurarsi che non giochino
con l'apparecchio.
•
18 ATTENZIONE: Non mettere in funzione l’i-
dropulitrice prima di aver srotolato il tubo ad
alta pressione.
•
19 ATTENZIONE: Avvolgere e svolgere il tubo
avendo cura di non causare il ribaltamento
dell’idropulitrice.
•
20 ATTENZIONE: Quando si svolge o avvolge
il tubo, la macchina deve essere spenta ed il
tubo scarico dalla pressione (fuori servizio).
•
21 ATTENZIONE: Rischio di esplosione. Non
spruzzare liquidi infiammabili.
•
22 ATTENZIONE: Per garantire la sicurezza
della macchina, usare solo pezzi di ricambio
originali presso il produttore o approvati dal
fabbricante.
•
23 ATTENZIONE: Non dirigere il getto verso
se stessi oppure verso altre persone per pulire
abiti o scarpe.
•
24 ATTENZIONE: Non permettere che l’appa-
recchio venga usato da bambini o da personale
non addestrato.
•
ATTENZIONE:
L'acqua che è passata attraver-
so i dispositivi antiriflusso è considerata non
potabile.
•
XX ATTENZIONE
:
Scollegare l'apparecchio
dalla rete elettrica, staccando la spina dalla
presa elettrica, prima di effettuare qualsiasi
intervento di manutenzione e pulizia .
•
XY ATTENZIONE: Prolunghe non adeguate
possono essere pericolose.
•
XJ ATTENZIONE: Se viene utilizzata una pro-
lunga, la spina e la presa dovranno essere im-
permeabili all’acqua
•
ATTENZIONE:
Durante il funzionamento non col-
locare la macchina in zone dove sia precaria l’aera-
zione e tantomeno coprirla.
•
ATTENZIONE:
Evitare di usare la macchina sotto
la pioggia e non rivolgere il getto contro di essa.
•
ATTENZIONE:
Non utilizzare l'apparecchio su
superfici infiammabili.
•
ATTENZIONE:
- NON TOCCARE L’APPARECCHIO CON MANI BAGNATE
E A PIEDI NUDI
- NON TIRARE IL CAVO DI ALIMENTAZIONE O L’APPA-
RECCHIO STESSO PER STACCARE LA SPINA DALLA
PRESA DI CORRENTE
- NEL CASO IN CUI DURANTE IL FUNZIONAMENTO
VENGA A MANCARE L’ALIMENTAZIONE DI CORREN-
TE, PER MOTIVI DI SICUREZZA, SPEGNERE LA MAC-
CHINA (OFF).
> DISPOSITIVI DI SICUREZZA
•
ATTENZIONE: La pistola è dotata di un fermo di
sicurezza. Ogni qualvolta si interrompe l’uso della
macchina è importante azionare il fermo di sicurezza
per evitare aperture accidentali.
- Dispositivi di sicurezza: pistola dotata di fermo di
sicurezza, macchina dotata di protezione da sovrac-
carichi elettrici (CL. I), pompa dotata di valvola di by
pass o dispositivo di arresto.
- Il pulsante di sicurezza della pistola non serve al
bloccaggio della leva durante il funzionamento, ma
per evitarne aperture accidentali.
•
ATTENZIONE: L'apparecchio è dotato di un disposi-
tivo di protezione motore: in caso di intervento del
dispositivo attendere qualche minuto o in alterna-
tiva scollegare e ricollegare l'apparecchio alla rete
2 -

IT
12
elettrica. In caso del ripetersi del problema o della
mancata riaccensione, portare l'apparecchio presso
il più vicino Centro Assistenza,
> STABILITÀ
•
ATTENZIONE: La macchina deve essere sempre
mantenuta su una base orizontale, in modo sicuro
e stabile.
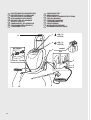
USO
> DESCRIZIONE DELL'APPARECCHIO
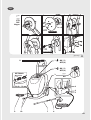
Vedere pag.3-4-5.
> MONTAGGIO DELL'APPARECCHIO
Vedere pag.2
> INSTALLAZIONE
Vedere fig.
- Controllare che l’interruttore generale sia in posizio-
ne “OFF”(0) e che il filtro dell’acqua sia inserito nel
manicotto di aspirazione della pompa (INLET).
- Avvitare l’innesto rapido a mano, senza l’aiuto di
utensili.
- Collegare il tubo di alimentazione dell’acqua all’in-
nesto rapido. Il tubo deve avere un diametro interno
di almeno 13 mm (1/2”).
- Collegare il tubo alta pressione al manicotto di uscita
della pompa (OUTLET). Il raccordo del tubo alta pres-
sione va spinto fino in fondo e poi avvitato a mano
senza l’aiuto di utensili.
- Collegare il tubo alta pressione alla pistola
-
Aprire completamente il rubinetto dell’acqua.
La temperatura dell’acqua deve essere tassati-
vamente inferiore a 40°C.
IMPORTANTE: l’idropulitrice deve funzionare
con acqua pulita onde evitare danni all’idropu-
litrice stessa.
- Sbloccare il fermo di sicurezza della pistola e tene-
re premuto il grilletto facendo scorrere acqua fino a
quando tutta l’aria sarà stata espulsa.
- Inserire la lancia nella pistola.
- Inserire la spina nella presa di corrente.
- Per avviare la macchina, premere il grilletto della
pistola e contemporaneamente posizionare l’inter-
ruttore generale su “ON” .
RIFORNIMENTO
Riempire il serbatoio con combustibile indicato sulla
targhetta dati tecnici. Evitare che il sebatoio si vuoti
durante il funzionamento per non danneggiare la
pompa del gasolio.
•
L’uso di combustibili non adeguati può causare peri-
colo.
Riempire il serbatoio del detergente con prodotti
consigliati adatti al tipo di lavaggio da effettuare.
•
ATTENZIONE: Usare solamente detergenti liquidi, evi-
tare assolutamente prodotti acidi o molto alcalini.
Vi consigliamo di usare i nostri prodotti che sono stati
studiati appositamente per l’uso con idropulitrici.
> AVVIAMENTO
Vedere fig.
Mettere in moto la macchina:
interruttore posizione 2 ( I ) ON .
Per lavare ad acqua calda:
interruttore posizione
1
( I ) ON
.
Il bruciatore funziona con la macchina in pressione.
> LANCE ALTA PRESSIONE
Vedere fig.
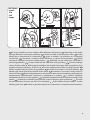
> ASPIRAZIONE DETERGENTE
Vedere sequenza fig.
> TUBO ALTA PRESSIONE
Vedere fig.
> ALIMENTAZIONE IDRICA
Collegamento idrico
ATTENZIONE (sinbolo):
apparecchio non
adatto al collegamento alla rete dell'acqua po-
tabile.
L’idropulitrice può essere collegata diretta-
mente alla rete di distribuzione dell’acqua PO-
TABILE solamente se nella tubazione di alimen-
tazione è installato un dispositivo antiriflusso
con svuotamento conforme alle normative
vigenti.
Assicurarsi che il tubo sia almeno Ø 13mm - 1/2
inch e che sia rinforzato.
•
ATTENZIONE:
L'acqua che è passata attraverso i
dispositivi antiriflusso è considerata non potabile.
IMPORTANTE: Aspirare solamente acqua filtrata o
pulita. Il rubine prelievo acqua deve garantire una
erogazione pari al doppio della portata massima
della pompa.
- 3

IT
13
-Portata minima: 15 l/ min.
-Temperatura massima dell’acqua in ingresso: 40°C
-Pressione massima dell’acqua in ingresso: 1Mpa
Collocare l’idropulitrice il più vicino possibile alla
rete idrica di approvvigionamento.
La non osservanza delle suddette condizioni provo-
ca gravi danni meccanici alla pompa nonché il deca-
dimento della garanzia.
Alimentazione dalla conduttura dell’acqua
·
Collegare un tubo flessibile di alimentazione (non
compreso nella fornitura) al raccordo per l’acqua
dell’apparecchio ed all’alimentazione dell’acqua.
·
Aprire il rubinetto.
Alimentazione dell’acqua da un serbatoio
aperto
·
Svitare il raccordo per l’alimentazione dell’acqua.
·
Avvitare il tubo di aspirazione con filtro (non com-
preso nella fornitura) al raccordo per l’acqua dell’ap-
parecchio.
·
Immergere il filtro nel serbatoio.
·
Sfiatare l’apparecchio prima dell’uso.
·
Svitare il tubo flessibile ad alta pressione dal raccor-
do dell’alta pressione dell’apparecchio.
·
Accendere l’apparecchio e farlo funzionare finché
l’acqua esce priva di bolle dal raccordo ad alta pres-
sione.
·
Spegnere l’apparecchio e riavvitare il tubo flessibile
ad alta pressione.
> ALIMENTAZIONE ELETTRICA
- Il collegamento elettrico dell’apparecchio deve esse-
re conforme alla norma IEC 60364-1.
IMPORTANTE Prima di collegare l’apparecchio, ac-
certarsi che i dati di targa siano rispondenti a quelli
della rete elettrica e che la presa sia protetta con un
interruttore magnetotermico differenziale “SALVA-
VITA” con sensibilità di intervento inferiore a 0,03 A
- 30ms.
- In casi di incompatibilità tra la presa e la spina
dell’apparecchio, fare sostituire la presa con altra di
tipo adatto da personale professionalmente qualifi-
cato.
- Non utilizzare l’apparecchio in caso di temperatura
ambiente inferiore a 0°C, se esso é equipaggiato con
cavo in PVC (H VV-F).
•
XY ATTENZIONE: Prolunghe non adeguate posso-
no essere pericolose.
•
XJ ATTENZIONE: Se viene utilizzata una prolunga,
la spina e la presa dovranno essere impermeabili
all’acqua e il cavo deve avere le dimensioni indicate
nella tabella sottostante.
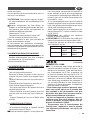
<16 A <25 A
<20 m ø 1,5 mm2
14 AWG
ø 2,5 mm2
12 AWG
20 m - 50 m ø 2,5 mm2
12 AWG
ø 4,0 mm2
10 AWG
(SE PRESENTE)
IMPORTANTE: (Automatic Stop System), il quale
provvede a spegnere l’idropulitrice durante la fase
di by-pass. Per avviare l’idropulitrice è perciò neces-
sario posizionare l’interruttore su (I)“ON” quindi pre-
mere la leva della pistola, l’A.S.S. provvederà ad av-
viare l’apparecchio rispegnendolo automaticamente
qualora venga rilasciata la leva. Si consiglia perciò di
inserire la sicura posta sulla leva della pistola ogni
qualvolta si fermi la macchina, per evitare accensioni
accidentali.
· Spontanei avviamenti della macchina senza interve-
nire sulla pistola sono imputabili a fenomeni quali
bolle d’aria nell’acqua o altro e non a difettosità del
prodotto.
· Non lasciare la macchina in stand-by senza sorveglian-
za per più di 5 minuti. In caso contrario è necessario,
per la protezione della macchina, riportare l’interrut-
tore in posizione (0)“OFF”.
· Verificare che l’accoppiamento del tubo alta pressio-
ne con la macchina e con la pistola in dotazione sia
correttamente eseguito, vale a dire senza perdita
d’acqua.
> FINE LAVORO
Vedere fig.
Premere l’interruttore sulla posizione “OFF”(0)
ed attendere che l’acqua si raffreddi comple-
tamente. In tal modo si evitano depositi di cal-
care e surriscaldamenti della serpentina e della
caldaia, sempre dannosi.
IMPORTANTE
A macchina ferma scaricare sem-
pre il tubo della pressione, aprendo la pistola.
4 -

IT
14
CURA E MANUTENZIONE
Vedere fig.
•
XX ATTENZIONE
:
Scollegare l'apparecchio dalla
rete elettrica, staccando la spina dalla presa elet-
trica , prima di effettuare qualsiasi intervento di ma-
nutenzione e pulizia.
•
ATTENZIONE
:
Non spruzzare la macchina con ac-
qua e non usare detergenti o solventi aggressivi. La
macchina si potrebbe danneggiare.
·
Pulire la parte esterna della macchina con uno strac-
cio asciutto.
- Tenere sempre la macchina pulita in modo che l’aria
di raffreddamento possa passare liberamente attra-
verso le feritoie.
- Pulizia del filtro dell’acqua. Per il buon funzionamen-
to della pompa è importantissimo controllare e puli-
re frequentemente il filtro dell’acqua. Usare una pin-
za per estrarlo dalla pompa e sciacquarlo con cura
sotto l’acqua corrente.
- Pulizia dell’ugello: Un’ostruzione dell’ugello può
compromettere il corretto funzionamento della
macchina, perciò è necessario tenerlo pulito. Spe-
gnere la macchina e smontare la lancia. Pulire l’ugel-
lo con lo spillo in dotazione. Risciacquare la lancia
sotto l’acqua corrente.
- In caso di ripristino dell’olio della pompa, utilizzare
un olio con gradazione SAE 20W40 a base minerale.
Quantità contenuta: 70 gr.
- Controllare periodicamente il filtro gasolio, se dete-
riorato o troppo sporco sostituirlo.
> STOCCAGGIO
Vedere fig.
· Spostare l'apparecchio solo afferrando la maniglia di
trasporto
· Conservare l'apparecchio e gli accessori in un luogo
asciutto e sicuro, fuori dalla portata dei bambini.
CONDIZIONI DI GARANZIA
Tutti i nostri apparecchi sono stati sottoposti ad ac-
curati collaudi e sono coperti da garanzia da difetti
di fabbricazione in conformità alle normative vigenti
applicabili nei vari Paesi.
La garanzia decorre dalla data di acquisto.
Sono esclusi dalla garanzia: le parti soggette a nor-
male usura, le parti in gomma, spazzole di carbone,
i filtri, gli accessori e gli optional; i danni accidentali,
per trasporto, per incuria o inadeguato trattamento,
per uso ed installazione errati o impropri.
La garanzia non contempla la pulizia degli organi
funzionanti, delle incrostazioni, dei filtri e ugelli in
genere.
La macchina è destinata esclusivamente ad un uso
hobbystico e NON PROFESSIONALE:
La garanzia non copre l'uso diverso da quello priva-
to.
SMALTIMENTO
Quale proprietario di un apparecchio elettri-
co o elettronico, la legge (conformemente
alla direttiva UE
2002/96/CE del 27 gennaio 2003) le vieta di
smaltire questo prodotto o i suoi accessori elettrici
/ elettronici come rifiuto domestico solido urbano e
le impone invece di smaltirlo negli appositi centri di
raccolta.
E’ possibile smaltire il prodotto direttamente dal di-
stributore mediante l’acquisto di un prodotto nuovo,
equivalente a quello da smaltire
- 5

IT
15
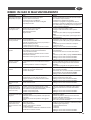
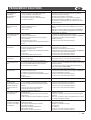
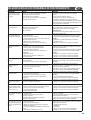
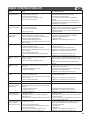
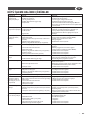
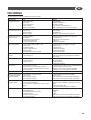
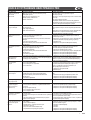
RIMEDI IN CASO DI MALFUNZIONAMENTO
INCONVENIENTI CAUSE RIMEDIO
1. Premendo l’interruttore
l’elettropompa non parte. 1. La spina non è ben inserita nella presa.
2. La presa elettrica non funziona.
3. La tensione di rete è insufficiente.
4. La prolunga elettrica di sezione è inadeguata
5. La pompa è bloccata.
1. Inserire correttamente la spina nella presa di corrente.
2. Far controllare la presa elettrica.
3. Controllare che l’impianto sia adeguato.
4. Consultare il paragrafo sul collegamento elettrico.
5. Posizionare l’interruttore su ON mentre si tiene premuta
la leva della pistola, se il problema persiste rivolgersi ad
un centro assistenza autorizzato.
2. La macchina si avvia,
ma l’acqua non esce. 6. Pompa, tubi o accessori congelati.
7. Nessuna alimentazione idrica.
8. Filtro dell’acqua intasato.
9. Ugello intasato.
6. Lasciare scongelare la pompa e i tubi.
7. Collegare la macchina alla rete idrica e aprire il
rubinetto.
8. Smontare e pulire il filtro (vedi paragrafo “MANUTEN-
ZIONE”).
9. Smontare la lancia dalla pistola e pulire l’ugello con lo
spillo in dotazione.
3. L’elettropompa gira ma
non va in pressione. 10.Acqua insufficiente.
11.Filtro aspirazione intasato.
12.Valvola di regolazione di pressione (se presente) in
posizione di minima pressione.
13.L’ugello della lancia è usurato
14.Valvole aspirazione o mandata intasate o usurate.
10.Controllare che la portata sia di almeno 12 l/min.
11.Smontare e pulire il filtro (vedi paragrafo “MANUTEN-
ZIONE “).
12.Aumentare la pressione avvitando la manopola.
13.Sostituire la lancia.
14.Rivolgersi ad un centro assistenza autorizzato.
4. Pressione di lavoro
irregolare. 15.L’ugello della lancia è ostruito o sporco.
16.Presenza di aria nell’acqua di alimentazione.
17.Filtro aspirazione intasato.
18.Valvole aspirazione o mandata intasate o usurate.
19.Guarnizioni consumate.
20.Guarnizioni valvola regolazione pressione usurate.
15.Smontare la lancia dalla pistola e pulire l’ugello con lo
spillo in dotazione.
16.Fornire alla macchina una corretta alimentazione
idrica.
17.Smontare e pulire il filtro (v. paragr. ”MANUTENZIONE”).
18.Rivolgersi ad un centro assistenza autorizzato.
19.Rivolgersi ad un centro assistenza autorizzato.
20.Rivolgersi ad un centro assistenza autorizzato.
5. Il motore si arresta
improvvisamente. 21.L’interruttore termico di sicurezza della macchina è
scattato.
22.La prolunga elettrica di sezione è inadeguata.
21.Lasciare raffreddare il motore per alcuni minuti. Se
l’anomalia persiste rivolgersi ad un centro assistenza
autorizzato.
22.Consultare il paragrafo sul collegamento elettrico.
6. Perdite di acqua dalla
macchina. 23.Perdite dall’avvolgitubo (se presente).
24.Perdite dal raccordo di alimentazione.
25.Perdite dalla pompa.
rare i raccordi, se il difetto persiste rivolgersi ad un
centro assistenza autorizzato.
24.Assicurarsi che il raccordo sia montato correttamente
(Vedi le immagini del paragrafo INSTALLAZIONE).
25.Rivolgersi ad un centro assistenza autorizzato.
7. Rumorosità anomala. 26.Filtro aspirazione intasato.
27.Temperatura eccessiva dell’acqua di ingresso.
28.Valvole aspirazione o mandata intasate o usurate.
29.Cuscinetti usurati.
26.Smontare e pulire il filtro (v. paragr. “MANUTENZIONE”).
27.Portare la temperatura sotto i 40°C.
28.Rivolgersi ad un centro assistenza autorizzato.
29.Rivolgersi ad un centro assistenza autorizzato.
8. Presenza di acqua
nell’olio. 30.Anelli di tenuta usurati. 30.Rivolgersi ad un centro assistenza autorizzato.
9. Ripartenze anomale
della macchina in condi-
zioni di pistola rilasciata
(versioni con A.S.S.).
31.Perdita di acqua dal collegamento tubo - pistola
(esclusi i modelli con tubo e pistola forniti già connessi).
32.Presenza di aria nell’acqua di alimentazione.
33.Perdita di acqua dalla pistola.
34.Perdita di acqua dalla pompa.
31.Serrare il collegamento utilizzando 2 chiavi inglesi.
32.Fornire alla macchina una corretta alimentazione
idrica.
33.Rivolgersi ad un centro assistenza autorizzato.
34.Rivolgersi ad un centro assistenza autorizzato.
10.La macchina non aspira
detergente. 35.Serbatoio vuoto.
36.Manopola della lancia in posizione di alta pressione
(se presente).
37.Tubetto trasparente di aspirazione danneggiato o
staccato.
35.Riempire il serbatoio.
36.Portarla in posizione di bassa pressione tirando la
manopola in direzione dell’ugello.
37.Ricollegare il tubetto. Se il problema persiste rivolgersi
ad un centro assistenza autorizzato.
11.Azionando l’interrut-
tore bruciatore non si
verifica l’accensione della
caldaia
38.Mancanza gasolio
39.Filtro gasolio intasato
40.Pompa gasolio bloccata o bruciata
41.Termostato guasto
42.Scarica accensione insufficiente o totalmente assente
43.Elettrodi non a distanza corretta.
38.Verificare il livello nel serbatoio e controllare la pulizia
del tubetto rigido di aspirazione
39.Sostituire il filtrino di linea
40.Sostituirla
41.Sostituirlo
42.Rivolgersi ad un centro assistenza autorizzato.
43.Rivolgersi ad un centro assistenza autorizzato.
6 -

Translation of the original instructions
EN
16
SAFETY PRECAUTIONS
> WARNINGS
• 01WARNING: This appliance is for outdoor
use only.
• 02WARNING: Always disconnect the elec-
tricity and water supplies on completion of
every job.
• 03WARNING: Do not use the machine if a
supply cord or important parts of the ma-
chine are damaged, e.g. safety devices, high
pressure hoses, trigger gun.
• 04WARNING: This appliance has been de-
signed for use with the detergent provided
or the detergent specified by the manufac-
turer, such as a neutral shampoo based on
biodegradable anionic surface active deter-
gents. The use of other detergents or chemi-
cals may put the appliance’s safety at risk.
• 05WARNING: o not use the machine within
range of persons unless they wear protective
clothing.
• 06WARNING: Do not direct the nozzle to-
ward mechanical parts containing lubricant
grease, as the grease will dissolve and spread
over the surrounding ground. Vehicle tyres/
tyre valves may only be cleaned from a mini-
mum distance of 30 cm, otherwise the vehi-
cle tyre/tyre valve could be damaged by the
high-pressure jet. The first indication of this
is a discoloration of the tyre. Damaged vehi-
cle tyres/tyre valves can be deadly danger-
ous.
• 07WARNING: High pressure jets
can be dangerous if subject to
misuse. The jet must not be di-
rected at persons,animal, live electrical
equipment or the machine itself.
• 08WARNING: High pressure hoses, fittings
and couplings are important for the safety
of the machine. Use only hoses, fittings and
couplings recommended by the manufac-
turer. (it is extremely important to protect
these components against damage by avoid-
ing their improper use and protecting them
against bending, knocks and scratches).
• 09WARNING: Appliances not equipped
with A.S.S. – Automatic Stop System: must
not be left in operation for more than 2 min-
utes with the gun released. The recycled wa-
ter heats up considerably, seriously damag-
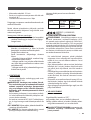
INDEX pag.
General information 1
Symbols 1
Safety precautions 1
Usage 3
Care and maintenance 5
Warranty conditions 5
Disposal 5
Troubleshooting 6
Pictures 8-9
GENERAL INFORMATION
> INTENDED USE
· The appliance can be used for washing surfaces out-
doors, whenever pressurised water is required to re-
move dirt.
· With special optional accessories, it can be used for
foaming and sandingblasting, and for washing with
a rotary brush for application to the gun.
· This appliance’s performance and userfriendliness
make it suitable for NON PROFESSIONAL use.
> THECNICAL DATA
(see thecnical data plate)
SYMBOLS
CAUTION! It is important to be
careful of the following items.
IMPORTANT
LOCKED
OPEN
IF PRESENT
Double insulated (IF PRESENT): supple-
mentary insulation is applied to the basic
insulation to protect against electric shock
in the event of failure of the basic insulation.
warning do not touch
warning symbol : do not inhale
..
- 1

EN
17
ing the pump.
• 10WARNING: Appli-
ances equipped with
A.S.S – Automatic Stop System: these appli-
ances should not be left in standby for more
than 5 minutes.
• 11WARNING: Switch the appliance off com-
pletely (master switch on (0)OFF) whenever
it is left unattended.
• 12WARNING: Every machine is tested in its
operating conditions, so it is normal for a few
drops of water to be left inside it.
• 13WARNING: Take care not damage the
electric cable. If the supply cord is damaged,
it must be replaced by the manufacturer, its
service agent or similarly qualified persons in
order to avoid a hazard
• 14WARNING: Appliance with fluid under
pressure. Keep a firm hold on the gun and be
prepared to take the kickback pressure. Only
use the high pressure nozzle provided with
the appliance.
• 16WARNING: This appliance is not intended
for use by persons (including children) with
reduced physical, sensory or mental capa-
bilities, or lack of experience and knowledge,
unless they have been given supervision or
instruction concerning use of the appliance
by a person responsible for their safety.
• 17WARNING: Children should be super-
vised to ensure that they do not play with
the appliance.
• 18WARNING: Never start the high-pressure
cleaner without first completely unwinding
the high-pressure hose.
• 19WARNING: When winding and unwind-
ing the pipe take care not to cause the high-
pressure cleaner to overturn.
• 20WARNING: Before unwinding or winding
the hose, switch the machine off and release
the pressure in the hose itself (switching off).
• 21WARNING: Risk of explosion — Do not
spray flammable liquids.
• 22WARNING: To ensure machine safety, use
only original spare parts from the manufac-
turer or approved by the manufacturer.
• 23WARNING: Do not direct the jet against
yourself or others in order to clean clothes or
foot-wear.
• 24WARNING: High pressure cleaners shall
not be used by children or untrained person-
nel.
• WARNING: Water that has flown through
backflow preventers is considered to be
non-potable.
• XX WARNING: the machine shall be discon-
nected from its power source, by removing
the plug from the socket-outlet, during
cleaning or maintenance and when replac-
ing spare parts
• XJ WARNING: If an extension cord is used,
the plug and socket must be of watertight
construction.
• XY WARNING: Inadequate extension cords
can be dangerous.
•
WARNING: When the unit is working do not use it in
a closed place where ventilation may be insufficient
and never cover the unit.
•
WARNING: By no means use the machine during
thunderstorms or when it is raining.
•
WARNING: Do not use the unit on inflammables
surfaces.
•
WARNING:
- NEVER EVER TOUCH THE MACHINE WITH WET
HANDS OR BARE FEET.
- NEVER PULL THE POWER SUPPLY CABLE OR MA-
CHINE IN ORDER TO DISCONNECT THE PLUG FROM
THE SOCKET.
- IF DURING FUNCTIONING THE POWER SUPPLY
RUNS OUT, FOR SAFETY REASONS, TURN THE MA-
CHINE OFF.
> SAFETY DEVICE
• WARNING: the gun is fitted with a safety
catch. Whenever use of the machine is inter-
rupted it is important to operate the safety
catch to prevent accidental activation of the
jet.
- Safety features: gun equipped with safety
locking device, appliance equipped with
(Class I) overload cutout, pump equipped
with by-pass valve or shutdown device.
- The safety button on the gun is not there to
lock the lever during operation, but to pre-
vent its accidental operation.
• WARNING: The appliance is equipped with
a motor protection device: in case of device
intervention, wait some minutes or, in alter-
native, disconnect and re-connect the prod-
uct to the electric system. In case this prob-
lem repeats again or if the product does not
start again, take the product to the nearest
After Sales Service Point
> STABILITY
2 -

EN
18
• WARNING: The machine must be always kept
on horizontal bases, in a safe and stable way.
USAGE
> DESCRIPTION OF THE MACHINE
See pag.3-4-5.
> ASSEMBLY INSTRUCTIONS
See pag.2.
> PUT INTO SERVICE
See fig.
* Check that the master switch is turned to
“OFF” and that the water filter is fitted into
the pump’s inlet pipe.
* Screw the snap connection into place by
hand, without the aid of tools.
* Connect the water supply hose to the snap
connection. The hose must have an inside
diameter of at least 13 mm (1/2”).
* Connect the high pressure hose to the
pump’s outlet pipe. Press the high pressure
hose coupling fully down and then screw
into place by hand without the aid of tools.
* Connect the high pressure hose to the gun.
* Turn the water tap fully on. The water tem-
perature absolutely must be below 40°C.
IMPORTANT: The washer machine has to
operate with clean water in order to avoid
any damages to the washer machine itself.
* Release the gun safety catch and keep the
trigger pressed, allowing the water to flow
until all the air has been expelled.
* Fit the lance into the gun.
* Connect the plug to the power socket.
* To start the machine, press the gun trigger
and at the same time tur
n the master switch to
“ON”.
FILLING UP
Fill up the tank with the fuel
indicated on the
technical data plate.
Avoid that the tank is empty when the ma-
chine is running in order not to damage the
fu
el pump.
•
WARNING:
Incorrect fuel shall not used as
they as provide hazard.
Fill up the detergent tank with the suggested prod-
ucts, suitable for the kind of washing to be carried
out .
•WARNING:
make use only of liquid deter-
gent, do not absolutely use acid or too much
alkaline products.
We suggest you to make use of our products, which
have been studied for the use with washer ma-
chines.
> STARTING UP
See fig.
Start the machine:
turn the switch pos. 2 ( I ) ON .
To wash with hot water:
turn the switch pos. 1 ( I ) ON .
The burner operates when the machine is in pres-
sion.
> HIGH PRESSURE LANCE
See fig.
> DETERGENT SUCTION
See fig.
> HIGH PRESSURE HOSE
See fig.
> WATER SUPPLY
Water supply collection
Water supply from the water main
· Connect a supply hose (not included) to the water
inlet of the unit and to the water supply.
· Open the water supply.
WARNING: (symbol) machine not suitable for
connection to the potable water mains.
The cleaner can only be connected to the wa-
ter mains if the water mains is separated by a
backflow preventer. Make sure that the hose
is at least Ø 13mm-1/2 inch and that it is rein-
forced.
• WARNING: Water that has flown through
backflow preventers is considered to be
nonpotable.
IMPORTANT: Only clean or filtered water
should be used for intake. The delivery of the
water intake tap should be equal to the dou-
ble of the maximum pump range.
-
Minimum delivery rate: 15 l/ min.
-
Maximum intake water temperature: 40°C
-
Max inlet water pressure: 1Mpa
Place the cleaner as close to the water supply
system as possible.
- 3

EN
19
Water supply from an open container
· Unscrew the coupling part for the water inlet.
· Screw the suction hose with filter (not included) onto
the water connection of the unit.
· Hang the filter in the container.
· Vent the unit before operation.
· Unscrew the high-pressure line at the high-pressure
outlet of the unit.
· Switch on the unit and let it run until water free of
bubbles emerges at the high-pressure outlet.
· Switch off the unit and screw on the high-pressure
hose again.
Failure to comply with the above conditions
causes serious mechanical damage to the
pump and the loss of warranty cover.
> ELECTRICITY SUPPLY
- The appliance’s electrical connection must
comply with the IEC 60364-1 standard.
IMPORTANT: Before connecting the ap-
pliance, make sure that the nameplate data
are the same as those of the electrical mains
and that the socket is protected by a differ-
ential security breaker with tripping sensitiv-
ity below 0.03 A - 30 ms.
- If the appliance’s plug is not compatible
with the socket, have the socket replaced
with another of suitable type by profession-
ally qualified staff.
- Never use the appliance in ambient temper-
atures below 0° C if it is equipped with a PVC
(H VV-F) cable.
• XY WARNING: Inadequate extension cords
can be dangerous.
• XJ WARNING: If an extension cord is used,
the plug and socket must be of watertight
construction.
Information for supply may also be obtained
from the plug manufacturer.
<16 A <25 A
<20 m ø 1,5 mm2
14 AWG
ø 2,5 mm2
12 AWG
20 m - 50 m ø 2,5 mm2
12 AWG
ø 4,0 mm2
10 AWG
> PLUG
HOW TO CONNECT THE CORD TO A U.K. PLUG:
IMPORTANT The wires in the mains lead are col-
oured in accordance with the following code:
Blue Neutral
Brown Live
Yellow/Green Earth
Please read the in-
structions given be-
low before connect-
ing the cord to a plug.
If in doubt please
consult a qualified
electrician. As the
colours of the wires in
the mains lead of this
appliance may not
correspond with the
coloured markings
identifying the termi-
nals in your plug, proceed as follows: The wires that
is coloured Brown must be connected to the termi-
nal which is marked with the letter L or coloured
Red. The wire that is coloured Blue must be con-
nected to the terminal wich is marked with the letter
N or coloured Black. Safety points for rewireable or
moulded plug: The mains lead of this appliance may
be already fitted with a BS1363 13A plug.
- If your socket outlet is not suitable for the plug, then
the plug must be removed (cut off if it is a mould-
ed on plug), the flexible cord insulation should be
stripped back as appropriate and a suitable 3 pin
plug fitted.
•
WARNING: Dispose of a plug that has been cut from
the power supply cord, as such a plug is hazardous
if inserted in a live 13A socket outlet elsewhere in
the house. - Should the fuse need to be replaced
an ASTA marked fuse, approved to BS1362, of the
same rating must be used. - Always replace the fuse
cover after fitting a fuse. The plug must NOT be used
if the cover is omitted or lost until a replacement is
obtained. - Make certain that only the correct fuse
cover is used and fitted. - For plugs with detachable
fuse cover the replacement must be the same as the
colour insert in the base of the plug, or as directed by
the embossed wording on the base of the plug. - If
the detachable fuse cover is lost a replacement may
be purchased from a Service Centre.
( if fitted)
NOTE:
(Automatic Stop System), which
stops the machine during the bypass phase. To start
the water cleaner, it is therefore necessary to set the
switch on position (I)“ON”; after that press the pistol
4 -

EN
20
trigger: the Automatic Stop System will start the ma-
chine and will stop it automatically when the trigger
is released. It is advisable to put on the safety of the
pistol trigger whenever the machine is stopped, in
order to avoid unintentional starting.
· Any automatic start of the machine without press-
ing the gun trigger is attributable to air bubbles in
the water or other similar phenomena which do not
imply the existence of any defects in the machine.
· Do not leave the appliance unattended during the
standby for more than 5 minutes. Contrarily, for the
safety of the appliance it is necessary to re-turn the
switch into the (0) OFF position.
· Please check that the coupling of the high pressure
hose with the appliance and the gun supplied as
standard equipments made correctly, that is to say
without any water leak.
> SWITCHING OFF
See fig.
turn the switch pos. 2 (0) OFF position and wait that
the water get completly cold.
In this way you avoid any calcareous deposit and
overheatings of the coil and the boiler, which are al-
ways dangerous.
IMPORTANT:
When the machine is switched off,
always discharge the pressure hose, opening the
gun.
CARE AND MAINTENANCE
See fig.
• XX WARNING: the machine shall be discon-
nected from its power source, by removing
the plug from the socket-outlet, during
cleaning or maintenance
• WARNING: Do not spray the appliance with
water and do not use detergents or aggres-
sive solvents. Machine could be damaged.
· Clean the exterior part of the machine with a dry
cloth.
- Always keep the machine clean so that the cooling
air can pass through the slits without obstructions..
- Cleaning the water filter: To ensure the pump gives
good service it is extremely important to check and
clean the water filter frequently. Use pliers to extract
it from the pump and rinse it carefully in running wa-
ter.
- Cleaning the nozzle: A blockage in the nozzle may
prevent the machine from operating correctly, so it
must be kept clean. Switch off the machine and re-
move the lance. Clean the nozzle with the pin pro-
vided. Rinse the lance in running water.
- When topping up the oil in the pump, use a SAE
20W40 mineral oil. Quantity supplied: 70 gr.
- The replacement of the fuel metal pipe is requested
after disassembling to avoid fuel leakages.
> STORAGE
See fig.
· Move the machine only by grasping the car-
rying handle
· Store the appliance and the accessories in a
frost-safe room.
WARRANTY CONDITIONS
All our machines are subjected to strict tests
and are covered against manufacturing de-
fects in accordance with applicable regula-
tions. The warranty is effective from the date of
purchase. The following are not included in
the warranty: - Parts subject to normal wear.
- Rubber parts, charcoal, filters and the acces-
sories and optional accessories. - Accidental
damage, caused by transport, neglect or inad-
equate treatment, incorrect or improper use
and installation failing - The warranty shall not
cover any cleaning operations to which the op-
erative components may be subjected, such
as clogged nozzles and filter blocked due to
limestones. This pressure cleaner is intended
to be used for domestic and hobby work: the
warranty does not cover any other different
kind of use.
DISPOSAL WEEE
As the owner of electrical or electronic
equipment, the law (in accordance
with the EU Directive 2002/96/EC of 27 Janu-
ary 2003) prohibits you from disposing of this
product or its electrical / electronic accessories
as municipal solid waste and obliges you to
make use of the appropriate waste collection
facilities.
The product can be disposed of by returning it
to the distributor when a new product is pur-
chased. The new product must be equivalent
to that being disposed of.
- 5
La pagina si sta caricando...
La pagina si sta caricando...
La pagina si sta caricando...
La pagina si sta caricando...
La pagina si sta caricando...
La pagina si sta caricando...
La pagina si sta caricando...
La pagina si sta caricando...
La pagina si sta caricando...
La pagina si sta caricando...
La pagina si sta caricando...
La pagina si sta caricando...
La pagina si sta caricando...
La pagina si sta caricando...
La pagina si sta caricando...
La pagina si sta caricando...
La pagina si sta caricando...
La pagina si sta caricando...
La pagina si sta caricando...
La pagina si sta caricando...
La pagina si sta caricando...
La pagina si sta caricando...
La pagina si sta caricando...
La pagina si sta caricando...
La pagina si sta caricando...
La pagina si sta caricando...
La pagina si sta caricando...
La pagina si sta caricando...
La pagina si sta caricando...
La pagina si sta caricando...
La pagina si sta caricando...
La pagina si sta caricando...
La pagina si sta caricando...
La pagina si sta caricando...
La pagina si sta caricando...
La pagina si sta caricando...
La pagina si sta caricando...
La pagina si sta caricando...
La pagina si sta caricando...
La pagina si sta caricando...
La pagina si sta caricando...
La pagina si sta caricando...
La pagina si sta caricando...
La pagina si sta caricando...
La pagina si sta caricando...
La pagina si sta caricando...
La pagina si sta caricando...
La pagina si sta caricando...
La pagina si sta caricando...
La pagina si sta caricando...
La pagina si sta caricando...
La pagina si sta caricando...
La pagina si sta caricando...
La pagina si sta caricando...
La pagina si sta caricando...
La pagina si sta caricando...
La pagina si sta caricando...
La pagina si sta caricando...
La pagina si sta caricando...
La pagina si sta caricando...
La pagina si sta caricando...
La pagina si sta caricando...
La pagina si sta caricando...
La pagina si sta caricando...
La pagina si sta caricando...
La pagina si sta caricando...
La pagina si sta caricando...
La pagina si sta caricando...
La pagina si sta caricando...
La pagina si sta caricando...
La pagina si sta caricando...
La pagina si sta caricando...
La pagina si sta caricando...
La pagina si sta caricando...
La pagina si sta caricando...
La pagina si sta caricando...
La pagina si sta caricando...
La pagina si sta caricando...
La pagina si sta caricando...
La pagina si sta caricando...
La pagina si sta caricando...
La pagina si sta caricando...
La pagina si sta caricando...
La pagina si sta caricando...
La pagina si sta caricando...
La pagina si sta caricando...
La pagina si sta caricando...
La pagina si sta caricando...
La pagina si sta caricando...
La pagina si sta caricando...
La pagina si sta caricando...
La pagina si sta caricando...
La pagina si sta caricando...
La pagina si sta caricando...
La pagina si sta caricando...
La pagina si sta caricando...
La pagina si sta caricando...
La pagina si sta caricando...
La pagina si sta caricando...
La pagina si sta caricando...
La pagina si sta caricando...
La pagina si sta caricando...
La pagina si sta caricando...
La pagina si sta caricando...
La pagina si sta caricando...
La pagina si sta caricando...
La pagina si sta caricando...
La pagina si sta caricando...
-
 1
1
-
 2
2
-
 3
3
-
 4
4
-
 5
5
-
 6
6
-
 7
7
-
 8
8
-
 9
9
-
 10
10
-
 11
11
-
 12
12
-
 13
13
-
 14
14
-
 15
15
-
 16
16
-
 17
17
-
 18
18
-
 19
19
-
 20
20
-
 21
21
-
 22
22
-
 23
23
-
 24
24
-
 25
25
-
 26
26
-
 27
27
-
 28
28
-
 29
29
-
 30
30
-
 31
31
-
 32
32
-
 33
33
-
 34
34
-
 35
35
-
 36
36
-
 37
37
-
 38
38
-
 39
39
-
 40
40
-
 41
41
-
 42
42
-
 43
43
-
 44
44
-
 45
45
-
 46
46
-
 47
47
-
 48
48
-
 49
49
-
 50
50
-
 51
51
-
 52
52
-
 53
53
-
 54
54
-
 55
55
-
 56
56
-
 57
57
-
 58
58
-
 59
59
-
 60
60
-
 61
61
-
 62
62
-
 63
63
-
 64
64
-
 65
65
-
 66
66
-
 67
67
-
 68
68
-
 69
69
-
 70
70
-
 71
71
-
 72
72
-
 73
73
-
 74
74
-
 75
75
-
 76
76
-
 77
77
-
 78
78
-
 79
79
-
 80
80
-
 81
81
-
 82
82
-
 83
83
-
 84
84
-
 85
85
-
 86
86
-
 87
87
-
 88
88
-
 89
89
-
 90
90
-
 91
91
-
 92
92
-
 93
93
-
 94
94
-
 95
95
-
 96
96
-
 97
97
-
 98
98
-
 99
99
-
 100
100
-
 101
101
-
 102
102
-
 103
103
-
 104
104
-
 105
105
-
 106
106
-
 107
107
-
 108
108
-
 109
109
-
 110
110
-
 111
111
-
 112
112
-
 113
113
-
 114
114
-
 115
115
-
 116
116
-
 117
117
-
 118
118
-
 119
119
-
 120
120
-
 121
121
-
 122
122
-
 123
123
-
 124
124
-
 125
125
-
 126
126
-
 127
127
-
 128
128


in altre lingue
- français: Lavor LAV54 Manuel utilisateur
- español: Lavor LAV54 Manual de usuario
- Deutsch: Lavor LAV54 Benutzerhandbuch
- русский: Lavor LAV54 Руководство пользователя
- Nederlands: Lavor LAV54 Handleiding
- português: Lavor LAV54 Manual do usuário
- dansk: Lavor LAV54 Brugermanual
- čeština: Lavor LAV54 Uživatelský manuál
- polski: Lavor LAV54 Instrukcja obsługi
- eesti: Lavor LAV54 Kasutusjuhend
- svenska: Lavor LAV54 Användarmanual
- Türkçe: Lavor LAV54 Kullanım kılavuzu
- suomi: Lavor LAV54 Ohjekirja
