
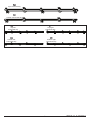
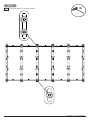
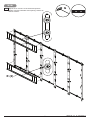
12020-04-13 #:146-9045-1
ENG
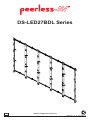
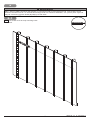
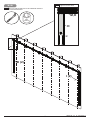
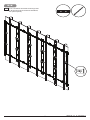
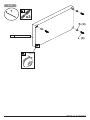
DS-LED27BDL Series
*Actual conguration may vary

22020-04-13 #:146-9045-1
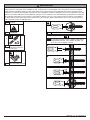
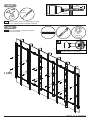
Wear anti-static gloves.
ENG
Symbols
ENG
WARNING
ENG
x3
Screws must get at
least three full turns
ENG
Do not overtighten screws.
ENG
1
2
ENG To properly tighten screws: Tighten until screw
head makes contact, then tighten another 1/2
turn. Do not overtighten screws.
4
+1/2
3
ENG - This product is designed to be installed on plywood walls. Hardware is included for plywood installation.
walls. Before installing make sure the supporting surface will support the combined load of the equipment and
hardware. Screws must be tightly secured. Do not overtighten screws or damage can occur and product may fail.
Never exceed the Maximum Load Capacity. Always use an assistant or mechanical lifting equipment to safely lift
and position equipment. This product is intended for indoor use only. Use of this product outdoors could lead to
call customer care at 1-800-865-2112.
WARNING

32020-04-13 #:146-9045-1
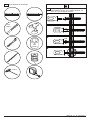
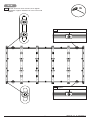
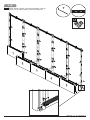
Tools Needed for Assembly.
ENG
5/32"
(4mm)
3/8"
(10mm)
2.5mm
1
2
ENG To properly tighten screws: Tighten until screw
head makes contact, then tighten another 1/2
turn. Do not overtighten screws.
4
+1/2
3

42020-04-13 #:146-9045-1
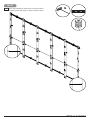
H
IJL M5 x 5mm
set screw
#14 x 1.75"
wood screw
M5 x 8mmM8 x 40mm
A B C
left column right column inside column
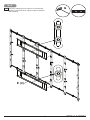
Parts List
Description
Aleft column
Bright column
Cinside column
Dvertical spacer
Ehorizontal spacer
Fextrusion connector
G3mm allen wrench two-tip T-handle
HM5 x 5mm set screw
I#14 x 1.75" wood screw
JM5 x 8mm
Kwall plate shim
LM8x40mm
Mtop horizontal asy
Nbottom horizontal asy
Otop left horizontal asy (5X5 only)
Ptop right horizontal asy (5X5 only)
Qbottom left horizontal asy (5X5 only)
Rbottom right horizontal asy (5X5 only)
Sspacer
T5mm allen wrench
Parts (Before beginning, make sure you have all parts shown below).
ENG
K
wall plate
shim
E
horizontal
spacer
F
extrusion
connector
D
vertical spacer
G
3mm allen wrench
two-tip T-handle
TS
5mm allen
wrench
spacer

52020-04-13 #:146-9045-1
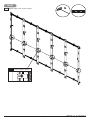
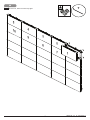
O
M
P
N
Q R
top left
horizontal asy
top horizontal asy
top right
horizontal asy
bottom horizontal asy
bottom left
horizontal asy
bottom right
horizontal asy

62020-04-13 #:146-9045-1
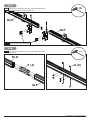
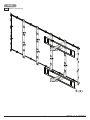
1-1
Optional: If connecting two top horizontal extrusions,
ENG
Remove and save hardware.
ENG
M,O
M,P
1-2
Use extrusion connectors to connect top horizontal
extrusions.
ENG
F (4) H (8)
G
2.5mm
M,P
M,O

72020-04-13 #:146-9045-1
2-1
Optional: If connecting two bottom horizontal
ENG
Remove and save hardware.
ENG
N,R
N,Q
1-3
Replace one hook-on bracket in between connected
extrusions.
ENG
Use saved hardware.
ENG
G
G
M,P
M,O

82020-04-13 #:146-9045-1
N,R
N,R
N,Q
N,Q
2-2
Use extrusion connectors to connect bottom
horizontal extrusions.
ENG
H (6)
F (3)
2-3
Replace one hook-on bracket in between connected
extrusions.
ENG
Use saved hardware.
ENG
G
2.5mm

92020-04-13 #:146-9045-1
This page intentionally left blank.
ENG

10 2020-04-13 #:146-9045-1
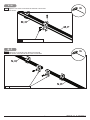
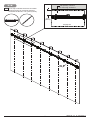
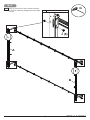
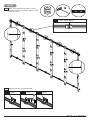
3-1
Use a laser level to keep mounting holes
level.
ENG
3
ENG - When installing Peerless wall mounts on a wood stud wall covered with plywood, verify that the wood
studs are a minimum of 2" x 4" nominal size and plywood is a minimum Grade BC, 1/2" (13 mm) thick. Plywood
may be covered by gypsum board (drywall) up to 5/8" thick.
WARNING

11 2020-04-13 #:146-9045-1
3-2
Level top horizontal extrusion and mark
mounting holes on plywood (must be
minimum Grade BC, 1/2" (13mm) thick.)
ENG
N,P
2.75"
(70mm)
display tile
7/8"(22mm) minimum
for mounting clearance

12 2020-04-13 #:146-9045-1
3-3
Drill mounting holes into supporting surface
(1.75" (44mm) minimum depth required).
ENG
5/32"
(4mm)
1.75"
(44mm)
5/32"
(4mm)
3-4
Level extrusion. Install using wood screws
provided.
ENG
3/8"
(10mm)
Maximum 80 in. • lb (9 N.M.).
ENG
I (5)
N,P

13 2020-04-13 #:146-9045-1
3-5
horizontal extrusion.
ENG
3/8"
(10mm)
ENG
D
I
M,O
D (2)
I (2)

14 2020-04-13 #:146-9045-1
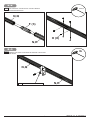
3-6
Use third vertical spacer to align bottom
then mark mounting holes on plywood (must be
minimum Grade BC, 1/2" (13mm) thick.)
ENG
58.68"
(149cm)
D
ENG
D
N,Q
N,R

15 2020-04-13 #:146-9045-1
3-8
Use third vertical spacer to align bottom
spacer, then install using wood screws
provided.
ENG
3/8"
(10mm)
Maximum 80 in. • lb (9 N.M.).
ENG
3-7
Drill mounting holes into supporting surface
(1.75" (44mm) minimum depth required).
ENG
5/32"
(4mm)
1.75"
(44mm)
5/32"
(4mm)
I (5)
N,R

16 2020-04-13 #:146-9045-1
3-9
Remove vertical spacer.
ENG
3/8"
(10mm)
D (2)
I (2)

17 2020-04-13 #:146-9045-1
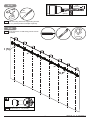
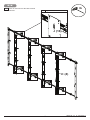
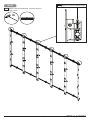
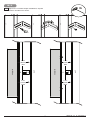
4-1
Hook on and secure outer vertical columns.
"L" and "R" markings designate left and right
column.
ENG
A
B
J (8)
Tighten hardware.
ENG
G

18 2020-04-13 #:146-9045-1
4-2
Hook on and secure all inside vertical
columns.
ENG
C (4)
Tighten hardware.
ENG
J (16)
G

19 2020-04-13 #:146-9045-1
5-1
Loosen hardware on vertical columns.
ENG G

20 2020-04-13 #:146-9045-1
5-2
Tighten.
ENG
Tighten.
ENG
Plumb and level outer columns, then tighten
hardware. Tighten hardware on four corner wall
plates.
ENG G
La pagina si sta caricando...
La pagina si sta caricando...
La pagina si sta caricando...
La pagina si sta caricando...
La pagina si sta caricando...
La pagina si sta caricando...
La pagina si sta caricando...
La pagina si sta caricando...
La pagina si sta caricando...
La pagina si sta caricando...
La pagina si sta caricando...
La pagina si sta caricando...
La pagina si sta caricando...
La pagina si sta caricando...
La pagina si sta caricando...
La pagina si sta caricando...
-
 1
1
-
 2
2
-
 3
3
-
 4
4
-
 5
5
-
 6
6
-
 7
7
-
 8
8
-
 9
9
-
 10
10
-
 11
11
-
 12
12
-
 13
13
-
 14
14
-
 15
15
-
 16
16
-
 17
17
-
 18
18
-
 19
19
-
 20
20
-
 21
21
-
 22
22
-
 23
23
-
 24
24
-
 25
25
-
 26
26
-
 27
27
-
 28
28
-
 29
29
-
 30
30
-
 31
31
-
 32
32
-
 33
33
-
 34
34
-
 35
35
-
 36
36


