Brandt FC510XS1 Manuale del proprietario
- Categoria
- Forni
- Tipo
- Manuale del proprietario

Installazione - Uso - Manutenzione
Installation - Use - Maintenance
Installation - Emploi - Entretien
Instalación - Uso - Mantenimiento
Installatie - Gebruik - Onderhoud
Instalação - Uso - Manutenção
Installation - Gebrauch - Wartung
IT
GB
FR
ES
NL
PT
DE
FC510XS1

IT GB FR
2
CARO CLIENTE,
sentitamente La ringrazia-
mo e ci congratuliamo per
la scelta da Lei fatta.
Questo nuovo prodotto ac-
curatamente progettato e
costruito con materiali di
primissima qualità, è stato
accuratamente collaudato
per poter soddisfare tutte le
esigenze di una perfetta cot-
tura. La preghiamo pertanto
di leggere e rispettare le
facili istruzioni che Le
permetteranno di raggiun-
gere eccellenti risultati fin
dalla primissima utilizza-
zione.
IL COSTRUTTORE
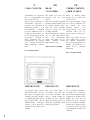
IMPORTANTE
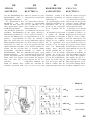
La targhetta delle caratte-
ristiche del forno è accessi-
bile anche ad apparecchio
installato. In questa targhet-
ta, visibile aprendo la porta,
sono riportati tutti i dati di
identificazione dell’appa-
recchio a cui si dovrà fare
riferimento per richiesta di
ricambi.
DEAR
CUSTOMER,
We thank you and con-
gratulate you on your
choice.
This new carefully designed
product, manufactured with
the highest quality mate-
rials, has been carefully
tested to satisfy all your
cooking demands.
We would therefore request
you to read and follow
these easy instructions
which will allow you to
obtain excellent results
right from the start.
THE MANUFACTURER
CHÈRE CLIENTE,
CHER CLIENT,
Merci et sincères félici-
tations pour le choix que
vous avez fait.
Ce nouveau produit, conçu
avec soin et fabriqué avec
des matièrs de toute
première qualité, a été
soigneusement testé pour
satisfaire toutes vos exi-
gences d’une cuisson par-
faite.
Nous vous prions de bien
vous vouloir lire et suivre
des simples instructions,
que vous permettront d’at-
teindre d’excellents ré-
sultats dès la prémière
utilisation.
LE CONSTRUCTEUR
IMPORTANT
“Il est possible d’accéder à
la plaque des caractéristi-
ques du four même lorsque
l’appareil est installé. Cette
plaque, que l’on voit en
ouvrant la porte, présente
toutes les données d’identi-
fication de l’appareil qu’il
est nécessaire de citer pour
toute demande de pièces de
rechange”.
IMPORTANT
The oven’s data plate is
accessible even with the
oven fully installed. The
plate is visible simply by
opening the door. Always
quote the details from it to
identify the appliance when
ordering spare parts.
La pagina si sta caricando...

IT GB FR
4
INDICE
Primo utilizzo pag. 6
Pannelli autopulenti 8
Rispetto dell’ambiente 10
Frontale comandi 12-14
Istruzioni di
funzionamento:
- cottura con la funzione
“convenzione” 14
- cottura con la funzione
“ventilato” 16
- cottura alla griglia 18
Termostato 20
Temporizzatore 20
Timer elettronico 24
Sostituzione lampada 28
Smontaggio della porta del
forno 30
PER L’INSTALLATORE
Incasso del forno 32
Allacciamento elettrico 34
CONTENTS
First use pag. 6
Self-cleaning panel 8
Respect for the
environment 10
Control panel 12-14
Instructions for use:
- conventional cooking 14
- fan cooking 16
- grill cooking 18
Thermostat 20
Cooking timer 20
Electronic timer 24
Light replacement 28
Removing the oven door 30
INSTALLATION
INSTRUCTIONS
Flush fitting 32
Electrical connections 34
INDEX
Première utilisation pag. 6
Panneaux autonettoyants 8
Respect
de l’environnement 10
Panneau de commande 12-14
Instructions pour le
fonctionnement:
- cuisson conventionnelle 14
- cuissson ventilée 16
- cuissson au gril 18
Thermostat 20
Temporisateur 20
Temporisateur electronique 24
Remplacement de la lampe 28
Demontage
de la porte du four 30
POUR L’INSTALLATEUR
Encastrement du four 32
Branchement electrique 34

ES NL PTDE
5
INDICE
Primera utilización pag. 7
Paneles autolimpiantes 9
Respeto por el medio
ambiente 11
Panel de control 13-15
Instrucciones de
funcionamiento:
- Cocción convencional 15
- Cocción ventilada 17
- Cocción al grill 19
Termostato 21
Temporizador 21
Temporizador
electrónico 25
Cambio de la bombilla 29
Desmontaje
de la puerta horno 31
PARA EL INSTALADOR
Encastre del horno 33
Conexión eléctrica 35
INHOUD
Eerste gebruik pag. 7
Zelfreinigende panelen 9
Respect voor het milieu 11
Bedieningspaneel 13-15
Werkingsinstructies:
- Traditionele bereidingen 15
- Bereiding met ventilatie 17
-
Bereiding met
grill 19
Thermostaat 21
Timer 21
Elektronische timer 25
Vervanging lampje 29
Demontage
van de ovendeur 31
VOOR DE INSTALLATEUR
Inbouw van de oven 33
Elektrische aansluiting 35
INDICE
Primeira utilização pág. 7
Painéis autolimpantes 9
Respeito do ambiente 11
Painel comandos 13-15
Instruções de
funcionamento:
- Cozedura convencional 15
- Cozedura ventilada 17
- Cozedura ao gril 19
Termóstato 21
Temporizador 21
Timer electrónico 25
Substituição da lâmpada 29
Desmontagem
da porta forno 31
PARA O INSTALADOR
Encastre do forno 33
Ligação eléctrica 35
INDEX
Erstmalige Benutzung S. 7
Selbstreinigende Platten 9
Umweltverträglichkeit 11
Bedienblende 13-15
Betriebsanleitung:
- Konventionelles Backen 15
-
Umluftbacken
17
- Grillen 19
Thermostat 21
Zeitschalter 21
Elektronische Zeitschaltuhr 25
Auswechslung der
Ofenbeleuchtung 29
Ausbauen der Ofentür 31
FÜR DEN INSTALLATEUR
Einbau des Backofens 33
Stromanschluß 35

IT GB FR
6
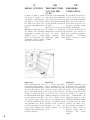
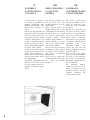
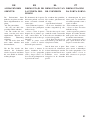
PRIMO UTILIZZO
Il forno va pulito a fondo
con acqua e sapone e ri-
sciacquato accuratamente.
Per togliere i telai laterali
nei forni con pareti lisce
procedere come illustrato in
figura.
Riscaldare il forno per circa
30 minuti alla massima
temperatura; verranno così
eliminati tutti i residui
grassi di lavorazione che
potrebbero causare sgrade-
voli odori in fase di cottura.
PREMIERE
UTILISATION
Le four doit être nettoyé à
fond à l’eau et au savon,
puis rincé méticuleusement.
Pour enlever les cadres la-
téraux dans les fours à pa-
rois lisses, procéder comme
indiqué sur la figure.
Il convient de n’insérer la
nourriture que lorsque le
four a atteint la température
préétablie, c’est-à-dire
quand s’éteint le voyant
lumineux.
THE FIRST TIME
YOU USE THE
OVEN
Clean the oven thoroughly
with soapy water and rinse
well. To remove the lateral
frames from smooth-walled
ovens, proceed as shown in
the figure.
Operate the oven for about
30 minutes at maximum
temperature to burn off all
traces of grease which
might otherwise create
unpleasant smells when
cooking.
Important:
A titre de précaution, avant
d’effectuer toute opération
de nettoyage du four quelle
qu’elle soit, débrancher
toujours la fiche de la prise
de courant ou couper la
ligne d’alimentation de
l’appareil. Veiller à ne pas
utiliser de substances acides
ou alcalines (jus de citron,
vinaigre, sel, tomate, etc.).
Ne pas utiliser de produits à
base de chlore, acides ou
abrasifs, surtout pour le
nettoyage des parois
peintes.
Important:
As a safety precaution,
before cleaning the oven,
always disconnect the plug
from the power socket or
the power cable from the
oven. Do not use acid or
alkaline substances to clean
the oven (lemon juice,
vinegar, salt, tomatoes etc.).
Do not use chlorine based
products, acids or abrasive
products to clean the
painted surfaces of the
oven.
Importante:
come precauzione di sicu-
rezza prima di procedere a
qualsiasi operazione di puli-
zia del forno staccare sem-
pre la spina della presa di
corrente o togliere la linea
di alimentazione dell’appa-
recchio. Inoltre evitare di u-
sare sostanze acide o alcali-
ne (succhi di limone, aceto,
sale, pomodori ecc.). Evita-
re di usare prodotti a base di
cloro, acidi o abrasivi spe-
cialmente per la pulizia del-
le pareti verniciate.
La pagina si sta caricando...

IT GB FR
8
PANNEAUX
AUTONETTOYANTS
CATALYTIQUES
Nos fours à parois lisses
peuvent être munis, à l’inté-
rieur, de panneaux auto-
nettoyants qui recouvrent
les parois.
Devant être accrochés sur
les parois, avant les châssis
latéraux, ces panneaux spé-
ciaux sont recouverts d’un
émail spécial catalytique
microporeux qui provoque
l’oxydation et l’évaporation
graduelles des écla-
boussures d’huile et de
graisse qui sont ainsi éli-
minées pendant les cuissons
à plus de 200° C.
Si le four n’est pas propre
après la cuisson d’aliments
très gras, le faire fonction-
ner à vide à la température
maximum pendant 60 mi-
nutes maximum.
Les panneaux autonet-
toyants ne doivent être ni
lavés, ni nettoyés avec des
produits abrasifs ou des
produits contenant des
acides ou des alcalis.
SELF-CLEANING
CATALYTIC
PANELS
Our smooth walled ovens
can be fitted with self-
cleaning panels to cover the
inside walls.
These special panels are
simply hooked on to the
walls before the side frames
are fitted. They are coated
in a special, micro-porous
catalytic enamel which
oxidises and gradually va-
porises splashes of grease
and oil at cooking tempe-
ratures above 200° C.
If the oven is not clean after
cooking fatty foods, operate
the empty oven for 60 mi-
nutes (max.) at maximum
temperature.
Never wash or clean self-
cleaning panels with abra-
sive, acid, or alkaline
products.
PANNELLI
AUTOPULENTI
CATALICI
I nostri forni con pareti li-
sce hanno la possibilità di
montare all’interno della
muffola dei pannelli auto-
pulenti che ricoprono le
pareti.
Questi speciali pannelli, da
agganciare alle pareti prima
dei telai laterali, sono rico-
perti di uno speciale smalto
catalitico microporoso che
ossida e vaporizza gradual-
mente gli schizzi di olio e
grasso eliminandoli durante
le cotture sopra i 200° C.
Se dopo una cottura di cibi
molto grassi il forno non è
pulito, farlo funzionare a
vuoto alla massima tempe-
ratura per un tempo massi-
mo di 60 minuti.
I pannelli autopulenti non
devono essere lavati né pu-
liti con prodotti abrasivi o
prodotti contenenti acidi o
alcali.
La pagina si sta caricando...

IT GB FR
10
RESPECT DE
L’ENVIRONNEMENT
La documentation de cet
appareil est imprimée sur
du papier blanchi, sans
chlore ou sur du papier re-
cyclé, de façon à contribuer
à la sauvegarde de l’envi-
ronnement.
Les emballages sont conçus
pour ne pas nuire à l’en-
vironnement; ils peuvent
être récupérés ou recyclés,
car il s’agit de produits
écologiques.
Le fait de recycler l’em-
ballage permet de consom-
mer moins de matières
premières et de réduire le
volume des déchets indu-
striels et domestiques.
RESPECT FOR THE
ENVIRONMENT
The documentation pro-
vided with this oven has
been printed on chlorine
free bleached paper or re-
cycled paper to show
respect for the environ-
ment.
The packaging has also
been designed to avoid en-
vironmental impact. Pack-
aging material is ecological
and can be re-used or
recycled.
By recycling the packaging,
you will help save raw ma-
terials as well as reducing
the bulk of domestic and
industrial waste.
RISPETTO
DELL’AMBIENTE
La documentazione del pre-
sente apparecchio utilizza
carta sbiancata, senza cloro,
oppure carta riciclata allo
scopo di contribuire alla
protezione dell’ambiente
Gli imballaggi sono conce-
piti per non danneggiare
l’ambiente; possono essere
recuperati o riciclati essen-
do prodotti ecologici.
Riciclando l’imballaggio, si
contribuirà ad un risparmio
di materie prime e ad una
riduzione del volume degli
scarti industriali e dome-
stici.
La pagina si sta caricando...

IT GB FR
12
FONCTIONS DU
PANNEAU DE
COMMANDE
SYMBOLES DES
FONCTIONS SUR LE
COMMUTATEUR
Lampe du four (reste al-
lumée pendant la marche).
Résistance inférieure.
Régulation du thermostat de
50° C à MAX.
Résistance inférieure et su-
périeure. Réglage du ther-
mostat de 50° C à MAX.
Résistance supérieure, infé-
rieure avec ventilateur. Ré-
glage du thermostat de
50°C à MAX.
Résistance circulaire avec
ventilateur. Réglage du
thermostat de 50° C à
MAX.
Ventilateur pour décongé-
lation. Réglage du thermo-
stat à 0° C.
Résistance inférieure avec
ventilateur. Réglage du
thermostat de 50°C à MAX.
Double résistance supé-
rieure avec ventilateur (grill
à grande surface). Réglage
du thermostat de 50° à
200°C.
Double résistance supé-
rieure (grill à grande sur-
face). Réglage du thermo-
stat de 50° à 200°C.
CONTROL PANEL
FUNCTIONS
FUNCTION SYMBOLS
ON THE SELECTOR
Oven light (stays on while
oven is in use).
Bottom heating element.
Thermostat setting from
50°C to MAX.
Top and bottom heating
elements. Thermostat
setting from 50°C to MAX.
Top and bottom heating
elements with fan. Thermo-
stat setting from 50°C to
MAX.
Circular heating element
with fan. Thermostat setting
from 50°C to MAX.
Fan for defrosting. Thermo-
stat setting at 0°C.
Bottom heating element
with fan. Thermostat
setting from 50°C to MAX.
Double top heating element
with fan ( large area grill).
Thermostat setting from
50°C to 200°C.
Double top heating element
(large area grill). Thermo-
stat setting from 50°C to
200°C.
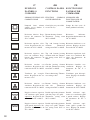
FUNZIONI
PANNELLO
COMANDI
SIMBOLI FUNZIONI SUL
COMMUTATORE
Lampada forno (rimane
sempre accesa durante il
funzionamento).
Resistenza inferiore. Rego-
lazione del termostato da
50° C a MAX.
Resistenza superiore ed in-
feriore. Regolazione del ter-
mostato da 50° C a MAX.
Resistenza superiore, infe-
riore con ventilatore. Rego-
lazione del termostato da
50° C a MAX.
Resistenza circolare con
ventilatore. Regolazione del
termostato da 50° C a MAX.
Ventilatore per scongela-
mento. Regolazione del ter-
mostato a 0° C.
Resistenza inferiore con
ventilatore. Regolazione del
termostato da 50° C a MAX.
Doppia resistenza superiore
con ventilatore (grill grande
superficie). Regolazione del
termostato da 50° a 200° C.
Doppia resistenza superiore
(grill grande superficie). Re-
golazione del termostato da
50° a 200° C.

ES NL PTDE
13
FUN°ÕES PAINEL
DE COMANDOS
SÍMBOLOS FUNÇÕES
NO COMUTADOR
Lâmpada do forno (perma-
nece sempre acesa durante
o funcionamento).
Resistência inferior. Regu -
lação do termóstato de
50°C ao MAX.
Resistência superior e infe-
rior. Regulação do termó-
stato de 50°C ao MAX.
Resistência superior, infe-
rior com ventilador. Regu-
lação do termóstato desde
50°C ao MAX.
Resistência circular com
ventilador. Regulação do
termóstato desde 50°C ao
MAX.
Ventilador para descongela-
ção. Regulação do termó-
stato a 0°C.
Resistência inferior com
ventilador. Regulação do
termóstato desde 50°C ao
MAX.
Dupla resistência superior
com ventilador (grill de
grande superfície) Regula-
ção do termóstato desde
50°C até 200° C.
Dupla resistência superior
(grill de grande superfície)
Regulação do termóstato
desde 50° até 200° C.
FUNCTIES
BEDIENINGSPANEEL
FUNCTIE-SYMBOLEN
OP DE SCHAKELAAR
Ovenverlichting (blijft altijd
branden tijdens de
werking).
Onderwarmte. Instelling
van de thermostaat van
50°C tot MAX.
Bovenwarmte en onderwarmte.
Instelling van de thermostaat
van 50°C tot MAX.
Bovenwarmte, onder-
warmte met ventilator. In-
stelling van de thermostaat
van 50°C tot MAX.
Rond verwarmingselement
met ventilator. Instelling
van de thermostaat van
50°C tot MAX.
Ventilator voor het ont-
dooien. Instelling van de
thermostaat op 0°C.
Onderste verwarmingsele-
ment met ventilator. In-
stelling van de thermostaat
van 50°C tot max.
Dubbel bovenste verwarm-
ingselement met ventilator
(grill met groot oppervlak).
Instelling van de thermo-
staat van 50°C tot 200°C.
Dubbel bovenste ver-
warmingselement (grill met
groot oppervlak). Instelling
van de thermostaat van
50°C tot 200°C.
FUNCIONES
PANEL DE
MANDOS
SÍMBOLOS DEL PANEL
DE CONTROL
Bombilla horno (queda
siempre encendida durante
el funcionamiento).
Resistencia inferior. Regu-
lación del termostato entre
50° C y MAX.
Resistencia superior e infe-
rior. Regulación del termo-
stato entre 50° C y MAX.
Resistencia superior, infe-
rior con ventilador. Regula-
ción del termostato entre
50° C y MAX.
Resistencia circular con
ventilador. Regulación del
termostato entre 50° C y
MAX.
Ventilador para desconge-
lación. Regulación del ter-
mostato a 0° C.
Resistencia inferior con
ventilador. Regulación del
termostato entre 50° C y
MAX.
Doble resistencia superior
con ventilador (grill gran
superficie). Regulación del
termostato entre 50° C y
200° C.
Doble resistencia superior
(grill gran superficie). Re-
gulación del termostato en-
tre 50° C y 200° C.
BEDIENTAFEL-
FUNKTIONEN
FUNKTIONSSYMBOLE
AM SCHALTER
Ofenbeleuchtung (bleibt
während des Betriebs
immer eingeschaltet).
Unterhitze. Einstellung des
Thermostats von 50°C auf
MAX.
Ober- und Unterhitze. Ein-
stellung des Thermostats
von 50°C auf MAX.
Oberhitze, Unterhitze mit
Ventilator. Einstellung des
Thermostats von 50°C auf
MAX.
Heißluft mit Ventilator.
Einstellung des Thermostats
von 50°C auf MAX.
Ventilatorbetrieb zum Auf-
tauen von Tiefkühlkost.
Einstellung des Thermostats
auf 0°C.
Unterhitze mit Ventilator.
Einstellung des Thermostats
von 50°C auf MAX.
Doppelte Oberhitze mit
Ventilator (großflächiger
Grill). Einstellung des
Thermostats von 50° auf
200°C.
Doppelte Oberhitze (groß-
flächiger Grill). Einstellung
des Thermostats von 50°
auf 200°C.

IT GB FR
14
INSTRUCTIONS
POUR LE
FONCTIONNEMENT
CUISSON
CONVENTIONNELLE
Système classique utilisant
la chaleur supérieure et
inférieure, indiqué pour la
cuisson d’un seul plat.
Il convient de n’insérer la
nourriture que lorsque le
four a atteint la température
préétablie, c’est-à-dire
quand s’éteint le voyant lu-
mineux.
Si, vers la fin de la cuisson,
il est nécessaire d’augmen-
ter la température inférieure
ou supérieure, il faut placer
le commutateur dans la
position adéquate. On con-
seille d’ouvrir le moins
possible la porte du four au
cours de la cuisson.
INSTRUCTIONS
FOR USE
CONVENTIONAL
COOKING
Conventional cooking uses
top and bottom heat to cook
a single dish.
Place the food in the oven
only once cooking tempe-
rature has been reached, i.e.
when the heating indicator
goes out.
If you want to increase top
or bottom temperature to-
wards the end of the cook-
ing cycle, set the tempe-
rature control to the right
position.It is advisable to
open the oven door as little
as possible during cooking.
ISTRUZIONI DI
FUNZIONAMENTO
COTTURA
CONVENZIONALE
Sistema classico che utiliz-
za calore superiore ed infe-
riore adatto per la cottura di
un solo piatto.
E’ bene che il cibo venga
inserito quando il forno ha
raggiunto la temperatura
prestabilita, cioè quando si
e’ spenta la spia luminosa.
Se verso fine cottura si
avesse necessità di incre-
mentare la temperatura in-
feriore o superiore, posi-
zionare il commutatore nel-
la rispettiva posizione. Si
consiglia di aprire il meno
possibile la porta del forno
durante la cottura.
Resistenza superiore (grill
superficie e potenza ridotta).
Regolazione del termostato
da 50° a 200° C.
Resistenza inferiore +
Resistenza circolare con
ventilatore. Regolazione del
termostato da 50° C a MAX.
Top heating element (small,
low power grill). Thermo-
stat setting from 50°C to
200°C.
Bottom heating element +
Circular heating element
with fan. Thermostat setting
from 50°C to MAX.
Résistance supérieure (grill
à grande surface et puis-
sance réduite). Réglage du
thermostat de 50° à 200°C.
Résistance inférieure +
Résistance circulaire avec
ventilateur. Réglage du
thermostat de 50° C à
MAX.
La pagina si sta caricando...

IT GB FR
16
Le préchauffage n’est pas
nécessaire; il est toutefois
préférable d’y recourir
pour la pâtisserie.
It is not essential to pre-
heat the oven, but you are
advised to do so when
cooking pastries.
Non e’ necessario il
preriscaldamento, ma per
pasticceria e’ preferibile
farlo.
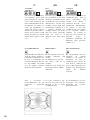
SCONGELAMENTO
Selezionando una delle fun-
zioni di cottura ventilato e
regolando il termostato sul-
lo zero, il ventilatore farà
circolare all’interno del for-
no aria fredda, favorendo
così un rapido scongela-
mento dei cibi congelati.
CUISSON
VENTILEE
Avec ce type de cuisson, un
ventilateur placé dans la
partie postérieure fait
circuler l’air chaud à
l’intérieur du four, en le
répartissant uniformément.
La cuisson se fait plus
rapidement que par rapport
à la cuisson conven-
tionnelle. Le système se
prête bien à la cuisson sur
plusieurs étages et
également d’aliments de
différents types (poisson,
viande, etc.)
FAN
COOKING
For this type of cooking a
fan positioned at the back
allows the circulation of hot
air inside the oven, creating
uniform heat. In this way
cooking is more rapid than
conventional cooking. It is
a suitable method for
cooking dishes on more
than one shelf, especially
when the food is of
different types (fish, meat
etc.)
COTTURA
VENTILATO
Con questo tipo di cottura,
un ventilatore posto nella
parte posteriore fa circolare
l’aria calda all’interno del
forno, distribuendola in mo-
do uniforme. La cottura av-
viene più rapidamente ri-
spetto alla cottura conven-
zionale. Il sistema risulta i-
doneo per la cottura su più
ripiani ed anche per cibi di
natura diversa (pesce, carne
ecc. ).
DEFROSTING
By selecting one of the fan
cooking functions and
setting
the thermostat to zero, the
fan allows cold air to
circulate
inside the oven. In this way
frozen food can be rapidly
defrosted.
DECONGELATION
En sélectionnant une des
fonctions de cuisson
ventilée et en réglant le
thermostat sur zéro, le
ventilateur fera circuler de
l’air froid à l’intérieur du
four, en provoquant de cette
manière une décongélation
rapide des aliments
congelés.
La pagina si sta caricando...

IT GB FR
18
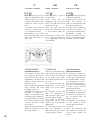
CUISSON AU GRIL
Type de cuisson pour griller
ou dorer les aliments.
Certains fours peuvent être
munis d’un moteur de
piques et d’une broche pour
la cuisson en rôtissoire.
La grille portant l’aliment à
cuire doit être insérée à la
1e ou 2e position du dessus.
Préchauffer pendant 5’.
Tourner le bouton du ther-
mostat sur une température
comprise entre 50° et 200°.
GRILL COOKING
Use the grill to grill or
brown foods.
Some ovens may be
equipped with an electric
motor, spit and skewers for
turning on the spit.
Place the shelf with the
food to be cooked in the 1st
or 2nd position from the
top.
Pre-heat the oven for 5 mi-
nutes. Turn the thermostat
to a temperature between
50° and 200°.
COTTURA AL GRILL
Tipo di cottura per la gri-
gliatura o doratura dei cibi.
Alcuni forni possono essere
completi di motorino asta e
spiedo per cottura al girar-
rosto.
La griglia con il cibo da
cuocere va inserito nella 1°
o 2° posizione da sopra.
Preriscaldare per 5’. Ruo-
tare la manopola del termo-
stato con temperature da
50° a 200°.
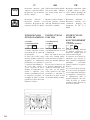
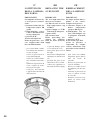
VENTILATORE DI
RAFFREDDAMENTO
Il ventilatore è posto sulla
parte superiore del forno e
crea un circolo d’aria di raf-
freddamento all’interno del
mobile e attraverso la porta
del forno stesso.
Entra in funzione quando la
parte esteriore del forno
raggiunge i 60°C ca.
Accendendo il forno e im-
postando il termostato a
200°C, il ventilatore entra
in funzione dopo 10 min ca.
Lo spegnimento del ventila-
tore avviene quando la parte
esteriore del forno scende
sotto i 60°C.
Dopo un utilizzo del forno a
200°C il ventilatore si spe-
gne dopo 30 min. ca.
COOLING FAN
The fan is positioned on the
upper part of the oven and
create a circle of cooling air
on the inside of the furni-
ture and through the door of
the oven.
It is turned on when the
temperature of the outer
shell of the oven reaches
60°C.
By switching on the oven
with the thermostat at
200°C the fan starts work-
ing after approx.10 min.
It is turned off when the
temperature of the outer
shell of the oven descends
under 60°C.
By switching off the oven
with the thermostat at
200°C the fan stops work-
ing after approx. 30 min.
VENTILATEUR DE
REFROIDISSEMENT
Le ventilateur est placé sur
la partie supérieure du four
et crée une circulation d’air
de refroidissement à l’inté-
rieur du meuble et à travers
la porte du four lui-même.
Il se met en marche quand
la partie externe du four
atteint environ 60°C.
En allumant le four et en
programmant le thermostat
sur 200°C, le ventilateur se
met en marche après 10
minutes environ.
L’extinction du ventilateur
se fait quand la partie
externe du four descend
sous 60°C.
Après une utilisation du
four à 200°C, le ventilateur
s’éteint après environ 30
minutes.
La pagina si sta caricando...

IT GB FR
20
THERMOSTAT
Dispositif permettant de ré-
gler la température de cuis-
son la plus indiquée pour
les aliments et pouvant être
réglé de 50° à 250° C.
REGULATEUR
D’ENERGIE 0-11
COMMUTATEUR 0-6
Dispositifs pour le réglage
de la puissance des plaques
électriques en fonte ou en
vitrocéramique. En aug-
mentant progressivement
de 0-6 ou de 0-11, la
fourniture de chaleur
s’élève.
MINUTEUR
Signaleur acoustique de 0-
60 minutes. Tourner le
bouton dans le sens des
aiguilles d’une montre jus-
qu’à la position maximum,
puis le remettre sur le
temps désiré.
TEMPORISATEUR
Régler le bouton du com-
mutateur et du thermostat
sur la position et sur la tem-
pérature désirées.
Pour les cuissons à temps
défini, tourner le bouton
vers la droite en le réglant
sur la durée préétablie.
Tourner le bouton dans le
sens des aiguilles d’une
montre jusqu’à la position
maximum, puis le remettre
sur le temps désiré.
Ensuite, un signal sonore
indique que le temps prévu
s’est écoulé et le four cesse
de fonctionner.
Pour la cuisson à temps in-
défini, tourner le bouton
vers la gauche en le mettant
au niveau du symbole .
THERMOSTAT
Use the thermostat to set
the cooking temperature
you need. The thermostat
can be adjusted from 50° to
250° C.
0-11 HEAT REGULATOR
0-6 SELECTOR
Use these to adjust the heat
in the cast iron or glass-
ceramic plates. Increase the
setting from 0 to 6 or from
0 to 11 to raise the tempe-
rature.
ALARM TIMER
You can set this timer to
sound a buzzer after 0 to 60
minutes of cooking. First
turn the knob fully clock-
wise, then turn it back to
the desired alarm time.
COOKING TIMER
First, turn the cooking se-
lector to the required cook-
ing function, and the ther-
mostat to the desired cook-
ing temperature.
Then, to set end of cooking
time, turn the cooking timer
to the right and to the
desired time. First turn the
knob fully clockwise, then
turn it back to the desired
alarm time. A buzzer
sounds at the end of the
timed cooking period, and
the oven switches itself off.
To set only the start of
cooking, turn the cooking
timer to the left to the
symbol.
TERMOSTATO
Dispositivo che permette di
regolare la temperatura di
cottura più idonea ai cibi
cuocere e può essere rego-
lato da 50° a 250° C.
REGOLATORE ENERGIA
0-11
COMMUTATORE 0-6
Dispositivi per la regola-
zione della potenza delle
piastre elettriche in ghisa o
vetro ceramica. Aumentan-
do progressivamente da 0-6
oppure da 0-11 aumenta l’e-
rogazione di calore.
CONTAMINUTI
Segnalatore acustico da 0-
60 minuti. Si deve ruotare la
manopola in senso orario
fino alla posizione massima
per poi riportarla al tempo
desiderato.
TEMPORIZZATORE
Impostare la manopola del
commutatore e del termo-
stato nella posizione e tem-
peratura desiderata.
Per cotture a tempo definito
ruotare la manopola a destra
posizionandola nel tempo
prestabilito. Si deve ruotare
la manopola in senso orario
fino alla posizione massima
per poi riportarla al tempo
desiderato. In seguito, un
segnale acustico segnalerà
che il tempo è trascorso e il
forno cessa di funzionare.
Per cottura a tempo indefi-
nito ruotare la manopola a
sinistra portandola in corri-
spondenza del simbolo .
La pagina si sta caricando...

IT GB FR
22
FIN DE CUISSON
ANALOGIQUE
Réglage de l’horloge
Tirer le petit bouton vers soi et
le tourner dans le sens des
aiguilles d’une montre.
Régler le bouton du com-
mutateur et du thermostat
sur la position et sur la tem-
pérature désirées. Pour les
cuissons à temps défini, ap-
puyer sur le bouton et le
tourner dans le sens des
aiguilles d’une montre jus-
qu’au temps désiré. Ensuite,
un signal sonore indique
que le temps prévu s’est
écoulé et le four cesse de
fonctionner. Pour interrom-
pre le signal sonore, tourner
dans le sens inverse à celui
des aiguilles d’une montre
jusqu’à la position .
Pour la cuisson à temps in-
défini, le bouton doit rester
sur la position Manuel .
PROGRAMMING END OF
COOKING TIME WITH
THE ANALOGUE TIMER
Setting the clock
Pull the knob out and turn it
clockwise to set the clock.
First, turn the cooking se-
lector to the required cook-
ing function, and the ther-
mostat to the desired cook-
ing temperature. Then, to
set end of cooking time, turn
the cooking timer to the
right and to the desired
time. A buzzer sounds at
the end of the timed cook-
ing period, and the oven
switches itself off. Push the
timer knob in to silence the
buzzer .
To set only the start of
cooking, leave the knob in
the manual position.
FINE COTTURA
ANALOGICO
Regolazione dell’orologio
Tirare verso di sé la mano-
polina e ruotare in senso
orario.
Impostare la manopola del
commutatore e del termo-
stato nella posizione e tem-
peratura desiderata. Per cot-
ture a tempo definito pre-
mere la manopola e ruotarla
in senso orario fino al tem-
po desiderato. Un segnale
acustico avviserà che il
tempo è trascorso e il forno
smette di funzionare. Per
interrompere il segnale acu-
stico ruotare in senso anti-
orario fino alla posizione
.
Per cottura a tempo indefi-
nito la manopola deve re-
stare sulla posizione ma-
nuale.
La pagina si sta caricando...

IT GB FR
24
TEMPORISATEUR
ELECTRONIQUE
A 6 TOUCHES
Réglage de l’horloge
Appuyer en même temps
sur les touches de durée
et de fin de cuisson
et agir sur les touches
+/- jusqu’au réglage de
l’heure désirée.
FONCTIONNEMENT
MANUEL
Pour les cuissons à temps
indéfini, appuyer sur la
touche Manuel .
FONCTIONNEMENT SEMI-
AUTOMATIQUE DE
DUREE DE CUISSON
Pour les cuissons à temps
défini. Appuyer sur la
touche de durée de cuisson
et, à l’aide des touches +/-,
régler le temps nécessaire
pour la cuisson. Le temps
préétabli étant écoulé, le
signal sonore retentit et le
four s’arrête. Remettre le
bouton du thermostat et du
commutateur sur la position
0, puis appuyer sur la
touche Manuel.
FONCTIONNEMENT SEMI-
AUTOMATIQUE DE FIN
DE CUISSON
Pour les cuissons à temps
défini, appuyer sur la tou-
che de fin de cuisson
et, à l’aide des touches +/-,
régler l’heure où l’on veut
que le four cesse de fon-
ctionner. Le temps préétabli
étant écoulé, le signal sono-
re retentit et le four s’arrête.
Remettre le bouton du ther-
mostat et du commutateur
sur la position 0, puis ap-
puyer sur la touche Manuel.
6 KEY
ELECTRONIC
TIMER
Setting the clock
Press the duration key
and the end of cooking
key simultaneously, then
press the +/- keys to set the
time.
MANUAL OPERATION
To start cooking without
setting end of cooking time,
press the manual key .
SETTING ONLY THE
DURATION OF COOKING
IN SEMI-AUTOMATIC
MODE
To set the duration of cook-
ing, press the duration key
and press the +/- keys to set
the duration of cooking. A
buzzer sounds when the
cooking period finishes, and
the oven switches itself off.
Turn the thermostat and
selector knobs back to 0
position and press the ma-
nual key.
SETTING ONLY THE END
OF COOKING TIME IN
SEMI-AUTOMATIC MODE
To set the end of cooking
time, press the end of
cooking key and press
the +/- keys to set the time
at which you want the oven
to switch off. A buzzer
sounds when the clock
reaches the set time, and the
oven switches itself off.
Turn the thermostat and
selector knobs back to 0
position and press the
manual key.
TIMER
ELETTRONICO 6
TASTI
Regolazione dell’orologio
Premere contemporanea-
mente i tasti di durata
e fine cottura ed agire
sui tasti +/- fino all’im-
postazione dell’ora deside-
rata.
FUNZIONAMENTO
MANUALE
Per cotture a tempo indefi-
nito premere il tasto ma-
nuale .
FUNZIONAMENTO
SEMIAUTOMATICO DI
DURATA COTTURA
Per cotture a tempo defini-
to. Premere il tasto di durata
cottura ed impostare con i
tasti +/- il tempo necessario
per la cottura. Trascorso il
tempo entra in funzione il
segnale acustico ed il forno
cessa di funzionare. Ripor-
tare la manopola del termo-
stato e del commutatore in
posizione 0 quindi premere
il tasto manuale.
FUNZIONAMENTO
SEMIAUTOMATICO DI
FINE COTTURA
Per cotture a tempo definito
premere il tasto di fine
cottura e impostare
con i tasti +/- l’ora in cui si
vuole che il forno cessi di
funzionare. Trascorso il
tempo entra in funzione il
segnalatore acustico e il
forno si arresta. Riportare la
manopola del termostato e
del commutatore in posizio-
ne 0 quindi premere il tasto
manuale.

ES NL PTDE
25
TIMER
ELECTRÓNICO 6
TECLAS
Regulação do relógio
Carregar simultaneamente
nas teclas de duração e
fim cozedura e agir
sobre as teclas +/- até à
programação da hora
desejada.
FUNCIONAMENTO
MANUAL
Para cozinhar a tempo inde-
finido carregar na tecla
manual .
FUNCIONAMENTO SEMI-
AUTOMÁTICO DE
DURA°ÃO DE
COZINHADO
Para cozinhar a tempo defi-
nido. Carregar na tecla de
duração de cozinhado e pro-
gramar com as teclas +/- o
tempo necessário para o co-
zinhado. Passado o tempo
entra em função o sinal acú-
stico e o forno deixa de fun-
cionar. Tornar a levar o bo-
tão do termóstato e do comu-
tador à posição 0 em seguida
carregar na tecla manual.
FUNCIONAMENTO SEMI-
AUTOMÁTICO FIM DE
COZINHADO
Para cozinhar a tempo
definido carregar na tecla
fim de cozinhado e pro-
gramar com as teclas +/- a
hora na qual se pretende que
o forno deixe de funcionar.
Passado o tempo entra em
função o sinalizador acústico
e o forno deixa de funcionar.
Tornar a levar o botão do
termóstato e do comutador à
posição 0 em seguida
carregar na tecla manual.
ELEKTRONISCHE
TIMER 6
TOETSEN
Stellen van de klok
Druk tegelijkertijd op de
toetsen voor de duur
en einde bereiding en
bedien de toetsen +/- totdat
de gewenste tijd is
ingesteld.
HANDBEDIENING
Druk op de handbedienings-
toets voor bereidingen zon-
der vaste bereidingstijd.
HALFAUTOMATISCHE
BEDIENING VAN DE
BEREIDINGSDUUR
Voor bereidingen met vaste
bereidingstijd, druk op de
toets van de bereidingsduur
en stel met de toetsen +/- de
gewenste tijd in. Nadat deze
tijd verstreken is, klinkt er
een geluidssignaal en stopt
de werking van de oven.
Zet de thermostaatknop en
de schakelaar in de stand 0,
en druk vervolgens op de
handbedieningstoets.
HALFAUTOMATISCHE
BEDIENING EINDE
BEREIDING
Voor bereidingen met vaste
bereidingstijd, druk op de
toets voor einde bereiding
en stel met de toetsen +/
- de tijd in waarop de
werking van de oven moet
stoppen. Nadat de tijd ver-
streken is, klinkt er een
geluidssignaal en stopt de
oven. Zet de thermostaatknop
en de schakelaar terug in de
stand 0 en druk vervolgens
op de handbedieningstoets.
TEMPORIZADOR
ELECTRÓNICO
DE 6 TECLAS:
Regulación del reloj
Apretar simultáneamente las
teclas de duración y fin
de cocción , y pulsar las
teclas +/- hasta la pro-
gramación de la hora deseada.
FUNCIÓNAMIENTO
MANUAL:
Para cocciones con tiempo
indefinido apretar la tecla
manual .
FUNCIONAMIENTO
SEMIAUTOMÁTICO DE
DURACIÓN COCCIÓN:
Para cocciones con tiempo
definido. Apretar la tecla de
duración cocción y progra-
mar con las teclas +/- el
tiempo necesario para la coc-
ción. Transcurrido el tiempo
entra en funcionamiento la
señal acústica y el horno deja
de funcionar. Volver a
colocar el mando del termo-
stato y del selector de
potencia en posición 0 luego
apretar la tecla manual.
FUNCIONAMIENTO
SEMIAUTOMÁTICO DE
FIN COCCIÓN:
Para cocciones con tiempo
definido apretar la tecla de
fin cocción y programar
con las teclas +/- la hora en
la cual se quiere que el
horno deje de funcionar.
Transcurrido el tiempo entra
en funcionamiento el indica-
dor acústico y el horno se
para. Volver a colocar el
mando del termostato y del
selector de potencia en
posición 0, luego apretar la
tecla manual.
ELEKTRONISCHE
ZEITSCHALTUHR
MIT 6 TASTEN
Einstellung der Uhr
Gleichzeitig die Tasten für
Gardauer und Garende
drücken und die
Tasten +/- betätigen, bis die
gewünschte Uhrzeit einge-
stellt ist.
MANUALBETRIEB
Für unbestimmte Garzeiten
die Taste Manualbetrieb
drücken.
HALBAUTOMATISCHER
BETRIEB GARDAUER
Für bestimmte Garzeiten.
Die Taste für Gardauer
drücken und mit den Tasten
+/- die erforderliche Garzeit
einstellen. Nach Ablauf der
eingestellten Garzeit ertönt
der Signalton und der Back-
ofen wird ausgeschaltet.
Den Drehgriff des Thermo-
stats und des Umschalters
wieder auf 0 stellen und
dann die Taste für den
Manualbetrieb drücken.
HALBAUTOMATISCHER
BETRIEB GARENDE
Für bestimmte Garzeiten die
Taste für Garende
drücken und mit den Tasten
+/- die Uhrzeit einstellen, in
der der Backofen ausge-
schaltet werden soll. Nach
Ablauf der eingestellten Gar-
zeit ertönt der Signalton und
der Backofen wird ausge-
schaltet. Den Drehgriff des
Thermostats und des Um-
schalters wieder auf 0 stellen
und dann die Taste für den
Manualbetrieb drücken.

IT GB FR
26
FONCTIONNEMENT
AUTOMATIQUE
Pour les cuissons à temps
défini, appuyer sur la
touche de durée cuisson
et, à l’aide des touches
+/-, régler le temps
nécessaire à la cuisson.
Appuyer sur la touche de
fin de cuisson et régler
l’heure où l’on veut que le
four s’arrête.
A la fin du programme, le
symbole AUTO clignote et
le signal sonore qui retentit
alors doit être interrompu
en appuyant sur n’importe
quelle touche.
MINUTEUR
Appuyer sur la touche du
minuteur et sélectionner le
temps de cuisson désiré
avec la touche +/-. Le temps
préétabli étant écoulé, le
signal sonore qui retentit
alors peut être interrompu
en appuyant sur n’importe
quelle touche.
ERREURS DE
PROGRAMMATION
Il y a erreur de programma-
tion si l’heure indiquée par
l’horloge est comprise entre
l’heure de début et l’heure de
fin de cuisson. L’erreur est
indiquée par un signal sonore
et par le clignotement du
symbole AUTO. L’erreur de
programmation peut être
corrigée en modifiant la
durée ou le temps de cuisson.
ANNULATION DU
PROGRAMME
Un programme peut être an-
nulé en appuyant sur le
bouton de fonctionnement
manuel.
FULLY AUTOMATIC
OPERATION
To set the end of cooking
time, press the duration key
and press the +/- keys
to set the duration of
cooking. Press the end of
cooking key and press
the +/- keys to set the time
at which you want the oven
to switch off.
When you finish setting
these times, the AUTO
symbol flashes and the
buzzer sounds. Press any
key to silence it
.
ALARM TIMER
Press the alarm timer key
and press the +/- keys to set
the required duration of
cooking. The buzzer sounds
when the cooking time
ends. Press any key to
silence it.
PROGRAMMING
ERRORS
You cannot program in a
cooking period which starts
earlier than the time
displayed on the clock. If
you try to do so, the buzzer
sounds and the AUTO
symbol flasher. Simply
change the duration or
cooking time to correct the
error.
CANCELLING A COOKING
PROGRAMME
To cancel a cooking
programme, simply press
the manual key.
FUNZIONAMENTO
AUTOMATICO
Per cotture a tempo definito
premere il tasto di durata
cottura e impostare
con i tasti +/- il tempo
necessario per la cottura.
Premere il tasto di fine
cottura e impostare
l’ora in cui si vuole che il
forno si arresti.
Al termine del programma
il simbolo AUTO lampeg-
gia, si mette in funzione il
segnale acustico che dovrà
essere spento premendo un
tasto qualsiasi.
CONTAMINUTI
Premere il tasto contaminati
e selezionare il tempo di
cottura desiderato con il
tasto +/-. Al termine del
tempo impostato si mette in
funzione il segnale acustico
che può essere interrotto
premendo uno qualsiasi dei
tasti.
ERRORI DI
PROGRAMMAZIONE
Si ha un errore di program-
mazione se l’ora indicata
dall’orologio è compresa tra
l’ora di inizio e l’ora di fine
cottura. L’errore sarà segna-
lato acusticamente e me-
diante il lampeggio inter-
mittente del simbolo
AUTO. L’errore di impo-
stazione può essere corretto
variando la durata o il tem-
po di cottura.
ANNULLAMENTO
PROGRAMMA
Un programma può essere
annullato premendo il
pulsante del funzionamento
manuale.
La pagina si sta caricando...

IT GB FR
28
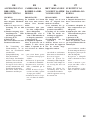
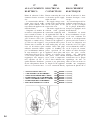
SOSTITUZIONE
DELLA LAMPADA
DEL FORNO
IMPORTANTE:
La lampada del forno de-
ve avere precise caratteri-
stiche:
a) struttura adatta alle alte
temperature (fino a 300
gradi)
b) alimentazione: vedere
valore V/Hz indicato sul-
la targa matricola
c) potenza 25 W.
d) attacco di tipo E 14
Prima di procedere, stac-
care l’apparecchio dalla
linea di alimentazione.
- per evitare danni, stende-
re nel forno uno strofinac-
cio per stoviglie
- svitare la protezione in
vetro della lampada
- svitare la vecchia lampa-
da e sostituirla con la nuo-
va
- rimontare la protezione in
vetro e togliere lo strofi-
naccio per stoviglie
- collegare nuovamente
l’apparecchio alla linea di
alimentazione
REPLACING THE
OVEN LIGHT
IMPORTANT:
The oven light must have
these precise features:
a) it must be able to resist
high temperatures (up
to 300°C)
b) power supply: see V/Hz
indicated on data plate.
c) power 25W.
d) E 14 connection.
Before proceeding, dis-
connect the appliance
from the main electricity
supply.
- to prevent damage, place
a tea cloth in the oven
- unscrew the glass cover of
the light
- unscrew the old light bulb
and replace it with the new
one
- put back the glass cover
and remove the tea cloth
- connect the appliance to
the main electricity supply
REMPLACEMENT
DE LA LAMPE DU
FOUR
IMPORTANT:
La lampe du four doit ré-
pondre à des caracté-
ristiques bien précises :
a) structure adaptée à de
hautes températures
(jusqu’à 300 degrés)
b) alimentation: voir va-
leur V/Hz indiquée sur
la plaquette d’identifi-
cation.
c) puissance 25 W.
d) raccord de type E14
Avant de procéder à
l’opération de rempla-
cement, débrancher l’ap-
pareil du réseau d’alimen-
tation,
- pour éviter tout endom-
magement, placer dans le
four un essuie de
vaisselle,
- dévisser la protection en
verre de la lampe,
- dévisser la lampe uséeet
la remplacer par une nou-
velle,
- remonter la protection en
verre et enlever l’essuie
de vaisselle,
- brancher à nouveau l’ap-
pareil au réseau d’ali-
mentation
La pagina si sta caricando...

IT GB FR
30
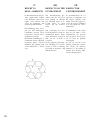
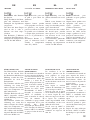
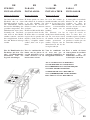
DEMONTAGE DE
LA PORTE DU
FOUR
Le démontage de la porte
du four peut être effectué
facilement de la manière
suivante :
- ouvrir complètement la
porte;
- lever les deux manettes
indiquées sur la fig.;
- refermer la porte sur le
premier cran d’arrêt déter-
miné par les deux manettes
soulevées au préalable;
- lever la porte vers le haut
et vers l’extérieur du four
pour l’ôter de son siège;
Pour remonter la porte,
insérer les charnières dans
les logements prévus à cet
effet, puis remettre les deux
manettes en position de
fermeture.
REMOVING THE
OVEN DOOR
The oven door can be
removed quickly and easily.
To do so, proceed as
follows:
- Open the door fully.
- Lift the two levers shown
in fig.
- Close the door as far as
the first stop (caused by the
raised levers).
- Lift the door upwards and
outwards to remove it from
its mountings.
To replace fit the door, fit
the hinges in their
mountings and lower the
two levers.
SMONTAGGIO
DELLA PORTA
FORNO
Lo smontaggio della porta
forno può essere facilmente
effettuato operando come
segue:
- aprire totalmente la porta;
- sollevare le due levette
indicate in fig.;
- richiudere la porta sul pri-
mo scatto di arresto de-
terminato dalle due levette
sollevate in precedenza;
- sollevare la porta verso
l’alto e verso l’esterno del
forno per estrarla dalle sedi;
Per rimontare la porta, inse-
rire le cerniere nelle apposi-
te sedi e quindi riportare le
due levette nella posizione
di chiusura.
La pagina si sta caricando...

IT GB FR
32
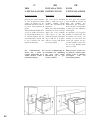
POUR
L’INSTALLATEUR
Encastrement du four
Le four peut être installé
sous un plan de cuisson ou
dans une colonne. Les
dimensions de l’encastre-
ment doivent correspondre
à celles qui sont indiquées
sur la figure.
Le matériau avec lequel le
meuble est réalisé doit être
en mesure de résister à la
chaleur. Le four doit être
centré par rapport aux pa-
rois du meuble et fixé avec
les vis et les douilles four-
nies à cet effet.
Pour associer le four avec
les plans de cuisson poly-
valents à gaz et combinés
électriques, voir les
instructions jointes.
INSTALLATION
INSTRUCTIONS
Flush fitting
The oven can be installed
under a work top or in a
cooking column. Figure
shows the installation di-
mensions.
Make sure that surrounding
materials are heat resistant.
Align the oven centrally
with respect to the side
walls of the units surround-
ing it and fix it in place
with the screws and Allen
screws provided.
See the accompanying in-
structions for combining
the oven with multi-
functional gas or gas-
electric cookers.
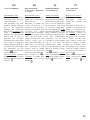
PER
L’INSTALLATORE
Incasso del forno
Il forno può essere installa-
to sotto un piano di cottura
oppure in colonna. Le di-
mensioni dell’incasso devo-
no essere come riportato in
figura.
Il materiale del mobile deve
essere in grado di resistere
al calore. Il forno deve esse-
re centrato rispetto alle pa-
reti del mobile e fissato con
le viti e bussole che sono
fornite in dotazione.
Per l’abbinamento del
forno con i piani di
cottura polivalenti gas o
combi elettrici vedere le
istruzioni allegate.
La pagina si sta caricando...
La pagina si sta caricando...
La pagina si sta caricando...
La pagina si sta caricando...
La pagina si sta caricando...
La pagina si sta caricando...
-
 1
1
-
 2
2
-
 3
3
-
 4
4
-
 5
5
-
 6
6
-
 7
7
-
 8
8
-
 9
9
-
 10
10
-
 11
11
-
 12
12
-
 13
13
-
 14
14
-
 15
15
-
 16
16
-
 17
17
-
 18
18
-
 19
19
-
 20
20
-
 21
21
-
 22
22
-
 23
23
-
 24
24
-
 25
25
-
 26
26
-
 27
27
-
 28
28
-
 29
29
-
 30
30
-
 31
31
-
 32
32
-
 33
33
-
 34
34
-
 35
35
-
 36
36
-
 37
37
-
 38
38


Brandt FC510XS1 Manuale del proprietario
- Categoria
- Forni
- Tipo
- Manuale del proprietario
in altre lingue
- English: Brandt FC510XS1 Owner's manual
- français: Brandt FC510XS1 Le manuel du propriétaire
- español: Brandt FC510XS1 El manual del propietario
- Deutsch: Brandt FC510XS1 Bedienungsanleitung
- Nederlands: Brandt FC510XS1 de handleiding
- português: Brandt FC510XS1 Manual do proprietário
Altri documenti
-
Artusi AO6100MB Manuale utente
-
EURO ESM90TSX Manuale utente
-
Artusi AO900X Manuale utente
-
Hoover HOE9185/1X/E Manuale utente
-
-
 La Germania F668D9X/12 specificazione
-
Baumatic BO667TS.DD Manuale utente
-
-
Candy FHL647/1X Manuale del proprietario
