Bresser 4716416 Manuale del proprietario
- Categoria
- Telescopi
- Tipo
- Manuale del proprietario
Questo manuale è adatto anche per

GB
INSTRUCTION MANUAL
150/1200 (6") · f/8
203/1218 (8") · f/6
254/1270 (10") · f/5
305/1525 (12") · f/5
Dobson Telescope · Parabolic Newtonian Reector
Art. No. 4716416 / 4716420 / 4716425 / 4716430
DOB-150 / 203 / 254 / 305

- 2 -
DE
Diese Bedienungsanleitung ist als
Teil des Gerätes zu betrachten.
Lesen Sie vor der Benutzung des
Geräts aufmerksam die Sicherheitshinweise
und die Bedienungsanleitung.
Bewahren Sie diese Bedienungsanleitung für
die erneute Verwendung zu einem späteren
Zeitpunkt auf. Bei Verkauf oder Weitergabe
des Gerätes ist die Bedienungsanleitung an
jeden nachfolgenden Besitzer/Benutzer des
Produkts weiterzugeben.
GEFAHR von Körperschäden!
Schauen Sie mit diesem Gerät niemals direkt
in die Sonne oder in die Nähe der Sonne. Es
besteht ERBLINDUNGSGEFAHR!
Kinder sollten das Gerät nur unter Aufsicht
benutzen. Verpackungsmaterialien (Plastiktüten,
Gummibänder, etc.) von Kindern fernhalten! Es
besteht ERSTICKUNGSGEFAHR!
BRANDGEFAHR!
Setzen Sie das Gerät – speziell die Linsen –
keiner direkten Sonneneinstrahlung aus! Durch
die Lichtbündelung könnten Brände verursacht
werden.
GEFAHR von Sachschäden!
Bauen Sie das Gerät nicht auseinander! Wenden
Sie sich im Falle eines Defekts bitte an Ihren
Fachhändler. Er nimmt mit dem Service-Center
Kontakt auf und kann das Gerät ggf. zwecks
Reparatur einschicken.
GB
These operating instructions are to
be considered a component of the
device.
Please read the safety instructions and the
operating instructions carefully before use.
Keep these instructions for renewed use
at a later date. When the device is sold
or given to someone else, the instruction
manual must be provided to the new
owner/user of the product.
RISK of physical injury!
Never look through this device directly at or near
the sun. There is a risk of BLINDING YOURSELF!
Children should only use this device under
supervision. Keep packaging materials (plastic
bags, rubber bands, etc.) away from children.
There is a risk of SUFFOCATION.
Fire/Burning RISK!
Never subject the device - especially the lenses
- to direct sunlight. Light ray concentration can
cause res and/or burns.
RISK of material damage!
Never take the device apart. Please consult your
dealer if there are any defects. The dealer will
contact our service centre and send the device in
for repair if needed.
!
FR
Le présent mode d‘emploi doit être
considéré comme faisant partie
intégrante de l’appareil.
Avant d’utiliser l’appareil, veuillez lire
attentivement les consignes de sécurité et
le mode d’emploi.
Conservez celui-ci an de pouvoir le
réutiliser ultérieurement le cas échéant. En
cas de revente ou de cession de l’appareil,
le mode d’emploi doit être remis à tout
propriétaire ou utilisateur suivant du
produit.
RISQUE de blessures corporelles!
Avec cet appareil, ne regardez jamais
directement vers le soleil ou à proximité du
soleil. DANGER DE DEVENIR AVEUGLE !
Les enfants ne devraient utiliser l’appareil que
sous surveillance. Gardez hors de leur portée les
matériaux d’emballage (sachets en plastique,
élastiques etc.) ! DANGER D’ÉTOUFFEMENT !
DANGER D’INCENDIE !
Ne laissez jamais l’appareil – et surtout les
lentilles – exposé directement aux rayons du
soleil ! L’eet de loupe pourrait provoquer des
incendies.
DANGER de dommage sur le matériel !
Ne démontez jamais l’appareil ! En cas
d’endommagement, adressez-vous à votre
revendeur. Il prendra contact avec le centre
de service et pourra, le cas échéant, envoyer
l’appareil au service de réparations.
NL
Deze gebruiksaanwijzing maakt
deel uit van het apparaat.
Lees vóór het eerste gebruik van
het apparaat de veiligheidsinstructies en de
gebruiksaanwijzing aandachtig door.
Bewaar deze gebruiksaanwijzing voor
later gebruik. Wanneer het apparaat
wordt verkocht of doorgegeven, dient
de gebruiksaanwijzing aan de volgende
eigenaar / gebruiker van het product te
worden overgedragen.
GEVAAR voor lichamelijk letsel!
Kijk met dit apparaat nooit direct in de zon of in
de buurt van de zon. Uw kind kan zo VERBLIND
raken!
Kinderen dienen het apparaat uitsluitend onder
toezicht te gebruiken. Houd verpakkingsmateriaal
(plastic zakken, elastiek, enz.) ver van kinderen!
Uw kind kan daardoor STIKKEN!
GEVAAR Voor brand!
Stel het apparaat – en vooral de lenzen – niet
bloot aan direct zonlicht! Door de lichtbundeling
kan brand worden veroorzaakt.
GEVAAR voor schade aan het materiaal!
Haal het apparaat niet uit elkaar! Neem in geval
van storingen contact op met de speciaalzaak.
Deze neemt contact op met het servicecentrum
en kan het apparaat indien nodig ter reparatie
versturen.
IT
Questo manuale d’uso va
considerato parte integrante
dell’apparecchio.
Prima di usare l’apparecchio, leggere con
attenzione le indicazioni di sicurezza e il
manuale d’uso.
Conservare il manuale d’uso per poterlo
utilizzare di nuovo in un secondo momento.
Se si vende o si cede l’apparecchio,
consegnare il manuale d’uso ad ogni
successivo possessore/utilizzatore del
prodotto.
PERICOLO di lesioni!
Non osservare mai direttamente il sole o
un punto in prossimità del sole con questo
apparecchio. PERICOLO DI ACCECAMENTO!
Non lasciare mai incustoditi i bambini quando
usano l’apparecchio. Tenere i materiali di
imballaggio (buste di plastica, elastici, ecc.)
lontano dalla portata dei bambini! PERICOLO DI
SOFFOCAMENTO!
PERICOLO DI INCENDIO!
Non lasciare mai l’apparecchio, in particolar
modo le lenti, esposto ai raggi diretti del sole!
La focalizzazione della luce solare potrebbe
innescare incendi.
PERICOLO per danni a cose!
Non smontare l’apparecchio! In caso di
difetti all’apparecchio rivolgersi al rivenditore
specializzato. Il rivenditore si metterà in
contatto con il servizio di assistenza clienti
ed eventualmente manderà l'apparecchio in
riparazione.
ES
El presente manual de
instrucciones se debe considerar
parte integrante del aparato.
Antes de utilizar el aparato, lea
detenidamente las indicaciones de
seguridad y el manual de instrucciones.
Guarde el presente manual de instrucciones
por si necesita volver a utilizarlo más tarde.
En caso de venta o entrega a terceros del
aparato, se debe entregar el manual de
instrucciones al siguiente propietario/
usuario del producto.
¡PELIGRO de lesiones corporales!
No mire nunca con este aparato directamente
hacia el sol o hacia sus inmediaciones. ¡Existe
PELIGRO DE CEGUERA!
Los niños sólo deben utilizar el aparato bajo la
supervisión de un adulto. ¡Mantener fuera del
alcance de los niños los materiales de embalaje
Allgemeine Warnhinweise · General Safety Informations · Avertissements généraux
Algemene veiligheid informatie · Avvertenze generali · Advertencias generales de seguridad
Informações gerais de segurança ·
Общие предупреждения

- 3 -
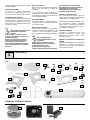
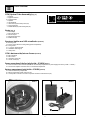
Scope of delivery
I
A
WV
D
C
F
E
B
X
G
H
I
J
K
10x
L
10x
M
5x
N
1x
O
1x
P
2x
Q
2x
R
Fig. 1
3x
S
4x
T
U
Only Art.No.: 4716430 (12" Dobson):
(bolsas de plástico, cintas de goma, etc.)! ¡Existe
PELIGRO DE ASFIXIA!
¡PELIGRO DE INCENDIO!
¡No exponga el aparato (especialmente
las lentes) a la radiación directa del sol! La
concentración de luz podría provocar incendios.
¡PELIGRO de daños materiales!
¡No desmonte el aparato! En caso de que perciba
un defecto, diríjase a su tienda especializada. En
ella se pondrán en contacto con el centro de
servicio técnico y, si procede, enviarán el aparato
para que sea reparado.
PT
Este manual de instruções deve ser
considerado como parte do
aparelho.
Antes de utilizar o aparelho, leia com
atenção as advertências de segurança e o
manual de instruções.
Guarde este manual de instruções de
forma a poder consultá-lo mais tarde.
Ao vender ou entregar o aparelho a
outro proprietário/utilizador do produto
deve entregar juntamente o manual de
instruções.
RISCO de ferimentos!
Nunca direccione este aparelho directamente
para o sol ou para perto do sol. RISCO DE
CEGUEIRA!
As crianças só devem utilizar o aparelho sob
vigilância. Manter os materiais da embalagem
(sacos de plástico, elásticos, etc.) afastados das
crianças! RISCO DE ASFIXIA!
RISCO DE INCÊNDIO!
Não sujeite o aparelho – sobretudo as lentes – à
radiação solar directa! A compressão da luz pode
provocar um incêndio.
RISCO de danos materiais!
Não desmonte o aparelho! Em caso de defeito,
consulte o seu distribuidor especializado. Ele
contactará o Centro de Assistência e poderá
enviar o aparelho para uma eventual reparação.
RU
Данное руководство по
эксплуатации является частью
устройства.
Перед использованием устройства
внимательно прочитайте инструкции
по технике безопасности и
руководство по эксплуатации.
Сохраните руководство по эксплуатации
для последующего использования.
При продаже или передаче устройства
руководство по эксплуатации
необходимо передать следующему
владельцу (пользователю).
ОПАСНОСТЬ травмирования!
Ни в коем случае не смотрите через этот
прибор прямо на солнце или в направлении
солнца. Опасность ПОТЕРИ ЗРЕНИЯ!
Дети должны использовать прибор только
под присмотром взрослых. Исключите
доступ детей к упаковочным материалам
(пластиковые пакеты, резиновые ленты и
т.д.)! ОПАСНОСТЬ УДУШЬЯ!
ОПАСНОСТЬ ПОЖАРА!
Не прибор – в особенности линзы – под
прямыми солнечными лучами! Из-за
фокусировки солнечных лучей может
возникнуть пожар!
ОПАСНОСТЬ причинения материального
ущерба!
Не разбирайте прибор! В случае неисправности
обращайтесь к дилеру. Он свяжется с
сервисным центром и может переслать прибор
для выполнения ремонта.
Allgemeine Warnhinweise · General Safety Informations · Avertissements généraux
Algemene veiligheid informatie · Avvertenze generali · Advertencias generales de seguridad
Informações gerais de segurança ·
Общие предупреждения

- 4 -
Parts Overview
D
C
B
F
H
g
e
j
i
j
1!1) 1@
H
a
F
a
Fig. 2
B
C
1%
E
1#
1$
1^
1^
1&
h
Inset B
2)
2!
2) 2!
2!
2)
1(
1*
1$
a
Inset A
c
a
II

- 5 -
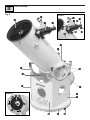
OTA (Optical Tube Assembly) (Fig. 2)
1. Eyepiece
2. Eyepiece extension
2a. Eyepiece holder
3. Aperture
4. LED viewnder
5. OTA bracket (2x) with clamp screw (5a)
6. Fixing screws (4x)
7. Altitude wheels (2x) with lateral guids (7a)
Basis (Fig. 2)
8. Basis bridge
9. Basis side parts (2x)
10. Basis front part
11. Round basis plate (2x)
12. Rubber feet (3x)
Eyepiece holder and LED viewnder (Inset A)
13. Focusing drive
14. Friction screws (fFocus lock and grinding pressure adjustment)
14a. Fixing screws
15. 1 ¼" and 2" eyepiece holder
16. Viewnder mounting (2x)
17. Clamp screw
OTA's bottom side/mirror frame (Inset B)
18. Mirror backside
19. Mirror frame
20. Collimation screws (3x)
21. Counter screws (3x)
Power connection of the fan (only Art.No.: 4716430) (Inset C)
22. Power connection socket of the fan (suitable for 12 Volt battery compartment or power supply unit. Polarity: inside + / outside -)
23. Fan for faster adaption of the main mirror to the ambient temperature
Battery compartment (only Art.No.: 4716430) (Inset D)
24. Pouch for the battery compartment
25. Battery compartment (power source for fan)
26. Coaxial power connector to connect to the power connection socket of the fan (22)
Parts Overview
www.bresser.de/download/Messier/Dobson
Inset C Inset D
2@
2#
2^
2%
2$
II

- 6 -
Setup
Assembling the base
NOTE!
You additionally need a suitable Phillips screwdriver, an Allen wrench and an open-end wrench or
ring wrench for assembling. Use an old carpet or another soft surface to avoid any damages to the
component parts.
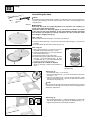
IMPORTANT!
Note that the studs are height-adjustable. It is therefore not necessary to
screw in the studs until they stop.
Important: Make sure that only approx. 4 mm of the stud heads are visible
in the holes for the quick fasteners. So the quick fastener and the stud head
will interlock and all parts are rmly connected. For that, install the studs
accordingly in height (see Fig. A1).
STEP 1 (Fig. 3):
The base supports the OTA and allows for a movement in all directions.
1. Put the rst bottom plate (Fig. 1, A) on the oor and place the rubber feet (Fig. 1, S) over the outer
drill holes.
2. Screw each rubber feet down with a woodscrew (Fig. 1, N).
STEP 2 (Fig. 4):
1. Insert a plastic sleeve (Fig. 1, R) into the drill hole in
the middle of both bottom plates (Fig. 1, A + B).
2. Screw four threaded bolts (Fig. 1, L) into the outer drill
holes of bottom plate on top.
3. Put both bottom plates on top of each other.
4. Bolt both bottom plates together with the ne-thread
screw (Fig. 1, P) and the safety nut (Fig. 1, O). Place
one ring washer (Fig. 1, Q) on each side between the
screw head or nut and the plastic sleeve.
5. Fig 4b: Only Art.No.: 4716430 (12" Dobson):
Install the three-layer needle bearing between as
shown.
Fig. 3
Fig. 4
Required
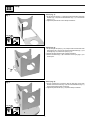
STEP 3 (Fig. 5):
1. Put all side parts (Fig. 1, C-F) on the oor.
2. Screw the threaded bolts (Fig. 1, L) into the small drill holes of both side
parts (Fig. 1, C + D).
3. Insert two quick fasteners (Fig. 1, M) into the large drill holes of both
side parts and the bridge (Fig. 1, E) and four quick fasteners into drill
holes of the front part (Fig. 1, F).
NOTE!
Make sure that the opening at the bottom of the quick fasteners is pointing
to the drill hole on the edge. An arrow at the notch for the Phillips head is
showing the right direction.
STEP 4 (Fig. 6):
1. Set up the left side part (Fig. 1, C) and put the bridge (Fig. 1, E) with its drill
holes for the quick fasteners (Fig. 1, M) over the threaded bolts (Fig. 1, L).
2. Tighten the quick fasteners with a Phillips screwdriver.
SW-17
PH-2 (6mm)
2 mm
Fig. 4b
Only Art.No.: 4716430 (12" Dobson)
Needle Bearing
Fig. 6
max. 4 mm
Fig. A1
Fig. 5
III

- 7 -
STEP 5 (Fig. 7):
1. Set up the front part (Fig. 1, F) and put it with the drill holes of the quick
fasteners (Fig. 1, M) over the threaded bolts (Fig. 1, L) of the left side
part (Fig. 1, C).
2. Tighten the quick fasteners with a Phillips screwdriver.
STEP 6 (Fig. 8):
1. Set up the right side part (Fig. 1, D) and put it with the drill holes of the
qick fasteners (Fig. 1, M) over the remaining threaded bolts (Fig. 1, L) of
the bridge (Fig. 1, E) and the front part (Fig. 1, F).
2. Thighten the quick fasteners with a Phillips screwdriver.
3. Use two woodscrews (Fig. 1, N) to attach the accessory tray (Fig. 1, G) to
the front part.
STEP 7 (Fig. 9):
1. Put the complete base construction with the drill holes of the quick
fasteners at the bottom rst (Fig. 1, M) over the threaded bolts (Fig. 1, L)
of the prepared bottom plate construction.
2. Tighten the quick fasteners (Fig. 1, M) with a Phillips screwdriver.
Setup
Fig. 7
Fig. 8
Fig. 9
max. 4 mm
Fig. A1
max. 4 mm
Fig. A1
III

- 8 -
Setup
Attaching the OTA
STEP 8 (Fig. 10):
1. Attach both altitude wheels (Fig. 1, H) with the xing screws (Fig. 1, T) to
the right and left side of the OTA.
NOTE!
Make sure that the 'noses' on one side (Fig. 10, X) are pointing in the
direction of the clamp screws (Fig. 10, 5a) for the brackets and that the
lateral guides of the altitude wheels are pointing at one another.
STEP 9 (Fig. 11):
1. Put the OTA with the attached altitude wheels into the half round sections
of the side parts (Fig. 11, 9).
NOTE!
Make sure that the aperture of the OTA (Fig. 11, 3) is pointing in the
direction of the front part (Fig. 11, 10) when attaching it.
2. Hold the OTA with one hand until it is balanced correctly. If neccessary,
move the OTA a little to another position within the brackets (Fig. 11,
5) to establish a balance. Also when changing the accessories a new
balancing of the OTA is required.
NOTE!
Balancing is important because otherwise the tube could tip over at a low
imbalance and could be damaged.
3. Adjust the lateral guides (Fig. 11, 7a) of the altitude. Use a suitable 2mm
Allen wrench. The side oating and the friction of the altitude axis can
be adjusted by evenly tigthening the four Allen screws (two per lateral
guide).
NOTE!
Do not tighten the screws too rmly to avoid premature wear.
Fig. 10
X
F
a
Fig. 11
1)
J
D
F
H
a
III

- 9 -
Installing accessories
Inserting the eyepiece (Fig. 12)
1. Insert the 1 ¼" eyepiece (Fig. 1, J) into the eyepiece holder (Fig. 12, 15).
2. Tighten the clamp screw (Fig. 12, 17) slightly.
3. Look through the eyepiece and turn the focusing wheel of the focusing drive (Fig. 12, 13) right or
left to focus the image.
4.
When using a 2" eyepiece remove the 1 ¼" eyepiece adapter (Fig. 12, 15) from the holder rst.
5. Now insert the 2" eyepiece and x it with the lock screw.
The eyepiece holder is equipped with a friction screw (Fig. 12, 14) on its bottom side and with two
xing screws (Fig. 12, 14a) on its top side. Adjust the friction screw so that the focusing drive can be
moved sensitively. Additionally the focuser can be xed with the xing screws to avoid unintentional
adjustment.
NOTE!
Loosen the xing screws on the focuser completely before start focusing! Never tighten the friction
screw and xing screws too rmly.
Attaching a spacer sleeve (Fig. 12a)
NOTE!
A spacer sleeve resolves focusing problems when the focusing point is not close to the eyepiece
extension. With a spacer sleeve it is for example possible to use the telescope for photography or to
use eyepieces with the telescope that oer an extrem focal position. Thereby it is bridging the optical
distance by its own length. When using a spacer sleeve, it is also no longer necessary to turn out the
eyepiece extension until it stops. Furthermore it will increase the mechanical stability.
1.
Unscrew the eyepiece holder (Fig. 12, 2a) and remove it from the eyepiece extension (Fig. 12, 2).
2. Screw the spacer sleeve (Fig. 12, U) on the eyepiece extension (Fig. 12, 2).
3. Screw the eyepiece holder (Fig. 12, 2a) on the spacer sleeve (Fig. 12, U).
4. By screwing two or more optional spacer sleeves together, the optical distance can be extended
additionally.
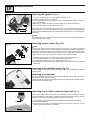
Attaching the viewnder holder (Fig. 13)
Slide the viewnder holder into the slit of the pre-installed holder base. Fix holder base by thightening
the xing screws.
Attaching the viewnder
Remove the viewnder's adjustment screws and slide the viewnder into the holder. The obejctive
lens of the viewnder must face to the sky.
Tighten the viewnder's adjustment screws by hand. Read more under 'Align the viewnder'. Remove
the dust protection cap before using it.
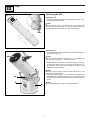
Attaching the 10:1 Micro reduction (optional) (Fig. 14)
The 10:1 Micro reduction unit (Art. No. 06-25720) is available as an optional accessory and can be
attached instead of the normal reduction. It allows for normal focusing speed as well as for a focusing
speed that is reduced by ten times and therefore provides a very ne focusing.
1. Loosen the Allen screw at the bottom side of the right focusing wheel with an Allen wrench.
2. Pull out the focusing wheel.
3. Insert the 10:1 micro reduction unit and tighten the Allen screws of the drive shaft (Fig. 14, X) and
the Allen screw of the housing (Fig. 14, Y) sturdy.
Fig. 12
1#
1&
1%
1$
a
1$
Fig. 14
X
Y
Fig. 13
Fig. 12a
c
a
c
U
IV

- 10 -
Usage
Using a Dobsonian telescope
1. Never lubricate the Teon pads on the ground plate. Your Dobsonian has been designed with some
inherent friction. You want the telescope to move easily when you position it, but you also want it
to stay in the position you place it. Using any kind of oil, silicone spray, wax, or grease will ruin the
performance by causing the telescope to move too easily. Just keep these bearing surfaces clean;
that’s all the maintenance required.
2. The altitude bearing surfaces (Fig. 1, 7) of the telescope are lightly lubricated at the factory for
optimum performance. Over a period of time, these surfaces may become dry or dirty. Simply
clean o the bearing surfaces with a dry cloth or paper towel. Do not use solvents or alcohol-based
cleaning solutions as this may damage the bearings or the painted surfaces of the telescope.
3. You will notice that your telescope will move in altitude by raising and lowering the tube, and in
azimuth by rotating the base. As you observe objects in the night sky they will appear to drift out
of the eld of view due to the Earth’s rotation. To keep an object centered in the eld of view, just
lightly nudge the telescope in the proper direction. This may take a little practice at rst, but you’ll
soon get the hang of it.
4. Be sure the Mount is placed on a relatively level surface to allow proper operation. Each of the
three feet should be in rm contact and not wobble. If you are in an area with particularly rough or
soft ground, it may be helpful to place the mount on a thick piece of plywood.
5. Part of the fun of using a Dobsonian type of telescope is the challenge of hunting for objects in
the night sky. Invest in some simple star charts and books that tell you how to locate objects using
a technique called “star hopping.” Once you begin learning the star patterns and constellations,
you’re well on you way to nding many amazing sights.
Align the Viewnder (Fig. 15)
The wide viewnder's eld of view oers an easier way to observe objects than an eyepiece which
provides a smaller eld of view. If you have not already attached the viewnder to the telecope,
follow the procedure described before.
For an sensible use of the viewnder, it must be aligned with the telescope so that both the view-
nder and optical tube point at the same position in the sky. This alignment makes it easier to nd
objects: First locate an object in the wide-eld viewnder, then look through the telescope's eyepiece
for a detailed view.
To align the viewnder, perform steps 1 to 4 during the daytime; step 5 should be performed at night.
1. Remove the dust covers from the telescope and from the viewnder.
2. If you have not already done this, insert the included eyepiece into the eyepiece holder of tele-
scope.
3. Look through the viewnder at an object at a distance of at least 1000m. If the distant object is not
in focus, turn the focus lock ring of the viewnder counterclockwise to loosen the front cell. Twist
the front cell until the observed image is in focus and retighten the focus lock ring.
4. Point the telescope at a tall, well dened and stationary land object (e.g. a tree or an antenna)
at a distance of at least 1000m and center the object in the eyepiece. Bring the image in focus by
turning the focus knob.
5. Look through the viewnder. Loosen or tighten one or more of the viewnder's adjustment screws
to align the viewnder. Make sure that the viewnder’s crosshairs are precisely centered on the
object that had been centered in the telescope‘s eyepiece before. After done this, the telescope is
ready for the rst observation.
Attention!
NEVER look through the telescope at or near the sun! Looking at the sun will cause irreversible dam-
ges to your eyes - even when observing for just a fraction of a second. Furthermore it will also cause
damages to the telescope.
6. Repeat the alignment procedure for an object at the nightsky (e.g. a bright star or the moon) and
make the necessary ne adjustments. Therefore, follow steps 3 and 4 above. With this alignment,
the objects which were visible in the viewnder's wide eld of view will also be visible when loo-
king through the telescope.
Fig. 15
V

- 11 -
Usage
Calculating the magnication
The magnication, or power of a telescope is determined by two factors: the focal length of the
eyepiece and the focal length of the telescope.
Your telescope is supplied with one eyepiece. The focal length of the eyepiece, 25mm, is printed on
its side.
The focal length of the 8" Dobsonian is 1218mm.
To change magnication, change eyepieces.
To calculate the magnication of a given eyepiece, use this formula:
Telescope focal length
Magnication = ----------------------------------
Eyepiece focal ength
Example with the 8” Dobsonian and a 25 mm eyepiece:
1218 mm
Magnication = --------------- = 49x (approx. value)
25 mm
The type of eyepiece, whether Modied Achromatic, Plössl, or Super Plössl, has no eect on
magnication, but does have a bearing on such optical characteristics as eld of view, atness of
eld, and color correction.
Maximum practical magnication is about 50X per inch of aperture (for the 8” it is 8 x 50 = approx. 400X
magnication). Generally, however, lower powers produce higher image resolution. When unsteady
air conditions prevail (as witnessed by rapid “twinkling” of the stars), extremely high powers result
in distorted magnication and observational details are diminished by the use of excessive power.
When beginning observations on a particular object, always start with a low power
eyepiece. Centered the object in the eld of view. Sharply focus the object. Then try
using a higher power eyepiece. If the image starts to become fuzzy when you use
higher magnication, back down to a lower power. The atmosphere is not suciently
steady to support high powers. Keep in mind that a bright, clearly resolved, but
smaller image will show far more detail than a dimmer, poorly resolved larger image.
V

- 12 -
Usage
Observation
Allow for a temperature adjustment for about 90 minutes before starting an observation. Because
when bringing the telecope e.g. from a heated car or house to a place outside so called tube seeing
may occur. This means that the primary mirror is warmer than the air and will produce air turbulence.
After the temperature adjustment the telecope will produce a sharp image.
Try out your telescope during the daytime at rst. It is easier to learn how it operates and how to
observe when it is light.
Pick out an easy object to observe: A distant mountain, a lighthouse or something else. Point the
optical tube so it lines up with the object.
Look through the LED viender until you can see the object.
Once you have the object lined up in the nder, it should also be visible in the optical tube’s 25 mm
eyepiece.
Look through the eyepiece and start focusing on the object you have chosen.
When you feel comfortable with the nder, the eyepieces, the locks and the adjustment controls, you
will be ready to try out the telescope at night. The Moon is the best object to observe the rst time you
go out at night. Pick a night when the Moon is a crescent. No shadows are seen during a full Moon,
making it appear at and uninteresting.
Use a neutral density lter (sometimes called a “moon lter”) when observing the Moon. Neutral
density lters are available from your local dealer as an optional accessory.
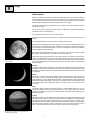
Spend several nights observing the Moon. Some nights, the Moon is so bright that it makes other
objects in the sky dicult to see. These are nights that are excellent for lunar observation. The most
obvious features are craters. The dark areas on the Moon are called maria and are composed of lava
from the period when the Moon still had volcanic activity. You can also see mountain ranges and fault
lines on the Moon.
Planets
During their orbit around the sun the planets are continuously changing their position on the sky. You
can nd the actual position of the planets in astronomy circulars and soon on the information center
of the Explore Scientic homepage. The following planets are especially suited for observations with
your telescope:
Venus
The diameter of Venus is about 9/10 the diameter of the Earth. When Venus is orbiting the sun the
astronomer can observe the change of the light phases of Venus during this orbit: Crescent, half
Venus, full Venus – very much like the phases of the moon. The planetary disc of Venus appears white
because the sunlight is reected by a compact layer of clouds that covers all surface details. Venus
is only visible before dawn and shortly after dusk in the vicinity of the sun, so be careful not to look
into the sun.
Mars
The diameter of Mars is about half the Earth's diameter. In a telescope Mars appears as a tiny red-
orange disk. Maybe you will see a tiny white patch when you look at the polar regions that are
covered in ice. About every two years, when Mars and Earth reach their smallest distance you can
discover new features.
Jupiter
The biggest planet in our solar system is Jupiter with about 11 times bigger equatorial diameter than
the Earth. The Planet appears as a disk that is covered in dark lines. Those lines are cloud bands in the
atmosphere of Jupiter. Even with low magnication 4 of the 67 moons of Jupiter are visible – the so
called Galilean moons (Io, Ganymed, Europa and Callisto). Because those moons are orbiting Jupiter
the visible number and position changes. Sometimes a moon passes above the planetary disc of
Jupiter – then the shadow of the moon can be spotted on the planet as a sharp dark spot.
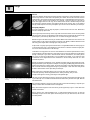
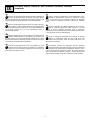
Fig. 16: Craters of the moon are excellent targets to observe
even for beginners.
Fig. 17: Planet Venus in its thin crescent phase
Fig. 18: Jupiter's four largest moons can be observed in a
dierent position every night.
V

- 13 -
Saturn
Saturn has a diameter about 9 times the Earth's diameter and appears as small roundish disc. You can
see the rings of Saturn on both sides of the planetary disc. Galilei, who was the rst human observer
of this planet in 1610 couldn´t know that the planet had rings – he described that Saturn had „ears“.
The rings of Saturn mainly consist of billions of icy particles – from tiniest dust up to the size of a
house. The biggest division in the rings, the so called “Cassini division” should be easily seen with
your telescope in nights of steady air. The biggest of the 62 moons of Saturn, Titan, is also visible as
a bright, starlike object in the vicinity of the planet. Up to 6 moons can be detected in your telescope.
Deep-Sky-Objekte
To locate constellations, stars or „deep-sky-objects“, it makes sense to use a star chart. We will list a
selection of deep sky objects here:
Stars are giant objects that mainly consist of gas. Due to the nuclear fusion in their core they radiate
energy and shine. The stars are extremely far away. Because of this vast distance they appear as tiny
spots of light in your telescope, despite their size – no matter how big your telescope is.
Nebulae are giant interstellar clouds of gas and dust. Within those clouds new stars are born. The
premier nebula on the northern hemisphere is the Great Orion Nebula, a diuse nebula that looks
like a fuzzy patch of light. M42 is 1600 light years away from Earth.
A open cluster is a group of young stars that were born in a single diuse nebula not too long ago (on
an astronomical time scale…). The Plejades are a open cluster in a distance of about 410 light years.
You can see several hundred stars in the telescope.
Constellations are big patterns of stars that were believed to be celestial representations of men,
gods and objects by the old civilizations. Those patterns are too big to be observed at a single glance
through a telescope. If you want to become familiar with the constellations, start with a pattern
that is easy to nd, like the Big Dipper in the constellation Ursa Major. Try to locate the other
constellations in the neighborhood of this constellation in the second step and move on to even
more distant patterns.
Galaxies are gigantic accumulations of stars, nebulae and clusters that are held together by gravity.
Most galaxies have a spiral shape (like for example our own galaxy, the Milky Way), but there are also
galaxies with elliptical or irregular shapes. The closest spiral galaxy is the Andromeda Galaxy (M31).
The core of M31 looks like a bright patch of light in your telescope – under dark clear skies you will
be able to detect features in this object with your telescope.
When you become an advanced observer you can look for other types of objects such
as asteroids, planetary nebula and globular clusters. And if you’re lucky, every so often
a bright comet appears in the sky, presenting an unforgettable sight.
The more you learn about objects in the sky, the more you will learn to appreciate the sights you see
in your telescope. Start a notebook and write down the observations you make each night. Note the
time and the date.
One of the best methods to record your telescopic views is astronomical sketching. It improves your
ability to see ne detail and subtle variations in brightness.
Many astronomical magazines and online forms give the opportunity to get in contact with other
amateur astronomers.
Online resources like www.cloudynights.com or www.stargazerslounge.com help to build up
knowledge and get to know other aspects of the hobby. The more you know aboit it, the more fun
this hobby will be!
Usage
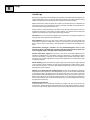
Fig. 19: Saturn is perhaps the most unforgettable sight to see
in a telescope.
Fig. 20: M31, the Andromeda galaxy, is one of the easiest
galaxies to locate and observe during the fall and winter
evenings.
Fig. 21: The pleiades is probably the most striking star cluster
to observe in the Northern Hemisphere.
V

- 14 -
Usage
Useful tips
By the way, you might have noticed something strange when you looked through your eyepiece. The
image is upside down, and it is also reversed. That means reading words can be a problem or viewing
objects on the ground can be a problem. But it has no aect on astronomical objects.
Because of the Earth's rotation all objects seem to drift across the eld of view. To compensate this
movement you have to move the telescope smoothly and slowly. The higher the magnication the
more accurate this tracking movement has to be.
Another solution is to place the object on the eastern rim of the eld of view and let it drift across
the eld, then reposition it on the eastern rim again. However – this method only works with good
eyepieces that are delivering a sharp image up to the edge of the eld.
Vibrations: Try to avoid touching the eyepiece during observations. Touching the eyepiece and
the slight shiver of the hand will cause unsteady views.
Dark adaption: Give your eyes some time to adapt to the darkness. This takes about 20-30
minutes after an exposure to a bright light – even if it is a short exposure. Use a dim light with a red
lter to read star charts or draw objects – dim red light does not inuence the dark adaption very
much.
Observations through a window are very disadvantageous (even if the
window is open). The light that is gathered by the telescope has to pass a lot
of air and glass layers, causing severe image deterioration.
Planets and other objects that are close to the horizon are severely inuenced by air
turbulence and absorbance. It is much better to time your observations in a way that those objects
are close to the meridian, so that they are on their highest position possible. If the image is dim or
moving fast, use a smaller magnication. Using too much magnication is a mistake that is made
very often by beginners.
Warm clothing: Even in the summer the nights may get very cold during clear nights, especially
on the mountains. Always remember to bring warm clothing like thick jackets, beanies, gloves,
winter shoes and thick socks – even if your were sweating during the day. It is hard to enjoy even the
best night when you are freezing!
Explore your observing site during the day: The ideal site should be far of frequently
used streets and other light sources that would prevent your eyes to become dark adapted. Keep
in mind that it is likely to get foggy in the vicinity of open water, such as river valleys or lakes. The
ground should be solid and relatively at. You can observe in the city, but try to get to a place some
distance away, where you can see the milky way if possible. You can get really good conditions as
close as 50 km outside of cities. An old astronomers quote says: “ you cannot really replace a dark sky
by anything than a darker sky”
Additional information:
As mentioned before, a lot of additional information for people of all ages can be found in the
internet and in specialist magazines. Most public libraries normally oer good literature. You may
also contact an astronomical organisation next to you. Events are often announced in the local press.
V

- 15 -
Maintenance and Cleaning
Maintenance
Your telescope is a precision instrument that will provide many years of fun. When you are treating
this telescope with the same care as for example a expensive camera, it is very unlikely that you will
ever need to return it for service or maintenance. Please notice the following rules:
1. Avoid cleaning the optics. A little dust on the optical system will not deteriorate the performance
of the optical system by any noticeable amount. A little dust should not be a reason to clean the
optics.
2. If cleaning the optics is necessary it is best to brush away the dust with a ne camel hair brush as
it is used for photographic equipment. NEVER USE pressurized air or microber cloth as it is often
recommended for glasses.
3. Organic dirt (ngerprints etc.) can be removed from the optical surface with a mixture of 3 parts
distilled water and one part isopropanol. You may add a very little bit of glass cleaner to the mix.
Only use soft, white cosmetical tissues. Soak the mirror to dissolve the dirt and remove the uid
with short, cautious strokes. Remember to change tissues every few strokes.
Attention: Never not use any pre-impregnated cleaning cloths!
4. While you are using your telescope during the night you will eventually have dew condensing on
the surfaces. This will not cause any trouble – your telescope is designed to take a little moisture
without problems. When you store the telescope, however, we recommend to wipe the surfaces
(except the optics) with a dry cloth and give the telescope some time to evaporate the water on the
optics by putting the telescope into a dry room with the lid of the mirror box open. Wait until all
water has dried o until you store the telescope.
5. If your telescope is not to be used for an extended period, perhaps for one month or more, it
is advisable to remove the batteries from the battery pack. Batteries left in the telescope for
prolonged periods may leak, causing damage.
6. Do not leave your telescope inside a sealed car on a warm summer day; excessive ambient
temperatures can damage the telescope’s internal lubrication.
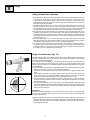
Collimation
All telescopes are collimated precisely at the factory before shipment. However – a telescope
that was disassembled has to be freshly collimated after reassembly. Collimating a telescope is a
straightforward procedure that is not very dicult. The collimation procedure is slightly dierent
from that of other Newtonian reecting telescopes, because of the "fast" f/5 to f/6 focal ratio of the
primary mirror. In typical Newtonian reectors with more conventional focal ratios (i.e. longer focal
ratios), when the observer looks down the focuser tube (without an eyepiece in the focuser), the
images of the diagonal mirror, primary mirror, focuser tube and the observer's eye appear centered
relative to each other.
However, with the short focal ratio primary mirror of this Dobsonian telescope, correct collimation
requires that the diagonal mirror be oset in 2 directions: (1) away from the focuser and (2) towards
the primary mirror, in equal amounts. This oset is approximately 1/8" in each direction. Note that
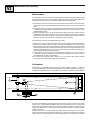
Fig. 21: Netonian reecting telescope. Spider vanes (1); secondary mirror (2); parabolic primary mirror (3); primary mirror adjustment screws (4); focuser drawtube (5); focused image (6).
VI

- 16 -
Maintenance and Cleaning
these osets have been performed at the factory prior to shipment of your telescope. It is only
necessary for you to conrm that the telescope has not been badly jarred out of collimation, and to
perform the nal ne-tuning of Step 4, below. To check and, if necessary, set the optical collimation,
follow these steps:
1. Observe through the focuser and orient your body so that the telescope's primary mirror is to
your right, and the open end of the telescope tube is to your left. The diagonal mirror will appear
centered and round as shown (Fig. 24). If the diagonal appears o center, then adjust the 3
collimation screws on the plastic diagonal mirror housing.
2. If the reection of the primary mirror (Fig. 24) is not centered on the surface of the diagonal mirror,
adjust the 3 collimation adjustment screws on the diagonal mirror housing to center the reection.
As described above, the 3 collimation screws (Fig. 22, 2) on the diagonal mirror housing are used
for two dierent adjustments during the collimation procedure.
NOTE!
Do not force the 3 screws (Fig. 22, 2) past their normal travel.
Do not rotate the collimation screws more than two full turns in a counterclockwise direction (i.e.
not more than two full turns in their "loosening" dirction), or else the diagonal mirror may become
loosened from its support. Note that the diagonal mirror collimation adjustments are very sensitive:
generally turning a collimation screw 1/2-turn will have a dramatic eect on collimation.
3. If the reection of the diagonal mirror is not centered within the reection of the primary mirror,
adjust the 3 collimation adjustment screws located on the rear of the primary mirror cell.
NOTE!
The primary mirror housing (Fig. 23) is equipped with 6 screws. The 3 large knurled screws are
collimation screws (Fig. 23, 21) and the 3 smaller knurled screws are lock screws (Fig. 23, 20). These
lock screws must be loosened before the collimation screws can be turned. Proceed by "trial and
error" until you develop a feel for which collimation screw to turn in order to change the image in
any given way.
4. Perform an actual star test to conrm the accuracy of steps 1 through 3. Using the 25mm eyepiece,
point the telescope at a moderately bright (second or third magnitude) star, and center the image
in the main telescope's eld of view.
5. Bring the star's image slowly in and out of focus until you see several disks surrounding the star's
center. If steps 1 through 3 were done correctly, you will see concentric (centered with respect to
each other) circles (Fig. 25, 1). An improperly collimated instrument will reveal oblong or elongated
circles (Fig. 25, 2). Adjust the 3 collimating screws on the primary mirror housing until the circles
are concentric on either side of the focus.
In summary, the adjustment screws on the plastic diagonal mirror housing change the tilt of the
secondary mirror so that it is correctly centered in the focuser drawtube, and so that the primary
mirror appears centered when looking into the focuser. The 3 collimating knobs on the primary
mirror change the tilt of the primary mirror so that it reects the light directly up the center of the
drawtube.
2)
2!
2) 2!
2!
2)
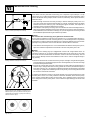
Fig. 23: Underside of rear mirror tube (primary mirror
housing). Collimation screws (20); Lock screws (21).
Fig. 22: Secondary Mirror Assembly (front and side view). Spider
vanes (1); tilt screws (2); secondary mirror holder (3).
Fig. 24: View you see while collimating the telescope (without
eyepiece inserted). Focuser drawtube (1); diagonal mirror (2);
reection of primary mirror (3); reection of secondary mirror
(darkened due to back lighting) (4); primary mirror holder (5);
reection of observer's eye (6)
Fig. 25: Correct (1) and incorrect (2) collimation as viewed du-
ring a star test.
VI

- 17 -
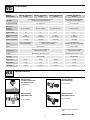
Technical data
VII
Optional accessories
VIII
BRESSER Messier
10:1 Micro reduction unit
with HEXAFOC focuser
Art. No. 0625720
BRESSER MESSIER
8X50 FINDER SCOPE
Art. No. 4900850
EXPLORE SCIENTIFIC
8X50 FINDER SCOPE
Art. No. 0620150
EXPLORE SCIENTIFIC
8X50 FINDER SCOPE 90°
Art. No. 0620160
Find more additional accessories
under
www.bresser.de
BRESSER
Messier Dobson
DOB-150 150/1200 (6")
4716416
DOB-203 203/1218 (8")
4716420
DOB-254 254/1270 (10")
4716425
Tube (OTA)
Tube made of metal with adjustable brackets and
altitude wheels made of aluminium
Secondary mirror holder four armed, steel
Main mirror
diameter/
focal length
6" (150/1200mm), 8" (203/1218mm), 10" (254/1270mm),
Aperture ration f/8 f/6 f/5
Theoretical resolving
power
0,86
arc seconds
0,74
arc seconds
0,59
arc seconds
Limiting magnitudes 12,7 mag
13,5 mag 14,0 mag
Focuser
2.0 inch Rack and pinion focuser
with 2" and
1¼"
adapter
2.5" HEXAFOC focuser, aluminium,
with 2" and 1¼" adapter
Mount Dobson system
Accessory tray
For one 2" and two 1¼" eyepieces,
installed to the front side
Eyepiece BRESSER Super-Plössl 25mm (1¼")
Viewnder 6x30 viewnder
Weight (OTA) 8.3 kg 10.9 kg 16.4 kg
Weight (Basis) 7.8 kg 9 kg 11.2 kg
Total weight 16.2 kg 19.9 kg 27.6 kg
DOB-305 305/1525 (12")
4716430
GRP tube with adjustable tube clamps
and aluminum altitude bearings
four armed, steel
12" (305/1525mm),
f/5
0,45
arc seconds
14,5 mag
2,5" HEXAFOC focuser,
aluminium, with 2" and 1 1/4" adapter
Dobson system
For one 2" and two 1¼" eyepieces,
installed to the front side
BRESSER Super-Plössl 25mm (1¼")
6x30 viewnder
18.9 kg
14.8 kg
33.7 kg

- 18 -
Entsorgung · Disposal · Elimination · Afval · Saltimento · Eliminación · Eliminação
Утилизация
IX
DE
Entsorgen Sie die Verpackungsmaterialien sortenrein. Beachten Sie
bei der Entsorgung des Geräts die aktuellen gesetzlichen Bestim-
mungen! Informationen zur fachgerechten Entsorgung erhalten Sie bei
den kommunalen Entsorgungsdienstleistern oder dem Umweltamt.
GB
Dispose of the packaging materials properly, according to their type,
such as paper or cardboard. Please take the current legal regulations
into account when disposing of your device. You can get more information
on the proper disposal from your local waste-disposal service or
environmental authority.
FR
Eliminez l’emballage en triant les matériaux. Lors de l’élimination de
l’appareil, veuillez respecter les lois applicables en la matière. Pour
plus d’informations concernant l’élimination des déchets dans le respect
des lois et réglementations applicables, veuillez vous adresser aux services
communaux en charge de la gestion des déchets.
NL
Scheid het verpakkingsmateriaal voordat u het weggooit. Let bij het
weggooien van een apparaat altijd op de huidige wet- en regelgeving.
Informatie over het correct scheiden en weggooien van afval kunt u bij uw
gemeentelijke milieudienst inwinnen.
IT
Smaltire i materiali di imballaggio in maniera dierenziata. Per lo
smaltimento dell’apparecchio osservare le disposizioni di legge
attuali. Le informazioni su uno smaltimento conforme sono disponibili
presso il servizio di smaltimento comunale o l’Agenzia per l’ambiente
locale.
ES
Elimine los materiales de embalaje separados por tipos. Por favor,
tenga en cuenta las disposiciones legales vigentes a la hora de
eliminar el aparato. Obtendrá información sobre la eliminación
reglamentaria en los proveedores de servicios de eliminación municipales
o en la agencia de protección medioambiental.
PT
Separe os materiais da embalagem. Na reciclagem do aparelho
respeite os regulamentos legais em vigor. Pode obter mais
informações sobre a reciclagem correta nos serviços municipais ou na
agência do meio ambiente.
RU
Утилизируйте упаковку как предписано законом. Элементы
питания не являются бытовыми отходами, поэтому в соответствии
с законодательными требованиями их необходимо сдавать в пункты
приема использованных элементов питания. Вы можете бесплатно
сдать использованные элементы питания в нашем магазине или
рядом с вами (например, в торговых точках или в пунктах приема).

- 19 -
DE
Die reguläre Garantiezeit beträgt 10 Jahre und beginnt am Tag des
Kaufs. Die vollständigen Garantiebedingungen sowie Informationen
zu Garantiezeitverlängerung und Serviceleistungen können Sie unter
www.bresser.de/garantiebedingungen einsehen.
GB
The regular guarantee period is 10 years and begins on the day of
purchase. You can consult the full guarantee terms as well as information
on extending the guarantee period and details of our services at
www.bresser.de/warranty_terms.
FR
La durée normale de la garantie est de 10 ans à compter du jour de l’achat.
Vous pouvez consulter l’intégralité des conditions de garantie ainsi que les
informations concernant la prolongation de la garantie et les prestations
de service sur www.bresser.de/warranty_terms.
NL
De reguliere garantieperiode bedraagt 10 jaar en begint op de dag
van aankoop. De volledige garantievoorwaarden en informatie over de
verlenging van de garantieperiode en servicediensten kunt u bekijken op
www.bresser.de/warranty_terms.
IT
La durata regolare della garanzia è di 10 anni e decorre dalla data
dell'acquisto. Le condizioni complete di garanzia e le informazioni
sull'estensione di garanzia e i servizi di assistenza sono visibili al sito
www.bresser.de/warranty_terms.
ES
El período regular de garantía es 10 anos iniciándose en el día de la compra.
Las condiciones de garantía completas así como informaciones relativas a
la ampliación de la garantía y los servicios pueden encontrarse en www.
bresser.de/warranty_terms
PT
O prazo de garantia normal perfaz 10 anos e começa no dia da compra.
Todas as condições de garantia bem como informações sobre o
prolongamento da garantia e prestações de serviço podem ser consultadas
em www.bresser.de/warranty_terms.
RU
Стандартный гарантийный срок составляет 10 года, начиная со дня
покупки. Подробные условия гарантии, информацию о расширенной
гарантии и о наших сервисных центрах можно получить на нашем сайте
www.bresser.de/warranty_terms.
Garantie & Service · Warranty and Service · Garantie et Service · Garanzia e assistenza
Garantía y servicio · Garantia e Serviço · Гарантия и обслуживание
X

Errors and technical changes reserved.
Manual_Messier-Dobson-Rockerbox_en_BRESSER_v102020a
Contact
Bresser GmbH
Gutenbergstraße 2
46414 Rhede · Germany
www.bresser.de
@BresserEurope
DE
AT
CH
BE
Bei Fragen zum Produkt und eventuellen
Reklamationen nehmen Sie bitte zunächst mit
dem Service-Center Kontakt auf, vorzugsweise
per E-Mail.
E-Mail: [email protected]
Telefon*: +49 28 72 80 74 210
BRESSER GmbH
Kundenservice
Gutenbergstr.2
46414Rhede
Deutschland
*Lokale Rufnummer in Deutschland (Die Höhe der Gebühren je
Telefonat ist abhängig vom Tarif Ihres Telefonanbieters); Anrufe aus
dem Ausland sind mit höheren Kosten verbunden.
GB
IE
Pleasecontacttheservicecentrerstforany
questions regarding the product or claims,
preferablybye-mail.
E-Mail: [email protected]
Telephone*: +44 1342 837 098
BRESSER UK Ltd.
SuiteG3,EdenHouse
EnterpriseWay
Edenbridge,KentTN86HF
United Kingdom
*NumberchargedatlocalratesintheUK(theamountyouwill
bechargedperphonecallwilldependonthetariffofyourphone
provider); calls from abroad will involve higher costs.
FR
BE
Si vous avez des questions concernant ce produit
ou en cas de réclamations, veuillez prendre
contact avec notre centre de services (de
préférence via e-mail).
E-Mail: [email protected]
Téléphone*: 0080063437000
BRESSER France SARL
Pôle d’Activités de Nicopolis
314AvenuedesChênesVerts
83170Brignoles
France
*Prix d'un appel local depuis la France ou Belgique
NL
BE
Als u met betrekking tot het product vragen
of eventuele klachten heeft kunt u contact
opnemen met het service centrum (bij voorkeur
per e-mail).
E-Mail: [email protected]
Telefoon*: +31 528 23 24 76
BRESSER Benelux
Smirnoffstraat8
7903AXHoogeveen
The Netherlands
*Het telefoonnummer wordt in het Nederland tegen lokaal tarief
in rekening gebracht. Het bedrag dat u per gesprek in rekening
gebracht zal worden, is afhankelijk van het tarief van uw telefoon
provider; gesprekken vanuit het buitenland zullen hogere kosten met
zich meebrengen.
ES
IT
PT
Si desea formular alguna pregunta sobre el
producto o alguna eventual reclamación, le
rogamos que se ponga en contacto con el centro
de servicio técnico (de preferencia por e-mail).
E-Mail: [email protected]
Teléfono*: +34916797269
BRESSER Iberia SLU
c/Valdemorillo,1NaveB
P.I.VentorrodelCano
28925AlcorcónMadrid
España
*Número local de España (el importe de cada llamada telefónica
dependen de las tarifas de los distribuidores); Las llamadas des del
extranjero están ligadas a costes suplementarios..
-
 1
1
-
 2
2
-
 3
3
-
 4
4
-
 5
5
-
 6
6
-
 7
7
-
 8
8
-
 9
9
-
 10
10
-
 11
11
-
 12
12
-
 13
13
-
 14
14
-
 15
15
-
 16
16
-
 17
17
-
 18
18
-
 19
19
-
 20
20


Bresser 4716416 Manuale del proprietario
- Categoria
- Telescopi
- Tipo
- Manuale del proprietario
- Questo manuale è adatto anche per
in altre lingue
- English: Bresser 4716416 Owner's manual
Documenti correlati
-
Bresser Messier 8'' Dobsonian Manuale del proprietario
-
Bresser Messier 6" Dobson Manuale del proprietario
-
-
-
National Geographic 76/350 Solar filter telescope Manuale del proprietario
-
Bresser 4660910 Manuale del proprietario
-
Bresser 175x Manuale del proprietario
-
-
Discovery Adventures 4410050 Manuale del proprietario