IKEA 304.756.24 FINPUTSAD Integrated Dishwasher Manuale utente
- Categoria
- Lavastoviglie
- Tipo
- Manuale utente


1x 1x
1
1 2 3 4
3sec
h
h
01 h 12 h
2 3
ON
h
3sec
h
3sec
h
3sec
h
3sec
1 2 3
1 2 3 4
ON OFF
1
1 2 3 4
3sec
h
h
01 h 12 h
2 3
ON
h
3sec
h
3sec
h
3sec
h
3sec
1 2 3
1 2 3 4
ON OFF

FINPUTSAD
www.ikea.com
1
1 2 3 4
3sec
h
h
01 h 12 h
2 3
ON
h
3sec
h
3sec
h
3sec
h
3sec
1 2 3
1 2 3 4
ON OFF
1
1 2 3 4
3sec
h
h
01 h 12 h
2 3
ON
h
3sec
h
3sec
h
3sec
h
3sec
1 2 3
1 2 3 4
ON OFF

To download the full version visit www.ikea.com
6ENGLISH
Product description
First Use
Advice regarding the rst time use
Before installation and rst usage of the appliance please
read carefully „ SAFETY and WARRANTY” and „ASSEMBLY
INSTRUCTION” guides available in the product literature bag.
Please remember to remove all transport protection parts from
the dishwasher.
Filling the salt reservoir
The use of salt prevents the formation of LIMESCALE on the
dishes andon the machine’s functional components.
• It is mandatory that THE SALT RESERVOIR BE NEVER EMPTY.
• It is important to set the water hardness.
The salt reservoir is located in the lower part of the dishwasher
(see PRODUCT DESCRIPTION) and should be lled when the
SALT REFILL indicator light
ENGLISH
7
Control panel
Product description
1. Upper rack
2. �������
3. Upper rack height adjuster
4. Upper sprayer arm
5. Lower rack
6. Cutlery basket
7. Lower sprayer arm
8. Filter Assembly
9. Salt reservoir
10. Detergent and Rinse Aid dispensers
11. Rating plate
12. Control panel
1
2
3
4
5
6
10
7
11
9
8
First use
ADVICE REGARDING THE FIRST TIME USE
After installation, remove the stoppers from the racks and the
retaining elastic elements from the upper rack.
FILLING THE SALT RESERVOIR
The use of salt prevents the formation of LIMESCALE on the
dishes andon the machine’s functional components.
• It is important that the salt reservoir be never empty.
• It is important to set the water hardness.
The salt reservoir is located in the lower part of the
dishwasher (see PRODUCT DESCRIPTION) and should be
filled when the SALT REFILL indicator light in the
control panel is lit .
1. Remove the lower rack and
unscrew the reservoir cap
(anticlockwise).
2. Only the first time you do this: fill
the salt reservoir with water.
3. Position the funnel (see figure)
and fill the salt reservoir right up
to its edge (approximately 1 kg);
it is not unusual for a little water to
leak out.
4. Remove the funnel and wipe any
salt residue away from the
opening.
1. On-Off/Reset button with indicator light
2. Program selection button
3. Salt refill indicator ligh
4. Rinse Aid refill indicator ligh
5. Program number and delay time indicator
6. Tablet indicator light
7. Display
8. Half Load indicator light
9. Half Load button
10. Delay button
11. START/Pause button with indicator light / Tab
1 2 3 4 5 6 7 8 9 10 11
3sec
h
in the control panel is lit.
1. Remove the lower rack and unscrew
the reservoir cap (anticlockwise).
2. Position the funnel (see gure) and
ll the salt reservoir right up to its
edge (approximately 1 kg); it is not
unusual for a little water to leak out.
3. Only the rst time you do this: ll
the salt reservoir with water.
4. Remove the funnel and wipe any
salt residue away from the opening.
ENGLISH
7
Control panel
Product description
1. Upper rack
2. �������
3. Upper rack height adjuster
4. Upper sprayer arm
5. Lower rack
6. Cutlery basket
7. Lower sprayer arm
8. Filter Assembly
9. Salt reservoir
10. Detergent and Rinse Aid dispensers
11. Rating plate
12. Control panel
1
2
3
4
5
6
10
7
11
9
8
First use
ADVICE REGARDING THE FIRST TIME USE
After installation, remove the stoppers from the racks and the
retaining elastic elements from the upper rack.
FILLING THE SALT RESERVOIR
The use of salt prevents the formation of LIMESCALE on the
dishes andon the machine’s functional components.
• It is important that the salt reservoir be never empty.
• It is important to set the water hardness.
The salt reservoir is located in the lower part of the
dishwasher (see PRODUCT DESCRIPTION) and should be
filled when the SALT REFILL indicator light in the
control panel is lit .
1. Remove the lower rack and
unscrew the reservoir cap
(anticlockwise).
2. Only the first time you do this: fill
the salt reservoir with water.
3. Position the funnel (see figure)
and fill the salt reservoir right up
to its edge (approximately 1 kg);
it is not unusual for a little water to
leak out.
4. Remove the funnel and wipe any
salt residue away from the
opening.
1. On-Off/Reset button with indicator light
2. Program selection button
3. Salt refill indicator ligh
4. Rinse Aid refill indicator ligh
5. Program number and delay time indicator
6. Tablet indicator light
7. Display
8. Half Load indicator light
9. Half Load button
10. Delay button
11. START/Pause button with indicator light / Tab
1 2 3 4 5 6 7 8 9 10 11
3sec
h
Make sure the cap is screwed on tightly, so that no detergent
can get into the container during the wash program (this could
damage the water softener beyond repair).
As soon as this procedure is complete, run a program without
loading.
Only use salt that has been specically designed for
dishwashers. If the salt container is not lled, the water
softener and the heating element may be damaged
as a result of limescale accumulation. Using of Salt is
recommended with any type of dishwasher detergent.
Whenever you need to add salt, it is mandatory to complete
the procedure before the beginning of the washing cycle to
avoid corrosion.
Setting the water hardness
To allow the water softener to work in a perfect way, it is
essential that the water hardness setting is based on the actual
water hardness in your house. This information can be obtained
from your local water supplier. The factory sets the default value
for the water hardness.
• Switch on the appliance by pressing the ON/OFF button.
• Switch o the appliance by pressing the ON/OFF button.
• Hold down button
ENGLISH
8
• Switch on the appliance by pressing the ON/OFF button.
• Switch off the appliance by pressing the ON/OFF button.
• Hold down button for 5 seconds, until you hear a beep.
• Switch on the appliance by pressing the ON/OFF button.
•
•
The current selection level number and the salt indicator light
������
Press button to select the desired hardness level (see
WATER HARDNESS TABLE).
• Switch off the appliance by pressing the ON/OFF button.
Setting is complete!
Water Hardness Table
Level °dH
German degrees
°fH
French degrees
1 Soft 0 - 6 0 - 10
2 Medium 7 - 11 11 - 20
3 Average 12 - 17 21 - 30
4 Hard 18 - 34 31 - 60
5 Very hard 35 - 50 61 - 90
Make sure the cap is screwed on tightly, so that no detergent can
get into the container during the wash program (this could damage
the water softener beyond repair).
As soon as this procedure is complete, run a program without
loading. The “Pre-Wash” program alone is NOT������
Residual saline solution or grains of salt can lead to corrosion,
irreparably damaging the stainless steel components.
The guarantee is not applicable if faults are caused by such
circumstances.
��������������������������������s.
��������������������������������
heating element may be damaged as a result.
Whenever you need to add salt, it is mandatory to complete
the procedure before the beginning of the washing cycle.
SETTING THE WATER HARDNESS
To allow the water softener to work in a perfect way, it is essential
that the water hardness setting is based on the actual water hard-
ness in your house. This information can be obtained from your local
water supplier. The factory setting is for average (3) water hardness.
FILLING THE RINSE AID DISPENSER
Rinse aid makes dish DRYING easier. The rinse aid dispenser A
should be lled when the RINSE AID REFILL indicator light
in the control panel is lit.
1. Open the dispenser B by pressing and pulling up the tab on
the lid.
2. Carefully introduce the rinse aid as far as the maximum
(110 ml) reference notch of the lling space - avoid spilling it.
If this happens, clean the spill immediately with a dry cloth.
3. Press the lid down until you hear a click to close it.
NEVER pour the rinse aid directly into the tub.
A
B
ADJUSTING THE DOSAGE OF RINSE AID
If you are not completely satised with the drying results, you can
adjust the quantity of rinse aid used.
• Switch the dishwasher on using the ON/OFF button.
• Switch it off using the ON/OFF button.
• Press button three times - a beep will be heard.
• Switch it on using the ON/OFF button.
•
•
The current selection level number and rinse aid indicator light ash.
Press button to select the level of rinse aid quantity to be
supplied.
• Switch it off using the ON/OFF button.
Setting is complete!
If the rinse aid level is set to ZERO (ECO), no rinse aid will be
supplied. The LOW RINSE AID indicator light will not be lit if you
run out of rinse aid. A maximum of 5 levels can be set according to
the dishwasher model. The factory setting is specic to the model,
please follow instruction above to check this for your machine.
•If you see bluish streaks on the dishes, set a low number (1-2).
• If there are drops of water or limescale marks on the dishes,
set a high number (3-4).
FILLING THE DETERGENT DISPENSER
������������������������������
dishwashers.
To achieve the best washing and drying results, the combined
useof detergent, rinse aid liquid and rened salt is required.
We recommend using detergents that do not contain phosphates
or chlorine, as these products are harmful to the environment.
Good washing results also depend on the correct amount of
detergent being used.
Exceeding the stated amount does not result in a more effective
wash and increases environmental pollution.
The amount can be adjusted to the soil level. In the case of
normally soiled items, use approximately either 35g (powder
detergent) or 35ml (liquid detergent) and additional tea spoon of
detergent directly inside the tub. If tablets are used, one tablet
will be enough.
If the crockery is only lightly soiled or if it has been rinsed with
water before being placed in the dishwasher, reduce the amount
of detergent used accordingly (minimum 25 g/ml) e.g. skip the
powder/gel putted inside the tub.
To open the detergent dispenser
press button A.
Introduce the detergent into
the dry dispenser B only.
Place the amount of detergent
for pre-washing directly inside
the tub.
A
B
1.
2.
When measuring out the detergent refer to the mentioned ear-
lier information to add the proper quantity. Inside the dispenser
B there are indications to help the detergent dosing.
Remove detergent residues from the edges of the dispenser
and close the cover until it clicks.
3. Close the lid of the detergent dispenser by pulling it up until
the closing device is secured in place.
The detergent dispenser automatically opens up at the right time
according to the program. If all-in-one detergents are used, we
recommend using the TABLET button, because it adjusts the
program so that the best washing and drying results are always
achieved.
for 5 seconds, until you hear a beep.
• Switch on the appliance by pressing quickly the ON/OFF
button.
• The current selection level number and the salt indicator light
both ash
• Press button
ENGLISH
8
• Switch on the appliance by pressing the ON/OFF button.
• Switch off the appliance by pressing the ON/OFF button.
• Hold down button for 5 seconds, until you hear a beep.
• Switch on the appliance by pressing the ON/OFF button.
•
•
The current selection level number and the salt indicator light
������
Press button to select the desired hardness level (see
WATER HARDNESS TABLE).
• Switch off the appliance by pressing the ON/OFF button.
Setting is complete!
Water Hardness Table
Level °dH
German degrees
°fH
French degrees
1 Soft 0 - 6 0 - 10
2 Medium 7 - 11 11 - 20
3 Average 12 - 17 21 - 30
4 Hard 18 - 34 31 - 60
5 Very hard 35 - 50 61 - 90
Make sure the cap is screwed on tightly, so that no detergent can
get into the container during the wash program (this could damage
the water softener beyond repair).
As soon as this procedure is complete, run a program without
loading. The “Pre-Wash” program alone is NOT������
Residual saline solution or grains of salt can lead to corrosion,
irreparably damaging the stainless steel components.
The guarantee is not applicable if faults are caused by such
circumstances.
��������������������������������s.
��������������������������������
heating element may be damaged as a result.
Whenever you need to add salt, it is mandatory to complete
the procedure before the beginning of the washing cycle.
SETTING THE WATER HARDNESS
To allow the water softener to work in a perfect way, it is essential
that the water hardness setting is based on the actual water hard-
ness in your house. This information can be obtained from your local
water supplier. The factory setting is for average (3) water hardness.
FILLING THE RINSE AID DISPENSER
Rinse aid makes dish DRYING easier. The rinse aid dispenser A
should be lled when the RINSE AID REFILL indicator light
in the control panel is lit.
1. Open the dispenser B by pressing and pulling up the tab on
the lid.
2. Carefully introduce the rinse aid as far as the maximum
(110 ml) reference notch of the lling space - avoid spilling it.
If this happens, clean the spill immediately with a dry cloth.
3. Press the lid down until you hear a click to close it.
NEVER pour the rinse aid directly into the tub.
A
B
ADJUSTING THE DOSAGE OF RINSE AID
If you are not completely satised with the drying results, you can
adjust the quantity of rinse aid used.
• Switch the dishwasher on using the ON/OFF button.
• Switch it off using the ON/OFF button.
• Press button three times - a beep will be heard.
• Switch it on using the ON/OFF button.
•
•
The current selection level number and rinse aid indicator light ash.
Press button to select the level of rinse aid quantity to be
supplied.
• Switch it off using the ON/OFF button.
Setting is complete!
If the rinse aid level is set to ZERO (ECO), no rinse aid will be
supplied. The LOW RINSE AID indicator light will not be lit if you
run out of rinse aid. A maximum of 5 levels can be set according to
the dishwasher model. The factory setting is specic to the model,
please follow instruction above to check this for your machine.
•If you see bluish streaks on the dishes, set a low number (1-2).
• If there are drops of water or limescale marks on the dishes,
set a high number (3-4).
FILLING THE DETERGENT DISPENSER
������������������������������
dishwashers.
To achieve the best washing and drying results, the combined
useof detergent, rinse aid liquid and rened salt is required.
We recommend using detergents that do not contain phosphates
or chlorine, as these products are harmful to the environment.
Good washing results also depend on the correct amount of
detergent being used.
Exceeding the stated amount does not result in a more effective
wash and increases environmental pollution.
The amount can be adjusted to the soil level. In the case of
normally soiled items, use approximately either 35g (powder
detergent) or 35ml (liquid detergent) and additional tea spoon of
detergent directly inside the tub. If tablets are used, one tablet
will be enough.
If the crockery is only lightly soiled or if it has been rinsed with
water before being placed in the dishwasher, reduce the amount
of detergent used accordingly (minimum 25 g/ml) e.g. skip the
powder/gel putted inside the tub.
To open the detergent dispenser
press button A.
Introduce the detergent into
the dry dispenser B only.
Place the amount of detergent
for pre-washing directly inside
the tub.
A
B
1.
2.
When measuring out the detergent refer to the mentioned ear-
lier information to add the proper quantity. Inside the dispenser
B there are indications to help the detergent dosing.
Remove detergent residues from the edges of the dispenser
and close the cover until it clicks.
3. Close the lid of the detergent dispenser by pulling it up until
the closing device is secured in place.
The detergent dispenser automatically opens up at the right time
according to the program. If all-in-one detergents are used, we
recommend using the TABLET button, because it adjusts the
program so that the best washing and drying results are always
achieved.
to select the desired hardness level (see
WATER HARDNESS TABLE).
• Switch o the appliance by pressing the ON/OFF button.
Setting is complete!
Water Hardness Table
Level °dH
German
degrees
°fH
French
degrees
°Clark
English
degrees
1Soft 0 - 6 0 - 10 0 - 7
2Medium 7 - 11 11 - 20 8 - 14
3Average 12 - 16 21 - 29 15 - 20
4 Hard 17 - 34 30 - 60 21 - 42
5Very hard 35 - 50 61 - 90 43 - 62
Water Softening System
Water softener automatically reduces water hardness, conse
quently preventing scale buildup on heater, contributing also to
better cleaning eciency.
This system regenerates itself with salt, therefore it is required
to rell salt container when empty.
Frequency of regeneration depends on water hardness level
setting regeneration takes place once per 5 Eco cycles with
water hardness level set to 3.
Regeneration process starts in nal rinse and nishes in drying
phase, before cycle ends.
* Single regeneration consumes: ~3.5 L of water;
* Takes up to 5 additional minutes for the cycle;
* Consumes below 0.005 kWh of energy.
4
2
7
8
10
1
3
5
6
9
11
0000 000 00000
Service:
1 Upper rack
2 Cutlery rack
3 Foldable aps
4 Upper rack height adjuster
5 Upper sprayer arm
6 Lower rack
7 Lower sprayer arm
8 Filter Assembly
9 Salt reservoir
10 Detergent and Rinse Aid dispensers
11 Control pannel

To download the full version visit www.ikea.com
7ENGLISH
Filling the rinse aid dispenser
Rinse aid makes dish DRYING easier. The rinse aid dispenser A
should be lled when the RINSE AID REFILL indicator light
ENGLISH
7
Control panel
Product description
1. Upper rack
2. �������
3. Upper rack height adjuster
4. Upper sprayer arm
5. Lower rack
6. Cutlery basket
7. Lower sprayer arm
8. Filter Assembly
9. Salt reservoir
10. Detergent and Rinse Aid dispensers
11. Rating plate
12. Control panel
1
2
3
4
5
6
10
7
11
9
8
First use
ADVICE REGARDING THE FIRST TIME USE
After installation, remove the stoppers from the racks and the
retaining elastic elements from the upper rack.
FILLING THE SALT RESERVOIR
The use of salt prevents the formation of LIMESCALE on the
dishes andon the machine’s functional components.
• It is important that the salt reservoir be never empty.
• It is important to set the water hardness.
The salt reservoir is located in the lower part of the
dishwasher (see PRODUCT DESCRIPTION) and should be
filled when the SALT REFILL indicator light in the
control panel is lit .
1. Remove the lower rack and
unscrew the reservoir cap
(anticlockwise).
2. Only the first time you do this: fill
the salt reservoir with water.
3. Position the funnel (see figure)
and fill the salt reservoir right up
to its edge (approximately 1 kg);
it is not unusual for a little water to
leak out.
4. Remove the funnel and wipe any
salt residue away from the
opening.
1. On-Off/Reset button with indicator light
2. Program selection button
3. Salt refill indicator ligh
4. Rinse Aid refill indicator ligh
5. Program number and delay time indicator
6. Tablet indicator light
7. Display
8. Half Load indicator light
9. Half Load button
10. Delay button
11. START/Pause button with indicator light / Tab
1 2 3 4 5 6 7 8 9 10 11
3sec
h
in
the control panel is lit.
A
B
BA
1. Open the dispenser B by pressing and pulling up the tab on
the lid.
2. Carefully introduce the rinse aid as far as the maximum (110
ml) reference notch of the lling space avoid spilling it. If this
happens, clean the spill immediately with a dry cloth.
3. Press the lid down until you hear a click to close it.
NEVER pour the rinse aid directly into the tub.
Adjusting the dosage of rinse aid
If you are not completely satised with the drying results, you
can adjust the quantity of rinse aid used.
• Switch the dishwasher on using the ON/OFF button.
• Switch it o using the ON/OFF button.
• Press button
ENGLISH
8
• Switch on the appliance by pressing the ON/OFF button.
• Switch off the appliance by pressing the ON/OFF button.
• Hold down button for 5 seconds, until you hear a beep.
• Switch on the appliance by pressing the ON/OFF button.
•
•
The current selection level number and the salt indicator light
������
Press button to select the desired hardness level (see
WATER HARDNESS TABLE).
• Switch off the appliance by pressing the ON/OFF button.
Setting is complete!
Water Hardness Table
Level °dH
German degrees
°fH
French degrees
1 Soft 0 - 6 0 - 10
2 Medium 7 - 11 11 - 20
3 Average 12 - 17 21 - 30
4 Hard 18 - 34 31 - 60
5 Very hard 35 - 50 61 - 90
Make sure the cap is screwed on tightly, so that no detergent can
get into the container during the wash program (this could damage
the water softener beyond repair).
As soon as this procedure is complete, run a program without
loading. The “Pre-Wash” program alone is NOT������
Residual saline solution or grains of salt can lead to corrosion,
irreparably damaging the stainless steel components.
The guarantee is not applicable if faults are caused by such
circumstances.
��������������������������������s.
��������������������������������
heating element may be damaged as a result.
Whenever you need to add salt, it is mandatory to complete
the procedure before the beginning of the washing cycle.
SETTING THE WATER HARDNESS
To allow the water softener to work in a perfect way, it is essential
that the water hardness setting is based on the actual water hard-
ness in your house. This information can be obtained from your local
water supplier. The factory setting is for average (3) water hardness.
FILLING THE RINSE AID DISPENSER
Rinse aid makes dish DRYING easier. The rinse aid dispenser A
should be lled when the RINSE AID REFILL indicator light
in the control panel is lit.
1. Open the dispenser B by pressing and pulling up the tab on
the lid.
2. Carefully introduce the rinse aid as far as the maximum
(110 ml) reference notch of the lling space - avoid spilling it.
If this happens, clean the spill immediately with a dry cloth.
3. Press the lid down until you hear a click to close it.
NEVER pour the rinse aid directly into the tub.
A
B
ADJUSTING THE DOSAGE OF RINSE AID
If you are not completely satised with the drying results, you can
adjust the quantity of rinse aid used.
• Switch the dishwasher on using the ON/OFF button.
• Switch it off using the ON/OFF button.
• Press button three times - a beep will be heard.
• Switch it on using the ON/OFF button.
•
•
The current selection level number and rinse aid indicator light ash.
Press button to select the level of rinse aid quantity to be
supplied.
• Switch it off using the ON/OFF button.
Setting is complete!
If the rinse aid level is set to ZERO (ECO), no rinse aid will be
supplied. The LOW RINSE AID indicator light will not be lit if you
run out of rinse aid. A maximum of 5 levels can be set according to
the dishwasher model. The factory setting is specic to the model,
please follow instruction above to check this for your machine.
•If you see bluish streaks on the dishes, set a low number (1-2).
• If there are drops of water or limescale marks on the dishes,
set a high number (3-4).
FILLING THE DETERGENT DISPENSER
������������������������������
dishwashers.
To achieve the best washing and drying results, the combined
useof detergent, rinse aid liquid and rened salt is required.
We recommend using detergents that do not contain phosphates
or chlorine, as these products are harmful to the environment.
Good washing results also depend on the correct amount of
detergent being used.
Exceeding the stated amount does not result in a more effective
wash and increases environmental pollution.
The amount can be adjusted to the soil level. In the case of
normally soiled items, use approximately either 35g (powder
detergent) or 35ml (liquid detergent) and additional tea spoon of
detergent directly inside the tub. If tablets are used, one tablet
will be enough.
If the crockery is only lightly soiled or if it has been rinsed with
water before being placed in the dishwasher, reduce the amount
of detergent used accordingly (minimum 25 g/ml) e.g. skip the
powder/gel putted inside the tub.
To open the detergent dispenser
press button A.
Introduce the detergent into
the dry dispenser B only.
Place the amount of detergent
for pre-washing directly inside
the tub.
A
B
1.
2.
When measuring out the detergent refer to the mentioned ear-
lier information to add the proper quantity. Inside the dispenser
B there are indications to help the detergent dosing.
Remove detergent residues from the edges of the dispenser
and close the cover until it clicks.
3. Close the lid of the detergent dispenser by pulling it up until
the closing device is secured in place.
The detergent dispenser automatically opens up at the right time
according to the program. If all-in-one detergents are used, we
recommend using the TABLET button, because it adjusts the
program so that the best washing and drying results are always
achieved.
three times a beep will be heard.
• Switch it on using the ON/OFF button.
• The current selection level number and rinse aid indicator
light ash.
• Press button
ENGLISH
8
• Switch on the appliance by pressing the ON/OFF button.
• Switch off the appliance by pressing the ON/OFF button.
• Hold down button for 5 seconds, until you hear a beep.
• Switch on the appliance by pressing the ON/OFF button.
•
•
The current selection level number and the salt indicator light
������
Press button to select the desired hardness level (see
WATER HARDNESS TABLE).
• Switch off the appliance by pressing the ON/OFF button.
Setting is complete!
Water Hardness Table
Level °dH
German degrees
°fH
French degrees
1 Soft 0 - 6 0 - 10
2 Medium 7 - 11 11 - 20
3 Average 12 - 17 21 - 30
4 Hard 18 - 34 31 - 60
5 Very hard 35 - 50 61 - 90
Make sure the cap is screwed on tightly, so that no detergent can
get into the container during the wash program (this could damage
the water softener beyond repair).
As soon as this procedure is complete, run a program without
loading. The “Pre-Wash” program alone is NOT������
Residual saline solution or grains of salt can lead to corrosion,
irreparably damaging the stainless steel components.
The guarantee is not applicable if faults are caused by such
circumstances.
��������������������������������s.
��������������������������������
heating element may be damaged as a result.
Whenever you need to add salt, it is mandatory to complete
the procedure before the beginning of the washing cycle.
SETTING THE WATER HARDNESS
To allow the water softener to work in a perfect way, it is essential
that the water hardness setting is based on the actual water hard-
ness in your house. This information can be obtained from your local
water supplier. The factory setting is for average (3) water hardness.
FILLING THE RINSE AID DISPENSER
Rinse aid makes dish DRYING easier. The rinse aid dispenser A
should be lled when the RINSE AID REFILL indicator light
in the control panel is lit.
1. Open the dispenser B by pressing and pulling up the tab on
the lid.
2. Carefully introduce the rinse aid as far as the maximum
(110 ml) reference notch of the lling space - avoid spilling it.
If this happens, clean the spill immediately with a dry cloth.
3. Press the lid down until you hear a click to close it.
NEVER pour the rinse aid directly into the tub.
A
B
ADJUSTING THE DOSAGE OF RINSE AID
If you are not completely satised with the drying results, you can
adjust the quantity of rinse aid used.
• Switch the dishwasher on using the ON/OFF button.
• Switch it off using the ON/OFF button.
• Press button three times - a beep will be heard.
• Switch it on using the ON/OFF button.
•
•
The current selection level number and rinse aid indicator light ash.
Press button to select the level of rinse aid quantity to be
supplied.
• Switch it off using the ON/OFF button.
Setting is complete!
If the rinse aid level is set to ZERO (ECO), no rinse aid will be
supplied. The LOW RINSE AID indicator light will not be lit if you
run out of rinse aid. A maximum of 5 levels can be set according to
the dishwasher model. The factory setting is specic to the model,
please follow instruction above to check this for your machine.
•If you see bluish streaks on the dishes, set a low number (1-2).
• If there are drops of water or limescale marks on the dishes,
set a high number (3-4).
FILLING THE DETERGENT DISPENSER
������������������������������
dishwashers.
To achieve the best washing and drying results, the combined
useof detergent, rinse aid liquid and rened salt is required.
We recommend using detergents that do not contain phosphates
or chlorine, as these products are harmful to the environment.
Good washing results also depend on the correct amount of
detergent being used.
Exceeding the stated amount does not result in a more effective
wash and increases environmental pollution.
The amount can be adjusted to the soil level. In the case of
normally soiled items, use approximately either 35g (powder
detergent) or 35ml (liquid detergent) and additional tea spoon of
detergent directly inside the tub. If tablets are used, one tablet
will be enough.
If the crockery is only lightly soiled or if it has been rinsed with
water before being placed in the dishwasher, reduce the amount
of detergent used accordingly (minimum 25 g/ml) e.g. skip the
powder/gel putted inside the tub.
To open the detergent dispenser
press button A.
Introduce the detergent into
the dry dispenser B only.
Place the amount of detergent
for pre-washing directly inside
the tub.
A
B
1.
2.
When measuring out the detergent refer to the mentioned ear-
lier information to add the proper quantity. Inside the dispenser
B there are indications to help the detergent dosing.
Remove detergent residues from the edges of the dispenser
and close the cover until it clicks.
3. Close the lid of the detergent dispenser by pulling it up until
the closing device is secured in place.
The detergent dispenser automatically opens up at the right time
according to the program. If all-in-one detergents are used, we
recommend using the TABLET button, because it adjusts the
program so that the best washing and drying results are always
achieved.
to select the level of rinse aid quantity to be
supplied.
• Switch it o using the ON/OFF button.
Setting is complete!
If the rinse aid level is set to ZERO (ECO), no rinse aid will be
supplied. The LOW RINSE AID indicator light will not be lit if you
run out of rinse aid. A maximum of 5 levels can be set according
to the dishwasher model. The factory setting is specic to the
model, please follow instruction above to check this for your
machine.
• If you see bluish streaks on the dishes, set a low number (12).
• If there are drops of water or limescale marks on the dishes,
set a high number (34).
Filling the detergent dispenser
Usage of detergent not designed for dishwashers may cause
malfunction or damage to the appliance.
To open the detergent dispenser press button C.
Introduce the detergent into the dry dispenser D only.
Place the amount of detergent for
pre-washing directly inside the tub.
ENGLISH
8
• Switch on the appliance by pressing the ON/OFF button.
• Switch off the appliance by pressing the ON/OFF button.
• Hold down button for 5 seconds, until you hear a beep.
• Switch on the appliance by pressing the ON/OFF button.
•
•
The current selection level number and the salt indicator light
������
Press button to select the desired hardness level (see
WATER HARDNESS TABLE).
• Switch off the appliance by pressing the ON/OFF button.
Setting is complete!
Water Hardness Table
Level °dH
German degrees
°fH
French degrees
1 Soft 0 - 6 0 - 10
2 Medium 7 - 11 11 - 20
3 Average 12 - 17 21 - 30
4 Hard 18 - 34 31 - 60
5 Very hard 35 - 50 61 - 90
Make sure the cap is screwed on tightly, so that no detergent can
get into the container during the wash program (this could damage
the water softener beyond repair).
As soon as this procedure is complete, run a program without
loading. The “Pre-Wash” program alone is NOT������
Residual saline solution or grains of salt can lead to corrosion,
irreparably damaging the stainless steel components.
The guarantee is not applicable if faults are caused by such
circumstances.
��������������������������������s.
��������������������������������
heating element may be damaged as a result.
Whenever you need to add salt, it is mandatory to complete
the procedure before the beginning of the washing cycle.
SETTING THE WATER HARDNESS
To allow the water softener to work in a perfect way, it is essential
that the water hardness setting is based on the actual water hard-
ness in your house. This information can be obtained from your local
water supplier. The factory setting is for average (3) water hardness.
FILLING THE RINSE AID DISPENSER
Rinse aid makes dish DRYING easier. The rinse aid dispenser A
should be lled when the RINSE AID REFILL indicator light
in the control panel is lit.
1. Open the dispenser B by pressing and pulling up the tab on
the lid.
2. Carefully introduce the rinse aid as far as the maximum
(110 ml) reference notch of the lling space - avoid spilling it.
If this happens, clean the spill immediately with a dry cloth.
3. Press the lid down until you hear a click to close it.
NEVER pour the rinse aid directly into the tub.
A
B
ADJUSTING THE DOSAGE OF RINSE AID
If you are not completely satised with the drying results, you can
adjust the quantity of rinse aid used.
• Switch the dishwasher on using the ON/OFF button.
• Switch it off using the ON/OFF button.
• Press button three times - a beep will be heard.
• Switch it on using the ON/OFF button.
•
•
The current selection level number and rinse aid indicator light ash.
Press button to select the level of rinse aid quantity to be
supplied.
• Switch it off using the ON/OFF button.
Setting is complete!
If the rinse aid level is set to ZERO (ECO), no rinse aid will be
supplied. The LOW RINSE AID indicator light will not be lit if you
run out of rinse aid. A maximum of 5 levels can be set according to
the dishwasher model. The factory setting is specic to the model,
please follow instruction above to check this for your machine.
•If you see bluish streaks on the dishes, set a low number (1-2).
• If there are drops of water or limescale marks on the dishes,
set a high number (3-4).
FILLING THE DETERGENT DISPENSER
������������������������������
dishwashers.
To achieve the best washing and drying results, the combined
useof detergent, rinse aid liquid and rened salt is required.
We recommend using detergents that do not contain phosphates
or chlorine, as these products are harmful to the environment.
Good washing results also depend on the correct amount of
detergent being used.
Exceeding the stated amount does not result in a more effective
wash and increases environmental pollution.
The amount can be adjusted to the soil level. In the case of
normally soiled items, use approximately either 35g (powder
detergent) or 35ml (liquid detergent) and additional tea spoon of
detergent directly inside the tub. If tablets are used, one tablet
will be enough.
If the crockery is only lightly soiled or if it has been rinsed with
water before being placed in the dishwasher, reduce the amount
of detergent used accordingly (minimum 25 g/ml) e.g. skip the
powder/gel putted inside the tub.
To open the detergent dispenser
press button A.
Introduce the detergent into
the dry dispenser B only.
Place the amount of detergent
for pre-washing directly inside
the tub.
A
B
1.
2.
When measuring out the detergent refer to the mentioned ear-
lier information to add the proper quantity. Inside the dispenser
B there are indications to help the detergent dosing.
Remove detergent residues from the edges of the dispenser
and close the cover until it clicks.
3. Close the lid of the detergent dispenser by pulling it up until
the closing device is secured in place.
The detergent dispenser automatically opens up at the right time
according to the program. If all-in-one detergents are used, we
recommend using the TABLET button, because it adjusts the
program so that the best washing and drying results are always
achieved.
D
C
1. When measuring out the detergent refer to the mentioned
earlier information to add the proper quantity. Inside the
dispenser D there are indications to help the detergent
dosing.
2. Remove detergent residues from the edges of the dispenser
and close the cover until it clicks.
3. Close the lid of the detergent dispenser by pulling it up until
the closing device is secured in place.
The detergent dispenser automatically opens up at the right
time according to the program. If allinone detergents are used,
we recommend using the TABLET button, because it adjusts the
program so that the best washing and drying results are always
achieved.
Control panel
1 2 3 4 5 6 8 9 10 11 12 13
7
2
65°
1
50°
56
10 PROGRAMS
3
50°
4
45°
7
50°
8
65°
10
50°-60° 50°
9
65°
h
3sec
1 OnO/Reset button with indicator light
2 Program selection button
3 Salt rell indicator ligh
4 Rinse Aid rell indicator ligh
5 Program number and delay time indicator
6 Tablet indicator light
7 Display
8 Flexible Wash indicator light
9 Flexible Wash button
10 Delay button
11 Short Time button with indicator light
12 Extra Dry button with indicator light
13 START/Pause button with indicator light / Tab

To download the full version visit www.ikea.com
8ENGLISH
EN
11
OPTIONS AND FUNCTIONS
OPTIONS can be selected directly by pressing the corresponding button (see CONTROL PANEL).
If an option is not compatible with the selected program see PROGRAMS TABLE, the corresponding LED ashes rapidly 3 times
and beeps will sound. The option will not be enabled.
TABLET (Tab)
This setting allows you to optimize the performance of
the program according to the type of detergent used.
Press the START/PAUSE button for 3 seconds (the
corresponding symbol will light up) if you use combined
detergents in tablet form (rinse aid, salt and detergent in
1 dose).
If you use powder or liquid detergent, this option
should be off.
NaturalDry
NaturalDry is a convection drying system which automatically
opens the door during/after drying phase to ensure exceptional
drying performance every day. Door opens at the temperature
that is safe to your kitchen furniture, thus door will not be opened
when the option of SHORT TIME is on.
As additional steam protection, special designed protection foil is
added together with the dishwasher. To see how to mount protec-
tion foil please refer to (INSTALLATION GUIDE).
NaturalDry functionality could be disabled by the user as follows:
1. Go to the Dishwasher software menu pressing and holding
button (6 sec).
2. You are currently in Light Control Menu (please refer to
OPERATION INDICATOR description), if you don’t want to
change anything please press and hold button (until one of
the two letters appears on the display)
3. You switched to NaturalDry Control Menu, you could change
status of NaturalDry functionality by pressing button:
E – enabled d – disabled
To conrm the change and exit from the Control Menu please
press and hold button (3 sec).
DELAY
The start time of the program may be delayed for a period
of time between 1 and 12 hours.
1. Press the DELAY button: the corresponding «h» symbol
appears on the display; each time you press the button,
the time (1h, 2h, etc. up to max. 12h) from the start of
the selected wash cycle will be increased.
2. Select the wash program, press the START/PAUSE
button and within 4 seconds close the door: the timer
will begin counting down.
3. Once this time has elapsed, the indicator light «h»
switches off and the wash cycle begins.
To adjust the delay time and select a shorter period of time,
press the DELAY button. To cancel it, press the button
repeatedly until the selected delayed start indicator light
«h» switches off.
The DELAY function cannot be set once a wash cycle
has been started.
FLEXI WASH
If there are not many dishes to be washed, a half loading
may be used in order to save water, electricity and
detergent.
Select the program and then press the FLEXI WASH button:
the symbol of the chosen rack will appear on the display.
By default the appliance washes dishes in all racks.
To wash only the specic rack, press this button repeatedly:
shown on the display (only lower rack)
shown on the display (only upper rack)
shown on the display (only cutlery rack)
shown on the display (option is OFF and the appliance will
wash dishes in all racks).
Remember to load the upper or lower rack only, and to
reduce the amount of detergent accordingly.
If upper rack is removed, please apply detergent
directly to tub instead of detergent dispenser.
SHORT TIME
This option can be used to reduce the duration of the main
programs while maintaining the same washing and drying
performance levels.
After selecting the program, press the SHORT TIME button
and the indicator light will switch on. To deselect the option,
press the same button again.
EXTRA DRY
To improve the drying of the dishes, after selecting the
program, press the EXTRA DRY button and the indicator
light comes on.
A higher temperature during the nal rinse and an extended
drying phase allow for improving drying. To deselect the
option, press the same button again. The EXTRA DRY
option results in the lengthening of the wash cycle.
OPERATION INDICATOR
A LED light projected on the oor indicates that the
dishwasher is working. One of the following operating
modes can be selected:
a) Disabled function.
b) When the cycle starts the light goes on for few seconds,
stays off during the cycle and ashes at the end of the
cycle.
c) The light stays on during the cycle and ashes at the
end of the cycle (default mode).
If the delayed start was set, the light goes on either for the
rst few seconds or the entire duration of the countdown,
based on whether mode b) or c) was set.
The light goes off every time the door is opened. To select
the mode you prefer, switch on the machine, hold down
button P until one of the three letters appears on the display,
press button P until you reach the desired letter (or mode),
hold down button P to conrm the selection.
Note: If NaturalDry is active and it opens the door, then
Operation Indicator will not ash at the end of cycle.
FLEXIBLE WASH
If there are not many dishes to be washed, a half
loading may be used in order to save water, electricity
and detergent.
By default the appliance washes dishes in all racks.
To wash only the specic rack, press this button
repeatedly:
EN
11
OPTIONS AND FUNCTIONS
OPTIONS can be selected directly by pressing the corresponding button (see CONTROL PANEL).
If an option is not compatible with the selected program see PROGRAMS TABLE, the corresponding LED ashes rapidly 3 times
and beeps will sound. The option will not be enabled.
TABLET (Tab)
This setting allows you to optimize the performance of
the program according to the type of detergent used.
Press the START/PAUSE button for 3 seconds (the
corresponding symbol will light up) if you use combined
detergents in tablet form (rinse aid, salt and detergent in
1 dose).
If you use powder or liquid detergent, this option
should be off.
NaturalDry
NaturalDry is a convection drying system which automatically
opens the door during/after drying phase to ensure exceptional
drying performance every day. Door opens at the temperature
that is safe to your kitchen furniture, thus door will not be opened
when the option of SHORT TIME is on.
As additional steam protection, special designed protection foil is
added together with the dishwasher. To see how to mount protec-
tion foil please refer to (INSTALLATION GUIDE).
NaturalDry functionality could be disabled by the user as follows:
1. Go to the Dishwasher software menu pressing and holding
button (6 sec).
2. You are currently in Light Control Menu (please refer to
OPERATION INDICATOR description), if you don’t want to
change anything please press and hold button (until one of
the two letters appears on the display)
3. You switched to NaturalDry Control Menu, you could change
status of NaturalDry functionality by pressing button:
E – enabled d – disabled
To conrm the change and exit from the Control Menu please
press and hold button (3 sec).
DELAY
The start time of the program may be delayed for a period
of time between 1 and 12 hours.
1. Press the DELAY button: the corresponding «h» symbol
appears on the display; each time you press the button,
the time (1h, 2h, etc. up to max. 12h) from the start of
the selected wash cycle will be increased.
2. Select the wash program, press the START/PAUSE
button and within 4 seconds close the door: the timer
will begin counting down.
3. Once this time has elapsed, the indicator light «h»
switches off and the wash cycle begins.
To adjust the delay time and select a shorter period of time,
press the DELAY button. To cancel it, press the button
repeatedly until the selected delayed start indicator light
«h» switches off.
The DELAY function cannot be set once a wash cycle
has been started.
FLEXI WASH
If there are not many dishes to be washed, a half loading
may be used in order to save water, electricity and
detergent.
Select the program and then press the FLEXI WASH button:
the symbol of the chosen rack will appear on the display.
By default the appliance washes dishes in all racks.
To wash only the specic rack, press this button repeatedly:
shown on the display (only lower rack)
shown on the display (only upper rack)
shown on the display (only cutlery rack)
shown on the display (option is OFF and the appliance will
wash dishes in all racks).
Remember to load the upper or lower rack only, and to
reduce the amount of detergent accordingly.
If upper rack is removed, please apply detergent
directly to tub instead of detergent dispenser.
SHORT TIME
This option can be used to reduce the duration of the main
programs while maintaining the same washing and drying
performance levels.
After selecting the program, press the SHORT TIME button
and the indicator light will switch on. To deselect the option,
press the same button again.
EXTRA DRY
To improve the drying of the dishes, after selecting the
program, press the EXTRA DRY button and the indicator
light comes on.
A higher temperature during the nal rinse and an extended
drying phase allow for improving drying. To deselect the
option, press the same button again. The EXTRA DRY
option results in the lengthening of the wash cycle.
OPERATION INDICATOR
A LED light projected on the oor indicates that the
dishwasher is working. One of the following operating
modes can be selected:
a) Disabled function.
b) When the cycle starts the light goes on for few seconds,
stays off during the cycle and ashes at the end of the
cycle.
c) The light stays on during the cycle and ashes at the
end of the cycle (default mode).
If the delayed start was set, the light goes on either for the
rst few seconds or the entire duration of the countdown,
based on whether mode b) or c) was set.
The light goes off every time the door is opened. To select
the mode you prefer, switch on the machine, hold down
button P until one of the three letters appears on the display,
press button P until you reach the desired letter (or mode),
hold down button P to conrm the selection.
Note: If NaturalDry is active and it opens the door, then
Operation Indicator will not ash at the end of cycle.
shown on the display (only lower rack)
shown on the display (only upper rack)
shown on the display (only cutlery rack)
shown on the display (option is OFF and the appliance
will wash dishes in all racks).
9
ENGLISH
1. Press the DELAY button: the corresponding «h» symbol
appears on the display; each time you press the button,
the time (1h, 2h, etc. up to max. 12h) from the start of
the selected wash cycle will be increased.
2. Select the wash program, press the START/PAUSE
button and within 4 seconds close the door: the timer
will begin counting down.
3. Once this time has elapsed, the indicator light «h»
switches off and the wash cycle begins.
To adjust the delay time and select a shorter period of time,
press the DELAY button. To cancel it, press the button
repeatedly until the selected delayed start indicator light
«h» switches off.
The DELAY function cannot be set once a wash cycle
has been started.
NaturalDry
Door opening system NaturalDry is a convection drying system
which automatically opens the door during/after drying phase to
ensure exceptional drying performance every day. Door opens at
the temperature that is safe to your kitchen furniture.
As additional steam protection, special designed protection foil is
added together with the dishwasher. To see how to mount protec-
tion foil please refer to (INSTALLATION GUIDE).
NaturalDry functionality could be disabled by the user as follows:
1. Go to the Dishwasher software menu pressing and holding
button (6 sec).
2. You switched to NaturalDry Control Menu, you could change
status of NaturalDry functionality by pressing button:
E – enabled d – disabled
To conrm the change and exit from the Control Menu please
press and hold button (3 sec).
DELAY
The start time of the program may be delayed for a period
of time between 1 and 12 hours.
Program
Drying
phase
Natural
Dry
Available
options *)
Duration of
wash pro-
gram
(h:min)**)
Water
consumption
(litres/cycle)
Energy
consumption
(kWh/cycle)
50° 2:45 12.0 0.92
1 Eco
2 Conventional
wash and dry 55° 2:00 15.0 1.35
3Intensive 65° - 2:30 15.0 1.50
4Fast 50° -- 0:55 11.5 1.10
5Sanitizing 65° - 1:40 11.5 1.30
6Pre-Wash
-
-- 0:10 4.5 0.01
7Self-Clean 65° --0:50 8.0 0.80
ECO program data is measured under laboratory conditions according to European Standard EN 60436:2019.
Note for Test Laboratories: For information on comparative EN testing conditions, please send an email to the following
address: [email protected]
Pre-treatment of the dishes is not needed before any of the programs.
*) Not all options can be used simultaneously.
**) Values given for programes other than the eco program are indicative only. The actual time may vary depending on many
factors such as temperature and pressure of the incoming water, room temperature, amount of detergent, quantity and type of
load, load balancing, additional selected options and sensor calibration.
Standby consumption: Left-on mode consumption: 5 W - Off mode consumption: 0.5 W
PROGRAMS DESCRIPTION
DELAY
The start time of the program may be delayed for a
period of time between 1 and 12 hours.
1. Press the DELAY button: the corresponding «h»
symbol appears on the display; each time you press
the button, the time (1h, 2h, etc. up to max. 12h) from
the start of the selected wash cycle will be increased.
2. Select the wash program, press the START/PAUSE
button and within 4 seconds close the door: the timer
will begin counting down.
3. Once this time has elapsed, the indicator light «h»
switches o and the wash cycle begins.
To adjust the delay time and select a shorter period
of time, press the DELAY button. To cancel it, press
the button repeatedly until the selected delayed start
indicator light «h» switches o.
The DELAY function cannot be set once a wash
cycle has been started.
EN
11
OPTIONS AND FUNCTIONS
OPTIONS can be selected directly by pressing the corresponding button (see CONTROL PANEL).
If an option is not compatible with the selected program see PROGRAMS TABLE, the corresponding LED ashes rapidly 3 times
and beeps will sound. The option will not be enabled.
TABLET (Tab)
This setting allows you to optimize the performance of
the program according to the type of detergent used.
Press the START/PAUSE button for 3 seconds (the
corresponding symbol will light up) if you use combined
detergents in tablet form (rinse aid, salt and detergent in
1 dose).
If you use powder or liquid detergent, this option
should be off.
NaturalDry
NaturalDry is a convection drying system which automatically
opens the door during/after drying phase to ensure exceptional
drying performance every day. Door opens at the temperature
that is safe to your kitchen furniture, thus door will not be opened
when the option of SHORT TIME is on.
As additional steam protection, special designed protection foil is
added together with the dishwasher. To see how to mount protec-
tion foil please refer to (INSTALLATION GUIDE).
NaturalDry functionality could be disabled by the user as follows:
1. Go to the Dishwasher software menu pressing and holding
button (6 sec).
2. You are currently in Light Control Menu (please refer to
OPERATION INDICATOR description), if you don’t want to
change anything please press and hold button (until one of
the two letters appears on the display)
3. You switched to NaturalDry Control Menu, you could change
status of NaturalDry functionality by pressing button:
E – enabled d – disabled
To conrm the change and exit from the Control Menu please
press and hold button (3 sec).
DELAY
The start time of the program may be delayed for a period
of time between 1 and 12 hours.
1. Press the DELAY button: the corresponding «h» symbol
appears on the display; each time you press the button,
the time (1h, 2h, etc. up to max. 12h) from the start of
the selected wash cycle will be increased.
2. Select the wash program, press the START/PAUSE
button and within 4 seconds close the door: the timer
will begin counting down.
3. Once this time has elapsed, the indicator light «h»
switches off and the wash cycle begins.
To adjust the delay time and select a shorter period of time,
press the DELAY button. To cancel it, press the button
repeatedly until the selected delayed start indicator light
«h» switches off.
The DELAY function cannot be set once a wash cycle
has been started.
FLEXI WASH
If there are not many dishes to be washed, a half loading
may be used in order to save water, electricity and
detergent.
Select the program and then press the FLEXI WASH button:
the symbol of the chosen rack will appear on the display.
By default the appliance washes dishes in all racks.
To wash only the specic rack, press this button repeatedly:
shown on the display (only lower rack)
shown on the display (only upper rack)
shown on the display (only cutlery rack)
shown on the display (option is OFF and the appliance will
wash dishes in all racks).
Remember to load the upper or lower rack only, and to
reduce the amount of detergent accordingly.
If upper rack is removed, please apply detergent
directly to tub instead of detergent dispenser.
SHORT TIME
This option can be used to reduce the duration of the main
programs while maintaining the same washing and drying
performance levels.
After selecting the program, press the SHORT TIME button
and the indicator light will switch on. To deselect the option,
press the same button again.
EXTRA DRY
To improve the drying of the dishes, after selecting the
program, press the EXTRA DRY button and the indicator
light comes on.
A higher temperature during the nal rinse and an extended
drying phase allow for improving drying. To deselect the
option, press the same button again. The EXTRA DRY
option results in the lengthening of the wash cycle.
OPERATION INDICATOR
A LED light projected on the oor indicates that the
dishwasher is working. One of the following operating
modes can be selected:
a) Disabled function.
b) When the cycle starts the light goes on for few seconds,
stays off during the cycle and ashes at the end of the
cycle.
c) The light stays on during the cycle and ashes at the
end of the cycle (default mode).
If the delayed start was set, the light goes on either for the
rst few seconds or the entire duration of the countdown,
based on whether mode b) or c) was set.
The light goes off every time the door is opened. To select
the mode you prefer, switch on the machine, hold down
button P until one of the three letters appears on the display,
press button P until you reach the desired letter (or mode),
hold down button P to conrm the selection.
Note: If NaturalDry is active and it opens the door, then
Operation Indicator will not ash at the end of cycle.
SHORT TIME
This option can be used to reduce the duration of
the main programs while maintaining the same
performance. Select a program, press the SHORT
TIME button and the indicator light will switch on.
To deselect the option, press the same button again.
EN
11
OPTIONS AND FUNCTIONS
OPTIONS can be selected directly by pressing the corresponding button (see CONTROL PANEL).
If an option is not compatible with the selected program see PROGRAMS TABLE, the corresponding LED ashes rapidly 3 times
and beeps will sound. The option will not be enabled.
TABLET (Tab)
This setting allows you to optimize the performance of
the program according to the type of detergent used.
Press the START/PAUSE button for 3 seconds (the
corresponding symbol will light up) if you use combined
detergents in tablet form (rinse aid, salt and detergent in
1 dose).
If you use powder or liquid detergent, this option
should be off.
NaturalDry
NaturalDry is a convection drying system which automatically
opens the door during/after drying phase to ensure exceptional
drying performance every day. Door opens at the temperature
that is safe to your kitchen furniture, thus door will not be opened
when the option of SHORT TIME is on.
As additional steam protection, special designed protection foil is
added together with the dishwasher. To see how to mount protec-
tion foil please refer to (INSTALLATION GUIDE).
NaturalDry functionality could be disabled by the user as follows:
1. Go to the Dishwasher software menu pressing and holding
button (6 sec).
2. You are currently in Light Control Menu (please refer to
OPERATION INDICATOR description), if you don’t want to
change anything please press and hold button (until one of
the two letters appears on the display)
3. You switched to NaturalDry Control Menu, you could change
status of NaturalDry functionality by pressing button:
E – enabled d – disabled
To conrm the change and exit from the Control Menu please
press and hold button (3 sec).
DELAY
The start time of the program may be delayed for a period
of time between 1 and 12 hours.
1. Press the DELAY button: the corresponding «h» symbol
appears on the display; each time you press the button,
the time (1h, 2h, etc. up to max. 12h) from the start of
the selected wash cycle will be increased.
2. Select the wash program, press the START/PAUSE
button and within 4 seconds close the door: the timer
will begin counting down.
3. Once this time has elapsed, the indicator light «h»
switches off and the wash cycle begins.
To adjust the delay time and select a shorter period of time,
press the DELAY button. To cancel it, press the button
repeatedly until the selected delayed start indicator light
«h» switches off.
The DELAY function cannot be set once a wash cycle
has been started.
FLEXI WASH
If there are not many dishes to be washed, a half loading
may be used in order to save water, electricity and
detergent.
Select the program and then press the FLEXI WASH button:
the symbol of the chosen rack will appear on the display.
By default the appliance washes dishes in all racks.
To wash only the specic rack, press this button repeatedly:
shown on the display (only lower rack)
shown on the display (only upper rack)
shown on the display (only cutlery rack)
shown on the display (option is OFF and the appliance will
wash dishes in all racks).
Remember to load the upper or lower rack only, and to
reduce the amount of detergent accordingly.
If upper rack is removed, please apply detergent
directly to tub instead of detergent dispenser.
SHORT TIME
This option can be used to reduce the duration of the main
programs while maintaining the same washing and drying
performance levels.
After selecting the program, press the SHORT TIME button
and the indicator light will switch on. To deselect the option,
press the same button again.
EXTRA DRY
To improve the drying of the dishes, after selecting the
program, press the EXTRA DRY button and the indicator
light comes on.
A higher temperature during the nal rinse and an extended
drying phase allow for improving drying. To deselect the
option, press the same button again. The EXTRA DRY
option results in the lengthening of the wash cycle.
OPERATION INDICATOR
A LED light projected on the oor indicates that the
dishwasher is working. One of the following operating
modes can be selected:
a) Disabled function.
b) When the cycle starts the light goes on for few seconds,
stays off during the cycle and ashes at the end of the
cycle.
c) The light stays on during the cycle and ashes at the
end of the cycle (default mode).
If the delayed start was set, the light goes on either for the
rst few seconds or the entire duration of the countdown,
based on whether mode b) or c) was set.
The light goes off every time the door is opened. To select
the mode you prefer, switch on the machine, hold down
button P until one of the three letters appears on the display,
press button P until you reach the desired letter (or mode),
hold down button P to conrm the selection.
Note: If NaturalDry is active and it opens the door, then
Operation Indicator will not ash at the end of cycle.
EXTRA DRY
A higher temperature during the nal rinse as an
extended drying phase which allows improved drying.
After selecting the program, press the EXTRA DRY
button and the indicator light comes on. To deselect
the option, press the same button again. The EXTRA
DRY option results in the lengthening of the wash
cycle.
1. CHECK WATER CONNECTION
Check that the dishwasher is connected to the water supply
and that the tap is open.
2. SWITCH ON THE DISHWASHER
Open the door and press the ON/OFF button.
3.
4.
LOAD THE RACKS (see LOADING THE RACKS)
FILLING THE DETERGENT DISPENSER
(see PROGRAMS TABLE).
5.
6.
7.
CHOOSE THE PROGRAM AND CUSTOMISE THE CYCLE
Select the most appropriate program in accordance with the
type of crockery and its soiling level (see PROGRAMS
DESCRIPTION) by pressing the button.
Select the desired options (see OPTIONS AND FUNCTIONS).
START
Start the wash cycle by pressing START/Pause button (led
is lit) and closing the door within 4 sec. When the program
starts you hear a single beep. If the door was not closed within
4sec., the alarm sound will be played. In this case, open the
door, press START/Pause button and close the door again
within 4 sec.
END OF WASH CYCLE
The end of the wash cycle is indicated by beeps and by the
ashing of the wash cycle number on the display. Open the
door and switch off the appliance by pressing the ON/OFF
button.
Wait for a few minutes before removing the crockery - to avoid
burns. Unload the racks, beginning with the lower one.
The machine will switch off automatically during certain
extended periods of inactivity, in order to minimise electri-
city consumption. If the crockery is only lightly soiled or
if it has been rinsed with water before being placed in the
dishwasher, reduce the amount of detergent used accordingly.
MODIFYING A RUNNING PROGRAM
If a wrong program was selected, it is possible to change it, pro-
vided that it has only just begun: open the door, press and hold
the ON/OFF button, the machine will switch off.
Switch the machine back on using the ON/OFF button and select
the new wash cycle and any desired options; Start the wash cycle
by pressing START/Pause button and closing the door within 4 sec.
ADDING EXTRA CROCKERY
Without switching off the machine, open the door (START/Pause
led starts blinking) (be ware of HOT steam!) and place the
crockery inside the dishwasher. Press the START/Pause button
and close the door within 4 sec., the cycle will resume from the
point at which it was interrupted.
ACCIDENTAL INTERRUPTIONS
If the door is opened during the wash cycle, or if there is a power
cut, the cycle stops. Press the START/Pause button and close
the door within 4 sec., the cycle will resume from the point at
which it was interrupted.
DAILY USE
Functions
1. ECO - Normally soiled crockery. Standard program, the most efficient in terms of its combined energy and water
consumption.
2. NORMAL - Mixed soil. For normally soiled dishes with dried food residues.
3. INTENSIVE - Program recommended for heavily soiled crockery, especially suitable for pans and saucepans (not to be used
for delicate items).
4. PRE-WASH - Use to refresh crockery planned to be washed later. No detergent to be used with this program.
5. FAST - Normally soiled crockery. Everyday cycle, that ensures optimal cleaning performance in shorter time.
6. SANITIZING - Normally or heavily soiled crockery, with additional antibacterial wash. Can be used to perform
maintenance of the dishwasher.
7. SELF- CLEAN - Program to be used to perform maintenance of the dishwasher. It cleans the interior of the appliance
using hot water.
OPTIONS can be selected directly by pressing the corresponding button (see CONTROL PANEL).
If an option is not compatible with the selected program see PROGRAMS TABLE, the corresponding LED � � � �rapidly 3 times
and beeps will sound. The option will not be enabled.
HALF LOAD
If there are not many dishes to be washed, a half load
cycle may be used in order to save water, electricity and
detergent. Select the program and press the HALF LOAD
button: the indicator light will light up. Press the HALF
LOAD button to deselect this option.
Remember to halve the amount of detergent.
To adjust the delay time and select a shorter period of time,
press the DELAY button. To cancel it, press the button
repeatedly until the selected delayed start indicator light
«h» switches off.
The DELAY function cannot be set once a wash cycle
has been started.
TABLET (Tab)
This setting allows you to optimize the performance of
the program according to the type of detergent used.
Press the START/PAUSE button for 3 seconds (the
corresponding symbol will light up) if you use combined
detergents in tablet form (rinse aid, salt and detergent in
1 dose).
If you use powder or liquid detergent, this option
should be off.
1. Go to the Dishwasher software menu pressing and holding
button (6 sec).
2. You switched to NaturalDry Control Menu, you could change
status of NaturalDry functionality by pressing button:
E – enabled d – disabled
To conrm the change and exit from the Control Menu please
press and hold button (3 sec).
TABLET (Tab)
Press the START/PAUSE button for 3 seconds (the
corresponding symbol will light up) if you use
combined detergents in tablet form (rinse aid, salt
and detergent in 1 dose).
If you use powder or liquid detergent, this option
should be o.
EN
11
OPTIONS AND FUNCTIONS
OPTIONS can be selected directly by pressing the corresponding button (see CONTROL PANEL).
If an option is not compatible with the selected program see PROGRAMS TABLE, the corresponding LED ashes rapidly 3 times
and beeps will sound. The option will not be enabled.
TABLET (Tab)
This setting allows you to optimize the performance of
the program according to the type of detergent used.
Press the START/PAUSE button for 3 seconds (the
corresponding symbol will light up) if you use combined
detergents in tablet form (rinse aid, salt and detergent in
1 dose).
If you use powder or liquid detergent, this option
should be off.
NaturalDry
NaturalDry is a convection drying system which automatically
opens the door during/after drying phase to ensure exceptional
drying performance every day. Door opens at the temperature
that is safe to your kitchen furniture, thus door will not be opened
when the option of SHORT TIME is on.
As additional steam protection, special designed protection foil is
added together with the dishwasher. To see how to mount protec-
tion foil please refer to (INSTALLATION GUIDE).
NaturalDry functionality could be disabled by the user as follows:
1. Go to the Dishwasher software menu pressing and holding
button (6 sec).
2. You are currently in Light Control Menu (please refer to
OPERATION INDICATOR description), if you don’t want to
change anything please press and hold button (until one of
the two letters appears on the display)
3. You switched to NaturalDry Control Menu, you could change
status of NaturalDry functionality by pressing button:
E – enabled d – disabled
To conrm the change and exit from the Control Menu please
press and hold button (3 sec).
DELAY
The start time of the program may be delayed for a period
of time between 1 and 12 hours.
1. Press the DELAY button: the corresponding «h» symbol
appears on the display; each time you press the button,
the time (1h, 2h, etc. up to max. 12h) from the start of
the selected wash cycle will be increased.
2. Select the wash program, press the START/PAUSE
button and within 4 seconds close the door: the timer
will begin counting down.
3. Once this time has elapsed, the indicator light «h»
switches off and the wash cycle begins.
To adjust the delay time and select a shorter period of time,
press the DELAY button. To cancel it, press the button
repeatedly until the selected delayed start indicator light
«h» switches off.
The DELAY function cannot be set once a wash cycle
has been started.
FLEXI WASH
If there are not many dishes to be washed, a half loading
may be used in order to save water, electricity and
detergent.
Select the program and then press the FLEXI WASH button:
the symbol of the chosen rack will appear on the display.
By default the appliance washes dishes in all racks.
To wash only the specic rack, press this button repeatedly:
shown on the display (only lower rack)
shown on the display (only upper rack)
shown on the display (only cutlery rack)
shown on the display (option is OFF and the appliance will
wash dishes in all racks).
Remember to load the upper or lower rack only, and to
reduce the amount of detergent accordingly.
If upper rack is removed, please apply detergent
directly to tub instead of detergent dispenser.
SHORT TIME
This option can be used to reduce the duration of the main
programs while maintaining the same washing and drying
performance levels.
After selecting the program, press the SHORT TIME button
and the indicator light will switch on. To deselect the option,
press the same button again.
EXTRA DRY
To improve the drying of the dishes, after selecting the
program, press the EXTRA DRY button and the indicator
light comes on.
A higher temperature during the nal rinse and an extended
drying phase allow for improving drying. To deselect the
option, press the same button again. The EXTRA DRY
option results in the lengthening of the wash cycle.
OPERATION INDICATOR
A LED light projected on the oor indicates that the
dishwasher is working. One of the following operating
modes can be selected:
a) Disabled function.
b) When the cycle starts the light goes on for few seconds,
stays off during the cycle and ashes at the end of the
cycle.
c) The light stays on during the cycle and ashes at the
end of the cycle (default mode).
If the delayed start was set, the light goes on either for the
rst few seconds or the entire duration of the countdown,
based on whether mode b) or c) was set.
The light goes off every time the door is opened. To select
the mode you prefer, switch on the machine, hold down
button P until one of the three letters appears on the display,
press button P until you reach the desired letter (or mode),
hold down button P to conrm the selection.
Note: If NaturalDry is active and it opens the door, then
Operation Indicator will not ash at the end of cycle.
OPERATION INDICATOR
A LED light projected on the oor indicates that the
dishwasher is working.
a) Disabled function.
b) When the cycle starts the light goes on for a few
seconds, stays o during the cycle and ashes at the
end of the cycle.
c) The light stays on during the cycle and ashes at
the end of the cycle (default mode).
If the delayed start was set, the light goes on either
for the rst few seconds or the entire duration of the
countdown, based on whether mode b) or c) was set.
The light goes o every time the door is opened.
To select the mode you prefer, switch on the machine,
hold down button
ENGLISH
8
• Switch on the appliance by pressing the ON/OFF button.
• Switch off the appliance by pressing the ON/OFF button.
• Hold down button for 5 seconds, until you hear a beep.
• Switch on the appliance by pressing the ON/OFF button.
•
•
The current selection level number and the salt indicator light
������
Press button to select the desired hardness level (see
WATER HARDNESS TABLE).
• Switch off the appliance by pressing the ON/OFF button.
Setting is complete!
Water Hardness Table
Level °dH
German degrees
°fH
French degrees
1 Soft 0 - 6 0 - 10
2 Medium 7 - 11 11 - 20
3 Average 12 - 17 21 - 30
4 Hard 18 - 34 31 - 60
5 Very hard 35 - 50 61 - 90
Make sure the cap is screwed on tightly, so that no detergent can
get into the container during the wash program (this could damage
the water softener beyond repair).
As soon as this procedure is complete, run a program without
loading. The “Pre-Wash” program alone is NOT������
Residual saline solution or grains of salt can lead to corrosion,
irreparably damaging the stainless steel components.
The guarantee is not applicable if faults are caused by such
circumstances.
��������������������������������s.
��������������������������������
heating element may be damaged as a result.
Whenever you need to add salt, it is mandatory to complete
the procedure before the beginning of the washing cycle.
SETTING THE WATER HARDNESS
To allow the water softener to work in a perfect way, it is essential
that the water hardness setting is based on the actual water hard-
ness in your house. This information can be obtained from your local
water supplier. The factory setting is for average (3) water hardness.
FILLING THE RINSE AID DISPENSER
Rinse aid makes dish DRYING easier. The rinse aid dispenser A
should be lled when the RINSE AID REFILL indicator light
in the control panel is lit.
1. Open the dispenser B by pressing and pulling up the tab on
the lid.
2. Carefully introduce the rinse aid as far as the maximum
(110 ml) reference notch of the lling space - avoid spilling it.
If this happens, clean the spill immediately with a dry cloth.
3. Press the lid down until you hear a click to close it.
NEVER pour the rinse aid directly into the tub.
A
B
ADJUSTING THE DOSAGE OF RINSE AID
If you are not completely satised with the drying results, you can
adjust the quantity of rinse aid used.
• Switch the dishwasher on using the ON/OFF button.
• Switch it off using the ON/OFF button.
• Press button three times - a beep will be heard.
• Switch it on using the ON/OFF button.
•
•
The current selection level number and rinse aid indicator light ash.
Press button to select the level of rinse aid quantity to be
supplied.
• Switch it off using the ON/OFF button.
Setting is complete!
If the rinse aid level is set to ZERO (ECO), no rinse aid will be
supplied. The LOW RINSE AID indicator light will not be lit if you
run out of rinse aid. A maximum of 5 levels can be set according to
the dishwasher model. The factory setting is specic to the model,
please follow instruction above to check this for your machine.
•If you see bluish streaks on the dishes, set a low number (1-2).
• If there are drops of water or limescale marks on the dishes,
set a high number (3-4).
FILLING THE DETERGENT DISPENSER
������������������������������
dishwashers.
To achieve the best washing and drying results, the combined
useof detergent, rinse aid liquid and rened salt is required.
We recommend using detergents that do not contain phosphates
or chlorine, as these products are harmful to the environment.
Good washing results also depend on the correct amount of
detergent being used.
Exceeding the stated amount does not result in a more effective
wash and increases environmental pollution.
The amount can be adjusted to the soil level. In the case of
normally soiled items, use approximately either 35g (powder
detergent) or 35ml (liquid detergent) and additional tea spoon of
detergent directly inside the tub. If tablets are used, one tablet
will be enough.
If the crockery is only lightly soiled or if it has been rinsed with
water before being placed in the dishwasher, reduce the amount
of detergent used accordingly (minimum 25 g/ml) e.g. skip the
powder/gel putted inside the tub.
To open the detergent dispenser
press button A.
Introduce the detergent into
the dry dispenser B only.
Place the amount of detergent
for pre-washing directly inside
the tub.
A
B
1.
2.
When measuring out the detergent refer to the mentioned ear-
lier information to add the proper quantity. Inside the dispenser
B there are indications to help the detergent dosing.
Remove detergent residues from the edges of the dispenser
and close the cover until it clicks.
3. Close the lid of the detergent dispenser by pulling it up until
the closing device is secured in place.
The detergent dispenser automatically opens up at the right time
according to the program. If all-in-one detergents are used, we
recommend using the TABLET button, because it adjusts the
program so that the best washing and drying results are always
achieved.
until one of the three letters
appears on the display, press button
ENGLISH
8
• Switch on the appliance by pressing the ON/OFF button.
• Switch off the appliance by pressing the ON/OFF button.
• Hold down button for 5 seconds, until you hear a beep.
• Switch on the appliance by pressing the ON/OFF button.
•
•
The current selection level number and the salt indicator light
������
Press button to select the desired hardness level (see
WATER HARDNESS TABLE).
• Switch off the appliance by pressing the ON/OFF button.
Setting is complete!
Water Hardness Table
Level °dH
German degrees
°fH
French degrees
1 Soft 0 - 6 0 - 10
2 Medium 7 - 11 11 - 20
3 Average 12 - 17 21 - 30
4 Hard 18 - 34 31 - 60
5 Very hard 35 - 50 61 - 90
Make sure the cap is screwed on tightly, so that no detergent can
get into the container during the wash program (this could damage
the water softener beyond repair).
As soon as this procedure is complete, run a program without
loading. The “Pre-Wash” program alone is NOT������
Residual saline solution or grains of salt can lead to corrosion,
irreparably damaging the stainless steel components.
The guarantee is not applicable if faults are caused by such
circumstances.
��������������������������������s.
��������������������������������
heating element may be damaged as a result.
Whenever you need to add salt, it is mandatory to complete
the procedure before the beginning of the washing cycle.
SETTING THE WATER HARDNESS
To allow the water softener to work in a perfect way, it is essential
that the water hardness setting is based on the actual water hard-
ness in your house. This information can be obtained from your local
water supplier. The factory setting is for average (3) water hardness.
FILLING THE RINSE AID DISPENSER
Rinse aid makes dish DRYING easier. The rinse aid dispenser A
should be lled when the RINSE AID REFILL indicator light
in the control panel is lit.
1. Open the dispenser B by pressing and pulling up the tab on
the lid.
2. Carefully introduce the rinse aid as far as the maximum
(110 ml) reference notch of the lling space - avoid spilling it.
If this happens, clean the spill immediately with a dry cloth.
3. Press the lid down until you hear a click to close it.
NEVER pour the rinse aid directly into the tub.
A
B
ADJUSTING THE DOSAGE OF RINSE AID
If you are not completely satised with the drying results, you can
adjust the quantity of rinse aid used.
• Switch the dishwasher on using the ON/OFF button.
• Switch it off using the ON/OFF button.
• Press button three times - a beep will be heard.
• Switch it on using the ON/OFF button.
•
•
The current selection level number and rinse aid indicator light ash.
Press button to select the level of rinse aid quantity to be
supplied.
• Switch it off using the ON/OFF button.
Setting is complete!
If the rinse aid level is set to ZERO (ECO), no rinse aid will be
supplied. The LOW RINSE AID indicator light will not be lit if you
run out of rinse aid. A maximum of 5 levels can be set according to
the dishwasher model. The factory setting is specic to the model,
please follow instruction above to check this for your machine.
•If you see bluish streaks on the dishes, set a low number (1-2).
• If there are drops of water or limescale marks on the dishes,
set a high number (3-4).
FILLING THE DETERGENT DISPENSER
������������������������������
dishwashers.
To achieve the best washing and drying results, the combined
useof detergent, rinse aid liquid and rened salt is required.
We recommend using detergents that do not contain phosphates
or chlorine, as these products are harmful to the environment.
Good washing results also depend on the correct amount of
detergent being used.
Exceeding the stated amount does not result in a more effective
wash and increases environmental pollution.
The amount can be adjusted to the soil level. In the case of
normally soiled items, use approximately either 35g (powder
detergent) or 35ml (liquid detergent) and additional tea spoon of
detergent directly inside the tub. If tablets are used, one tablet
will be enough.
If the crockery is only lightly soiled or if it has been rinsed with
water before being placed in the dishwasher, reduce the amount
of detergent used accordingly (minimum 25 g/ml) e.g. skip the
powder/gel putted inside the tub.
To open the detergent dispenser
press button A.
Introduce the detergent into
the dry dispenser B only.
Place the amount of detergent
for pre-washing directly inside
the tub.
A
B
1.
2.
When measuring out the detergent refer to the mentioned ear-
lier information to add the proper quantity. Inside the dispenser
B there are indications to help the detergent dosing.
Remove detergent residues from the edges of the dispenser
and close the cover until it clicks.
3. Close the lid of the detergent dispenser by pulling it up until
the closing device is secured in place.
The detergent dispenser automatically opens up at the right time
according to the program. If all-in-one detergents are used, we
recommend using the TABLET button, because it adjusts the
program so that the best washing and drying results are always
achieved.
until you
reach the desired letter (or mode), hold down button
ENGLISH
8
• Switch on the appliance by pressing the ON/OFF button.
• Switch off the appliance by pressing the ON/OFF button.
• Hold down button for 5 seconds, until you hear a beep.
• Switch on the appliance by pressing the ON/OFF button.
•
•
The current selection level number and the salt indicator light
������
Press button to select the desired hardness level (see
WATER HARDNESS TABLE).
• Switch off the appliance by pressing the ON/OFF button.
Setting is complete!
Water Hardness Table
Level °dH
German degrees
°fH
French degrees
1 Soft 0 - 6 0 - 10
2 Medium 7 - 11 11 - 20
3 Average 12 - 17 21 - 30
4 Hard 18 - 34 31 - 60
5 Very hard 35 - 50 61 - 90
Make sure the cap is screwed on tightly, so that no detergent can
get into the container during the wash program (this could damage
the water softener beyond repair).
As soon as this procedure is complete, run a program without
loading. The “Pre-Wash” program alone is NOT������
Residual saline solution or grains of salt can lead to corrosion,
irreparably damaging the stainless steel components.
The guarantee is not applicable if faults are caused by such
circumstances.
��������������������������������s.
��������������������������������
heating element may be damaged as a result.
Whenever you need to add salt, it is mandatory to complete
the procedure before the beginning of the washing cycle.
SETTING THE WATER HARDNESS
To allow the water softener to work in a perfect way, it is essential
that the water hardness setting is based on the actual water hard-
ness in your house. This information can be obtained from your local
water supplier. The factory setting is for average (3) water hardness.
FILLING THE RINSE AID DISPENSER
Rinse aid makes dish DRYING easier. The rinse aid dispenser A
should be lled when the RINSE AID REFILL indicator light
in the control panel is lit.
1. Open the dispenser B by pressing and pulling up the tab on
the lid.
2. Carefully introduce the rinse aid as far as the maximum
(110 ml) reference notch of the lling space - avoid spilling it.
If this happens, clean the spill immediately with a dry cloth.
3. Press the lid down until you hear a click to close it.
NEVER pour the rinse aid directly into the tub.
A
B
ADJUSTING THE DOSAGE OF RINSE AID
If you are not completely satised with the drying results, you can
adjust the quantity of rinse aid used.
• Switch the dishwasher on using the ON/OFF button.
• Switch it off using the ON/OFF button.
• Press button three times - a beep will be heard.
• Switch it on using the ON/OFF button.
•
•
The current selection level number and rinse aid indicator light ash.
Press button to select the level of rinse aid quantity to be
supplied.
• Switch it off using the ON/OFF button.
Setting is complete!
If the rinse aid level is set to ZERO (ECO), no rinse aid will be
supplied. The LOW RINSE AID indicator light will not be lit if you
run out of rinse aid. A maximum of 5 levels can be set according to
the dishwasher model. The factory setting is specic to the model,
please follow instruction above to check this for your machine.
•If you see bluish streaks on the dishes, set a low number (1-2).
• If there are drops of water or limescale marks on the dishes,
set a high number (3-4).
FILLING THE DETERGENT DISPENSER
������������������������������
dishwashers.
To achieve the best washing and drying results, the combined
useof detergent, rinse aid liquid and rened salt is required.
We recommend using detergents that do not contain phosphates
or chlorine, as these products are harmful to the environment.
Good washing results also depend on the correct amount of
detergent being used.
Exceeding the stated amount does not result in a more effective
wash and increases environmental pollution.
The amount can be adjusted to the soil level. In the case of
normally soiled items, use approximately either 35g (powder
detergent) or 35ml (liquid detergent) and additional tea spoon of
detergent directly inside the tub. If tablets are used, one tablet
will be enough.
If the crockery is only lightly soiled or if it has been rinsed with
water before being placed in the dishwasher, reduce the amount
of detergent used accordingly (minimum 25 g/ml) e.g. skip the
powder/gel putted inside the tub.
To open the detergent dispenser
press button A.
Introduce the detergent into
the dry dispenser B only.
Place the amount of detergent
for pre-washing directly inside
the tub.
A
B
1.
2.
When measuring out the detergent refer to the mentioned ear-
lier information to add the proper quantity. Inside the dispenser
B there are indications to help the detergent dosing.
Remove detergent residues from the edges of the dispenser
and close the cover until it clicks.
3. Close the lid of the detergent dispenser by pulling it up until
the closing device is secured in place.
The detergent dispenser automatically opens up at the right time
according to the program. If all-in-one detergents are used, we
recommend using the TABLET button, because it adjusts the
program so that the best washing and drying results are always
achieved.
to conrm the selection.
If NaturalDry is active and it opens the door, then
Operation Indicator will not ash at the end of cycle.
NATURALDRY
Door opening system NaturalDry is a convection drying system
which automatically opens the door during/after drying phase
to ensure exceptional drying performance every day. Door will
not be opened when the option of SHORT TIME is on due to high
temperatures. Don’t take out crockery immediately after door
opens but wait in order to have proper drying.
The function cannot be activated for all the programs, please
refer to programs table. As additional steam protection, special
designed protection foil is added together with the dishwasher.
To see how to mount protection foil please refer to (ASSEMBLY
INSTRUCTION).
NaturalDry functionality could be disabled by the user as
follows:
1. Go to the Operation Indicator menu as in last step, press and
hold
ENGLISH
8
• Switch on the appliance by pressing the ON/OFF button.
• Switch off the appliance by pressing the ON/OFF button.
• Hold down button for 5 seconds, until you hear a beep.
• Switch on the appliance by pressing the ON/OFF button.
•
•
The current selection level number and the salt indicator light
������
Press button to select the desired hardness level (see
WATER HARDNESS TABLE).
• Switch off the appliance by pressing the ON/OFF button.
Setting is complete!
Water Hardness Table
Level °dH
German degrees
°fH
French degrees
1 Soft 0 - 6 0 - 10
2 Medium 7 - 11 11 - 20
3 Average 12 - 17 21 - 30
4 Hard 18 - 34 31 - 60
5 Very hard 35 - 50 61 - 90
Make sure the cap is screwed on tightly, so that no detergent can
get into the container during the wash program (this could damage
the water softener beyond repair).
As soon as this procedure is complete, run a program without
loading. The “Pre-Wash” program alone is NOT������
Residual saline solution or grains of salt can lead to corrosion,
irreparably damaging the stainless steel components.
The guarantee is not applicable if faults are caused by such
circumstances.
��������������������������������s.
��������������������������������
heating element may be damaged as a result.
Whenever you need to add salt, it is mandatory to complete
the procedure before the beginning of the washing cycle.
SETTING THE WATER HARDNESS
To allow the water softener to work in a perfect way, it is essential
that the water hardness setting is based on the actual water hard-
ness in your house. This information can be obtained from your local
water supplier. The factory setting is for average (3) water hardness.
FILLING THE RINSE AID DISPENSER
Rinse aid makes dish DRYING easier. The rinse aid dispenser A
should be lled when the RINSE AID REFILL indicator light
in the control panel is lit.
1. Open the dispenser B by pressing and pulling up the tab on
the lid.
2. Carefully introduce the rinse aid as far as the maximum
(110 ml) reference notch of the lling space - avoid spilling it.
If this happens, clean the spill immediately with a dry cloth.
3. Press the lid down until you hear a click to close it.
NEVER pour the rinse aid directly into the tub.
A
B
ADJUSTING THE DOSAGE OF RINSE AID
If you are not completely satised with the drying results, you can
adjust the quantity of rinse aid used.
• Switch the dishwasher on using the ON/OFF button.
• Switch it off using the ON/OFF button.
• Press button three times - a beep will be heard.
• Switch it on using the ON/OFF button.
•
•
The current selection level number and rinse aid indicator light ash.
Press button to select the level of rinse aid quantity to be
supplied.
• Switch it off using the ON/OFF button.
Setting is complete!
If the rinse aid level is set to ZERO (ECO), no rinse aid will be
supplied. The LOW RINSE AID indicator light will not be lit if you
run out of rinse aid. A maximum of 5 levels can be set according to
the dishwasher model. The factory setting is specic to the model,
please follow instruction above to check this for your machine.
•If you see bluish streaks on the dishes, set a low number (1-2).
• If there are drops of water or limescale marks on the dishes,
set a high number (3-4).
FILLING THE DETERGENT DISPENSER
������������������������������
dishwashers.
To achieve the best washing and drying results, the combined
useof detergent, rinse aid liquid and rened salt is required.
We recommend using detergents that do not contain phosphates
or chlorine, as these products are harmful to the environment.
Good washing results also depend on the correct amount of
detergent being used.
Exceeding the stated amount does not result in a more effective
wash and increases environmental pollution.
The amount can be adjusted to the soil level. In the case of
normally soiled items, use approximately either 35g (powder
detergent) or 35ml (liquid detergent) and additional tea spoon of
detergent directly inside the tub. If tablets are used, one tablet
will be enough.
If the crockery is only lightly soiled or if it has been rinsed with
water before being placed in the dishwasher, reduce the amount
of detergent used accordingly (minimum 25 g/ml) e.g. skip the
powder/gel putted inside the tub.
To open the detergent dispenser
press button A.
Introduce the detergent into
the dry dispenser B only.
Place the amount of detergent
for pre-washing directly inside
the tub.
A
B
1.
2.
When measuring out the detergent refer to the mentioned ear-
lier information to add the proper quantity. Inside the dispenser
B there are indications to help the detergent dosing.
Remove detergent residues from the edges of the dispenser
and close the cover until it clicks.
3. Close the lid of the detergent dispenser by pulling it up until
the closing device is secured in place.
The detergent dispenser automatically opens up at the right time
according to the program. If all-in-one detergents are used, we
recommend using the TABLET button, because it adjusts the
program so that the best washing and drying results are always
achieved.
until menu appears.
2. Press and hold
ENGLISH
8
• Switch on the appliance by pressing the ON/OFF button.
• Switch off the appliance by pressing the ON/OFF button.
• Hold down button for 5 seconds, until you hear a beep.
• Switch on the appliance by pressing the ON/OFF button.
•
•
The current selection level number and the salt indicator light
������
Press button to select the desired hardness level (see
WATER HARDNESS TABLE).
• Switch off the appliance by pressing the ON/OFF button.
Setting is complete!
Water Hardness Table
Level °dH
German degrees
°fH
French degrees
1 Soft 0 - 6 0 - 10
2 Medium 7 - 11 11 - 20
3 Average 12 - 17 21 - 30
4 Hard 18 - 34 31 - 60
5 Very hard 35 - 50 61 - 90
Make sure the cap is screwed on tightly, so that no detergent can
get into the container during the wash program (this could damage
the water softener beyond repair).
As soon as this procedure is complete, run a program without
loading. The “Pre-Wash” program alone is NOT������
Residual saline solution or grains of salt can lead to corrosion,
irreparably damaging the stainless steel components.
The guarantee is not applicable if faults are caused by such
circumstances.
��������������������������������s.
��������������������������������
heating element may be damaged as a result.
Whenever you need to add salt, it is mandatory to complete
the procedure before the beginning of the washing cycle.
SETTING THE WATER HARDNESS
To allow the water softener to work in a perfect way, it is essential
that the water hardness setting is based on the actual water hard-
ness in your house. This information can be obtained from your local
water supplier. The factory setting is for average (3) water hardness.
FILLING THE RINSE AID DISPENSER
Rinse aid makes dish DRYING easier. The rinse aid dispenser A
should be lled when the RINSE AID REFILL indicator light
in the control panel is lit.
1. Open the dispenser B by pressing and pulling up the tab on
the lid.
2. Carefully introduce the rinse aid as far as the maximum
(110 ml) reference notch of the lling space - avoid spilling it.
If this happens, clean the spill immediately with a dry cloth.
3. Press the lid down until you hear a click to close it.
NEVER pour the rinse aid directly into the tub.
A
B
ADJUSTING THE DOSAGE OF RINSE AID
If you are not completely satised with the drying results, you can
adjust the quantity of rinse aid used.
• Switch the dishwasher on using the ON/OFF button.
• Switch it off using the ON/OFF button.
• Press button three times - a beep will be heard.
• Switch it on using the ON/OFF button.
•
•
The current selection level number and rinse aid indicator light ash.
Press button to select the level of rinse aid quantity to be
supplied.
• Switch it off using the ON/OFF button.
Setting is complete!
If the rinse aid level is set to ZERO (ECO), no rinse aid will be
supplied. The LOW RINSE AID indicator light will not be lit if you
run out of rinse aid. A maximum of 5 levels can be set according to
the dishwasher model. The factory setting is specic to the model,
please follow instruction above to check this for your machine.
•If you see bluish streaks on the dishes, set a low number (1-2).
• If there are drops of water or limescale marks on the dishes,
set a high number (3-4).
FILLING THE DETERGENT DISPENSER
������������������������������
dishwashers.
To achieve the best washing and drying results, the combined
useof detergent, rinse aid liquid and rened salt is required.
We recommend using detergents that do not contain phosphates
or chlorine, as these products are harmful to the environment.
Good washing results also depend on the correct amount of
detergent being used.
Exceeding the stated amount does not result in a more effective
wash and increases environmental pollution.
The amount can be adjusted to the soil level. In the case of
normally soiled items, use approximately either 35g (powder
detergent) or 35ml (liquid detergent) and additional tea spoon of
detergent directly inside the tub. If tablets are used, one tablet
will be enough.
If the crockery is only lightly soiled or if it has been rinsed with
water before being placed in the dishwasher, reduce the amount
of detergent used accordingly (minimum 25 g/ml) e.g. skip the
powder/gel putted inside the tub.
To open the detergent dispenser
press button A.
Introduce the detergent into
the dry dispenser B only.
Place the amount of detergent
for pre-washing directly inside
the tub.
A
B
1.
2.
When measuring out the detergent refer to the mentioned ear-
lier information to add the proper quantity. Inside the dispenser
B there are indications to help the detergent dosing.
Remove detergent residues from the edges of the dispenser
and close the cover until it clicks.
3. Close the lid of the detergent dispenser by pulling it up until
the closing device is secured in place.
The detergent dispenser automatically opens up at the right time
according to the program. If all-in-one detergents are used, we
recommend using the TABLET button, because it adjusts the
program so that the best washing and drying results are always
achieved.
again for 6 seconds to reach the
NaturalDry menu.
3. You switched to NaturalDry Control Menu, you could change
status of NaturalDry functionality by pressing button:
ENGLISH
8
• Switch on the appliance by pressing the ON/OFF button.
• Switch off the appliance by pressing the ON/OFF button.
• Hold down button for 5 seconds, until you hear a beep.
• Switch on the appliance by pressing the ON/OFF button.
•
•
The current selection level number and the salt indicator light
������
Press button to select the desired hardness level (see
WATER HARDNESS TABLE).
• Switch off the appliance by pressing the ON/OFF button.
Setting is complete!
Water Hardness Table
Level °dH
German degrees
°fH
French degrees
1 Soft 0 - 6 0 - 10
2 Medium 7 - 11 11 - 20
3 Average 12 - 17 21 - 30
4 Hard 18 - 34 31 - 60
5 Very hard 35 - 50 61 - 90
Make sure the cap is screwed on tightly, so that no detergent can
get into the container during the wash program (this could damage
the water softener beyond repair).
As soon as this procedure is complete, run a program without
loading. The “Pre-Wash” program alone is NOT������
Residual saline solution or grains of salt can lead to corrosion,
irreparably damaging the stainless steel components.
The guarantee is not applicable if faults are caused by such
circumstances.
��������������������������������s.
��������������������������������
heating element may be damaged as a result.
Whenever you need to add salt, it is mandatory to complete
the procedure before the beginning of the washing cycle.
SETTING THE WATER HARDNESS
To allow the water softener to work in a perfect way, it is essential
that the water hardness setting is based on the actual water hard-
ness in your house. This information can be obtained from your local
water supplier. The factory setting is for average (3) water hardness.
FILLING THE RINSE AID DISPENSER
Rinse aid makes dish DRYING easier. The rinse aid dispenser A
should be lled when the RINSE AID REFILL indicator light
in the control panel is lit.
1. Open the dispenser B by pressing and pulling up the tab on
the lid.
2. Carefully introduce the rinse aid as far as the maximum
(110 ml) reference notch of the lling space - avoid spilling it.
If this happens, clean the spill immediately with a dry cloth.
3. Press the lid down until you hear a click to close it.
NEVER pour the rinse aid directly into the tub.
A
B
ADJUSTING THE DOSAGE OF RINSE AID
If you are not completely satised with the drying results, you can
adjust the quantity of rinse aid used.
• Switch the dishwasher on using the ON/OFF button.
• Switch it off using the ON/OFF button.
• Press button three times - a beep will be heard.
• Switch it on using the ON/OFF button.
•
•
The current selection level number and rinse aid indicator light ash.
Press button to select the level of rinse aid quantity to be
supplied.
• Switch it off using the ON/OFF button.
Setting is complete!
If the rinse aid level is set to ZERO (ECO), no rinse aid will be
supplied. The LOW RINSE AID indicator light will not be lit if you
run out of rinse aid. A maximum of 5 levels can be set according to
the dishwasher model. The factory setting is specic to the model,
please follow instruction above to check this for your machine.
•If you see bluish streaks on the dishes, set a low number (1-2).
• If there are drops of water or limescale marks on the dishes,
set a high number (3-4).
FILLING THE DETERGENT DISPENSER
������������������������������
dishwashers.
To achieve the best washing and drying results, the combined
useof detergent, rinse aid liquid and rened salt is required.
We recommend using detergents that do not contain phosphates
or chlorine, as these products are harmful to the environment.
Good washing results also depend on the correct amount of
detergent being used.
Exceeding the stated amount does not result in a more effective
wash and increases environmental pollution.
The amount can be adjusted to the soil level. In the case of
normally soiled items, use approximately either 35g (powder
detergent) or 35ml (liquid detergent) and additional tea spoon of
detergent directly inside the tub. If tablets are used, one tablet
will be enough.
If the crockery is only lightly soiled or if it has been rinsed with
water before being placed in the dishwasher, reduce the amount
of detergent used accordingly (minimum 25 g/ml) e.g. skip the
powder/gel putted inside the tub.
To open the detergent dispenser
press button A.
Introduce the detergent into
the dry dispenser B only.
Place the amount of detergent
for pre-washing directly inside
the tub.
A
B
1.
2.
When measuring out the detergent refer to the mentioned ear-
lier information to add the proper quantity. Inside the dispenser
B there are indications to help the detergent dosing.
Remove detergent residues from the edges of the dispenser
and close the cover until it clicks.
3. Close the lid of the detergent dispenser by pulling it up until
the closing device is secured in place.
The detergent dispenser automatically opens up at the right time
according to the program. If all-in-one detergents are used, we
recommend using the TABLET button, because it adjusts the
program so that the best washing and drying results are always
achieved.
E – enabled d – disabled.
To conrm the change and exit from the Control Menu
please press and hold
ENGLISH
8
• Switch on the appliance by pressing the ON/OFF button.
• Switch off the appliance by pressing the ON/OFF button.
• Hold down button for 5 seconds, until you hear a beep.
• Switch on the appliance by pressing the ON/OFF button.
•
•
The current selection level number and the salt indicator light
������
Press button to select the desired hardness level (see
WATER HARDNESS TABLE).
• Switch off the appliance by pressing the ON/OFF button.
Setting is complete!
Water Hardness Table
Level °dH
German degrees
°fH
French degrees
1 Soft 0 - 6 0 - 10
2 Medium 7 - 11 11 - 20
3 Average 12 - 17 21 - 30
4 Hard 18 - 34 31 - 60
5 Very hard 35 - 50 61 - 90
Make sure the cap is screwed on tightly, so that no detergent can
get into the container during the wash program (this could damage
the water softener beyond repair).
As soon as this procedure is complete, run a program without
loading. The “Pre-Wash” program alone is NOT������
Residual saline solution or grains of salt can lead to corrosion,
irreparably damaging the stainless steel components.
The guarantee is not applicable if faults are caused by such
circumstances.
��������������������������������s.
��������������������������������
heating element may be damaged as a result.
Whenever you need to add salt, it is mandatory to complete
the procedure before the beginning of the washing cycle.
SETTING THE WATER HARDNESS
To allow the water softener to work in a perfect way, it is essential
that the water hardness setting is based on the actual water hard-
ness in your house. This information can be obtained from your local
water supplier. The factory setting is for average (3) water hardness.
FILLING THE RINSE AID DISPENSER
Rinse aid makes dish DRYING easier. The rinse aid dispenser A
should be lled when the RINSE AID REFILL indicator light
in the control panel is lit.
1. Open the dispenser B by pressing and pulling up the tab on
the lid.
2. Carefully introduce the rinse aid as far as the maximum
(110 ml) reference notch of the lling space - avoid spilling it.
If this happens, clean the spill immediately with a dry cloth.
3. Press the lid down until you hear a click to close it.
NEVER pour the rinse aid directly into the tub.
A
B
ADJUSTING THE DOSAGE OF RINSE AID
If you are not completely satised with the drying results, you can
adjust the quantity of rinse aid used.
• Switch the dishwasher on using the ON/OFF button.
• Switch it off using the ON/OFF button.
• Press button three times - a beep will be heard.
• Switch it on using the ON/OFF button.
•
•
The current selection level number and rinse aid indicator light ash.
Press button to select the level of rinse aid quantity to be
supplied.
• Switch it off using the ON/OFF button.
Setting is complete!
If the rinse aid level is set to ZERO (ECO), no rinse aid will be
supplied. The LOW RINSE AID indicator light will not be lit if you
run out of rinse aid. A maximum of 5 levels can be set according to
the dishwasher model. The factory setting is specic to the model,
please follow instruction above to check this for your machine.
•If you see bluish streaks on the dishes, set a low number (1-2).
• If there are drops of water or limescale marks on the dishes,
set a high number (3-4).
FILLING THE DETERGENT DISPENSER
������������������������������
dishwashers.
To achieve the best washing and drying results, the combined
useof detergent, rinse aid liquid and rened salt is required.
We recommend using detergents that do not contain phosphates
or chlorine, as these products are harmful to the environment.
Good washing results also depend on the correct amount of
detergent being used.
Exceeding the stated amount does not result in a more effective
wash and increases environmental pollution.
The amount can be adjusted to the soil level. In the case of
normally soiled items, use approximately either 35g (powder
detergent) or 35ml (liquid detergent) and additional tea spoon of
detergent directly inside the tub. If tablets are used, one tablet
will be enough.
If the crockery is only lightly soiled or if it has been rinsed with
water before being placed in the dishwasher, reduce the amount
of detergent used accordingly (minimum 25 g/ml) e.g. skip the
powder/gel putted inside the tub.
To open the detergent dispenser
press button A.
Introduce the detergent into
the dry dispenser B only.
Place the amount of detergent
for pre-washing directly inside
the tub.
A
B
1.
2.
When measuring out the detergent refer to the mentioned ear-
lier information to add the proper quantity. Inside the dispenser
B there are indications to help the detergent dosing.
Remove detergent residues from the edges of the dispenser
and close the cover until it clicks.
3. Close the lid of the detergent dispenser by pulling it up until
the closing device is secured in place.
The detergent dispenser automatically opens up at the right time
according to the program. If all-in-one detergents are used, we
recommend using the TABLET button, because it adjusts the
program so that the best washing and drying results are always
achieved.
button (3 sec).
DOOR OPENING
Eco 50° after 165 min
AUTO 50° 60° 80-170 min*
Intensive 65° end of cycle
Fast wash 30’ 50° N/A
Fast wash and dry 50° end of cycle
Glass 45° end of cycle
Silent 50° (Night program) end of cycle
Sanitizing 65° N/A
PreWash N/A
SelfClean 65° N/A
* depending on settings
Functions

To download the full version visit www.ikea.com
9ENGLISH
Programs table
ECO program data is measured under laboratory conditions
according to European Standard EN 60436:2019.
Note for Test Laboratories: For information on comparative
EN testing conditions, please send an email to the following
address: [email protected]
Pretreatment of the dishes is not needed before any of the
programs.
*) Not all options can be used simultaneously.
**) Values given for programes other than the eco program are
indicative only. The actual time may vary depending on many
factors such as temperature and pressure of the incoming
water, room temperature, amount of detergent, quantity and
type of load, load balancing, additional selected options and
sensor calibration.
1. ECO Eco program is suitable to clean normally soiled
tableware, that for this use, it is the most ecient program
in terms of its combined energy and water consumption,
and that it is used to assess compliance with the EU
Ecodesign legislation.
2. AUTO For normally soiled dishes with dried food residues.
Senses the level of soiling on the dishes and adjusts the
program accordingly. When the sensor is detecting the
soil level an animation appears in the display and the cycle
duration is updated.
3. INTENSIVE Program recommended for heavily soiled
crockery, especially suitable for pans and saucepans (not to
be used for delicate items).
4. FAST WASH 30’ Program to be used for half load of lightly
soiled dishes with no dried food residues.
5. FAST WASH AND DRY Normally soiled crockery. Everyday
cycle, that ensures optimal cleaning and drying performance
in shorter time.
6. GLASS Program for delicate items, which are more
sensitive to high temperatures, for example glasses and
cups.
7. SILENT Suitable for nighttime operation of the appliance.
Ensures optimal cleaning and drying performance with the
lowest noise emission.
8. SANITIZING Normally or heavily soiled crockery, with
additional antibacterial wash. Can be used to perform
maintenance of the dishwasher.
9. PRE-WASH Use to refresh crockery planned to be washed
later. No detergent to be used with this program.
10. SELF-CLEAN Program to be used to perform maintenance
of the dishwasher, to be carried out only when the
dishwasher is EMPTY using specic detergents designed for
dishwasher maintenance
Notes: Please note that cycle FAST WASH is dedicated for lightly
soiled dishes.
FUNCTIONS can be selected directly by pressing the
corresponding button (see CONTROL PANEL).
If an option is not compatible with the selected program see
PROGRAMS TABLE, the corresponding LED rapidly 3 times
and beeps will sound. The option will not be enabled.
Program Drying
phase
Natural
Dry
Available
functions *)
Duration of
wash program
(h:min)**)
Water
consumption
(litres/cycle)
Energy
consumption
(kWh/cycle)
1 Eco
EN
9
To open the detergent dispenser
press button C.
Introduce the detergent into
the dry dispenser D only.
Place the amount of detergent
for pre-washing directly inside
the tub.
1. When measuring out the detergent refer to the mentioned ear-
lier information to add the proper quantity. Inside the dispenser
C there are indications to help the detergent dosing.
2. Remove detergent residues from the edges of the dispenser
and close the cover until it clicks.
3. Close the lid of the detergent dispenser by pulling it up until
the closing device is secured in place.
The detergent dispenser automatically opens up at the right time
according to the program. If all-in-one detergents are used, we
recommend using the TABLET button, because it adjusts the
program so that the best washing and drying results are always
achieved.
C
D
PROGRAMS TABLE
ECO program data is measured under laboratory conditions according to European Standard EN 60436:2019.
Note for Test Laboratories: For information on comparative EN testing conditions, please send an email to the following address:
Pre-treatment of the dishes is not needed before any of the programs.
*) Not all options can be used simultaneously.
**) Values given for programes other than the eco program are indicative only. The actual time may vary depending on many factors such as temperature
and pressure of the incoming water, room temperature, amount of detergent, quantity and type of load, load balancing, additional selected options and
sensor calibration.
Standby consumption: Left-on mode consumption: 5 W - Off mode consumption: 0.5 W
PROGRAMS DESCRIPTION
1. ECO -
bined energy and water consumption, and that it is used to assess compliance with the EU Ecodesign legislation.
2. AUTO - For normally soiled dishes with dried food residues. Senses the level of soiling on the dishes and adjusts the program accor-
dingly. When the sensor is detecting the soil level an animation appears in the display and the cycle duration is updated.
3. INTENSIVE -
Program recommended for heavily soiled crockery, especially suitable for pans and saucepans (not to be used for delicate items).
4. FAST WASH 30’ - Program to be used for half load of lightly-soiled dishes with no dried food residues.
5. FAST WASH AND DRY
- Normally soiled crockery. Everyday cycle, that ensures optimal cleaning and drying performance in shorter time.
6. GLASS - Program for delicate items, which are more sensitive to high temperatures, for example glasses and cups.
7. SILENT -
Suitable for night-time operation of the appliance. Ensures optimal cleaning and drying performance with the lowest noise emission.
8. SANITIZING - Normally or heavily soiled crockery, with additional antibacterial wash. Can be used to perform maintenance of the
dishwasher.
9. PRE-WASH - Use to refresh crockery planned to be washed later. No detergent to be used with this program.
10. SELF-CLEAN - Program to be used to perform maintenance of the dishwasher. It cleans the interior of the appliance using hot water.
Notes:
Please note that cycle FAST WASH is dedicated for lightly soiled dishes.
Program
Drying
phase
Natural
Dry
Available
options *)
Duration of
wash
program
(h:min)**)
Water
consumption
(litres/cycle)
Energy
consumption
(kWh/cycle)
1Eco 3:40 8.7 0.66
2Auto 1:20 - 3:00 7.0 - 14.0 0.70 - 1.10
3Intensive 2:40 17.0 1.30
4 Fast wash 30’ -- 0:30 9.0 0.50
5 1:20 10.0 1.10
6Glass 1:40 12.0 1.00
7Silent 3:35 16.5 1.00
8Sanitizing - 1:40 12.0 1.30
9Pre-Wash -- 0:10 4.5 0.01
10 Self- Clean -- 0:50 9.5 0.70
50°
9
ENGLISH
1. Press the DELAY button: the corresponding «h» symbol
appears on the display; each time you press the button,
the time (1h, 2h, etc. up to max. 12h) from the start of
the selected wash cycle will be increased.
2. Select the wash program, press the START/PAUSE
button and within 4 seconds close the door: the timer
will begin counting down.
3. Once this time has elapsed, the indicator light «h»
switches off and the wash cycle begins.
To adjust the delay time and select a shorter period of time,
press the DELAY button. To cancel it, press the button
repeatedly until the selected delayed start indicator light
«h» switches off.
The DELAY function cannot be set once a wash cycle
has been started.
NaturalDry
Door opening system NaturalDry is a convection drying system
which automatically opens the door during/after drying phase to
ensure exceptional drying performance every day. Door opens at
the temperature that is safe to your kitchen furniture.
As additional steam protection, special designed protection foil is
added together with the dishwasher. To see how to mount protec-
tion foil please refer to (INSTALLATION GUIDE).
NaturalDry functionality could be disabled by the user as follows:
1. Go to the Dishwasher software menu pressing and holding
button (6 sec).
2. You switched to NaturalDry Control Menu, you could change
status of NaturalDry functionality by pressing button:
E – enabled d – disabled
To conrm the change and exit from the Control Menu please
press and hold button (3 sec).
DELAY
The start time of the program may be delayed for a period
of time between 1 and 12 hours.
Program
Drying
phase
Natural
Dry
Available
options *)
Duration of
wash pro-
gram
(h:min)**)
Water
consumption
(litres/cycle)
Energy
consumption
(kWh/cycle)
50° 2:45 12.0 0.92
1 Eco
2 Conventional
wash and dry 55° 2:00 15.0 1.35
3Intensive 65° - 2:30 15.0 1.50
4Fast 50° -- 0:55 11.5 1.10
5Sanitizing 65° - 1:40 11.5 1.30
6Pre-Wash
-
-- 0:10 4.5 0.01
7Self-Clean 65° --0:50 8.0 0.80
ECO program data is measured under laboratory conditions according to European Standard EN 60436:2019.
Note for Test Laboratories: For information on comparative EN testing conditions, please send an email to the following
address: [email protected]
Pre-treatment of the dishes is not needed before any of the programs.
*) Not all options can be used simultaneously.
**) Values given for programes other than the eco program are indicative only. The actual time may vary depending on many
factors such as temperature and pressure of the incoming water, room temperature, amount of detergent, quantity and type of
load, load balancing, additional selected options and sensor calibration.
Standby consumption: Left-on mode consumption: 5 W - Off mode consumption: 0.5 W
PROGRAMS DESCRIPTION
EN
9
To open the detergent dispenser
press button C.
Introduce the detergent into
the dry dispenser D only.
Place the amount of detergent
for pre-washing directly inside
the tub.
1. When measuring out the detergent refer to the mentioned ear-
lier information to add the proper quantity. Inside the dispenser
C there are indications to help the detergent dosing.
2. Remove detergent residues from the edges of the dispenser
and close the cover until it clicks.
3. Close the lid of the detergent dispenser by pulling it up until
the closing device is secured in place.
The detergent dispenser automatically opens up at the right time
according to the program. If all-in-one detergents are used, we
recommend using the TABLET button, because it adjusts the
program so that the best washing and drying results are always
achieved.
C
D
PROGRAMS TABLE
ECO program data is measured under laboratory conditions according to European Standard EN 60436:2019.
Note for Test Laboratories: For information on comparative EN testing conditions, please send an email to the following address:
Pre-treatment of the dishes is not needed before any of the programs.
*) Not all options can be used simultaneously.
**) Values given for programes other than the eco program are indicative only. The actual time may vary depending on many factors such as temperature
and pressure of the incoming water, room temperature, amount of detergent, quantity and type of load, load balancing, additional selected options and
sensor calibration.
Standby consumption: Left-on mode consumption: 5 W - Off mode consumption: 0.5 W
PROGRAMS DESCRIPTION
1. ECO -
bined energy and water consumption, and that it is used to assess compliance with the EU Ecodesign legislation.
2. AUTO - For normally soiled dishes with dried food residues. Senses the level of soiling on the dishes and adjusts the program accor-
dingly. When the sensor is detecting the soil level an animation appears in the display and the cycle duration is updated.
3. INTENSIVE -
Program recommended for heavily soiled crockery, especially suitable for pans and saucepans (not to be used for delicate items).
4. FAST WASH 30’ - Program to be used for half load of lightly-soiled dishes with no dried food residues.
5. FAST WASH AND DRY
- Normally soiled crockery. Everyday cycle, that ensures optimal cleaning and drying performance in shorter time.
6. GLASS - Program for delicate items, which are more sensitive to high temperatures, for example glasses and cups.
7. SILENT -
Suitable for night-time operation of the appliance. Ensures optimal cleaning and drying performance with the lowest noise emission.
8. SANITIZING - Normally or heavily soiled crockery, with additional antibacterial wash. Can be used to perform maintenance of the
dishwasher.
9. PRE-WASH - Use to refresh crockery planned to be washed later. No detergent to be used with this program.
10. SELF-CLEAN - Program to be used to perform maintenance of the dishwasher. It cleans the interior of the appliance using hot water.
Notes:
Please note that cycle FAST WASH is dedicated for lightly soiled dishes.
Program
Drying
phase
Natural
Dry
Available
options *)
Duration of
wash
program
(h:min)**)
Water
consumption
(litres/cycle)
Energy
consumption
(kWh/cycle)
1Eco 3:40 8.7 0.66
2Auto 1:20 - 3:00 7.0 - 14.0 0.70 - 1.10
3Intensive 2:40 17.0 1.30
4 Fast wash 30’ -- 0:30 9.0 0.50
5 1:20 10.0 1.10
6Glass 1:40 12.0 1.00
7Silent 3:35 16.5 1.00
8Sanitizing - 1:40 12.0 1.30
9Pre-Wash -- 0:10 4.5 0.01
10 Self- Clean -- 0:50 9.5 0.70
3:40 8.7 0.59
2 Auto
EN
9
To open the detergent dispenser
press button C.
Introduce the detergent into
the dry dispenser D only.
Place the amount of detergent
for pre-washing directly inside
the tub.
1. When measuring out the detergent refer to the mentioned ear-
lier information to add the proper quantity. Inside the dispenser
C there are indications to help the detergent dosing.
2. Remove detergent residues from the edges of the dispenser
and close the cover until it clicks.
3. Close the lid of the detergent dispenser by pulling it up until
the closing device is secured in place.
The detergent dispenser automatically opens up at the right time
according to the program. If all-in-one detergents are used, we
recommend using the TABLET button, because it adjusts the
program so that the best washing and drying results are always
achieved.
C
D
PROGRAMS TABLE
ECO program data is measured under laboratory conditions according to European Standard EN 60436:2019.
Note for Test Laboratories: For information on comparative EN testing conditions, please send an email to the following address:
Pre-treatment of the dishes is not needed before any of the programs.
*) Not all options can be used simultaneously.
**) Values given for programes other than the eco program are indicative only. The actual time may vary depending on many factors such as temperature
and pressure of the incoming water, room temperature, amount of detergent, quantity and type of load, load balancing, additional selected options and
sensor calibration.
Standby consumption: Left-on mode consumption: 5 W - Off mode consumption: 0.5 W
PROGRAMS DESCRIPTION
1. ECO -
bined energy and water consumption, and that it is used to assess compliance with the EU Ecodesign legislation.
2. AUTO - For normally soiled dishes with dried food residues. Senses the level of soiling on the dishes and adjusts the program accor-
dingly. When the sensor is detecting the soil level an animation appears in the display and the cycle duration is updated.
3. INTENSIVE -
Program recommended for heavily soiled crockery, especially suitable for pans and saucepans (not to be used for delicate items).
4. FAST WASH 30’ - Program to be used for half load of lightly-soiled dishes with no dried food residues.
5. FAST WASH AND DRY
- Normally soiled crockery. Everyday cycle, that ensures optimal cleaning and drying performance in shorter time.
6. GLASS - Program for delicate items, which are more sensitive to high temperatures, for example glasses and cups.
7. SILENT -
Suitable for night-time operation of the appliance. Ensures optimal cleaning and drying performance with the lowest noise emission.
8. SANITIZING - Normally or heavily soiled crockery, with additional antibacterial wash. Can be used to perform maintenance of the
dishwasher.
9. PRE-WASH - Use to refresh crockery planned to be washed later. No detergent to be used with this program.
10. SELF-CLEAN - Program to be used to perform maintenance of the dishwasher. It cleans the interior of the appliance using hot water.
Notes:
Please note that cycle FAST WASH is dedicated for lightly soiled dishes.
Program
Drying
phase
Natural
Dry
Available
options *)
Duration of
wash
program
(h:min)**)
Water
consumption
(litres/cycle)
Energy
consumption
(kWh/cycle)
1Eco 3:40 8.7 0.66
2Auto 1:20 - 3:00 7.0 - 14.0 0.70 - 1.10
3Intensive 2:40 17.0 1.30
4 Fast wash 30’ -- 0:30 9.0 0.50
5 1:20 10.0 1.10
6Glass 1:40 12.0 1.00
7Silent 3:35 16.5 1.00
8Sanitizing - 1:40 12.0 1.30
9Pre-Wash -- 0:10 4.5 0.01
10 Self- Clean -- 0:50 9.5 0.70
50-60°
9
ENGLISH
1. Press the DELAY button: the corresponding «h» symbol
appears on the display; each time you press the button,
the time (1h, 2h, etc. up to max. 12h) from the start of
the selected wash cycle will be increased.
2. Select the wash program, press the START/PAUSE
button and within 4 seconds close the door: the timer
will begin counting down.
3. Once this time has elapsed, the indicator light «h»
switches off and the wash cycle begins.
To adjust the delay time and select a shorter period of time,
press the DELAY button. To cancel it, press the button
repeatedly until the selected delayed start indicator light
«h» switches off.
The DELAY function cannot be set once a wash cycle
has been started.
NaturalDry
Door opening system NaturalDry is a convection drying system
which automatically opens the door during/after drying phase to
ensure exceptional drying performance every day. Door opens at
the temperature that is safe to your kitchen furniture.
As additional steam protection, special designed protection foil is
added together with the dishwasher. To see how to mount protec-
tion foil please refer to (INSTALLATION GUIDE).
NaturalDry functionality could be disabled by the user as follows:
1. Go to the Dishwasher software menu pressing and holding
button (6 sec).
2. You switched to NaturalDry Control Menu, you could change
status of NaturalDry functionality by pressing button:
E – enabled d – disabled
To conrm the change and exit from the Control Menu please
press and hold button (3 sec).
DELAY
The start time of the program may be delayed for a period
of time between 1 and 12 hours.
Program
Drying
phase
Natural
Dry
Available
options *)
Duration of
wash pro-
gram
(h:min)**)
Water
consumption
(litres/cycle)
Energy
consumption
(kWh/cycle)
50° 2:45 12.0 0.92
1 Eco
2 Conventional
wash and dry 55° 2:00 15.0 1.35
3Intensive 65° - 2:30 15.0 1.50
4Fast 50° -- 0:55 11.5 1.10
5Sanitizing 65° - 1:40 11.5 1.30
6Pre-Wash
-
-- 0:10 4.5 0.01
7Self-Clean 65° --0:50 8.0 0.80
ECO program data is measured under laboratory conditions according to European Standard EN 60436:2019.
Note for Test Laboratories: For information on comparative EN testing conditions, please send an email to the following
address: [email protected]
Pre-treatment of the dishes is not needed before any of the programs.
*) Not all options can be used simultaneously.
**) Values given for programes other than the eco program are indicative only. The actual time may vary depending on many
factors such as temperature and pressure of the incoming water, room temperature, amount of detergent, quantity and type of
load, load balancing, additional selected options and sensor calibration.
Standby consumption: Left-on mode consumption: 5 W - Off mode consumption: 0.5 W
PROGRAMS DESCRIPTION
EN
9
To open the detergent dispenser
press button C.
Introduce the detergent into
the dry dispenser D only.
Place the amount of detergent
for pre-washing directly inside
the tub.
1. When measuring out the detergent refer to the mentioned ear-
lier information to add the proper quantity. Inside the dispenser
C there are indications to help the detergent dosing.
2. Remove detergent residues from the edges of the dispenser
and close the cover until it clicks.
3. Close the lid of the detergent dispenser by pulling it up until
the closing device is secured in place.
The detergent dispenser automatically opens up at the right time
according to the program. If all-in-one detergents are used, we
recommend using the TABLET button, because it adjusts the
program so that the best washing and drying results are always
achieved.
C
D
PROGRAMS TABLE
ECO program data is measured under laboratory conditions according to European Standard EN 60436:2019.
Note for Test Laboratories: For information on comparative EN testing conditions, please send an email to the following address:
Pre-treatment of the dishes is not needed before any of the programs.
*) Not all options can be used simultaneously.
**) Values given for programes other than the eco program are indicative only. The actual time may vary depending on many factors such as temperature
and pressure of the incoming water, room temperature, amount of detergent, quantity and type of load, load balancing, additional selected options and
sensor calibration.
Standby consumption: Left-on mode consumption: 5 W - Off mode consumption: 0.5 W
PROGRAMS DESCRIPTION
1. ECO -
bined energy and water consumption, and that it is used to assess compliance with the EU Ecodesign legislation.
2. AUTO - For normally soiled dishes with dried food residues. Senses the level of soiling on the dishes and adjusts the program accor-
dingly. When the sensor is detecting the soil level an animation appears in the display and the cycle duration is updated.
3. INTENSIVE -
Program recommended for heavily soiled crockery, especially suitable for pans and saucepans (not to be used for delicate items).
4. FAST WASH 30’ - Program to be used for half load of lightly-soiled dishes with no dried food residues.
5. FAST WASH AND DRY
- Normally soiled crockery. Everyday cycle, that ensures optimal cleaning and drying performance in shorter time.
6. GLASS - Program for delicate items, which are more sensitive to high temperatures, for example glasses and cups.
7. SILENT -
Suitable for night-time operation of the appliance. Ensures optimal cleaning and drying performance with the lowest noise emission.
8. SANITIZING - Normally or heavily soiled crockery, with additional antibacterial wash. Can be used to perform maintenance of the
dishwasher.
9. PRE-WASH - Use to refresh crockery planned to be washed later. No detergent to be used with this program.
10. SELF-CLEAN - Program to be used to perform maintenance of the dishwasher. It cleans the interior of the appliance using hot water.
Notes:
Please note that cycle FAST WASH is dedicated for lightly soiled dishes.
Program
Drying
phase
Natural
Dry
Available
options *)
Duration of
wash
program
(h:min)**)
Water
consumption
(litres/cycle)
Energy
consumption
(kWh/cycle)
1Eco 3:40 8.7 0.66
2Auto 1:20 - 3:00 7.0 - 14.0 0.70 - 1.10
3Intensive 2:40 17.0 1.30
4 Fast wash 30’ -- 0:30 9.0 0.50
5 1:20 10.0 1.10
6Glass 1:40 12.0 1.00
7Silent 3:35 16.5 1.00
8Sanitizing - 1:40 12.0 1.30
9Pre-Wash -- 0:10 4.5 0.01
10 Self- Clean -- 0:50 9.5 0.70
1:20 3:00 7.0 14.0 0.70 1.10
3 Intensive
EN
9
To open the detergent dispenser
press button C.
Introduce the detergent into
the dry dispenser D only.
Place the amount of detergent
for pre-washing directly inside
the tub.
1. When measuring out the detergent refer to the mentioned ear-
lier information to add the proper quantity. Inside the dispenser
C there are indications to help the detergent dosing.
2. Remove detergent residues from the edges of the dispenser
and close the cover until it clicks.
3. Close the lid of the detergent dispenser by pulling it up until
the closing device is secured in place.
The detergent dispenser automatically opens up at the right time
according to the program. If all-in-one detergents are used, we
recommend using the TABLET button, because it adjusts the
program so that the best washing and drying results are always
achieved.
C
D
PROGRAMS TABLE
ECO program data is measured under laboratory conditions according to European Standard EN 60436:2019.
Note for Test Laboratories: For information on comparative EN testing conditions, please send an email to the following address:
Pre-treatment of the dishes is not needed before any of the programs.
*) Not all options can be used simultaneously.
**) Values given for programes other than the eco program are indicative only. The actual time may vary depending on many factors such as temperature
and pressure of the incoming water, room temperature, amount of detergent, quantity and type of load, load balancing, additional selected options and
sensor calibration.
Standby consumption: Left-on mode consumption: 5 W - Off mode consumption: 0.5 W
PROGRAMS DESCRIPTION
1. ECO -
bined energy and water consumption, and that it is used to assess compliance with the EU Ecodesign legislation.
2. AUTO - For normally soiled dishes with dried food residues. Senses the level of soiling on the dishes and adjusts the program accor-
dingly. When the sensor is detecting the soil level an animation appears in the display and the cycle duration is updated.
3. INTENSIVE -
Program recommended for heavily soiled crockery, especially suitable for pans and saucepans (not to be used for delicate items).
4. FAST WASH 30’ - Program to be used for half load of lightly-soiled dishes with no dried food residues.
5. FAST WASH AND DRY
- Normally soiled crockery. Everyday cycle, that ensures optimal cleaning and drying performance in shorter time.
6. GLASS - Program for delicate items, which are more sensitive to high temperatures, for example glasses and cups.
7. SILENT -
Suitable for night-time operation of the appliance. Ensures optimal cleaning and drying performance with the lowest noise emission.
8. SANITIZING - Normally or heavily soiled crockery, with additional antibacterial wash. Can be used to perform maintenance of the
dishwasher.
9. PRE-WASH - Use to refresh crockery planned to be washed later. No detergent to be used with this program.
10. SELF-CLEAN - Program to be used to perform maintenance of the dishwasher. It cleans the interior of the appliance using hot water.
Notes:
Please note that cycle FAST WASH is dedicated for lightly soiled dishes.
Program
Drying
phase
Natural
Dry
Available
options *)
Duration of
wash
program
(h:min)**)
Water
consumption
(litres/cycle)
Energy
consumption
(kWh/cycle)
1Eco 3:40 8.7 0.66
2Auto 1:20 - 3:00 7.0 - 14.0 0.70 - 1.10
3Intensive 2:40 17.0 1.30
4 Fast wash 30’ -- 0:30 9.0 0.50
5 1:20 10.0 1.10
6Glass 1:40 12.0 1.00
7Silent 3:35 16.5 1.00
8Sanitizing - 1:40 12.0 1.30
9Pre-Wash -- 0:10 4.5 0.01
10 Self- Clean -- 0:50 9.5 0.70
65°
9
ENGLISH
1. Press the DELAY button: the corresponding «h» symbol
appears on the display; each time you press the button,
the time (1h, 2h, etc. up to max. 12h) from the start of
the selected wash cycle will be increased.
2. Select the wash program, press the START/PAUSE
button and within 4 seconds close the door: the timer
will begin counting down.
3. Once this time has elapsed, the indicator light «h»
switches off and the wash cycle begins.
To adjust the delay time and select a shorter period of time,
press the DELAY button. To cancel it, press the button
repeatedly until the selected delayed start indicator light
«h» switches off.
The DELAY function cannot be set once a wash cycle
has been started.
NaturalDry
Door opening system NaturalDry is a convection drying system
which automatically opens the door during/after drying phase to
ensure exceptional drying performance every day. Door opens at
the temperature that is safe to your kitchen furniture.
As additional steam protection, special designed protection foil is
added together with the dishwasher. To see how to mount protec-
tion foil please refer to (INSTALLATION GUIDE).
NaturalDry functionality could be disabled by the user as follows:
1. Go to the Dishwasher software menu pressing and holding
button (6 sec).
2. You switched to NaturalDry Control Menu, you could change
status of NaturalDry functionality by pressing button:
E – enabled d – disabled
To conrm the change and exit from the Control Menu please
press and hold button (3 sec).
DELAY
The start time of the program may be delayed for a period
of time between 1 and 12 hours.
Program
Drying
phase
Natural
Dry
Available
options *)
Duration of
wash pro-
gram
(h:min)**)
Water
consumption
(litres/cycle)
Energy
consumption
(kWh/cycle)
50° 2:45 12.0 0.92
1 Eco
2 Conventional
wash and dry 55° 2:00 15.0 1.35
3Intensive 65° - 2:30 15.0 1.50
4Fast 50° -- 0:55 11.5 1.10
5Sanitizing 65° - 1:40 11.5 1.30
6Pre-Wash
-
-- 0:10 4.5 0.01
7Self-Clean 65° --0:50 8.0 0.80
ECO program data is measured under laboratory conditions according to European Standard EN 60436:2019.
Note for Test Laboratories: For information on comparative EN testing conditions, please send an email to the following
address: [email protected]
Pre-treatment of the dishes is not needed before any of the programs.
*) Not all options can be used simultaneously.
**) Values given for programes other than the eco program are indicative only. The actual time may vary depending on many
factors such as temperature and pressure of the incoming water, room temperature, amount of detergent, quantity and type of
load, load balancing, additional selected options and sensor calibration.
Standby consumption: Left-on mode consumption: 5 W - Off mode consumption: 0.5 W
PROGRAMS DESCRIPTION
EN
9
To open the detergent dispenser
press button C.
Introduce the detergent into
the dry dispenser D only.
Place the amount of detergent
for pre-washing directly inside
the tub.
1. When measuring out the detergent refer to the mentioned ear-
lier information to add the proper quantity. Inside the dispenser
C there are indications to help the detergent dosing.
2. Remove detergent residues from the edges of the dispenser
and close the cover until it clicks.
3. Close the lid of the detergent dispenser by pulling it up until
the closing device is secured in place.
The detergent dispenser automatically opens up at the right time
according to the program. If all-in-one detergents are used, we
recommend using the TABLET button, because it adjusts the
program so that the best washing and drying results are always
achieved.
C
D
PROGRAMS TABLE
ECO program data is measured under laboratory conditions according to European Standard EN 60436:2019.
Note for Test Laboratories: For information on comparative EN testing conditions, please send an email to the following address:
Pre-treatment of the dishes is not needed before any of the programs.
*) Not all options can be used simultaneously.
**) Values given for programes other than the eco program are indicative only. The actual time may vary depending on many factors such as temperature
and pressure of the incoming water, room temperature, amount of detergent, quantity and type of load, load balancing, additional selected options and
sensor calibration.
Standby consumption: Left-on mode consumption: 5 W - Off mode consumption: 0.5 W
PROGRAMS DESCRIPTION
1. ECO -
bined energy and water consumption, and that it is used to assess compliance with the EU Ecodesign legislation.
2. AUTO - For normally soiled dishes with dried food residues. Senses the level of soiling on the dishes and adjusts the program accor-
dingly. When the sensor is detecting the soil level an animation appears in the display and the cycle duration is updated.
3. INTENSIVE -
Program recommended for heavily soiled crockery, especially suitable for pans and saucepans (not to be used for delicate items).
4. FAST WASH 30’ - Program to be used for half load of lightly-soiled dishes with no dried food residues.
5. FAST WASH AND DRY
- Normally soiled crockery. Everyday cycle, that ensures optimal cleaning and drying performance in shorter time.
6. GLASS - Program for delicate items, which are more sensitive to high temperatures, for example glasses and cups.
7. SILENT -
Suitable for night-time operation of the appliance. Ensures optimal cleaning and drying performance with the lowest noise emission.
8. SANITIZING - Normally or heavily soiled crockery, with additional antibacterial wash. Can be used to perform maintenance of the
dishwasher.
9. PRE-WASH - Use to refresh crockery planned to be washed later. No detergent to be used with this program.
10. SELF-CLEAN - Program to be used to perform maintenance of the dishwasher. It cleans the interior of the appliance using hot water.
Notes:
Please note that cycle FAST WASH is dedicated for lightly soiled dishes.
Program
Drying
phase
Natural
Dry
Available
options *)
Duration of
wash
program
(h:min)**)
Water
consumption
(litres/cycle)
Energy
consumption
(kWh/cycle)
1Eco 3:40 8.7 0.66
2Auto 1:20 - 3:00 7.0 - 14.0 0.70 - 1.10
3Intensive 2:40 17.0 1.30
4 Fast wash 30’ -- 0:30 9.0 0.50
5 1:20 10.0 1.10
6Glass 1:40 12.0 1.00
7Silent 3:35 16.5 1.00
8Sanitizing - 1:40 12.0 1.30
9Pre-Wash -- 0:10 4.5 0.01
10 Self- Clean -- 0:50 9.5 0.70
2:40 17.0 1.30
4 Fast wash 30’
EN
9
To open the detergent dispenser
press button C.
Introduce the detergent into
the dry dispenser D only.
Place the amount of detergent
for pre-washing directly inside
the tub.
1. When measuring out the detergent refer to the mentioned ear-
lier information to add the proper quantity. Inside the dispenser
C there are indications to help the detergent dosing.
2. Remove detergent residues from the edges of the dispenser
and close the cover until it clicks.
3. Close the lid of the detergent dispenser by pulling it up until
the closing device is secured in place.
The detergent dispenser automatically opens up at the right time
according to the program. If all-in-one detergents are used, we
recommend using the TABLET button, because it adjusts the
program so that the best washing and drying results are always
achieved.
C
D
PROGRAMS TABLE
ECO program data is measured under laboratory conditions according to European Standard EN 60436:2019.
Note for Test Laboratories: For information on comparative EN testing conditions, please send an email to the following address:
Pre-treatment of the dishes is not needed before any of the programs.
*) Not all options can be used simultaneously.
**) Values given for programes other than the eco program are indicative only. The actual time may vary depending on many factors such as temperature
and pressure of the incoming water, room temperature, amount of detergent, quantity and type of load, load balancing, additional selected options and
sensor calibration.
Standby consumption: Left-on mode consumption: 5 W - Off mode consumption: 0.5 W
PROGRAMS DESCRIPTION
1. ECO -
bined energy and water consumption, and that it is used to assess compliance with the EU Ecodesign legislation.
2. AUTO - For normally soiled dishes with dried food residues. Senses the level of soiling on the dishes and adjusts the program accor-
dingly. When the sensor is detecting the soil level an animation appears in the display and the cycle duration is updated.
3. INTENSIVE -
Program recommended for heavily soiled crockery, especially suitable for pans and saucepans (not to be used for delicate items).
4. FAST WASH 30’ - Program to be used for half load of lightly-soiled dishes with no dried food residues.
5. FAST WASH AND DRY
- Normally soiled crockery. Everyday cycle, that ensures optimal cleaning and drying performance in shorter time.
6. GLASS - Program for delicate items, which are more sensitive to high temperatures, for example glasses and cups.
7. SILENT -
Suitable for night-time operation of the appliance. Ensures optimal cleaning and drying performance with the lowest noise emission.
8. SANITIZING - Normally or heavily soiled crockery, with additional antibacterial wash. Can be used to perform maintenance of the
dishwasher.
9. PRE-WASH - Use to refresh crockery planned to be washed later. No detergent to be used with this program.
10. SELF-CLEAN - Program to be used to perform maintenance of the dishwasher. It cleans the interior of the appliance using hot water.
Notes:
Please note that cycle FAST WASH is dedicated for lightly soiled dishes.
Program
Drying
phase
Natural
Dry
Available
options *)
Duration of
wash
program
(h:min)**)
Water
consumption
(litres/cycle)
Energy
consumption
(kWh/cycle)
1Eco 3:40 8.7 0.66
2Auto 1:20 - 3:00 7.0 - 14.0 0.70 - 1.10
3Intensive 2:40 17.0 1.30
4 Fast wash 30’ -- 0:30 9.0 0.50
5 1:20 10.0 1.10
6Glass 1:40 12.0 1.00
7Silent 3:35 16.5 1.00
8Sanitizing - 1:40 12.0 1.30
9Pre-Wash -- 0:10 4.5 0.01
10 Self- Clean -- 0:50 9.5 0.70
50° - -
EN
9
To open the detergent dispenser
press button C.
Introduce the detergent into
the dry dispenser D only.
Place the amount of detergent
for pre-washing directly inside
the tub.
1. When measuring out the detergent refer to the mentioned ear-
lier information to add the proper quantity. Inside the dispenser
C there are indications to help the detergent dosing.
2. Remove detergent residues from the edges of the dispenser
and close the cover until it clicks.
3. Close the lid of the detergent dispenser by pulling it up until
the closing device is secured in place.
The detergent dispenser automatically opens up at the right time
according to the program. If all-in-one detergents are used, we
recommend using the TABLET button, because it adjusts the
program so that the best washing and drying results are always
achieved.
C
D
PROGRAMS TABLE
ECO program data is measured under laboratory conditions according to European Standard EN 60436:2019.
Note for Test Laboratories: For information on comparative EN testing conditions, please send an email to the following address:
Pre-treatment of the dishes is not needed before any of the programs.
*) Not all options can be used simultaneously.
**) Values given for programes other than the eco program are indicative only. The actual time may vary depending on many factors such as temperature
and pressure of the incoming water, room temperature, amount of detergent, quantity and type of load, load balancing, additional selected options and
sensor calibration.
Standby consumption: Left-on mode consumption: 5 W - Off mode consumption: 0.5 W
PROGRAMS DESCRIPTION
1. ECO -
bined energy and water consumption, and that it is used to assess compliance with the EU Ecodesign legislation.
2. AUTO - For normally soiled dishes with dried food residues. Senses the level of soiling on the dishes and adjusts the program accor-
dingly. When the sensor is detecting the soil level an animation appears in the display and the cycle duration is updated.
3. INTENSIVE -
Program recommended for heavily soiled crockery, especially suitable for pans and saucepans (not to be used for delicate items).
4. FAST WASH 30’ - Program to be used for half load of lightly-soiled dishes with no dried food residues.
5. FAST WASH AND DRY
- Normally soiled crockery. Everyday cycle, that ensures optimal cleaning and drying performance in shorter time.
6. GLASS - Program for delicate items, which are more sensitive to high temperatures, for example glasses and cups.
7. SILENT -
Suitable for night-time operation of the appliance. Ensures optimal cleaning and drying performance with the lowest noise emission.
8. SANITIZING - Normally or heavily soiled crockery, with additional antibacterial wash. Can be used to perform maintenance of the
dishwasher.
9. PRE-WASH - Use to refresh crockery planned to be washed later. No detergent to be used with this program.
10. SELF-CLEAN - Program to be used to perform maintenance of the dishwasher. It cleans the interior of the appliance using hot water.
Notes:
Please note that cycle FAST WASH is dedicated for lightly soiled dishes.
Program
Drying
phase
Natural
Dry
Available
options *)
Duration of
wash
program
(h:min)**)
Water
consumption
(litres/cycle)
Energy
consumption
(kWh/cycle)
1Eco 3:40 8.7 0.66
2Auto 1:20 - 3:00 7.0 - 14.0 0.70 - 1.10
3Intensive 2:40 17.0 1.30
4 Fast wash 30’ -- 0:30 9.0 0.50
5 1:20 10.0 1.10
6Glass 1:40 12.0 1.00
7Silent 3:35 16.5 1.00
8Sanitizing - 1:40 12.0 1.30
9Pre-Wash -- 0:10 4.5 0.01
10 Self- Clean -- 0:50 9.5 0.70
0:30 9.0 0.50
5 Fast wash and Dry
EN
9
To open the detergent dispenser
press button C.
Introduce the detergent into
the dry dispenser D only.
Place the amount of detergent
for pre-washing directly inside
the tub.
1. When measuring out the detergent refer to the mentioned ear-
lier information to add the proper quantity. Inside the dispenser
C there are indications to help the detergent dosing.
2. Remove detergent residues from the edges of the dispenser
and close the cover until it clicks.
3. Close the lid of the detergent dispenser by pulling it up until
the closing device is secured in place.
The detergent dispenser automatically opens up at the right time
according to the program. If all-in-one detergents are used, we
recommend using the TABLET button, because it adjusts the
program so that the best washing and drying results are always
achieved.
C
D
PROGRAMS TABLE
ECO program data is measured under laboratory conditions according to European Standard EN 60436:2019.
Note for Test Laboratories: For information on comparative EN testing conditions, please send an email to the following address:
Pre-treatment of the dishes is not needed before any of the programs.
*) Not all options can be used simultaneously.
**) Values given for programes other than the eco program are indicative only. The actual time may vary depending on many factors such as temperature
and pressure of the incoming water, room temperature, amount of detergent, quantity and type of load, load balancing, additional selected options and
sensor calibration.
Standby consumption: Left-on mode consumption: 5 W - Off mode consumption: 0.5 W
PROGRAMS DESCRIPTION
1. ECO -
bined energy and water consumption, and that it is used to assess compliance with the EU Ecodesign legislation.
2. AUTO - For normally soiled dishes with dried food residues. Senses the level of soiling on the dishes and adjusts the program accor-
dingly. When the sensor is detecting the soil level an animation appears in the display and the cycle duration is updated.
3. INTENSIVE -
Program recommended for heavily soiled crockery, especially suitable for pans and saucepans (not to be used for delicate items).
4. FAST WASH 30’ - Program to be used for half load of lightly-soiled dishes with no dried food residues.
5. FAST WASH AND DRY
- Normally soiled crockery. Everyday cycle, that ensures optimal cleaning and drying performance in shorter time.
6. GLASS - Program for delicate items, which are more sensitive to high temperatures, for example glasses and cups.
7. SILENT -
Suitable for night-time operation of the appliance. Ensures optimal cleaning and drying performance with the lowest noise emission.
8. SANITIZING - Normally or heavily soiled crockery, with additional antibacterial wash. Can be used to perform maintenance of the
dishwasher.
9. PRE-WASH - Use to refresh crockery planned to be washed later. No detergent to be used with this program.
10. SELF-CLEAN - Program to be used to perform maintenance of the dishwasher. It cleans the interior of the appliance using hot water.
Notes:
Please note that cycle FAST WASH is dedicated for lightly soiled dishes.
Program
Drying
phase
Natural
Dry
Available
options *)
Duration of
wash
program
(h:min)**)
Water
consumption
(litres/cycle)
Energy
consumption
(kWh/cycle)
1Eco 3:40 8.7 0.66
2Auto 1:20 - 3:00 7.0 - 14.0 0.70 - 1.10
3Intensive 2:40 17.0 1.30
4 Fast wash 30’ -- 0:30 9.0 0.50
5 1:20 10.0 1.10
6Glass 1:40 12.0 1.00
7Silent 3:35 16.5 1.00
8Sanitizing - 1:40 12.0 1.30
9Pre-Wash -- 0:10 4.5 0.01
10 Self- Clean -- 0:50 9.5 0.70
50°
9
ENGLISH
1. Press the DELAY button: the corresponding «h» symbol
appears on the display; each time you press the button,
the time (1h, 2h, etc. up to max. 12h) from the start of
the selected wash cycle will be increased.
2. Select the wash program, press the START/PAUSE
button and within 4 seconds close the door: the timer
will begin counting down.
3. Once this time has elapsed, the indicator light «h»
switches off and the wash cycle begins.
To adjust the delay time and select a shorter period of time,
press the DELAY button. To cancel it, press the button
repeatedly until the selected delayed start indicator light
«h» switches off.
The DELAY function cannot be set once a wash cycle
has been started.
NaturalDry
Door opening system NaturalDry is a convection drying system
which automatically opens the door during/after drying phase to
ensure exceptional drying performance every day. Door opens at
the temperature that is safe to your kitchen furniture.
As additional steam protection, special designed protection foil is
added together with the dishwasher. To see how to mount protec-
tion foil please refer to (INSTALLATION GUIDE).
NaturalDry functionality could be disabled by the user as follows:
1. Go to the Dishwasher software menu pressing and holding
button (6 sec).
2. You switched to NaturalDry Control Menu, you could change
status of NaturalDry functionality by pressing button:
E – enabled d – disabled
To conrm the change and exit from the Control Menu please
press and hold button (3 sec).
DELAY
The start time of the program may be delayed for a period
of time between 1 and 12 hours.
Program
Drying
phase
Natural
Dry
Available
options *)
Duration of
wash pro-
gram
(h:min)**)
Water
consumption
(litres/cycle)
Energy
consumption
(kWh/cycle)
50° 2:45 12.0 0.92
1 Eco
2 Conventional
wash and dry 55° 2:00 15.0 1.35
3Intensive 65° - 2:30 15.0 1.50
4Fast 50° -- 0:55 11.5 1.10
5Sanitizing 65° - 1:40 11.5 1.30
6Pre-Wash
-
-- 0:10 4.5 0.01
7Self-Clean 65° --0:50 8.0 0.80
ECO program data is measured under laboratory conditions according to European Standard EN 60436:2019.
Note for Test Laboratories: For information on comparative EN testing conditions, please send an email to the following
address: [email protected]
Pre-treatment of the dishes is not needed before any of the programs.
*) Not all options can be used simultaneously.
**) Values given for programes other than the eco program are indicative only. The actual time may vary depending on many
factors such as temperature and pressure of the incoming water, room temperature, amount of detergent, quantity and type of
load, load balancing, additional selected options and sensor calibration.
Standby consumption: Left-on mode consumption: 5 W - Off mode consumption: 0.5 W
PROGRAMS DESCRIPTION
9
ENGLISH
1. Press the DELAY button: the corresponding «h» symbol
appears on the display; each time you press the button,
the time (1h, 2h, etc. up to max. 12h) from the start of
the selected wash cycle will be increased.
2. Select the wash program, press the START/PAUSE
button and within 4 seconds close the door: the timer
will begin counting down.
3. Once this time has elapsed, the indicator light «h»
switches off and the wash cycle begins.
To adjust the delay time and select a shorter period of time,
press the DELAY button. To cancel it, press the button
repeatedly until the selected delayed start indicator light
«h» switches off.
The DELAY function cannot be set once a wash cycle
has been started.
NaturalDry
Door opening system NaturalDry is a convection drying system
which automatically opens the door during/after drying phase to
ensure exceptional drying performance every day. Door opens at
the temperature that is safe to your kitchen furniture.
As additional steam protection, special designed protection foil is
added together with the dishwasher. To see how to mount protec-
tion foil please refer to (INSTALLATION GUIDE).
NaturalDry functionality could be disabled by the user as follows:
1. Go to the Dishwasher software menu pressing and holding
button (6 sec).
2. You switched to NaturalDry Control Menu, you could change
status of NaturalDry functionality by pressing button:
E – enabled d – disabled
To conrm the change and exit from the Control Menu please
press and hold button (3 sec).
DELAY
The start time of the program may be delayed for a period
of time between 1 and 12 hours.
Program
Drying
phase
Natural
Dry
Available
options *)
Duration of
wash pro-
gram
(h:min)**)
Water
consumption
(litres/cycle)
Energy
consumption
(kWh/cycle)
50° 2:45 12.0 0.92
1 Eco
2 Conventional
wash and dry 55° 2:00 15.0 1.35
3Intensive 65° - 2:30 15.0 1.50
4Fast 50° -- 0:55 11.5 1.10
5Sanitizing 65° - 1:40 11.5 1.30
6Pre-Wash
-
-- 0:10 4.5 0.01
7Self-Clean 65° --0:50 8.0 0.80
ECO program data is measured under laboratory conditions according to European Standard EN 60436:2019.
Note for Test Laboratories: For information on comparative EN testing conditions, please send an email to the following
address: [email protected]
Pre-treatment of the dishes is not needed before any of the programs.
*) Not all options can be used simultaneously.
**) Values given for programes other than the eco program are indicative only. The actual time may vary depending on many
factors such as temperature and pressure of the incoming water, room temperature, amount of detergent, quantity and type of
load, load balancing, additional selected options and sensor calibration.
Standby consumption: Left-on mode consumption: 5 W - Off mode consumption: 0.5 W
PROGRAMS DESCRIPTION
EN
9
To open the detergent dispenser
press button C.
Introduce the detergent into
the dry dispenser D only.
Place the amount of detergent
for pre-washing directly inside
the tub.
1. When measuring out the detergent refer to the mentioned ear-
lier information to add the proper quantity. Inside the dispenser
C there are indications to help the detergent dosing.
2. Remove detergent residues from the edges of the dispenser
and close the cover until it clicks.
3. Close the lid of the detergent dispenser by pulling it up until
the closing device is secured in place.
The detergent dispenser automatically opens up at the right time
according to the program. If all-in-one detergents are used, we
recommend using the TABLET button, because it adjusts the
program so that the best washing and drying results are always
achieved.
C
D
PROGRAMS TABLE
ECO program data is measured under laboratory conditions according to European Standard EN 60436:2019.
Note for Test Laboratories: For information on comparative EN testing conditions, please send an email to the following address:
Pre-treatment of the dishes is not needed before any of the programs.
*) Not all options can be used simultaneously.
**) Values given for programes other than the eco program are indicative only. The actual time may vary depending on many factors such as temperature
and pressure of the incoming water, room temperature, amount of detergent, quantity and type of load, load balancing, additional selected options and
sensor calibration.
Standby consumption: Left-on mode consumption: 5 W - Off mode consumption: 0.5 W
PROGRAMS DESCRIPTION
1. ECO -
bined energy and water consumption, and that it is used to assess compliance with the EU Ecodesign legislation.
2. AUTO - For normally soiled dishes with dried food residues. Senses the level of soiling on the dishes and adjusts the program accor-
dingly. When the sensor is detecting the soil level an animation appears in the display and the cycle duration is updated.
3. INTENSIVE -
Program recommended for heavily soiled crockery, especially suitable for pans and saucepans (not to be used for delicate items).
4. FAST WASH 30’ - Program to be used for half load of lightly-soiled dishes with no dried food residues.
5. FAST WASH AND DRY
- Normally soiled crockery. Everyday cycle, that ensures optimal cleaning and drying performance in shorter time.
6. GLASS - Program for delicate items, which are more sensitive to high temperatures, for example glasses and cups.
7. SILENT -
Suitable for night-time operation of the appliance. Ensures optimal cleaning and drying performance with the lowest noise emission.
8. SANITIZING - Normally or heavily soiled crockery, with additional antibacterial wash. Can be used to perform maintenance of the
dishwasher.
9. PRE-WASH - Use to refresh crockery planned to be washed later. No detergent to be used with this program.
10. SELF-CLEAN - Program to be used to perform maintenance of the dishwasher. It cleans the interior of the appliance using hot water.
Notes:
Please note that cycle FAST WASH is dedicated for lightly soiled dishes.
Program
Drying
phase
Natural
Dry
Available
options *)
Duration of
wash
program
(h:min)**)
Water
consumption
(litres/cycle)
Energy
consumption
(kWh/cycle)
1Eco 3:40 8.7 0.66
2Auto 1:20 - 3:00 7.0 - 14.0 0.70 - 1.10
3Intensive 2:40 17.0 1.30
4 Fast wash 30’ -- 0:30 9.0 0.50
5 1:20 10.0 1.10
6Glass 1:40 12.0 1.00
7Silent 3:35 16.5 1.00
8Sanitizing - 1:40 12.0 1.30
9Pre-Wash -- 0:10 4.5 0.01
10 Self- Clean -- 0:50 9.5 0.70
1:20 10.0 1.10
6 Glass
EN
9
To open the detergent dispenser
press button C.
Introduce the detergent into
the dry dispenser D only.
Place the amount of detergent
for pre-washing directly inside
the tub.
1. When measuring out the detergent refer to the mentioned ear-
lier information to add the proper quantity. Inside the dispenser
C there are indications to help the detergent dosing.
2. Remove detergent residues from the edges of the dispenser
and close the cover until it clicks.
3. Close the lid of the detergent dispenser by pulling it up until
the closing device is secured in place.
The detergent dispenser automatically opens up at the right time
according to the program. If all-in-one detergents are used, we
recommend using the TABLET button, because it adjusts the
program so that the best washing and drying results are always
achieved.
C
D
PROGRAMS TABLE
ECO program data is measured under laboratory conditions according to European Standard EN 60436:2019.
Note for Test Laboratories: For information on comparative EN testing conditions, please send an email to the following address:
Pre-treatment of the dishes is not needed before any of the programs.
*) Not all options can be used simultaneously.
**) Values given for programes other than the eco program are indicative only. The actual time may vary depending on many factors such as temperature
and pressure of the incoming water, room temperature, amount of detergent, quantity and type of load, load balancing, additional selected options and
sensor calibration.
Standby consumption: Left-on mode consumption: 5 W - Off mode consumption: 0.5 W
PROGRAMS DESCRIPTION
1. ECO -
bined energy and water consumption, and that it is used to assess compliance with the EU Ecodesign legislation.
2. AUTO - For normally soiled dishes with dried food residues. Senses the level of soiling on the dishes and adjusts the program accor-
dingly. When the sensor is detecting the soil level an animation appears in the display and the cycle duration is updated.
3. INTENSIVE -
Program recommended for heavily soiled crockery, especially suitable for pans and saucepans (not to be used for delicate items).
4. FAST WASH 30’ - Program to be used for half load of lightly-soiled dishes with no dried food residues.
5. FAST WASH AND DRY
- Normally soiled crockery. Everyday cycle, that ensures optimal cleaning and drying performance in shorter time.
6. GLASS - Program for delicate items, which are more sensitive to high temperatures, for example glasses and cups.
7. SILENT -
Suitable for night-time operation of the appliance. Ensures optimal cleaning and drying performance with the lowest noise emission.
8. SANITIZING - Normally or heavily soiled crockery, with additional antibacterial wash. Can be used to perform maintenance of the
dishwasher.
9. PRE-WASH - Use to refresh crockery planned to be washed later. No detergent to be used with this program.
10. SELF-CLEAN - Program to be used to perform maintenance of the dishwasher. It cleans the interior of the appliance using hot water.
Notes:
Please note that cycle FAST WASH is dedicated for lightly soiled dishes.
Program
Drying
phase
Natural
Dry
Available
options *)
Duration of
wash
program
(h:min)**)
Water
consumption
(litres/cycle)
Energy
consumption
(kWh/cycle)
1Eco 3:40 8.7 0.66
2Auto 1:20 - 3:00 7.0 - 14.0 0.70 - 1.10
3Intensive 2:40 17.0 1.30
4 Fast wash 30’ -- 0:30 9.0 0.50
5 1:20 10.0 1.10
6Glass 1:40 12.0 1.00
7Silent 3:35 16.5 1.00
8Sanitizing - 1:40 12.0 1.30
9Pre-Wash -- 0:10 4.5 0.01
10 Self- Clean -- 0:50 9.5 0.70
45°
9
ENGLISH
1. Press the DELAY button: the corresponding «h» symbol
appears on the display; each time you press the button,
the time (1h, 2h, etc. up to max. 12h) from the start of
the selected wash cycle will be increased.
2. Select the wash program, press the START/PAUSE
button and within 4 seconds close the door: the timer
will begin counting down.
3. Once this time has elapsed, the indicator light «h»
switches off and the wash cycle begins.
To adjust the delay time and select a shorter period of time,
press the DELAY button. To cancel it, press the button
repeatedly until the selected delayed start indicator light
«h» switches off.
The DELAY function cannot be set once a wash cycle
has been started.
NaturalDry
Door opening system NaturalDry is a convection drying system
which automatically opens the door during/after drying phase to
ensure exceptional drying performance every day. Door opens at
the temperature that is safe to your kitchen furniture.
As additional steam protection, special designed protection foil is
added together with the dishwasher. To see how to mount protec-
tion foil please refer to (INSTALLATION GUIDE).
NaturalDry functionality could be disabled by the user as follows:
1. Go to the Dishwasher software menu pressing and holding
button (6 sec).
2. You switched to NaturalDry Control Menu, you could change
status of NaturalDry functionality by pressing button:
E – enabled d – disabled
To conrm the change and exit from the Control Menu please
press and hold button (3 sec).
DELAY
The start time of the program may be delayed for a period
of time between 1 and 12 hours.
Program
Drying
phase
Natural
Dry
Available
options *)
Duration of
wash pro-
gram
(h:min)**)
Water
consumption
(litres/cycle)
Energy
consumption
(kWh/cycle)
50° 2:45 12.0 0.92
1 Eco
2 Conventional
wash and dry 55° 2:00 15.0 1.35
3Intensive 65° - 2:30 15.0 1.50
4Fast 50° -- 0:55 11.5 1.10
5Sanitizing 65° - 1:40 11.5 1.30
6Pre-Wash
-
-- 0:10 4.5 0.01
7Self-Clean 65° --0:50 8.0 0.80
ECO program data is measured under laboratory conditions according to European Standard EN 60436:2019.
Note for Test Laboratories: For information on comparative EN testing conditions, please send an email to the following
address: [email protected]
Pre-treatment of the dishes is not needed before any of the programs.
*) Not all options can be used simultaneously.
**) Values given for programes other than the eco program are indicative only. The actual time may vary depending on many
factors such as temperature and pressure of the incoming water, room temperature, amount of detergent, quantity and type of
load, load balancing, additional selected options and sensor calibration.
Standby consumption: Left-on mode consumption: 5 W - Off mode consumption: 0.5 W
PROGRAMS DESCRIPTION
EN
9
To open the detergent dispenser
press button C.
Introduce the detergent into
the dry dispenser D only.
Place the amount of detergent
for pre-washing directly inside
the tub.
1. When measuring out the detergent refer to the mentioned ear-
lier information to add the proper quantity. Inside the dispenser
C there are indications to help the detergent dosing.
2. Remove detergent residues from the edges of the dispenser
and close the cover until it clicks.
3. Close the lid of the detergent dispenser by pulling it up until
the closing device is secured in place.
The detergent dispenser automatically opens up at the right time
according to the program. If all-in-one detergents are used, we
recommend using the TABLET button, because it adjusts the
program so that the best washing and drying results are always
achieved.
C
D
PROGRAMS TABLE
ECO program data is measured under laboratory conditions according to European Standard EN 60436:2019.
Note for Test Laboratories: For information on comparative EN testing conditions, please send an email to the following address:
Pre-treatment of the dishes is not needed before any of the programs.
*) Not all options can be used simultaneously.
**) Values given for programes other than the eco program are indicative only. The actual time may vary depending on many factors such as temperature
and pressure of the incoming water, room temperature, amount of detergent, quantity and type of load, load balancing, additional selected options and
sensor calibration.
Standby consumption: Left-on mode consumption: 5 W - Off mode consumption: 0.5 W
PROGRAMS DESCRIPTION
1. ECO -
bined energy and water consumption, and that it is used to assess compliance with the EU Ecodesign legislation.
2. AUTO - For normally soiled dishes with dried food residues. Senses the level of soiling on the dishes and adjusts the program accor-
dingly. When the sensor is detecting the soil level an animation appears in the display and the cycle duration is updated.
3. INTENSIVE -
Program recommended for heavily soiled crockery, especially suitable for pans and saucepans (not to be used for delicate items).
4. FAST WASH 30’ - Program to be used for half load of lightly-soiled dishes with no dried food residues.
5. FAST WASH AND DRY
- Normally soiled crockery. Everyday cycle, that ensures optimal cleaning and drying performance in shorter time.
6. GLASS - Program for delicate items, which are more sensitive to high temperatures, for example glasses and cups.
7. SILENT -
Suitable for night-time operation of the appliance. Ensures optimal cleaning and drying performance with the lowest noise emission.
8. SANITIZING - Normally or heavily soiled crockery, with additional antibacterial wash. Can be used to perform maintenance of the
dishwasher.
9. PRE-WASH - Use to refresh crockery planned to be washed later. No detergent to be used with this program.
10. SELF-CLEAN - Program to be used to perform maintenance of the dishwasher. It cleans the interior of the appliance using hot water.
Notes:
Please note that cycle FAST WASH is dedicated for lightly soiled dishes.
Program
Drying
phase
Natural
Dry
Available
options *)
Duration of
wash
program
(h:min)**)
Water
consumption
(litres/cycle)
Energy
consumption
(kWh/cycle)
1Eco 3:40 8.7 0.66
2Auto 1:20 - 3:00 7.0 - 14.0 0.70 - 1.10
3Intensive 2:40 17.0 1.30
4 Fast wash 30’ -- 0:30 9.0 0.50
5 1:20 10.0 1.10
6Glass 1:40 12.0 1.00
7Silent 3:35 16.5 1.00
8Sanitizing - 1:40 12.0 1.30
9Pre-Wash -- 0:10 4.5 0.01
10 Self- Clean -- 0:50 9.5 0.70
1:40 12.0 1.00
7 Silent
EN
9
To open the detergent dispenser
press button C.
Introduce the detergent into
the dry dispenser D only.
Place the amount of detergent
for pre-washing directly inside
the tub.
1. When measuring out the detergent refer to the mentioned ear-
lier information to add the proper quantity. Inside the dispenser
C there are indications to help the detergent dosing.
2. Remove detergent residues from the edges of the dispenser
and close the cover until it clicks.
3. Close the lid of the detergent dispenser by pulling it up until
the closing device is secured in place.
The detergent dispenser automatically opens up at the right time
according to the program. If all-in-one detergents are used, we
recommend using the TABLET button, because it adjusts the
program so that the best washing and drying results are always
achieved.
C
D
PROGRAMS TABLE
ECO program data is measured under laboratory conditions according to European Standard EN 60436:2019.
Note for Test Laboratories: For information on comparative EN testing conditions, please send an email to the following address:
Pre-treatment of the dishes is not needed before any of the programs.
*) Not all options can be used simultaneously.
**) Values given for programes other than the eco program are indicative only. The actual time may vary depending on many factors such as temperature
and pressure of the incoming water, room temperature, amount of detergent, quantity and type of load, load balancing, additional selected options and
sensor calibration.
Standby consumption: Left-on mode consumption: 5 W - Off mode consumption: 0.5 W
PROGRAMS DESCRIPTION
1. ECO -
bined energy and water consumption, and that it is used to assess compliance with the EU Ecodesign legislation.
2. AUTO - For normally soiled dishes with dried food residues. Senses the level of soiling on the dishes and adjusts the program accor-
dingly. When the sensor is detecting the soil level an animation appears in the display and the cycle duration is updated.
3. INTENSIVE -
Program recommended for heavily soiled crockery, especially suitable for pans and saucepans (not to be used for delicate items).
4. FAST WASH 30’ - Program to be used for half load of lightly-soiled dishes with no dried food residues.
5. FAST WASH AND DRY
- Normally soiled crockery. Everyday cycle, that ensures optimal cleaning and drying performance in shorter time.
6. GLASS - Program for delicate items, which are more sensitive to high temperatures, for example glasses and cups.
7. SILENT -
Suitable for night-time operation of the appliance. Ensures optimal cleaning and drying performance with the lowest noise emission.
8. SANITIZING - Normally or heavily soiled crockery, with additional antibacterial wash. Can be used to perform maintenance of the
dishwasher.
9. PRE-WASH - Use to refresh crockery planned to be washed later. No detergent to be used with this program.
10. SELF-CLEAN - Program to be used to perform maintenance of the dishwasher. It cleans the interior of the appliance using hot water.
Notes:
Please note that cycle FAST WASH is dedicated for lightly soiled dishes.
Program
Drying
phase
Natural
Dry
Available
options *)
Duration of
wash
program
(h:min)**)
Water
consumption
(litres/cycle)
Energy
consumption
(kWh/cycle)
1Eco 3:40 8.7 0.66
2Auto 1:20 - 3:00 7.0 - 14.0 0.70 - 1.10
3Intensive 2:40 17.0 1.30
4 Fast wash 30’ -- 0:30 9.0 0.50
5 1:20 10.0 1.10
6Glass 1:40 12.0 1.00
7Silent 3:35 16.5 1.00
8Sanitizing - 1:40 12.0 1.30
9Pre-Wash -- 0:10 4.5 0.01
10 Self- Clean -- 0:50 9.5 0.70
50°
9
ENGLISH
1. Press the DELAY button: the corresponding «h» symbol
appears on the display; each time you press the button,
the time (1h, 2h, etc. up to max. 12h) from the start of
the selected wash cycle will be increased.
2. Select the wash program, press the START/PAUSE
button and within 4 seconds close the door: the timer
will begin counting down.
3. Once this time has elapsed, the indicator light «h»
switches off and the wash cycle begins.
To adjust the delay time and select a shorter period of time,
press the DELAY button. To cancel it, press the button
repeatedly until the selected delayed start indicator light
«h» switches off.
The DELAY function cannot be set once a wash cycle
has been started.
NaturalDry
Door opening system NaturalDry is a convection drying system
which automatically opens the door during/after drying phase to
ensure exceptional drying performance every day. Door opens at
the temperature that is safe to your kitchen furniture.
As additional steam protection, special designed protection foil is
added together with the dishwasher. To see how to mount protec-
tion foil please refer to (INSTALLATION GUIDE).
NaturalDry functionality could be disabled by the user as follows:
1. Go to the Dishwasher software menu pressing and holding
button (6 sec).
2. You switched to NaturalDry Control Menu, you could change
status of NaturalDry functionality by pressing button:
E – enabled d – disabled
To conrm the change and exit from the Control Menu please
press and hold button (3 sec).
DELAY
The start time of the program may be delayed for a period
of time between 1 and 12 hours.
Program
Drying
phase
Natural
Dry
Available
options *)
Duration of
wash pro-
gram
(h:min)**)
Water
consumption
(litres/cycle)
Energy
consumption
(kWh/cycle)
50° 2:45 12.0 0.92
1 Eco
2 Conventional
wash and dry 55° 2:00 15.0 1.35
3Intensive 65° - 2:30 15.0 1.50
4Fast 50° -- 0:55 11.5 1.10
5Sanitizing 65° - 1:40 11.5 1.30
6Pre-Wash
-
-- 0:10 4.5 0.01
7Self-Clean 65° --0:50 8.0 0.80
ECO program data is measured under laboratory conditions according to European Standard EN 60436:2019.
Note for Test Laboratories: For information on comparative EN testing conditions, please send an email to the following
address: [email protected]
Pre-treatment of the dishes is not needed before any of the programs.
*) Not all options can be used simultaneously.
**) Values given for programes other than the eco program are indicative only. The actual time may vary depending on many
factors such as temperature and pressure of the incoming water, room temperature, amount of detergent, quantity and type of
load, load balancing, additional selected options and sensor calibration.
Standby consumption: Left-on mode consumption: 5 W - Off mode consumption: 0.5 W
PROGRAMS DESCRIPTION
9
ENGLISH
1. Press the DELAY button: the corresponding «h» symbol
appears on the display; each time you press the button,
the time (1h, 2h, etc. up to max. 12h) from the start of
the selected wash cycle will be increased.
2. Select the wash program, press the START/PAUSE
button and within 4 seconds close the door: the timer
will begin counting down.
3. Once this time has elapsed, the indicator light «h»
switches off and the wash cycle begins.
To adjust the delay time and select a shorter period of time,
press the DELAY button. To cancel it, press the button
repeatedly until the selected delayed start indicator light
«h» switches off.
The DELAY function cannot be set once a wash cycle
has been started.
NaturalDry
Door opening system NaturalDry is a convection drying system
which automatically opens the door during/after drying phase to
ensure exceptional drying performance every day. Door opens at
the temperature that is safe to your kitchen furniture.
As additional steam protection, special designed protection foil is
added together with the dishwasher. To see how to mount protec-
tion foil please refer to (INSTALLATION GUIDE).
NaturalDry functionality could be disabled by the user as follows:
1. Go to the Dishwasher software menu pressing and holding
button (6 sec).
2. You switched to NaturalDry Control Menu, you could change
status of NaturalDry functionality by pressing button:
E – enabled d – disabled
To conrm the change and exit from the Control Menu please
press and hold button (3 sec).
DELAY
The start time of the program may be delayed for a period
of time between 1 and 12 hours.
Program
Drying
phase
Natural
Dry
Available
options *)
Duration of
wash pro-
gram
(h:min)**)
Water
consumption
(litres/cycle)
Energy
consumption
(kWh/cycle)
50° 2:45 12.0 0.92
1 Eco
2 Conventional
wash and dry 55° 2:00 15.0 1.35
3Intensive 65° - 2:30 15.0 1.50
4Fast 50° -- 0:55 11.5 1.10
5Sanitizing 65° - 1:40 11.5 1.30
6Pre-Wash
-
-- 0:10 4.5 0.01
7Self-Clean 65° --0:50 8.0 0.80
ECO program data is measured under laboratory conditions according to European Standard EN 60436:2019.
Note for Test Laboratories: For information on comparative EN testing conditions, please send an email to the following
address: [email protected]
Pre-treatment of the dishes is not needed before any of the programs.
*) Not all options can be used simultaneously.
**) Values given for programes other than the eco program are indicative only. The actual time may vary depending on many
factors such as temperature and pressure of the incoming water, room temperature, amount of detergent, quantity and type of
load, load balancing, additional selected options and sensor calibration.
Standby consumption: Left-on mode consumption: 5 W - Off mode consumption: 0.5 W
PROGRAMS DESCRIPTION
EN
9
To open the detergent dispenser
press button C.
Introduce the detergent into
the dry dispenser D only.
Place the amount of detergent
for pre-washing directly inside
the tub.
1. When measuring out the detergent refer to the mentioned ear-
lier information to add the proper quantity. Inside the dispenser
C there are indications to help the detergent dosing.
2. Remove detergent residues from the edges of the dispenser
and close the cover until it clicks.
3. Close the lid of the detergent dispenser by pulling it up until
the closing device is secured in place.
The detergent dispenser automatically opens up at the right time
according to the program. If all-in-one detergents are used, we
recommend using the TABLET button, because it adjusts the
program so that the best washing and drying results are always
achieved.
C
D
PROGRAMS TABLE
ECO program data is measured under laboratory conditions according to European Standard EN 60436:2019.
Note for Test Laboratories: For information on comparative EN testing conditions, please send an email to the following address:
Pre-treatment of the dishes is not needed before any of the programs.
*) Not all options can be used simultaneously.
**) Values given for programes other than the eco program are indicative only. The actual time may vary depending on many factors such as temperature
and pressure of the incoming water, room temperature, amount of detergent, quantity and type of load, load balancing, additional selected options and
sensor calibration.
Standby consumption: Left-on mode consumption: 5 W - Off mode consumption: 0.5 W
PROGRAMS DESCRIPTION
1. ECO -
bined energy and water consumption, and that it is used to assess compliance with the EU Ecodesign legislation.
2. AUTO - For normally soiled dishes with dried food residues. Senses the level of soiling on the dishes and adjusts the program accor-
dingly. When the sensor is detecting the soil level an animation appears in the display and the cycle duration is updated.
3. INTENSIVE -
Program recommended for heavily soiled crockery, especially suitable for pans and saucepans (not to be used for delicate items).
4. FAST WASH 30’ - Program to be used for half load of lightly-soiled dishes with no dried food residues.
5. FAST WASH AND DRY
- Normally soiled crockery. Everyday cycle, that ensures optimal cleaning and drying performance in shorter time.
6. GLASS - Program for delicate items, which are more sensitive to high temperatures, for example glasses and cups.
7. SILENT -
Suitable for night-time operation of the appliance. Ensures optimal cleaning and drying performance with the lowest noise emission.
8. SANITIZING - Normally or heavily soiled crockery, with additional antibacterial wash. Can be used to perform maintenance of the
dishwasher.
9. PRE-WASH - Use to refresh crockery planned to be washed later. No detergent to be used with this program.
10. SELF-CLEAN - Program to be used to perform maintenance of the dishwasher. It cleans the interior of the appliance using hot water.
Notes:
Please note that cycle FAST WASH is dedicated for lightly soiled dishes.
Program
Drying
phase
Natural
Dry
Available
options *)
Duration of
wash
program
(h:min)**)
Water
consumption
(litres/cycle)
Energy
consumption
(kWh/cycle)
1Eco 3:40 8.7 0.66
2Auto 1:20 - 3:00 7.0 - 14.0 0.70 - 1.10
3Intensive 2:40 17.0 1.30
4 Fast wash 30’ -- 0:30 9.0 0.50
5 1:20 10.0 1.10
6Glass 1:40 12.0 1.00
7Silent 3:35 16.5 1.00
8Sanitizing - 1:40 12.0 1.30
9Pre-Wash -- 0:10 4.5 0.01
10 Self- Clean -- 0:50 9.5 0.70
3:35 16.5 1.00
8 Sanitizing
EN
9
To open the detergent dispenser
press button C.
Introduce the detergent into
the dry dispenser D only.
Place the amount of detergent
for pre-washing directly inside
the tub.
1. When measuring out the detergent refer to the mentioned ear-
lier information to add the proper quantity. Inside the dispenser
C there are indications to help the detergent dosing.
2. Remove detergent residues from the edges of the dispenser
and close the cover until it clicks.
3. Close the lid of the detergent dispenser by pulling it up until
the closing device is secured in place.
The detergent dispenser automatically opens up at the right time
according to the program. If all-in-one detergents are used, we
recommend using the TABLET button, because it adjusts the
program so that the best washing and drying results are always
achieved.
C
D
PROGRAMS TABLE
ECO program data is measured under laboratory conditions according to European Standard EN 60436:2019.
Note for Test Laboratories: For information on comparative EN testing conditions, please send an email to the following address:
Pre-treatment of the dishes is not needed before any of the programs.
*) Not all options can be used simultaneously.
**) Values given for programes other than the eco program are indicative only. The actual time may vary depending on many factors such as temperature
and pressure of the incoming water, room temperature, amount of detergent, quantity and type of load, load balancing, additional selected options and
sensor calibration.
Standby consumption: Left-on mode consumption: 5 W - Off mode consumption: 0.5 W
PROGRAMS DESCRIPTION
1. ECO -
bined energy and water consumption, and that it is used to assess compliance with the EU Ecodesign legislation.
2. AUTO - For normally soiled dishes with dried food residues. Senses the level of soiling on the dishes and adjusts the program accor-
dingly. When the sensor is detecting the soil level an animation appears in the display and the cycle duration is updated.
3. INTENSIVE -
Program recommended for heavily soiled crockery, especially suitable for pans and saucepans (not to be used for delicate items).
4. FAST WASH 30’ - Program to be used for half load of lightly-soiled dishes with no dried food residues.
5. FAST WASH AND DRY
- Normally soiled crockery. Everyday cycle, that ensures optimal cleaning and drying performance in shorter time.
6. GLASS - Program for delicate items, which are more sensitive to high temperatures, for example glasses and cups.
7. SILENT -
Suitable for night-time operation of the appliance. Ensures optimal cleaning and drying performance with the lowest noise emission.
8. SANITIZING - Normally or heavily soiled crockery, with additional antibacterial wash. Can be used to perform maintenance of the
dishwasher.
9. PRE-WASH - Use to refresh crockery planned to be washed later. No detergent to be used with this program.
10. SELF-CLEAN - Program to be used to perform maintenance of the dishwasher. It cleans the interior of the appliance using hot water.
Notes:
Please note that cycle FAST WASH is dedicated for lightly soiled dishes.
Program
Drying
phase
Natural
Dry
Available
options *)
Duration of
wash
program
(h:min)**)
Water
consumption
(litres/cycle)
Energy
consumption
(kWh/cycle)
1Eco 3:40 8.7 0.66
2Auto 1:20 - 3:00 7.0 - 14.0 0.70 - 1.10
3Intensive 2:40 17.0 1.30
4 Fast wash 30’ -- 0:30 9.0 0.50
5 1:20 10.0 1.10
6Glass 1:40 12.0 1.00
7Silent 3:35 16.5 1.00
8Sanitizing - 1:40 12.0 1.30
9Pre-Wash -- 0:10 4.5 0.01
10 Self- Clean -- 0:50 9.5 0.70
65°
9
ENGLISH
1. Press the DELAY button: the corresponding «h» symbol
appears on the display; each time you press the button,
the time (1h, 2h, etc. up to max. 12h) from the start of
the selected wash cycle will be increased.
2. Select the wash program, press the START/PAUSE
button and within 4 seconds close the door: the timer
will begin counting down.
3. Once this time has elapsed, the indicator light «h»
switches off and the wash cycle begins.
To adjust the delay time and select a shorter period of time,
press the DELAY button. To cancel it, press the button
repeatedly until the selected delayed start indicator light
«h» switches off.
The DELAY function cannot be set once a wash cycle
has been started.
NaturalDry
Door opening system NaturalDry is a convection drying system
which automatically opens the door during/after drying phase to
ensure exceptional drying performance every day. Door opens at
the temperature that is safe to your kitchen furniture.
As additional steam protection, special designed protection foil is
added together with the dishwasher. To see how to mount protec-
tion foil please refer to (INSTALLATION GUIDE).
NaturalDry functionality could be disabled by the user as follows:
1. Go to the Dishwasher software menu pressing and holding
button (6 sec).
2. You switched to NaturalDry Control Menu, you could change
status of NaturalDry functionality by pressing button:
E – enabled d – disabled
To conrm the change and exit from the Control Menu please
press and hold button (3 sec).
DELAY
The start time of the program may be delayed for a period
of time between 1 and 12 hours.
Program
Drying
phase
Natural
Dry
Available
options *)
Duration of
wash pro-
gram
(h:min)**)
Water
consumption
(litres/cycle)
Energy
consumption
(kWh/cycle)
50° 2:45 12.0 0.92
1 Eco
2 Conventional
wash and dry 55° 2:00 15.0 1.35
3Intensive 65° - 2:30 15.0 1.50
4Fast 50° -- 0:55 11.5 1.10
5Sanitizing 65° - 1:40 11.5 1.30
6Pre-Wash
-
-- 0:10 4.5 0.01
7Self-Clean 65° --0:50 8.0 0.80
ECO program data is measured under laboratory conditions according to European Standard EN 60436:2019.
Note for Test Laboratories: For information on comparative EN testing conditions, please send an email to the following
address: [email protected]
Pre-treatment of the dishes is not needed before any of the programs.
*) Not all options can be used simultaneously.
**) Values given for programes other than the eco program are indicative only. The actual time may vary depending on many
factors such as temperature and pressure of the incoming water, room temperature, amount of detergent, quantity and type of
load, load balancing, additional selected options and sensor calibration.
Standby consumption: Left-on mode consumption: 5 W - Off mode consumption: 0.5 W
PROGRAMS DESCRIPTION
-
EN
9
To open the detergent dispenser
press button C.
Introduce the detergent into
the dry dispenser D only.
Place the amount of detergent
for pre-washing directly inside
the tub.
1. When measuring out the detergent refer to the mentioned ear-
lier information to add the proper quantity. Inside the dispenser
C there are indications to help the detergent dosing.
2. Remove detergent residues from the edges of the dispenser
and close the cover until it clicks.
3. Close the lid of the detergent dispenser by pulling it up until
the closing device is secured in place.
The detergent dispenser automatically opens up at the right time
according to the program. If all-in-one detergents are used, we
recommend using the TABLET button, because it adjusts the
program so that the best washing and drying results are always
achieved.
C
D
PROGRAMS TABLE
ECO program data is measured under laboratory conditions according to European Standard EN 60436:2019.
Note for Test Laboratories: For information on comparative EN testing conditions, please send an email to the following address:
Pre-treatment of the dishes is not needed before any of the programs.
*) Not all options can be used simultaneously.
**) Values given for programes other than the eco program are indicative only. The actual time may vary depending on many factors such as temperature
and pressure of the incoming water, room temperature, amount of detergent, quantity and type of load, load balancing, additional selected options and
sensor calibration.
Standby consumption: Left-on mode consumption: 5 W - Off mode consumption: 0.5 W
PROGRAMS DESCRIPTION
1. ECO -
bined energy and water consumption, and that it is used to assess compliance with the EU Ecodesign legislation.
2. AUTO - For normally soiled dishes with dried food residues. Senses the level of soiling on the dishes and adjusts the program accor-
dingly. When the sensor is detecting the soil level an animation appears in the display and the cycle duration is updated.
3. INTENSIVE -
Program recommended for heavily soiled crockery, especially suitable for pans and saucepans (not to be used for delicate items).
4. FAST WASH 30’ - Program to be used for half load of lightly-soiled dishes with no dried food residues.
5. FAST WASH AND DRY
- Normally soiled crockery. Everyday cycle, that ensures optimal cleaning and drying performance in shorter time.
6. GLASS - Program for delicate items, which are more sensitive to high temperatures, for example glasses and cups.
7. SILENT -
Suitable for night-time operation of the appliance. Ensures optimal cleaning and drying performance with the lowest noise emission.
8. SANITIZING - Normally or heavily soiled crockery, with additional antibacterial wash. Can be used to perform maintenance of the
dishwasher.
9. PRE-WASH - Use to refresh crockery planned to be washed later. No detergent to be used with this program.
10. SELF-CLEAN - Program to be used to perform maintenance of the dishwasher. It cleans the interior of the appliance using hot water.
Notes:
Please note that cycle FAST WASH is dedicated for lightly soiled dishes.
Program
Drying
phase
Natural
Dry
Available
options *)
Duration of
wash
program
(h:min)**)
Water
consumption
(litres/cycle)
Energy
consumption
(kWh/cycle)
1Eco 3:40 8.7 0.66
2Auto 1:20 - 3:00 7.0 - 14.0 0.70 - 1.10
3Intensive 2:40 17.0 1.30
4 Fast wash 30’ -- 0:30 9.0 0.50
5 1:20 10.0 1.10
6Glass 1:40 12.0 1.00
7Silent 3:35 16.5 1.00
8Sanitizing - 1:40 12.0 1.30
9Pre-Wash -- 0:10 4.5 0.01
10 Self- Clean -- 0:50 9.5 0.70
1:40 12.0 1.30
9 PreWash
EN
9
To open the detergent dispenser
press button C.
Introduce the detergent into
the dry dispenser D only.
Place the amount of detergent
for pre-washing directly inside
the tub.
1. When measuring out the detergent refer to the mentioned ear-
lier information to add the proper quantity. Inside the dispenser
C there are indications to help the detergent dosing.
2. Remove detergent residues from the edges of the dispenser
and close the cover until it clicks.
3. Close the lid of the detergent dispenser by pulling it up until
the closing device is secured in place.
The detergent dispenser automatically opens up at the right time
according to the program. If all-in-one detergents are used, we
recommend using the TABLET button, because it adjusts the
program so that the best washing and drying results are always
achieved.
C
D
PROGRAMS TABLE
ECO program data is measured under laboratory conditions according to European Standard EN 60436:2019.
Note for Test Laboratories: For information on comparative EN testing conditions, please send an email to the following address:
Pre-treatment of the dishes is not needed before any of the programs.
*) Not all options can be used simultaneously.
**) Values given for programes other than the eco program are indicative only. The actual time may vary depending on many factors such as temperature
and pressure of the incoming water, room temperature, amount of detergent, quantity and type of load, load balancing, additional selected options and
sensor calibration.
Standby consumption: Left-on mode consumption: 5 W - Off mode consumption: 0.5 W
PROGRAMS DESCRIPTION
1. ECO -
bined energy and water consumption, and that it is used to assess compliance with the EU Ecodesign legislation.
2. AUTO - For normally soiled dishes with dried food residues. Senses the level of soiling on the dishes and adjusts the program accor-
dingly. When the sensor is detecting the soil level an animation appears in the display and the cycle duration is updated.
3. INTENSIVE -
Program recommended for heavily soiled crockery, especially suitable for pans and saucepans (not to be used for delicate items).
4. FAST WASH 30’ - Program to be used for half load of lightly-soiled dishes with no dried food residues.
5. FAST WASH AND DRY
- Normally soiled crockery. Everyday cycle, that ensures optimal cleaning and drying performance in shorter time.
6. GLASS - Program for delicate items, which are more sensitive to high temperatures, for example glasses and cups.
7. SILENT -
Suitable for night-time operation of the appliance. Ensures optimal cleaning and drying performance with the lowest noise emission.
8. SANITIZING - Normally or heavily soiled crockery, with additional antibacterial wash. Can be used to perform maintenance of the
dishwasher.
9. PRE-WASH - Use to refresh crockery planned to be washed later. No detergent to be used with this program.
10. SELF-CLEAN - Program to be used to perform maintenance of the dishwasher. It cleans the interior of the appliance using hot water.
Notes:
Please note that cycle FAST WASH is dedicated for lightly soiled dishes.
Program
Drying
phase
Natural
Dry
Available
options *)
Duration of
wash
program
(h:min)**)
Water
consumption
(litres/cycle)
Energy
consumption
(kWh/cycle)
1Eco 3:40 8.7 0.66
2Auto 1:20 - 3:00 7.0 - 14.0 0.70 - 1.10
3Intensive 2:40 17.0 1.30
4 Fast wash 30’ -- 0:30 9.0 0.50
5 1:20 10.0 1.10
6Glass 1:40 12.0 1.00
7Silent 3:35 16.5 1.00
8Sanitizing - 1:40 12.0 1.30
9Pre-Wash -- 0:10 4.5 0.01
10 Self- Clean -- 0:50 9.5 0.70
- -
EN
9
To open the detergent dispenser
press button C.
Introduce the detergent into
the dry dispenser D only.
Place the amount of detergent
for pre-washing directly inside
the tub.
1. When measuring out the detergent refer to the mentioned ear-
lier information to add the proper quantity. Inside the dispenser
C there are indications to help the detergent dosing.
2. Remove detergent residues from the edges of the dispenser
and close the cover until it clicks.
3. Close the lid of the detergent dispenser by pulling it up until
the closing device is secured in place.
The detergent dispenser automatically opens up at the right time
according to the program. If all-in-one detergents are used, we
recommend using the TABLET button, because it adjusts the
program so that the best washing and drying results are always
achieved.
C
D
PROGRAMS TABLE
ECO program data is measured under laboratory conditions according to European Standard EN 60436:2019.
Note for Test Laboratories: For information on comparative EN testing conditions, please send an email to the following address:
Pre-treatment of the dishes is not needed before any of the programs.
*) Not all options can be used simultaneously.
**) Values given for programes other than the eco program are indicative only. The actual time may vary depending on many factors such as temperature
and pressure of the incoming water, room temperature, amount of detergent, quantity and type of load, load balancing, additional selected options and
sensor calibration.
Standby consumption: Left-on mode consumption: 5 W - Off mode consumption: 0.5 W
PROGRAMS DESCRIPTION
1. ECO -
bined energy and water consumption, and that it is used to assess compliance with the EU Ecodesign legislation.
2. AUTO - For normally soiled dishes with dried food residues. Senses the level of soiling on the dishes and adjusts the program accor-
dingly. When the sensor is detecting the soil level an animation appears in the display and the cycle duration is updated.
3. INTENSIVE -
Program recommended for heavily soiled crockery, especially suitable for pans and saucepans (not to be used for delicate items).
4. FAST WASH 30’ - Program to be used for half load of lightly-soiled dishes with no dried food residues.
5. FAST WASH AND DRY
- Normally soiled crockery. Everyday cycle, that ensures optimal cleaning and drying performance in shorter time.
6. GLASS - Program for delicate items, which are more sensitive to high temperatures, for example glasses and cups.
7. SILENT -
Suitable for night-time operation of the appliance. Ensures optimal cleaning and drying performance with the lowest noise emission.
8. SANITIZING - Normally or heavily soiled crockery, with additional antibacterial wash. Can be used to perform maintenance of the
dishwasher.
9. PRE-WASH - Use to refresh crockery planned to be washed later. No detergent to be used with this program.
10. SELF-CLEAN - Program to be used to perform maintenance of the dishwasher. It cleans the interior of the appliance using hot water.
Notes:
Please note that cycle FAST WASH is dedicated for lightly soiled dishes.
Program
Drying
phase
Natural
Dry
Available
options *)
Duration of
wash
program
(h:min)**)
Water
consumption
(litres/cycle)
Energy
consumption
(kWh/cycle)
1Eco 3:40 8.7 0.66
2Auto 1:20 - 3:00 7.0 - 14.0 0.70 - 1.10
3Intensive 2:40 17.0 1.30
4 Fast wash 30’ -- 0:30 9.0 0.50
5 1:20 10.0 1.10
6Glass 1:40 12.0 1.00
7Silent 3:35 16.5 1.00
8Sanitizing - 1:40 12.0 1.30
9Pre-Wash -- 0:10 4.5 0.01
10 Self- Clean -- 0:50 9.5 0.70
0:10 4.5 0.01
10 SelfClean
EN
9
To open the detergent dispenser
press button C.
Introduce the detergent into
the dry dispenser D only.
Place the amount of detergent
for pre-washing directly inside
the tub.
1. When measuring out the detergent refer to the mentioned ear-
lier information to add the proper quantity. Inside the dispenser
C there are indications to help the detergent dosing.
2. Remove detergent residues from the edges of the dispenser
and close the cover until it clicks.
3. Close the lid of the detergent dispenser by pulling it up until
the closing device is secured in place.
The detergent dispenser automatically opens up at the right time
according to the program. If all-in-one detergents are used, we
recommend using the TABLET button, because it adjusts the
program so that the best washing and drying results are always
achieved.
C
D
PROGRAMS TABLE
ECO program data is measured under laboratory conditions according to European Standard EN 60436:2019.
Note for Test Laboratories: For information on comparative EN testing conditions, please send an email to the following address:
Pre-treatment of the dishes is not needed before any of the programs.
*) Not all options can be used simultaneously.
**) Values given for programes other than the eco program are indicative only. The actual time may vary depending on many factors such as temperature
and pressure of the incoming water, room temperature, amount of detergent, quantity and type of load, load balancing, additional selected options and
sensor calibration.
Standby consumption: Left-on mode consumption: 5 W - Off mode consumption: 0.5 W
PROGRAMS DESCRIPTION
1. ECO -
bined energy and water consumption, and that it is used to assess compliance with the EU Ecodesign legislation.
2. AUTO - For normally soiled dishes with dried food residues. Senses the level of soiling on the dishes and adjusts the program accor-
dingly. When the sensor is detecting the soil level an animation appears in the display and the cycle duration is updated.
3. INTENSIVE -
Program recommended for heavily soiled crockery, especially suitable for pans and saucepans (not to be used for delicate items).
4. FAST WASH 30’ - Program to be used for half load of lightly-soiled dishes with no dried food residues.
5. FAST WASH AND DRY
- Normally soiled crockery. Everyday cycle, that ensures optimal cleaning and drying performance in shorter time.
6. GLASS - Program for delicate items, which are more sensitive to high temperatures, for example glasses and cups.
7. SILENT -
Suitable for night-time operation of the appliance. Ensures optimal cleaning and drying performance with the lowest noise emission.
8. SANITIZING - Normally or heavily soiled crockery, with additional antibacterial wash. Can be used to perform maintenance of the
dishwasher.
9. PRE-WASH - Use to refresh crockery planned to be washed later. No detergent to be used with this program.
10. SELF-CLEAN - Program to be used to perform maintenance of the dishwasher. It cleans the interior of the appliance using hot water.
Notes:
Please note that cycle FAST WASH is dedicated for lightly soiled dishes.
Program
Drying
phase
Natural
Dry
Available
options *)
Duration of
wash
program
(h:min)**)
Water
consumption
(litres/cycle)
Energy
consumption
(kWh/cycle)
1Eco 3:40 8.7 0.66
2Auto 1:20 - 3:00 7.0 - 14.0 0.70 - 1.10
3Intensive 2:40 17.0 1.30
4 Fast wash 30’ -- 0:30 9.0 0.50
5 1:20 10.0 1.10
6Glass 1:40 12.0 1.00
7Silent 3:35 16.5 1.00
8Sanitizing - 1:40 12.0 1.30
9Pre-Wash -- 0:10 4.5 0.01
10 Self- Clean -- 0:50 9.5 0.70
65° - -
EN
9
To open the detergent dispenser
press button C.
Introduce the detergent into
the dry dispenser D only.
Place the amount of detergent
for pre-washing directly inside
the tub.
1. When measuring out the detergent refer to the mentioned ear-
lier information to add the proper quantity. Inside the dispenser
C there are indications to help the detergent dosing.
2. Remove detergent residues from the edges of the dispenser
and close the cover until it clicks.
3. Close the lid of the detergent dispenser by pulling it up until
the closing device is secured in place.
The detergent dispenser automatically opens up at the right time
according to the program. If all-in-one detergents are used, we
recommend using the TABLET button, because it adjusts the
program so that the best washing and drying results are always
achieved.
C
D
PROGRAMS TABLE
ECO program data is measured under laboratory conditions according to European Standard EN 60436:2019.
Note for Test Laboratories: For information on comparative EN testing conditions, please send an email to the following address:
Pre-treatment of the dishes is not needed before any of the programs.
*) Not all options can be used simultaneously.
**) Values given for programes other than the eco program are indicative only. The actual time may vary depending on many factors such as temperature
and pressure of the incoming water, room temperature, amount of detergent, quantity and type of load, load balancing, additional selected options and
sensor calibration.
Standby consumption: Left-on mode consumption: 5 W - Off mode consumption: 0.5 W
PROGRAMS DESCRIPTION
1. ECO -
bined energy and water consumption, and that it is used to assess compliance with the EU Ecodesign legislation.
2. AUTO - For normally soiled dishes with dried food residues. Senses the level of soiling on the dishes and adjusts the program accor-
dingly. When the sensor is detecting the soil level an animation appears in the display and the cycle duration is updated.
3. INTENSIVE -
Program recommended for heavily soiled crockery, especially suitable for pans and saucepans (not to be used for delicate items).
4. FAST WASH 30’ - Program to be used for half load of lightly-soiled dishes with no dried food residues.
5. FAST WASH AND DRY
- Normally soiled crockery. Everyday cycle, that ensures optimal cleaning and drying performance in shorter time.
6. GLASS - Program for delicate items, which are more sensitive to high temperatures, for example glasses and cups.
7. SILENT -
Suitable for night-time operation of the appliance. Ensures optimal cleaning and drying performance with the lowest noise emission.
8. SANITIZING - Normally or heavily soiled crockery, with additional antibacterial wash. Can be used to perform maintenance of the
dishwasher.
9. PRE-WASH - Use to refresh crockery planned to be washed later. No detergent to be used with this program.
10. SELF-CLEAN - Program to be used to perform maintenance of the dishwasher. It cleans the interior of the appliance using hot water.
Notes:
Please note that cycle FAST WASH is dedicated for lightly soiled dishes.
Program
Drying
phase
Natural
Dry
Available
options *)
Duration of
wash
program
(h:min)**)
Water
consumption
(litres/cycle)
Energy
consumption
(kWh/cycle)
1Eco 3:40 8.7 0.66
2Auto 1:20 - 3:00 7.0 - 14.0 0.70 - 1.10
3Intensive 2:40 17.0 1.30
4 Fast wash 30’ -- 0:30 9.0 0.50
5 1:20 10.0 1.10
6Glass 1:40 12.0 1.00
7Silent 3:35 16.5 1.00
8Sanitizing - 1:40 12.0 1.30
9Pre-Wash -- 0:10 4.5 0.01
10 Self- Clean -- 0:50 9.5 0.70
0:50 9.5 0.70

To download the full version visit www.ikea.com
10ENGLISH
EN
10
LOADING THE RACKS
TIPS
Before loading the baskets, remove all food residues from the
crockery and empty the glasses. You do not need to rinse before-
hand under running water.
Arrange the crockery so that it is held in place rmly and does
not tip over; and arrange the containers with the openings facing
downwards and the concave/convex parts placed obliquely, thus
allowing the water to reach every surface and ow freely.
Warning: lids, handles, trays and frying pans do not prevent the
sprayer arms from rotating.
Place any small items in the cutlery basket. Very soiled dishes
and pans should be placed in the lower basket because in this
sector the water sprays are stronger and allow a higher washing
performance.
After loading the appliance, make sure that the sprayer arms can
cotate freely.
CUTLERY RACK
The third rack was designed to house
the cutlery.
Arrange the cutlery as shown in the
gure.
A separate arrangement of the cutlery
makes collection easier after washing
and
improves washing and drying per-
formance.
Knives and other utensils with sharp
edges must be positioned with the
blades facing downwards.
UPPER RACK
Load delicate and light dishes: glasses,
cups, saucers, low salad bowls.
The upper rack has tip-up supports
which can be used in a vertical position
when arranging tea/ dessert saucers
or in a lower position to load bowls and
food containers.
(loading example for the upper rack)
ADJUSTING THE HEIGHT OF THE UPPER RACK
The height of the upper basket can be adju-
sted: high position to place bulky crockery
in the lower basket and low position to make
the most of the tip-up compartments by cre-
ating more space upwards.
The upper rack is equipped with a Upper
Rack height adjuster (see gure), without
pressing the levers, lift it up by simply holding
the rack sides, as soon as the rack is stable
in its upper position. To restore to the lower
position, press the levers (A) at the sides of
the rack and move the basket downwards.
We strongly recommend that you do not adjust the height of
the rack when it is loaded.
NEVER raise or lower the basket on one side only.
FOLDABLE FLAPS WITH ADJUSTABLE POSITION
The side foldable aps can be fold or unfold
to optimize the arrangement of crockery
inside the rack.
Wine glasses can be placed safely in the
foldable aps by inserting the stem of each
glass into the corresponding slots.
Depending on the model:
•to unfold the aps there is needed to slide
it up and rotate or release it from the snaps
and pull it down.
•to fold the aps there is needed to rotate
it and slide aps down or pull it up and
attach aps to the snaps.
LOWER RACK
For pots, lids, plates, salad bowls, cutlery etc....
Large plates and lids should ideally be
placed at the sides to avoid interferen-
ces with the spray arm.
The lower rack has tip-up supports
which can be used in a vertical position
when arranging plates or in a horizontal
position (lower) to load pans and salad
bowls easily.
(loading example for the lower rack)
UNSUITABLE CROCKERY
• Wooden crockery and cutlery.
• Delicate decorated glasses, artistic handicraft and antique crockery.
Their decorations are not resistant.
•Parts in synthetic material which do not withstand high temperatures.
• Copper and tin crockery.
• Crockery soiled with ash, wax, lubricating grease or ink.
The colours of glass decorations and aluminium/silver pieces can
change and fade during the washing process. Some types of glass (e.g.
crystal objects) can become opaque after a number of wash cycles too.
DAMAGE TO GLASS AND CROCKERY
• Only use glasses and porcelain guaranteed by the manufacturer
as dishwasher safe.
• Use a delicate detergent suitable for crockery
• Collect glasses and cutlery from the dishwasher as soon as the
wash cycle is over.
HYGIENE
To avoid odour and sediment which can be accumulated in the
dishwasher please run a high temperature program at least once
a month. Use a tea spoon of detergent and run it without the loading
to clean your appliance.
TIPS ON ENERGY SAVING
• When the household dishwasher is used according to the manu-
facturer’s instructions, washing tableware in a dishwasher usu-
ally consumes less energy and water than hand dishwashing.
•In order to maximize dishwasher efciency it is recommended to
initiate the wash cycle once dishwasher is fully loaded. Loading
the household dishwasher up to the capacity indicated by the man-
ufacturer will contribute to energy and water savings. Information
on correct loading of tableware can be found in Loading chapter.
In case of partial loading it is recommended to use dedicated wash
options if available (Half load/ Zone Wash, Multizone), illing up only
selected racks. Incorrect loading or overloading the dishwasher may
increase resources usage (such as water, energy and time, as well
as increase noise level), reducing cleaning and drying performance.
• Manual pre-rinsing of tableware items leads to increased water
and energy consumption and is not recommended.
Cutlery rack
The third rack was designed to house
the cutlery.
Arrange the cutlery as shown in the
gure.
A separate arrangement of the
cutlery makes collection easier after
washing and improves washing and
drying performance.
Knives and other utensils with
sharp edges must be positioned
with the blades facing downwards.
EN
10
LOADING THE RACKS
TIPS
Before loading the baskets, remove all food residues from the
crockery and empty the glasses. You do not need to rinse before-
hand under running water.
Arrange the crockery so that it is held in place rmly and does
not tip over; and arrange the containers with the openings facing
downwards and the concave/convex parts placed obliquely, thus
allowing the water to reach every surface and ow freely.
Warning: lids, handles, trays and frying pans do not prevent the
sprayer arms from rotating.
Place any small items in the cutlery basket. Very soiled dishes
and pans should be placed in the lower basket because in this
sector the water sprays are stronger and allow a higher washing
performance.
After loading the appliance, make sure that the sprayer arms can
cotate freely.
CUTLERY RACK
The third rack was designed to house
the cutlery.
Arrange the cutlery as shown in the
gure.
A separate arrangement of the cutlery
makes collection easier after washing
and
improves washing and drying per-
formance.
Knives and other utensils with sharp
edges must be positioned with the
blades facing downwards.
UPPER RACK
Load delicate and light dishes: glasses,
cups, saucers, low salad bowls.
The upper rack has tip-up supports
which can be used in a vertical position
when arranging tea/ dessert saucers
or in a lower position to load bowls and
food containers.
(loading example for the upper rack)
ADJUSTING THE HEIGHT OF THE UPPER RACK
The height of the upper basket can be adju-
sted: high position to place bulky crockery
in the lower basket and low position to make
the most of the tip-up compartments by cre-
ating more space upwards.
The upper rack is equipped with a Upper
Rack height adjuster (see gure), without
pressing the levers, lift it up by simply holding
the rack sides, as soon as the rack is stable
in its upper position. To restore to the lower
position, press the levers (A) at the sides of
the rack and move the basket downwards.
We strongly recommend that you do not adjust the height of
the rack when it is loaded.
NEVER raise or lower the basket on one side only.
FOLDABLE FLAPS WITH ADJUSTABLE POSITION
The side foldable aps can be fold or unfold
to optimize the arrangement of crockery
inside the rack.
Wine glasses can be placed safely in the
foldable aps by inserting the stem of each
glass into the corresponding slots.
Depending on the model:
•to unfold the aps there is needed to slide
it up and rotate or release it from the snaps
and pull it down.
•to fold the aps there is needed to rotate
it and slide aps down or pull it up and
attach aps to the snaps.
LOWER RACK
For pots, lids, plates, salad bowls, cutlery etc....
Large plates and lids should ideally be
placed at the sides to avoid interferen-
ces with the spray arm.
The lower rack has tip-up supports
which can be used in a vertical position
when arranging plates or in a horizontal
position (lower) to load pans and salad
bowls easily.
(loading example for the lower rack)
UNSUITABLE CROCKERY
• Wooden crockery and cutlery.
• Delicate decorated glasses, artistic handicraft and antique crockery.
Their decorations are not resistant.
•Parts in synthetic material which do not withstand high temperatures.
• Copper and tin crockery.
• Crockery soiled with ash, wax, lubricating grease or ink.
The colours of glass decorations and aluminium/silver pieces can
change and fade during the washing process. Some types of glass (e.g.
crystal objects) can become opaque after a number of wash cycles too.
DAMAGE TO GLASS AND CROCKERY
• Only use glasses and porcelain guaranteed by the manufacturer
as dishwasher safe.
• Use a delicate detergent suitable for crockery
• Collect glasses and cutlery from the dishwasher as soon as the
wash cycle is over.
HYGIENE
To avoid odour and sediment which can be accumulated in the
dishwasher please run a high temperature program at least once
a month. Use a tea spoon of detergent and run it without the loading
to clean your appliance.
TIPS ON ENERGY SAVING
• When the household dishwasher is used according to the manu-
facturer’s instructions, washing tableware in a dishwasher usu-
ally consumes less energy and water than hand dishwashing.
•In order to maximize dishwasher efciency it is recommended to
initiate the wash cycle once dishwasher is fully loaded. Loading
the household dishwasher up to the capacity indicated by the man-
ufacturer will contribute to energy and water savings. Information
on correct loading of tableware can be found in Loading chapter.
In case of partial loading it is recommended to use dedicated wash
options if available (Half load/ Zone Wash, Multizone), illing up only
selected racks. Incorrect loading or overloading the dishwasher may
increase resources usage (such as water, energy and time, as well
as increase noise level), reducing cleaning and drying performance.
• Manual pre-rinsing of tableware items leads to increased water
and energy consumption and is not recommended.
Upper rack
Load delicate and light dishes:
glasses, cups, saucers, low salad
bowls.
The upper rack has tipup supports
which can be used in a vertical
position when arranging tea/ dessert
saucers or in a lower position to load
bowls and food containers.
(loading example for the upper rack)
EN
10
LOADING THE RACKS
TIPS
Before loading the baskets, remove all food residues from the
crockery and empty the glasses. You do not need to rinse before-
hand under running water.
Arrange the crockery so that it is held in place rmly and does
not tip over; and arrange the containers with the openings facing
downwards and the concave/convex parts placed obliquely, thus
allowing the water to reach every surface and ow freely.
Warning: lids, handles, trays and frying pans do not prevent the
sprayer arms from rotating.
Place any small items in the cutlery basket. Very soiled dishes
and pans should be placed in the lower basket because in this
sector the water sprays are stronger and allow a higher washing
performance.
After loading the appliance, make sure that the sprayer arms can
cotate freely.
CUTLERY RACK
The third rack was designed to house
the cutlery.
Arrange the cutlery as shown in the
gure.
A separate arrangement of the cutlery
makes collection easier after washing
and
improves washing and drying per-
formance.
Knives and other utensils with sharp
edges must be positioned with the
blades facing downwards.
UPPER RACK
Load delicate and light dishes: glasses,
cups, saucers, low salad bowls.
The upper rack has tip-up supports
which can be used in a vertical position
when arranging tea/ dessert saucers
or in a lower position to load bowls and
food containers.
(loading example for the upper rack)
ADJUSTING THE HEIGHT OF THE UPPER RACK
The height of the upper basket can be adju-
sted: high position to place bulky crockery
in the lower basket and low position to make
the most of the tip-up compartments by cre-
ating more space upwards.
The upper rack is equipped with a Upper
Rack height adjuster (see gure), without
pressing the levers, lift it up by simply holding
the rack sides, as soon as the rack is stable
in its upper position. To restore to the lower
position, press the levers (A) at the sides of
the rack and move the basket downwards.
We strongly recommend that you do not adjust the height of
the rack when it is loaded.
NEVER raise or lower the basket on one side only.
FOLDABLE FLAPS WITH ADJUSTABLE POSITION
The side foldable aps can be fold or unfold
to optimize the arrangement of crockery
inside the rack.
Wine glasses can be placed safely in the
foldable aps by inserting the stem of each
glass into the corresponding slots.
Depending on the model:
•to unfold the aps there is needed to slide
it up and rotate or release it from the snaps
and pull it down.
•to fold the aps there is needed to rotate
it and slide aps down or pull it up and
attach aps to the snaps.
LOWER RACK
For pots, lids, plates, salad bowls, cutlery etc....
Large plates and lids should ideally be
placed at the sides to avoid interferen-
ces with the spray arm.
The lower rack has tip-up supports
which can be used in a vertical position
when arranging plates or in a horizontal
position (lower) to load pans and salad
bowls easily.
(loading example for the lower rack)
UNSUITABLE CROCKERY
• Wooden crockery and cutlery.
• Delicate decorated glasses, artistic handicraft and antique crockery.
Their decorations are not resistant.
•Parts in synthetic material which do not withstand high temperatures.
• Copper and tin crockery.
• Crockery soiled with ash, wax, lubricating grease or ink.
The colours of glass decorations and aluminium/silver pieces can
change and fade during the washing process. Some types of glass (e.g.
crystal objects) can become opaque after a number of wash cycles too.
DAMAGE TO GLASS AND CROCKERY
• Only use glasses and porcelain guaranteed by the manufacturer
as dishwasher safe.
• Use a delicate detergent suitable for crockery
• Collect glasses and cutlery from the dishwasher as soon as the
wash cycle is over.
HYGIENE
To avoid odour and sediment which can be accumulated in the
dishwasher please run a high temperature program at least once
a month. Use a tea spoon of detergent and run it without the loading
to clean your appliance.
TIPS ON ENERGY SAVING
• When the household dishwasher is used according to the manu-
facturer’s instructions, washing tableware in a dishwasher usu-
ally consumes less energy and water than hand dishwashing.
•In order to maximize dishwasher efciency it is recommended to
initiate the wash cycle once dishwasher is fully loaded. Loading
the household dishwasher up to the capacity indicated by the man-
ufacturer will contribute to energy and water savings. Information
on correct loading of tableware can be found in Loading chapter.
In case of partial loading it is recommended to use dedicated wash
options if available (Half load/ Zone Wash, Multizone), illing up only
selected racks. Incorrect loading or overloading the dishwasher may
increase resources usage (such as water, energy and time, as well
as increase noise level), reducing cleaning and drying performance.
• Manual pre-rinsing of tableware items leads to increased water
and energy consumption and is not recommended.
Adjusting the height of the upper
rack
The height of the upper rack can be
adjusted: high position to place bulky
crockery in the lower basket and low
position to make the most of the tip
up supports by creating more space
upwards and avoid collision with the
items loaded into lower rack.
The upper rack is equipped with a
Upper Rack height adjuster (see
gure), without pressing the levers,
lift it up by simply holding the rack
sides, as soon as the rack is stable in its upper position.
To restore to the lower position, press the levers A at the sides of
the rack and move the basket downwards.
We strongly recommend that you do not adjust the height of
the rack when it is loaded. NEVER raise or lower the basket
on one side only.
Foldable aps with adjustable position
The side foldable aps can be fold or
unfold to optimize the arrangement of
crockery inside the rack.
Wine glasses can be placed safely in the
foldable aps by inserting the stem of
each glass into the corresponding slots.
Depending on the model:
• to unfold the aps there is needed to
slide it up and rotate or release it from
the snaps and pull it down.
• to fold the aps there is needed to
rotate it and slide aps down or pull it
up and attach aps to the snaps.
EN
10
LOADING THE RACKS
TIPS
Before loading the baskets, remove all food residues from the
crockery and empty the glasses. You do not need to rinse before-
hand under running water.
Arrange the crockery so that it is held in place rmly and does
not tip over; and arrange the containers with the openings facing
downwards and the concave/convex parts placed obliquely, thus
allowing the water to reach every surface and ow freely.
Warning: lids, handles, trays and frying pans do not prevent the
sprayer arms from rotating.
Place any small items in the cutlery basket. Very soiled dishes
and pans should be placed in the lower basket because in this
sector the water sprays are stronger and allow a higher washing
performance.
After loading the appliance, make sure that the sprayer arms can
cotate freely.
CUTLERY RACK
The third rack was designed to house
the cutlery.
Arrange the cutlery as shown in the
gure.
A separate arrangement of the cutlery
makes collection easier after washing
and
improves washing and drying per-
formance.
Knives and other utensils with sharp
edges must be positioned with the
blades facing downwards.
UPPER RACK
Load delicate and light dishes: glasses,
cups, saucers, low salad bowls.
The upper rack has tip-up supports
which can be used in a vertical position
when arranging tea/ dessert saucers
or in a lower position to load bowls and
food containers.
(loading example for the upper rack)
ADJUSTING THE HEIGHT OF THE UPPER RACK
The height of the upper basket can be adju-
sted: high position to place bulky crockery
in the lower basket and low position to make
the most of the tip-up compartments by cre-
ating more space upwards.
The upper rack is equipped with a Upper
Rack height adjuster (see gure), without
pressing the levers, lift it up by simply holding
the rack sides, as soon as the rack is stable
in its upper position. To restore to the lower
position, press the levers (A) at the sides of
the rack and move the basket downwards.
We strongly recommend that you do not adjust the height of
the rack when it is loaded.
NEVER raise or lower the basket on one side only.
FOLDABLE FLAPS WITH ADJUSTABLE POSITION
The side foldable aps can be fold or unfold
to optimize the arrangement of crockery
inside the rack.
Wine glasses can be placed safely in the
foldable aps by inserting the stem of each
glass into the corresponding slots.
Depending on the model:
•to unfold the aps there is needed to slide
it up and rotate or release it from the snaps
and pull it down.
•to fold the aps there is needed to rotate
it and slide aps down or pull it up and
attach aps to the snaps.
LOWER RACK
For pots, lids, plates, salad bowls, cutlery etc....
Large plates and lids should ideally be
placed at the sides to avoid interferen-
ces with the spray arm.
The lower rack has tip-up supports
which can be used in a vertical position
when arranging plates or in a horizontal
position (lower) to load pans and salad
bowls easily.
(loading example for the lower rack)
UNSUITABLE CROCKERY
• Wooden crockery and cutlery.
• Delicate decorated glasses, artistic handicraft and antique crockery.
Their decorations are not resistant.
•Parts in synthetic material which do not withstand high temperatures.
• Copper and tin crockery.
• Crockery soiled with ash, wax, lubricating grease or ink.
The colours of glass decorations and aluminium/silver pieces can
change and fade during the washing process. Some types of glass (e.g.
crystal objects) can become opaque after a number of wash cycles too.
DAMAGE TO GLASS AND CROCKERY
• Only use glasses and porcelain guaranteed by the manufacturer
as dishwasher safe.
• Use a delicate detergent suitable for crockery
• Collect glasses and cutlery from the dishwasher as soon as the
wash cycle is over.
HYGIENE
To avoid odour and sediment which can be accumulated in the
dishwasher please run a high temperature program at least once
a month. Use a tea spoon of detergent and run it without the loading
to clean your appliance.
TIPS ON ENERGY SAVING
• When the household dishwasher is used according to the manu-
facturer’s instructions, washing tableware in a dishwasher usu-
ally consumes less energy and water than hand dishwashing.
•In order to maximize dishwasher efciency it is recommended to
initiate the wash cycle once dishwasher is fully loaded. Loading
the household dishwasher up to the capacity indicated by the man-
ufacturer will contribute to energy and water savings. Information
on correct loading of tableware can be found in Loading chapter.
In case of partial loading it is recommended to use dedicated wash
options if available (Half load/ Zone Wash, Multizone), illing up only
selected racks. Incorrect loading or overloading the dishwasher may
increase resources usage (such as water, energy and time, as well
as increase noise level), reducing cleaning and drying performance.
• Manual pre-rinsing of tableware items leads to increased water
and energy consumption and is not recommended.
Lower rack
For pots, lids, plates, salad bowls, cutlery
etc...
Large plates and lids should ideally be
placed at the sides to avoid interferences
with the spray arm.
The lower rack has tipup supports
which can be used in a vertical position
when arranging plates or in a horizontal
position (lower) to load pans and salad
bowls easily.
(loading example for the lower rack)
Loading the racks

To download the full version visit www.ikea.com
11ENGLISH
When contacting our Service Provider, please state the codes
provided on your product’s identication plate.
The model information can be retrieved using the QRCode
reported in the energy label.
The label also includes the model identier that can be used to
consult the
https://eprel.ec.europa.eu database portal. XXXXXXXXXXXXX XXXXXXXXX
XXXXXXXXXXXXX XXXXXXXXX
XXXXXXXXXXXXX XXXXXXXXX XXXXXXXXXXXXX XXXXXXXXX
XXXXXXXXXXXXX XXXXXXXXXXXXX XXXXXXXXXXXXX
XXXXX
XXXXX
XXXXX
XXXXX
XXXXX
XXXXX
XXXXX
XXXXX
XXXXX
XXXXX
XXXXX
XXXXX
XXXXX
XXXXX
XXXXX
00000
On the rating plate the article number is 8 digits
On the rating plate the serial number is 12 digits
What to do if ...
If you encounter an issue with your appliance, check “What to do if...” chapter in the full version of the User Manual available
on: www.ikea.com.
Technical data
IKEA FINPUTSAD 10 220-240
50 C 59 8,7 A/A 10/0,5 40,5 41 B
Brand Model Number
of place
settings
Voltage (V)
Frequency
(Hz)
Energy
eciency
class
Energy
consumption
(kWh/100 cycles)
Water
consumption
(l/ cycle)
Cleaning /
Drying
performance
class
Water supply
pressure (Bar)
max, min
Power consumption in
Noise
level
(dB)A
Noise
class
Delay start
(W) Standby
mode (W)

Zum Herunterladen der vollständigen Version besuchen Sie bitte www.ikea.com
12DEUTSCH
Produktbeschreibung
Erster Gebrauch
Hinweise zur ersten Inbetriebnahme
Bitte lesen Sie vor Installation und erstem Gebrauch des
Produktes sorgfältig die Anleitungen „SICHERHEIT und
GARANTIE“ und „MONTAGEANWEISUNG“ in der Tasche der
Produktunterlagen durch. Bitten denken Sie daran, sämtliche
Teile zum Transportschutz aus dem Geschirrspüler zu entfernen.
Salzbehälter befüllen
Mit der Verwendung von Salz werden KALKABLAGERUNGEN
auf dem Geschirr und den funktionalen Komponenten des
Geschirrspülers verhindert.
• DER SALZBEHÄLTER DARF NIE LEER SEIN.
• Es ist wichtig, die Wasserhärte einzustellen.
Der Salzbehälter bendet sich im Geschirrspülerboden (siehe
PRODUKTBESCHREIBUNG) und muss aufgefüllt werden, wenn
die SALZNACHFÜLLANZEIGE
ENGLISH
7
Control panel
Product description
1. Upper rack
2. �������
3. Upper rack height adjuster
4. Upper sprayer arm
5. Lower rack
6. Cutlery basket
7. Lower sprayer arm
8. Filter Assembly
9. Salt reservoir
10. Detergent and Rinse Aid dispensers
11. Rating plate
12. Control panel
1
2
3
4
5
6
10
7
11
9
8
First use
ADVICE REGARDING THE FIRST TIME USE
After installation, remove the stoppers from the racks and the
retaining elastic elements from the upper rack.
FILLING THE SALT RESERVOIR
The use of salt prevents the formation of LIMESCALE on the
dishes andon the machine’s functional components.
• It is important that the salt reservoir be never empty.
• It is important to set the water hardness.
The salt reservoir is located in the lower part of the
dishwasher (see PRODUCT DESCRIPTION) and should be
filled when the SALT REFILL indicator light in the
control panel is lit .
1. Remove the lower rack and
unscrew the reservoir cap
(anticlockwise).
2. Only the first time you do this: fill
the salt reservoir with water.
3. Position the funnel (see figure)
and fill the salt reservoir right up
to its edge (approximately 1 kg);
it is not unusual for a little water to
leak out.
4. Remove the funnel and wipe any
salt residue away from the
opening.
1. On-Off/Reset button with indicator light
2. Program selection button
3. Salt refill indicator ligh
4. Rinse Aid refill indicator ligh
5. Program number and delay time indicator
6. Tablet indicator light
7. Display
8. Half Load indicator light
9. Half Load button
10. Delay button
11. START/Pause button with indicator light / Tab
1 2 3 4 5 6 7 8 9 10 11
3sec
h
der Bedienblende leuchtet.
1. Ziehen Sie den Unterkorb
heraus und schrauben Sie den
Salzbehälterdeckel gegen den
Uhrzeigersinn ab.
2. Setzen Sie den Trichter auf (siehe
Abbildung) und füllen Sie den
Behälter bis zum Rand mit Salz (ca.
1 kg); es ist normal, wenn etwas
Wasser ausläuft.
3. Nur beim ersten Mal: Befüllen Sie
den Salzbehälter mit Wasser.
4. Den Trichter abnehmen und die
Salzreste vom Önungsrand
entfernen.
ENGLISH
7
Control panel
Product description
1. Upper rack
2. �������
3. Upper rack height adjuster
4. Upper sprayer arm
5. Lower rack
6. Cutlery basket
7. Lower sprayer arm
8. Filter Assembly
9. Salt reservoir
10. Detergent and Rinse Aid dispensers
11. Rating plate
12. Control panel
1
2
3
4
5
6
10
7
11
9
8
First use
ADVICE REGARDING THE FIRST TIME USE
After installation, remove the stoppers from the racks and the
retaining elastic elements from the upper rack.
FILLING THE SALT RESERVOIR
The use of salt prevents the formation of LIMESCALE on the
dishes andon the machine’s functional components.
• It is important that the salt reservoir be never empty.
• It is important to set the water hardness.
The salt reservoir is located in the lower part of the
dishwasher (see PRODUCT DESCRIPTION) and should be
filled when the SALT REFILL indicator light in the
control panel is lit .
1. Remove the lower rack and
unscrew the reservoir cap
(anticlockwise).
2. Only the first time you do this: fill
the salt reservoir with water.
3. Position the funnel (see figure)
and fill the salt reservoir right up
to its edge (approximately 1 kg);
it is not unusual for a little water to
leak out.
4. Remove the funnel and wipe any
salt residue away from the
opening.
1. On-Off/Reset button with indicator light
2. Program selection button
3. Salt refill indicator ligh
4. Rinse Aid refill indicator ligh
5. Program number and delay time indicator
6. Tablet indicator light
7. Display
8. Half Load indicator light
9. Half Load button
10. Delay button
11. START/Pause button with indicator light / Tab
1 2 3 4 5 6 7 8 9 10 11
3sec
h
Sicherstellen, dass der Deckel fest angeschraubt ist, so
dass kein Spülmittel während dem Waschprogramm in den
Behälter gelangt (dies könnte den Wasserenthärter irreparabel
beschädigen).
Sobald dieses Verfahren abgeschlossen ist, ein Programm ohne
Beladung laufen lassen.
Verwenden Sie bitte nur Spezialsalz für Geschirrspüler.
Wenn der Salzbehälter nicht gefüllt ist, könnten
Kesselsteinablagerungen den Wasserenthärter und das
Heizelement beschädigen. Die Verwendung von Salz wird bei
jeder Art von Geschirrspülmittel empfohlen.
Immer wenn Sie Salz zugeben müssen, ist es zwingend
vorgeschrieben, diesen Vorgang vor dem Beginn des
Spülgangs auszuführen, um Korrosion zu vermeiden.
Wasserhärte einstellen
Damit der Wasserenthärter perfekt arbeiten kann, muss die
Wasserhärte je nach der aktuellen Wasserhärte in Ihrem Haus
eingestellt werden. Diese Information erhalten sie bei Ihrem
örtlichen Wasserversorger. Das Werk stellt den Standardwert für
die Wasserhärte ein.
• Gerät mit der EIN/AUS-Taste einschalten.
• Gerät mit der EIN/AUS-Taste ausschalten.
• Die Taste
ENGLISH
8
• Switch on the appliance by pressing the ON/OFF button.
• Switch off the appliance by pressing the ON/OFF button.
• Hold down button for 5 seconds, until you hear a beep.
• Switch on the appliance by pressing the ON/OFF button.
•
•
The current selection level number and the salt indicator light
������
Press button to select the desired hardness level (see
WATER HARDNESS TABLE).
• Switch off the appliance by pressing the ON/OFF button.
Setting is complete!
Water Hardness Table
Level °dH
German degrees
°fH
French degrees
1 Soft 0 - 6 0 - 10
2 Medium 7 - 11 11 - 20
3 Average 12 - 17 21 - 30
4 Hard 18 - 34 31 - 60
5 Very hard 35 - 50 61 - 90
Make sure the cap is screwed on tightly, so that no detergent can
get into the container during the wash program (this could damage
the water softener beyond repair).
As soon as this procedure is complete, run a program without
loading. The “Pre-Wash” program alone is NOT������
Residual saline solution or grains of salt can lead to corrosion,
irreparably damaging the stainless steel components.
The guarantee is not applicable if faults are caused by such
circumstances.
��������������������������������s.
��������������������������������
heating element may be damaged as a result.
Whenever you need to add salt, it is mandatory to complete
the procedure before the beginning of the washing cycle.
SETTING THE WATER HARDNESS
To allow the water softener to work in a perfect way, it is essential
that the water hardness setting is based on the actual water hard-
ness in your house. This information can be obtained from your local
water supplier. The factory setting is for average (3) water hardness.
FILLING THE RINSE AID DISPENSER
Rinse aid makes dish DRYING easier. The rinse aid dispenser A
should be lled when the RINSE AID REFILL indicator light
in the control panel is lit.
1. Open the dispenser B by pressing and pulling up the tab on
the lid.
2. Carefully introduce the rinse aid as far as the maximum
(110 ml) reference notch of the lling space - avoid spilling it.
If this happens, clean the spill immediately with a dry cloth.
3. Press the lid down until you hear a click to close it.
NEVER pour the rinse aid directly into the tub.
A
B
ADJUSTING THE DOSAGE OF RINSE AID
If you are not completely satised with the drying results, you can
adjust the quantity of rinse aid used.
• Switch the dishwasher on using the ON/OFF button.
• Switch it off using the ON/OFF button.
• Press button three times - a beep will be heard.
• Switch it on using the ON/OFF button.
•
•
The current selection level number and rinse aid indicator light ash.
Press button to select the level of rinse aid quantity to be
supplied.
• Switch it off using the ON/OFF button.
Setting is complete!
If the rinse aid level is set to ZERO (ECO), no rinse aid will be
supplied. The LOW RINSE AID indicator light will not be lit if you
run out of rinse aid. A maximum of 5 levels can be set according to
the dishwasher model. The factory setting is specic to the model,
please follow instruction above to check this for your machine.
•If you see bluish streaks on the dishes, set a low number (1-2).
• If there are drops of water or limescale marks on the dishes,
set a high number (3-4).
FILLING THE DETERGENT DISPENSER
������������������������������
dishwashers.
To achieve the best washing and drying results, the combined
useof detergent, rinse aid liquid and rened salt is required.
We recommend using detergents that do not contain phosphates
or chlorine, as these products are harmful to the environment.
Good washing results also depend on the correct amount of
detergent being used.
Exceeding the stated amount does not result in a more effective
wash and increases environmental pollution.
The amount can be adjusted to the soil level. In the case of
normally soiled items, use approximately either 35g (powder
detergent) or 35ml (liquid detergent) and additional tea spoon of
detergent directly inside the tub. If tablets are used, one tablet
will be enough.
If the crockery is only lightly soiled or if it has been rinsed with
water before being placed in the dishwasher, reduce the amount
of detergent used accordingly (minimum 25 g/ml) e.g. skip the
powder/gel putted inside the tub.
To open the detergent dispenser
press button A.
Introduce the detergent into
the dry dispenser B only.
Place the amount of detergent
for pre-washing directly inside
the tub.
A
B
1.
2.
When measuring out the detergent refer to the mentioned ear-
lier information to add the proper quantity. Inside the dispenser
B there are indications to help the detergent dosing.
Remove detergent residues from the edges of the dispenser
and close the cover until it clicks.
3. Close the lid of the detergent dispenser by pulling it up until
the closing device is secured in place.
The detergent dispenser automatically opens up at the right time
according to the program. If all-in-one detergents are used, we
recommend using the TABLET button, because it adjusts the
program so that the best washing and drying results are always
achieved.
5 Sekunden lang gedrückt halten, bis Sie einen
Piepton hören.
• Gerät durch schnelles Drücken der EIN/AUS-Taste einschalten.
• Die Nummer der aktuell ausgewählten Stufe und die
Salznachfüllanzeige blinken.
• Drücken Sie die Taste
ENGLISH
8
• Switch on the appliance by pressing the ON/OFF button.
• Switch off the appliance by pressing the ON/OFF button.
• Hold down button for 5 seconds, until you hear a beep.
• Switch on the appliance by pressing the ON/OFF button.
•
•
The current selection level number and the salt indicator light
������
Press button to select the desired hardness level (see
WATER HARDNESS TABLE).
• Switch off the appliance by pressing the ON/OFF button.
Setting is complete!
Water Hardness Table
Level °dH
German degrees
°fH
French degrees
1 Soft 0 - 6 0 - 10
2 Medium 7 - 11 11 - 20
3 Average 12 - 17 21 - 30
4 Hard 18 - 34 31 - 60
5 Very hard 35 - 50 61 - 90
Make sure the cap is screwed on tightly, so that no detergent can
get into the container during the wash program (this could damage
the water softener beyond repair).
As soon as this procedure is complete, run a program without
loading. The “Pre-Wash” program alone is NOT������
Residual saline solution or grains of salt can lead to corrosion,
irreparably damaging the stainless steel components.
The guarantee is not applicable if faults are caused by such
circumstances.
��������������������������������s.
��������������������������������
heating element may be damaged as a result.
Whenever you need to add salt, it is mandatory to complete
the procedure before the beginning of the washing cycle.
SETTING THE WATER HARDNESS
To allow the water softener to work in a perfect way, it is essential
that the water hardness setting is based on the actual water hard-
ness in your house. This information can be obtained from your local
water supplier. The factory setting is for average (3) water hardness.
FILLING THE RINSE AID DISPENSER
Rinse aid makes dish DRYING easier. The rinse aid dispenser A
should be lled when the RINSE AID REFILL indicator light
in the control panel is lit.
1. Open the dispenser B by pressing and pulling up the tab on
the lid.
2. Carefully introduce the rinse aid as far as the maximum
(110 ml) reference notch of the lling space - avoid spilling it.
If this happens, clean the spill immediately with a dry cloth.
3. Press the lid down until you hear a click to close it.
NEVER pour the rinse aid directly into the tub.
A
B
ADJUSTING THE DOSAGE OF RINSE AID
If you are not completely satised with the drying results, you can
adjust the quantity of rinse aid used.
• Switch the dishwasher on using the ON/OFF button.
• Switch it off using the ON/OFF button.
• Press button three times - a beep will be heard.
• Switch it on using the ON/OFF button.
•
•
The current selection level number and rinse aid indicator light ash.
Press button to select the level of rinse aid quantity to be
supplied.
• Switch it off using the ON/OFF button.
Setting is complete!
If the rinse aid level is set to ZERO (ECO), no rinse aid will be
supplied. The LOW RINSE AID indicator light will not be lit if you
run out of rinse aid. A maximum of 5 levels can be set according to
the dishwasher model. The factory setting is specic to the model,
please follow instruction above to check this for your machine.
•If you see bluish streaks on the dishes, set a low number (1-2).
• If there are drops of water or limescale marks on the dishes,
set a high number (3-4).
FILLING THE DETERGENT DISPENSER
������������������������������
dishwashers.
To achieve the best washing and drying results, the combined
useof detergent, rinse aid liquid and rened salt is required.
We recommend using detergents that do not contain phosphates
or chlorine, as these products are harmful to the environment.
Good washing results also depend on the correct amount of
detergent being used.
Exceeding the stated amount does not result in a more effective
wash and increases environmental pollution.
The amount can be adjusted to the soil level. In the case of
normally soiled items, use approximately either 35g (powder
detergent) or 35ml (liquid detergent) and additional tea spoon of
detergent directly inside the tub. If tablets are used, one tablet
will be enough.
If the crockery is only lightly soiled or if it has been rinsed with
water before being placed in the dishwasher, reduce the amount
of detergent used accordingly (minimum 25 g/ml) e.g. skip the
powder/gel putted inside the tub.
To open the detergent dispenser
press button A.
Introduce the detergent into
the dry dispenser B only.
Place the amount of detergent
for pre-washing directly inside
the tub.
A
B
1.
2.
When measuring out the detergent refer to the mentioned ear-
lier information to add the proper quantity. Inside the dispenser
B there are indications to help the detergent dosing.
Remove detergent residues from the edges of the dispenser
and close the cover until it clicks.
3. Close the lid of the detergent dispenser by pulling it up until
the closing device is secured in place.
The detergent dispenser automatically opens up at the right time
according to the program. If all-in-one detergents are used, we
recommend using the TABLET button, because it adjusts the
program so that the best washing and drying results are always
achieved.
um die gewünschte Härtestufe
auszuwählen (siehe WASSERHÄRTE-TABELLE).
• Gerät mit der EIN/AUS-Taste ausschalten. Die Einstellung ist
abgeschlossen!
Wasserhärte-Tabelle
Stufe °dH
Deut.
Härtegr.
°fH
Französischer
Härtegr.
°Clark
Englische
Härtegr.
1 Weich 0 - 6 0 - 10 0 - 7
2 Mittel 7 - 11 11 - 20 8 - 14
3 Durchschnittlich 12 - 16 21 - 29 15 - 20
4 Hart 17 - 34 30 - 60 21 - 42
5 Sehr hart 35 - 50 61 - 90 43 - 62
Wasserenthärtungsanlage
Der Wasserenthärter verringert automatisch die Wasserhärte
und verhindert somit die Bildung von Kalk auf dem Heizgerät.
Dies trägt auch zu einer ezienteren Reinigung bei.
Dieses System regeneriert sich mit Salz, daher ist es erforderlich,
Salz in den Behälter zu füllen, wenn dieser leer ist.
Die Häugkeit der Regeneration hängt von der Einstellung der
Wasserhärte ab. Bei Einstellung der Wasserhärtestufe auf 3
wird die Regeneration einmal nach jeweils 5 Eco-Programmen
durchgeführt.
Der Regenerationsprozess beginnt in der Endspülung und endet
in der Trocknungsphase, bevor der Zyklus endet.
* Eine einzelne Regeneration verbraucht: ~3,5 l Wasser;
* erfordert bis zu 5 zusätzliche Minuten für das Programm;
* Energieverbrauch unter 0,005 kWh.
4
2
7
8
10
1
3
5
6
9
11
0000 000 00000
Service:
1 Oberkorb
2 Besteckschublade
3 Faltbare Klappen
4 Oberkorb Höhenversteller
5 Oberer Sprüharm
6 Unterkorb
7 Unterer Sprüharm
8 Filtereinheit
9 Salzbehälter
10 Spülmittel und Klarspülerspender
11 Bedienblende

Zum Herunterladen der vollständigen Version besuchen Sie bitte www.ikea.com
13DEUTSCH
Klarspülerspender auüllen
Klarspüler macht das TROCKNEN von Geschirr einfacher.
Der Klarspülerspender A muss aufgefüllt werden, wenn das
KLARSPÜLER AUFFÜLLEN Anzeigelicht
ENGLISH
7
Control panel
Product description
1. Upper rack
2. �������
3. Upper rack height adjuster
4. Upper sprayer arm
5. Lower rack
6. Cutlery basket
7. Lower sprayer arm
8. Filter Assembly
9. Salt reservoir
10. Detergent and Rinse Aid dispensers
11. Rating plate
12. Control panel
1
2
3
4
5
6
10
7
11
9
8
First use
ADVICE REGARDING THE FIRST TIME USE
After installation, remove the stoppers from the racks and the
retaining elastic elements from the upper rack.
FILLING THE SALT RESERVOIR
The use of salt prevents the formation of LIMESCALE on the
dishes andon the machine’s functional components.
• It is important that the salt reservoir be never empty.
• It is important to set the water hardness.
The salt reservoir is located in the lower part of the
dishwasher (see PRODUCT DESCRIPTION) and should be
filled when the SALT REFILL indicator light in the
control panel is lit .
1. Remove the lower rack and
unscrew the reservoir cap
(anticlockwise).
2. Only the first time you do this: fill
the salt reservoir with water.
3. Position the funnel (see figure)
and fill the salt reservoir right up
to its edge (approximately 1 kg);
it is not unusual for a little water to
leak out.
4. Remove the funnel and wipe any
salt residue away from the
opening.
1. On-Off/Reset button with indicator light
2. Program selection button
3. Salt refill indicator ligh
4. Rinse Aid refill indicator ligh
5. Program number and delay time indicator
6. Tablet indicator light
7. Display
8. Half Load indicator light
9. Half Load button
10. Delay button
11. START/Pause button with indicator light / Tab
1 2 3 4 5 6 7 8 9 10 11
3sec
h
auf der Bedienblende
leuchtet.
A
B
BA
1. Den Behälter B durch Drücken und Anheben der Zunge am
Deckel önen.
2. Den Klarspüler vorsichtig bis zur maximalen
Füllstandsmarkierung (110 ml) an der Füllönung einfüllen
und ein Überlaufen vermeiden. Andernfalls sofort mit einem
trockenen Tuch abwischen.
3. Den Deckel schließen bis er einrastet.
Füllen Sie den Klarspüler NIEMALS direkt ins Innere des
Geschirrspülers.
Klarspülerdosierung
Sollte das Trockenergebnis unzufriedenstellend sein, kann die
Klarspülerdosierung neu eingestellt werden.
• Den Geschirrspüler mit der Taste EIN/AUS einschalten.
• Mit der Taste EIN/AUS ausschalten.
• Drücken Sie die Taste
ENGLISH
8
• Switch on the appliance by pressing the ON/OFF button.
• Switch off the appliance by pressing the ON/OFF button.
• Hold down button for 5 seconds, until you hear a beep.
• Switch on the appliance by pressing the ON/OFF button.
•
•
The current selection level number and the salt indicator light
������
Press button to select the desired hardness level (see
WATER HARDNESS TABLE).
• Switch off the appliance by pressing the ON/OFF button.
Setting is complete!
Water Hardness Table
Level °dH
German degrees
°fH
French degrees
1 Soft 0 - 6 0 - 10
2 Medium 7 - 11 11 - 20
3 Average 12 - 17 21 - 30
4 Hard 18 - 34 31 - 60
5 Very hard 35 - 50 61 - 90
Make sure the cap is screwed on tightly, so that no detergent can
get into the container during the wash program (this could damage
the water softener beyond repair).
As soon as this procedure is complete, run a program without
loading. The “Pre-Wash” program alone is NOT������
Residual saline solution or grains of salt can lead to corrosion,
irreparably damaging the stainless steel components.
The guarantee is not applicable if faults are caused by such
circumstances.
��������������������������������s.
��������������������������������
heating element may be damaged as a result.
Whenever you need to add salt, it is mandatory to complete
the procedure before the beginning of the washing cycle.
SETTING THE WATER HARDNESS
To allow the water softener to work in a perfect way, it is essential
that the water hardness setting is based on the actual water hard-
ness in your house. This information can be obtained from your local
water supplier. The factory setting is for average (3) water hardness.
FILLING THE RINSE AID DISPENSER
Rinse aid makes dish DRYING easier. The rinse aid dispenser A
should be lled when the RINSE AID REFILL indicator light
in the control panel is lit.
1. Open the dispenser B by pressing and pulling up the tab on
the lid.
2. Carefully introduce the rinse aid as far as the maximum
(110 ml) reference notch of the lling space - avoid spilling it.
If this happens, clean the spill immediately with a dry cloth.
3. Press the lid down until you hear a click to close it.
NEVER pour the rinse aid directly into the tub.
A
B
ADJUSTING THE DOSAGE OF RINSE AID
If you are not completely satised with the drying results, you can
adjust the quantity of rinse aid used.
• Switch the dishwasher on using the ON/OFF button.
• Switch it off using the ON/OFF button.
• Press button three times - a beep will be heard.
• Switch it on using the ON/OFF button.
•
•
The current selection level number and rinse aid indicator light ash.
Press button to select the level of rinse aid quantity to be
supplied.
• Switch it off using the ON/OFF button.
Setting is complete!
If the rinse aid level is set to ZERO (ECO), no rinse aid will be
supplied. The LOW RINSE AID indicator light will not be lit if you
run out of rinse aid. A maximum of 5 levels can be set according to
the dishwasher model. The factory setting is specic to the model,
please follow instruction above to check this for your machine.
•If you see bluish streaks on the dishes, set a low number (1-2).
• If there are drops of water or limescale marks on the dishes,
set a high number (3-4).
FILLING THE DETERGENT DISPENSER
������������������������������
dishwashers.
To achieve the best washing and drying results, the combined
useof detergent, rinse aid liquid and rened salt is required.
We recommend using detergents that do not contain phosphates
or chlorine, as these products are harmful to the environment.
Good washing results also depend on the correct amount of
detergent being used.
Exceeding the stated amount does not result in a more effective
wash and increases environmental pollution.
The amount can be adjusted to the soil level. In the case of
normally soiled items, use approximately either 35g (powder
detergent) or 35ml (liquid detergent) and additional tea spoon of
detergent directly inside the tub. If tablets are used, one tablet
will be enough.
If the crockery is only lightly soiled or if it has been rinsed with
water before being placed in the dishwasher, reduce the amount
of detergent used accordingly (minimum 25 g/ml) e.g. skip the
powder/gel putted inside the tub.
To open the detergent dispenser
press button A.
Introduce the detergent into
the dry dispenser B only.
Place the amount of detergent
for pre-washing directly inside
the tub.
A
B
1.
2.
When measuring out the detergent refer to the mentioned ear-
lier information to add the proper quantity. Inside the dispenser
B there are indications to help the detergent dosing.
Remove detergent residues from the edges of the dispenser
and close the cover until it clicks.
3. Close the lid of the detergent dispenser by pulling it up until
the closing device is secured in place.
The detergent dispenser automatically opens up at the right time
according to the program. If all-in-one detergents are used, we
recommend using the TABLET button, because it adjusts the
program so that the best washing and drying results are always
achieved.
drei Mal - ein Piepton ertönt.
• Mit der Taste EIN/AUS einschalten.
• Die Nummer der aktuell ausgewählten Stufe und die
Klarspülernachfüllanzeige blinken.
• Drücken Sie die Taste
ENGLISH
8
• Switch on the appliance by pressing the ON/OFF button.
• Switch off the appliance by pressing the ON/OFF button.
• Hold down button for 5 seconds, until you hear a beep.
• Switch on the appliance by pressing the ON/OFF button.
•
•
The current selection level number and the salt indicator light
������
Press button to select the desired hardness level (see
WATER HARDNESS TABLE).
• Switch off the appliance by pressing the ON/OFF button.
Setting is complete!
Water Hardness Table
Level °dH
German degrees
°fH
French degrees
1 Soft 0 - 6 0 - 10
2 Medium 7 - 11 11 - 20
3 Average 12 - 17 21 - 30
4 Hard 18 - 34 31 - 60
5 Very hard 35 - 50 61 - 90
Make sure the cap is screwed on tightly, so that no detergent can
get into the container during the wash program (this could damage
the water softener beyond repair).
As soon as this procedure is complete, run a program without
loading. The “Pre-Wash” program alone is NOT������
Residual saline solution or grains of salt can lead to corrosion,
irreparably damaging the stainless steel components.
The guarantee is not applicable if faults are caused by such
circumstances.
��������������������������������s.
��������������������������������
heating element may be damaged as a result.
Whenever you need to add salt, it is mandatory to complete
the procedure before the beginning of the washing cycle.
SETTING THE WATER HARDNESS
To allow the water softener to work in a perfect way, it is essential
that the water hardness setting is based on the actual water hard-
ness in your house. This information can be obtained from your local
water supplier. The factory setting is for average (3) water hardness.
FILLING THE RINSE AID DISPENSER
Rinse aid makes dish DRYING easier. The rinse aid dispenser A
should be lled when the RINSE AID REFILL indicator light
in the control panel is lit.
1. Open the dispenser B by pressing and pulling up the tab on
the lid.
2. Carefully introduce the rinse aid as far as the maximum
(110 ml) reference notch of the lling space - avoid spilling it.
If this happens, clean the spill immediately with a dry cloth.
3. Press the lid down until you hear a click to close it.
NEVER pour the rinse aid directly into the tub.
A
B
ADJUSTING THE DOSAGE OF RINSE AID
If you are not completely satised with the drying results, you can
adjust the quantity of rinse aid used.
• Switch the dishwasher on using the ON/OFF button.
• Switch it off using the ON/OFF button.
• Press button three times - a beep will be heard.
• Switch it on using the ON/OFF button.
•
•
The current selection level number and rinse aid indicator light ash.
Press button to select the level of rinse aid quantity to be
supplied.
• Switch it off using the ON/OFF button.
Setting is complete!
If the rinse aid level is set to ZERO (ECO), no rinse aid will be
supplied. The LOW RINSE AID indicator light will not be lit if you
run out of rinse aid. A maximum of 5 levels can be set according to
the dishwasher model. The factory setting is specic to the model,
please follow instruction above to check this for your machine.
•If you see bluish streaks on the dishes, set a low number (1-2).
• If there are drops of water or limescale marks on the dishes,
set a high number (3-4).
FILLING THE DETERGENT DISPENSER
������������������������������
dishwashers.
To achieve the best washing and drying results, the combined
useof detergent, rinse aid liquid and rened salt is required.
We recommend using detergents that do not contain phosphates
or chlorine, as these products are harmful to the environment.
Good washing results also depend on the correct amount of
detergent being used.
Exceeding the stated amount does not result in a more effective
wash and increases environmental pollution.
The amount can be adjusted to the soil level. In the case of
normally soiled items, use approximately either 35g (powder
detergent) or 35ml (liquid detergent) and additional tea spoon of
detergent directly inside the tub. If tablets are used, one tablet
will be enough.
If the crockery is only lightly soiled or if it has been rinsed with
water before being placed in the dishwasher, reduce the amount
of detergent used accordingly (minimum 25 g/ml) e.g. skip the
powder/gel putted inside the tub.
To open the detergent dispenser
press button A.
Introduce the detergent into
the dry dispenser B only.
Place the amount of detergent
for pre-washing directly inside
the tub.
A
B
1.
2.
When measuring out the detergent refer to the mentioned ear-
lier information to add the proper quantity. Inside the dispenser
B there are indications to help the detergent dosing.
Remove detergent residues from the edges of the dispenser
and close the cover until it clicks.
3. Close the lid of the detergent dispenser by pulling it up until
the closing device is secured in place.
The detergent dispenser automatically opens up at the right time
according to the program. If all-in-one detergents are used, we
recommend using the TABLET button, because it adjusts the
program so that the best washing and drying results are always
achieved.
, um den Stand der gelieferten
Klarspülermenge auszuwählen.
• Mit der Taste EIN/AUS ausschalten.
Die Einstellung ist abgeschlossen!
Die Klarspülerstufe kann auf NULL (ECO) eingestellt werden.
In diesem Fall wird kein Klarspüler ausgegeben. Die
Kontrollleuchte zur ANZEIGE DES FEHLENDEN KLARSPÜLERS
leuchtet nicht mehr auf. Je nach Gerätemodell können bis max.
5 Stufen eingestellt werden. Die Werkseinstellung ist abhängig
vom Modell. Bitte befolgen Sie die Anweisungen oben, um dies
für Ihr Gerät zu überprüfen.
• Wenn Sie bläuliche Streifen auf dem Geschirr sehen, stellen
Sie eine niedrigere Zahl ein (1-2).
• Wenn Wassertropfen oder Kalkablagerungen auf dem
Geschirr sind, eine höhere Zahl einstellen (3-4).
Einfüllen des Spülmittels
Die Verwendung von Spülmittel, das nicht für Geschirrspüler
entwickelt wurde, ist, kann zu Funktionsstörungen oder
Schäden am Gerät führen.
Drücken Sie zum Önen des Spülmittelfachs Taste C.
Füllen Sie das Spülmittel ausschließlich in das trockene Fach
D ein.
Geben Sie die Spülmittelmenge für die Vorwäsche direkt in
das Innere des Geschirrspülers.
ENGLISH
8
• Switch on the appliance by pressing the ON/OFF button.
• Switch off the appliance by pressing the ON/OFF button.
• Hold down button for 5 seconds, until you hear a beep.
• Switch on the appliance by pressing the ON/OFF button.
•
•
The current selection level number and the salt indicator light
������
Press button to select the desired hardness level (see
WATER HARDNESS TABLE).
• Switch off the appliance by pressing the ON/OFF button.
Setting is complete!
Water Hardness Table
Level °dH
German degrees
°fH
French degrees
1 Soft 0 - 6 0 - 10
2 Medium 7 - 11 11 - 20
3 Average 12 - 17 21 - 30
4 Hard 18 - 34 31 - 60
5 Very hard 35 - 50 61 - 90
Make sure the cap is screwed on tightly, so that no detergent can
get into the container during the wash program (this could damage
the water softener beyond repair).
As soon as this procedure is complete, run a program without
loading. The “Pre-Wash” program alone is NOT������
Residual saline solution or grains of salt can lead to corrosion,
irreparably damaging the stainless steel components.
The guarantee is not applicable if faults are caused by such
circumstances.
��������������������������������s.
��������������������������������
heating element may be damaged as a result.
Whenever you need to add salt, it is mandatory to complete
the procedure before the beginning of the washing cycle.
SETTING THE WATER HARDNESS
To allow the water softener to work in a perfect way, it is essential
that the water hardness setting is based on the actual water hard-
ness in your house. This information can be obtained from your local
water supplier. The factory setting is for average (3) water hardness.
FILLING THE RINSE AID DISPENSER
Rinse aid makes dish DRYING easier. The rinse aid dispenser A
should be lled when the RINSE AID REFILL indicator light
in the control panel is lit.
1. Open the dispenser B by pressing and pulling up the tab on
the lid.
2. Carefully introduce the rinse aid as far as the maximum
(110 ml) reference notch of the lling space - avoid spilling it.
If this happens, clean the spill immediately with a dry cloth.
3. Press the lid down until you hear a click to close it.
NEVER pour the rinse aid directly into the tub.
A
B
ADJUSTING THE DOSAGE OF RINSE AID
If you are not completely satised with the drying results, you can
adjust the quantity of rinse aid used.
• Switch the dishwasher on using the ON/OFF button.
• Switch it off using the ON/OFF button.
• Press button three times - a beep will be heard.
• Switch it on using the ON/OFF button.
•
•
The current selection level number and rinse aid indicator light ash.
Press button to select the level of rinse aid quantity to be
supplied.
• Switch it off using the ON/OFF button.
Setting is complete!
If the rinse aid level is set to ZERO (ECO), no rinse aid will be
supplied. The LOW RINSE AID indicator light will not be lit if you
run out of rinse aid. A maximum of 5 levels can be set according to
the dishwasher model. The factory setting is specic to the model,
please follow instruction above to check this for your machine.
•If you see bluish streaks on the dishes, set a low number (1-2).
• If there are drops of water or limescale marks on the dishes,
set a high number (3-4).
FILLING THE DETERGENT DISPENSER
������������������������������
dishwashers.
To achieve the best washing and drying results, the combined
useof detergent, rinse aid liquid and rened salt is required.
We recommend using detergents that do not contain phosphates
or chlorine, as these products are harmful to the environment.
Good washing results also depend on the correct amount of
detergent being used.
Exceeding the stated amount does not result in a more effective
wash and increases environmental pollution.
The amount can be adjusted to the soil level. In the case of
normally soiled items, use approximately either 35g (powder
detergent) or 35ml (liquid detergent) and additional tea spoon of
detergent directly inside the tub. If tablets are used, one tablet
will be enough.
If the crockery is only lightly soiled or if it has been rinsed with
water before being placed in the dishwasher, reduce the amount
of detergent used accordingly (minimum 25 g/ml) e.g. skip the
powder/gel putted inside the tub.
To open the detergent dispenser
press button A.
Introduce the detergent into
the dry dispenser B only.
Place the amount of detergent
for pre-washing directly inside
the tub.
A
B
1.
2.
When measuring out the detergent refer to the mentioned ear-
lier information to add the proper quantity. Inside the dispenser
B there are indications to help the detergent dosing.
Remove detergent residues from the edges of the dispenser
and close the cover until it clicks.
3. Close the lid of the detergent dispenser by pulling it up until
the closing device is secured in place.
The detergent dispenser automatically opens up at the right time
according to the program. If all-in-one detergents are used, we
recommend using the TABLET button, because it adjusts the
program so that the best washing and drying results are always
achieved.
D
C
1. Hinsichtlich der Dosierung verweisen wir auf die zuvor
erwähnte Information, in der die richtige Menge angegeben
ist. Im Fach D sind Anzeigen, die bei der Spülmitteldosierung
helfen.
2. Entfernen Sie eventuelle Spülmittelrückstände von den
Kanten der Kammern und schließen Sie den Deckel so, dass
er einrastet.
3. Schieben Sie den Deckel der Spülmittelkammer zum Schließen
nach oben, bis er einrastet.
Die Spülmittelkammer önet sich automatisch zum richtigen
Zeitpunkt des jeweils gewählten Programms. Werden
Kombispülmittel verwendet, dann empfehlen wir, die Option
TAB zu verwenden. Damit werden die Programme dem
verwendeten Spülmittel angepasst, um das bestmögliche
Spülergebnis zu erhalten.
Bedienfeld
1 2 3 4 5 6 8 9 10 11 12 13
7
2
65°
1
50°
56
10 PROGRAMS
3
50°
4
45°
7
50°
8
65°
10
50°-60° 50°
9
65°
h
3sec
1 Ein-Aus/Reset Taste mit Anzeigelicht
2 Programmwahl-Taste
3 Anzeigelicht zum Salz auüllen
4 Anzeigelicht zum Klarspüler auüllen
5 Programmnummer und Verzögerungszeit-Anzeige
6 Tab-Anzeigelicht
7 Display
8 Flexibles Spülen-Anzeigelicht
9 Flexibles Spülen-Taste
10 Startvorwahl-Taste
11 Short Time-Taste (Kurze Dauer) mit Anzeigelicht
12 Extra Dry-Taste mit Anzeigelicht
13 START/Pause-Taste mit Anzeigelicht/Tab

Zum Herunterladen der vollständigen Version besuchen Sie bitte www.ikea.com
14DEUTSCH
EN
11
OPTIONS AND FUNCTIONS
OPTIONS can be selected directly by pressing the corresponding button (see CONTROL PANEL).
If an option is not compatible with the selected program see PROGRAMS TABLE, the corresponding LED ashes rapidly 3 times
and beeps will sound. The option will not be enabled.
TABLET (Tab)
This setting allows you to optimize the performance of
the program according to the type of detergent used.
Press the START/PAUSE button for 3 seconds (the
corresponding symbol will light up) if you use combined
detergents in tablet form (rinse aid, salt and detergent in
1 dose).
If you use powder or liquid detergent, this option
should be off.
NaturalDry
NaturalDry is a convection drying system which automatically
opens the door during/after drying phase to ensure exceptional
drying performance every day. Door opens at the temperature
that is safe to your kitchen furniture, thus door will not be opened
when the option of SHORT TIME is on.
As additional steam protection, special designed protection foil is
added together with the dishwasher. To see how to mount protec-
tion foil please refer to (INSTALLATION GUIDE).
NaturalDry functionality could be disabled by the user as follows:
1. Go to the Dishwasher software menu pressing and holding
button (6 sec).
2. You are currently in Light Control Menu (please refer to
OPERATION INDICATOR description), if you don’t want to
change anything please press and hold button (until one of
the two letters appears on the display)
3. You switched to NaturalDry Control Menu, you could change
status of NaturalDry functionality by pressing button:
E – enabled d – disabled
To conrm the change and exit from the Control Menu please
press and hold button (3 sec).
DELAY
The start time of the program may be delayed for a period
of time between 1 and 12 hours.
1. Press the DELAY button: the corresponding «h» symbol
appears on the display; each time you press the button,
the time (1h, 2h, etc. up to max. 12h) from the start of
the selected wash cycle will be increased.
2. Select the wash program, press the START/PAUSE
button and within 4 seconds close the door: the timer
will begin counting down.
3. Once this time has elapsed, the indicator light «h»
switches off and the wash cycle begins.
To adjust the delay time and select a shorter period of time,
press the DELAY button. To cancel it, press the button
repeatedly until the selected delayed start indicator light
«h» switches off.
The DELAY function cannot be set once a wash cycle
has been started.
FLEXI WASH
If there are not many dishes to be washed, a half loading
may be used in order to save water, electricity and
detergent.
Select the program and then press the FLEXI WASH button:
the symbol of the chosen rack will appear on the display.
By default the appliance washes dishes in all racks.
To wash only the specic rack, press this button repeatedly:
shown on the display (only lower rack)
shown on the display (only upper rack)
shown on the display (only cutlery rack)
shown on the display (option is OFF and the appliance will
wash dishes in all racks).
Remember to load the upper or lower rack only, and to
reduce the amount of detergent accordingly.
If upper rack is removed, please apply detergent
directly to tub instead of detergent dispenser.
SHORT TIME
This option can be used to reduce the duration of the main
programs while maintaining the same washing and drying
performance levels.
After selecting the program, press the SHORT TIME button
and the indicator light will switch on. To deselect the option,
press the same button again.
EXTRA DRY
To improve the drying of the dishes, after selecting the
program, press the EXTRA DRY button and the indicator
light comes on.
A higher temperature during the nal rinse and an extended
drying phase allow for improving drying. To deselect the
option, press the same button again. The EXTRA DRY
option results in the lengthening of the wash cycle.
OPERATION INDICATOR
A LED light projected on the oor indicates that the
dishwasher is working. One of the following operating
modes can be selected:
a) Disabled function.
b) When the cycle starts the light goes on for few seconds,
stays off during the cycle and ashes at the end of the
cycle.
c) The light stays on during the cycle and ashes at the
end of the cycle (default mode).
If the delayed start was set, the light goes on either for the
rst few seconds or the entire duration of the countdown,
based on whether mode b) or c) was set.
The light goes off every time the door is opened. To select
the mode you prefer, switch on the machine, hold down
button P until one of the three letters appears on the display,
press button P until you reach the desired letter (or mode),
hold down button P to conrm the selection.
Note: If NaturalDry is active and it opens the door, then
Operation Indicator will not ash at the end of cycle.
FLEXIBLES SPÜLEN
Haben Sie nur wenig Geschirr zu spülen, wählen
Sie den Spülgang Halbe Füllung. Sie sparen Wasser,
Strom und Spülmittel.
Standardmäßig wäscht das Gerät das Geschirr in
allen Körben.
Drücken Sie diese Taste wiederholt, um nur einen
bestimmten Korb zu spülen:
EN
11
OPTIONS AND FUNCTIONS
OPTIONS can be selected directly by pressing the corresponding button (see CONTROL PANEL).
If an option is not compatible with the selected program see PROGRAMS TABLE, the corresponding LED ashes rapidly 3 times
and beeps will sound. The option will not be enabled.
TABLET (Tab)
This setting allows you to optimize the performance of
the program according to the type of detergent used.
Press the START/PAUSE button for 3 seconds (the
corresponding symbol will light up) if you use combined
detergents in tablet form (rinse aid, salt and detergent in
1 dose).
If you use powder or liquid detergent, this option
should be off.
NaturalDry
NaturalDry is a convection drying system which automatically
opens the door during/after drying phase to ensure exceptional
drying performance every day. Door opens at the temperature
that is safe to your kitchen furniture, thus door will not be opened
when the option of SHORT TIME is on.
As additional steam protection, special designed protection foil is
added together with the dishwasher. To see how to mount protec-
tion foil please refer to (INSTALLATION GUIDE).
NaturalDry functionality could be disabled by the user as follows:
1. Go to the Dishwasher software menu pressing and holding
button (6 sec).
2. You are currently in Light Control Menu (please refer to
OPERATION INDICATOR description), if you don’t want to
change anything please press and hold button (until one of
the two letters appears on the display)
3. You switched to NaturalDry Control Menu, you could change
status of NaturalDry functionality by pressing button:
E – enabled d – disabled
To conrm the change and exit from the Control Menu please
press and hold button (3 sec).
DELAY
The start time of the program may be delayed for a period
of time between 1 and 12 hours.
1. Press the DELAY button: the corresponding «h» symbol
appears on the display; each time you press the button,
the time (1h, 2h, etc. up to max. 12h) from the start of
the selected wash cycle will be increased.
2. Select the wash program, press the START/PAUSE
button and within 4 seconds close the door: the timer
will begin counting down.
3. Once this time has elapsed, the indicator light «h»
switches off and the wash cycle begins.
To adjust the delay time and select a shorter period of time,
press the DELAY button. To cancel it, press the button
repeatedly until the selected delayed start indicator light
«h» switches off.
The DELAY function cannot be set once a wash cycle
has been started.
FLEXI WASH
If there are not many dishes to be washed, a half loading
may be used in order to save water, electricity and
detergent.
Select the program and then press the FLEXI WASH button:
the symbol of the chosen rack will appear on the display.
By default the appliance washes dishes in all racks.
To wash only the specic rack, press this button repeatedly:
shown on the display (only lower rack)
shown on the display (only upper rack)
shown on the display (only cutlery rack)
shown on the display (option is OFF and the appliance will
wash dishes in all racks).
Remember to load the upper or lower rack only, and to
reduce the amount of detergent accordingly.
If upper rack is removed, please apply detergent
directly to tub instead of detergent dispenser.
SHORT TIME
This option can be used to reduce the duration of the main
programs while maintaining the same washing and drying
performance levels.
After selecting the program, press the SHORT TIME button
and the indicator light will switch on. To deselect the option,
press the same button again.
EXTRA DRY
To improve the drying of the dishes, after selecting the
program, press the EXTRA DRY button and the indicator
light comes on.
A higher temperature during the nal rinse and an extended
drying phase allow for improving drying. To deselect the
option, press the same button again. The EXTRA DRY
option results in the lengthening of the wash cycle.
OPERATION INDICATOR
A LED light projected on the oor indicates that the
dishwasher is working. One of the following operating
modes can be selected:
a) Disabled function.
b) When the cycle starts the light goes on for few seconds,
stays off during the cycle and ashes at the end of the
cycle.
c) The light stays on during the cycle and ashes at the
end of the cycle (default mode).
If the delayed start was set, the light goes on either for the
rst few seconds or the entire duration of the countdown,
based on whether mode b) or c) was set.
The light goes off every time the door is opened. To select
the mode you prefer, switch on the machine, hold down
button P until one of the three letters appears on the display,
press button P until you reach the desired letter (or mode),
hold down button P to conrm the selection.
Note: If NaturalDry is active and it opens the door, then
Operation Indicator will not ash at the end of cycle.
gezeigt auf dem Display (nur Unterkorb)
gezeigt auf dem Display (nur Oberkorb)
gezeigt auf dem Display (nur Besteckschublade)
gezeigt auf dem Display (Option ist AUS und das
Gerät wäscht Geschirr in allen Körben).
9
ENGLISH
1. Press the DELAY button: the corresponding «h» symbol
appears on the display; each time you press the button,
the time (1h, 2h, etc. up to max. 12h) from the start of
the selected wash cycle will be increased.
2. Select the wash program, press the START/PAUSE
button and within 4 seconds close the door: the timer
will begin counting down.
3. Once this time has elapsed, the indicator light «h»
switches off and the wash cycle begins.
To adjust the delay time and select a shorter period of time,
press the DELAY button. To cancel it, press the button
repeatedly until the selected delayed start indicator light
«h» switches off.
The DELAY function cannot be set once a wash cycle
has been started.
NaturalDry
Door opening system NaturalDry is a convection drying system
which automatically opens the door during/after drying phase to
ensure exceptional drying performance every day. Door opens at
the temperature that is safe to your kitchen furniture.
As additional steam protection, special designed protection foil is
added together with the dishwasher. To see how to mount protec-
tion foil please refer to (INSTALLATION GUIDE).
NaturalDry functionality could be disabled by the user as follows:
1. Go to the Dishwasher software menu pressing and holding
button (6 sec).
2. You switched to NaturalDry Control Menu, you could change
status of NaturalDry functionality by pressing button:
E – enabled d – disabled
To conrm the change and exit from the Control Menu please
press and hold button (3 sec).
DELAY
The start time of the program may be delayed for a period
of time between 1 and 12 hours.
Program
Drying
phase
Natural
Dry
Available
options *)
Duration of
wash pro-
gram
(h:min)**)
Water
consumption
(litres/cycle)
Energy
consumption
(kWh/cycle)
50° 2:45 12.0 0.92
1 Eco
2 Conventional
wash and dry 55° 2:00 15.0 1.35
3Intensive 65° - 2:30 15.0 1.50
4Fast 50° -- 0:55 11.5 1.10
5Sanitizing 65° - 1:40 11.5 1.30
6Pre-Wash
-
-- 0:10 4.5 0.01
7Self-Clean 65° --0:50 8.0 0.80
ECO program data is measured under laboratory conditions according to European Standard EN 60436:2019.
Note for Test Laboratories: For information on comparative EN testing conditions, please send an email to the following
address: [email protected]
Pre-treatment of the dishes is not needed before any of the programs.
*) Not all options can be used simultaneously.
**) Values given for programes other than the eco program are indicative only. The actual time may vary depending on many
factors such as temperature and pressure of the incoming water, room temperature, amount of detergent, quantity and type of
load, load balancing, additional selected options and sensor calibration.
Standby consumption: Left-on mode consumption: 5 W - Off mode consumption: 0.5 W
PROGRAMS DESCRIPTION
STARTZEITVORWAHL
Der Programmstartzeit kann um eine Zeit von 1 bis 12
Stunden verzögert werden.
1. Drücken Sie die Taste STARTVERZÖGERUNG: Das
entsprechende Symbol „h“ erscheint auf dem Display;
bei jedem Drücken der Taste, erhöht sich die Zeit (1
Std., 2 Std., usw. bis zu max. 12 Std.) ab dem Start des
ausgewählten Spülprogramms.
2. Wählen Sie das Spülprogramm, drücken Sie die
Taste START/Pause-Taste und schließen Sie innerhalb
von 4 Sekunden die Tür: die Zeitschaltuhr beginnt mit
der Rückzählung.
3. Nach Ablauf dieser Zeit, schaltet sich das
Anzeigelicht „h“ aus und das Programm beginnt
automatisch.
Um die Startverzögerung anzupassen und
eine kürzere Dauer auszuwählen, die Taste
STARTVERZÖGERUNG drücken. Um abzubrechen,
die Taste wiederholt drücken, bis das ausgewählte
Startverzögerung-Anzeigelicht „h“ aus geht.
Bei bereits in Gang gesetztem Programm ist eine
Startzeitvorwahl nicht mehr möglich.
EN
11
OPTIONS AND FUNCTIONS
OPTIONS can be selected directly by pressing the corresponding button (see CONTROL PANEL).
If an option is not compatible with the selected program see PROGRAMS TABLE, the corresponding LED ashes rapidly 3 times
and beeps will sound. The option will not be enabled.
TABLET (Tab)
This setting allows you to optimize the performance of
the program according to the type of detergent used.
Press the START/PAUSE button for 3 seconds (the
corresponding symbol will light up) if you use combined
detergents in tablet form (rinse aid, salt and detergent in
1 dose).
If you use powder or liquid detergent, this option
should be off.
NaturalDry
NaturalDry is a convection drying system which automatically
opens the door during/after drying phase to ensure exceptional
drying performance every day. Door opens at the temperature
that is safe to your kitchen furniture, thus door will not be opened
when the option of SHORT TIME is on.
As additional steam protection, special designed protection foil is
added together with the dishwasher. To see how to mount protec-
tion foil please refer to (INSTALLATION GUIDE).
NaturalDry functionality could be disabled by the user as follows:
1. Go to the Dishwasher software menu pressing and holding
button (6 sec).
2. You are currently in Light Control Menu (please refer to
OPERATION INDICATOR description), if you don’t want to
change anything please press and hold button (until one of
the two letters appears on the display)
3. You switched to NaturalDry Control Menu, you could change
status of NaturalDry functionality by pressing button:
E – enabled d – disabled
To conrm the change and exit from the Control Menu please
press and hold button (3 sec).
DELAY
The start time of the program may be delayed for a period
of time between 1 and 12 hours.
1. Press the DELAY button: the corresponding «h» symbol
appears on the display; each time you press the button,
the time (1h, 2h, etc. up to max. 12h) from the start of
the selected wash cycle will be increased.
2. Select the wash program, press the START/PAUSE
button and within 4 seconds close the door: the timer
will begin counting down.
3. Once this time has elapsed, the indicator light «h»
switches off and the wash cycle begins.
To adjust the delay time and select a shorter period of time,
press the DELAY button. To cancel it, press the button
repeatedly until the selected delayed start indicator light
«h» switches off.
The DELAY function cannot be set once a wash cycle
has been started.
FLEXI WASH
If there are not many dishes to be washed, a half loading
may be used in order to save water, electricity and
detergent.
Select the program and then press the FLEXI WASH button:
the symbol of the chosen rack will appear on the display.
By default the appliance washes dishes in all racks.
To wash only the specic rack, press this button repeatedly:
shown on the display (only lower rack)
shown on the display (only upper rack)
shown on the display (only cutlery rack)
shown on the display (option is OFF and the appliance will
wash dishes in all racks).
Remember to load the upper or lower rack only, and to
reduce the amount of detergent accordingly.
If upper rack is removed, please apply detergent
directly to tub instead of detergent dispenser.
SHORT TIME
This option can be used to reduce the duration of the main
programs while maintaining the same washing and drying
performance levels.
After selecting the program, press the SHORT TIME button
and the indicator light will switch on. To deselect the option,
press the same button again.
EXTRA DRY
To improve the drying of the dishes, after selecting the
program, press the EXTRA DRY button and the indicator
light comes on.
A higher temperature during the nal rinse and an extended
drying phase allow for improving drying. To deselect the
option, press the same button again. The EXTRA DRY
option results in the lengthening of the wash cycle.
OPERATION INDICATOR
A LED light projected on the oor indicates that the
dishwasher is working. One of the following operating
modes can be selected:
a) Disabled function.
b) When the cycle starts the light goes on for few seconds,
stays off during the cycle and ashes at the end of the
cycle.
c) The light stays on during the cycle and ashes at the
end of the cycle (default mode).
If the delayed start was set, the light goes on either for the
rst few seconds or the entire duration of the countdown,
based on whether mode b) or c) was set.
The light goes off every time the door is opened. To select
the mode you prefer, switch on the machine, hold down
button P until one of the three letters appears on the display,
press button P until you reach the desired letter (or mode),
hold down button P to conrm the selection.
Note: If NaturalDry is active and it opens the door, then
Operation Indicator will not ash at the end of cycle.
SHORT TIME (KURZE DAUER)
Diese Option kann verwendet werden um die
Dauer der Hauptprogramme zu reduzieren, unter
Beibehaltung derselben Leistung. Programm wählen,
drücken Sie die SHORT TIME-Taste (kurze Dauer) und
das Anzeigelicht leuchtet auf.
Durch erneuten Druck auf die Taste wird die Option
deaktiviert.
EN
11
OPTIONS AND FUNCTIONS
OPTIONS can be selected directly by pressing the corresponding button (see CONTROL PANEL).
If an option is not compatible with the selected program see PROGRAMS TABLE, the corresponding LED ashes rapidly 3 times
and beeps will sound. The option will not be enabled.
TABLET (Tab)
This setting allows you to optimize the performance of
the program according to the type of detergent used.
Press the START/PAUSE button for 3 seconds (the
corresponding symbol will light up) if you use combined
detergents in tablet form (rinse aid, salt and detergent in
1 dose).
If you use powder or liquid detergent, this option
should be off.
NaturalDry
NaturalDry is a convection drying system which automatically
opens the door during/after drying phase to ensure exceptional
drying performance every day. Door opens at the temperature
that is safe to your kitchen furniture, thus door will not be opened
when the option of SHORT TIME is on.
As additional steam protection, special designed protection foil is
added together with the dishwasher. To see how to mount protec-
tion foil please refer to (INSTALLATION GUIDE).
NaturalDry functionality could be disabled by the user as follows:
1. Go to the Dishwasher software menu pressing and holding
button (6 sec).
2. You are currently in Light Control Menu (please refer to
OPERATION INDICATOR description), if you don’t want to
change anything please press and hold button (until one of
the two letters appears on the display)
3. You switched to NaturalDry Control Menu, you could change
status of NaturalDry functionality by pressing button:
E – enabled d – disabled
To conrm the change and exit from the Control Menu please
press and hold button (3 sec).
DELAY
The start time of the program may be delayed for a period
of time between 1 and 12 hours.
1. Press the DELAY button: the corresponding «h» symbol
appears on the display; each time you press the button,
the time (1h, 2h, etc. up to max. 12h) from the start of
the selected wash cycle will be increased.
2. Select the wash program, press the START/PAUSE
button and within 4 seconds close the door: the timer
will begin counting down.
3. Once this time has elapsed, the indicator light «h»
switches off and the wash cycle begins.
To adjust the delay time and select a shorter period of time,
press the DELAY button. To cancel it, press the button
repeatedly until the selected delayed start indicator light
«h» switches off.
The DELAY function cannot be set once a wash cycle
has been started.
FLEXI WASH
If there are not many dishes to be washed, a half loading
may be used in order to save water, electricity and
detergent.
Select the program and then press the FLEXI WASH button:
the symbol of the chosen rack will appear on the display.
By default the appliance washes dishes in all racks.
To wash only the specic rack, press this button repeatedly:
shown on the display (only lower rack)
shown on the display (only upper rack)
shown on the display (only cutlery rack)
shown on the display (option is OFF and the appliance will
wash dishes in all racks).
Remember to load the upper or lower rack only, and to
reduce the amount of detergent accordingly.
If upper rack is removed, please apply detergent
directly to tub instead of detergent dispenser.
SHORT TIME
This option can be used to reduce the duration of the main
programs while maintaining the same washing and drying
performance levels.
After selecting the program, press the SHORT TIME button
and the indicator light will switch on. To deselect the option,
press the same button again.
EXTRA DRY
To improve the drying of the dishes, after selecting the
program, press the EXTRA DRY button and the indicator
light comes on.
A higher temperature during the nal rinse and an extended
drying phase allow for improving drying. To deselect the
option, press the same button again. The EXTRA DRY
option results in the lengthening of the wash cycle.
OPERATION INDICATOR
A LED light projected on the oor indicates that the
dishwasher is working. One of the following operating
modes can be selected:
a) Disabled function.
b) When the cycle starts the light goes on for few seconds,
stays off during the cycle and ashes at the end of the
cycle.
c) The light stays on during the cycle and ashes at the
end of the cycle (default mode).
If the delayed start was set, the light goes on either for the
rst few seconds or the entire duration of the countdown,
based on whether mode b) or c) was set.
The light goes off every time the door is opened. To select
the mode you prefer, switch on the machine, hold down
button P until one of the three letters appears on the display,
press button P until you reach the desired letter (or mode),
hold down button P to conrm the selection.
Note: If NaturalDry is active and it opens the door, then
Operation Indicator will not ash at the end of cycle.
EXTRA DRY
Eine höhere Temperatur während des letzten
Spülgangs sowie eine verlängerte Trockenphase, die
eine verbesserte Trocknung gestattet.
Nach der Auswahl des Programms, drücken Sie
die EXTRA DRY (EXTRA TROCKNEN) Taste und das
Anzeigelicht leuchtet auf. Durch erneuten Druck
auf die Taste wird die Option deaktiviert. Die Option
EXTRA DRY verlängert die Programmdauer.
1. CHECK WATER CONNECTION
Check that the dishwasher is connected to the water supply
and that the tap is open.
2. SWITCH ON THE DISHWASHER
Open the door and press the ON/OFF button.
3.
4.
LOAD THE RACKS (see LOADING THE RACKS)
FILLING THE DETERGENT DISPENSER
(see PROGRAMS TABLE).
5.
6.
7.
CHOOSE THE PROGRAM AND CUSTOMISE THE CYCLE
Select the most appropriate program in accordance with the
type of crockery and its soiling level (see PROGRAMS
DESCRIPTION) by pressing the button.
Select the desired options (see OPTIONS AND FUNCTIONS).
START
Start the wash cycle by pressing START/Pause button (led
is lit) and closing the door within 4 sec. When the program
starts you hear a single beep. If the door was not closed within
4sec., the alarm sound will be played. In this case, open the
door, press START/Pause button and close the door again
within 4 sec.
END OF WASH CYCLE
The end of the wash cycle is indicated by beeps and by the
ashing of the wash cycle number on the display. Open the
door and switch off the appliance by pressing the ON/OFF
button.
Wait for a few minutes before removing the crockery - to avoid
burns. Unload the racks, beginning with the lower one.
The machine will switch off automatically during certain
extended periods of inactivity, in order to minimise electri-
city consumption. If the crockery is only lightly soiled or
if it has been rinsed with water before being placed in the
dishwasher, reduce the amount of detergent used accordingly.
MODIFYING A RUNNING PROGRAM
If a wrong program was selected, it is possible to change it, pro-
vided that it has only just begun: open the door, press and hold
the ON/OFF button, the machine will switch off.
Switch the machine back on using the ON/OFF button and select
the new wash cycle and any desired options; Start the wash cycle
by pressing START/Pause button and closing the door within 4 sec.
ADDING EXTRA CROCKERY
Without switching off the machine, open the door (START/Pause
led starts blinking) (be ware of HOT steam!) and place the
crockery inside the dishwasher. Press the START/Pause button
and close the door within 4 sec., the cycle will resume from the
point at which it was interrupted.
ACCIDENTAL INTERRUPTIONS
If the door is opened during the wash cycle, or if there is a power
cut, the cycle stops. Press the START/Pause button and close
the door within 4 sec., the cycle will resume from the point at
which it was interrupted.
DAILY USE
Functions
1. ECO - Normally soiled crockery. Standard program, the most efficient in terms of its combined energy and water
consumption.
2. NORMAL - Mixed soil. For normally soiled dishes with dried food residues.
3. INTENSIVE - Program recommended for heavily soiled crockery, especially suitable for pans and saucepans (not to be used
for delicate items).
4. PRE-WASH - Use to refresh crockery planned to be washed later. No detergent to be used with this program.
5. FAST - Normally soiled crockery. Everyday cycle, that ensures optimal cleaning performance in shorter time.
6. SANITIZING - Normally or heavily soiled crockery, with additional antibacterial wash. Can be used to perform
maintenance of the dishwasher.
7. SELF- CLEAN - Program to be used to perform maintenance of the dishwasher. It cleans the interior of the appliance
using hot water.
OPTIONS can be selected directly by pressing the corresponding button (see CONTROL PANEL).
If an option is not compatible with the selected program see PROGRAMS TABLE, the corresponding LED � � � �rapidly 3 times
and beeps will sound. The option will not be enabled.
HALF LOAD
If there are not many dishes to be washed, a half load
cycle may be used in order to save water, electricity and
detergent. Select the program and press the HALF LOAD
button: the indicator light will light up. Press the HALF
LOAD button to deselect this option.
Remember to halve the amount of detergent.
To adjust the delay time and select a shorter period of time,
press the DELAY button. To cancel it, press the button
repeatedly until the selected delayed start indicator light
«h» switches off.
The DELAY function cannot be set once a wash cycle
has been started.
TABLET (Tab)
This setting allows you to optimize the performance of
the program according to the type of detergent used.
Press the START/PAUSE button for 3 seconds (the
corresponding symbol will light up) if you use combined
detergents in tablet form (rinse aid, salt and detergent in
1 dose).
If you use powder or liquid detergent, this option
should be off.
1. Go to the Dishwasher software menu pressing and holding
button (6 sec).
2. You switched to NaturalDry Control Menu, you could change
status of NaturalDry functionality by pressing button:
E – enabled d – disabled
To conrm the change and exit from the Control Menu please
press and hold button (3 sec).
TAB
Drücken Sie die Taste START/PAUSE 3 Sekunden
lang (das entsprechende Symbol leuchtet), wenn Sie
kombinierte Spülmittel in Tablettenform verwenden
(Klarspüler, Salz und Spülmittel in einer Tablette).
Wenn Sie Pulver oder Flüssigspülmittel
verwenden, muss diese Option ausgeschaltet sein.
EN
11
OPTIONS AND FUNCTIONS
OPTIONS can be selected directly by pressing the corresponding button (see CONTROL PANEL).
If an option is not compatible with the selected program see PROGRAMS TABLE, the corresponding LED ashes rapidly 3 times
and beeps will sound. The option will not be enabled.
TABLET (Tab)
This setting allows you to optimize the performance of
the program according to the type of detergent used.
Press the START/PAUSE button for 3 seconds (the
corresponding symbol will light up) if you use combined
detergents in tablet form (rinse aid, salt and detergent in
1 dose).
If you use powder or liquid detergent, this option
should be off.
NaturalDry
NaturalDry is a convection drying system which automatically
opens the door during/after drying phase to ensure exceptional
drying performance every day. Door opens at the temperature
that is safe to your kitchen furniture, thus door will not be opened
when the option of SHORT TIME is on.
As additional steam protection, special designed protection foil is
added together with the dishwasher. To see how to mount protec-
tion foil please refer to (INSTALLATION GUIDE).
NaturalDry functionality could be disabled by the user as follows:
1. Go to the Dishwasher software menu pressing and holding
button (6 sec).
2. You are currently in Light Control Menu (please refer to
OPERATION INDICATOR description), if you don’t want to
change anything please press and hold button (until one of
the two letters appears on the display)
3. You switched to NaturalDry Control Menu, you could change
status of NaturalDry functionality by pressing button:
E – enabled d – disabled
To conrm the change and exit from the Control Menu please
press and hold button (3 sec).
DELAY
The start time of the program may be delayed for a period
of time between 1 and 12 hours.
1. Press the DELAY button: the corresponding «h» symbol
appears on the display; each time you press the button,
the time (1h, 2h, etc. up to max. 12h) from the start of
the selected wash cycle will be increased.
2. Select the wash program, press the START/PAUSE
button and within 4 seconds close the door: the timer
will begin counting down.
3. Once this time has elapsed, the indicator light «h»
switches off and the wash cycle begins.
To adjust the delay time and select a shorter period of time,
press the DELAY button. To cancel it, press the button
repeatedly until the selected delayed start indicator light
«h» switches off.
The DELAY function cannot be set once a wash cycle
has been started.
FLEXI WASH
If there are not many dishes to be washed, a half loading
may be used in order to save water, electricity and
detergent.
Select the program and then press the FLEXI WASH button:
the symbol of the chosen rack will appear on the display.
By default the appliance washes dishes in all racks.
To wash only the specic rack, press this button repeatedly:
shown on the display (only lower rack)
shown on the display (only upper rack)
shown on the display (only cutlery rack)
shown on the display (option is OFF and the appliance will
wash dishes in all racks).
Remember to load the upper or lower rack only, and to
reduce the amount of detergent accordingly.
If upper rack is removed, please apply detergent
directly to tub instead of detergent dispenser.
SHORT TIME
This option can be used to reduce the duration of the main
programs while maintaining the same washing and drying
performance levels.
After selecting the program, press the SHORT TIME button
and the indicator light will switch on. To deselect the option,
press the same button again.
EXTRA DRY
To improve the drying of the dishes, after selecting the
program, press the EXTRA DRY button and the indicator
light comes on.
A higher temperature during the nal rinse and an extended
drying phase allow for improving drying. To deselect the
option, press the same button again. The EXTRA DRY
option results in the lengthening of the wash cycle.
OPERATION INDICATOR
A LED light projected on the oor indicates that the
dishwasher is working. One of the following operating
modes can be selected:
a) Disabled function.
b) When the cycle starts the light goes on for few seconds,
stays off during the cycle and ashes at the end of the
cycle.
c) The light stays on during the cycle and ashes at the
end of the cycle (default mode).
If the delayed start was set, the light goes on either for the
rst few seconds or the entire duration of the countdown,
based on whether mode b) or c) was set.
The light goes off every time the door is opened. To select
the mode you prefer, switch on the machine, hold down
button P until one of the three letters appears on the display,
press button P until you reach the desired letter (or mode),
hold down button P to conrm the selection.
Note: If NaturalDry is active and it opens the door, then
Operation Indicator will not ash at the end of cycle.
BETRIEBSANZEIGE
Eine auf den Boden projizierte LED zeigt an, dass der
Geschirrspüler in Betrieb ist.
a) Deaktivierte Funktion.
b) Wenn das Programm startet schaltet sich das
Licht für einige Sekunden ein, bleibt während
dem Programm ausgeschaltet und blinkt zu
Programmende.
c) Das Licht bleibt während dem Programm an und
blinkt zu Programmende (Standardbetriebsweise).
Wenn der verzögerte Start ausgewählt wurde,
schaltet sich das Licht entweder die ersten paar
Sekunden an oder bleibt während der gesamten
Dauer der Rückzählung an, je nachdem ob b) oder c)
eingestellt wurde. Das Licht geht aus, sobald die Tür
geönet wird.
Um die bevorzugte Betriebsart auszuwählen, die
Maschine einschalten, die Taste
ENGLISH
8
• Switch on the appliance by pressing the ON/OFF button.
• Switch off the appliance by pressing the ON/OFF button.
• Hold down button for 5 seconds, until you hear a beep.
• Switch on the appliance by pressing the ON/OFF button.
•
•
The current selection level number and the salt indicator light
������
Press button to select the desired hardness level (see
WATER HARDNESS TABLE).
• Switch off the appliance by pressing the ON/OFF button.
Setting is complete!
Water Hardness Table
Level °dH
German degrees
°fH
French degrees
1 Soft 0 - 6 0 - 10
2 Medium 7 - 11 11 - 20
3 Average 12 - 17 21 - 30
4 Hard 18 - 34 31 - 60
5 Very hard 35 - 50 61 - 90
Make sure the cap is screwed on tightly, so that no detergent can
get into the container during the wash program (this could damage
the water softener beyond repair).
As soon as this procedure is complete, run a program without
loading. The “Pre-Wash” program alone is NOT������
Residual saline solution or grains of salt can lead to corrosion,
irreparably damaging the stainless steel components.
The guarantee is not applicable if faults are caused by such
circumstances.
��������������������������������s.
��������������������������������
heating element may be damaged as a result.
Whenever you need to add salt, it is mandatory to complete
the procedure before the beginning of the washing cycle.
SETTING THE WATER HARDNESS
To allow the water softener to work in a perfect way, it is essential
that the water hardness setting is based on the actual water hard-
ness in your house. This information can be obtained from your local
water supplier. The factory setting is for average (3) water hardness.
FILLING THE RINSE AID DISPENSER
Rinse aid makes dish DRYING easier. The rinse aid dispenser A
should be lled when the RINSE AID REFILL indicator light
in the control panel is lit.
1. Open the dispenser B by pressing and pulling up the tab on
the lid.
2. Carefully introduce the rinse aid as far as the maximum
(110 ml) reference notch of the lling space - avoid spilling it.
If this happens, clean the spill immediately with a dry cloth.
3. Press the lid down until you hear a click to close it.
NEVER pour the rinse aid directly into the tub.
A
B
ADJUSTING THE DOSAGE OF RINSE AID
If you are not completely satised with the drying results, you can
adjust the quantity of rinse aid used.
• Switch the dishwasher on using the ON/OFF button.
• Switch it off using the ON/OFF button.
• Press button three times - a beep will be heard.
• Switch it on using the ON/OFF button.
•
•
The current selection level number and rinse aid indicator light ash.
Press button to select the level of rinse aid quantity to be
supplied.
• Switch it off using the ON/OFF button.
Setting is complete!
If the rinse aid level is set to ZERO (ECO), no rinse aid will be
supplied. The LOW RINSE AID indicator light will not be lit if you
run out of rinse aid. A maximum of 5 levels can be set according to
the dishwasher model. The factory setting is specic to the model,
please follow instruction above to check this for your machine.
•If you see bluish streaks on the dishes, set a low number (1-2).
• If there are drops of water or limescale marks on the dishes,
set a high number (3-4).
FILLING THE DETERGENT DISPENSER
������������������������������
dishwashers.
To achieve the best washing and drying results, the combined
useof detergent, rinse aid liquid and rened salt is required.
We recommend using detergents that do not contain phosphates
or chlorine, as these products are harmful to the environment.
Good washing results also depend on the correct amount of
detergent being used.
Exceeding the stated amount does not result in a more effective
wash and increases environmental pollution.
The amount can be adjusted to the soil level. In the case of
normally soiled items, use approximately either 35g (powder
detergent) or 35ml (liquid detergent) and additional tea spoon of
detergent directly inside the tub. If tablets are used, one tablet
will be enough.
If the crockery is only lightly soiled or if it has been rinsed with
water before being placed in the dishwasher, reduce the amount
of detergent used accordingly (minimum 25 g/ml) e.g. skip the
powder/gel putted inside the tub.
To open the detergent dispenser
press button A.
Introduce the detergent into
the dry dispenser B only.
Place the amount of detergent
for pre-washing directly inside
the tub.
A
B
1.
2.
When measuring out the detergent refer to the mentioned ear-
lier information to add the proper quantity. Inside the dispenser
B there are indications to help the detergent dosing.
Remove detergent residues from the edges of the dispenser
and close the cover until it clicks.
3. Close the lid of the detergent dispenser by pulling it up until
the closing device is secured in place.
The detergent dispenser automatically opens up at the right time
according to the program. If all-in-one detergents are used, we
recommend using the TABLET button, because it adjusts the
program so that the best washing and drying results are always
achieved.
gedrückt halten,
bis einer der drei Buchstaben auf dem Display
erscheint, die Taste
ENGLISH
8
• Switch on the appliance by pressing the ON/OFF button.
• Switch off the appliance by pressing the ON/OFF button.
• Hold down button for 5 seconds, until you hear a beep.
• Switch on the appliance by pressing the ON/OFF button.
•
•
The current selection level number and the salt indicator light
������
Press button to select the desired hardness level (see
WATER HARDNESS TABLE).
• Switch off the appliance by pressing the ON/OFF button.
Setting is complete!
Water Hardness Table
Level °dH
German degrees
°fH
French degrees
1 Soft 0 - 6 0 - 10
2 Medium 7 - 11 11 - 20
3 Average 12 - 17 21 - 30
4 Hard 18 - 34 31 - 60
5 Very hard 35 - 50 61 - 90
Make sure the cap is screwed on tightly, so that no detergent can
get into the container during the wash program (this could damage
the water softener beyond repair).
As soon as this procedure is complete, run a program without
loading. The “Pre-Wash” program alone is NOT������
Residual saline solution or grains of salt can lead to corrosion,
irreparably damaging the stainless steel components.
The guarantee is not applicable if faults are caused by such
circumstances.
��������������������������������s.
��������������������������������
heating element may be damaged as a result.
Whenever you need to add salt, it is mandatory to complete
the procedure before the beginning of the washing cycle.
SETTING THE WATER HARDNESS
To allow the water softener to work in a perfect way, it is essential
that the water hardness setting is based on the actual water hard-
ness in your house. This information can be obtained from your local
water supplier. The factory setting is for average (3) water hardness.
FILLING THE RINSE AID DISPENSER
Rinse aid makes dish DRYING easier. The rinse aid dispenser A
should be lled when the RINSE AID REFILL indicator light
in the control panel is lit.
1. Open the dispenser B by pressing and pulling up the tab on
the lid.
2. Carefully introduce the rinse aid as far as the maximum
(110 ml) reference notch of the lling space - avoid spilling it.
If this happens, clean the spill immediately with a dry cloth.
3. Press the lid down until you hear a click to close it.
NEVER pour the rinse aid directly into the tub.
A
B
ADJUSTING THE DOSAGE OF RINSE AID
If you are not completely satised with the drying results, you can
adjust the quantity of rinse aid used.
• Switch the dishwasher on using the ON/OFF button.
• Switch it off using the ON/OFF button.
• Press button three times - a beep will be heard.
• Switch it on using the ON/OFF button.
•
•
The current selection level number and rinse aid indicator light ash.
Press button to select the level of rinse aid quantity to be
supplied.
• Switch it off using the ON/OFF button.
Setting is complete!
If the rinse aid level is set to ZERO (ECO), no rinse aid will be
supplied. The LOW RINSE AID indicator light will not be lit if you
run out of rinse aid. A maximum of 5 levels can be set according to
the dishwasher model. The factory setting is specic to the model,
please follow instruction above to check this for your machine.
•If you see bluish streaks on the dishes, set a low number (1-2).
• If there are drops of water or limescale marks on the dishes,
set a high number (3-4).
FILLING THE DETERGENT DISPENSER
������������������������������
dishwashers.
To achieve the best washing and drying results, the combined
useof detergent, rinse aid liquid and rened salt is required.
We recommend using detergents that do not contain phosphates
or chlorine, as these products are harmful to the environment.
Good washing results also depend on the correct amount of
detergent being used.
Exceeding the stated amount does not result in a more effective
wash and increases environmental pollution.
The amount can be adjusted to the soil level. In the case of
normally soiled items, use approximately either 35g (powder
detergent) or 35ml (liquid detergent) and additional tea spoon of
detergent directly inside the tub. If tablets are used, one tablet
will be enough.
If the crockery is only lightly soiled or if it has been rinsed with
water before being placed in the dishwasher, reduce the amount
of detergent used accordingly (minimum 25 g/ml) e.g. skip the
powder/gel putted inside the tub.
To open the detergent dispenser
press button A.
Introduce the detergent into
the dry dispenser B only.
Place the amount of detergent
for pre-washing directly inside
the tub.
A
B
1.
2.
When measuring out the detergent refer to the mentioned ear-
lier information to add the proper quantity. Inside the dispenser
B there are indications to help the detergent dosing.
Remove detergent residues from the edges of the dispenser
and close the cover until it clicks.
3. Close the lid of the detergent dispenser by pulling it up until
the closing device is secured in place.
The detergent dispenser automatically opens up at the right time
according to the program. If all-in-one detergents are used, we
recommend using the TABLET button, because it adjusts the
program so that the best washing and drying results are always
achieved.
drücken, bis der gewünschte
Buchstabe (oder Betriebsweise) erreicht ist, die Taste
ENGLISH
8
• Switch on the appliance by pressing the ON/OFF button.
• Switch off the appliance by pressing the ON/OFF button.
• Hold down button for 5 seconds, until you hear a beep.
• Switch on the appliance by pressing the ON/OFF button.
•
•
The current selection level number and the salt indicator light
������
Press button to select the desired hardness level (see
WATER HARDNESS TABLE).
• Switch off the appliance by pressing the ON/OFF button.
Setting is complete!
Water Hardness Table
Level °dH
German degrees
°fH
French degrees
1 Soft 0 - 6 0 - 10
2 Medium 7 - 11 11 - 20
3 Average 12 - 17 21 - 30
4 Hard 18 - 34 31 - 60
5 Very hard 35 - 50 61 - 90
Make sure the cap is screwed on tightly, so that no detergent can
get into the container during the wash program (this could damage
the water softener beyond repair).
As soon as this procedure is complete, run a program without
loading. The “Pre-Wash” program alone is NOT������
Residual saline solution or grains of salt can lead to corrosion,
irreparably damaging the stainless steel components.
The guarantee is not applicable if faults are caused by such
circumstances.
��������������������������������s.
��������������������������������
heating element may be damaged as a result.
Whenever you need to add salt, it is mandatory to complete
the procedure before the beginning of the washing cycle.
SETTING THE WATER HARDNESS
To allow the water softener to work in a perfect way, it is essential
that the water hardness setting is based on the actual water hard-
ness in your house. This information can be obtained from your local
water supplier. The factory setting is for average (3) water hardness.
FILLING THE RINSE AID DISPENSER
Rinse aid makes dish DRYING easier. The rinse aid dispenser A
should be lled when the RINSE AID REFILL indicator light
in the control panel is lit.
1. Open the dispenser B by pressing and pulling up the tab on
the lid.
2. Carefully introduce the rinse aid as far as the maximum
(110 ml) reference notch of the lling space - avoid spilling it.
If this happens, clean the spill immediately with a dry cloth.
3. Press the lid down until you hear a click to close it.
NEVER pour the rinse aid directly into the tub.
A
B
ADJUSTING THE DOSAGE OF RINSE AID
If you are not completely satised with the drying results, you can
adjust the quantity of rinse aid used.
• Switch the dishwasher on using the ON/OFF button.
• Switch it off using the ON/OFF button.
• Press button three times - a beep will be heard.
• Switch it on using the ON/OFF button.
•
•
The current selection level number and rinse aid indicator light ash.
Press button to select the level of rinse aid quantity to be
supplied.
• Switch it off using the ON/OFF button.
Setting is complete!
If the rinse aid level is set to ZERO (ECO), no rinse aid will be
supplied. The LOW RINSE AID indicator light will not be lit if you
run out of rinse aid. A maximum of 5 levels can be set according to
the dishwasher model. The factory setting is specic to the model,
please follow instruction above to check this for your machine.
•If you see bluish streaks on the dishes, set a low number (1-2).
• If there are drops of water or limescale marks on the dishes,
set a high number (3-4).
FILLING THE DETERGENT DISPENSER
������������������������������
dishwashers.
To achieve the best washing and drying results, the combined
useof detergent, rinse aid liquid and rened salt is required.
We recommend using detergents that do not contain phosphates
or chlorine, as these products are harmful to the environment.
Good washing results also depend on the correct amount of
detergent being used.
Exceeding the stated amount does not result in a more effective
wash and increases environmental pollution.
The amount can be adjusted to the soil level. In the case of
normally soiled items, use approximately either 35g (powder
detergent) or 35ml (liquid detergent) and additional tea spoon of
detergent directly inside the tub. If tablets are used, one tablet
will be enough.
If the crockery is only lightly soiled or if it has been rinsed with
water before being placed in the dishwasher, reduce the amount
of detergent used accordingly (minimum 25 g/ml) e.g. skip the
powder/gel putted inside the tub.
To open the detergent dispenser
press button A.
Introduce the detergent into
the dry dispenser B only.
Place the amount of detergent
for pre-washing directly inside
the tub.
A
B
1.
2.
When measuring out the detergent refer to the mentioned ear-
lier information to add the proper quantity. Inside the dispenser
B there are indications to help the detergent dosing.
Remove detergent residues from the edges of the dispenser
and close the cover until it clicks.
3. Close the lid of the detergent dispenser by pulling it up until
the closing device is secured in place.
The detergent dispenser automatically opens up at the right time
according to the program. If all-in-one detergents are used, we
recommend using the TABLET button, because it adjusts the
program so that the best washing and drying results are always
achieved.
gedrückt halten, um die Auswahl zu bestätigen.
Wenn NaturalDry aktiv ist und die Tür önet, blinkt
die Betriebsanzeige bei Ende des Spülgangs nicht.
NATURALDRY
Das Türönungssystem NaturalDry ist ein
Heißlufttrocknungssystem, das die Tür während/nach der
Trockenphase automatisch önet, um täglich hervorragende
Trockenleistung sicherzustellen. Wenn die Option SHORT
TIME (KURZE DAUER) eingeschaltet ist, wird die Tür aufgrund
der hohen Temperaturen nicht geönet. Entnehmen Sie das
Geschirr nicht sofort, nachdem sich die Tür önet, sondern
warten Sie, damit es richtig trocknet.
Die Funktion kann nicht bei allen Programmen eingeschaltet
werden, beachten Sie bitte die Programmtabelle. Als
zusätzlicher Dampfschutz wird dem Geschirrspüler eine
speziell entwickelte Schutzfolie beigefügt. Für die Montage der
Schutzfolie siehe (MONTAGEANLEITUNG).
Die NaturalDry-Funktion könnte wie folgt durch den Benutzer
deaktiviert werden:
1. Gehen Sie zum Betriebsanzeige-Menü wie im letzten Schritt
und halten Sie
ENGLISH
8
• Switch on the appliance by pressing the ON/OFF button.
• Switch off the appliance by pressing the ON/OFF button.
• Hold down button for 5 seconds, until you hear a beep.
• Switch on the appliance by pressing the ON/OFF button.
•
•
The current selection level number and the salt indicator light
������
Press button to select the desired hardness level (see
WATER HARDNESS TABLE).
• Switch off the appliance by pressing the ON/OFF button.
Setting is complete!
Water Hardness Table
Level °dH
German degrees
°fH
French degrees
1 Soft 0 - 6 0 - 10
2 Medium 7 - 11 11 - 20
3 Average 12 - 17 21 - 30
4 Hard 18 - 34 31 - 60
5 Very hard 35 - 50 61 - 90
Make sure the cap is screwed on tightly, so that no detergent can
get into the container during the wash program (this could damage
the water softener beyond repair).
As soon as this procedure is complete, run a program without
loading. The “Pre-Wash” program alone is NOT������
Residual saline solution or grains of salt can lead to corrosion,
irreparably damaging the stainless steel components.
The guarantee is not applicable if faults are caused by such
circumstances.
��������������������������������s.
��������������������������������
heating element may be damaged as a result.
Whenever you need to add salt, it is mandatory to complete
the procedure before the beginning of the washing cycle.
SETTING THE WATER HARDNESS
To allow the water softener to work in a perfect way, it is essential
that the water hardness setting is based on the actual water hard-
ness in your house. This information can be obtained from your local
water supplier. The factory setting is for average (3) water hardness.
FILLING THE RINSE AID DISPENSER
Rinse aid makes dish DRYING easier. The rinse aid dispenser A
should be lled when the RINSE AID REFILL indicator light
in the control panel is lit.
1. Open the dispenser B by pressing and pulling up the tab on
the lid.
2. Carefully introduce the rinse aid as far as the maximum
(110 ml) reference notch of the lling space - avoid spilling it.
If this happens, clean the spill immediately with a dry cloth.
3. Press the lid down until you hear a click to close it.
NEVER pour the rinse aid directly into the tub.
A
B
ADJUSTING THE DOSAGE OF RINSE AID
If you are not completely satised with the drying results, you can
adjust the quantity of rinse aid used.
• Switch the dishwasher on using the ON/OFF button.
• Switch it off using the ON/OFF button.
• Press button three times - a beep will be heard.
• Switch it on using the ON/OFF button.
•
•
The current selection level number and rinse aid indicator light ash.
Press button to select the level of rinse aid quantity to be
supplied.
• Switch it off using the ON/OFF button.
Setting is complete!
If the rinse aid level is set to ZERO (ECO), no rinse aid will be
supplied. The LOW RINSE AID indicator light will not be lit if you
run out of rinse aid. A maximum of 5 levels can be set according to
the dishwasher model. The factory setting is specic to the model,
please follow instruction above to check this for your machine.
•If you see bluish streaks on the dishes, set a low number (1-2).
• If there are drops of water or limescale marks on the dishes,
set a high number (3-4).
FILLING THE DETERGENT DISPENSER
������������������������������
dishwashers.
To achieve the best washing and drying results, the combined
useof detergent, rinse aid liquid and rened salt is required.
We recommend using detergents that do not contain phosphates
or chlorine, as these products are harmful to the environment.
Good washing results also depend on the correct amount of
detergent being used.
Exceeding the stated amount does not result in a more effective
wash and increases environmental pollution.
The amount can be adjusted to the soil level. In the case of
normally soiled items, use approximately either 35g (powder
detergent) or 35ml (liquid detergent) and additional tea spoon of
detergent directly inside the tub. If tablets are used, one tablet
will be enough.
If the crockery is only lightly soiled or if it has been rinsed with
water before being placed in the dishwasher, reduce the amount
of detergent used accordingly (minimum 25 g/ml) e.g. skip the
powder/gel putted inside the tub.
To open the detergent dispenser
press button A.
Introduce the detergent into
the dry dispenser B only.
Place the amount of detergent
for pre-washing directly inside
the tub.
A
B
1.
2.
When measuring out the detergent refer to the mentioned ear-
lier information to add the proper quantity. Inside the dispenser
B there are indications to help the detergent dosing.
Remove detergent residues from the edges of the dispenser
and close the cover until it clicks.
3. Close the lid of the detergent dispenser by pulling it up until
the closing device is secured in place.
The detergent dispenser automatically opens up at the right time
according to the program. If all-in-one detergents are used, we
recommend using the TABLET button, because it adjusts the
program so that the best washing and drying results are always
achieved.
gedrückt, bis das Menü erscheint.
2. Halten Sie
ENGLISH
8
• Switch on the appliance by pressing the ON/OFF button.
• Switch off the appliance by pressing the ON/OFF button.
• Hold down button for 5 seconds, until you hear a beep.
• Switch on the appliance by pressing the ON/OFF button.
•
•
The current selection level number and the salt indicator light
������
Press button to select the desired hardness level (see
WATER HARDNESS TABLE).
• Switch off the appliance by pressing the ON/OFF button.
Setting is complete!
Water Hardness Table
Level °dH
German degrees
°fH
French degrees
1 Soft 0 - 6 0 - 10
2 Medium 7 - 11 11 - 20
3 Average 12 - 17 21 - 30
4 Hard 18 - 34 31 - 60
5 Very hard 35 - 50 61 - 90
Make sure the cap is screwed on tightly, so that no detergent can
get into the container during the wash program (this could damage
the water softener beyond repair).
As soon as this procedure is complete, run a program without
loading. The “Pre-Wash” program alone is NOT������
Residual saline solution or grains of salt can lead to corrosion,
irreparably damaging the stainless steel components.
The guarantee is not applicable if faults are caused by such
circumstances.
��������������������������������s.
��������������������������������
heating element may be damaged as a result.
Whenever you need to add salt, it is mandatory to complete
the procedure before the beginning of the washing cycle.
SETTING THE WATER HARDNESS
To allow the water softener to work in a perfect way, it is essential
that the water hardness setting is based on the actual water hard-
ness in your house. This information can be obtained from your local
water supplier. The factory setting is for average (3) water hardness.
FILLING THE RINSE AID DISPENSER
Rinse aid makes dish DRYING easier. The rinse aid dispenser A
should be lled when the RINSE AID REFILL indicator light
in the control panel is lit.
1. Open the dispenser B by pressing and pulling up the tab on
the lid.
2. Carefully introduce the rinse aid as far as the maximum
(110 ml) reference notch of the lling space - avoid spilling it.
If this happens, clean the spill immediately with a dry cloth.
3. Press the lid down until you hear a click to close it.
NEVER pour the rinse aid directly into the tub.
A
B
ADJUSTING THE DOSAGE OF RINSE AID
If you are not completely satised with the drying results, you can
adjust the quantity of rinse aid used.
• Switch the dishwasher on using the ON/OFF button.
• Switch it off using the ON/OFF button.
• Press button three times - a beep will be heard.
• Switch it on using the ON/OFF button.
•
•
The current selection level number and rinse aid indicator light ash.
Press button to select the level of rinse aid quantity to be
supplied.
• Switch it off using the ON/OFF button.
Setting is complete!
If the rinse aid level is set to ZERO (ECO), no rinse aid will be
supplied. The LOW RINSE AID indicator light will not be lit if you
run out of rinse aid. A maximum of 5 levels can be set according to
the dishwasher model. The factory setting is specic to the model,
please follow instruction above to check this for your machine.
•If you see bluish streaks on the dishes, set a low number (1-2).
• If there are drops of water or limescale marks on the dishes,
set a high number (3-4).
FILLING THE DETERGENT DISPENSER
������������������������������
dishwashers.
To achieve the best washing and drying results, the combined
useof detergent, rinse aid liquid and rened salt is required.
We recommend using detergents that do not contain phosphates
or chlorine, as these products are harmful to the environment.
Good washing results also depend on the correct amount of
detergent being used.
Exceeding the stated amount does not result in a more effective
wash and increases environmental pollution.
The amount can be adjusted to the soil level. In the case of
normally soiled items, use approximately either 35g (powder
detergent) or 35ml (liquid detergent) and additional tea spoon of
detergent directly inside the tub. If tablets are used, one tablet
will be enough.
If the crockery is only lightly soiled or if it has been rinsed with
water before being placed in the dishwasher, reduce the amount
of detergent used accordingly (minimum 25 g/ml) e.g. skip the
powder/gel putted inside the tub.
To open the detergent dispenser
press button A.
Introduce the detergent into
the dry dispenser B only.
Place the amount of detergent
for pre-washing directly inside
the tub.
A
B
1.
2.
When measuring out the detergent refer to the mentioned ear-
lier information to add the proper quantity. Inside the dispenser
B there are indications to help the detergent dosing.
Remove detergent residues from the edges of the dispenser
and close the cover until it clicks.
3. Close the lid of the detergent dispenser by pulling it up until
the closing device is secured in place.
The detergent dispenser automatically opens up at the right time
according to the program. If all-in-one detergents are used, we
recommend using the TABLET button, because it adjusts the
program so that the best washing and drying results are always
achieved.
erneut 6 Sekunden lang gedrückt, um zum
NaturalDry-Menü zu gelangen.
3. Sie haben auf das Menü NaturalDry-Steuerung umgeschaltet.
Sie können nun durch Drücken der Taste den Status der
NaturalDry-Funktion ändern:
ENGLISH
8
• Switch on the appliance by pressing the ON/OFF button.
• Switch off the appliance by pressing the ON/OFF button.
• Hold down button for 5 seconds, until you hear a beep.
• Switch on the appliance by pressing the ON/OFF button.
•
•
The current selection level number and the salt indicator light
������
Press button to select the desired hardness level (see
WATER HARDNESS TABLE).
• Switch off the appliance by pressing the ON/OFF button.
Setting is complete!
Water Hardness Table
Level °dH
German degrees
°fH
French degrees
1 Soft 0 - 6 0 - 10
2 Medium 7 - 11 11 - 20
3 Average 12 - 17 21 - 30
4 Hard 18 - 34 31 - 60
5 Very hard 35 - 50 61 - 90
Make sure the cap is screwed on tightly, so that no detergent can
get into the container during the wash program (this could damage
the water softener beyond repair).
As soon as this procedure is complete, run a program without
loading. The “Pre-Wash” program alone is NOT������
Residual saline solution or grains of salt can lead to corrosion,
irreparably damaging the stainless steel components.
The guarantee is not applicable if faults are caused by such
circumstances.
��������������������������������s.
��������������������������������
heating element may be damaged as a result.
Whenever you need to add salt, it is mandatory to complete
the procedure before the beginning of the washing cycle.
SETTING THE WATER HARDNESS
To allow the water softener to work in a perfect way, it is essential
that the water hardness setting is based on the actual water hard-
ness in your house. This information can be obtained from your local
water supplier. The factory setting is for average (3) water hardness.
FILLING THE RINSE AID DISPENSER
Rinse aid makes dish DRYING easier. The rinse aid dispenser A
should be lled when the RINSE AID REFILL indicator light
in the control panel is lit.
1. Open the dispenser B by pressing and pulling up the tab on
the lid.
2. Carefully introduce the rinse aid as far as the maximum
(110 ml) reference notch of the lling space - avoid spilling it.
If this happens, clean the spill immediately with a dry cloth.
3. Press the lid down until you hear a click to close it.
NEVER pour the rinse aid directly into the tub.
A
B
ADJUSTING THE DOSAGE OF RINSE AID
If you are not completely satised with the drying results, you can
adjust the quantity of rinse aid used.
• Switch the dishwasher on using the ON/OFF button.
• Switch it off using the ON/OFF button.
• Press button three times - a beep will be heard.
• Switch it on using the ON/OFF button.
•
•
The current selection level number and rinse aid indicator light ash.
Press button to select the level of rinse aid quantity to be
supplied.
• Switch it off using the ON/OFF button.
Setting is complete!
If the rinse aid level is set to ZERO (ECO), no rinse aid will be
supplied. The LOW RINSE AID indicator light will not be lit if you
run out of rinse aid. A maximum of 5 levels can be set according to
the dishwasher model. The factory setting is specic to the model,
please follow instruction above to check this for your machine.
•If you see bluish streaks on the dishes, set a low number (1-2).
• If there are drops of water or limescale marks on the dishes,
set a high number (3-4).
FILLING THE DETERGENT DISPENSER
������������������������������
dishwashers.
To achieve the best washing and drying results, the combined
useof detergent, rinse aid liquid and rened salt is required.
We recommend using detergents that do not contain phosphates
or chlorine, as these products are harmful to the environment.
Good washing results also depend on the correct amount of
detergent being used.
Exceeding the stated amount does not result in a more effective
wash and increases environmental pollution.
The amount can be adjusted to the soil level. In the case of
normally soiled items, use approximately either 35g (powder
detergent) or 35ml (liquid detergent) and additional tea spoon of
detergent directly inside the tub. If tablets are used, one tablet
will be enough.
If the crockery is only lightly soiled or if it has been rinsed with
water before being placed in the dishwasher, reduce the amount
of detergent used accordingly (minimum 25 g/ml) e.g. skip the
powder/gel putted inside the tub.
To open the detergent dispenser
press button A.
Introduce the detergent into
the dry dispenser B only.
Place the amount of detergent
for pre-washing directly inside
the tub.
A
B
1.
2.
When measuring out the detergent refer to the mentioned ear-
lier information to add the proper quantity. Inside the dispenser
B there are indications to help the detergent dosing.
Remove detergent residues from the edges of the dispenser
and close the cover until it clicks.
3. Close the lid of the detergent dispenser by pulling it up until
the closing device is secured in place.
The detergent dispenser automatically opens up at the right time
according to the program. If all-in-one detergents are used, we
recommend using the TABLET button, because it adjusts the
program so that the best washing and drying results are always
achieved.
E – aktiviert d – deaktiviert
Zum Bestätigen der Änderung und zum Verlassen des
Steuerungsmenüs drücken und halten Sie bitte die
ENGLISH
8
• Switch on the appliance by pressing the ON/OFF button.
• Switch off the appliance by pressing the ON/OFF button.
• Hold down button for 5 seconds, until you hear a beep.
• Switch on the appliance by pressing the ON/OFF button.
•
•
The current selection level number and the salt indicator light
������
Press button to select the desired hardness level (see
WATER HARDNESS TABLE).
• Switch off the appliance by pressing the ON/OFF button.
Setting is complete!
Water Hardness Table
Level °dH
German degrees
°fH
French degrees
1 Soft 0 - 6 0 - 10
2 Medium 7 - 11 11 - 20
3 Average 12 - 17 21 - 30
4 Hard 18 - 34 31 - 60
5 Very hard 35 - 50 61 - 90
Make sure the cap is screwed on tightly, so that no detergent can
get into the container during the wash program (this could damage
the water softener beyond repair).
As soon as this procedure is complete, run a program without
loading. The “Pre-Wash” program alone is NOT������
Residual saline solution or grains of salt can lead to corrosion,
irreparably damaging the stainless steel components.
The guarantee is not applicable if faults are caused by such
circumstances.
��������������������������������s.
��������������������������������
heating element may be damaged as a result.
Whenever you need to add salt, it is mandatory to complete
the procedure before the beginning of the washing cycle.
SETTING THE WATER HARDNESS
To allow the water softener to work in a perfect way, it is essential
that the water hardness setting is based on the actual water hard-
ness in your house. This information can be obtained from your local
water supplier. The factory setting is for average (3) water hardness.
FILLING THE RINSE AID DISPENSER
Rinse aid makes dish DRYING easier. The rinse aid dispenser A
should be lled when the RINSE AID REFILL indicator light
in the control panel is lit.
1. Open the dispenser B by pressing and pulling up the tab on
the lid.
2. Carefully introduce the rinse aid as far as the maximum
(110 ml) reference notch of the lling space - avoid spilling it.
If this happens, clean the spill immediately with a dry cloth.
3. Press the lid down until you hear a click to close it.
NEVER pour the rinse aid directly into the tub.
A
B
ADJUSTING THE DOSAGE OF RINSE AID
If you are not completely satised with the drying results, you can
adjust the quantity of rinse aid used.
• Switch the dishwasher on using the ON/OFF button.
• Switch it off using the ON/OFF button.
• Press button three times - a beep will be heard.
• Switch it on using the ON/OFF button.
•
•
The current selection level number and rinse aid indicator light ash.
Press button to select the level of rinse aid quantity to be
supplied.
• Switch it off using the ON/OFF button.
Setting is complete!
If the rinse aid level is set to ZERO (ECO), no rinse aid will be
supplied. The LOW RINSE AID indicator light will not be lit if you
run out of rinse aid. A maximum of 5 levels can be set according to
the dishwasher model. The factory setting is specic to the model,
please follow instruction above to check this for your machine.
•If you see bluish streaks on the dishes, set a low number (1-2).
• If there are drops of water or limescale marks on the dishes,
set a high number (3-4).
FILLING THE DETERGENT DISPENSER
������������������������������
dishwashers.
To achieve the best washing and drying results, the combined
useof detergent, rinse aid liquid and rened salt is required.
We recommend using detergents that do not contain phosphates
or chlorine, as these products are harmful to the environment.
Good washing results also depend on the correct amount of
detergent being used.
Exceeding the stated amount does not result in a more effective
wash and increases environmental pollution.
The amount can be adjusted to the soil level. In the case of
normally soiled items, use approximately either 35g (powder
detergent) or 35ml (liquid detergent) and additional tea spoon of
detergent directly inside the tub. If tablets are used, one tablet
will be enough.
If the crockery is only lightly soiled or if it has been rinsed with
water before being placed in the dishwasher, reduce the amount
of detergent used accordingly (minimum 25 g/ml) e.g. skip the
powder/gel putted inside the tub.
To open the detergent dispenser
press button A.
Introduce the detergent into
the dry dispenser B only.
Place the amount of detergent
for pre-washing directly inside
the tub.
A
B
1.
2.
When measuring out the detergent refer to the mentioned ear-
lier information to add the proper quantity. Inside the dispenser
B there are indications to help the detergent dosing.
Remove detergent residues from the edges of the dispenser
and close the cover until it clicks.
3. Close the lid of the detergent dispenser by pulling it up until
the closing device is secured in place.
The detergent dispenser automatically opens up at the right time
according to the program. If all-in-one detergents are used, we
recommend using the TABLET button, because it adjusts the
program so that the best washing and drying results are always
achieved.
Taste
(3 Sek.).
ÖFFNEN DER TÜR
Eco 50° nach 165 min.
AUTO 50°- 60° 80-170 min*
Intensiv 65° Programmende
Schnell Spülen 30’ 50° N/A
Schnell Spülen und Trocknen 50° Programmende
Glas 45° Programmende
Leise 50° (Nachtprogramm) Programmende
Hygiene 65° N/A
Vorspülen N/A
Selbstreinigung 65° N/A
* abhängig von den Einstellungen
Funktionen

Zum Herunterladen der vollständigen Version besuchen Sie bitte www.ikea.com
15DEUTSCH
Programmtabelle
Die ECO-Programmdaten sind Labormessdaten, die gemäß der
europäischen Vorschrift EN 60436:2019 erfasst wurden.
Hinweis für Prüabore: Für Informationen zu Vergleichs-EN-
Testbedingungen senden Sie bitte eine E-Mail an die folgende
Adresse: [email protected]
Eine Vorbehandlung des Geschirrs ist vor keinem Programm
erforderlich.
*) Nicht alle Optionen können gleichzeitig verwendet werden.
**) Die für andere Programme als das Eco-Programm
angegebenen Werte sind nur Richtwerte. Die aktuelle Zeit
kann auf Grundlage von mehreren Faktoren, wie Temperatur
und Druck des eintretenden Wassers, Raumtemperatur,
Spülmittelmenge, Menge und Art der Beladung, Lastausgleich,
zusätzlich gewählte Optionen und Sensoreichung variieren.
1. ECO - Das Eco-Programm eignet sich zum Reinigen
von normal verschmutztem Geschirr und ist für diese
Verwendung hinsichtlich des Wasser- und Stromverbrauchs
das eektivste Programm zur Einhaltung der EU-Ökodesign-
Rechtsvorschriften.
2. AUTO - Für normal verschmutztes Geschirr mit trockenen
Speiseresten. Erfasst den Grad der Verschmutzung auf dem
Geschirr und passt das Programm ntsprechend an. Wenn
der Sensor den Grad der Verschmutzung erfasst, wird im
Display eine Animation angezeigt und die Programmdauer
wird aktualisiert.
3. INTENSIV - Für sehr schmutziges Geschirr empfohlen,
besonders geeignet für Töpfe und Pfannen (nicht für
empndliches Geschirr verwenden).
4. SCHNELL SPÜLEN 30’ - Programm ideal für eine halbe
Beladung mit leicht verschmutztem Geschirr ohne
getrocknete Speisereste.
5. SCHNELL SPÜLEN UND TROCKNEN - Normal verschmutztes
Geschirr. Täglicher Zyklus, der optimale Reinigungs- und
Trockenleistung in kürzester Zeit garantiert.
6. GLAS - EIN PROGRAMM FÜR EMPFINDLICHES GESCHIRR, DAS
EMPFINDLICHER AUF HÖHERE TEMPERATUREN REAGIERT,
WIE GLÄSER UND TASSEN.
7. SILENT - Geeignet für den Nachtbetrieb des Gerätes.
Garantiert optimale Reinigungs- und Trockenleistung bei
niedrigstem Lärmpegel.
8. HYGIENE - Normal oder stark verschmutztes Geschirr
mit zusätzlichem antibakteriellem Spülgang. Kann für die
Wartung des Geschirrspülers verwendet werden.
9. VORSPÜLEN - Verwendet, um Geschirr einzuweichen, das
später gespült werden soll. Für dieses Programm wird kein
Spülmittel verwendet.
10. SELBSTREINIGUNG - Programm, das für die Pege des
Geschirrspüler zu verwenden ist. Es ist nur bei LEEREM
Geschirrspüler und mit speziellen Reinigungsmitteln für die
Pege des Geschirrspülers auszuführen.
Anm.: Bitte beachten Sie, dass das Programm SCHNELL SPÜLEN
für leicht verschmutztes Geschirr geeignet ist.
FUNKTIONEN kann direkt durch Drücken der entsprechenden
Taste ausgewählt werden (siehe BEDIENBLENDE).
Wenn eine Option nicht mit dem ausgewählten Programm
kompatibel ist siehe PROGRAMMTABELLE, blinken die
entsprechenden LED 3 Mal schnell und ein Piepton ertönt.
Die Option wird nicht aktiviert.
Programm Trocken-
phase
Natural
Dry
Verfügbare
Funktionen *)
Dauer des
Spülprogamms
(h:min)**)
Wasser-
verbrauch
(Liter/Progr.)
Energieverbrauch
(kWh/Progr.)
1 Eco
EN
9
To open the detergent dispenser
press button C.
Introduce the detergent into
the dry dispenser D only.
Place the amount of detergent
for pre-washing directly inside
the tub.
1. When measuring out the detergent refer to the mentioned ear-
lier information to add the proper quantity. Inside the dispenser
C there are indications to help the detergent dosing.
2. Remove detergent residues from the edges of the dispenser
and close the cover until it clicks.
3. Close the lid of the detergent dispenser by pulling it up until
the closing device is secured in place.
The detergent dispenser automatically opens up at the right time
according to the program. If all-in-one detergents are used, we
recommend using the TABLET button, because it adjusts the
program so that the best washing and drying results are always
achieved.
C
D
PROGRAMS TABLE
ECO program data is measured under laboratory conditions according to European Standard EN 60436:2019.
Note for Test Laboratories: For information on comparative EN testing conditions, please send an email to the following address:
Pre-treatment of the dishes is not needed before any of the programs.
*) Not all options can be used simultaneously.
**) Values given for programes other than the eco program are indicative only. The actual time may vary depending on many factors such as temperature
and pressure of the incoming water, room temperature, amount of detergent, quantity and type of load, load balancing, additional selected options and
sensor calibration.
Standby consumption: Left-on mode consumption: 5 W - Off mode consumption: 0.5 W
PROGRAMS DESCRIPTION
1. ECO -
bined energy and water consumption, and that it is used to assess compliance with the EU Ecodesign legislation.
2. AUTO - For normally soiled dishes with dried food residues. Senses the level of soiling on the dishes and adjusts the program accor-
dingly. When the sensor is detecting the soil level an animation appears in the display and the cycle duration is updated.
3. INTENSIVE -
Program recommended for heavily soiled crockery, especially suitable for pans and saucepans (not to be used for delicate items).
4. FAST WASH 30’ - Program to be used for half load of lightly-soiled dishes with no dried food residues.
5. FAST WASH AND DRY
- Normally soiled crockery. Everyday cycle, that ensures optimal cleaning and drying performance in shorter time.
6. GLASS - Program for delicate items, which are more sensitive to high temperatures, for example glasses and cups.
7. SILENT -
Suitable for night-time operation of the appliance. Ensures optimal cleaning and drying performance with the lowest noise emission.
8. SANITIZING - Normally or heavily soiled crockery, with additional antibacterial wash. Can be used to perform maintenance of the
dishwasher.
9. PRE-WASH - Use to refresh crockery planned to be washed later. No detergent to be used with this program.
10. SELF-CLEAN - Program to be used to perform maintenance of the dishwasher. It cleans the interior of the appliance using hot water.
Notes:
Please note that cycle FAST WASH is dedicated for lightly soiled dishes.
Program
Drying
phase
Natural
Dry
Available
options *)
Duration of
wash
program
(h:min)**)
Water
consumption
(litres/cycle)
Energy
consumption
(kWh/cycle)
1Eco 3:40 8.7 0.66
2Auto 1:20 - 3:00 7.0 - 14.0 0.70 - 1.10
3Intensive 2:40 17.0 1.30
4 Fast wash 30’ -- 0:30 9.0 0.50
5 1:20 10.0 1.10
6Glass 1:40 12.0 1.00
7Silent 3:35 16.5 1.00
8Sanitizing - 1:40 12.0 1.30
9Pre-Wash -- 0:10 4.5 0.01
10 Self- Clean -- 0:50 9.5 0.70
50°
9
ENGLISH
1. Press the DELAY button: the corresponding «h» symbol
appears on the display; each time you press the button,
the time (1h, 2h, etc. up to max. 12h) from the start of
the selected wash cycle will be increased.
2. Select the wash program, press the START/PAUSE
button and within 4 seconds close the door: the timer
will begin counting down.
3. Once this time has elapsed, the indicator light «h»
switches off and the wash cycle begins.
To adjust the delay time and select a shorter period of time,
press the DELAY button. To cancel it, press the button
repeatedly until the selected delayed start indicator light
«h» switches off.
The DELAY function cannot be set once a wash cycle
has been started.
NaturalDry
Door opening system NaturalDry is a convection drying system
which automatically opens the door during/after drying phase to
ensure exceptional drying performance every day. Door opens at
the temperature that is safe to your kitchen furniture.
As additional steam protection, special designed protection foil is
added together with the dishwasher. To see how to mount protec-
tion foil please refer to (INSTALLATION GUIDE).
NaturalDry functionality could be disabled by the user as follows:
1. Go to the Dishwasher software menu pressing and holding
button (6 sec).
2. You switched to NaturalDry Control Menu, you could change
status of NaturalDry functionality by pressing button:
E – enabled d – disabled
To conrm the change and exit from the Control Menu please
press and hold button (3 sec).
DELAY
The start time of the program may be delayed for a period
of time between 1 and 12 hours.
Program
Drying
phase
Natural
Dry
Available
options *)
Duration of
wash pro-
gram
(h:min)**)
Water
consumption
(litres/cycle)
Energy
consumption
(kWh/cycle)
50° 2:45 12.0 0.92
1 Eco
2 Conventional
wash and dry 55° 2:00 15.0 1.35
3Intensive 65° - 2:30 15.0 1.50
4Fast 50° -- 0:55 11.5 1.10
5Sanitizing 65° - 1:40 11.5 1.30
6Pre-Wash
-
-- 0:10 4.5 0.01
7Self-Clean 65° --0:50 8.0 0.80
ECO program data is measured under laboratory conditions according to European Standard EN 60436:2019.
Note for Test Laboratories: For information on comparative EN testing conditions, please send an email to the following
address: [email protected]
Pre-treatment of the dishes is not needed before any of the programs.
*) Not all options can be used simultaneously.
**) Values given for programes other than the eco program are indicative only. The actual time may vary depending on many
factors such as temperature and pressure of the incoming water, room temperature, amount of detergent, quantity and type of
load, load balancing, additional selected options and sensor calibration.
Standby consumption: Left-on mode consumption: 5 W - Off mode consumption: 0.5 W
PROGRAMS DESCRIPTION
EN
9
To open the detergent dispenser
press button C.
Introduce the detergent into
the dry dispenser D only.
Place the amount of detergent
for pre-washing directly inside
the tub.
1. When measuring out the detergent refer to the mentioned ear-
lier information to add the proper quantity. Inside the dispenser
C there are indications to help the detergent dosing.
2. Remove detergent residues from the edges of the dispenser
and close the cover until it clicks.
3. Close the lid of the detergent dispenser by pulling it up until
the closing device is secured in place.
The detergent dispenser automatically opens up at the right time
according to the program. If all-in-one detergents are used, we
recommend using the TABLET button, because it adjusts the
program so that the best washing and drying results are always
achieved.
C
D
PROGRAMS TABLE
ECO program data is measured under laboratory conditions according to European Standard EN 60436:2019.
Note for Test Laboratories: For information on comparative EN testing conditions, please send an email to the following address:
Pre-treatment of the dishes is not needed before any of the programs.
*) Not all options can be used simultaneously.
**) Values given for programes other than the eco program are indicative only. The actual time may vary depending on many factors such as temperature
and pressure of the incoming water, room temperature, amount of detergent, quantity and type of load, load balancing, additional selected options and
sensor calibration.
Standby consumption: Left-on mode consumption: 5 W - Off mode consumption: 0.5 W
PROGRAMS DESCRIPTION
1. ECO -
bined energy and water consumption, and that it is used to assess compliance with the EU Ecodesign legislation.
2. AUTO - For normally soiled dishes with dried food residues. Senses the level of soiling on the dishes and adjusts the program accor-
dingly. When the sensor is detecting the soil level an animation appears in the display and the cycle duration is updated.
3. INTENSIVE -
Program recommended for heavily soiled crockery, especially suitable for pans and saucepans (not to be used for delicate items).
4. FAST WASH 30’ - Program to be used for half load of lightly-soiled dishes with no dried food residues.
5. FAST WASH AND DRY
- Normally soiled crockery. Everyday cycle, that ensures optimal cleaning and drying performance in shorter time.
6. GLASS - Program for delicate items, which are more sensitive to high temperatures, for example glasses and cups.
7. SILENT -
Suitable for night-time operation of the appliance. Ensures optimal cleaning and drying performance with the lowest noise emission.
8. SANITIZING - Normally or heavily soiled crockery, with additional antibacterial wash. Can be used to perform maintenance of the
dishwasher.
9. PRE-WASH - Use to refresh crockery planned to be washed later. No detergent to be used with this program.
10. SELF-CLEAN - Program to be used to perform maintenance of the dishwasher. It cleans the interior of the appliance using hot water.
Notes:
Please note that cycle FAST WASH is dedicated for lightly soiled dishes.
Program
Drying
phase
Natural
Dry
Available
options *)
Duration of
wash
program
(h:min)**)
Water
consumption
(litres/cycle)
Energy
consumption
(kWh/cycle)
1Eco 3:40 8.7 0.66
2Auto 1:20 - 3:00 7.0 - 14.0 0.70 - 1.10
3Intensive 2:40 17.0 1.30
4 Fast wash 30’ -- 0:30 9.0 0.50
5 1:20 10.0 1.10
6Glass 1:40 12.0 1.00
7Silent 3:35 16.5 1.00
8Sanitizing - 1:40 12.0 1.30
9Pre-Wash -- 0:10 4.5 0.01
10 Self- Clean -- 0:50 9.5 0.70
3:40 8.7 0.59
2 Auto
EN
9
To open the detergent dispenser
press button C.
Introduce the detergent into
the dry dispenser D only.
Place the amount of detergent
for pre-washing directly inside
the tub.
1. When measuring out the detergent refer to the mentioned ear-
lier information to add the proper quantity. Inside the dispenser
C there are indications to help the detergent dosing.
2. Remove detergent residues from the edges of the dispenser
and close the cover until it clicks.
3. Close the lid of the detergent dispenser by pulling it up until
the closing device is secured in place.
The detergent dispenser automatically opens up at the right time
according to the program. If all-in-one detergents are used, we
recommend using the TABLET button, because it adjusts the
program so that the best washing and drying results are always
achieved.
C
D
PROGRAMS TABLE
ECO program data is measured under laboratory conditions according to European Standard EN 60436:2019.
Note for Test Laboratories: For information on comparative EN testing conditions, please send an email to the following address:
Pre-treatment of the dishes is not needed before any of the programs.
*) Not all options can be used simultaneously.
**) Values given for programes other than the eco program are indicative only. The actual time may vary depending on many factors such as temperature
and pressure of the incoming water, room temperature, amount of detergent, quantity and type of load, load balancing, additional selected options and
sensor calibration.
Standby consumption: Left-on mode consumption: 5 W - Off mode consumption: 0.5 W
PROGRAMS DESCRIPTION
1. ECO -
bined energy and water consumption, and that it is used to assess compliance with the EU Ecodesign legislation.
2. AUTO - For normally soiled dishes with dried food residues. Senses the level of soiling on the dishes and adjusts the program accor-
dingly. When the sensor is detecting the soil level an animation appears in the display and the cycle duration is updated.
3. INTENSIVE -
Program recommended for heavily soiled crockery, especially suitable for pans and saucepans (not to be used for delicate items).
4. FAST WASH 30’ - Program to be used for half load of lightly-soiled dishes with no dried food residues.
5. FAST WASH AND DRY
- Normally soiled crockery. Everyday cycle, that ensures optimal cleaning and drying performance in shorter time.
6. GLASS - Program for delicate items, which are more sensitive to high temperatures, for example glasses and cups.
7. SILENT -
Suitable for night-time operation of the appliance. Ensures optimal cleaning and drying performance with the lowest noise emission.
8. SANITIZING - Normally or heavily soiled crockery, with additional antibacterial wash. Can be used to perform maintenance of the
dishwasher.
9. PRE-WASH - Use to refresh crockery planned to be washed later. No detergent to be used with this program.
10. SELF-CLEAN - Program to be used to perform maintenance of the dishwasher. It cleans the interior of the appliance using hot water.
Notes:
Please note that cycle FAST WASH is dedicated for lightly soiled dishes.
Program
Drying
phase
Natural
Dry
Available
options *)
Duration of
wash
program
(h:min)**)
Water
consumption
(litres/cycle)
Energy
consumption
(kWh/cycle)
1Eco 3:40 8.7 0.66
2Auto 1:20 - 3:00 7.0 - 14.0 0.70 - 1.10
3Intensive 2:40 17.0 1.30
4 Fast wash 30’ -- 0:30 9.0 0.50
5 1:20 10.0 1.10
6Glass 1:40 12.0 1.00
7Silent 3:35 16.5 1.00
8Sanitizing - 1:40 12.0 1.30
9Pre-Wash -- 0:10 4.5 0.01
10 Self- Clean -- 0:50 9.5 0.70
50-60°
9
ENGLISH
1. Press the DELAY button: the corresponding «h» symbol
appears on the display; each time you press the button,
the time (1h, 2h, etc. up to max. 12h) from the start of
the selected wash cycle will be increased.
2. Select the wash program, press the START/PAUSE
button and within 4 seconds close the door: the timer
will begin counting down.
3. Once this time has elapsed, the indicator light «h»
switches off and the wash cycle begins.
To adjust the delay time and select a shorter period of time,
press the DELAY button. To cancel it, press the button
repeatedly until the selected delayed start indicator light
«h» switches off.
The DELAY function cannot be set once a wash cycle
has been started.
NaturalDry
Door opening system NaturalDry is a convection drying system
which automatically opens the door during/after drying phase to
ensure exceptional drying performance every day. Door opens at
the temperature that is safe to your kitchen furniture.
As additional steam protection, special designed protection foil is
added together with the dishwasher. To see how to mount protec-
tion foil please refer to (INSTALLATION GUIDE).
NaturalDry functionality could be disabled by the user as follows:
1. Go to the Dishwasher software menu pressing and holding
button (6 sec).
2. You switched to NaturalDry Control Menu, you could change
status of NaturalDry functionality by pressing button:
E – enabled d – disabled
To conrm the change and exit from the Control Menu please
press and hold button (3 sec).
DELAY
The start time of the program may be delayed for a period
of time between 1 and 12 hours.
Program
Drying
phase
Natural
Dry
Available
options *)
Duration of
wash pro-
gram
(h:min)**)
Water
consumption
(litres/cycle)
Energy
consumption
(kWh/cycle)
50° 2:45 12.0 0.92
1 Eco
2 Conventional
wash and dry 55° 2:00 15.0 1.35
3Intensive 65° - 2:30 15.0 1.50
4Fast 50° -- 0:55 11.5 1.10
5Sanitizing 65° - 1:40 11.5 1.30
6Pre-Wash
-
-- 0:10 4.5 0.01
7Self-Clean 65° --0:50 8.0 0.80
ECO program data is measured under laboratory conditions according to European Standard EN 60436:2019.
Note for Test Laboratories: For information on comparative EN testing conditions, please send an email to the following
address: [email protected]
Pre-treatment of the dishes is not needed before any of the programs.
*) Not all options can be used simultaneously.
**) Values given for programes other than the eco program are indicative only. The actual time may vary depending on many
factors such as temperature and pressure of the incoming water, room temperature, amount of detergent, quantity and type of
load, load balancing, additional selected options and sensor calibration.
Standby consumption: Left-on mode consumption: 5 W - Off mode consumption: 0.5 W
PROGRAMS DESCRIPTION
9
ENGLISH
1. Press the DELAY button: the corresponding «h» symbol
appears on the display; each time you press the button,
the time (1h, 2h, etc. up to max. 12h) from the start of
the selected wash cycle will be increased.
2. Select the wash program, press the START/PAUSE
button and within 4 seconds close the door: the timer
will begin counting down.
3. Once this time has elapsed, the indicator light «h»
switches off and the wash cycle begins.
To adjust the delay time and select a shorter period of time,
press the DELAY button. To cancel it, press the button
repeatedly until the selected delayed start indicator light
«h» switches off.
The DELAY function cannot be set once a wash cycle
has been started.
NaturalDry
Door opening system NaturalDry is a convection drying system
which automatically opens the door during/after drying phase to
ensure exceptional drying performance every day. Door opens at
the temperature that is safe to your kitchen furniture.
As additional steam protection, special designed protection foil is
added together with the dishwasher. To see how to mount protec-
tion foil please refer to (INSTALLATION GUIDE).
NaturalDry functionality could be disabled by the user as follows:
1. Go to the Dishwasher software menu pressing and holding
button (6 sec).
2. You switched to NaturalDry Control Menu, you could change
status of NaturalDry functionality by pressing button:
E – enabled d – disabled
To conrm the change and exit from the Control Menu please
press and hold button (3 sec).
DELAY
The start time of the program may be delayed for a period
of time between 1 and 12 hours.
Program
Drying
phase
Natural
Dry
Available
options *)
Duration of
wash pro-
gram
(h:min)**)
Water
consumption
(litres/cycle)
Energy
consumption
(kWh/cycle)
50° 2:45 12.0 0.92
1 Eco
2 Conventional
wash and dry 55° 2:00 15.0 1.35
3Intensive 65° - 2:30 15.0 1.50
4Fast 50° -- 0:55 11.5 1.10
5Sanitizing 65° - 1:40 11.5 1.30
6Pre-Wash
-
-- 0:10 4.5 0.01
7Self-Clean 65° --0:50 8.0 0.80
ECO program data is measured under laboratory conditions according to European Standard EN 60436:2019.
Note for Test Laboratories: For information on comparative EN testing conditions, please send an email to the following
address: [email protected]
Pre-treatment of the dishes is not needed before any of the programs.
*) Not all options can be used simultaneously.
**) Values given for programes other than the eco program are indicative only. The actual time may vary depending on many
factors such as temperature and pressure of the incoming water, room temperature, amount of detergent, quantity and type of
load, load balancing, additional selected options and sensor calibration.
Standby consumption: Left-on mode consumption: 5 W - Off mode consumption: 0.5 W
PROGRAMS DESCRIPTION
EN
9
To open the detergent dispenser
press button C.
Introduce the detergent into
the dry dispenser D only.
Place the amount of detergent
for pre-washing directly inside
the tub.
1. When measuring out the detergent refer to the mentioned ear-
lier information to add the proper quantity. Inside the dispenser
C there are indications to help the detergent dosing.
2. Remove detergent residues from the edges of the dispenser
and close the cover until it clicks.
3. Close the lid of the detergent dispenser by pulling it up until
the closing device is secured in place.
The detergent dispenser automatically opens up at the right time
according to the program. If all-in-one detergents are used, we
recommend using the TABLET button, because it adjusts the
program so that the best washing and drying results are always
achieved.
C
D
PROGRAMS TABLE
ECO program data is measured under laboratory conditions according to European Standard EN 60436:2019.
Note for Test Laboratories: For information on comparative EN testing conditions, please send an email to the following address:
Pre-treatment of the dishes is not needed before any of the programs.
*) Not all options can be used simultaneously.
**) Values given for programes other than the eco program are indicative only. The actual time may vary depending on many factors such as temperature
and pressure of the incoming water, room temperature, amount of detergent, quantity and type of load, load balancing, additional selected options and
sensor calibration.
Standby consumption: Left-on mode consumption: 5 W - Off mode consumption: 0.5 W
PROGRAMS DESCRIPTION
1. ECO -
bined energy and water consumption, and that it is used to assess compliance with the EU Ecodesign legislation.
2. AUTO - For normally soiled dishes with dried food residues. Senses the level of soiling on the dishes and adjusts the program accor-
dingly. When the sensor is detecting the soil level an animation appears in the display and the cycle duration is updated.
3. INTENSIVE -
Program recommended for heavily soiled crockery, especially suitable for pans and saucepans (not to be used for delicate items).
4. FAST WASH 30’ - Program to be used for half load of lightly-soiled dishes with no dried food residues.
5. FAST WASH AND DRY
- Normally soiled crockery. Everyday cycle, that ensures optimal cleaning and drying performance in shorter time.
6. GLASS - Program for delicate items, which are more sensitive to high temperatures, for example glasses and cups.
7. SILENT -
Suitable for night-time operation of the appliance. Ensures optimal cleaning and drying performance with the lowest noise emission.
8. SANITIZING - Normally or heavily soiled crockery, with additional antibacterial wash. Can be used to perform maintenance of the
dishwasher.
9. PRE-WASH - Use to refresh crockery planned to be washed later. No detergent to be used with this program.
10. SELF-CLEAN - Program to be used to perform maintenance of the dishwasher. It cleans the interior of the appliance using hot water.
Notes:
Please note that cycle FAST WASH is dedicated for lightly soiled dishes.
Program
Drying
phase
Natural
Dry
Available
options *)
Duration of
wash
program
(h:min)**)
Water
consumption
(litres/cycle)
Energy
consumption
(kWh/cycle)
1Eco 3:40 8.7 0.66
2Auto 1:20 - 3:00 7.0 - 14.0 0.70 - 1.10
3Intensive 2:40 17.0 1.30
4 Fast wash 30’ -- 0:30 9.0 0.50
5 1:20 10.0 1.10
6Glass 1:40 12.0 1.00
7Silent 3:35 16.5 1.00
8Sanitizing - 1:40 12.0 1.30
9Pre-Wash -- 0:10 4.5 0.01
10 Self- Clean -- 0:50 9.5 0.70
1:20 - 3:00 7.0 - 14.0 0.70 - 1.10
3 Intensiv
EN
9
To open the detergent dispenser
press button C.
Introduce the detergent into
the dry dispenser D only.
Place the amount of detergent
for pre-washing directly inside
the tub.
1. When measuring out the detergent refer to the mentioned ear-
lier information to add the proper quantity. Inside the dispenser
C there are indications to help the detergent dosing.
2. Remove detergent residues from the edges of the dispenser
and close the cover until it clicks.
3. Close the lid of the detergent dispenser by pulling it up until
the closing device is secured in place.
The detergent dispenser automatically opens up at the right time
according to the program. If all-in-one detergents are used, we
recommend using the TABLET button, because it adjusts the
program so that the best washing and drying results are always
achieved.
C
D
PROGRAMS TABLE
ECO program data is measured under laboratory conditions according to European Standard EN 60436:2019.
Note for Test Laboratories: For information on comparative EN testing conditions, please send an email to the following address:
Pre-treatment of the dishes is not needed before any of the programs.
*) Not all options can be used simultaneously.
**) Values given for programes other than the eco program are indicative only. The actual time may vary depending on many factors such as temperature
and pressure of the incoming water, room temperature, amount of detergent, quantity and type of load, load balancing, additional selected options and
sensor calibration.
Standby consumption: Left-on mode consumption: 5 W - Off mode consumption: 0.5 W
PROGRAMS DESCRIPTION
1. ECO -
bined energy and water consumption, and that it is used to assess compliance with the EU Ecodesign legislation.
2. AUTO - For normally soiled dishes with dried food residues. Senses the level of soiling on the dishes and adjusts the program accor-
dingly. When the sensor is detecting the soil level an animation appears in the display and the cycle duration is updated.
3. INTENSIVE -
Program recommended for heavily soiled crockery, especially suitable for pans and saucepans (not to be used for delicate items).
4. FAST WASH 30’ - Program to be used for half load of lightly-soiled dishes with no dried food residues.
5. FAST WASH AND DRY
- Normally soiled crockery. Everyday cycle, that ensures optimal cleaning and drying performance in shorter time.
6. GLASS - Program for delicate items, which are more sensitive to high temperatures, for example glasses and cups.
7. SILENT -
Suitable for night-time operation of the appliance. Ensures optimal cleaning and drying performance with the lowest noise emission.
8. SANITIZING - Normally or heavily soiled crockery, with additional antibacterial wash. Can be used to perform maintenance of the
dishwasher.
9. PRE-WASH - Use to refresh crockery planned to be washed later. No detergent to be used with this program.
10. SELF-CLEAN - Program to be used to perform maintenance of the dishwasher. It cleans the interior of the appliance using hot water.
Notes:
Please note that cycle FAST WASH is dedicated for lightly soiled dishes.
Program
Drying
phase
Natural
Dry
Available
options *)
Duration of
wash
program
(h:min)**)
Water
consumption
(litres/cycle)
Energy
consumption
(kWh/cycle)
1Eco 3:40 8.7 0.66
2Auto 1:20 - 3:00 7.0 - 14.0 0.70 - 1.10
3Intensive 2:40 17.0 1.30
4 Fast wash 30’ -- 0:30 9.0 0.50
5 1:20 10.0 1.10
6Glass 1:40 12.0 1.00
7Silent 3:35 16.5 1.00
8Sanitizing - 1:40 12.0 1.30
9Pre-Wash -- 0:10 4.5 0.01
10 Self- Clean -- 0:50 9.5 0.70
65°
9
ENGLISH
1. Press the DELAY button: the corresponding «h» symbol
appears on the display; each time you press the button,
the time (1h, 2h, etc. up to max. 12h) from the start of
the selected wash cycle will be increased.
2. Select the wash program, press the START/PAUSE
button and within 4 seconds close the door: the timer
will begin counting down.
3. Once this time has elapsed, the indicator light «h»
switches off and the wash cycle begins.
To adjust the delay time and select a shorter period of time,
press the DELAY button. To cancel it, press the button
repeatedly until the selected delayed start indicator light
«h» switches off.
The DELAY function cannot be set once a wash cycle
has been started.
NaturalDry
Door opening system NaturalDry is a convection drying system
which automatically opens the door during/after drying phase to
ensure exceptional drying performance every day. Door opens at
the temperature that is safe to your kitchen furniture.
As additional steam protection, special designed protection foil is
added together with the dishwasher. To see how to mount protec-
tion foil please refer to (INSTALLATION GUIDE).
NaturalDry functionality could be disabled by the user as follows:
1. Go to the Dishwasher software menu pressing and holding
button (6 sec).
2. You switched to NaturalDry Control Menu, you could change
status of NaturalDry functionality by pressing button:
E – enabled d – disabled
To conrm the change and exit from the Control Menu please
press and hold button (3 sec).
DELAY
The start time of the program may be delayed for a period
of time between 1 and 12 hours.
Program
Drying
phase
Natural
Dry
Available
options *)
Duration of
wash pro-
gram
(h:min)**)
Water
consumption
(litres/cycle)
Energy
consumption
(kWh/cycle)
50° 2:45 12.0 0.92
1 Eco
2 Conventional
wash and dry 55° 2:00 15.0 1.35
3Intensive 65° - 2:30 15.0 1.50
4Fast 50° -- 0:55 11.5 1.10
5Sanitizing 65° - 1:40 11.5 1.30
6Pre-Wash
-
-- 0:10 4.5 0.01
7Self-Clean 65° --0:50 8.0 0.80
ECO program data is measured under laboratory conditions according to European Standard EN 60436:2019.
Note for Test Laboratories: For information on comparative EN testing conditions, please send an email to the following
address: [email protected]
Pre-treatment of the dishes is not needed before any of the programs.
*) Not all options can be used simultaneously.
**) Values given for programes other than the eco program are indicative only. The actual time may vary depending on many
factors such as temperature and pressure of the incoming water, room temperature, amount of detergent, quantity and type of
load, load balancing, additional selected options and sensor calibration.
Standby consumption: Left-on mode consumption: 5 W - Off mode consumption: 0.5 W
PROGRAMS DESCRIPTION
EN
9
To open the detergent dispenser
press button C.
Introduce the detergent into
the dry dispenser D only.
Place the amount of detergent
for pre-washing directly inside
the tub.
1. When measuring out the detergent refer to the mentioned ear-
lier information to add the proper quantity. Inside the dispenser
C there are indications to help the detergent dosing.
2. Remove detergent residues from the edges of the dispenser
and close the cover until it clicks.
3. Close the lid of the detergent dispenser by pulling it up until
the closing device is secured in place.
The detergent dispenser automatically opens up at the right time
according to the program. If all-in-one detergents are used, we
recommend using the TABLET button, because it adjusts the
program so that the best washing and drying results are always
achieved.
C
D
PROGRAMS TABLE
ECO program data is measured under laboratory conditions according to European Standard EN 60436:2019.
Note for Test Laboratories: For information on comparative EN testing conditions, please send an email to the following address:
Pre-treatment of the dishes is not needed before any of the programs.
*) Not all options can be used simultaneously.
**) Values given for programes other than the eco program are indicative only. The actual time may vary depending on many factors such as temperature
and pressure of the incoming water, room temperature, amount of detergent, quantity and type of load, load balancing, additional selected options and
sensor calibration.
Standby consumption: Left-on mode consumption: 5 W - Off mode consumption: 0.5 W
PROGRAMS DESCRIPTION
1. ECO -
bined energy and water consumption, and that it is used to assess compliance with the EU Ecodesign legislation.
2. AUTO - For normally soiled dishes with dried food residues. Senses the level of soiling on the dishes and adjusts the program accor-
dingly. When the sensor is detecting the soil level an animation appears in the display and the cycle duration is updated.
3. INTENSIVE -
Program recommended for heavily soiled crockery, especially suitable for pans and saucepans (not to be used for delicate items).
4. FAST WASH 30’ - Program to be used for half load of lightly-soiled dishes with no dried food residues.
5. FAST WASH AND DRY
- Normally soiled crockery. Everyday cycle, that ensures optimal cleaning and drying performance in shorter time.
6. GLASS - Program for delicate items, which are more sensitive to high temperatures, for example glasses and cups.
7. SILENT -
Suitable for night-time operation of the appliance. Ensures optimal cleaning and drying performance with the lowest noise emission.
8. SANITIZING - Normally or heavily soiled crockery, with additional antibacterial wash. Can be used to perform maintenance of the
dishwasher.
9. PRE-WASH - Use to refresh crockery planned to be washed later. No detergent to be used with this program.
10. SELF-CLEAN - Program to be used to perform maintenance of the dishwasher. It cleans the interior of the appliance using hot water.
Notes:
Please note that cycle FAST WASH is dedicated for lightly soiled dishes.
Program
Drying
phase
Natural
Dry
Available
options *)
Duration of
wash
program
(h:min)**)
Water
consumption
(litres/cycle)
Energy
consumption
(kWh/cycle)
1Eco 3:40 8.7 0.66
2Auto 1:20 - 3:00 7.0 - 14.0 0.70 - 1.10
3Intensive 2:40 17.0 1.30
4 Fast wash 30’ -- 0:30 9.0 0.50
5 1:20 10.0 1.10
6Glass 1:40 12.0 1.00
7Silent 3:35 16.5 1.00
8Sanitizing - 1:40 12.0 1.30
9Pre-Wash -- 0:10 4.5 0.01
10 Self- Clean -- 0:50 9.5 0.70
2:40 17.0 1.30
4 Schnell Spülen 30’
EN
9
To open the detergent dispenser
press button C.
Introduce the detergent into
the dry dispenser D only.
Place the amount of detergent
for pre-washing directly inside
the tub.
1. When measuring out the detergent refer to the mentioned ear-
lier information to add the proper quantity. Inside the dispenser
C there are indications to help the detergent dosing.
2. Remove detergent residues from the edges of the dispenser
and close the cover until it clicks.
3. Close the lid of the detergent dispenser by pulling it up until
the closing device is secured in place.
The detergent dispenser automatically opens up at the right time
according to the program. If all-in-one detergents are used, we
recommend using the TABLET button, because it adjusts the
program so that the best washing and drying results are always
achieved.
C
D
PROGRAMS TABLE
ECO program data is measured under laboratory conditions according to European Standard EN 60436:2019.
Note for Test Laboratories: For information on comparative EN testing conditions, please send an email to the following address:
Pre-treatment of the dishes is not needed before any of the programs.
*) Not all options can be used simultaneously.
**) Values given for programes other than the eco program are indicative only. The actual time may vary depending on many factors such as temperature
and pressure of the incoming water, room temperature, amount of detergent, quantity and type of load, load balancing, additional selected options and
sensor calibration.
Standby consumption: Left-on mode consumption: 5 W - Off mode consumption: 0.5 W
PROGRAMS DESCRIPTION
1. ECO -
bined energy and water consumption, and that it is used to assess compliance with the EU Ecodesign legislation.
2. AUTO - For normally soiled dishes with dried food residues. Senses the level of soiling on the dishes and adjusts the program accor-
dingly. When the sensor is detecting the soil level an animation appears in the display and the cycle duration is updated.
3. INTENSIVE -
Program recommended for heavily soiled crockery, especially suitable for pans and saucepans (not to be used for delicate items).
4. FAST WASH 30’ - Program to be used for half load of lightly-soiled dishes with no dried food residues.
5. FAST WASH AND DRY
- Normally soiled crockery. Everyday cycle, that ensures optimal cleaning and drying performance in shorter time.
6. GLASS - Program for delicate items, which are more sensitive to high temperatures, for example glasses and cups.
7. SILENT -
Suitable for night-time operation of the appliance. Ensures optimal cleaning and drying performance with the lowest noise emission.
8. SANITIZING - Normally or heavily soiled crockery, with additional antibacterial wash. Can be used to perform maintenance of the
dishwasher.
9. PRE-WASH - Use to refresh crockery planned to be washed later. No detergent to be used with this program.
10. SELF-CLEAN - Program to be used to perform maintenance of the dishwasher. It cleans the interior of the appliance using hot water.
Notes:
Please note that cycle FAST WASH is dedicated for lightly soiled dishes.
Program
Drying
phase
Natural
Dry
Available
options *)
Duration of
wash
program
(h:min)**)
Water
consumption
(litres/cycle)
Energy
consumption
(kWh/cycle)
1Eco 3:40 8.7 0.66
2Auto 1:20 - 3:00 7.0 - 14.0 0.70 - 1.10
3Intensive 2:40 17.0 1.30
4 Fast wash 30’ -- 0:30 9.0 0.50
5 1:20 10.0 1.10
6Glass 1:40 12.0 1.00
7Silent 3:35 16.5 1.00
8Sanitizing - 1:40 12.0 1.30
9Pre-Wash -- 0:10 4.5 0.01
10 Self- Clean -- 0:50 9.5 0.70
50° - -
EN
9
To open the detergent dispenser
press button C.
Introduce the detergent into
the dry dispenser D only.
Place the amount of detergent
for pre-washing directly inside
the tub.
1. When measuring out the detergent refer to the mentioned ear-
lier information to add the proper quantity. Inside the dispenser
C there are indications to help the detergent dosing.
2. Remove detergent residues from the edges of the dispenser
and close the cover until it clicks.
3. Close the lid of the detergent dispenser by pulling it up until
the closing device is secured in place.
The detergent dispenser automatically opens up at the right time
according to the program. If all-in-one detergents are used, we
recommend using the TABLET button, because it adjusts the
program so that the best washing and drying results are always
achieved.
C
D
PROGRAMS TABLE
ECO program data is measured under laboratory conditions according to European Standard EN 60436:2019.
Note for Test Laboratories: For information on comparative EN testing conditions, please send an email to the following address:
Pre-treatment of the dishes is not needed before any of the programs.
*) Not all options can be used simultaneously.
**) Values given for programes other than the eco program are indicative only. The actual time may vary depending on many factors such as temperature
and pressure of the incoming water, room temperature, amount of detergent, quantity and type of load, load balancing, additional selected options and
sensor calibration.
Standby consumption: Left-on mode consumption: 5 W - Off mode consumption: 0.5 W
PROGRAMS DESCRIPTION
1. ECO -
bined energy and water consumption, and that it is used to assess compliance with the EU Ecodesign legislation.
2. AUTO - For normally soiled dishes with dried food residues. Senses the level of soiling on the dishes and adjusts the program accor-
dingly. When the sensor is detecting the soil level an animation appears in the display and the cycle duration is updated.
3. INTENSIVE -
Program recommended for heavily soiled crockery, especially suitable for pans and saucepans (not to be used for delicate items).
4. FAST WASH 30’ - Program to be used for half load of lightly-soiled dishes with no dried food residues.
5. FAST WASH AND DRY
- Normally soiled crockery. Everyday cycle, that ensures optimal cleaning and drying performance in shorter time.
6. GLASS - Program for delicate items, which are more sensitive to high temperatures, for example glasses and cups.
7. SILENT -
Suitable for night-time operation of the appliance. Ensures optimal cleaning and drying performance with the lowest noise emission.
8. SANITIZING - Normally or heavily soiled crockery, with additional antibacterial wash. Can be used to perform maintenance of the
dishwasher.
9. PRE-WASH - Use to refresh crockery planned to be washed later. No detergent to be used with this program.
10. SELF-CLEAN - Program to be used to perform maintenance of the dishwasher. It cleans the interior of the appliance using hot water.
Notes:
Please note that cycle FAST WASH is dedicated for lightly soiled dishes.
Program
Drying
phase
Natural
Dry
Available
options *)
Duration of
wash
program
(h:min)**)
Water
consumption
(litres/cycle)
Energy
consumption
(kWh/cycle)
1Eco 3:40 8.7 0.66
2Auto 1:20 - 3:00 7.0 - 14.0 0.70 - 1.10
3Intensive 2:40 17.0 1.30
4 Fast wash 30’ -- 0:30 9.0 0.50
5 1:20 10.0 1.10
6Glass 1:40 12.0 1.00
7Silent 3:35 16.5 1.00
8Sanitizing - 1:40 12.0 1.30
9Pre-Wash -- 0:10 4.5 0.01
10 Self- Clean -- 0:50 9.5 0.70
0:30 9.0 0.50
5 Schnell Spülen
und Trocknen
EN
9
To open the detergent dispenser
press button C.
Introduce the detergent into
the dry dispenser D only.
Place the amount of detergent
for pre-washing directly inside
the tub.
1. When measuring out the detergent refer to the mentioned ear-
lier information to add the proper quantity. Inside the dispenser
C there are indications to help the detergent dosing.
2. Remove detergent residues from the edges of the dispenser
and close the cover until it clicks.
3. Close the lid of the detergent dispenser by pulling it up until
the closing device is secured in place.
The detergent dispenser automatically opens up at the right time
according to the program. If all-in-one detergents are used, we
recommend using the TABLET button, because it adjusts the
program so that the best washing and drying results are always
achieved.
C
D
PROGRAMS TABLE
ECO program data is measured under laboratory conditions according to European Standard EN 60436:2019.
Note for Test Laboratories: For information on comparative EN testing conditions, please send an email to the following address:
Pre-treatment of the dishes is not needed before any of the programs.
*) Not all options can be used simultaneously.
**) Values given for programes other than the eco program are indicative only. The actual time may vary depending on many factors such as temperature
and pressure of the incoming water, room temperature, amount of detergent, quantity and type of load, load balancing, additional selected options and
sensor calibration.
Standby consumption: Left-on mode consumption: 5 W - Off mode consumption: 0.5 W
PROGRAMS DESCRIPTION
1. ECO -
bined energy and water consumption, and that it is used to assess compliance with the EU Ecodesign legislation.
2. AUTO - For normally soiled dishes with dried food residues. Senses the level of soiling on the dishes and adjusts the program accor-
dingly. When the sensor is detecting the soil level an animation appears in the display and the cycle duration is updated.
3. INTENSIVE -
Program recommended for heavily soiled crockery, especially suitable for pans and saucepans (not to be used for delicate items).
4. FAST WASH 30’ - Program to be used for half load of lightly-soiled dishes with no dried food residues.
5. FAST WASH AND DRY
- Normally soiled crockery. Everyday cycle, that ensures optimal cleaning and drying performance in shorter time.
6. GLASS - Program for delicate items, which are more sensitive to high temperatures, for example glasses and cups.
7. SILENT -
Suitable for night-time operation of the appliance. Ensures optimal cleaning and drying performance with the lowest noise emission.
8. SANITIZING - Normally or heavily soiled crockery, with additional antibacterial wash. Can be used to perform maintenance of the
dishwasher.
9. PRE-WASH - Use to refresh crockery planned to be washed later. No detergent to be used with this program.
10. SELF-CLEAN - Program to be used to perform maintenance of the dishwasher. It cleans the interior of the appliance using hot water.
Notes:
Please note that cycle FAST WASH is dedicated for lightly soiled dishes.
Program
Drying
phase
Natural
Dry
Available
options *)
Duration of
wash
program
(h:min)**)
Water
consumption
(litres/cycle)
Energy
consumption
(kWh/cycle)
1Eco 3:40 8.7 0.66
2Auto 1:20 - 3:00 7.0 - 14.0 0.70 - 1.10
3Intensive 2:40 17.0 1.30
4 Fast wash 30’ -- 0:30 9.0 0.50
5 1:20 10.0 1.10
6Glass 1:40 12.0 1.00
7Silent 3:35 16.5 1.00
8Sanitizing - 1:40 12.0 1.30
9Pre-Wash -- 0:10 4.5 0.01
10 Self- Clean -- 0:50 9.5 0.70
50°
9
ENGLISH
1. Press the DELAY button: the corresponding «h» symbol
appears on the display; each time you press the button,
the time (1h, 2h, etc. up to max. 12h) from the start of
the selected wash cycle will be increased.
2. Select the wash program, press the START/PAUSE
button and within 4 seconds close the door: the timer
will begin counting down.
3. Once this time has elapsed, the indicator light «h»
switches off and the wash cycle begins.
To adjust the delay time and select a shorter period of time,
press the DELAY button. To cancel it, press the button
repeatedly until the selected delayed start indicator light
«h» switches off.
The DELAY function cannot be set once a wash cycle
has been started.
NaturalDry
Door opening system NaturalDry is a convection drying system
which automatically opens the door during/after drying phase to
ensure exceptional drying performance every day. Door opens at
the temperature that is safe to your kitchen furniture.
As additional steam protection, special designed protection foil is
added together with the dishwasher. To see how to mount protec-
tion foil please refer to (INSTALLATION GUIDE).
NaturalDry functionality could be disabled by the user as follows:
1. Go to the Dishwasher software menu pressing and holding
button (6 sec).
2. You switched to NaturalDry Control Menu, you could change
status of NaturalDry functionality by pressing button:
E – enabled d – disabled
To conrm the change and exit from the Control Menu please
press and hold button (3 sec).
DELAY
The start time of the program may be delayed for a period
of time between 1 and 12 hours.
Program
Drying
phase
Natural
Dry
Available
options *)
Duration of
wash pro-
gram
(h:min)**)
Water
consumption
(litres/cycle)
Energy
consumption
(kWh/cycle)
50° 2:45 12.0 0.92
1 Eco
2 Conventional
wash and dry 55° 2:00 15.0 1.35
3Intensive 65° - 2:30 15.0 1.50
4Fast 50° -- 0:55 11.5 1.10
5Sanitizing 65° - 1:40 11.5 1.30
6Pre-Wash
-
-- 0:10 4.5 0.01
7Self-Clean 65° --0:50 8.0 0.80
ECO program data is measured under laboratory conditions according to European Standard EN 60436:2019.
Note for Test Laboratories: For information on comparative EN testing conditions, please send an email to the following
address: [email protected]
Pre-treatment of the dishes is not needed before any of the programs.
*) Not all options can be used simultaneously.
**) Values given for programes other than the eco program are indicative only. The actual time may vary depending on many
factors such as temperature and pressure of the incoming water, room temperature, amount of detergent, quantity and type of
load, load balancing, additional selected options and sensor calibration.
Standby consumption: Left-on mode consumption: 5 W - Off mode consumption: 0.5 W
PROGRAMS DESCRIPTION
9
ENGLISH
1. Press the DELAY button: the corresponding «h» symbol
appears on the display; each time you press the button,
the time (1h, 2h, etc. up to max. 12h) from the start of
the selected wash cycle will be increased.
2. Select the wash program, press the START/PAUSE
button and within 4 seconds close the door: the timer
will begin counting down.
3. Once this time has elapsed, the indicator light «h»
switches off and the wash cycle begins.
To adjust the delay time and select a shorter period of time,
press the DELAY button. To cancel it, press the button
repeatedly until the selected delayed start indicator light
«h» switches off.
The DELAY function cannot be set once a wash cycle
has been started.
NaturalDry
Door opening system NaturalDry is a convection drying system
which automatically opens the door during/after drying phase to
ensure exceptional drying performance every day. Door opens at
the temperature that is safe to your kitchen furniture.
As additional steam protection, special designed protection foil is
added together with the dishwasher. To see how to mount protec-
tion foil please refer to (INSTALLATION GUIDE).
NaturalDry functionality could be disabled by the user as follows:
1. Go to the Dishwasher software menu pressing and holding
button (6 sec).
2. You switched to NaturalDry Control Menu, you could change
status of NaturalDry functionality by pressing button:
E – enabled d – disabled
To conrm the change and exit from the Control Menu please
press and hold button (3 sec).
DELAY
The start time of the program may be delayed for a period
of time between 1 and 12 hours.
Program
Drying
phase
Natural
Dry
Available
options *)
Duration of
wash pro-
gram
(h:min)**)
Water
consumption
(litres/cycle)
Energy
consumption
(kWh/cycle)
50° 2:45 12.0 0.92
1 Eco
2 Conventional
wash and dry 55° 2:00 15.0 1.35
3Intensive 65° - 2:30 15.0 1.50
4Fast 50° -- 0:55 11.5 1.10
5Sanitizing 65° - 1:40 11.5 1.30
6Pre-Wash
-
-- 0:10 4.5 0.01
7Self-Clean 65° --0:50 8.0 0.80
ECO program data is measured under laboratory conditions according to European Standard EN 60436:2019.
Note for Test Laboratories: For information on comparative EN testing conditions, please send an email to the following
address: [email protected]
Pre-treatment of the dishes is not needed before any of the programs.
*) Not all options can be used simultaneously.
**) Values given for programes other than the eco program are indicative only. The actual time may vary depending on many
factors such as temperature and pressure of the incoming water, room temperature, amount of detergent, quantity and type of
load, load balancing, additional selected options and sensor calibration.
Standby consumption: Left-on mode consumption: 5 W - Off mode consumption: 0.5 W
PROGRAMS DESCRIPTION
EN
9
To open the detergent dispenser
press button C.
Introduce the detergent into
the dry dispenser D only.
Place the amount of detergent
for pre-washing directly inside
the tub.
1. When measuring out the detergent refer to the mentioned ear-
lier information to add the proper quantity. Inside the dispenser
C there are indications to help the detergent dosing.
2. Remove detergent residues from the edges of the dispenser
and close the cover until it clicks.
3. Close the lid of the detergent dispenser by pulling it up until
the closing device is secured in place.
The detergent dispenser automatically opens up at the right time
according to the program. If all-in-one detergents are used, we
recommend using the TABLET button, because it adjusts the
program so that the best washing and drying results are always
achieved.
C
D
PROGRAMS TABLE
ECO program data is measured under laboratory conditions according to European Standard EN 60436:2019.
Note for Test Laboratories: For information on comparative EN testing conditions, please send an email to the following address:
Pre-treatment of the dishes is not needed before any of the programs.
*) Not all options can be used simultaneously.
**) Values given for programes other than the eco program are indicative only. The actual time may vary depending on many factors such as temperature
and pressure of the incoming water, room temperature, amount of detergent, quantity and type of load, load balancing, additional selected options and
sensor calibration.
Standby consumption: Left-on mode consumption: 5 W - Off mode consumption: 0.5 W
PROGRAMS DESCRIPTION
1. ECO -
bined energy and water consumption, and that it is used to assess compliance with the EU Ecodesign legislation.
2. AUTO - For normally soiled dishes with dried food residues. Senses the level of soiling on the dishes and adjusts the program accor-
dingly. When the sensor is detecting the soil level an animation appears in the display and the cycle duration is updated.
3. INTENSIVE -
Program recommended for heavily soiled crockery, especially suitable for pans and saucepans (not to be used for delicate items).
4. FAST WASH 30’ - Program to be used for half load of lightly-soiled dishes with no dried food residues.
5. FAST WASH AND DRY
- Normally soiled crockery. Everyday cycle, that ensures optimal cleaning and drying performance in shorter time.
6. GLASS - Program for delicate items, which are more sensitive to high temperatures, for example glasses and cups.
7. SILENT -
Suitable for night-time operation of the appliance. Ensures optimal cleaning and drying performance with the lowest noise emission.
8. SANITIZING - Normally or heavily soiled crockery, with additional antibacterial wash. Can be used to perform maintenance of the
dishwasher.
9. PRE-WASH - Use to refresh crockery planned to be washed later. No detergent to be used with this program.
10. SELF-CLEAN - Program to be used to perform maintenance of the dishwasher. It cleans the interior of the appliance using hot water.
Notes:
Please note that cycle FAST WASH is dedicated for lightly soiled dishes.
Program
Drying
phase
Natural
Dry
Available
options *)
Duration of
wash
program
(h:min)**)
Water
consumption
(litres/cycle)
Energy
consumption
(kWh/cycle)
1Eco 3:40 8.7 0.66
2Auto 1:20 - 3:00 7.0 - 14.0 0.70 - 1.10
3Intensive 2:40 17.0 1.30
4 Fast wash 30’ -- 0:30 9.0 0.50
5 1:20 10.0 1.10
6Glass 1:40 12.0 1.00
7Silent 3:35 16.5 1.00
8Sanitizing - 1:40 12.0 1.30
9Pre-Wash -- 0:10 4.5 0.01
10 Self- Clean -- 0:50 9.5 0.70
1:20 10.0 1.10
6 Glas
EN
9
To open the detergent dispenser
press button C.
Introduce the detergent into
the dry dispenser D only.
Place the amount of detergent
for pre-washing directly inside
the tub.
1. When measuring out the detergent refer to the mentioned ear-
lier information to add the proper quantity. Inside the dispenser
C there are indications to help the detergent dosing.
2. Remove detergent residues from the edges of the dispenser
and close the cover until it clicks.
3. Close the lid of the detergent dispenser by pulling it up until
the closing device is secured in place.
The detergent dispenser automatically opens up at the right time
according to the program. If all-in-one detergents are used, we
recommend using the TABLET button, because it adjusts the
program so that the best washing and drying results are always
achieved.
C
D
PROGRAMS TABLE
ECO program data is measured under laboratory conditions according to European Standard EN 60436:2019.
Note for Test Laboratories: For information on comparative EN testing conditions, please send an email to the following address:
Pre-treatment of the dishes is not needed before any of the programs.
*) Not all options can be used simultaneously.
**) Values given for programes other than the eco program are indicative only. The actual time may vary depending on many factors such as temperature
and pressure of the incoming water, room temperature, amount of detergent, quantity and type of load, load balancing, additional selected options and
sensor calibration.
Standby consumption: Left-on mode consumption: 5 W - Off mode consumption: 0.5 W
PROGRAMS DESCRIPTION
1. ECO -
bined energy and water consumption, and that it is used to assess compliance with the EU Ecodesign legislation.
2. AUTO - For normally soiled dishes with dried food residues. Senses the level of soiling on the dishes and adjusts the program accor-
dingly. When the sensor is detecting the soil level an animation appears in the display and the cycle duration is updated.
3. INTENSIVE -
Program recommended for heavily soiled crockery, especially suitable for pans and saucepans (not to be used for delicate items).
4. FAST WASH 30’ - Program to be used for half load of lightly-soiled dishes with no dried food residues.
5. FAST WASH AND DRY
- Normally soiled crockery. Everyday cycle, that ensures optimal cleaning and drying performance in shorter time.
6. GLASS - Program for delicate items, which are more sensitive to high temperatures, for example glasses and cups.
7. SILENT -
Suitable for night-time operation of the appliance. Ensures optimal cleaning and drying performance with the lowest noise emission.
8. SANITIZING - Normally or heavily soiled crockery, with additional antibacterial wash. Can be used to perform maintenance of the
dishwasher.
9. PRE-WASH - Use to refresh crockery planned to be washed later. No detergent to be used with this program.
10. SELF-CLEAN - Program to be used to perform maintenance of the dishwasher. It cleans the interior of the appliance using hot water.
Notes:
Please note that cycle FAST WASH is dedicated for lightly soiled dishes.
Program
Drying
phase
Natural
Dry
Available
options *)
Duration of
wash
program
(h:min)**)
Water
consumption
(litres/cycle)
Energy
consumption
(kWh/cycle)
1Eco 3:40 8.7 0.66
2Auto 1:20 - 3:00 7.0 - 14.0 0.70 - 1.10
3Intensive 2:40 17.0 1.30
4 Fast wash 30’ -- 0:30 9.0 0.50
5 1:20 10.0 1.10
6Glass 1:40 12.0 1.00
7Silent 3:35 16.5 1.00
8Sanitizing - 1:40 12.0 1.30
9Pre-Wash -- 0:10 4.5 0.01
10 Self- Clean -- 0:50 9.5 0.70
45°
9
ENGLISH
1. Press the DELAY button: the corresponding «h» symbol
appears on the display; each time you press the button,
the time (1h, 2h, etc. up to max. 12h) from the start of
the selected wash cycle will be increased.
2. Select the wash program, press the START/PAUSE
button and within 4 seconds close the door: the timer
will begin counting down.
3. Once this time has elapsed, the indicator light «h»
switches off and the wash cycle begins.
To adjust the delay time and select a shorter period of time,
press the DELAY button. To cancel it, press the button
repeatedly until the selected delayed start indicator light
«h» switches off.
The DELAY function cannot be set once a wash cycle
has been started.
NaturalDry
Door opening system NaturalDry is a convection drying system
which automatically opens the door during/after drying phase to
ensure exceptional drying performance every day. Door opens at
the temperature that is safe to your kitchen furniture.
As additional steam protection, special designed protection foil is
added together with the dishwasher. To see how to mount protec-
tion foil please refer to (INSTALLATION GUIDE).
NaturalDry functionality could be disabled by the user as follows:
1. Go to the Dishwasher software menu pressing and holding
button (6 sec).
2. You switched to NaturalDry Control Menu, you could change
status of NaturalDry functionality by pressing button:
E – enabled d – disabled
To conrm the change and exit from the Control Menu please
press and hold button (3 sec).
DELAY
The start time of the program may be delayed for a period
of time between 1 and 12 hours.
Program
Drying
phase
Natural
Dry
Available
options *)
Duration of
wash pro-
gram
(h:min)**)
Water
consumption
(litres/cycle)
Energy
consumption
(kWh/cycle)
50° 2:45 12.0 0.92
1 Eco
2 Conventional
wash and dry 55° 2:00 15.0 1.35
3Intensive 65° - 2:30 15.0 1.50
4Fast 50° -- 0:55 11.5 1.10
5Sanitizing 65° - 1:40 11.5 1.30
6Pre-Wash
-
-- 0:10 4.5 0.01
7Self-Clean 65° --0:50 8.0 0.80
ECO program data is measured under laboratory conditions according to European Standard EN 60436:2019.
Note for Test Laboratories: For information on comparative EN testing conditions, please send an email to the following
address: [email protected]
Pre-treatment of the dishes is not needed before any of the programs.
*) Not all options can be used simultaneously.
**) Values given for programes other than the eco program are indicative only. The actual time may vary depending on many
factors such as temperature and pressure of the incoming water, room temperature, amount of detergent, quantity and type of
load, load balancing, additional selected options and sensor calibration.
Standby consumption: Left-on mode consumption: 5 W - Off mode consumption: 0.5 W
PROGRAMS DESCRIPTION
EN
9
To open the detergent dispenser
press button C.
Introduce the detergent into
the dry dispenser D only.
Place the amount of detergent
for pre-washing directly inside
the tub.
1. When measuring out the detergent refer to the mentioned ear-
lier information to add the proper quantity. Inside the dispenser
C there are indications to help the detergent dosing.
2. Remove detergent residues from the edges of the dispenser
and close the cover until it clicks.
3. Close the lid of the detergent dispenser by pulling it up until
the closing device is secured in place.
The detergent dispenser automatically opens up at the right time
according to the program. If all-in-one detergents are used, we
recommend using the TABLET button, because it adjusts the
program so that the best washing and drying results are always
achieved.
C
D
PROGRAMS TABLE
ECO program data is measured under laboratory conditions according to European Standard EN 60436:2019.
Note for Test Laboratories: For information on comparative EN testing conditions, please send an email to the following address:
Pre-treatment of the dishes is not needed before any of the programs.
*) Not all options can be used simultaneously.
**) Values given for programes other than the eco program are indicative only. The actual time may vary depending on many factors such as temperature
and pressure of the incoming water, room temperature, amount of detergent, quantity and type of load, load balancing, additional selected options and
sensor calibration.
Standby consumption: Left-on mode consumption: 5 W - Off mode consumption: 0.5 W
PROGRAMS DESCRIPTION
1. ECO -
bined energy and water consumption, and that it is used to assess compliance with the EU Ecodesign legislation.
2. AUTO - For normally soiled dishes with dried food residues. Senses the level of soiling on the dishes and adjusts the program accor-
dingly. When the sensor is detecting the soil level an animation appears in the display and the cycle duration is updated.
3. INTENSIVE -
Program recommended for heavily soiled crockery, especially suitable for pans and saucepans (not to be used for delicate items).
4. FAST WASH 30’ - Program to be used for half load of lightly-soiled dishes with no dried food residues.
5. FAST WASH AND DRY
- Normally soiled crockery. Everyday cycle, that ensures optimal cleaning and drying performance in shorter time.
6. GLASS - Program for delicate items, which are more sensitive to high temperatures, for example glasses and cups.
7. SILENT -
Suitable for night-time operation of the appliance. Ensures optimal cleaning and drying performance with the lowest noise emission.
8. SANITIZING - Normally or heavily soiled crockery, with additional antibacterial wash. Can be used to perform maintenance of the
dishwasher.
9. PRE-WASH - Use to refresh crockery planned to be washed later. No detergent to be used with this program.
10. SELF-CLEAN - Program to be used to perform maintenance of the dishwasher. It cleans the interior of the appliance using hot water.
Notes:
Please note that cycle FAST WASH is dedicated for lightly soiled dishes.
Program
Drying
phase
Natural
Dry
Available
options *)
Duration of
wash
program
(h:min)**)
Water
consumption
(litres/cycle)
Energy
consumption
(kWh/cycle)
1Eco 3:40 8.7 0.66
2Auto 1:20 - 3:00 7.0 - 14.0 0.70 - 1.10
3Intensive 2:40 17.0 1.30
4 Fast wash 30’ -- 0:30 9.0 0.50
5 1:20 10.0 1.10
6Glass 1:40 12.0 1.00
7Silent 3:35 16.5 1.00
8Sanitizing - 1:40 12.0 1.30
9Pre-Wash -- 0:10 4.5 0.01
10 Self- Clean -- 0:50 9.5 0.70
1:40 12.0 1.00
7 Leise
EN
9
To open the detergent dispenser
press button C.
Introduce the detergent into
the dry dispenser D only.
Place the amount of detergent
for pre-washing directly inside
the tub.
1. When measuring out the detergent refer to the mentioned ear-
lier information to add the proper quantity. Inside the dispenser
C there are indications to help the detergent dosing.
2. Remove detergent residues from the edges of the dispenser
and close the cover until it clicks.
3. Close the lid of the detergent dispenser by pulling it up until
the closing device is secured in place.
The detergent dispenser automatically opens up at the right time
according to the program. If all-in-one detergents are used, we
recommend using the TABLET button, because it adjusts the
program so that the best washing and drying results are always
achieved.
C
D
PROGRAMS TABLE
ECO program data is measured under laboratory conditions according to European Standard EN 60436:2019.
Note for Test Laboratories: For information on comparative EN testing conditions, please send an email to the following address:
Pre-treatment of the dishes is not needed before any of the programs.
*) Not all options can be used simultaneously.
**) Values given for programes other than the eco program are indicative only. The actual time may vary depending on many factors such as temperature
and pressure of the incoming water, room temperature, amount of detergent, quantity and type of load, load balancing, additional selected options and
sensor calibration.
Standby consumption: Left-on mode consumption: 5 W - Off mode consumption: 0.5 W
PROGRAMS DESCRIPTION
1. ECO -
bined energy and water consumption, and that it is used to assess compliance with the EU Ecodesign legislation.
2. AUTO - For normally soiled dishes with dried food residues. Senses the level of soiling on the dishes and adjusts the program accor-
dingly. When the sensor is detecting the soil level an animation appears in the display and the cycle duration is updated.
3. INTENSIVE -
Program recommended for heavily soiled crockery, especially suitable for pans and saucepans (not to be used for delicate items).
4. FAST WASH 30’ - Program to be used for half load of lightly-soiled dishes with no dried food residues.
5. FAST WASH AND DRY
- Normally soiled crockery. Everyday cycle, that ensures optimal cleaning and drying performance in shorter time.
6. GLASS - Program for delicate items, which are more sensitive to high temperatures, for example glasses and cups.
7. SILENT -
Suitable for night-time operation of the appliance. Ensures optimal cleaning and drying performance with the lowest noise emission.
8. SANITIZING - Normally or heavily soiled crockery, with additional antibacterial wash. Can be used to perform maintenance of the
dishwasher.
9. PRE-WASH - Use to refresh crockery planned to be washed later. No detergent to be used with this program.
10. SELF-CLEAN - Program to be used to perform maintenance of the dishwasher. It cleans the interior of the appliance using hot water.
Notes:
Please note that cycle FAST WASH is dedicated for lightly soiled dishes.
Program
Drying
phase
Natural
Dry
Available
options *)
Duration of
wash
program
(h:min)**)
Water
consumption
(litres/cycle)
Energy
consumption
(kWh/cycle)
1Eco 3:40 8.7 0.66
2Auto 1:20 - 3:00 7.0 - 14.0 0.70 - 1.10
3Intensive 2:40 17.0 1.30
4 Fast wash 30’ -- 0:30 9.0 0.50
5 1:20 10.0 1.10
6Glass 1:40 12.0 1.00
7Silent 3:35 16.5 1.00
8Sanitizing - 1:40 12.0 1.30
9Pre-Wash -- 0:10 4.5 0.01
10 Self- Clean -- 0:50 9.5 0.70
50°
9
ENGLISH
1. Press the DELAY button: the corresponding «h» symbol
appears on the display; each time you press the button,
the time (1h, 2h, etc. up to max. 12h) from the start of
the selected wash cycle will be increased.
2. Select the wash program, press the START/PAUSE
button and within 4 seconds close the door: the timer
will begin counting down.
3. Once this time has elapsed, the indicator light «h»
switches off and the wash cycle begins.
To adjust the delay time and select a shorter period of time,
press the DELAY button. To cancel it, press the button
repeatedly until the selected delayed start indicator light
«h» switches off.
The DELAY function cannot be set once a wash cycle
has been started.
NaturalDry
Door opening system NaturalDry is a convection drying system
which automatically opens the door during/after drying phase to
ensure exceptional drying performance every day. Door opens at
the temperature that is safe to your kitchen furniture.
As additional steam protection, special designed protection foil is
added together with the dishwasher. To see how to mount protec-
tion foil please refer to (INSTALLATION GUIDE).
NaturalDry functionality could be disabled by the user as follows:
1. Go to the Dishwasher software menu pressing and holding
button (6 sec).
2. You switched to NaturalDry Control Menu, you could change
status of NaturalDry functionality by pressing button:
E – enabled d – disabled
To conrm the change and exit from the Control Menu please
press and hold button (3 sec).
DELAY
The start time of the program may be delayed for a period
of time between 1 and 12 hours.
Program
Drying
phase
Natural
Dry
Available
options *)
Duration of
wash pro-
gram
(h:min)**)
Water
consumption
(litres/cycle)
Energy
consumption
(kWh/cycle)
50° 2:45 12.0 0.92
1 Eco
2 Conventional
wash and dry 55° 2:00 15.0 1.35
3Intensive 65° - 2:30 15.0 1.50
4Fast 50° -- 0:55 11.5 1.10
5Sanitizing 65° - 1:40 11.5 1.30
6Pre-Wash
-
-- 0:10 4.5 0.01
7Self-Clean 65° --0:50 8.0 0.80
ECO program data is measured under laboratory conditions according to European Standard EN 60436:2019.
Note for Test Laboratories: For information on comparative EN testing conditions, please send an email to the following
address: [email protected]
Pre-treatment of the dishes is not needed before any of the programs.
*) Not all options can be used simultaneously.
**) Values given for programes other than the eco program are indicative only. The actual time may vary depending on many
factors such as temperature and pressure of the incoming water, room temperature, amount of detergent, quantity and type of
load, load balancing, additional selected options and sensor calibration.
Standby consumption: Left-on mode consumption: 5 W - Off mode consumption: 0.5 W
PROGRAMS DESCRIPTION
9
ENGLISH
1. Press the DELAY button: the corresponding «h» symbol
appears on the display; each time you press the button,
the time (1h, 2h, etc. up to max. 12h) from the start of
the selected wash cycle will be increased.
2. Select the wash program, press the START/PAUSE
button and within 4 seconds close the door: the timer
will begin counting down.
3. Once this time has elapsed, the indicator light «h»
switches off and the wash cycle begins.
To adjust the delay time and select a shorter period of time,
press the DELAY button. To cancel it, press the button
repeatedly until the selected delayed start indicator light
«h» switches off.
The DELAY function cannot be set once a wash cycle
has been started.
NaturalDry
Door opening system NaturalDry is a convection drying system
which automatically opens the door during/after drying phase to
ensure exceptional drying performance every day. Door opens at
the temperature that is safe to your kitchen furniture.
As additional steam protection, special designed protection foil is
added together with the dishwasher. To see how to mount protec-
tion foil please refer to (INSTALLATION GUIDE).
NaturalDry functionality could be disabled by the user as follows:
1. Go to the Dishwasher software menu pressing and holding
button (6 sec).
2. You switched to NaturalDry Control Menu, you could change
status of NaturalDry functionality by pressing button:
E – enabled d – disabled
To conrm the change and exit from the Control Menu please
press and hold button (3 sec).
DELAY
The start time of the program may be delayed for a period
of time between 1 and 12 hours.
Program
Drying
phase
Natural
Dry
Available
options *)
Duration of
wash pro-
gram
(h:min)**)
Water
consumption
(litres/cycle)
Energy
consumption
(kWh/cycle)
50° 2:45 12.0 0.92
1 Eco
2 Conventional
wash and dry 55° 2:00 15.0 1.35
3Intensive 65° - 2:30 15.0 1.50
4Fast 50° -- 0:55 11.5 1.10
5Sanitizing 65° - 1:40 11.5 1.30
6Pre-Wash
-
-- 0:10 4.5 0.01
7Self-Clean 65° --0:50 8.0 0.80
ECO program data is measured under laboratory conditions according to European Standard EN 60436:2019.
Note for Test Laboratories: For information on comparative EN testing conditions, please send an email to the following
address: [email protected]
Pre-treatment of the dishes is not needed before any of the programs.
*) Not all options can be used simultaneously.
**) Values given for programes other than the eco program are indicative only. The actual time may vary depending on many
factors such as temperature and pressure of the incoming water, room temperature, amount of detergent, quantity and type of
load, load balancing, additional selected options and sensor calibration.
Standby consumption: Left-on mode consumption: 5 W - Off mode consumption: 0.5 W
PROGRAMS DESCRIPTION
EN
9
To open the detergent dispenser
press button C.
Introduce the detergent into
the dry dispenser D only.
Place the amount of detergent
for pre-washing directly inside
the tub.
1. When measuring out the detergent refer to the mentioned ear-
lier information to add the proper quantity. Inside the dispenser
C there are indications to help the detergent dosing.
2. Remove detergent residues from the edges of the dispenser
and close the cover until it clicks.
3. Close the lid of the detergent dispenser by pulling it up until
the closing device is secured in place.
The detergent dispenser automatically opens up at the right time
according to the program. If all-in-one detergents are used, we
recommend using the TABLET button, because it adjusts the
program so that the best washing and drying results are always
achieved.
C
D
PROGRAMS TABLE
ECO program data is measured under laboratory conditions according to European Standard EN 60436:2019.
Note for Test Laboratories: For information on comparative EN testing conditions, please send an email to the following address:
Pre-treatment of the dishes is not needed before any of the programs.
*) Not all options can be used simultaneously.
**) Values given for programes other than the eco program are indicative only. The actual time may vary depending on many factors such as temperature
and pressure of the incoming water, room temperature, amount of detergent, quantity and type of load, load balancing, additional selected options and
sensor calibration.
Standby consumption: Left-on mode consumption: 5 W - Off mode consumption: 0.5 W
PROGRAMS DESCRIPTION
1. ECO -
bined energy and water consumption, and that it is used to assess compliance with the EU Ecodesign legislation.
2. AUTO - For normally soiled dishes with dried food residues. Senses the level of soiling on the dishes and adjusts the program accor-
dingly. When the sensor is detecting the soil level an animation appears in the display and the cycle duration is updated.
3. INTENSIVE -
Program recommended for heavily soiled crockery, especially suitable for pans and saucepans (not to be used for delicate items).
4. FAST WASH 30’ - Program to be used for half load of lightly-soiled dishes with no dried food residues.
5. FAST WASH AND DRY
- Normally soiled crockery. Everyday cycle, that ensures optimal cleaning and drying performance in shorter time.
6. GLASS - Program for delicate items, which are more sensitive to high temperatures, for example glasses and cups.
7. SILENT -
Suitable for night-time operation of the appliance. Ensures optimal cleaning and drying performance with the lowest noise emission.
8. SANITIZING - Normally or heavily soiled crockery, with additional antibacterial wash. Can be used to perform maintenance of the
dishwasher.
9. PRE-WASH - Use to refresh crockery planned to be washed later. No detergent to be used with this program.
10. SELF-CLEAN - Program to be used to perform maintenance of the dishwasher. It cleans the interior of the appliance using hot water.
Notes:
Please note that cycle FAST WASH is dedicated for lightly soiled dishes.
Program
Drying
phase
Natural
Dry
Available
options *)
Duration of
wash
program
(h:min)**)
Water
consumption
(litres/cycle)
Energy
consumption
(kWh/cycle)
1Eco 3:40 8.7 0.66
2Auto 1:20 - 3:00 7.0 - 14.0 0.70 - 1.10
3Intensive 2:40 17.0 1.30
4 Fast wash 30’ -- 0:30 9.0 0.50
5 1:20 10.0 1.10
6Glass 1:40 12.0 1.00
7Silent 3:35 16.5 1.00
8Sanitizing - 1:40 12.0 1.30
9Pre-Wash -- 0:10 4.5 0.01
10 Self- Clean -- 0:50 9.5 0.70
3:35 16.5 1.00
8 Hygiene
EN
9
To open the detergent dispenser
press button C.
Introduce the detergent into
the dry dispenser D only.
Place the amount of detergent
for pre-washing directly inside
the tub.
1. When measuring out the detergent refer to the mentioned ear-
lier information to add the proper quantity. Inside the dispenser
C there are indications to help the detergent dosing.
2. Remove detergent residues from the edges of the dispenser
and close the cover until it clicks.
3. Close the lid of the detergent dispenser by pulling it up until
the closing device is secured in place.
The detergent dispenser automatically opens up at the right time
according to the program. If all-in-one detergents are used, we
recommend using the TABLET button, because it adjusts the
program so that the best washing and drying results are always
achieved.
C
D
PROGRAMS TABLE
ECO program data is measured under laboratory conditions according to European Standard EN 60436:2019.
Note for Test Laboratories: For information on comparative EN testing conditions, please send an email to the following address:
Pre-treatment of the dishes is not needed before any of the programs.
*) Not all options can be used simultaneously.
**) Values given for programes other than the eco program are indicative only. The actual time may vary depending on many factors such as temperature
and pressure of the incoming water, room temperature, amount of detergent, quantity and type of load, load balancing, additional selected options and
sensor calibration.
Standby consumption: Left-on mode consumption: 5 W - Off mode consumption: 0.5 W
PROGRAMS DESCRIPTION
1. ECO -
bined energy and water consumption, and that it is used to assess compliance with the EU Ecodesign legislation.
2. AUTO - For normally soiled dishes with dried food residues. Senses the level of soiling on the dishes and adjusts the program accor-
dingly. When the sensor is detecting the soil level an animation appears in the display and the cycle duration is updated.
3. INTENSIVE -
Program recommended for heavily soiled crockery, especially suitable for pans and saucepans (not to be used for delicate items).
4. FAST WASH 30’ - Program to be used for half load of lightly-soiled dishes with no dried food residues.
5. FAST WASH AND DRY
- Normally soiled crockery. Everyday cycle, that ensures optimal cleaning and drying performance in shorter time.
6. GLASS - Program for delicate items, which are more sensitive to high temperatures, for example glasses and cups.
7. SILENT -
Suitable for night-time operation of the appliance. Ensures optimal cleaning and drying performance with the lowest noise emission.
8. SANITIZING - Normally or heavily soiled crockery, with additional antibacterial wash. Can be used to perform maintenance of the
dishwasher.
9. PRE-WASH - Use to refresh crockery planned to be washed later. No detergent to be used with this program.
10. SELF-CLEAN - Program to be used to perform maintenance of the dishwasher. It cleans the interior of the appliance using hot water.
Notes:
Please note that cycle FAST WASH is dedicated for lightly soiled dishes.
Program
Drying
phase
Natural
Dry
Available
options *)
Duration of
wash
program
(h:min)**)
Water
consumption
(litres/cycle)
Energy
consumption
(kWh/cycle)
1Eco 3:40 8.7 0.66
2Auto 1:20 - 3:00 7.0 - 14.0 0.70 - 1.10
3Intensive 2:40 17.0 1.30
4 Fast wash 30’ -- 0:30 9.0 0.50
5 1:20 10.0 1.10
6Glass 1:40 12.0 1.00
7Silent 3:35 16.5 1.00
8Sanitizing - 1:40 12.0 1.30
9Pre-Wash -- 0:10 4.5 0.01
10 Self- Clean -- 0:50 9.5 0.70
65°
9
ENGLISH
1. Press the DELAY button: the corresponding «h» symbol
appears on the display; each time you press the button,
the time (1h, 2h, etc. up to max. 12h) from the start of
the selected wash cycle will be increased.
2. Select the wash program, press the START/PAUSE
button and within 4 seconds close the door: the timer
will begin counting down.
3. Once this time has elapsed, the indicator light «h»
switches off and the wash cycle begins.
To adjust the delay time and select a shorter period of time,
press the DELAY button. To cancel it, press the button
repeatedly until the selected delayed start indicator light
«h» switches off.
The DELAY function cannot be set once a wash cycle
has been started.
NaturalDry
Door opening system NaturalDry is a convection drying system
which automatically opens the door during/after drying phase to
ensure exceptional drying performance every day. Door opens at
the temperature that is safe to your kitchen furniture.
As additional steam protection, special designed protection foil is
added together with the dishwasher. To see how to mount protec-
tion foil please refer to (INSTALLATION GUIDE).
NaturalDry functionality could be disabled by the user as follows:
1. Go to the Dishwasher software menu pressing and holding
button (6 sec).
2. You switched to NaturalDry Control Menu, you could change
status of NaturalDry functionality by pressing button:
E – enabled d – disabled
To conrm the change and exit from the Control Menu please
press and hold button (3 sec).
DELAY
The start time of the program may be delayed for a period
of time between 1 and 12 hours.
Program
Drying
phase
Natural
Dry
Available
options *)
Duration of
wash pro-
gram
(h:min)**)
Water
consumption
(litres/cycle)
Energy
consumption
(kWh/cycle)
50° 2:45 12.0 0.92
1 Eco
2 Conventional
wash and dry 55° 2:00 15.0 1.35
3Intensive 65° - 2:30 15.0 1.50
4Fast 50° -- 0:55 11.5 1.10
5Sanitizing 65° - 1:40 11.5 1.30
6Pre-Wash
-
-- 0:10 4.5 0.01
7Self-Clean 65° --0:50 8.0 0.80
ECO program data is measured under laboratory conditions according to European Standard EN 60436:2019.
Note for Test Laboratories: For information on comparative EN testing conditions, please send an email to the following
address: [email protected]
Pre-treatment of the dishes is not needed before any of the programs.
*) Not all options can be used simultaneously.
**) Values given for programes other than the eco program are indicative only. The actual time may vary depending on many
factors such as temperature and pressure of the incoming water, room temperature, amount of detergent, quantity and type of
load, load balancing, additional selected options and sensor calibration.
Standby consumption: Left-on mode consumption: 5 W - Off mode consumption: 0.5 W
PROGRAMS DESCRIPTION
-
EN
9
To open the detergent dispenser
press button C.
Introduce the detergent into
the dry dispenser D only.
Place the amount of detergent
for pre-washing directly inside
the tub.
1. When measuring out the detergent refer to the mentioned ear-
lier information to add the proper quantity. Inside the dispenser
C there are indications to help the detergent dosing.
2. Remove detergent residues from the edges of the dispenser
and close the cover until it clicks.
3. Close the lid of the detergent dispenser by pulling it up until
the closing device is secured in place.
The detergent dispenser automatically opens up at the right time
according to the program. If all-in-one detergents are used, we
recommend using the TABLET button, because it adjusts the
program so that the best washing and drying results are always
achieved.
C
D
PROGRAMS TABLE
ECO program data is measured under laboratory conditions according to European Standard EN 60436:2019.
Note for Test Laboratories: For information on comparative EN testing conditions, please send an email to the following address:
Pre-treatment of the dishes is not needed before any of the programs.
*) Not all options can be used simultaneously.
**) Values given for programes other than the eco program are indicative only. The actual time may vary depending on many factors such as temperature
and pressure of the incoming water, room temperature, amount of detergent, quantity and type of load, load balancing, additional selected options and
sensor calibration.
Standby consumption: Left-on mode consumption: 5 W - Off mode consumption: 0.5 W
PROGRAMS DESCRIPTION
1. ECO -
bined energy and water consumption, and that it is used to assess compliance with the EU Ecodesign legislation.
2. AUTO - For normally soiled dishes with dried food residues. Senses the level of soiling on the dishes and adjusts the program accor-
dingly. When the sensor is detecting the soil level an animation appears in the display and the cycle duration is updated.
3. INTENSIVE -
Program recommended for heavily soiled crockery, especially suitable for pans and saucepans (not to be used for delicate items).
4. FAST WASH 30’ - Program to be used for half load of lightly-soiled dishes with no dried food residues.
5. FAST WASH AND DRY
- Normally soiled crockery. Everyday cycle, that ensures optimal cleaning and drying performance in shorter time.
6. GLASS - Program for delicate items, which are more sensitive to high temperatures, for example glasses and cups.
7. SILENT -
Suitable for night-time operation of the appliance. Ensures optimal cleaning and drying performance with the lowest noise emission.
8. SANITIZING - Normally or heavily soiled crockery, with additional antibacterial wash. Can be used to perform maintenance of the
dishwasher.
9. PRE-WASH - Use to refresh crockery planned to be washed later. No detergent to be used with this program.
10. SELF-CLEAN - Program to be used to perform maintenance of the dishwasher. It cleans the interior of the appliance using hot water.
Notes:
Please note that cycle FAST WASH is dedicated for lightly soiled dishes.
Program
Drying
phase
Natural
Dry
Available
options *)
Duration of
wash
program
(h:min)**)
Water
consumption
(litres/cycle)
Energy
consumption
(kWh/cycle)
1Eco 3:40 8.7 0.66
2Auto 1:20 - 3:00 7.0 - 14.0 0.70 - 1.10
3Intensive 2:40 17.0 1.30
4 Fast wash 30’ -- 0:30 9.0 0.50
5 1:20 10.0 1.10
6Glass 1:40 12.0 1.00
7Silent 3:35 16.5 1.00
8Sanitizing - 1:40 12.0 1.30
9Pre-Wash -- 0:10 4.5 0.01
10 Self- Clean -- 0:50 9.5 0.70
1:40 12.0 1.30
9 Vorspülen
EN
9
To open the detergent dispenser
press button C.
Introduce the detergent into
the dry dispenser D only.
Place the amount of detergent
for pre-washing directly inside
the tub.
1. When measuring out the detergent refer to the mentioned ear-
lier information to add the proper quantity. Inside the dispenser
C there are indications to help the detergent dosing.
2. Remove detergent residues from the edges of the dispenser
and close the cover until it clicks.
3. Close the lid of the detergent dispenser by pulling it up until
the closing device is secured in place.
The detergent dispenser automatically opens up at the right time
according to the program. If all-in-one detergents are used, we
recommend using the TABLET button, because it adjusts the
program so that the best washing and drying results are always
achieved.
C
D
PROGRAMS TABLE
ECO program data is measured under laboratory conditions according to European Standard EN 60436:2019.
Note for Test Laboratories: For information on comparative EN testing conditions, please send an email to the following address:
Pre-treatment of the dishes is not needed before any of the programs.
*) Not all options can be used simultaneously.
**) Values given for programes other than the eco program are indicative only. The actual time may vary depending on many factors such as temperature
and pressure of the incoming water, room temperature, amount of detergent, quantity and type of load, load balancing, additional selected options and
sensor calibration.
Standby consumption: Left-on mode consumption: 5 W - Off mode consumption: 0.5 W
PROGRAMS DESCRIPTION
1. ECO -
bined energy and water consumption, and that it is used to assess compliance with the EU Ecodesign legislation.
2. AUTO - For normally soiled dishes with dried food residues. Senses the level of soiling on the dishes and adjusts the program accor-
dingly. When the sensor is detecting the soil level an animation appears in the display and the cycle duration is updated.
3. INTENSIVE -
Program recommended for heavily soiled crockery, especially suitable for pans and saucepans (not to be used for delicate items).
4. FAST WASH 30’ - Program to be used for half load of lightly-soiled dishes with no dried food residues.
5. FAST WASH AND DRY
- Normally soiled crockery. Everyday cycle, that ensures optimal cleaning and drying performance in shorter time.
6. GLASS - Program for delicate items, which are more sensitive to high temperatures, for example glasses and cups.
7. SILENT -
Suitable for night-time operation of the appliance. Ensures optimal cleaning and drying performance with the lowest noise emission.
8. SANITIZING - Normally or heavily soiled crockery, with additional antibacterial wash. Can be used to perform maintenance of the
dishwasher.
9. PRE-WASH - Use to refresh crockery planned to be washed later. No detergent to be used with this program.
10. SELF-CLEAN - Program to be used to perform maintenance of the dishwasher. It cleans the interior of the appliance using hot water.
Notes:
Please note that cycle FAST WASH is dedicated for lightly soiled dishes.
Program
Drying
phase
Natural
Dry
Available
options *)
Duration of
wash
program
(h:min)**)
Water
consumption
(litres/cycle)
Energy
consumption
(kWh/cycle)
1Eco 3:40 8.7 0.66
2Auto 1:20 - 3:00 7.0 - 14.0 0.70 - 1.10
3Intensive 2:40 17.0 1.30
4 Fast wash 30’ -- 0:30 9.0 0.50
5 1:20 10.0 1.10
6Glass 1:40 12.0 1.00
7Silent 3:35 16.5 1.00
8Sanitizing - 1:40 12.0 1.30
9Pre-Wash -- 0:10 4.5 0.01
10 Self- Clean -- 0:50 9.5 0.70
- -
EN
9
To open the detergent dispenser
press button C.
Introduce the detergent into
the dry dispenser D only.
Place the amount of detergent
for pre-washing directly inside
the tub.
1. When measuring out the detergent refer to the mentioned ear-
lier information to add the proper quantity. Inside the dispenser
C there are indications to help the detergent dosing.
2. Remove detergent residues from the edges of the dispenser
and close the cover until it clicks.
3. Close the lid of the detergent dispenser by pulling it up until
the closing device is secured in place.
The detergent dispenser automatically opens up at the right time
according to the program. If all-in-one detergents are used, we
recommend using the TABLET button, because it adjusts the
program so that the best washing and drying results are always
achieved.
C
D
PROGRAMS TABLE
ECO program data is measured under laboratory conditions according to European Standard EN 60436:2019.
Note for Test Laboratories: For information on comparative EN testing conditions, please send an email to the following address:
Pre-treatment of the dishes is not needed before any of the programs.
*) Not all options can be used simultaneously.
**) Values given for programes other than the eco program are indicative only. The actual time may vary depending on many factors such as temperature
and pressure of the incoming water, room temperature, amount of detergent, quantity and type of load, load balancing, additional selected options and
sensor calibration.
Standby consumption: Left-on mode consumption: 5 W - Off mode consumption: 0.5 W
PROGRAMS DESCRIPTION
1. ECO -
bined energy and water consumption, and that it is used to assess compliance with the EU Ecodesign legislation.
2. AUTO - For normally soiled dishes with dried food residues. Senses the level of soiling on the dishes and adjusts the program accor-
dingly. When the sensor is detecting the soil level an animation appears in the display and the cycle duration is updated.
3. INTENSIVE -
Program recommended for heavily soiled crockery, especially suitable for pans and saucepans (not to be used for delicate items).
4. FAST WASH 30’ - Program to be used for half load of lightly-soiled dishes with no dried food residues.
5. FAST WASH AND DRY
- Normally soiled crockery. Everyday cycle, that ensures optimal cleaning and drying performance in shorter time.
6. GLASS - Program for delicate items, which are more sensitive to high temperatures, for example glasses and cups.
7. SILENT -
Suitable for night-time operation of the appliance. Ensures optimal cleaning and drying performance with the lowest noise emission.
8. SANITIZING - Normally or heavily soiled crockery, with additional antibacterial wash. Can be used to perform maintenance of the
dishwasher.
9. PRE-WASH - Use to refresh crockery planned to be washed later. No detergent to be used with this program.
10. SELF-CLEAN - Program to be used to perform maintenance of the dishwasher. It cleans the interior of the appliance using hot water.
Notes:
Please note that cycle FAST WASH is dedicated for lightly soiled dishes.
Program
Drying
phase
Natural
Dry
Available
options *)
Duration of
wash
program
(h:min)**)
Water
consumption
(litres/cycle)
Energy
consumption
(kWh/cycle)
1Eco 3:40 8.7 0.66
2Auto 1:20 - 3:00 7.0 - 14.0 0.70 - 1.10
3Intensive 2:40 17.0 1.30
4 Fast wash 30’ -- 0:30 9.0 0.50
5 1:20 10.0 1.10
6Glass 1:40 12.0 1.00
7Silent 3:35 16.5 1.00
8Sanitizing - 1:40 12.0 1.30
9Pre-Wash -- 0:10 4.5 0.01
10 Self- Clean -- 0:50 9.5 0.70
0:10 4.5 0.01
10 Selbstreinigung
EN
9
To open the detergent dispenser
press button C.
Introduce the detergent into
the dry dispenser D only.
Place the amount of detergent
for pre-washing directly inside
the tub.
1. When measuring out the detergent refer to the mentioned ear-
lier information to add the proper quantity. Inside the dispenser
C there are indications to help the detergent dosing.
2. Remove detergent residues from the edges of the dispenser
and close the cover until it clicks.
3. Close the lid of the detergent dispenser by pulling it up until
the closing device is secured in place.
The detergent dispenser automatically opens up at the right time
according to the program. If all-in-one detergents are used, we
recommend using the TABLET button, because it adjusts the
program so that the best washing and drying results are always
achieved.
C
D
PROGRAMS TABLE
ECO program data is measured under laboratory conditions according to European Standard EN 60436:2019.
Note for Test Laboratories: For information on comparative EN testing conditions, please send an email to the following address:
Pre-treatment of the dishes is not needed before any of the programs.
*) Not all options can be used simultaneously.
**) Values given for programes other than the eco program are indicative only. The actual time may vary depending on many factors such as temperature
and pressure of the incoming water, room temperature, amount of detergent, quantity and type of load, load balancing, additional selected options and
sensor calibration.
Standby consumption: Left-on mode consumption: 5 W - Off mode consumption: 0.5 W
PROGRAMS DESCRIPTION
1. ECO -
bined energy and water consumption, and that it is used to assess compliance with the EU Ecodesign legislation.
2. AUTO - For normally soiled dishes with dried food residues. Senses the level of soiling on the dishes and adjusts the program accor-
dingly. When the sensor is detecting the soil level an animation appears in the display and the cycle duration is updated.
3. INTENSIVE -
Program recommended for heavily soiled crockery, especially suitable for pans and saucepans (not to be used for delicate items).
4. FAST WASH 30’ - Program to be used for half load of lightly-soiled dishes with no dried food residues.
5. FAST WASH AND DRY
- Normally soiled crockery. Everyday cycle, that ensures optimal cleaning and drying performance in shorter time.
6. GLASS - Program for delicate items, which are more sensitive to high temperatures, for example glasses and cups.
7. SILENT -
Suitable for night-time operation of the appliance. Ensures optimal cleaning and drying performance with the lowest noise emission.
8. SANITIZING - Normally or heavily soiled crockery, with additional antibacterial wash. Can be used to perform maintenance of the
dishwasher.
9. PRE-WASH - Use to refresh crockery planned to be washed later. No detergent to be used with this program.
10. SELF-CLEAN - Program to be used to perform maintenance of the dishwasher. It cleans the interior of the appliance using hot water.
Notes:
Please note that cycle FAST WASH is dedicated for lightly soiled dishes.
Program
Drying
phase
Natural
Dry
Available
options *)
Duration of
wash
program
(h:min)**)
Water
consumption
(litres/cycle)
Energy
consumption
(kWh/cycle)
1Eco 3:40 8.7 0.66
2Auto 1:20 - 3:00 7.0 - 14.0 0.70 - 1.10
3Intensive 2:40 17.0 1.30
4 Fast wash 30’ -- 0:30 9.0 0.50
5 1:20 10.0 1.10
6Glass 1:40 12.0 1.00
7Silent 3:35 16.5 1.00
8Sanitizing - 1:40 12.0 1.30
9Pre-Wash -- 0:10 4.5 0.01
10 Self- Clean -- 0:50 9.5 0.70
65° - -
EN
9
To open the detergent dispenser
press button C.
Introduce the detergent into
the dry dispenser D only.
Place the amount of detergent
for pre-washing directly inside
the tub.
1. When measuring out the detergent refer to the mentioned ear-
lier information to add the proper quantity. Inside the dispenser
C there are indications to help the detergent dosing.
2. Remove detergent residues from the edges of the dispenser
and close the cover until it clicks.
3. Close the lid of the detergent dispenser by pulling it up until
the closing device is secured in place.
The detergent dispenser automatically opens up at the right time
according to the program. If all-in-one detergents are used, we
recommend using the TABLET button, because it adjusts the
program so that the best washing and drying results are always
achieved.
C
D
PROGRAMS TABLE
ECO program data is measured under laboratory conditions according to European Standard EN 60436:2019.
Note for Test Laboratories: For information on comparative EN testing conditions, please send an email to the following address:
Pre-treatment of the dishes is not needed before any of the programs.
*) Not all options can be used simultaneously.
**) Values given for programes other than the eco program are indicative only. The actual time may vary depending on many factors such as temperature
and pressure of the incoming water, room temperature, amount of detergent, quantity and type of load, load balancing, additional selected options and
sensor calibration.
Standby consumption: Left-on mode consumption: 5 W - Off mode consumption: 0.5 W
PROGRAMS DESCRIPTION
1. ECO -
bined energy and water consumption, and that it is used to assess compliance with the EU Ecodesign legislation.
2. AUTO - For normally soiled dishes with dried food residues. Senses the level of soiling on the dishes and adjusts the program accor-
dingly. When the sensor is detecting the soil level an animation appears in the display and the cycle duration is updated.
3. INTENSIVE -
Program recommended for heavily soiled crockery, especially suitable for pans and saucepans (not to be used for delicate items).
4. FAST WASH 30’ - Program to be used for half load of lightly-soiled dishes with no dried food residues.
5. FAST WASH AND DRY
- Normally soiled crockery. Everyday cycle, that ensures optimal cleaning and drying performance in shorter time.
6. GLASS - Program for delicate items, which are more sensitive to high temperatures, for example glasses and cups.
7. SILENT -
Suitable for night-time operation of the appliance. Ensures optimal cleaning and drying performance with the lowest noise emission.
8. SANITIZING - Normally or heavily soiled crockery, with additional antibacterial wash. Can be used to perform maintenance of the
dishwasher.
9. PRE-WASH - Use to refresh crockery planned to be washed later. No detergent to be used with this program.
10. SELF-CLEAN - Program to be used to perform maintenance of the dishwasher. It cleans the interior of the appliance using hot water.
Notes:
Please note that cycle FAST WASH is dedicated for lightly soiled dishes.
Program
Drying
phase
Natural
Dry
Available
options *)
Duration of
wash
program
(h:min)**)
Water
consumption
(litres/cycle)
Energy
consumption
(kWh/cycle)
1Eco 3:40 8.7 0.66
2Auto 1:20 - 3:00 7.0 - 14.0 0.70 - 1.10
3Intensive 2:40 17.0 1.30
4 Fast wash 30’ -- 0:30 9.0 0.50
5 1:20 10.0 1.10
6Glass 1:40 12.0 1.00
7Silent 3:35 16.5 1.00
8Sanitizing - 1:40 12.0 1.30
9Pre-Wash -- 0:10 4.5 0.01
10 Self- Clean -- 0:50 9.5 0.70
0:50 9.5 0.70

Zum Herunterladen der vollständigen Version besuchen Sie bitte www.ikea.com
16DEUTSCH
EN
10
LOADING THE RACKS
TIPS
Before loading the baskets, remove all food residues from the
crockery and empty the glasses. You do not need to rinse before-
hand under running water.
Arrange the crockery so that it is held in place rmly and does
not tip over; and arrange the containers with the openings facing
downwards and the concave/convex parts placed obliquely, thus
allowing the water to reach every surface and ow freely.
Warning: lids, handles, trays and frying pans do not prevent the
sprayer arms from rotating.
Place any small items in the cutlery basket. Very soiled dishes
and pans should be placed in the lower basket because in this
sector the water sprays are stronger and allow a higher washing
performance.
After loading the appliance, make sure that the sprayer arms can
cotate freely.
CUTLERY RACK
The third rack was designed to house
the cutlery.
Arrange the cutlery as shown in the
gure.
A separate arrangement of the cutlery
makes collection easier after washing
and
improves washing and drying per-
formance.
Knives and other utensils with sharp
edges must be positioned with the
blades facing downwards.
UPPER RACK
Load delicate and light dishes: glasses,
cups, saucers, low salad bowls.
The upper rack has tip-up supports
which can be used in a vertical position
when arranging tea/ dessert saucers
or in a lower position to load bowls and
food containers.
(loading example for the upper rack)
ADJUSTING THE HEIGHT OF THE UPPER RACK
The height of the upper basket can be adju-
sted: high position to place bulky crockery
in the lower basket and low position to make
the most of the tip-up compartments by cre-
ating more space upwards.
The upper rack is equipped with a Upper
Rack height adjuster (see gure), without
pressing the levers, lift it up by simply holding
the rack sides, as soon as the rack is stable
in its upper position. To restore to the lower
position, press the levers (A) at the sides of
the rack and move the basket downwards.
We strongly recommend that you do not adjust the height of
the rack when it is loaded.
NEVER raise or lower the basket on one side only.
FOLDABLE FLAPS WITH ADJUSTABLE POSITION
The side foldable aps can be fold or unfold
to optimize the arrangement of crockery
inside the rack.
Wine glasses can be placed safely in the
foldable aps by inserting the stem of each
glass into the corresponding slots.
Depending on the model:
•to unfold the aps there is needed to slide
it up and rotate or release it from the snaps
and pull it down.
•to fold the aps there is needed to rotate
it and slide aps down or pull it up and
attach aps to the snaps.
LOWER RACK
For pots, lids, plates, salad bowls, cutlery etc....
Large plates and lids should ideally be
placed at the sides to avoid interferen-
ces with the spray arm.
The lower rack has tip-up supports
which can be used in a vertical position
when arranging plates or in a horizontal
position (lower) to load pans and salad
bowls easily.
(loading example for the lower rack)
UNSUITABLE CROCKERY
• Wooden crockery and cutlery.
• Delicate decorated glasses, artistic handicraft and antique crockery.
Their decorations are not resistant.
•Parts in synthetic material which do not withstand high temperatures.
• Copper and tin crockery.
• Crockery soiled with ash, wax, lubricating grease or ink.
The colours of glass decorations and aluminium/silver pieces can
change and fade during the washing process. Some types of glass (e.g.
crystal objects) can become opaque after a number of wash cycles too.
DAMAGE TO GLASS AND CROCKERY
• Only use glasses and porcelain guaranteed by the manufacturer
as dishwasher safe.
• Use a delicate detergent suitable for crockery
• Collect glasses and cutlery from the dishwasher as soon as the
wash cycle is over.
HYGIENE
To avoid odour and sediment which can be accumulated in the
dishwasher please run a high temperature program at least once
a month. Use a tea spoon of detergent and run it without the loading
to clean your appliance.
TIPS ON ENERGY SAVING
• When the household dishwasher is used according to the manu-
facturer’s instructions, washing tableware in a dishwasher usu-
ally consumes less energy and water than hand dishwashing.
•In order to maximize dishwasher efciency it is recommended to
initiate the wash cycle once dishwasher is fully loaded. Loading
the household dishwasher up to the capacity indicated by the man-
ufacturer will contribute to energy and water savings. Information
on correct loading of tableware can be found in Loading chapter.
In case of partial loading it is recommended to use dedicated wash
options if available (Half load/ Zone Wash, Multizone), illing up only
selected racks. Incorrect loading or overloading the dishwasher may
increase resources usage (such as water, energy and time, as well
as increase noise level), reducing cleaning and drying performance.
• Manual pre-rinsing of tableware items leads to increased water
and energy consumption and is not recommended.
Besteckschublade
Die dritte Schublade wurde für das
Hineinlegen von Besteck entwickelt.
Platzieren Sie das Besteck wie
abgebildet.
Eine getrennte Anordnung des
Bestecks macht das Sortieren nach
dem Spülen einfacher und verbessert
die Spül- und Trockenleistung.
Messer und andere
Küchenutensilien mit scharfen
Spitzen sind mit nach unten
gerichteter Schneide in einzuordnen.
EN
10
LOADING THE RACKS
TIPS
Before loading the baskets, remove all food residues from the
crockery and empty the glasses. You do not need to rinse before-
hand under running water.
Arrange the crockery so that it is held in place rmly and does
not tip over; and arrange the containers with the openings facing
downwards and the concave/convex parts placed obliquely, thus
allowing the water to reach every surface and ow freely.
Warning: lids, handles, trays and frying pans do not prevent the
sprayer arms from rotating.
Place any small items in the cutlery basket. Very soiled dishes
and pans should be placed in the lower basket because in this
sector the water sprays are stronger and allow a higher washing
performance.
After loading the appliance, make sure that the sprayer arms can
cotate freely.
CUTLERY RACK
The third rack was designed to house
the cutlery.
Arrange the cutlery as shown in the
gure.
A separate arrangement of the cutlery
makes collection easier after washing
and
improves washing and drying per-
formance.
Knives and other utensils with sharp
edges must be positioned with the
blades facing downwards.
UPPER RACK
Load delicate and light dishes: glasses,
cups, saucers, low salad bowls.
The upper rack has tip-up supports
which can be used in a vertical position
when arranging tea/ dessert saucers
or in a lower position to load bowls and
food containers.
(loading example for the upper rack)
ADJUSTING THE HEIGHT OF THE UPPER RACK
The height of the upper basket can be adju-
sted: high position to place bulky crockery
in the lower basket and low position to make
the most of the tip-up compartments by cre-
ating more space upwards.
The upper rack is equipped with a Upper
Rack height adjuster (see gure), without
pressing the levers, lift it up by simply holding
the rack sides, as soon as the rack is stable
in its upper position. To restore to the lower
position, press the levers (A) at the sides of
the rack and move the basket downwards.
We strongly recommend that you do not adjust the height of
the rack when it is loaded.
NEVER raise or lower the basket on one side only.
FOLDABLE FLAPS WITH ADJUSTABLE POSITION
The side foldable aps can be fold or unfold
to optimize the arrangement of crockery
inside the rack.
Wine glasses can be placed safely in the
foldable aps by inserting the stem of each
glass into the corresponding slots.
Depending on the model:
•to unfold the aps there is needed to slide
it up and rotate or release it from the snaps
and pull it down.
•to fold the aps there is needed to rotate
it and slide aps down or pull it up and
attach aps to the snaps.
LOWER RACK
For pots, lids, plates, salad bowls, cutlery etc....
Large plates and lids should ideally be
placed at the sides to avoid interferen-
ces with the spray arm.
The lower rack has tip-up supports
which can be used in a vertical position
when arranging plates or in a horizontal
position (lower) to load pans and salad
bowls easily.
(loading example for the lower rack)
UNSUITABLE CROCKERY
• Wooden crockery and cutlery.
• Delicate decorated glasses, artistic handicraft and antique crockery.
Their decorations are not resistant.
•Parts in synthetic material which do not withstand high temperatures.
• Copper and tin crockery.
• Crockery soiled with ash, wax, lubricating grease or ink.
The colours of glass decorations and aluminium/silver pieces can
change and fade during the washing process. Some types of glass (e.g.
crystal objects) can become opaque after a number of wash cycles too.
DAMAGE TO GLASS AND CROCKERY
• Only use glasses and porcelain guaranteed by the manufacturer
as dishwasher safe.
• Use a delicate detergent suitable for crockery
• Collect glasses and cutlery from the dishwasher as soon as the
wash cycle is over.
HYGIENE
To avoid odour and sediment which can be accumulated in the
dishwasher please run a high temperature program at least once
a month. Use a tea spoon of detergent and run it without the loading
to clean your appliance.
TIPS ON ENERGY SAVING
• When the household dishwasher is used according to the manu-
facturer’s instructions, washing tableware in a dishwasher usu-
ally consumes less energy and water than hand dishwashing.
•In order to maximize dishwasher efciency it is recommended to
initiate the wash cycle once dishwasher is fully loaded. Loading
the household dishwasher up to the capacity indicated by the man-
ufacturer will contribute to energy and water savings. Information
on correct loading of tableware can be found in Loading chapter.
In case of partial loading it is recommended to use dedicated wash
options if available (Half load/ Zone Wash, Multizone), illing up only
selected racks. Incorrect loading or overloading the dishwasher may
increase resources usage (such as water, energy and time, as well
as increase noise level), reducing cleaning and drying performance.
• Manual pre-rinsing of tableware items leads to increased water
and energy consumption and is not recommended.
Oberkorb
Hier sortieren Sie empndliches und
leichtes Geschirr ein: Gläser, Tassen,
kleine Teller, ache Schüsseln.
Der Oberkorb verfügt über klappbare
Halterungen, die in vertikaler
Stellung für Untertassen oder
Dessertteller oder in einer tieferen
Stellung für Schüsseln und sonstige
Behältnisse verwendet werden
können.
(Sortierbeispiel für den Oberkorb)
EN
10
LOADING THE RACKS
TIPS
Before loading the baskets, remove all food residues from the
crockery and empty the glasses. You do not need to rinse before-
hand under running water.
Arrange the crockery so that it is held in place rmly and does
not tip over; and arrange the containers with the openings facing
downwards and the concave/convex parts placed obliquely, thus
allowing the water to reach every surface and ow freely.
Warning: lids, handles, trays and frying pans do not prevent the
sprayer arms from rotating.
Place any small items in the cutlery basket. Very soiled dishes
and pans should be placed in the lower basket because in this
sector the water sprays are stronger and allow a higher washing
performance.
After loading the appliance, make sure that the sprayer arms can
cotate freely.
CUTLERY RACK
The third rack was designed to house
the cutlery.
Arrange the cutlery as shown in the
gure.
A separate arrangement of the cutlery
makes collection easier after washing
and
improves washing and drying per-
formance.
Knives and other utensils with sharp
edges must be positioned with the
blades facing downwards.
UPPER RACK
Load delicate and light dishes: glasses,
cups, saucers, low salad bowls.
The upper rack has tip-up supports
which can be used in a vertical position
when arranging tea/ dessert saucers
or in a lower position to load bowls and
food containers.
(loading example for the upper rack)
ADJUSTING THE HEIGHT OF THE UPPER RACK
The height of the upper basket can be adju-
sted: high position to place bulky crockery
in the lower basket and low position to make
the most of the tip-up compartments by cre-
ating more space upwards.
The upper rack is equipped with a Upper
Rack height adjuster (see gure), without
pressing the levers, lift it up by simply holding
the rack sides, as soon as the rack is stable
in its upper position. To restore to the lower
position, press the levers (A) at the sides of
the rack and move the basket downwards.
We strongly recommend that you do not adjust the height of
the rack when it is loaded.
NEVER raise or lower the basket on one side only.
FOLDABLE FLAPS WITH ADJUSTABLE POSITION
The side foldable aps can be fold or unfold
to optimize the arrangement of crockery
inside the rack.
Wine glasses can be placed safely in the
foldable aps by inserting the stem of each
glass into the corresponding slots.
Depending on the model:
•to unfold the aps there is needed to slide
it up and rotate or release it from the snaps
and pull it down.
•to fold the aps there is needed to rotate
it and slide aps down or pull it up and
attach aps to the snaps.
LOWER RACK
For pots, lids, plates, salad bowls, cutlery etc....
Large plates and lids should ideally be
placed at the sides to avoid interferen-
ces with the spray arm.
The lower rack has tip-up supports
which can be used in a vertical position
when arranging plates or in a horizontal
position (lower) to load pans and salad
bowls easily.
(loading example for the lower rack)
UNSUITABLE CROCKERY
• Wooden crockery and cutlery.
• Delicate decorated glasses, artistic handicraft and antique crockery.
Their decorations are not resistant.
•Parts in synthetic material which do not withstand high temperatures.
• Copper and tin crockery.
• Crockery soiled with ash, wax, lubricating grease or ink.
The colours of glass decorations and aluminium/silver pieces can
change and fade during the washing process. Some types of glass (e.g.
crystal objects) can become opaque after a number of wash cycles too.
DAMAGE TO GLASS AND CROCKERY
• Only use glasses and porcelain guaranteed by the manufacturer
as dishwasher safe.
• Use a delicate detergent suitable for crockery
• Collect glasses and cutlery from the dishwasher as soon as the
wash cycle is over.
HYGIENE
To avoid odour and sediment which can be accumulated in the
dishwasher please run a high temperature program at least once
a month. Use a tea spoon of detergent and run it without the loading
to clean your appliance.
TIPS ON ENERGY SAVING
• When the household dishwasher is used according to the manu-
facturer’s instructions, washing tableware in a dishwasher usu-
ally consumes less energy and water than hand dishwashing.
•In order to maximize dishwasher efciency it is recommended to
initiate the wash cycle once dishwasher is fully loaded. Loading
the household dishwasher up to the capacity indicated by the man-
ufacturer will contribute to energy and water savings. Information
on correct loading of tableware can be found in Loading chapter.
In case of partial loading it is recommended to use dedicated wash
options if available (Half load/ Zone Wash, Multizone), illing up only
selected racks. Incorrect loading or overloading the dishwasher may
increase resources usage (such as water, energy and time, as well
as increase noise level), reducing cleaning and drying performance.
• Manual pre-rinsing of tableware items leads to increased water
and energy consumption and is not recommended.
Höheneinstellung des Oberkorbs
Der Oberkorb kann in der Höhe
verstellt werden:
stellen Sie ihn in die oberste Position,
wenn Sie großes Geschirr in den
Unterkorb einräumen wollen. Wenn
Sie eher die klappbaren Bereiche
nutzen wollen, dann stellen Sie ihn in
die untere Position. Somit vermeiden
Sie Zusammenstoßen
mit dem Geschirr im Unterkorb.
Der Oberkorb ist mit einem
Oberkorb Höhenversteller (siehe Abbildung) ausgestattet.
Ohne Drücken der Hebel kann er einfach durch Heben der
Korbseiten angehoben werden, sobald der Korb stabil in seiner
unteren Stellung ist.
Um den Korb zurück in die untere Stellung zu bringen, drücken
Sie die Hebel A an den Seiten des Korbs und schieben Sie ihn
nach unten.
Es empehlt sich, die Höhe des Oberkorbes bei leerem Korb
zu regulieren. Heben oder senken Sie den Korb NIEMALS nur
an einer Seite.
Klappbare Ablagen mit verstellbarer
Position
Die klappbaren Seitenablagen können
ein- oder ausgeklappt werden, um beim
Einräumen des Geschirrs den Platz im
Korb optimal auszunutzen.
Stielgläser können an den Ablagen
stabilisiert werden, indem sie mit dem
Stiel in die vorgesehene Aussparung
gestellt werden.
Je nach Modell:
• Zum Ausklappen der Ablagen, müssen
diese nach oben geschoben und
gedreht oder aus den Schnappern
gelöst und nach unten gezogen
werden.
• Zum Einklappen der Ablagen, müssen
diese gedreht und nach unten
geschoben oder nach oben gezogen
und an den Schnappern befestigt
werden.
EN
10
LOADING THE RACKS
TIPS
Before loading the baskets, remove all food residues from the
crockery and empty the glasses. You do not need to rinse before-
hand under running water.
Arrange the crockery so that it is held in place rmly and does
not tip over; and arrange the containers with the openings facing
downwards and the concave/convex parts placed obliquely, thus
allowing the water to reach every surface and ow freely.
Warning: lids, handles, trays and frying pans do not prevent the
sprayer arms from rotating.
Place any small items in the cutlery basket. Very soiled dishes
and pans should be placed in the lower basket because in this
sector the water sprays are stronger and allow a higher washing
performance.
After loading the appliance, make sure that the sprayer arms can
cotate freely.
CUTLERY RACK
The third rack was designed to house
the cutlery.
Arrange the cutlery as shown in the
gure.
A separate arrangement of the cutlery
makes collection easier after washing
and
improves washing and drying per-
formance.
Knives and other utensils with sharp
edges must be positioned with the
blades facing downwards.
UPPER RACK
Load delicate and light dishes: glasses,
cups, saucers, low salad bowls.
The upper rack has tip-up supports
which can be used in a vertical position
when arranging tea/ dessert saucers
or in a lower position to load bowls and
food containers.
(loading example for the upper rack)
ADJUSTING THE HEIGHT OF THE UPPER RACK
The height of the upper basket can be adju-
sted: high position to place bulky crockery
in the lower basket and low position to make
the most of the tip-up compartments by cre-
ating more space upwards.
The upper rack is equipped with a Upper
Rack height adjuster (see gure), without
pressing the levers, lift it up by simply holding
the rack sides, as soon as the rack is stable
in its upper position. To restore to the lower
position, press the levers (A) at the sides of
the rack and move the basket downwards.
We strongly recommend that you do not adjust the height of
the rack when it is loaded.
NEVER raise or lower the basket on one side only.
FOLDABLE FLAPS WITH ADJUSTABLE POSITION
The side foldable aps can be fold or unfold
to optimize the arrangement of crockery
inside the rack.
Wine glasses can be placed safely in the
foldable aps by inserting the stem of each
glass into the corresponding slots.
Depending on the model:
•to unfold the aps there is needed to slide
it up and rotate or release it from the snaps
and pull it down.
•to fold the aps there is needed to rotate
it and slide aps down or pull it up and
attach aps to the snaps.
LOWER RACK
For pots, lids, plates, salad bowls, cutlery etc....
Large plates and lids should ideally be
placed at the sides to avoid interferen-
ces with the spray arm.
The lower rack has tip-up supports
which can be used in a vertical position
when arranging plates or in a horizontal
position (lower) to load pans and salad
bowls easily.
(loading example for the lower rack)
UNSUITABLE CROCKERY
• Wooden crockery and cutlery.
• Delicate decorated glasses, artistic handicraft and antique crockery.
Their decorations are not resistant.
•Parts in synthetic material which do not withstand high temperatures.
• Copper and tin crockery.
• Crockery soiled with ash, wax, lubricating grease or ink.
The colours of glass decorations and aluminium/silver pieces can
change and fade during the washing process. Some types of glass (e.g.
crystal objects) can become opaque after a number of wash cycles too.
DAMAGE TO GLASS AND CROCKERY
• Only use glasses and porcelain guaranteed by the manufacturer
as dishwasher safe.
• Use a delicate detergent suitable for crockery
• Collect glasses and cutlery from the dishwasher as soon as the
wash cycle is over.
HYGIENE
To avoid odour and sediment which can be accumulated in the
dishwasher please run a high temperature program at least once
a month. Use a tea spoon of detergent and run it without the loading
to clean your appliance.
TIPS ON ENERGY SAVING
• When the household dishwasher is used according to the manu-
facturer’s instructions, washing tableware in a dishwasher usu-
ally consumes less energy and water than hand dishwashing.
•In order to maximize dishwasher efciency it is recommended to
initiate the wash cycle once dishwasher is fully loaded. Loading
the household dishwasher up to the capacity indicated by the man-
ufacturer will contribute to energy and water savings. Information
on correct loading of tableware can be found in Loading chapter.
In case of partial loading it is recommended to use dedicated wash
options if available (Half load/ Zone Wash, Multizone), illing up only
selected racks. Incorrect loading or overloading the dishwasher may
increase resources usage (such as water, energy and time, as well
as increase noise level), reducing cleaning and drying performance.
• Manual pre-rinsing of tableware items leads to increased water
and energy consumption and is not recommended.
Unterkorb
Für Töpfe, Deckel, Teller, Salatschüsslen,
Besteck usw.
Große Teller und Deckel sollten
idealerweise an den Seiten platziert
werden, um Behinderungen des
Sprüharms zu vermeiden.
Der Unterkorb verfügt über klappbare
Ablagen, die in vertikaler Stellung für
Teller oder in horizontaler (niedriger)
Position für Pfannen und Salatschüsseln
verwendet werden können.
(Sortierbeispiel für den Unterkorb)
Körbe beladen

Zum Herunterladen der vollständigen Version besuchen Sie bitte www.ikea.com
17DEUTSCH
Wird unser Servicevertragspartner kontaktiert, bitte die Codes
auf dem Typenschild des Produkts angeben.
Die Modellinformation ist über den QR-Code auf der
Energieverbrauchskennzeichnung aufrufbar.
Die Kennzeichnung enthält auch die Modellnummer, die den
Zugang zum
https://eprel.ec.europa.eu Datenbankportal ermöglicht. XXXXXXXXXXXXX XXXXXXXXX
XXXXXXXXXXXXX XXXXXXXXX
XXXXXXXXXXXXX XXXXXXXXX XXXXXXXXXXXXX XXXXXXXXX
XXXXXXXXXXXXX XXXXXXXXXXXXX XXXXXXXXXXXXX
XXXXX
XXXXX
XXXXX
XXXXX
XXXXX
XXXXX
XXXXX
XXXXX
XXXXX
XXXXX
XXXXX
XXXXX
XXXXX
XXXXX
XXXXX
00000
Auf dem Typenschild bendet sich eine 8-stellige Artikelnummer
Auf dem Typenschild bendet sich eine 12-stellige Seriennummer
Was tun, wenn...
Wenn ein Problem an Ihrem Gerät auftritt, prüfen Sie bitte das Kapitel “Was tun wenn...” in der vollständigen Version der
Bedienungsanleitung auf: www.ikea.com.
Technische Daten
IKEA FINPUTSAD 10 220-240
50 C 59 8,7 A/A 10/0,5 4 0,5 41 B
Marke Modell Anzahl an
Maßgede-
cken
Span-
nung (V)
Frequenz
(Hz)
Energie-
ezienz-
klasse
Energieverbrauch
(kWh/100
Spülgänge)
Wasser-
verbrauch (l/
Spülgang)
Reinigen /
Trocknen
Wirkungs-
klasse
Wassereinlass-
druck (Bar)
max., min.
Leistungsaufnahme:
Ge-
räusch-
entwick-
lung
(dB)A
Luft-
schall-
emis-
sions-
klasse
Startvor-
wahl (W) Standby-Mo-
dus (W)

Per scaricare la versione completa visita il sito www.ikea.com
18ITALIANO
Descrizione prodotto
Primo utilizzo
Suggerimento per il primo utilizzo
Prima dell'installazione e del primo utilizzo dell'apparecchio,
leggere attentamente le guide "SICUREZZA e GARANZIA"
e "ISTRUZIONI DI MONTAGGIO" disponibili nella busta del
prodotto. Ricordarsi di rimuovere dalla lavastoviglie tutte le parti
di protezione per il trasporto.
Riempimento del serbatoio del sale
L'uso di sale previene la formazione di CALCARE sulla supercie
dei piatti e sui componenti della macchina.
• È indispensabile che IL SERBATOIO DEL SALE NON SIA MAI
VUOTO.
• È essenziale quindi che il livello di durezza dell'acqua sia stato
impostato.
Il serbatoio del sale è situato nella parte inferiore della
lavastoviglie (vedere DESCRIZIONE DEI PRODOTTO) e deve
essere rifornito ogni volta che l'indicatore di RIEMPIMENTO SALE
ENGLISH
7
Control panel
Product description
1. Upper rack
2. �������
3. Upper rack height adjuster
4. Upper sprayer arm
5. Lower rack
6. Cutlery basket
7. Lower sprayer arm
8. Filter Assembly
9. Salt reservoir
10. Detergent and Rinse Aid dispensers
11. Rating plate
12. Control panel
1
2
3
4
5
6
10
7
11
9
8
First use
ADVICE REGARDING THE FIRST TIME USE
After installation, remove the stoppers from the racks and the
retaining elastic elements from the upper rack.
FILLING THE SALT RESERVOIR
The use of salt prevents the formation of LIMESCALE on the
dishes andon the machine’s functional components.
• It is important that the salt reservoir be never empty.
• It is important to set the water hardness.
The salt reservoir is located in the lower part of the
dishwasher (see PRODUCT DESCRIPTION) and should be
filled when the SALT REFILL indicator light in the
control panel is lit .
1. Remove the lower rack and
unscrew the reservoir cap
(anticlockwise).
2. Only the first time you do this: fill
the salt reservoir with water.
3. Position the funnel (see figure)
and fill the salt reservoir right up
to its edge (approximately 1 kg);
it is not unusual for a little water to
leak out.
4. Remove the funnel and wipe any
salt residue away from the
opening.
1. On-Off/Reset button with indicator light
2. Program selection button
3. Salt refill indicator ligh
4. Rinse Aid refill indicator ligh
5. Program number and delay time indicator
6. Tablet indicator light
7. Display
8. Half Load indicator light
9. Half Load button
10. Delay button
11. START/Pause button with indicator light / Tab
1 2 3 4 5 6 7 8 9 10 11
3sec
h
sul pannello comandi si accende.
1. Togliere il cestello inferiore e svitare
il tappo del serbatoio (ruotare in
senso antiorario).
2. Sistemare opportunamente
l'imbuto (vedere gura) e riempire il
serbatoio del sale no all'orlo (circa
1 kg); Non è inconsueto che l'acqua
trabocchi leggermente.
3. Solo la prima volta: riempire
d'acqua il serbatoio del sale.
4. Togliere l'imbuto ed eliminare
qualsiasi residuo di sale dall'area
circostante l'apertura.
ENGLISH
7
Control panel
Product description
1. Upper rack
2. �������
3. Upper rack height adjuster
4. Upper sprayer arm
5. Lower rack
6. Cutlery basket
7. Lower sprayer arm
8. Filter Assembly
9. Salt reservoir
10. Detergent and Rinse Aid dispensers
11. Rating plate
12. Control panel
1
2
3
4
5
6
10
7
11
9
8
First use
ADVICE REGARDING THE FIRST TIME USE
After installation, remove the stoppers from the racks and the
retaining elastic elements from the upper rack.
FILLING THE SALT RESERVOIR
The use of salt prevents the formation of LIMESCALE on the
dishes andon the machine’s functional components.
• It is important that the salt reservoir be never empty.
• It is important to set the water hardness.
The salt reservoir is located in the lower part of the
dishwasher (see PRODUCT DESCRIPTION) and should be
filled when the SALT REFILL indicator light in the
control panel is lit .
1. Remove the lower rack and
unscrew the reservoir cap
(anticlockwise).
2. Only the first time you do this: fill
the salt reservoir with water.
3. Position the funnel (see figure)
and fill the salt reservoir right up
to its edge (approximately 1 kg);
it is not unusual for a little water to
leak out.
4. Remove the funnel and wipe any
salt residue away from the
opening.
1. On-Off/Reset button with indicator light
2. Program selection button
3. Salt refill indicator ligh
4. Rinse Aid refill indicator ligh
5. Program number and delay time indicator
6. Tablet indicator light
7. Display
8. Half Load indicator light
9. Half Load button
10. Delay button
11. START/Pause button with indicator light / Tab
1 2 3 4 5 6 7 8 9 10 11
3sec
h
Accertarsi che il tappo sia adeguatamente serrato per
evitare l'ingresso di detersivo all'interno della vaschetta
durante il programma di lavaggio (ciò potrebbe causare il
danneggiamento del dispositivo addolcente senza possibilità di
riparazione).
Non appena completata tale procedura, avviare uno dei
programmi senza carico.
Utilizzare soltanto sale di tipo specico per lavastoviglie.
La mancanza di sale nel serbatoio potrebbe danneggiare
l'addolcitore d'acqua e la resistenza per eetto
dell'accumulo di calcare. L'uso del sale è consigliato con
qualsiasi tipo di detersivo per lavastoviglie.
Ogni volta che occorre aggiungere sale, la procedura deve
essere necessariamente eseguita prima dell'inizio del ciclo
di lavaggio per evitare rischi di corrosione.
Impostazione della durezza dell'acqua
Per consentire che il dispositivo addolcente dell'acqua agisca
al meglio, è essenziale che l'impostazione del livello di durezza
dell'acqua tenga conto della sua durezza eettiva nell'utenza
domestica. È possibile ottenere il valore di durezza dell'acqua
nell'utenza domestica rivolgendosi al proprio fornitore. Il
valore predenito per la durezza dell'acqua viene impostato in
fabbrica.
• Azionare l'apparecchio premendo il tasto ACCENSIONE/
SPEGNIMENTO.
• Disattivare l'apparecchio premendo il tasto ACCENSIONE/
SPEGNIMENTO.
• Premere il tasto
ENGLISH
8
• Switch on the appliance by pressing the ON/OFF button.
• Switch off the appliance by pressing the ON/OFF button.
• Hold down button for 5 seconds, until you hear a beep.
• Switch on the appliance by pressing the ON/OFF button.
•
•
The current selection level number and the salt indicator light
������
Press button to select the desired hardness level (see
WATER HARDNESS TABLE).
• Switch off the appliance by pressing the ON/OFF button.
Setting is complete!
Water Hardness Table
Level °dH
German degrees
°fH
French degrees
1 Soft 0 - 6 0 - 10
2 Medium 7 - 11 11 - 20
3 Average 12 - 17 21 - 30
4 Hard 18 - 34 31 - 60
5 Very hard 35 - 50 61 - 90
Make sure the cap is screwed on tightly, so that no detergent can
get into the container during the wash program (this could damage
the water softener beyond repair).
As soon as this procedure is complete, run a program without
loading. The “Pre-Wash” program alone is NOT������
Residual saline solution or grains of salt can lead to corrosion,
irreparably damaging the stainless steel components.
The guarantee is not applicable if faults are caused by such
circumstances.
��������������������������������s.
��������������������������������
heating element may be damaged as a result.
Whenever you need to add salt, it is mandatory to complete
the procedure before the beginning of the washing cycle.
SETTING THE WATER HARDNESS
To allow the water softener to work in a perfect way, it is essential
that the water hardness setting is based on the actual water hard-
ness in your house. This information can be obtained from your local
water supplier. The factory setting is for average (3) water hardness.
FILLING THE RINSE AID DISPENSER
Rinse aid makes dish DRYING easier. The rinse aid dispenser A
should be lled when the RINSE AID REFILL indicator light
in the control panel is lit.
1. Open the dispenser B by pressing and pulling up the tab on
the lid.
2. Carefully introduce the rinse aid as far as the maximum
(110 ml) reference notch of the lling space - avoid spilling it.
If this happens, clean the spill immediately with a dry cloth.
3. Press the lid down until you hear a click to close it.
NEVER pour the rinse aid directly into the tub.
A
B
ADJUSTING THE DOSAGE OF RINSE AID
If you are not completely satised with the drying results, you can
adjust the quantity of rinse aid used.
• Switch the dishwasher on using the ON/OFF button.
• Switch it off using the ON/OFF button.
• Press button three times - a beep will be heard.
• Switch it on using the ON/OFF button.
•
•
The current selection level number and rinse aid indicator light ash.
Press button to select the level of rinse aid quantity to be
supplied.
• Switch it off using the ON/OFF button.
Setting is complete!
If the rinse aid level is set to ZERO (ECO), no rinse aid will be
supplied. The LOW RINSE AID indicator light will not be lit if you
run out of rinse aid. A maximum of 5 levels can be set according to
the dishwasher model. The factory setting is specic to the model,
please follow instruction above to check this for your machine.
•If you see bluish streaks on the dishes, set a low number (1-2).
• If there are drops of water or limescale marks on the dishes,
set a high number (3-4).
FILLING THE DETERGENT DISPENSER
������������������������������
dishwashers.
To achieve the best washing and drying results, the combined
useof detergent, rinse aid liquid and rened salt is required.
We recommend using detergents that do not contain phosphates
or chlorine, as these products are harmful to the environment.
Good washing results also depend on the correct amount of
detergent being used.
Exceeding the stated amount does not result in a more effective
wash and increases environmental pollution.
The amount can be adjusted to the soil level. In the case of
normally soiled items, use approximately either 35g (powder
detergent) or 35ml (liquid detergent) and additional tea spoon of
detergent directly inside the tub. If tablets are used, one tablet
will be enough.
If the crockery is only lightly soiled or if it has been rinsed with
water before being placed in the dishwasher, reduce the amount
of detergent used accordingly (minimum 25 g/ml) e.g. skip the
powder/gel putted inside the tub.
To open the detergent dispenser
press button A.
Introduce the detergent into
the dry dispenser B only.
Place the amount of detergent
for pre-washing directly inside
the tub.
A
B
1.
2.
When measuring out the detergent refer to the mentioned ear-
lier information to add the proper quantity. Inside the dispenser
B there are indications to help the detergent dosing.
Remove detergent residues from the edges of the dispenser
and close the cover until it clicks.
3. Close the lid of the detergent dispenser by pulling it up until
the closing device is secured in place.
The detergent dispenser automatically opens up at the right time
according to the program. If all-in-one detergents are used, we
recommend using the TABLET button, because it adjusts the
program so that the best washing and drying results are always
achieved.
per 5 secondi nché non si sente un
segnale acustico.
• Accendere l'apparecchio premendo rapidamente il tasto ON/
OFF.
• Il numero del livello attualmente selezionato e la spia del sale
lampeggiano.
• Premere il tasto
ENGLISH
8
• Switch on the appliance by pressing the ON/OFF button.
• Switch off the appliance by pressing the ON/OFF button.
• Hold down button for 5 seconds, until you hear a beep.
• Switch on the appliance by pressing the ON/OFF button.
•
•
The current selection level number and the salt indicator light
������
Press button to select the desired hardness level (see
WATER HARDNESS TABLE).
• Switch off the appliance by pressing the ON/OFF button.
Setting is complete!
Water Hardness Table
Level °dH
German degrees
°fH
French degrees
1 Soft 0 - 6 0 - 10
2 Medium 7 - 11 11 - 20
3 Average 12 - 17 21 - 30
4 Hard 18 - 34 31 - 60
5 Very hard 35 - 50 61 - 90
Make sure the cap is screwed on tightly, so that no detergent can
get into the container during the wash program (this could damage
the water softener beyond repair).
As soon as this procedure is complete, run a program without
loading. The “Pre-Wash” program alone is NOT������
Residual saline solution or grains of salt can lead to corrosion,
irreparably damaging the stainless steel components.
The guarantee is not applicable if faults are caused by such
circumstances.
��������������������������������s.
��������������������������������
heating element may be damaged as a result.
Whenever you need to add salt, it is mandatory to complete
the procedure before the beginning of the washing cycle.
SETTING THE WATER HARDNESS
To allow the water softener to work in a perfect way, it is essential
that the water hardness setting is based on the actual water hard-
ness in your house. This information can be obtained from your local
water supplier. The factory setting is for average (3) water hardness.
FILLING THE RINSE AID DISPENSER
Rinse aid makes dish DRYING easier. The rinse aid dispenser A
should be lled when the RINSE AID REFILL indicator light
in the control panel is lit.
1. Open the dispenser B by pressing and pulling up the tab on
the lid.
2. Carefully introduce the rinse aid as far as the maximum
(110 ml) reference notch of the lling space - avoid spilling it.
If this happens, clean the spill immediately with a dry cloth.
3. Press the lid down until you hear a click to close it.
NEVER pour the rinse aid directly into the tub.
A
B
ADJUSTING THE DOSAGE OF RINSE AID
If you are not completely satised with the drying results, you can
adjust the quantity of rinse aid used.
• Switch the dishwasher on using the ON/OFF button.
• Switch it off using the ON/OFF button.
• Press button three times - a beep will be heard.
• Switch it on using the ON/OFF button.
•
•
The current selection level number and rinse aid indicator light ash.
Press button to select the level of rinse aid quantity to be
supplied.
• Switch it off using the ON/OFF button.
Setting is complete!
If the rinse aid level is set to ZERO (ECO), no rinse aid will be
supplied. The LOW RINSE AID indicator light will not be lit if you
run out of rinse aid. A maximum of 5 levels can be set according to
the dishwasher model. The factory setting is specic to the model,
please follow instruction above to check this for your machine.
•If you see bluish streaks on the dishes, set a low number (1-2).
• If there are drops of water or limescale marks on the dishes,
set a high number (3-4).
FILLING THE DETERGENT DISPENSER
������������������������������
dishwashers.
To achieve the best washing and drying results, the combined
useof detergent, rinse aid liquid and rened salt is required.
We recommend using detergents that do not contain phosphates
or chlorine, as these products are harmful to the environment.
Good washing results also depend on the correct amount of
detergent being used.
Exceeding the stated amount does not result in a more effective
wash and increases environmental pollution.
The amount can be adjusted to the soil level. In the case of
normally soiled items, use approximately either 35g (powder
detergent) or 35ml (liquid detergent) and additional tea spoon of
detergent directly inside the tub. If tablets are used, one tablet
will be enough.
If the crockery is only lightly soiled or if it has been rinsed with
water before being placed in the dishwasher, reduce the amount
of detergent used accordingly (minimum 25 g/ml) e.g. skip the
powder/gel putted inside the tub.
To open the detergent dispenser
press button A.
Introduce the detergent into
the dry dispenser B only.
Place the amount of detergent
for pre-washing directly inside
the tub.
A
B
1.
2.
When measuring out the detergent refer to the mentioned ear-
lier information to add the proper quantity. Inside the dispenser
B there are indications to help the detergent dosing.
Remove detergent residues from the edges of the dispenser
and close the cover until it clicks.
3. Close the lid of the detergent dispenser by pulling it up until
the closing device is secured in place.
The detergent dispenser automatically opens up at the right time
according to the program. If all-in-one detergents are used, we
recommend using the TABLET button, because it adjusts the
program so that the best washing and drying results are always
achieved.
per selezionare il livello di durezza
dell'acqua desiderato (vedere la TABELLA DI DUREZZA
DELL'ACQUA).
• Disattivare l'apparecchio premendo il tasto ACCENSIONE/
SPEGNIMENTO. La procedura di impostazione è stata
completata!
Tabella di durezza dell'acqua
Livello °dH
Gradi
tedeschi
°fH
Gradi
francesi
°Clark
Gradi inglesi
1 Dolce 0 - 6 0 - 10 0 - 7
2 Moderatamente
dolce
7 - 11 11 - 20 8 - 14
3 Preimpostato 12 - 16 21 - 29 15 - 20
4 Dura 17 - 34 30 - 60 21 - 42
5 Molto dura 35 - 50 61 - 90 43 - 62
Sistema di addolcimento dell'acqua
L'addolcitore dell’acqua riduce automaticamente la durezza
dell'acqua, prev enendo così la formazione di calcare sul
riscaldatore e contribuendo anche a una migliore ecienza di
pulizia.
Questo sistema si rigenera con il sale, che deve essere perciò
4
2
7
8
10
1
3
5
6
9
11
0000 000 00000
Service:
1 Cestello superiore
2 Cestello portaposate
3 Sponde ribaltabili
4 Regolatore altezza cestello superiore
5 Aspersore superiore
6 Cestello inferiore
7 Aspersore inferiore
8 Gruppo ltro
9 Distributore del sale
10 Distributori per detersivo e brillantante
11 Pannello comandi

Per scaricare la versione completa visita il sito www.ikea.com
19ITALIANO
rabboccato quando il serbatoio del sale è vuoto.
La frequenza di rigenerazione dipende dall'impostazione del
livello di durezza dell'acqua: la rigenerazione avviene una volta
ogni 5 cicli Eco con il livello di durezza dell'acqua impostato a 3.
Il processo di rigenerazione inizia durante il risciacquo nale e
termina nella fase di asciugatura, prima del termine del ciclo.
* Una singola rigenerazione consuma: ~3,5 L di acqua;
* Richiede no a 5 minuti aggiuntivi per il ciclo;
* Consuma meno di 0,005 kWh di energia.
Riempimento del distributore di brillantante
L'utilizzo di brillantante facilita il processo di ASCIUGATURA
delle stoviglie. Il distributore di brillantante A deve essere
riempito ogni volta che si accende la spia di RIEMPIMENTO
BRILLANTANTE
ENGLISH
7
Control panel
Product description
1. Upper rack
2. �������
3. Upper rack height adjuster
4. Upper sprayer arm
5. Lower rack
6. Cutlery basket
7. Lower sprayer arm
8. Filter Assembly
9. Salt reservoir
10. Detergent and Rinse Aid dispensers
11. Rating plate
12. Control panel
1
2
3
4
5
6
10
7
11
9
8
First use
ADVICE REGARDING THE FIRST TIME USE
After installation, remove the stoppers from the racks and the
retaining elastic elements from the upper rack.
FILLING THE SALT RESERVOIR
The use of salt prevents the formation of LIMESCALE on the
dishes andon the machine’s functional components.
• It is important that the salt reservoir be never empty.
• It is important to set the water hardness.
The salt reservoir is located in the lower part of the
dishwasher (see PRODUCT DESCRIPTION) and should be
filled when the SALT REFILL indicator light in the
control panel is lit .
1. Remove the lower rack and
unscrew the reservoir cap
(anticlockwise).
2. Only the first time you do this: fill
the salt reservoir with water.
3. Position the funnel (see figure)
and fill the salt reservoir right up
to its edge (approximately 1 kg);
it is not unusual for a little water to
leak out.
4. Remove the funnel and wipe any
salt residue away from the
opening.
1. On-Off/Reset button with indicator light
2. Program selection button
3. Salt refill indicator ligh
4. Rinse Aid refill indicator ligh
5. Program number and delay time indicator
6. Tablet indicator light
7. Display
8. Half Load indicator light
9. Half Load button
10. Delay button
11. START/Pause button with indicator light / Tab
1 2 3 4 5 6 7 8 9 10 11
3sec
h
sul pannello comandi.
A
B
BA
1. Aprire il distributore B premendo e sollevando la linguetta sul
coperchio.
2. Versare delicatamente il brillantante no al segno che indica
il livello di riferimento massimo (110 ml), ma evitandone
la fuoriuscita. Nel caso in cui ciò si verichi, asciugare
immediatamente il liquido fuoriuscito mediante un panno
asciutto.
3. Abbassare il coperchio no ad avvertire lo scatto che ne
segnala la chiusura.
Non versare MAI il brillantante direttamente all'interno
della vaschetta.
Regolazione del dosaggio di brillantante
Se non si è completamente soddisfatti del processo di
asciugatura, è possibile regolare la quantità di brillantante da
utilizzare.
• Azionare la lavastoviglie agendo sul tasto ACCENSIONE/
SPEGNIMENTO.
• Disattivare la lavastoviglie utilizzando lo stesso tasto
ACCENSIONE/SPEGNIMENTO .
• Premere tre volte il tasto
ENGLISH
8
• Switch on the appliance by pressing the ON/OFF button.
• Switch off the appliance by pressing the ON/OFF button.
• Hold down button for 5 seconds, until you hear a beep.
• Switch on the appliance by pressing the ON/OFF button.
•
•
The current selection level number and the salt indicator light
������
Press button to select the desired hardness level (see
WATER HARDNESS TABLE).
• Switch off the appliance by pressing the ON/OFF button.
Setting is complete!
Water Hardness Table
Level °dH
German degrees
°fH
French degrees
1 Soft 0 - 6 0 - 10
2 Medium 7 - 11 11 - 20
3 Average 12 - 17 21 - 30
4 Hard 18 - 34 31 - 60
5 Very hard 35 - 50 61 - 90
Make sure the cap is screwed on tightly, so that no detergent can
get into the container during the wash program (this could damage
the water softener beyond repair).
As soon as this procedure is complete, run a program without
loading. The “Pre-Wash” program alone is NOT������
Residual saline solution or grains of salt can lead to corrosion,
irreparably damaging the stainless steel components.
The guarantee is not applicable if faults are caused by such
circumstances.
��������������������������������s.
��������������������������������
heating element may be damaged as a result.
Whenever you need to add salt, it is mandatory to complete
the procedure before the beginning of the washing cycle.
SETTING THE WATER HARDNESS
To allow the water softener to work in a perfect way, it is essential
that the water hardness setting is based on the actual water hard-
ness in your house. This information can be obtained from your local
water supplier. The factory setting is for average (3) water hardness.
FILLING THE RINSE AID DISPENSER
Rinse aid makes dish DRYING easier. The rinse aid dispenser A
should be lled when the RINSE AID REFILL indicator light
in the control panel is lit.
1. Open the dispenser B by pressing and pulling up the tab on
the lid.
2. Carefully introduce the rinse aid as far as the maximum
(110 ml) reference notch of the lling space - avoid spilling it.
If this happens, clean the spill immediately with a dry cloth.
3. Press the lid down until you hear a click to close it.
NEVER pour the rinse aid directly into the tub.
A
B
ADJUSTING THE DOSAGE OF RINSE AID
If you are not completely satised with the drying results, you can
adjust the quantity of rinse aid used.
• Switch the dishwasher on using the ON/OFF button.
• Switch it off using the ON/OFF button.
• Press button three times - a beep will be heard.
• Switch it on using the ON/OFF button.
•
•
The current selection level number and rinse aid indicator light ash.
Press button to select the level of rinse aid quantity to be
supplied.
• Switch it off using the ON/OFF button.
Setting is complete!
If the rinse aid level is set to ZERO (ECO), no rinse aid will be
supplied. The LOW RINSE AID indicator light will not be lit if you
run out of rinse aid. A maximum of 5 levels can be set according to
the dishwasher model. The factory setting is specic to the model,
please follow instruction above to check this for your machine.
•If you see bluish streaks on the dishes, set a low number (1-2).
• If there are drops of water or limescale marks on the dishes,
set a high number (3-4).
FILLING THE DETERGENT DISPENSER
������������������������������
dishwashers.
To achieve the best washing and drying results, the combined
useof detergent, rinse aid liquid and rened salt is required.
We recommend using detergents that do not contain phosphates
or chlorine, as these products are harmful to the environment.
Good washing results also depend on the correct amount of
detergent being used.
Exceeding the stated amount does not result in a more effective
wash and increases environmental pollution.
The amount can be adjusted to the soil level. In the case of
normally soiled items, use approximately either 35g (powder
detergent) or 35ml (liquid detergent) and additional tea spoon of
detergent directly inside the tub. If tablets are used, one tablet
will be enough.
If the crockery is only lightly soiled or if it has been rinsed with
water before being placed in the dishwasher, reduce the amount
of detergent used accordingly (minimum 25 g/ml) e.g. skip the
powder/gel putted inside the tub.
To open the detergent dispenser
press button A.
Introduce the detergent into
the dry dispenser B only.
Place the amount of detergent
for pre-washing directly inside
the tub.
A
B
1.
2.
When measuring out the detergent refer to the mentioned ear-
lier information to add the proper quantity. Inside the dispenser
B there are indications to help the detergent dosing.
Remove detergent residues from the edges of the dispenser
and close the cover until it clicks.
3. Close the lid of the detergent dispenser by pulling it up until
the closing device is secured in place.
The detergent dispenser automatically opens up at the right time
according to the program. If all-in-one detergents are used, we
recommend using the TABLET button, because it adjusts the
program so that the best washing and drying results are always
achieved.
: si avverte il segnale
corrispondente.
• Azionare la lavastoviglie mediante il tasto ACCENSIONE/
SPEGNIMENTO.
• Il numero corrispondente alla selezione corrente e la spia del
brillantante lampeggiano entrambi.
• Premere il tasto
ENGLISH
8
• Switch on the appliance by pressing the ON/OFF button.
• Switch off the appliance by pressing the ON/OFF button.
• Hold down button for 5 seconds, until you hear a beep.
• Switch on the appliance by pressing the ON/OFF button.
•
•
The current selection level number and the salt indicator light
������
Press button to select the desired hardness level (see
WATER HARDNESS TABLE).
• Switch off the appliance by pressing the ON/OFF button.
Setting is complete!
Water Hardness Table
Level °dH
German degrees
°fH
French degrees
1 Soft 0 - 6 0 - 10
2 Medium 7 - 11 11 - 20
3 Average 12 - 17 21 - 30
4 Hard 18 - 34 31 - 60
5 Very hard 35 - 50 61 - 90
Make sure the cap is screwed on tightly, so that no detergent can
get into the container during the wash program (this could damage
the water softener beyond repair).
As soon as this procedure is complete, run a program without
loading. The “Pre-Wash” program alone is NOT������
Residual saline solution or grains of salt can lead to corrosion,
irreparably damaging the stainless steel components.
The guarantee is not applicable if faults are caused by such
circumstances.
��������������������������������s.
��������������������������������
heating element may be damaged as a result.
Whenever you need to add salt, it is mandatory to complete
the procedure before the beginning of the washing cycle.
SETTING THE WATER HARDNESS
To allow the water softener to work in a perfect way, it is essential
that the water hardness setting is based on the actual water hard-
ness in your house. This information can be obtained from your local
water supplier. The factory setting is for average (3) water hardness.
FILLING THE RINSE AID DISPENSER
Rinse aid makes dish DRYING easier. The rinse aid dispenser A
should be lled when the RINSE AID REFILL indicator light
in the control panel is lit.
1. Open the dispenser B by pressing and pulling up the tab on
the lid.
2. Carefully introduce the rinse aid as far as the maximum
(110 ml) reference notch of the lling space - avoid spilling it.
If this happens, clean the spill immediately with a dry cloth.
3. Press the lid down until you hear a click to close it.
NEVER pour the rinse aid directly into the tub.
A
B
ADJUSTING THE DOSAGE OF RINSE AID
If you are not completely satised with the drying results, you can
adjust the quantity of rinse aid used.
• Switch the dishwasher on using the ON/OFF button.
• Switch it off using the ON/OFF button.
• Press button three times - a beep will be heard.
• Switch it on using the ON/OFF button.
•
•
The current selection level number and rinse aid indicator light ash.
Press button to select the level of rinse aid quantity to be
supplied.
• Switch it off using the ON/OFF button.
Setting is complete!
If the rinse aid level is set to ZERO (ECO), no rinse aid will be
supplied. The LOW RINSE AID indicator light will not be lit if you
run out of rinse aid. A maximum of 5 levels can be set according to
the dishwasher model. The factory setting is specic to the model,
please follow instruction above to check this for your machine.
•If you see bluish streaks on the dishes, set a low number (1-2).
• If there are drops of water or limescale marks on the dishes,
set a high number (3-4).
FILLING THE DETERGENT DISPENSER
������������������������������
dishwashers.
To achieve the best washing and drying results, the combined
useof detergent, rinse aid liquid and rened salt is required.
We recommend using detergents that do not contain phosphates
or chlorine, as these products are harmful to the environment.
Good washing results also depend on the correct amount of
detergent being used.
Exceeding the stated amount does not result in a more effective
wash and increases environmental pollution.
The amount can be adjusted to the soil level. In the case of
normally soiled items, use approximately either 35g (powder
detergent) or 35ml (liquid detergent) and additional tea spoon of
detergent directly inside the tub. If tablets are used, one tablet
will be enough.
If the crockery is only lightly soiled or if it has been rinsed with
water before being placed in the dishwasher, reduce the amount
of detergent used accordingly (minimum 25 g/ml) e.g. skip the
powder/gel putted inside the tub.
To open the detergent dispenser
press button A.
Introduce the detergent into
the dry dispenser B only.
Place the amount of detergent
for pre-washing directly inside
the tub.
A
B
1.
2.
When measuring out the detergent refer to the mentioned ear-
lier information to add the proper quantity. Inside the dispenser
B there are indications to help the detergent dosing.
Remove detergent residues from the edges of the dispenser
and close the cover until it clicks.
3. Close the lid of the detergent dispenser by pulling it up until
the closing device is secured in place.
The detergent dispenser automatically opens up at the right time
according to the program. If all-in-one detergents are used, we
recommend using the TABLET button, because it adjusts the
program so that the best washing and drying results are always
achieved.
per impostare il livello corrispondente alla
dose di brillantante richiesta.
• Disattivare la lavastoviglie utilizzando lo stesso tasto
ACCENSIONE/SPEGNIMENTO .
La procedura di impostazione è stata completata!
Nel caso in cui il livello di brillantante sia impostato su ZERO
(programma ECOLOGICO), il brillantante non viene erogato.
In caso di esaurimento del brillantante la spia BRILLANTANTE
INSUFFICIENTE non è illuminata. A seconda del modello di
lavastoviglie è possibile impostare al massimo 5 livelli di
dosaggio. Le impostazioni di fabbrica dipendono dal modello;
seguire le istruzioni precedenti in base alle caratteristiche del
proprio apparecchio.
• In presenza di strisce con sfumature blu sulla supercie dei
piatti, impostare un livello di dosaggio basso (1-2).
• In presenza di gocce d'acqua o di calcare sulla supercie dei
piatti impostare invece dosaggi alti (3-4).
Riempimento del distributore di detersivo
L'uso di un detersivo non specico per lavastoviglie
potrebbe causare malfunzionamenti o danni all'apparecchio.
Per aprire il distributore di detersivo premere il tasto C.
Versare il detersivo solo nel distributore D asciutto.
Collocare la quantità di detersivo per il
pre-lavaggio direttamente nella vaschetta.
ENGLISH
8
• Switch on the appliance by pressing the ON/OFF button.
• Switch off the appliance by pressing the ON/OFF button.
• Hold down button for 5 seconds, until you hear a beep.
• Switch on the appliance by pressing the ON/OFF button.
•
•
The current selection level number and the salt indicator light
������
Press button to select the desired hardness level (see
WATER HARDNESS TABLE).
• Switch off the appliance by pressing the ON/OFF button.
Setting is complete!
Water Hardness Table
Level °dH
German degrees
°fH
French degrees
1 Soft 0 - 6 0 - 10
2 Medium 7 - 11 11 - 20
3 Average 12 - 17 21 - 30
4 Hard 18 - 34 31 - 60
5 Very hard 35 - 50 61 - 90
Make sure the cap is screwed on tightly, so that no detergent can
get into the container during the wash program (this could damage
the water softener beyond repair).
As soon as this procedure is complete, run a program without
loading. The “Pre-Wash” program alone is NOT������
Residual saline solution or grains of salt can lead to corrosion,
irreparably damaging the stainless steel components.
The guarantee is not applicable if faults are caused by such
circumstances.
��������������������������������s.
��������������������������������
heating element may be damaged as a result.
Whenever you need to add salt, it is mandatory to complete
the procedure before the beginning of the washing cycle.
SETTING THE WATER HARDNESS
To allow the water softener to work in a perfect way, it is essential
that the water hardness setting is based on the actual water hard-
ness in your house. This information can be obtained from your local
water supplier. The factory setting is for average (3) water hardness.
FILLING THE RINSE AID DISPENSER
Rinse aid makes dish DRYING easier. The rinse aid dispenser A
should be lled when the RINSE AID REFILL indicator light
in the control panel is lit.
1. Open the dispenser B by pressing and pulling up the tab on
the lid.
2. Carefully introduce the rinse aid as far as the maximum
(110 ml) reference notch of the lling space - avoid spilling it.
If this happens, clean the spill immediately with a dry cloth.
3. Press the lid down until you hear a click to close it.
NEVER pour the rinse aid directly into the tub.
A
B
ADJUSTING THE DOSAGE OF RINSE AID
If you are not completely satised with the drying results, you can
adjust the quantity of rinse aid used.
• Switch the dishwasher on using the ON/OFF button.
• Switch it off using the ON/OFF button.
• Press button three times - a beep will be heard.
• Switch it on using the ON/OFF button.
•
•
The current selection level number and rinse aid indicator light ash.
Press button to select the level of rinse aid quantity to be
supplied.
• Switch it off using the ON/OFF button.
Setting is complete!
If the rinse aid level is set to ZERO (ECO), no rinse aid will be
supplied. The LOW RINSE AID indicator light will not be lit if you
run out of rinse aid. A maximum of 5 levels can be set according to
the dishwasher model. The factory setting is specic to the model,
please follow instruction above to check this for your machine.
•If you see bluish streaks on the dishes, set a low number (1-2).
• If there are drops of water or limescale marks on the dishes,
set a high number (3-4).
FILLING THE DETERGENT DISPENSER
������������������������������
dishwashers.
To achieve the best washing and drying results, the combined
useof detergent, rinse aid liquid and rened salt is required.
We recommend using detergents that do not contain phosphates
or chlorine, as these products are harmful to the environment.
Good washing results also depend on the correct amount of
detergent being used.
Exceeding the stated amount does not result in a more effective
wash and increases environmental pollution.
The amount can be adjusted to the soil level. In the case of
normally soiled items, use approximately either 35g (powder
detergent) or 35ml (liquid detergent) and additional tea spoon of
detergent directly inside the tub. If tablets are used, one tablet
will be enough.
If the crockery is only lightly soiled or if it has been rinsed with
water before being placed in the dishwasher, reduce the amount
of detergent used accordingly (minimum 25 g/ml) e.g. skip the
powder/gel putted inside the tub.
To open the detergent dispenser
press button A.
Introduce the detergent into
the dry dispenser B only.
Place the amount of detergent
for pre-washing directly inside
the tub.
A
B
1.
2.
When measuring out the detergent refer to the mentioned ear-
lier information to add the proper quantity. Inside the dispenser
B there are indications to help the detergent dosing.
Remove detergent residues from the edges of the dispenser
and close the cover until it clicks.
3. Close the lid of the detergent dispenser by pulling it up until
the closing device is secured in place.
The detergent dispenser automatically opens up at the right time
according to the program. If all-in-one detergents are used, we
recommend using the TABLET button, because it adjusts the
program so that the best washing and drying results are always
achieved.
D
C
1. Per il dosaggio corretto del detersivo fare riferimento ai dati
sopra riportati. Il distributore D contiene indicatori di livello
per facilitare il dosaggio del detersivo.
2. Eliminare eventuali residui di detersivo dai bordi della
vaschetta e chiudere il coperchio no ad avvertire lo scatto
caratteristico.
3. Chiudere il coperchio della vaschetta sollevandolo no a
portare il dispositivo di chiusura in sede.
Il distributore del detersivo si apre automaticamente quando
previsto dal programma in uso. Se si utilizzano detersivi del
tipo "All in one", si consiglia di servirsi del tasto PASTIGLIA per
impostare il programma in modo da ottenere sempre i migliori
risultati nel lavaggio e nell'asciugatura.
Pannello comandi
1 2 3 4 5 6 8 9 10 11 12 13
7
2
65°
1
50°
56
10 PROGRAMS
3
50°
4
45°
7
50°
8
65°
10
50°-60° 50°
9
65°
h
3sec
1 Tasto Accensione-Spegnimento/Ripristino e relativa
spia
2 Tasto di selezione programmi
3 Spia di riempimento sale
4 Spia di riempimento brillantante
5 programma e indicatore di durata del ritardo
6 Spia pastiglie
7 Display
8 Spia di lavaggio essibile
9 Pulsante di lavaggio essibile
10 Tasto Avvio ritardato
11 Pulsante di tempo ridotto con spia
12 Tasto Extra Dry e relativa spia
13 Tasto AVVIO/Pausa con spia / Pastiglie

Per scaricare la versione completa visita il sito www.ikea.com
20ITALIANO
EN
11
OPTIONS AND FUNCTIONS
OPTIONS can be selected directly by pressing the corresponding button (see CONTROL PANEL).
If an option is not compatible with the selected program see PROGRAMS TABLE, the corresponding LED ashes rapidly 3 times
and beeps will sound. The option will not be enabled.
TABLET (Tab)
This setting allows you to optimize the performance of
the program according to the type of detergent used.
Press the START/PAUSE button for 3 seconds (the
corresponding symbol will light up) if you use combined
detergents in tablet form (rinse aid, salt and detergent in
1 dose).
If you use powder or liquid detergent, this option
should be off.
NaturalDry
NaturalDry is a convection drying system which automatically
opens the door during/after drying phase to ensure exceptional
drying performance every day. Door opens at the temperature
that is safe to your kitchen furniture, thus door will not be opened
when the option of SHORT TIME is on.
As additional steam protection, special designed protection foil is
added together with the dishwasher. To see how to mount protec-
tion foil please refer to (INSTALLATION GUIDE).
NaturalDry functionality could be disabled by the user as follows:
1. Go to the Dishwasher software menu pressing and holding
button (6 sec).
2. You are currently in Light Control Menu (please refer to
OPERATION INDICATOR description), if you don’t want to
change anything please press and hold button (until one of
the two letters appears on the display)
3. You switched to NaturalDry Control Menu, you could change
status of NaturalDry functionality by pressing button:
E – enabled d – disabled
To conrm the change and exit from the Control Menu please
press and hold button (3 sec).
DELAY
The start time of the program may be delayed for a period
of time between 1 and 12 hours.
1. Press the DELAY button: the corresponding «h» symbol
appears on the display; each time you press the button,
the time (1h, 2h, etc. up to max. 12h) from the start of
the selected wash cycle will be increased.
2. Select the wash program, press the START/PAUSE
button and within 4 seconds close the door: the timer
will begin counting down.
3. Once this time has elapsed, the indicator light «h»
switches off and the wash cycle begins.
To adjust the delay time and select a shorter period of time,
press the DELAY button. To cancel it, press the button
repeatedly until the selected delayed start indicator light
«h» switches off.
The DELAY function cannot be set once a wash cycle
has been started.
FLEXI WASH
If there are not many dishes to be washed, a half loading
may be used in order to save water, electricity and
detergent.
Select the program and then press the FLEXI WASH button:
the symbol of the chosen rack will appear on the display.
By default the appliance washes dishes in all racks.
To wash only the specic rack, press this button repeatedly:
shown on the display (only lower rack)
shown on the display (only upper rack)
shown on the display (only cutlery rack)
shown on the display (option is OFF and the appliance will
wash dishes in all racks).
Remember to load the upper or lower rack only, and to
reduce the amount of detergent accordingly.
If upper rack is removed, please apply detergent
directly to tub instead of detergent dispenser.
SHORT TIME
This option can be used to reduce the duration of the main
programs while maintaining the same washing and drying
performance levels.
After selecting the program, press the SHORT TIME button
and the indicator light will switch on. To deselect the option,
press the same button again.
EXTRA DRY
To improve the drying of the dishes, after selecting the
program, press the EXTRA DRY button and the indicator
light comes on.
A higher temperature during the nal rinse and an extended
drying phase allow for improving drying. To deselect the
option, press the same button again. The EXTRA DRY
option results in the lengthening of the wash cycle.
OPERATION INDICATOR
A LED light projected on the oor indicates that the
dishwasher is working. One of the following operating
modes can be selected:
a) Disabled function.
b) When the cycle starts the light goes on for few seconds,
stays off during the cycle and ashes at the end of the
cycle.
c) The light stays on during the cycle and ashes at the
end of the cycle (default mode).
If the delayed start was set, the light goes on either for the
rst few seconds or the entire duration of the countdown,
based on whether mode b) or c) was set.
The light goes off every time the door is opened. To select
the mode you prefer, switch on the machine, hold down
button P until one of the three letters appears on the display,
press button P until you reach the desired letter (or mode),
hold down button P to conrm the selection.
Note: If NaturalDry is active and it opens the door, then
Operation Indicator will not ash at the end of cycle.
LAVAGGIO FLESSIBILE
Nel caso in cui i piatti da lavare siano pochi, per
limitare il consumo di acqua, elettricità e detersivo si
può utilizzare il programma Mezzo carico.
Come sua impostazione predenita, l'apparecchio
esegue il lavaggio in tutti i cestelli.
Per il lavaggio esclusivamente di un cestello in
particolare, premere ripetutamente il tasto in
questione:
EN
11
OPTIONS AND FUNCTIONS
OPTIONS can be selected directly by pressing the corresponding button (see CONTROL PANEL).
If an option is not compatible with the selected program see PROGRAMS TABLE, the corresponding LED ashes rapidly 3 times
and beeps will sound. The option will not be enabled.
TABLET (Tab)
This setting allows you to optimize the performance of
the program according to the type of detergent used.
Press the START/PAUSE button for 3 seconds (the
corresponding symbol will light up) if you use combined
detergents in tablet form (rinse aid, salt and detergent in
1 dose).
If you use powder or liquid detergent, this option
should be off.
NaturalDry
NaturalDry is a convection drying system which automatically
opens the door during/after drying phase to ensure exceptional
drying performance every day. Door opens at the temperature
that is safe to your kitchen furniture, thus door will not be opened
when the option of SHORT TIME is on.
As additional steam protection, special designed protection foil is
added together with the dishwasher. To see how to mount protec-
tion foil please refer to (INSTALLATION GUIDE).
NaturalDry functionality could be disabled by the user as follows:
1. Go to the Dishwasher software menu pressing and holding
button (6 sec).
2. You are currently in Light Control Menu (please refer to
OPERATION INDICATOR description), if you don’t want to
change anything please press and hold button (until one of
the two letters appears on the display)
3. You switched to NaturalDry Control Menu, you could change
status of NaturalDry functionality by pressing button:
E – enabled d – disabled
To conrm the change and exit from the Control Menu please
press and hold button (3 sec).
DELAY
The start time of the program may be delayed for a period
of time between 1 and 12 hours.
1. Press the DELAY button: the corresponding «h» symbol
appears on the display; each time you press the button,
the time (1h, 2h, etc. up to max. 12h) from the start of
the selected wash cycle will be increased.
2. Select the wash program, press the START/PAUSE
button and within 4 seconds close the door: the timer
will begin counting down.
3. Once this time has elapsed, the indicator light «h»
switches off and the wash cycle begins.
To adjust the delay time and select a shorter period of time,
press the DELAY button. To cancel it, press the button
repeatedly until the selected delayed start indicator light
«h» switches off.
The DELAY function cannot be set once a wash cycle
has been started.
FLEXI WASH
If there are not many dishes to be washed, a half loading
may be used in order to save water, electricity and
detergent.
Select the program and then press the FLEXI WASH button:
the symbol of the chosen rack will appear on the display.
By default the appliance washes dishes in all racks.
To wash only the specic rack, press this button repeatedly:
shown on the display (only lower rack)
shown on the display (only upper rack)
shown on the display (only cutlery rack)
shown on the display (option is OFF and the appliance will
wash dishes in all racks).
Remember to load the upper or lower rack only, and to
reduce the amount of detergent accordingly.
If upper rack is removed, please apply detergent
directly to tub instead of detergent dispenser.
SHORT TIME
This option can be used to reduce the duration of the main
programs while maintaining the same washing and drying
performance levels.
After selecting the program, press the SHORT TIME button
and the indicator light will switch on. To deselect the option,
press the same button again.
EXTRA DRY
To improve the drying of the dishes, after selecting the
program, press the EXTRA DRY button and the indicator
light comes on.
A higher temperature during the nal rinse and an extended
drying phase allow for improving drying. To deselect the
option, press the same button again. The EXTRA DRY
option results in the lengthening of the wash cycle.
OPERATION INDICATOR
A LED light projected on the oor indicates that the
dishwasher is working. One of the following operating
modes can be selected:
a) Disabled function.
b) When the cycle starts the light goes on for few seconds,
stays off during the cycle and ashes at the end of the
cycle.
c) The light stays on during the cycle and ashes at the
end of the cycle (default mode).
If the delayed start was set, the light goes on either for the
rst few seconds or the entire duration of the countdown,
based on whether mode b) or c) was set.
The light goes off every time the door is opened. To select
the mode you prefer, switch on the machine, hold down
button P until one of the three letters appears on the display,
press button P until you reach the desired letter (or mode),
hold down button P to conrm the selection.
Note: If NaturalDry is active and it opens the door, then
Operation Indicator will not ash at the end of cycle.
indicato nel display (cestello inferiore soltanto)
indicato nel display (cestello superiore soltanto)
indicato nel display (cestello portaposate soltanto)
indicato nel display (l'opzione è impostata su
Spegnimento e l'apparecchio esegue il lavaggio per
tutti i cestelli).
9
ENGLISH
1. Press the DELAY button: the corresponding «h» symbol
appears on the display; each time you press the button,
the time (1h, 2h, etc. up to max. 12h) from the start of
the selected wash cycle will be increased.
2. Select the wash program, press the START/PAUSE
button and within 4 seconds close the door: the timer
will begin counting down.
3. Once this time has elapsed, the indicator light «h»
switches off and the wash cycle begins.
To adjust the delay time and select a shorter period of time,
press the DELAY button. To cancel it, press the button
repeatedly until the selected delayed start indicator light
«h» switches off.
The DELAY function cannot be set once a wash cycle
has been started.
NaturalDry
Door opening system NaturalDry is a convection drying system
which automatically opens the door during/after drying phase to
ensure exceptional drying performance every day. Door opens at
the temperature that is safe to your kitchen furniture.
As additional steam protection, special designed protection foil is
added together with the dishwasher. To see how to mount protec-
tion foil please refer to (INSTALLATION GUIDE).
NaturalDry functionality could be disabled by the user as follows:
1. Go to the Dishwasher software menu pressing and holding
button (6 sec).
2. You switched to NaturalDry Control Menu, you could change
status of NaturalDry functionality by pressing button:
E – enabled d – disabled
To conrm the change and exit from the Control Menu please
press and hold button (3 sec).
DELAY
The start time of the program may be delayed for a period
of time between 1 and 12 hours.
Program
Drying
phase
Natural
Dry
Available
options *)
Duration of
wash pro-
gram
(h:min)**)
Water
consumption
(litres/cycle)
Energy
consumption
(kWh/cycle)
50° 2:45 12.0 0.92
1 Eco
2 Conventional
wash and dry 55° 2:00 15.0 1.35
3Intensive 65° - 2:30 15.0 1.50
4Fast 50° -- 0:55 11.5 1.10
5Sanitizing 65° - 1:40 11.5 1.30
6Pre-Wash
-
-- 0:10 4.5 0.01
7Self-Clean 65° --0:50 8.0 0.80
ECO program data is measured under laboratory conditions according to European Standard EN 60436:2019.
Note for Test Laboratories: For information on comparative EN testing conditions, please send an email to the following
address: [email protected]
Pre-treatment of the dishes is not needed before any of the programs.
*) Not all options can be used simultaneously.
**) Values given for programes other than the eco program are indicative only. The actual time may vary depending on many
factors such as temperature and pressure of the incoming water, room temperature, amount of detergent, quantity and type of
load, load balancing, additional selected options and sensor calibration.
Standby consumption: Left-on mode consumption: 5 W - Off mode consumption: 0.5 W
PROGRAMS DESCRIPTION
AVVIO RITARDATO
È possibile ritardare l'avvio del programma per un
tempo compreso tra 1 e 12 ore.
1. Premere il tasto AVVIO RITARDATO: sul display
appare il simbolo "h" corrispondente; a ogni
pressione del tasto aumenta l'intervallo di tempo (1
h, 2 h, ecc. no a un massimo di 12 h) tra il momento
in cui i seleziona il programma e l'avvio del ciclo di
lavaggio selezionato.
2. Selezionare il programma di lavaggio, premere
il tasto AVVIO/PAUSA e chiudere la porta entro 4
secondi: Il timer inizia il conto alla rovescia.
3. Una volta trascorso il tempo impostato, l'indicatore
"h" si spegne e inizia il ciclo di lavaggio.
Per regolare il tempo di avvio ritardato e selezionare
un intervallo di tempo inferiore a quello impostato,
premere il tasto AVVIO RITARDATO. Per annullare
l'impostazione, premere ripetutamente il tasto no
allo spegnimento dell'indicatore "h".
Una volta avviato il ciclo di lavaggio, non è più
possibile impostare la funzione di avvio ritardato.
EN
11
OPTIONS AND FUNCTIONS
OPTIONS can be selected directly by pressing the corresponding button (see CONTROL PANEL).
If an option is not compatible with the selected program see PROGRAMS TABLE, the corresponding LED ashes rapidly 3 times
and beeps will sound. The option will not be enabled.
TABLET (Tab)
This setting allows you to optimize the performance of
the program according to the type of detergent used.
Press the START/PAUSE button for 3 seconds (the
corresponding symbol will light up) if you use combined
detergents in tablet form (rinse aid, salt and detergent in
1 dose).
If you use powder or liquid detergent, this option
should be off.
NaturalDry
NaturalDry is a convection drying system which automatically
opens the door during/after drying phase to ensure exceptional
drying performance every day. Door opens at the temperature
that is safe to your kitchen furniture, thus door will not be opened
when the option of SHORT TIME is on.
As additional steam protection, special designed protection foil is
added together with the dishwasher. To see how to mount protec-
tion foil please refer to (INSTALLATION GUIDE).
NaturalDry functionality could be disabled by the user as follows:
1. Go to the Dishwasher software menu pressing and holding
button (6 sec).
2. You are currently in Light Control Menu (please refer to
OPERATION INDICATOR description), if you don’t want to
change anything please press and hold button (until one of
the two letters appears on the display)
3. You switched to NaturalDry Control Menu, you could change
status of NaturalDry functionality by pressing button:
E – enabled d – disabled
To conrm the change and exit from the Control Menu please
press and hold button (3 sec).
DELAY
The start time of the program may be delayed for a period
of time between 1 and 12 hours.
1. Press the DELAY button: the corresponding «h» symbol
appears on the display; each time you press the button,
the time (1h, 2h, etc. up to max. 12h) from the start of
the selected wash cycle will be increased.
2. Select the wash program, press the START/PAUSE
button and within 4 seconds close the door: the timer
will begin counting down.
3. Once this time has elapsed, the indicator light «h»
switches off and the wash cycle begins.
To adjust the delay time and select a shorter period of time,
press the DELAY button. To cancel it, press the button
repeatedly until the selected delayed start indicator light
«h» switches off.
The DELAY function cannot be set once a wash cycle
has been started.
FLEXI WASH
If there are not many dishes to be washed, a half loading
may be used in order to save water, electricity and
detergent.
Select the program and then press the FLEXI WASH button:
the symbol of the chosen rack will appear on the display.
By default the appliance washes dishes in all racks.
To wash only the specic rack, press this button repeatedly:
shown on the display (only lower rack)
shown on the display (only upper rack)
shown on the display (only cutlery rack)
shown on the display (option is OFF and the appliance will
wash dishes in all racks).
Remember to load the upper or lower rack only, and to
reduce the amount of detergent accordingly.
If upper rack is removed, please apply detergent
directly to tub instead of detergent dispenser.
SHORT TIME
This option can be used to reduce the duration of the main
programs while maintaining the same washing and drying
performance levels.
After selecting the program, press the SHORT TIME button
and the indicator light will switch on. To deselect the option,
press the same button again.
EXTRA DRY
To improve the drying of the dishes, after selecting the
program, press the EXTRA DRY button and the indicator
light comes on.
A higher temperature during the nal rinse and an extended
drying phase allow for improving drying. To deselect the
option, press the same button again. The EXTRA DRY
option results in the lengthening of the wash cycle.
OPERATION INDICATOR
A LED light projected on the oor indicates that the
dishwasher is working. One of the following operating
modes can be selected:
a) Disabled function.
b) When the cycle starts the light goes on for few seconds,
stays off during the cycle and ashes at the end of the
cycle.
c) The light stays on during the cycle and ashes at the
end of the cycle (default mode).
If the delayed start was set, the light goes on either for the
rst few seconds or the entire duration of the countdown,
based on whether mode b) or c) was set.
The light goes off every time the door is opened. To select
the mode you prefer, switch on the machine, hold down
button P until one of the three letters appears on the display,
press button P until you reach the desired letter (or mode),
hold down button P to conrm the selection.
Note: If NaturalDry is active and it opens the door, then
Operation Indicator will not ash at the end of cycle.
TEMPO RIDOTTO
Questa opzione consente di ridurre la durata
dei programmi principali mantenendo le stesse
prestazioni. Selezionare un programma, premere il
pulsante TEMPO RIDOTTO e la spia si accende.
Per deselezionare l'opzione in questione premere
nuovamente lo stesso tasto.
EN
11
OPTIONS AND FUNCTIONS
OPTIONS can be selected directly by pressing the corresponding button (see CONTROL PANEL).
If an option is not compatible with the selected program see PROGRAMS TABLE, the corresponding LED ashes rapidly 3 times
and beeps will sound. The option will not be enabled.
TABLET (Tab)
This setting allows you to optimize the performance of
the program according to the type of detergent used.
Press the START/PAUSE button for 3 seconds (the
corresponding symbol will light up) if you use combined
detergents in tablet form (rinse aid, salt and detergent in
1 dose).
If you use powder or liquid detergent, this option
should be off.
NaturalDry
NaturalDry is a convection drying system which automatically
opens the door during/after drying phase to ensure exceptional
drying performance every day. Door opens at the temperature
that is safe to your kitchen furniture, thus door will not be opened
when the option of SHORT TIME is on.
As additional steam protection, special designed protection foil is
added together with the dishwasher. To see how to mount protec-
tion foil please refer to (INSTALLATION GUIDE).
NaturalDry functionality could be disabled by the user as follows:
1. Go to the Dishwasher software menu pressing and holding
button (6 sec).
2. You are currently in Light Control Menu (please refer to
OPERATION INDICATOR description), if you don’t want to
change anything please press and hold button (until one of
the two letters appears on the display)
3. You switched to NaturalDry Control Menu, you could change
status of NaturalDry functionality by pressing button:
E – enabled d – disabled
To conrm the change and exit from the Control Menu please
press and hold button (3 sec).
DELAY
The start time of the program may be delayed for a period
of time between 1 and 12 hours.
1. Press the DELAY button: the corresponding «h» symbol
appears on the display; each time you press the button,
the time (1h, 2h, etc. up to max. 12h) from the start of
the selected wash cycle will be increased.
2. Select the wash program, press the START/PAUSE
button and within 4 seconds close the door: the timer
will begin counting down.
3. Once this time has elapsed, the indicator light «h»
switches off and the wash cycle begins.
To adjust the delay time and select a shorter period of time,
press the DELAY button. To cancel it, press the button
repeatedly until the selected delayed start indicator light
«h» switches off.
The DELAY function cannot be set once a wash cycle
has been started.
FLEXI WASH
If there are not many dishes to be washed, a half loading
may be used in order to save water, electricity and
detergent.
Select the program and then press the FLEXI WASH button:
the symbol of the chosen rack will appear on the display.
By default the appliance washes dishes in all racks.
To wash only the specic rack, press this button repeatedly:
shown on the display (only lower rack)
shown on the display (only upper rack)
shown on the display (only cutlery rack)
shown on the display (option is OFF and the appliance will
wash dishes in all racks).
Remember to load the upper or lower rack only, and to
reduce the amount of detergent accordingly.
If upper rack is removed, please apply detergent
directly to tub instead of detergent dispenser.
SHORT TIME
This option can be used to reduce the duration of the main
programs while maintaining the same washing and drying
performance levels.
After selecting the program, press the SHORT TIME button
and the indicator light will switch on. To deselect the option,
press the same button again.
EXTRA DRY
To improve the drying of the dishes, after selecting the
program, press the EXTRA DRY button and the indicator
light comes on.
A higher temperature during the nal rinse and an extended
drying phase allow for improving drying. To deselect the
option, press the same button again. The EXTRA DRY
option results in the lengthening of the wash cycle.
OPERATION INDICATOR
A LED light projected on the oor indicates that the
dishwasher is working. One of the following operating
modes can be selected:
a) Disabled function.
b) When the cycle starts the light goes on for few seconds,
stays off during the cycle and ashes at the end of the
cycle.
c) The light stays on during the cycle and ashes at the
end of the cycle (default mode).
If the delayed start was set, the light goes on either for the
rst few seconds or the entire duration of the countdown,
based on whether mode b) or c) was set.
The light goes off every time the door is opened. To select
the mode you prefer, switch on the machine, hold down
button P until one of the three letters appears on the display,
press button P until you reach the desired letter (or mode),
hold down button P to conrm the selection.
Note: If NaturalDry is active and it opens the door, then
Operation Indicator will not ash at the end of cycle.
ASCIUGATURA EXTRA
Una temperatura più elevata durante il risciacquo
nale come fase di asciugatura prolungata che
consente di migliorare l'asciugatura.
Dopo aver selezionato il programma richiesto,
premere il tasto EXTRA DRY: la corrispondente spia
si illumina. Per deselezionare l'opzione in questione
premere nuovamente lo stesso tasto. L'opzione
EXTRA DRY comporta una maggior durata del ciclo di
lavaggio.
1. CHECK WATER CONNECTION
Check that the dishwasher is connected to the water supply
and that the tap is open.
2. SWITCH ON THE DISHWASHER
Open the door and press the ON/OFF button.
3.
4.
LOAD THE RACKS (see LOADING THE RACKS)
FILLING THE DETERGENT DISPENSER
(see PROGRAMS TABLE).
5.
6.
7.
CHOOSE THE PROGRAM AND CUSTOMISE THE CYCLE
Select the most appropriate program in accordance with the
type of crockery and its soiling level (see PROGRAMS
DESCRIPTION) by pressing the button.
Select the desired options (see OPTIONS AND FUNCTIONS).
START
Start the wash cycle by pressing START/Pause button (led
is lit) and closing the door within 4 sec. When the program
starts you hear a single beep. If the door was not closed within
4sec., the alarm sound will be played. In this case, open the
door, press START/Pause button and close the door again
within 4 sec.
END OF WASH CYCLE
The end of the wash cycle is indicated by beeps and by the
ashing of the wash cycle number on the display. Open the
door and switch off the appliance by pressing the ON/OFF
button.
Wait for a few minutes before removing the crockery - to avoid
burns. Unload the racks, beginning with the lower one.
The machine will switch off automatically during certain
extended periods of inactivity, in order to minimise electri-
city consumption. If the crockery is only lightly soiled or
if it has been rinsed with water before being placed in the
dishwasher, reduce the amount of detergent used accordingly.
MODIFYING A RUNNING PROGRAM
If a wrong program was selected, it is possible to change it, pro-
vided that it has only just begun: open the door, press and hold
the ON/OFF button, the machine will switch off.
Switch the machine back on using the ON/OFF button and select
the new wash cycle and any desired options; Start the wash cycle
by pressing START/Pause button and closing the door within 4 sec.
ADDING EXTRA CROCKERY
Without switching off the machine, open the door (START/Pause
led starts blinking) (be ware of HOT steam!) and place the
crockery inside the dishwasher. Press the START/Pause button
and close the door within 4 sec., the cycle will resume from the
point at which it was interrupted.
ACCIDENTAL INTERRUPTIONS
If the door is opened during the wash cycle, or if there is a power
cut, the cycle stops. Press the START/Pause button and close
the door within 4 sec., the cycle will resume from the point at
which it was interrupted.
DAILY USE
Functions
1. ECO - Normally soiled crockery. Standard program, the most efficient in terms of its combined energy and water
consumption.
2. NORMAL - Mixed soil. For normally soiled dishes with dried food residues.
3. INTENSIVE - Program recommended for heavily soiled crockery, especially suitable for pans and saucepans (not to be used
for delicate items).
4. PRE-WASH - Use to refresh crockery planned to be washed later. No detergent to be used with this program.
5. FAST - Normally soiled crockery. Everyday cycle, that ensures optimal cleaning performance in shorter time.
6. SANITIZING - Normally or heavily soiled crockery, with additional antibacterial wash. Can be used to perform
maintenance of the dishwasher.
7. SELF- CLEAN - Program to be used to perform maintenance of the dishwasher. It cleans the interior of the appliance
using hot water.
OPTIONS can be selected directly by pressing the corresponding button (see CONTROL PANEL).
If an option is not compatible with the selected program see PROGRAMS TABLE, the corresponding LED � � � �rapidly 3 times
and beeps will sound. The option will not be enabled.
HALF LOAD
If there are not many dishes to be washed, a half load
cycle may be used in order to save water, electricity and
detergent. Select the program and press the HALF LOAD
button: the indicator light will light up. Press the HALF
LOAD button to deselect this option.
Remember to halve the amount of detergent.
To adjust the delay time and select a shorter period of time,
press the DELAY button. To cancel it, press the button
repeatedly until the selected delayed start indicator light
«h» switches off.
The DELAY function cannot be set once a wash cycle
has been started.
TABLET (Tab)
This setting allows you to optimize the performance of
the program according to the type of detergent used.
Press the START/PAUSE button for 3 seconds (the
corresponding symbol will light up) if you use combined
detergents in tablet form (rinse aid, salt and detergent in
1 dose).
If you use powder or liquid detergent, this option
should be off.
1. Go to the Dishwasher software menu pressing and holding
button (6 sec).
2. You switched to NaturalDry Control Menu, you could change
status of NaturalDry functionality by pressing button:
E – enabled d – disabled
To conrm the change and exit from the Control Menu please
press and hold button (3 sec).
Pastiglia
Premere il tasto AVVIO/PAUSA per 3 secondi (la
spia corrispondente si accenderà) se si utilizza un
detersivo combinato in pastiglie (brillantante, sale e
detersivo in un'unica dose).
Se si utilizza un detersivo in polvere o in forma
liquida, questa opzione deve essere disattivata.
EN
11
OPTIONS AND FUNCTIONS
OPTIONS can be selected directly by pressing the corresponding button (see CONTROL PANEL).
If an option is not compatible with the selected program see PROGRAMS TABLE, the corresponding LED ashes rapidly 3 times
and beeps will sound. The option will not be enabled.
TABLET (Tab)
This setting allows you to optimize the performance of
the program according to the type of detergent used.
Press the START/PAUSE button for 3 seconds (the
corresponding symbol will light up) if you use combined
detergents in tablet form (rinse aid, salt and detergent in
1 dose).
If you use powder or liquid detergent, this option
should be off.
NaturalDry
NaturalDry is a convection drying system which automatically
opens the door during/after drying phase to ensure exceptional
drying performance every day. Door opens at the temperature
that is safe to your kitchen furniture, thus door will not be opened
when the option of SHORT TIME is on.
As additional steam protection, special designed protection foil is
added together with the dishwasher. To see how to mount protec-
tion foil please refer to (INSTALLATION GUIDE).
NaturalDry functionality could be disabled by the user as follows:
1. Go to the Dishwasher software menu pressing and holding
button (6 sec).
2. You are currently in Light Control Menu (please refer to
OPERATION INDICATOR description), if you don’t want to
change anything please press and hold button (until one of
the two letters appears on the display)
3. You switched to NaturalDry Control Menu, you could change
status of NaturalDry functionality by pressing button:
E – enabled d – disabled
To conrm the change and exit from the Control Menu please
press and hold button (3 sec).
DELAY
The start time of the program may be delayed for a period
of time between 1 and 12 hours.
1. Press the DELAY button: the corresponding «h» symbol
appears on the display; each time you press the button,
the time (1h, 2h, etc. up to max. 12h) from the start of
the selected wash cycle will be increased.
2. Select the wash program, press the START/PAUSE
button and within 4 seconds close the door: the timer
will begin counting down.
3. Once this time has elapsed, the indicator light «h»
switches off and the wash cycle begins.
To adjust the delay time and select a shorter period of time,
press the DELAY button. To cancel it, press the button
repeatedly until the selected delayed start indicator light
«h» switches off.
The DELAY function cannot be set once a wash cycle
has been started.
FLEXI WASH
If there are not many dishes to be washed, a half loading
may be used in order to save water, electricity and
detergent.
Select the program and then press the FLEXI WASH button:
the symbol of the chosen rack will appear on the display.
By default the appliance washes dishes in all racks.
To wash only the specic rack, press this button repeatedly:
shown on the display (only lower rack)
shown on the display (only upper rack)
shown on the display (only cutlery rack)
shown on the display (option is OFF and the appliance will
wash dishes in all racks).
Remember to load the upper or lower rack only, and to
reduce the amount of detergent accordingly.
If upper rack is removed, please apply detergent
directly to tub instead of detergent dispenser.
SHORT TIME
This option can be used to reduce the duration of the main
programs while maintaining the same washing and drying
performance levels.
After selecting the program, press the SHORT TIME button
and the indicator light will switch on. To deselect the option,
press the same button again.
EXTRA DRY
To improve the drying of the dishes, after selecting the
program, press the EXTRA DRY button and the indicator
light comes on.
A higher temperature during the nal rinse and an extended
drying phase allow for improving drying. To deselect the
option, press the same button again. The EXTRA DRY
option results in the lengthening of the wash cycle.
OPERATION INDICATOR
A LED light projected on the oor indicates that the
dishwasher is working. One of the following operating
modes can be selected:
a) Disabled function.
b) When the cycle starts the light goes on for few seconds,
stays off during the cycle and ashes at the end of the
cycle.
c) The light stays on during the cycle and ashes at the
end of the cycle (default mode).
If the delayed start was set, the light goes on either for the
rst few seconds or the entire duration of the countdown,
based on whether mode b) or c) was set.
The light goes off every time the door is opened. To select
the mode you prefer, switch on the machine, hold down
button P until one of the three letters appears on the display,
press button P until you reach the desired letter (or mode),
hold down button P to conrm the selection.
Note: If NaturalDry is active and it opens the door, then
Operation Indicator will not ash at the end of cycle.
SPIA DI FUNZIONAMENTO
La luce di un LED proiettata sul pavimento segnala
che la lavastoviglie è in funzione.
a) Funzione disattivata.
b) All'avvio del ciclo la spia si accende per alcuni
secondi, rimane spenta durante il ciclo e lampeggia al
termine dello stesso.
c) La spia rimane accesa durante il ciclo di lavaggio e
lampeggia alla sua conclusione (modalità predenita).
A seconda che sia stata impostata la modalità b)
oppure c), in caso di impostazione del programma
di avvio ritardato la spia si illumina rispettivamente
per pochi secondi e per l'intera durata del conto
alla rovescia. La spia si spegne a ogni apertura della
porta.
Per selezionare la modalità preferita, accendere la
macchina, tenere premuto il pulsante
ENGLISH
8
• Switch on the appliance by pressing the ON/OFF button.
• Switch off the appliance by pressing the ON/OFF button.
• Hold down button for 5 seconds, until you hear a beep.
• Switch on the appliance by pressing the ON/OFF button.
•
•
The current selection level number and the salt indicator light
������
Press button to select the desired hardness level (see
WATER HARDNESS TABLE).
• Switch off the appliance by pressing the ON/OFF button.
Setting is complete!
Water Hardness Table
Level °dH
German degrees
°fH
French degrees
1 Soft 0 - 6 0 - 10
2 Medium 7 - 11 11 - 20
3 Average 12 - 17 21 - 30
4 Hard 18 - 34 31 - 60
5 Very hard 35 - 50 61 - 90
Make sure the cap is screwed on tightly, so that no detergent can
get into the container during the wash program (this could damage
the water softener beyond repair).
As soon as this procedure is complete, run a program without
loading. The “Pre-Wash” program alone is NOT������
Residual saline solution or grains of salt can lead to corrosion,
irreparably damaging the stainless steel components.
The guarantee is not applicable if faults are caused by such
circumstances.
��������������������������������s.
��������������������������������
heating element may be damaged as a result.
Whenever you need to add salt, it is mandatory to complete
the procedure before the beginning of the washing cycle.
SETTING THE WATER HARDNESS
To allow the water softener to work in a perfect way, it is essential
that the water hardness setting is based on the actual water hard-
ness in your house. This information can be obtained from your local
water supplier. The factory setting is for average (3) water hardness.
FILLING THE RINSE AID DISPENSER
Rinse aid makes dish DRYING easier. The rinse aid dispenser A
should be lled when the RINSE AID REFILL indicator light
in the control panel is lit.
1. Open the dispenser B by pressing and pulling up the tab on
the lid.
2. Carefully introduce the rinse aid as far as the maximum
(110 ml) reference notch of the lling space - avoid spilling it.
If this happens, clean the spill immediately with a dry cloth.
3. Press the lid down until you hear a click to close it.
NEVER pour the rinse aid directly into the tub.
A
B
ADJUSTING THE DOSAGE OF RINSE AID
If you are not completely satised with the drying results, you can
adjust the quantity of rinse aid used.
• Switch the dishwasher on using the ON/OFF button.
• Switch it off using the ON/OFF button.
• Press button three times - a beep will be heard.
• Switch it on using the ON/OFF button.
•
•
The current selection level number and rinse aid indicator light ash.
Press button to select the level of rinse aid quantity to be
supplied.
• Switch it off using the ON/OFF button.
Setting is complete!
If the rinse aid level is set to ZERO (ECO), no rinse aid will be
supplied. The LOW RINSE AID indicator light will not be lit if you
run out of rinse aid. A maximum of 5 levels can be set according to
the dishwasher model. The factory setting is specic to the model,
please follow instruction above to check this for your machine.
•If you see bluish streaks on the dishes, set a low number (1-2).
• If there are drops of water or limescale marks on the dishes,
set a high number (3-4).
FILLING THE DETERGENT DISPENSER
������������������������������
dishwashers.
To achieve the best washing and drying results, the combined
useof detergent, rinse aid liquid and rened salt is required.
We recommend using detergents that do not contain phosphates
or chlorine, as these products are harmful to the environment.
Good washing results also depend on the correct amount of
detergent being used.
Exceeding the stated amount does not result in a more effective
wash and increases environmental pollution.
The amount can be adjusted to the soil level. In the case of
normally soiled items, use approximately either 35g (powder
detergent) or 35ml (liquid detergent) and additional tea spoon of
detergent directly inside the tub. If tablets are used, one tablet
will be enough.
If the crockery is only lightly soiled or if it has been rinsed with
water before being placed in the dishwasher, reduce the amount
of detergent used accordingly (minimum 25 g/ml) e.g. skip the
powder/gel putted inside the tub.
To open the detergent dispenser
press button A.
Introduce the detergent into
the dry dispenser B only.
Place the amount of detergent
for pre-washing directly inside
the tub.
A
B
1.
2.
When measuring out the detergent refer to the mentioned ear-
lier information to add the proper quantity. Inside the dispenser
B there are indications to help the detergent dosing.
Remove detergent residues from the edges of the dispenser
and close the cover until it clicks.
3. Close the lid of the detergent dispenser by pulling it up until
the closing device is secured in place.
The detergent dispenser automatically opens up at the right time
according to the program. If all-in-one detergents are used, we
recommend using the TABLET button, because it adjusts the
program so that the best washing and drying results are always
achieved.
nché sul
display non compare una delle tre lettere, premere
il pulsante
ENGLISH
8
• Switch on the appliance by pressing the ON/OFF button.
• Switch off the appliance by pressing the ON/OFF button.
• Hold down button for 5 seconds, until you hear a beep.
• Switch on the appliance by pressing the ON/OFF button.
•
•
The current selection level number and the salt indicator light
������
Press button to select the desired hardness level (see
WATER HARDNESS TABLE).
• Switch off the appliance by pressing the ON/OFF button.
Setting is complete!
Water Hardness Table
Level °dH
German degrees
°fH
French degrees
1 Soft 0 - 6 0 - 10
2 Medium 7 - 11 11 - 20
3 Average 12 - 17 21 - 30
4 Hard 18 - 34 31 - 60
5 Very hard 35 - 50 61 - 90
Make sure the cap is screwed on tightly, so that no detergent can
get into the container during the wash program (this could damage
the water softener beyond repair).
As soon as this procedure is complete, run a program without
loading. The “Pre-Wash” program alone is NOT������
Residual saline solution or grains of salt can lead to corrosion,
irreparably damaging the stainless steel components.
The guarantee is not applicable if faults are caused by such
circumstances.
��������������������������������s.
��������������������������������
heating element may be damaged as a result.
Whenever you need to add salt, it is mandatory to complete
the procedure before the beginning of the washing cycle.
SETTING THE WATER HARDNESS
To allow the water softener to work in a perfect way, it is essential
that the water hardness setting is based on the actual water hard-
ness in your house. This information can be obtained from your local
water supplier. The factory setting is for average (3) water hardness.
FILLING THE RINSE AID DISPENSER
Rinse aid makes dish DRYING easier. The rinse aid dispenser A
should be lled when the RINSE AID REFILL indicator light
in the control panel is lit.
1. Open the dispenser B by pressing and pulling up the tab on
the lid.
2. Carefully introduce the rinse aid as far as the maximum
(110 ml) reference notch of the lling space - avoid spilling it.
If this happens, clean the spill immediately with a dry cloth.
3. Press the lid down until you hear a click to close it.
NEVER pour the rinse aid directly into the tub.
A
B
ADJUSTING THE DOSAGE OF RINSE AID
If you are not completely satised with the drying results, you can
adjust the quantity of rinse aid used.
• Switch the dishwasher on using the ON/OFF button.
• Switch it off using the ON/OFF button.
• Press button three times - a beep will be heard.
• Switch it on using the ON/OFF button.
•
•
The current selection level number and rinse aid indicator light ash.
Press button to select the level of rinse aid quantity to be
supplied.
• Switch it off using the ON/OFF button.
Setting is complete!
If the rinse aid level is set to ZERO (ECO), no rinse aid will be
supplied. The LOW RINSE AID indicator light will not be lit if you
run out of rinse aid. A maximum of 5 levels can be set according to
the dishwasher model. The factory setting is specic to the model,
please follow instruction above to check this for your machine.
•If you see bluish streaks on the dishes, set a low number (1-2).
• If there are drops of water or limescale marks on the dishes,
set a high number (3-4).
FILLING THE DETERGENT DISPENSER
������������������������������
dishwashers.
To achieve the best washing and drying results, the combined
useof detergent, rinse aid liquid and rened salt is required.
We recommend using detergents that do not contain phosphates
or chlorine, as these products are harmful to the environment.
Good washing results also depend on the correct amount of
detergent being used.
Exceeding the stated amount does not result in a more effective
wash and increases environmental pollution.
The amount can be adjusted to the soil level. In the case of
normally soiled items, use approximately either 35g (powder
detergent) or 35ml (liquid detergent) and additional tea spoon of
detergent directly inside the tub. If tablets are used, one tablet
will be enough.
If the crockery is only lightly soiled or if it has been rinsed with
water before being placed in the dishwasher, reduce the amount
of detergent used accordingly (minimum 25 g/ml) e.g. skip the
powder/gel putted inside the tub.
To open the detergent dispenser
press button A.
Introduce the detergent into
the dry dispenser B only.
Place the amount of detergent
for pre-washing directly inside
the tub.
A
B
1.
2.
When measuring out the detergent refer to the mentioned ear-
lier information to add the proper quantity. Inside the dispenser
B there are indications to help the detergent dosing.
Remove detergent residues from the edges of the dispenser
and close the cover until it clicks.
3. Close the lid of the detergent dispenser by pulling it up until
the closing device is secured in place.
The detergent dispenser automatically opens up at the right time
according to the program. If all-in-one detergents are used, we
recommend using the TABLET button, because it adjusts the
program so that the best washing and drying results are always
achieved.
no a raggiungere la lettera (o la
modalità) desiderata, tenere premuto il pulsante
ENGLISH
8
• Switch on the appliance by pressing the ON/OFF button.
• Switch off the appliance by pressing the ON/OFF button.
• Hold down button for 5 seconds, until you hear a beep.
• Switch on the appliance by pressing the ON/OFF button.
•
•
The current selection level number and the salt indicator light
������
Press button to select the desired hardness level (see
WATER HARDNESS TABLE).
• Switch off the appliance by pressing the ON/OFF button.
Setting is complete!
Water Hardness Table
Level °dH
German degrees
°fH
French degrees
1 Soft 0 - 6 0 - 10
2 Medium 7 - 11 11 - 20
3 Average 12 - 17 21 - 30
4 Hard 18 - 34 31 - 60
5 Very hard 35 - 50 61 - 90
Make sure the cap is screwed on tightly, so that no detergent can
get into the container during the wash program (this could damage
the water softener beyond repair).
As soon as this procedure is complete, run a program without
loading. The “Pre-Wash” program alone is NOT������
Residual saline solution or grains of salt can lead to corrosion,
irreparably damaging the stainless steel components.
The guarantee is not applicable if faults are caused by such
circumstances.
��������������������������������s.
��������������������������������
heating element may be damaged as a result.
Whenever you need to add salt, it is mandatory to complete
the procedure before the beginning of the washing cycle.
SETTING THE WATER HARDNESS
To allow the water softener to work in a perfect way, it is essential
that the water hardness setting is based on the actual water hard-
ness in your house. This information can be obtained from your local
water supplier. The factory setting is for average (3) water hardness.
FILLING THE RINSE AID DISPENSER
Rinse aid makes dish DRYING easier. The rinse aid dispenser A
should be lled when the RINSE AID REFILL indicator light
in the control panel is lit.
1. Open the dispenser B by pressing and pulling up the tab on
the lid.
2. Carefully introduce the rinse aid as far as the maximum
(110 ml) reference notch of the lling space - avoid spilling it.
If this happens, clean the spill immediately with a dry cloth.
3. Press the lid down until you hear a click to close it.
NEVER pour the rinse aid directly into the tub.
A
B
ADJUSTING THE DOSAGE OF RINSE AID
If you are not completely satised with the drying results, you can
adjust the quantity of rinse aid used.
• Switch the dishwasher on using the ON/OFF button.
• Switch it off using the ON/OFF button.
• Press button three times - a beep will be heard.
• Switch it on using the ON/OFF button.
•
•
The current selection level number and rinse aid indicator light ash.
Press button to select the level of rinse aid quantity to be
supplied.
• Switch it off using the ON/OFF button.
Setting is complete!
If the rinse aid level is set to ZERO (ECO), no rinse aid will be
supplied. The LOW RINSE AID indicator light will not be lit if you
run out of rinse aid. A maximum of 5 levels can be set according to
the dishwasher model. The factory setting is specic to the model,
please follow instruction above to check this for your machine.
•If you see bluish streaks on the dishes, set a low number (1-2).
• If there are drops of water or limescale marks on the dishes,
set a high number (3-4).
FILLING THE DETERGENT DISPENSER
������������������������������
dishwashers.
To achieve the best washing and drying results, the combined
useof detergent, rinse aid liquid and rened salt is required.
We recommend using detergents that do not contain phosphates
or chlorine, as these products are harmful to the environment.
Good washing results also depend on the correct amount of
detergent being used.
Exceeding the stated amount does not result in a more effective
wash and increases environmental pollution.
The amount can be adjusted to the soil level. In the case of
normally soiled items, use approximately either 35g (powder
detergent) or 35ml (liquid detergent) and additional tea spoon of
detergent directly inside the tub. If tablets are used, one tablet
will be enough.
If the crockery is only lightly soiled or if it has been rinsed with
water before being placed in the dishwasher, reduce the amount
of detergent used accordingly (minimum 25 g/ml) e.g. skip the
powder/gel putted inside the tub.
To open the detergent dispenser
press button A.
Introduce the detergent into
the dry dispenser B only.
Place the amount of detergent
for pre-washing directly inside
the tub.
A
B
1.
2.
When measuring out the detergent refer to the mentioned ear-
lier information to add the proper quantity. Inside the dispenser
B there are indications to help the detergent dosing.
Remove detergent residues from the edges of the dispenser
and close the cover until it clicks.
3. Close the lid of the detergent dispenser by pulling it up until
the closing device is secured in place.
The detergent dispenser automatically opens up at the right time
according to the program. If all-in-one detergents are used, we
recommend using the TABLET button, because it adjusts the
program so that the best washing and drying results are always
achieved.
per confermare la selezione.
Se NaturalDry è attivo e apre lo sportello, l'indicatore
di funzionamento non lampeggia alla ne del ciclo.
NATURALDRY
Il sistema NaturalDry è una funzione di asciugatura a
convezione che apre automaticamente la porta durante/dopo
la fase di asciugatura per garantire stoviglie perfettamente
asciutte dopo ogni lavaggio. La porta non viene aperta quando
è attiva l'opzione TEMPO RIDOTTO a causa delle temperature
elevate. Non tirare fuori le stoviglie subito dopo l'apertura della
porta, ma attendere per un'asciugatura adeguata.
La funzione non può essere attivata per tutti i programmi,
fare riferimento alla tabella dei programmi. Come ulteriore
protezione dal vapore, la lavastoviglie viene fornita con una
speciale lamina di protezione aggiuntiva. Per istruzioni sul
montaggio della lamina protettiva, vedere le (ISTRUZIONI DI
MONTAGGIO).
La funzione NaturalDry può essere disabilitata come segue:
1. Accedere al menu della spia di funzionamento come
nell'ultimo passaggio, premere a lungo
ENGLISH
8
• Switch on the appliance by pressing the ON/OFF button.
• Switch off the appliance by pressing the ON/OFF button.
• Hold down button for 5 seconds, until you hear a beep.
• Switch on the appliance by pressing the ON/OFF button.
•
•
The current selection level number and the salt indicator light
������
Press button to select the desired hardness level (see
WATER HARDNESS TABLE).
• Switch off the appliance by pressing the ON/OFF button.
Setting is complete!
Water Hardness Table
Level °dH
German degrees
°fH
French degrees
1 Soft 0 - 6 0 - 10
2 Medium 7 - 11 11 - 20
3 Average 12 - 17 21 - 30
4 Hard 18 - 34 31 - 60
5 Very hard 35 - 50 61 - 90
Make sure the cap is screwed on tightly, so that no detergent can
get into the container during the wash program (this could damage
the water softener beyond repair).
As soon as this procedure is complete, run a program without
loading. The “Pre-Wash” program alone is NOT������
Residual saline solution or grains of salt can lead to corrosion,
irreparably damaging the stainless steel components.
The guarantee is not applicable if faults are caused by such
circumstances.
��������������������������������s.
��������������������������������
heating element may be damaged as a result.
Whenever you need to add salt, it is mandatory to complete
the procedure before the beginning of the washing cycle.
SETTING THE WATER HARDNESS
To allow the water softener to work in a perfect way, it is essential
that the water hardness setting is based on the actual water hard-
ness in your house. This information can be obtained from your local
water supplier. The factory setting is for average (3) water hardness.
FILLING THE RINSE AID DISPENSER
Rinse aid makes dish DRYING easier. The rinse aid dispenser A
should be lled when the RINSE AID REFILL indicator light
in the control panel is lit.
1. Open the dispenser B by pressing and pulling up the tab on
the lid.
2. Carefully introduce the rinse aid as far as the maximum
(110 ml) reference notch of the lling space - avoid spilling it.
If this happens, clean the spill immediately with a dry cloth.
3. Press the lid down until you hear a click to close it.
NEVER pour the rinse aid directly into the tub.
A
B
ADJUSTING THE DOSAGE OF RINSE AID
If you are not completely satised with the drying results, you can
adjust the quantity of rinse aid used.
• Switch the dishwasher on using the ON/OFF button.
• Switch it off using the ON/OFF button.
• Press button three times - a beep will be heard.
• Switch it on using the ON/OFF button.
•
•
The current selection level number and rinse aid indicator light ash.
Press button to select the level of rinse aid quantity to be
supplied.
• Switch it off using the ON/OFF button.
Setting is complete!
If the rinse aid level is set to ZERO (ECO), no rinse aid will be
supplied. The LOW RINSE AID indicator light will not be lit if you
run out of rinse aid. A maximum of 5 levels can be set according to
the dishwasher model. The factory setting is specic to the model,
please follow instruction above to check this for your machine.
•If you see bluish streaks on the dishes, set a low number (1-2).
• If there are drops of water or limescale marks on the dishes,
set a high number (3-4).
FILLING THE DETERGENT DISPENSER
������������������������������
dishwashers.
To achieve the best washing and drying results, the combined
useof detergent, rinse aid liquid and rened salt is required.
We recommend using detergents that do not contain phosphates
or chlorine, as these products are harmful to the environment.
Good washing results also depend on the correct amount of
detergent being used.
Exceeding the stated amount does not result in a more effective
wash and increases environmental pollution.
The amount can be adjusted to the soil level. In the case of
normally soiled items, use approximately either 35g (powder
detergent) or 35ml (liquid detergent) and additional tea spoon of
detergent directly inside the tub. If tablets are used, one tablet
will be enough.
If the crockery is only lightly soiled or if it has been rinsed with
water before being placed in the dishwasher, reduce the amount
of detergent used accordingly (minimum 25 g/ml) e.g. skip the
powder/gel putted inside the tub.
To open the detergent dispenser
press button A.
Introduce the detergent into
the dry dispenser B only.
Place the amount of detergent
for pre-washing directly inside
the tub.
A
B
1.
2.
When measuring out the detergent refer to the mentioned ear-
lier information to add the proper quantity. Inside the dispenser
B there are indications to help the detergent dosing.
Remove detergent residues from the edges of the dispenser
and close the cover until it clicks.
3. Close the lid of the detergent dispenser by pulling it up until
the closing device is secured in place.
The detergent dispenser automatically opens up at the right time
according to the program. If all-in-one detergents are used, we
recommend using the TABLET button, because it adjusts the
program so that the best washing and drying results are always
achieved.
nché non
compare il menu.
2. Premere nuovamente
ENGLISH
8
• Switch on the appliance by pressing the ON/OFF button.
• Switch off the appliance by pressing the ON/OFF button.
• Hold down button for 5 seconds, until you hear a beep.
• Switch on the appliance by pressing the ON/OFF button.
•
•
The current selection level number and the salt indicator light
������
Press button to select the desired hardness level (see
WATER HARDNESS TABLE).
• Switch off the appliance by pressing the ON/OFF button.
Setting is complete!
Water Hardness Table
Level °dH
German degrees
°fH
French degrees
1 Soft 0 - 6 0 - 10
2 Medium 7 - 11 11 - 20
3 Average 12 - 17 21 - 30
4 Hard 18 - 34 31 - 60
5 Very hard 35 - 50 61 - 90
Make sure the cap is screwed on tightly, so that no detergent can
get into the container during the wash program (this could damage
the water softener beyond repair).
As soon as this procedure is complete, run a program without
loading. The “Pre-Wash” program alone is NOT������
Residual saline solution or grains of salt can lead to corrosion,
irreparably damaging the stainless steel components.
The guarantee is not applicable if faults are caused by such
circumstances.
��������������������������������s.
��������������������������������
heating element may be damaged as a result.
Whenever you need to add salt, it is mandatory to complete
the procedure before the beginning of the washing cycle.
SETTING THE WATER HARDNESS
To allow the water softener to work in a perfect way, it is essential
that the water hardness setting is based on the actual water hard-
ness in your house. This information can be obtained from your local
water supplier. The factory setting is for average (3) water hardness.
FILLING THE RINSE AID DISPENSER
Rinse aid makes dish DRYING easier. The rinse aid dispenser A
should be lled when the RINSE AID REFILL indicator light
in the control panel is lit.
1. Open the dispenser B by pressing and pulling up the tab on
the lid.
2. Carefully introduce the rinse aid as far as the maximum
(110 ml) reference notch of the lling space - avoid spilling it.
If this happens, clean the spill immediately with a dry cloth.
3. Press the lid down until you hear a click to close it.
NEVER pour the rinse aid directly into the tub.
A
B
ADJUSTING THE DOSAGE OF RINSE AID
If you are not completely satised with the drying results, you can
adjust the quantity of rinse aid used.
• Switch the dishwasher on using the ON/OFF button.
• Switch it off using the ON/OFF button.
• Press button three times - a beep will be heard.
• Switch it on using the ON/OFF button.
•
•
The current selection level number and rinse aid indicator light ash.
Press button to select the level of rinse aid quantity to be
supplied.
• Switch it off using the ON/OFF button.
Setting is complete!
If the rinse aid level is set to ZERO (ECO), no rinse aid will be
supplied. The LOW RINSE AID indicator light will not be lit if you
run out of rinse aid. A maximum of 5 levels can be set according to
the dishwasher model. The factory setting is specic to the model,
please follow instruction above to check this for your machine.
•If you see bluish streaks on the dishes, set a low number (1-2).
• If there are drops of water or limescale marks on the dishes,
set a high number (3-4).
FILLING THE DETERGENT DISPENSER
������������������������������
dishwashers.
To achieve the best washing and drying results, the combined
useof detergent, rinse aid liquid and rened salt is required.
We recommend using detergents that do not contain phosphates
or chlorine, as these products are harmful to the environment.
Good washing results also depend on the correct amount of
detergent being used.
Exceeding the stated amount does not result in a more effective
wash and increases environmental pollution.
The amount can be adjusted to the soil level. In the case of
normally soiled items, use approximately either 35g (powder
detergent) or 35ml (liquid detergent) and additional tea spoon of
detergent directly inside the tub. If tablets are used, one tablet
will be enough.
If the crockery is only lightly soiled or if it has been rinsed with
water before being placed in the dishwasher, reduce the amount
of detergent used accordingly (minimum 25 g/ml) e.g. skip the
powder/gel putted inside the tub.
To open the detergent dispenser
press button A.
Introduce the detergent into
the dry dispenser B only.
Place the amount of detergent
for pre-washing directly inside
the tub.
A
B
1.
2.
When measuring out the detergent refer to the mentioned ear-
lier information to add the proper quantity. Inside the dispenser
B there are indications to help the detergent dosing.
Remove detergent residues from the edges of the dispenser
and close the cover until it clicks.
3. Close the lid of the detergent dispenser by pulling it up until
the closing device is secured in place.
The detergent dispenser automatically opens up at the right time
according to the program. If all-in-one detergents are used, we
recommend using the TABLET button, because it adjusts the
program so that the best washing and drying results are always
achieved.
per 6 secondi per accedere al menu
NaturalDry.
3. Accedendo al menu di controllo NaturalDry è possibile
cambiare lo stato della funzione premendo il tasto :
ENGLISH
8
• Switch on the appliance by pressing the ON/OFF button.
• Switch off the appliance by pressing the ON/OFF button.
• Hold down button for 5 seconds, until you hear a beep.
• Switch on the appliance by pressing the ON/OFF button.
•
•
The current selection level number and the salt indicator light
������
Press button to select the desired hardness level (see
WATER HARDNESS TABLE).
• Switch off the appliance by pressing the ON/OFF button.
Setting is complete!
Water Hardness Table
Level °dH
German degrees
°fH
French degrees
1 Soft 0 - 6 0 - 10
2 Medium 7 - 11 11 - 20
3 Average 12 - 17 21 - 30
4 Hard 18 - 34 31 - 60
5 Very hard 35 - 50 61 - 90
Make sure the cap is screwed on tightly, so that no detergent can
get into the container during the wash program (this could damage
the water softener beyond repair).
As soon as this procedure is complete, run a program without
loading. The “Pre-Wash” program alone is NOT������
Residual saline solution or grains of salt can lead to corrosion,
irreparably damaging the stainless steel components.
The guarantee is not applicable if faults are caused by such
circumstances.
��������������������������������s.
��������������������������������
heating element may be damaged as a result.
Whenever you need to add salt, it is mandatory to complete
the procedure before the beginning of the washing cycle.
SETTING THE WATER HARDNESS
To allow the water softener to work in a perfect way, it is essential
that the water hardness setting is based on the actual water hard-
ness in your house. This information can be obtained from your local
water supplier. The factory setting is for average (3) water hardness.
FILLING THE RINSE AID DISPENSER
Rinse aid makes dish DRYING easier. The rinse aid dispenser A
should be lled when the RINSE AID REFILL indicator light
in the control panel is lit.
1. Open the dispenser B by pressing and pulling up the tab on
the lid.
2. Carefully introduce the rinse aid as far as the maximum
(110 ml) reference notch of the lling space - avoid spilling it.
If this happens, clean the spill immediately with a dry cloth.
3. Press the lid down until you hear a click to close it.
NEVER pour the rinse aid directly into the tub.
A
B
ADJUSTING THE DOSAGE OF RINSE AID
If you are not completely satised with the drying results, you can
adjust the quantity of rinse aid used.
• Switch the dishwasher on using the ON/OFF button.
• Switch it off using the ON/OFF button.
• Press button three times - a beep will be heard.
• Switch it on using the ON/OFF button.
•
•
The current selection level number and rinse aid indicator light ash.
Press button to select the level of rinse aid quantity to be
supplied.
• Switch it off using the ON/OFF button.
Setting is complete!
If the rinse aid level is set to ZERO (ECO), no rinse aid will be
supplied. The LOW RINSE AID indicator light will not be lit if you
run out of rinse aid. A maximum of 5 levels can be set according to
the dishwasher model. The factory setting is specic to the model,
please follow instruction above to check this for your machine.
•If you see bluish streaks on the dishes, set a low number (1-2).
• If there are drops of water or limescale marks on the dishes,
set a high number (3-4).
FILLING THE DETERGENT DISPENSER
������������������������������
dishwashers.
To achieve the best washing and drying results, the combined
useof detergent, rinse aid liquid and rened salt is required.
We recommend using detergents that do not contain phosphates
or chlorine, as these products are harmful to the environment.
Good washing results also depend on the correct amount of
detergent being used.
Exceeding the stated amount does not result in a more effective
wash and increases environmental pollution.
The amount can be adjusted to the soil level. In the case of
normally soiled items, use approximately either 35g (powder
detergent) or 35ml (liquid detergent) and additional tea spoon of
detergent directly inside the tub. If tablets are used, one tablet
will be enough.
If the crockery is only lightly soiled or if it has been rinsed with
water before being placed in the dishwasher, reduce the amount
of detergent used accordingly (minimum 25 g/ml) e.g. skip the
powder/gel putted inside the tub.
To open the detergent dispenser
press button A.
Introduce the detergent into
the dry dispenser B only.
Place the amount of detergent
for pre-washing directly inside
the tub.
A
B
1.
2.
When measuring out the detergent refer to the mentioned ear-
lier information to add the proper quantity. Inside the dispenser
B there are indications to help the detergent dosing.
Remove detergent residues from the edges of the dispenser
and close the cover until it clicks.
3. Close the lid of the detergent dispenser by pulling it up until
the closing device is secured in place.
The detergent dispenser automatically opens up at the right time
according to the program. If all-in-one detergents are used, we
recommend using the TABLET button, because it adjusts the
program so that the best washing and drying results are always
achieved.
E – attivato d – disattivato.
Per confermare la modica e uscire dal menu di controllo,
premere a lungo il tasto
ENGLISH
8
• Switch on the appliance by pressing the ON/OFF button.
• Switch off the appliance by pressing the ON/OFF button.
• Hold down button for 5 seconds, until you hear a beep.
• Switch on the appliance by pressing the ON/OFF button.
•
•
The current selection level number and the salt indicator light
������
Press button to select the desired hardness level (see
WATER HARDNESS TABLE).
• Switch off the appliance by pressing the ON/OFF button.
Setting is complete!
Water Hardness Table
Level °dH
German degrees
°fH
French degrees
1 Soft 0 - 6 0 - 10
2 Medium 7 - 11 11 - 20
3 Average 12 - 17 21 - 30
4 Hard 18 - 34 31 - 60
5 Very hard 35 - 50 61 - 90
Make sure the cap is screwed on tightly, so that no detergent can
get into the container during the wash program (this could damage
the water softener beyond repair).
As soon as this procedure is complete, run a program without
loading. The “Pre-Wash” program alone is NOT������
Residual saline solution or grains of salt can lead to corrosion,
irreparably damaging the stainless steel components.
The guarantee is not applicable if faults are caused by such
circumstances.
��������������������������������s.
��������������������������������
heating element may be damaged as a result.
Whenever you need to add salt, it is mandatory to complete
the procedure before the beginning of the washing cycle.
SETTING THE WATER HARDNESS
To allow the water softener to work in a perfect way, it is essential
that the water hardness setting is based on the actual water hard-
ness in your house. This information can be obtained from your local
water supplier. The factory setting is for average (3) water hardness.
FILLING THE RINSE AID DISPENSER
Rinse aid makes dish DRYING easier. The rinse aid dispenser A
should be lled when the RINSE AID REFILL indicator light
in the control panel is lit.
1. Open the dispenser B by pressing and pulling up the tab on
the lid.
2. Carefully introduce the rinse aid as far as the maximum
(110 ml) reference notch of the lling space - avoid spilling it.
If this happens, clean the spill immediately with a dry cloth.
3. Press the lid down until you hear a click to close it.
NEVER pour the rinse aid directly into the tub.
A
B
ADJUSTING THE DOSAGE OF RINSE AID
If you are not completely satised with the drying results, you can
adjust the quantity of rinse aid used.
• Switch the dishwasher on using the ON/OFF button.
• Switch it off using the ON/OFF button.
• Press button three times - a beep will be heard.
• Switch it on using the ON/OFF button.
•
•
The current selection level number and rinse aid indicator light ash.
Press button to select the level of rinse aid quantity to be
supplied.
• Switch it off using the ON/OFF button.
Setting is complete!
If the rinse aid level is set to ZERO (ECO), no rinse aid will be
supplied. The LOW RINSE AID indicator light will not be lit if you
run out of rinse aid. A maximum of 5 levels can be set according to
the dishwasher model. The factory setting is specic to the model,
please follow instruction above to check this for your machine.
•If you see bluish streaks on the dishes, set a low number (1-2).
• If there are drops of water or limescale marks on the dishes,
set a high number (3-4).
FILLING THE DETERGENT DISPENSER
������������������������������
dishwashers.
To achieve the best washing and drying results, the combined
useof detergent, rinse aid liquid and rened salt is required.
We recommend using detergents that do not contain phosphates
or chlorine, as these products are harmful to the environment.
Good washing results also depend on the correct amount of
detergent being used.
Exceeding the stated amount does not result in a more effective
wash and increases environmental pollution.
The amount can be adjusted to the soil level. In the case of
normally soiled items, use approximately either 35g (powder
detergent) or 35ml (liquid detergent) and additional tea spoon of
detergent directly inside the tub. If tablets are used, one tablet
will be enough.
If the crockery is only lightly soiled or if it has been rinsed with
water before being placed in the dishwasher, reduce the amount
of detergent used accordingly (minimum 25 g/ml) e.g. skip the
powder/gel putted inside the tub.
To open the detergent dispenser
press button A.
Introduce the detergent into
the dry dispenser B only.
Place the amount of detergent
for pre-washing directly inside
the tub.
A
B
1.
2.
When measuring out the detergent refer to the mentioned ear-
lier information to add the proper quantity. Inside the dispenser
B there are indications to help the detergent dosing.
Remove detergent residues from the edges of the dispenser
and close the cover until it clicks.
3. Close the lid of the detergent dispenser by pulling it up until
the closing device is secured in place.
The detergent dispenser automatically opens up at the right time
according to the program. If all-in-one detergents are used, we
recommend using the TABLET button, because it adjusts the
program so that the best washing and drying results are always
achieved.
(3 sec).
APERTURA PORTA
Eco 50° dopo 165 min
AUTO 50°- 60° 80-170 min*
Intensivo 65° ne ciclo
Lavaggio rapido 30’ 50° N/D
Lavaggio rapido e asciugatura 50° ne ciclo
Cristalli 45° ne ciclo
Silenzioso 50° (programma notte) ne ciclo
Igienizzante 65° N/D
Pre-lavaggio N/D
Auto-pulizia 65° N/D
* a seconda delle impostazioni
Funzioni
La pagina si sta caricando...
La pagina si sta caricando...
La pagina si sta caricando...
La pagina si sta caricando...
La pagina si sta caricando...
La pagina si sta caricando...
La pagina si sta caricando...
La pagina si sta caricando...
La pagina si sta caricando...
La pagina si sta caricando...
La pagina si sta caricando...
La pagina si sta caricando...
-
 1
1
-
 2
2
-
 3
3
-
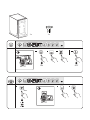 4
4
-
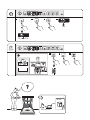 5
5
-
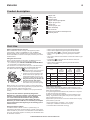 6
6
-
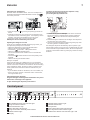 7
7
-
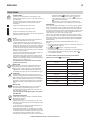 8
8
-
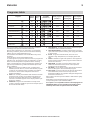 9
9
-
 10
10
-
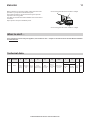 11
11
-
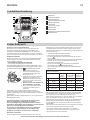 12
12
-
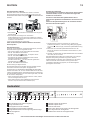 13
13
-
 14
14
-
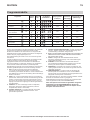 15
15
-
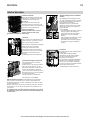 16
16
-
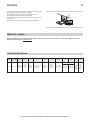 17
17
-
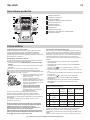 18
18
-
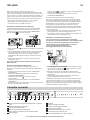 19
19
-
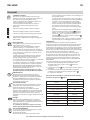 20
20
-
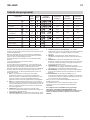 21
21
-
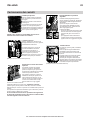 22
22
-
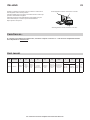 23
23
-
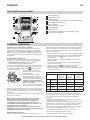 24
24
-
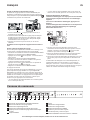 25
25
-
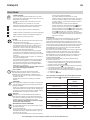 26
26
-
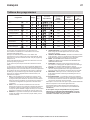 27
27
-
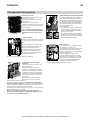 28
28
-
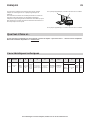 29
29
-
 30
30
-
 31
31
-
 32
32


IKEA 304.756.24 FINPUTSAD Integrated Dishwasher Manuale utente
- Categoria
- Lavastoviglie
- Tipo
- Manuale utente