Indesit NIS 41 V (EU) Guida utente
- Categoria
- Asciugatrici elettriche
- Tipo
- Guida utente

Contents
TUMBLE DRYER
Instruction booklet
Installation, 2
Product data, 3
Warnings, 4
Maintenance and Care, 6
Dryer description, 7
Start and programmes, 7
Laundry, 8
Troubleshooting- Service, 9
GB
English, 1
IT
Italiano, 10
FR
Français, 19
ES
Español, 28
PT
Português, 37
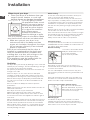
1
This symbol reminds you to read this
booklet.
! Keep this instruction booklet on hand in order to
refer to it when necessary. Take it with you when you
move, and should you sell this appliance or pass it
on to another party, make sure that this booklet is
supplied along with the dryer so that the new owner
may be informed about warnings and suggestions on
how the appliance works.
! Read these instructions carefully; the following
pages contain important information on installation
and suggestions on how the appliance works.
www.indesit.com

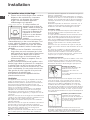
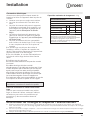
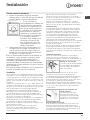
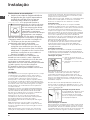
Installation
2
GB
Mobile venting
A vent tube must always be fitted when the dryer is
used in conjunction with Mobile Venting.
The tube must be fitted securely into the front of the
dryer. If possible, it is always best to connect the tube
to a permanent outlet close to the dryer. If permanent
installation is not possible, the dryer will work just as
well with the tube passing through a partly-opened
window.
! Ensure that the end of the tube is not directed toward
the air intake vent at the rear of the dryer.
! The vent tube should not exceed 2.4 metres in length
and should be kept free of any possible accumulation
of fluff, lint and water by shaking it out frequently.
Always ensure that the tube is not squashed.
Permanent venting
In conjunction with the vent tube we recommend using
a Wall/Window Vent Kit, available at a retail location or
the nearest Spare Parts Dealer.
Window mounting
1. The hole in the window should
ideally be made below the vent.
2. The tube should be
kept as short as possible.
Depending on how often you use your dryer, it is
essential that areas A and B are checked periodically
to remove lint or debris.
The vent tube adaptor must be fitted securely thus
preventing any humid air from being emitted back into
the room.
! The tube should be kept clear of the air intake vent
and kinks or ‘U’ bends must be avoided as these will
obstruct the tube or trap condensation.
Open window venting
The end of the tube should be
directed downwards, to prevent
warm moist air from condensing
in the room or in the dryer.
Wall hanging kit
This allows the dryer to be mounted on a wall of
suitable strength to take the weight. Alternatively it
should be used when the dryer is mounted on top of a
work surface to secure the dryer to the wall.
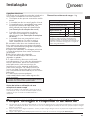
Where to put your dryer
•
●Place your dryer at a distance from gas
ranges, stoves, heaters, or cook tops
because flames can damage the appliance.
• ●If you are going to install
the appliance under a work
counter, be sure to leave a
50mm space between the
top and any other objects
on or above the machine
and a 25mm space
between the sides and
lateral furnishings or walls.
This is to ensure proper air circulation. Make
sure that the back vents are not obstructed.
•
●Make sure you put your dryer in an
environment that is not damp and has
proper air circulation throughout, the dryer
will not operate efficiently in an enclosed
space or cupboard.
! We do not recommend that the dryer is
installed in a cupboard but the dryer must
never be installed behind a lockable door,
a sliding door or a door with a hinge on the
opposite side to that of the dryer door.
! The appliance must be installed with the
rear surface placed against a wall.
Ventilation
The Dryer dries your laundry by drawing in cool, clean and
relatively dry air, heating it, and then distributing it through
the clothes as they are gently tumbled.
For optimum performance, the moist air is then blown out
through a vent tube.
When the dryer is in use, there has to be adequate
ventilation to avoid the back flow of gases into the room
from appliances burning other fuels, including open fires.
! Ensure that the dryer is adequately ventilated and that
the end of the vent tube is not directed towards the air
intake duct.
! The vent tube must always be fitted for optimum
performance.
! Make sure that the vent tube and air
intake vents are not
obstructed or blocked.
! The dryer must not recycle exhaust air.
! Misusing a tumble dryer may create a fire hazard.
! Do not discharge exhaust air into a flue which is used
for exhaust fumes from other appliances that burn gas or
other fuels.
! Do not discharge exhaust air into an extraction system or
any duct with an extractor fan. This will affect the way the
thermal controls operate and can result in a fire hazard.
! Do not allow clothes, towels etc., to hang down the front
of the dryer into the airstream. This obstructs the airflow
and may damage the dryer.
Minimum gap 50mm
Minimum gaps
25mm

GB
3
Installation
! The power cord should be regularly
checked. If the supply cord is damaged,
it must be replaced by the manufacturer,
its service agent or similarly qualified
persons in order to avoid a hazard. New or
longer power cords are supplied at an extra
charge by authorised dealers.
! The manufacturer denies any responsibility
should any of these rules not be followed.
! If in doubt about any of the above consult a
qualified electrician.
Before you start using your dryer
Once you have installed your dryer and before you
use it, clean the inside of the drum to remove any
dust that could have accumulated during transport.
Electrical connections
Make sure of the following before you
insert the plug into the the electrical socket:
•
●Make sure your hands are dry.
•
●The socket must have an earth connection.
•
●The socket must be able to sustain the
machines maximum power, which is
indicated on the rating label (see Dryer
Description).
•
●Power voltage must be within the values
indicated on the rating label (see Dryer
Description).
•
●The socket must be compatible with the
dryers plug. Should this not be the case,
replace the plug or the socket.
! The dryer must not be installed outdoors,
even if the space is sheltered. It can be
very dangerous if it is exposed to rain or
storms.
! Once installed, the dryers electrical wire
and plug must be within easy reach.
! Do not use extension cords.
! The power cord must not be bent or
squashed.
•
●Wring out items to eliminate excess water before tumble drying (if you use a washing machine first, select a
high spin cycle). Doing this will save time and energy during drying.
• ●Always dry full loads - you save energy: single items or small loads take longer to dry.
• ●Clean the filter after each use to contain energy consumption costs (see Maintenance).
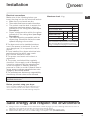
Save energy and respect the environment
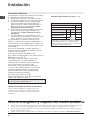
Maximum load: 4 kg
Power Consumption
O -mode (Po) - Watts 0.00
Left-on mode (Pl) - Watts 0.00
Programmes Kg kWh Minutes
Standard Cotton*
4 2.95 101
Standard Cotton
2 1.40 51
Synthetics 2 0.84 35
*This is the reference programme for the energy
label and suitable to dry normal wet cotton laundry.
This is the most e cient programme in terms of
energy consumption for drying wet cotton laundry.

4
GB
• ●Check to see if the dryer is empty before
loading it.
•
● The back of the dryer could
become very hot. Never touch it
while in use.
•
●Do not use the dryer unless the filter is
securely in place (see Maintenance).
•
●Do not overload the dryer (see Laundry
for maximum loads).
•
●Do not load items that are dripping wet.
•
●Carefully check all instructions on
clothing labels (see Laundry).
•
●Do not tumble dry large, very bulky
items.
•
●Do not tumble dry acrylic fibres at high
temperatures.
•
●Do not turn off the dryer when there are
still warm items inside.
•
●Clean the filter after each use (see
Maintenance).
•
●Do not allow lint to collect around the
dryer.
•
●Never climb on top of the dryer. It could
result in damage.
•
●Always follow electrical standards and
requirements (see Installation).
•
●Always buy original spare parts and
accessories (see Service).
! The appliance has been designed and
built according to international safety
standards.
These warnings are given for safety
reasons and must be followed carefully.
General safety
•
●This appliance can be used by
children aged from 8 years and above
and persons with reduced physical,
sensory or mental capabilities, or lack of
knowledge if they are given supervision
or instruction concerning use of the
appliance in a safe way and understand
the hazards involved.
• ●This tumble dryer has been designed
for home, and not professional use.
• ●Do not touch the appliance while bare
foot or with wet hands or feet.
• ●Unplug the machine by pulling on the
plug, not the cord.
• ●After using the dryer, turn it off and
unplug it. Keep the door closed to make
sure that children do not use it as a toy.
• ●Children should be supervised to ensure
that they do not play with the dryer.
• ●Cleaning and user maintenance should
not be made by children without
supervision.
• ●Children of less than 3 years should be
kept away from the appliance unless
continuously supervised.
• ●The appliance must be installed
correctly and have proper ventilation.
The air intake vents behind the machine,
the outlet vents and the vent tube should
never be obstructed (see Installation).
• ●Never direct the vent tube outlet towards
the air intake at the back of the machine.
• ●Never allow the tumble dryer to recycle
exhaust air.
•
●Never use the dryer on carpeting where
the pile height would prevent air from
entering the dryer from the base.
The
Warnings

GB
5
To minimise the risk of fire in your
tumble dryer, the following should be
observed:
•
●Tumble dry items only if they have been
washed with detergent and water, rinsed
and been through the spin cycle. It is a
fire hazard to dry items that HAVE NOT
been washed with water.
• ●Do not dry garments that have been
treated with chemical products.
• ●Do not tumble dry items that have
been spotted or soaked with vegetable
or cooking oils, this constitutes a fire
hazard. Oil-affected items can ignite
spontaneously, especially when exposed
to heat sources such as a tumble dryer.
The items become warm, causing an
oxidisation reaction with the oil, Oxidisation
creates heat. If the heat cannot escape,
items can become hot enough to
catch fire. Piling, stacking or storing oil-
effected items can prevent heat from
escaping and so create a fire hazard. If
it is unavoidable that fabrics containing
vegetable or cooking oil or those that
have been contaminated with hair care
products be placed in a tumble dryer
they should first be washed with extra
detergent - this will reduce, but not
eliminate the hazard. They should not
be removed from the dryer and piled or
stacked while hot.
! WARNING: Never stop the dryer before the end of the drying cycle unless all items are
quickly removed and spread out so that the heat is dissipated.
or explosive substances. Highly
flammable substances commonly used
in domestic environments including
cooking oil, acetone, denatured alcohol,
kerosene, spot removers, turpentine,
waxes and wax removers. Ensure these
items have been washed in hot water
with an extra amount of detergent before
being dried in the tumble dryer.
•
●Do not tumble dry items containing foam
rubber (also known as latex foam), or
similarly textured rubber like materials.
Foam rubber materials can, when heated,
produce fire by spontaneous combustion.
•
●Fabric softener or similar products should
not be used in a tumble dryer to eliminate
the effects of static electricity unless the
practice is specifically recommended by
the manufacturer of the fabric softener
product.
•
●Do not tumble dry undergarments that
contain metal reinforcements eg. bras
with metal reinforcing wires. Damage to
the tumble dryer can result if the metal
reinforcements come loose during drying.
•
●Do not tumble dry rubber, plastic articles
such as shower caps or babies water
proof covers, polythene or paper.
• ●Do not tumble dry rubber backed
articles, clothes fitted with foam rubber
pads, pillows, galoshes and rubber
coated tennis shoes.
•
●Remove all objects from pockets, such as
lighters and matches.
Warnings
• ●Do not tumble dry items that have
previously been cleaned in or washed
in, soaked in or soiled with petrol/
gasoline, dry cleaning solvents or other
flammable

6
GB
Maintenance and Care
Check the drum after each cycle
Turn the drum manually in order to remove small items
(handkerchiefs) that could have been left behind.
Cleaning the drum
! Do not use abrasives, steel wool or stainless steel
cleaning agents to clean the drum.
A coloured film may start to appear on the stainless
steel drum, this may be caused by a combination
of water and, or cleaning agents such as fabric
conditioner from the wash. This coloured film will not
affect the dryer performance.
Cleaning
•
●External parts in metal or plastic and rubber parts
can be cleaned with a damp cloth.
• ●Periodically check the vent tube and any
permanent venting fixture to make sure that there
has been no accumulation of fluff or lint, and
remove it.
• ●Remove lint that collects around the filter and the
outlet vents.
! Do not use solvents or abrasives.
! Have your dryer checked regularly by authorised
technicians to ensure electrical and mechanical safety
(see Service).
Switching off the electricity
Unplug your dryer when not using it, when
cleaning it and during all maintenance
operations.
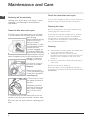
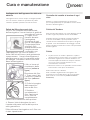
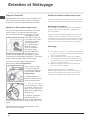
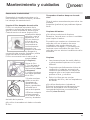
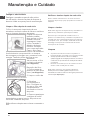
Clean the filter after each cycle
The filter is an important part of your dryer:
it accumulates lint and fluff that is formed
while drying.
When finished drying,
clean the filter by
rinsing it under
running water or with
your vacuum cleaner.
Should the filter
become clogged up,
the airflow inside the
dryer will be seriously
compromised: drying
times lengthen and you will consume more
energy. It may also
damage your dryer.
The filter is found in
the door trim (see
diagram).
Removing the filter:
1. Pull the plastic grip
of the filter upwards
(see diagram).
2. Clean the lint from
the inside surface of
the filter.
3.Replace the filter
correctly. Ensure the
filter is fully located
flush into the door
trim.
4. Remove any lint that has built up on the
inside of the door and around the door seal.
! Do not use the dryer without replacing the
filter.

7
GB
machine stops. When the door is closed, press the
start button and the dryer will restart but you will not
need to reset the timer control. You can however reset
the Timer Control at any stage should you wish.
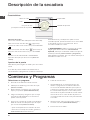
The TIMER knob sets the drying time: rotate it
clockwise, never counter-clockwise, until the
indicator is pointing to the drying time you want to
select (see Start and Programmes).
To turn Off the dryer: turn this knob until the ‘0’ is in
line with the indicator.
Heat selection
Select the relevant heat setting :
To select high heat
the Heat Selection button
must be IN
To select Low heat the Heat Selection button
must be OUT
The choice of HIGH HEAT or LOW HEAT depends
upon the fabric you wish to dry (see Laundry).
Door release
To open door, grip handle and pull towards you.
If the door is opened while the dryer is in use, the
drying programme cuts out automatically and the
6. Press the start switch.
7. About 10 minutes before the programme is
completed, the heating elements will be switched
off, and the programme enters the final ‘Cool
Tumble’ phase. During this phase, the fabric is
cooled. You should always allow the dryer to
complete this phase. If you open the door you
must press the start switch to resume drying.
8. Open the door, take the laundry out, clean the filter
and replace it (see Maintenance).
9. Unplug the dryer.
Choosing a programme
1. Plug the dryer into the electrical socket.
2. Sort your laundry according to fabric type (see
Laundry).
3. Open the door and make sure the filter is clean
and in place (see Maintenance).
4. Load the machine and make sure items are not in
the way of the door seal. Close the door.
5. Choose a drying time by checking the Drying Times
guide (see Laundry).
- Select the required temperature
with the heat
button.
- Select a drying time by rotating the TIMER knob
clockwise.
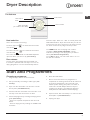
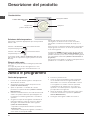
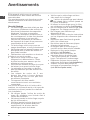
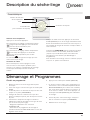
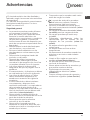
Dryer Description
Start and Programmes
The features
Heat switch
Start
Filter assembly
(on inside of the door)
Timer knob
Door release

8
GB
Laundry
Sorting your laundry
•
●Check symbols on clothing labels to make sure
that the articles can be tumble dried.
• ●Sort laundry by fabric type.
• ●Empty pockets and check buttons.
• ●Close zippers and hooks and tie loose belts and
strings.
• ●Wring out each item in order to eliminate as much
excess water as possible.
! Do not load dripping wet clothes into the dryer.
Maximum load size
Do not load more than maximum capacity.
These numbers refer to dry weight:
Natural fibres: 4kg max (9lb)
Synthetic fibres: 2kg max (4.4lb)
! DO NOT overload the dryer as this could result in
reduced drying performance.
Wash Care Labels
Look at the labels on your garments, especially when
tumble drying for the first time. The following symbols
are the most common:
May be tumble dried
Do not tumble dry
Tumble dry at high heat setting
Tumble dry at low heat setting
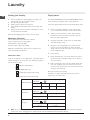
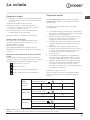
Drying times
The table (see below) presents APPROXIMATE drying
times in Minutes. Weights refer to dry garments.
Times are approximate and can vary depending upon:
• ●Amount of water retained in clothes after spin
cycle: towels and delicates retain a lot of water.
• ●Fabrics: items that are the same type of fabric
but different textures and thicknesses may not
have the same drying time.
• ●Quantity of laundry: single items or small loads
may take longer to
dry.
• ●Dryness: If you are going to iron some of your
clothes, they can be taken out while still a bit
damp. Others can be left longer if you need them
to be completely dry.
• ●Heat setting.
• ●Room temperature: if the room where the dryer is
located is cold, it will take longer for the dryer to
dry your clothes.
• ●Bulk: some bulky items can be tumble dried with
care. We suggest that you remove these items
several times, shake them out, and return them to
the dryer until finished.
! Do not over-dry your clothes.
All fabrics contain a little natural moisture, which
keeps them soft and fluffy.
Cottons
(Standard Cotton)
Synthetics
(Synthetics)
Acrylics
(Acrylics)
Drying times 800 -1000 rpm in washing machine.
High Heat
1 kg 2 kg 4 kg
3 kg
30 - 40 40 - 55 85 - 120
60 - 70
Drying times on reduced spin in washing machine.
High Heat
1 kg 2 kg
20 - 30 30 - 45
Drying times on reduced spin in washing machine.
Low Heat
1 kg 2 kg
30 - 50 50 - 70
• ●Note: At the end of a drying cycle, cottons could still be damp if you grouped cottons and synthetics together.
If this is the case, simply give the damp cotton items an additional short period of drying.

9
GB
Troubleshooting
Service
• ●The dryer was overloaded (see Laundry).
Before calling the Service Centre:
•
●Use the troubleshooting guide to see if you can
solve the problem yourself (see Troubleshooting).
• ●If not, turn off the dryer and call the Service Centre
closest to you.
What to tell the Service Centre:
• ●name, address and post code.
• ●telephone number.
• ●the type of problem.
• ●the date of purchase.
• ●the appliance model (Mod.).
• ●the serial number (S/N).
This information can be found on the data label inside
the door of the machine.
Spare Parts
This dryer is a complex machine. Repairing it yourself
or having a non-authorised person try to repair it could
cause harm to one or more persons, could damage the
machine and could invalidate the spare parts warranty.
Call an authorised technician if you experience
problems while using the machine.
Recycling and Disposal Information
As part of our continued commitment to
helping the environment, we reserve the right to
use quality recycled components to keep down
customer costs and minimise material wastage.
• ●Disposing of the packaging material: follow local
regulations, so the packaging can be recycled.
• ●To minimise risk of injury to children, remove
the door and plug - then cut off mains cable,
flush with the appliance. Dispose of these parts
separately to ensure that the appliance can no
longer be plugged into a mains socket.
Disposal of old electrical appliances
The European Directive 2012/19/EC on Waste Electrical
and Electronic Equipment (WEEE), requires that old
household electrical appliances must not be disposed
of in the normal unsorted municipal waste stream. Old
appliances must be collected separately in order to
optimise the recovery and recycling of the materials
they contain and reduce the impact on human health
and the environment.
The crossed out “wheeled bin” symbol on the
product reminds you of your obligation, that
when you dispose of the appliance it must be
separately collected.
Consumers should contact their local authority or
retailer for information concerning the correct disposal
of their old appliance.
This appliance has been designed, constructed and distributed in compliance with the
requirements of European Directives:
- LVD 2014/35/EU, EMC 2014/30/EU and RoHS 2011/65/EU.
One day your dryer seems not to be working. Before you call your Service Centre (see Service), go
through the following troubleshooting suggestions:
Problem:
The tumble dryer won’t start.
Its taking a long time to dry.
Possible causes / Solution:
•
●The plug is not plugged into the socket, or not making contact.
• ●There has been a power failure.
• ●The fuse has blown. Try to plug another appliance into the socket.
• ●You are using an extension cord? Try to plug the dryer’s power cord directly into
the socket.
• ●The TIMER knob has not been set properly (see Start and Programmes).
• ●The filter has not been cleaned (see Maintenance).
• ●The temperature setting is not ideal for the type of fabric you are drying (see
Start and Programmes, and see Laundry).
• ●The correct drying time has not been selected for the load (see Laundry).
• ●The flexible vent tube is obstructed (see Installation).
• ●The air intake at the rear of the dryer is obstructed (see Installation).
• ●The permanent ventilation flap on the storm cover is obstructed (see Installation).
• ●The items were too wet (see Laundry).
• ●The Start button has not been pressed (see Start and Programmes).

10
Italiano
Libretto di istruzioni
Indice
Installazione, 11
Informazioni sul prodotto, 12
Avvertenze, 13
Cura e manutenzione, 15
Descrizione del prodotto, 16
Avvio e programmi, 16
Bucato, 17
Ricerca guasti- Assistenza, 18
ASCIUGATRICE
Questo simbolo ti ricorda di leggere
questo libretto istruzioni.
! Tenere a portata di mano il presente libretto, così
da poterlo consultare facilmente ad ogni evenienza.
Tenere il libretto sempre vicino all’asciugatrice; nel
caso in cui l’apparecchio venga venduto o ceduto ad
altre persone,
ricordarsi di consegnare loro questo libretto,
cosœ da permettere anche ai nuovi possessori di
conoscere le avvertenze e i suggerimenti sull’utilizzo
dell’asciugatrice. ! Leggere attentamente queste
istruzioni: le pagine che seguono contengono
importanti informazioni sull’installazione e utili
suggerimenti sul funzionamento dell’elettrodomestico.
I
www.indesit.com

11
I
Installazione
! NON appendere vestiti, asciugamani, ecc. davanti
al flusso dell’aria dell’asciugatrice. Questo ostruisce il
flusso d’aria e potrebbe danneggiare l’asciugatrice.
Sistema di aerazione mobile
Quando si utilizza l’asciugatrice con il sistema di
aerazione mobile, è necessario collegare un tubo di
aerazione.
Il tubo deve essere montato in modo sicuro sul retro
dell’asciugatrice. Se possibile, si consiglia di fissare
il tubo ad uno scarico vicino all’asciugatrice. Quando
non può essere installata in modo fisso, l’asciugatrice
assicurerá comunque ottime prestazioni facendo
passare il tubo di aerazione attraverso una finestra
parzialmente aperta.
! Fare attenzione a non rivolgere il tubo di aerazione
verso la presa d’aria, che si trova nel lato posteriore
dell’asciugatrice.
! Il tubo di aerazione non deve superare la lunghezza
massima di 2,4 metri; deve inoltre essere scosso con
frequenza per rimuovere eventuali depositi di laniccio,
polvere o acqua. Fare attenzione a non calpestare il tubo.
Sistema di aerazione fisso
Si consiglia di collegare il tubo di aerazione ad
uno dei sistemi di aerazione per parete o finestra,
disponibili presso il rivenditore da cui è stata
acquistata l’asciugatrice o presso il più vicino
rivenditore di parti di ricambio.
Foro di aerazione su finestra
1. Il foro nella finestra deve
trovarsi idealmente sotto lo sfiato.
2. É importante quindi che il tubo
sia il più corto possibile.
Le aree A e B devono essere controllate
frequentemente, per prevenire il formarsi di laniccio
o detriti, specialmente nei casi di uso frequente
dell’asciugatrice. L’adattatore per il
tubo di aerazione
deve essere montato correttamente, così da evitare
che l’aria umida possa rientrare nella stanza.
! Il tubo non deve presentare tagli, strozzature o curve
a “U” che potrebbero ostruire la ventilazione o intrappolare la
condensa.
Aerazione attraverso una
finestra aperta
L’estremitá del tubo deve essere
rivolto verso il basso, così da
evitare che l’aria calda umida
possa condensarsi nella stanza
o nell’asciugatrice.
Kit aggancio muro
Con questo kit è possibile attaccare l’asciugatrice
ad una parete con un’adeguata resistenza per il
sostegno del peso. In alternativa, questo kit deve
essere usato quando l’asciugatrice viene montata
nella parte superiore di una superficie di lavoro per
fissare l’apparecchio alla parete.
Dove installare l’asciugatrice
•
●Le fiamme possono danneggiare
l’asciugatrice che deve pertanto essere
installata lontano da cucine a gas, stufe,
termosifoni o piani di cottura.
• ●Se l’elettrodomestico
verrá installato sotto
un banco da lavoro,
è necessario lasciare
uno spazio vuoto di
almeno 50 mm sopra
il pannel lo superiore
dell’elettrodomestico;
i pannelli laterali dovranno
invece avere uno spazio libero intorno
di almeno 25 mm. In questo modo sará
garantita la circolazione dell’aria. Controllare
che le prese d’aria del pannello posteriore
non siano ostruite.
• ●Assicurarsi inoltre che l’ambiente in
cui viene installata l’asciugatrice non
sia umido e che vi sia un adeguato
ricambio di aria. L’asciugatrice non
funzionerá correttamente se posizionata
in uno spazio chiuso o all’interno di un
mobile.
! Non À consigliabile che l’asciugatrice
sia installata in un armadio, e non deve mai
essere installata dietro una porta richiudibile a
chiave, una porta scorrevole o una porta con
cerniera sul lato opposto dello sportello
dell’asciugatrice.
! L’apparecchio deve essere installato con la
superficie posteriore posizionata contro un
muro.
Aerazione
Questo elettrodomestico asciuga il bucato immettendo
aria fredda, pulita e relativamente asciutta,
riscaldandola e facendola passare attraverso i
tessuti, che vengono così delicatamente asciugati.
Per agevolare l’asciugatura, l’aria umida viene
espulsa attraverso un tubo di aerazione. È importante
che l’ambiente in cui si utilizza l’asciugatrice sia
sufficientemente aerato, così da evitare il riciclo dei gas
combusti da altri apparecchi.
! Assicurarsi che l’asciugatrice sia sufficientemente
ventilata e che l’estremitá del tubo di aerazione non sia
rivolto verso il condotto della presa d’aria posteriore.
! Per il corretto funzionamento dell’asciugatrice è
indispensabile montare sempre il tubo di aerazione.
! Controllare che il tubo di aerazione e i condotti delle
prese d’aria non siano ostruiti o intasati.
! Evitare che l’asciugatrice ricicli aria viziata.
! L’uso scorretto dell’asciugatrice può creare il pericolo
di incendio.
! Non scaricare l’aria emessa dall’asciugatrice nello
stesso canale in cui viene scaricato il fumo emesso da
altri apparecchi che bruciano gas o altri combustibili.
! Non rilasciare l’aria aspirata in un sistema di
aspirazione o in condotti con ventole di aspirazione.
Ciò influirá sul funzionamento dei controlli termici e
potrebbe provocare incendi.
spazio minimo 50mm
spazio minima
25mm
spazio
minima
minima
minima
25mm

12
I
Installazione
• Strizzare bene i capi per rimuovere tutta l’acqua possibile prima di introdurli nell’asciugatrice (se si utilizza una lavatrice,
impostare un ciclo di centrifuga). In questo modo si risparmieranno tempo ed energia durante l’asciugatura.
• Ogni volta che si utilizza l’asciugatrice a pieno carico, si risparmia energia: capi singoli e piccoli carichi, impiegano più
tempo ad asciugarsi.
• Pulire il filtro alla fine di ogni ciclo di asciugatura così da contenere i costi connessi al consumo energetico (vedere la
sezione Manutenzione).
Risparmio energetico e rispetto dell’ambiente
Collegamento elettrico
Prima di inserire la spina nella presa
elettrica, verificare che:
•
●assicurarsi che le mani siano asciutte.
• ●la presa sia dotata di messa a terra.
• ●la presa sia in grado di supportare
la potenza massima prevista per
l’asciugatrice, cosœ come indicata
sull’etichetta che riporta le prestazioni di
esercizio (vedere la sezione Descrizione del
prodotto).
• ●la tensione di alimentazione sia compresa
nei valori indicati dall’etichetta che riporta
le prestazioni di esercizio (vedere la
sezione Descrizione del prodotto).
• ●la presa sia compatibile con il tipo di
spina dell’asciugatrice. In caso contrario,
sostituire la spina o la presa.
! L’asciugatrice non può essere installata
in ambienti all’aperto, anche se riparati.
Può essere molto pericoloso esporre
questo elettrodomestico alla pioggia o a un
temporale.
! Dopo l’installazione dell’elettrodomestico, il
cavo e la spina elettrica devono rimanere a
portata di mano.
! Non utilizzare prolunghe.
! Il cavo elettrico non deve essere tagliato né
calpestato.
! Il cavo elettrico deve essere controllato
periodicamente. Se il cavo di alimentazione
è danneggiato, esso deve essere sostituito
dal produttore, dal suo servizio assistenza
o da altro personale qualificato al fine
di evitare pericoli. Presso i rivenditori
autorizzati è possibile acquistare cavi di
ricambio e cavi più lunghi di quelli montati
in fabbrica.
! Il produttore declina ogni responsabilitá nei
casi in cui le presenti regole non vengano
rispettate.
! Se si nutrono dei dubbi a riguardo,
consultare un elettricista.
Informazioni preliminari
Una volta installata l’asciugatrice, prima di metterla in
funzione, pulire l’interno del cestello, così da rimuovere lo
sporco che può essersi accumulato durante il trasporto.
Massime dimensioni di carico: 4 kg
Consumo di Energia
In modalità: spento (Po) Watt 0.00
In modalità: lasciato acceso (Pl) Watt 0.00
Programmi Kg kWh Minuti
Cotone Standard*
4 2.95 101
Cotone Standard
2 1.40 51
Sintetici 2 0.84 35
*Programma di riferimento per l’etichetta dei
dati energetici, questo programma è adatto ad
asciugare capi di cotone normali ed è il programma
più eciente in termini di consumo energetico per
capi di cotone.

13
I
! Questo elettrodomestico è stato progettato
e realizzato rispettando gli standard di
sicurezza internazionale. Queste
avvertenze vengono fornite per motivi
di sicurezza e devono essere osservate
attentamente.
Sicurezza
• La presente asciugatrice può essere
usata da persone (compresi i bambini
da 8 anni in su) con capacitá fisiche,
sensoriali o mentali ridotte o senza
esperienza e conoscenza, se sono
sottoposte a supervisione o ricevano
istruzioni relative all’uso del dispositivo da
parte di una persona responsabile della
loro sicurezza.
• Questa asciugatrice è stata progettata
per uso domestico e non professionale.
• Non toccare l’elettrodomestico quando
si è a piedi nudi nè con le mani o i piedi
bagnati.
• Per scollegare l’elettrodomestico dalla
rete di alimentazione,bisogna tirare la
spina: mai il cavo.
• Dopo l’uso, spegnere l’asciugatrice e
scollegarla dalla rete di alimentazione.
Tenere lo sportello chiuso onde evitare
che i bambini possano utilizzare
l’asciugatrice come un gioco.
• I bambini devono essere sorvegliati per
assicurarsi che non giochino con
l’asciugatrice.
• Pulizia e manutenzione non devono
essere eseguite dai bambini senza
supervisione.
• I bambini di etá inferiore a 3 anni
devono essere tenuti lontano
dall’asciugatrice se non sono
constantemente sorvegliati.
• L’elettrodomestico deve essere installato
correttamente e deve avere un’adeguata
aerazione. Le prese d’aria posteriore, i
fori di scarico e il tubo di aerazione
non devono mai essere ostruiti (vedere la
sezione Installazione).
• Fare attenzione a non rivolgere mai
l’estremitá del tubo di aerazione verso la
presa d’aria posteriore.
• Evitare che l’asciugatrice ricicli aria
viziata.
• Non utilizzare l’asciugatrice sulla
moquette, nel caso in cui l’altezza del
pelo sia tale da impedire l’ingresso dell’aria
attraverso la base dell’asciugatrice.
• Verificare che l’asciugatrice sia vuota
prima di iniziare a caricarla.
• La parte posteriore dell’asciugatrice
può diventare molto calda. Evitare
assolutamente di toccarla durante il
funzionamento dell’elettrodomestico.
• Non utilizzare l’asciugatrice se il filtro
non è stato correttamente installato
(vedere la sezione Manutenzione).
• Non sovraccaricare l’asciugatrice
(vedere la sezione Bucato per i vari limiti
di carico).
• Non inserire capi completamente
bagnati.
• Seguire sempre con attenzione tutte le
istruzioni riportate sulle etichette per
il lavaggio dei capi (vedere la sezione
Bucato).
• Non introdurre nell’asciugatrice capi troppo
voluminosi.
• Non asciugare fibre acriliche ad alte
temperature.
• Non spegnere l’asciugatrice se vi sono
ancora capi caldi all’interno.
• Pulizia del filtro dopo ogni utilizzo
(vedere la sezione Manutenzione).
• Evitare l’accumulo di laniccio intorno
all’asciugatrice.
• Non salire sul pannello superiore
dell’elettrodomestico, perché in
questo modo si potrebbe danneggiare
gravemente l’asciugatrice.
• Rispettare sempre gli standard e le
caratteristiche elettriche (vedere la
sezione Installazione).
• Acquistare solo accessori e parti di
ricambio originali (vedere la sezione
Assistenza).
Avvertenze

14
I
Per ridurre il rischio di incendo
dell’asciugatrice,è necessario osservare i
seguenti punti:
• Prima di essere caricati nell’asciugatrice, i
capi devono essere lavati con acqua e
sapone, risciacquati e infine centrifugati.
L’asciugatura di capi che NON siano
stati precedentemente lavati con acqua,
determina il pericolo di incendio.
• Non caricare nell’asciugatrice capi
precedentemente trattati con prodotti
chimici.
• Non asciugare articoli macchiati o
imbevuti di olio vegetale o da cucina,
ciò costituisce un rischio di incendio.
Gli articoli sporchi di olio possono
infiammarsi spontaneamente,
specialmente quando vengono esposti a
fonti di calore come l’asciugatrice.
Gli articoli possono diventare caldi,
causando una reazione di ossidazione
con l’olio, l’ossidazione crea calore. Se
il calore non è in grado di fuoriuscire,
gli articoli possono scaldarsi tanto
da prendere fuoco. L’accumulo,
l’impilamento o il deposito di capi
sporchi/imbevuti di olio può impedire
la fuoriuscita del calore e causare un
incendio.
Se non è possibile evitare di porre
nell’asciugatrice articoli sporchi/imbevuti
di olio vegetale, olio da cucina o lacca, è
prima necessario lavarli con detergente
supplementare, ciò ridurrá, ma non
eliminerá il rischio di incendio. Che non
devono essere rimossi dall’asciugatrice
e impilati o ammucchiati quando sono
ancora caldi.
• Non inserire nell’asciugatrice capi che
sono stati precedentemente lavati,
puliti, imbevuti o lasciati in ammollo
in benzina, solventi a secco o altre
sostanze infiammabili o esplosive,
le sostanze altamente infiammabili
usate comunenmente negli ambienti
domestici, compresi olio da cucina,
acetone, alcol denaturato, cherosene,
sostanze antimacchia, trementina, cere
e sostanze di rimozione cere. Assicurarsi
che questi capi vengano lavati in acqua
calda con una quantitá supplementare
di detergente prima di essere inseriti
nell’asciugatrice.
• Non inserire nell’asciugatrice articoli
contenenti schiuma di gomma (detta
anche schiuma di lattice), o materiali
simili. I materiali in schiuma di lattice
quando vengono riscaldati possono
incendiarsi mediante la combustione
spontanea.
• Non utillizzare ammorbidenti o prodotti
simili nell’asciugatrice per eliminare
gli effetti dell’elettricitá statica, se
non consigliato espressamente dal
produttore dell’ammorbidente.
• Non inserire nell’asciugatrice indumenti
intimi che contengono rinforzi in metallo,
es. reggiseni con ferretti in metallo.
Se i ferretti si staccano durante
l’asciugatura, possono danneggiare
l’asciugatrice.
• Non inserire nell’asciugatrice articoli in
gomma solida, in plastica, come cuffie
per la doccia o teli impermeabili di
protezione per bambini, polietilene o
carta.
• Non inserire nell’asciugatrice articoli
foderati in gomma solida, capi con
imbottiture in schiuma di gomma,
cuscini, galosce e scarpe da tennis
rivestite in gomma.
• Togliere tutti gli oggetti dalle tasche,
specialmente accendini e fiammiferi.
Avvertenze
! AVVERTENZA: non arrestare mai l’asciugatrice prima della fine del ciclo di
asciugatura, a meno che tutti gli articoli non siano stati rimossi velocemente e stesi,
cosœ da dissipare il calore.

15
I
Cura e manutenzione
Controllo del cestello al termine di ogni
ciclo
Ruotare il cestello manualmente per rimuovere i
piccoli capi (fazzoletti) che potrebbero essere rimasti
all’interno dell’asciugatrice.
Pulizia del Tamburo
! Per la pulizia del tamburo non usare abrasivi, lana di
acciaio o agenti di pulizia di acciaio inossidabile.
Potrebbe formarsi una patina colorata sul tamburo
di acciaio inossidabile, questo potrebbe essere
causato da una combinazione di acqua e/o di agenti
di pulizia, come ammorbidente del lavaggio. Questa
patina colorata non avrá alcun effetto sulle prestazioni
dell’asciugatrice.
Pulizia
• Le parti esterne in metallo e plastica e le parti in
gomma possono essere pulite con un panno umido.
• Controllare regolarmente il tubo di aerazione ed
eventuali impianti di aerazione fissa per verificare
che non si sia accumulato del laniccio ed,
eventualmente, rimuoverlo.
• Rimuovere il laniccio che potrebbe essersi formato
intorno al filtro e alle prese di aerazione.
! Non usare solventi o abrasivi.
! Far controllare regolarmente l’asciugatrice da
personale tecnico qualificato per la sicurezza delle
parti elettriche e meccaniche (vedere la sezione
Assistenza).
Scollegamento dell’apparecchio dalla rete
elettrica
L’asciugatrice deve essere sempre scollegata quando
non è in funzione, durante le operazioni di pulizia
e durante qualsiasi operazione di manutenzione.
Pulizia del filtro dopo ogni ciclo
Il filtro è un componente fondamentale
dell’asciugatrice: la sua funzione è quella di
raccogliere il laniccio
e i nugoli che si
formano durante
l’asciugatura.
Al termine di ogni
ciclo di asciugatura,
É importante pulire
a fondo il filtro,
sciacquandolo sotto
l’acqua corrente
o pulendolo con
l’aspirapolvere. Se il filtro si intasa, il
flusso dell’aria all’interno sará gravemente
compromesso: I tempi di asciugatura si
allungheranno e così si consumerá molta
più energia. Potrebbero anche verificarsi
danni all’asciugatrice.
Il filtro si trova nel
rivestimento della
portiera (vedere a
figura).
Rimozione del filtro:
1. Tirare verso l’alto
il manico in plastica
del filtro (vedere a
figura).
2. Pulire la lanugine
dalla superficie
interna del filtro.
3.Sostituire
correttamente il
filtro. Assicurarsi
che il filtro sia
completamente
inserito nel rivestimento della portiera.
4. Rimuovi tutta la lanugine che se è
formata sulla parte interna della porta e
sulla guarnizione.
! Non utilizzare l’asciugatrice se il filtro non
è stato riposizionato.

16
I
Chiudendo la porta, premento il tasto Start
l’asciugatrice si riavvia senza che sia necessario
selezionare nuovamente l’intervallo di tempo con il
timer.
All’occorrenza, è tuttavia possibile variare l’intervallo di
tempo agendo sul timer in un momento qualsiasi del
ciclo di asciugatura.
La manopola TIMER imposta il tempo de asciugatura:
ruotarla in senso orario, mai in senso antiorario, fino a
quando l’indicatore punto verso il tempo di asciugatura
che si desidera selezionare (vedere la sezione Avvio e
programmi).
Per spegnere l’asciugatrice: ruotare la manopola fina a
quando lo ‘0’ è in linea con l’indicatore.
Selezione della temperatura
Selezionare il pulsante appropriato per la temperatura
bassa o alta.
Pulsante “IN DENTRO” per selezionare alta
temperatura (High Heat) .
Pulsante “IN FUORI” per selezionare bassa
temperatura (Low Heat) .
La scelta di ALTA o BASSA TEMPERATURA dipende
dal tessuto dei capi da asciugare (vedere la sezione
Bucato).
Rilascio della porta
Per aprire la porta, afferrare la maniglia, quindi tirare
verso sé.
Se si apre la porta mentre l’asciugatrice è in uso,
il programma si interrompe automaticamente e la
macchina si arresta.
6. Premere il pulsante Start.
7. Circa 10 minuti prima della fine del programma,
viene attivata la fase di asciugatura finale ad
aria fredda, che consente di raffreddare i tessuti:
si consiglia di non estrarre il bucato prima del
completamento di questa fase. Se si apre lo
sportello è necessario premere il pulsante Start
per riprendere l’asciugatura.
8. Aprire lo
sportello, estrarre il bucato, pulire il filtro
e metterlo nuovamente in posizione (vedere la
sezione Manutenzione).
9. Scollegare l’asciugatrice dalla rete elettrica.
Scelta del programma
1. Inserire la spina dell’asciugatrice nella presa di
alimentazione elettrica.
2. Selezionare il bucato in base al tipo di tessuto
(vedere la sezione Bucato).
3. Aprire lo sportello e controllare la corretta
posizione e la pulizia del filtro (vedere la sezione
Manutenzione).
4. Caricare l’elettrodomestico, facendo attenzione ad
evitare che qualche indumento possa frapporsi tra
lo sportello e la relativa guarnizione. Chiudere lo
sportello.
5. Scegliere il tempo di asciugatura controllando le
indicazioni date per il tipo di tessuti che dovete
asciugare nella relativa Guida di asciugatura
(vedere la sezione Bucato).
- Impostare la temperatura mediante il pulsante
TEMPERATURA.
- Selezionare il tempo di asciugatura, ruotando in
senso orario la manopola TIMER.
Descrizione del prodotto
Avvio e programmi
Caratteristiche
Selettore della temperatura
Gruppo filtro
(interno della porta)
Manopola TIMER
Apriporta
Start

17
I
Bucato
Controllo del bucato
•
●Controllare i simboli riportati sulle etichette dei
vari capi, per verificare se l’indumento può essere
introdotto nell’asciugatrice.
• ●Distinguere il bucato in base al tipo di tessuto.
• ●Svuotare la tasche e controllare i bottoni.
• ●Chiudere le lampo e i ganci e allacciare senza
stringere cinture e lacci.
• ●Strizzare gli indumenti per eliminare la maggior
quantitá di acqua possibile.
! Non caricare l’asciugatrice con capi totalmente pieni
d’acqua.
Dimensioni massimi di carico
Non caricare il cestello oltre la capacitá massima. I
seguenti valori si riferiscono al peso degli indumenti
asciutti:
Fibre naturali: massimo 4 kg
Fibre sintetiche: massimo 2 kg
! NON sovraccaricare l’asciugatrice perché ciò ridurrá
l’efficienza dell’elettrodomestico.
Etichette con le istruzioni per il lavaggio
Controllare con attenzione le etichette degli indumenti,
specialmente se si tratta della prima volta che si
introduce il capo in un’asciugatrice. Di seguito sono
riportati i simboli più comuni:
Può essere inserito nell’asciugatrice
Non inserire nell’asciugatrice
Asciugare ad alta temperatura
Asciugare a bassa temperatura
Tempi di asciugatura
La tabella riportata di seguito indica i tempi
APPROSSIMATIVI di asciugatura espressi in minuti. I
valori si riferiscono ad indumenti asciutti:
I tempi sono approssimativi e possono variare in base a:
• Quantitá di acqua trattenuta dai capi dopo la
centrifuga: le asciugamani e in genere i capi
delicati trattengono molta acqua.
• Tessuto: i capi dello stesso tessuto, ma
con trama e
spessore differente, avranno sicuramente tempi di
asciugatura diversi.
• Quantitá di bucato: capi singoli e piccoli carichi,
impiegano più tempo ad asciugarsi.
• Asciugatura: se i capi devono essere stirati, è
consigliabile estrarli dall’asciugatrice quando
sono ancora umidi. I capi che devono essere
completamente asciutti, possono invece essere
lasciati più a lungo.
• Temperatura impostata.
• Temperatura della stanza: più è bassa la
temperatura della stanza in cui si trova
l’asciugatrice, più tempo sará necessario per
l’asciugatura degli indumenti.
• Volume: alcuni capi voluminosi richiedono
particolare cura nel processo di asciugatura.
È consigliabile rimuovere questi capi, scuoterli
e inserirli nuovamente nell’asciugatrice: questa
operazione deve essere ripetuta diverse volte
durante il ciclo di asciugatura.
! Non asciugare troppo gli indumenti.
L’umiditá naturale contenuta nei tessuti serve a
conservarne la morbidezza e la vaporositá.
Cotone
Standard
(Standard
Cotton)
Sintetici
(Synthetics)
Acrilico
(Acrylics)
Tempi di asciugatura dopo lavaggi in lavatrici da 800-1.000 giri al minuto.
Alta temperatura (High Heat)
1 kg 2 kg 4 kg
3 kg
30 - 40 40 - 55 85 - 120
60 - 70
Tempi di asciugatura dopo lavaggi in lavatrici a velocitá inferiori
.
Alta temperatura (High Heat)
1 kg 2 kg
20 - 30 30 - 45
Tempi di asciugatura dopo lavaggi in lavatrici a velocitá inferiori
.
Bassa temperatura (Low Heat)
1 kg 2 kg
30 - 50 50 - 70
● Nota bene: Se si mischiano i capi in tessuto sintetico con capi in cotone, questi ultimi potrebbero risultare ancora
bagnati al termine del ciclo di asciugatura. In questo caso, avviare un ulteriore breve ciclo di asciugatura.

18
I
Ricerca guasti
Assistenza
Potrebbe accadere che l’asciugatrice sembri fuori uso. Prima di contattare il centro di assistenza (vedere la
sezione Assistenza), analizzare i seguenti suggerimenti per la risoluzione dei problemi:
Problema:
L’asciugatrice non si avvia.
L’asciugatura impiega troppo
tempo.
Possibili cause / Soluzioni:
•
●La spina potrebbe non essere inserita oppure potrebbe non riuscire
a fare contatto.
• ●Potrebbe essersi verificata una mancanza di corrente.
• ●Il fusibile potrebbe esseri bruciato. Provare a collegare un
altro elettrodomestico alla stessa presa.
• ●Se si utilizza una prolunga, provare a inserire la spina
dell’asciugatrice direttamente nella presa.
• ●La manopola TIMER potrebbe non essere stata impostata correttamente
(vedere la sezione Avvio e programmi).
• ●Il filtro potrebbe non essere stato pulito correttamente (vedere la
sezione Manutenzione).
• ●La temperatura impostata potrebbe non essere adatta al tipo di tessuto da
asciugare (vedere la sezione Avvio e programmi, e la sezione Bucato).
• ●Potrebbe non essere stato selezionato il tempo di asciugatura
corretto per il tipo di carico (vedere la sezione Bucato).
• ●Il tubo di aerazione flessibile potrebbe essere ostruito (vedere la
sezione Installazione).
• ●La presa d’aria nella parte posteriore dell’asciugatrice À ostruita
(vedere la sezione Installazione).
• ●L’aletta di aerazione fissa sulla copertura per temporali potrebbe essere
ostruita (vedere la sezione Installazione).
• ●Gli indumenti erano forse troppo bagnati (vedere la sezione Bucato).
• ●L’asciugatrice potrebbe essere sovraccarica (vedere la sezione Bucato).
Prima di chiamare il centro di assistenza:
• Provare a risolvere il problema in modo autonomo
servendosi dei consigli della sezione Risoluzione
dei problemi.
• In caso contrario, spegnere l’asciugatrice e
chiamare il più vicino centro di assistenza.
Notizie da comunicare al centro di assistenza:
• nome, indirizzo e codice postale
• numero di telefono
• tipo di problema verificatosi
• data di acquisto
• modello dell’apparecchio (Mod.)
• numero di serie (S/N)
Queste informazioni sono riportate sull’etichetta dei
dati posta all’interno dello sportello dell’asciugatrice.
Ricambi
L’asciugatrice è un elettrodomestico complesso:
tentare di ripararlo da soli o farlo riparare da
persone non qualificate, oltre a poter provocare
lesioni, potrebbe anche danneggiare in modo grave
l’apparecchio e invalidare la garanzia sulle parti di
ricambio.
Contattare sempre un tecnico qualificato nel caso in
cui si verifichi un malfunzionamento dell’asciugatrice.
Informazioni per riciclaggio e smaltimento
Nell’ambito del nostro costante impegno in difesa dell’ambiente, ci riserviamo il diritto di utilizzare componenti riciclati di qualitá per
ridurre i costi del cliente e minimizzare lo spreco di materiali.
• Smaltimento del materiale di imballaggio: seguire le normative locali, così da permettere di riciclare l’imballaggio.
• Per ridurre i rischi di incidenti ai bambini, rimuovere la sportello e la spina, quindi tagliare il cavo di alimentazione a filo con
l’apparecchio. Smaltire queste parti separatamente per assicurarsi che l’elettrodomestico non possa più essere collegato
a una presa di corrente.
Smaltimento : La direttiva Europea 2012/19/CE sui rifiuti di apparecchiature elettriche ed elettroniche (RAEE), prevede che gli
elettrodomestici non debbano essere smaltiti nel normale flusso dei rifiuti solidi urbani. Gli apparecchi dismessi devono essere
raccolti separatamente per ottimizzare il tasso di recupero e riciclaggio dei materiali che li compongono ed impedire potenziali
danni per la salute e l’ambiente.
Il simbolo del cestino barrato è riportato su tutti i prodotti per ricordare gli obblighi di raccolta separata.
Quando si acquista una nuova apparecchiatura equivalents si pu⁄ consegnare il RAEE al negoziante, che è tenuto a ritirarlo
gratuitamente; i RAEE di “piccolissime dimensioni” (nessun lato sopra i 25 cm) possono essere consegnati gratuitamente ai
negozianti anche se non si acquista nulla (solo nei negozi con superficie di vendita superiore a 400 mq).
Per ulteriori informazioni, sulla corretta dismissione degli elettrodomestici, i detentori potranno rivolgersi
al servizio pubblico preposto
o ai rivenditori.
Questo apparecchio è stato progettato, fabbricato e distribuito in conformità alle seguenti
Direttive:
- LVD 2014/35/UE, EMC 2014/30/UE e RoHS 2011/65/UE.
• ●Il pulsante Start non è stato premuto (vedere la sezione Avvio e
programmi).

19
F
Français
Notice d’utilisation
et installation
Table des Matières
Installation, 20
Données relatives au produit, 21
Avertissements, 22
Entretien et Nettoyage, 24
Description du sèche-linge, 25
Démarrage et programmes, 25
Linge, 26
Que faire en cas de panne, 27
Service Après-vente, 27
www.indesit.com
SÉCHE-LINGE
! Conservez cette notice d’utilisation et d’installation
á portée de main de manière á pouvoir vous y
référer si nécessaire. Emmenez-la avec vous si vous
déménagez, et, si vous vendez cet appareil ou que vous
le donniez á un tiers, faites en sorte que cette notice
accompagne le sèche-linge de manière á ce que le
nouveau propriétaire soit informé des avertissements
et suggestions concernant le fonctionnement de ce
sèche-linge.
! Lisez attentivement ce mode d’emploi; les pages
suivantes contiennent des informations importantes
concernant l’installation et des suggestions relatives
au fonctionnement de cet appareil.
Ce symbole vous rappele de lire le
livret d’instructions.

20
F
Installation
provenant d’autres appareils á combustion de gaz ou
d’autres combustibles.
! Ne pas expulser l’air d’évacuation dans un système
d’extraction ni dans un conduit équipé d’un ventilateur
aspirant. Ceci perturberait la façon dont la régulation
thermique fonctionne et pourrait entraîner un danger
d’incendie.
! NE PAS suspendre de vêtements, serviettes, etc. á
l’avant du séchoir dans le flux d’air sinon cela risque
d’obstruer le flux d’air et d’endommager le séchoir.
Ventilation mobile
Un tuyau de ventilation doit toujours être installé lorsque
le sèche-linge est utilisé conjointement avec une
Ventilation Mobile.
Le tuyau doit être solidement fixé sur l’avant du sèche-
linge. Si possible, il vaut toujours mieux connecter ce
tuyau á une sortie permanente située près du sèche-
linge. Si une installation permanente n’est pas possible,
le sèche linge fonctionnera tout aussi bien en faisant
passer le tuyau á travers une fenêtre partiellement
ouverte.
! Assurez-vous que l’extrémité du tuyau ne soit pas
dirigée vers l’orifice d’entrée d’air á l’arrière du sèche-
linge.
! Le tuyau de ventilation ne doit pas dépasser 2,4
mètres de longueur et vous devez faire en sorte
d’éviter toute accumulation éventuelle de peluches
et d’eau en le secouant fréquemment. Assurez-vous
toujours que ce tuyau ne soit pas écrasé.
Ventilation permanente
Conjointement avec le tuyau de ventilation, nous vous
recommandons
d’utiliser un Kit de Ventilation Mur/
Fenêtre, disponible dans le commerce ou chez votre
Revendeur de PiÀces de Rechange le plus proche.
Montage á la fenêtre
1. Le trou dans la fenêtre doit
idéalement être effectué
au-dessous de l’orifice de
ventilation.
2. Le tuyau doit être aussi court
que possible.
En fonction de la fréquence á laquelle vous utilisez
votre sèche-linge, il est essentiel que les zones A
et B soient vérifiées périodiquement pour retirer les
peluches ou les débris. L’adaptateur du tuyau de
ventilation doit être installé solidement, ce qui évite
ainsi que de l’air humide ne soit ré-émis dans la pièce.
! Le tuyau doit être placé á l’écart de l’orifice d’entrée
d’air ne doit être ni entaillé, ni crasé, ni plié en forme
de ‘U’ afin d’évitér d’obstruer le tuyau et de bloquer la
condensation.
Ventilation par fenêtre ouverte
L’extrémité du tuyau doit être
dirigée vers le bas, de manière à
éviter que de l’air chaud humide
se condense dans la pièce ou
dans le sèche-linge.
Kit de montage mural
Ce kit d’aération permet de monter le séchoir sur un mur
présentant une résistance suffisante pour supporter son poids.
En variante, il faut l’utiliser si le séchoir est monté sur une
surface de travail. Il permettra de fixer le séchoir dans le mur
Où installer votre sèche-linge
•
●Placez votre sèche-linge á une certaine
distance des cuisinières, fourneaux,
radiateurs, ou plaques de cuisson
á gaz, car les flammes peuvent
endommager cet appareil.
• ●Si vous installez cet
appareil sous un plan de
travail, faites en sorte de
laisser un espace de 50
mm entre le dessus de
l’appareil et tout autre
objet sur ou au-dessus
de la machine, et un
espace
de 25 mm entre les côtés et les éléments
d’ameublement ou les murs latéraux. Ceci
a pour objectif d’assurer une ventilation
convenable. Assurez-vous que les orifices
de ventilation situés á l’arrière ne soient pas
obstrués.
• ●Faites en sorte d’installer votre sèche-
linge dans un environnement qui n’est
pas humide et qui est doté d’une bonne
circulation d’air dans toute la pièce.
Le sèche linge ne fonctionnera pas
efficacement dans un espace clos ou
dans un placard.
! Nous vous déconseillons d’installer votre
sèche-linge dans un placard. En revanche,
le sèche-linge ne doit en aucun cas être
placé derrière une porte fermant á clè, une
porte coulissante ou une porte montée sur
des gonds du côté opposé á la porte de
chargement du sèche-linge.
! La surface arrière de l’appareil doit être
placée contre un mur.
Ventilation
Cet appareil sèche votre linge en aspirant de l’air frais,
propre et relativement sec, en le chauffant, et en le
distribuant ensuite parmi les vêtements qui sont brassés
doucement par la rotation du tambour. Pour une
performance optimale, l’air humide est ensuite expulsé á
travers un conduit de ventilation.
Lorsque le sèche-linge est en marche, une aération
adéquate est nécessaire afin d’éviter le retour de gaz
dans la pièce, provenant de la combustion d’autres
combustibles par des appareils, y compris les feux de
cheminée.
! Assurez-vous que le sèche-linge soit convenablement
ventilé et que l’extrémité du tuyau de ventilation ne soit
pas dirigée vers le conduit d’entrée d’air.
! Le tuyau de ventilation doit toujours être installé de
manière optimale.
! Assurez-vous que le tuyau de ventilation et les orifices
d’entrée d’air ne soient pas obstrués ou bloqués.
! Le sèche-linge ne doit pas recycler de l’air d’èvacuation.
! Une mauvaise utilisation d’un sèche-linge peut
entraîner un danger d’incendie.
! Ne pas expulser l’air d’évacuation dans un conduit
qui est utilisé pour les évacuations des émanations
minimale espace 50mm
minimale espace
25mm
La pagina si sta caricando...
La pagina si sta caricando...
La pagina si sta caricando...
La pagina si sta caricando...
La pagina si sta caricando...
La pagina si sta caricando...
La pagina si sta caricando...
La pagina si sta caricando...
La pagina si sta caricando...
La pagina si sta caricando...
La pagina si sta caricando...
La pagina si sta caricando...
La pagina si sta caricando...
La pagina si sta caricando...
La pagina si sta caricando...
La pagina si sta caricando...
La pagina si sta caricando...
La pagina si sta caricando...
La pagina si sta caricando...
La pagina si sta caricando...
La pagina si sta caricando...
La pagina si sta caricando...
La pagina si sta caricando...
La pagina si sta caricando...
La pagina si sta caricando...
La pagina si sta caricando...
La pagina si sta caricando...
La pagina si sta caricando...
-
 1
1
-
 2
2
-
 3
3
-
 4
4
-
 5
5
-
 6
6
-
 7
7
-
 8
8
-
 9
9
-
 10
10
-
 11
11
-
 12
12
-
 13
13
-
 14
14
-
 15
15
-
 16
16
-
 17
17
-
 18
18
-
 19
19
-
 20
20
-
 21
21
-
 22
22
-
 23
23
-
 24
24
-
 25
25
-
 26
26
-
 27
27
-
 28
28
-
 29
29
-
 30
30
-
 31
31
-
 32
32
-
 33
33
-
 34
34
-
 35
35
-
 36
36
-
 37
37
-
 38
38
-
 39
39
-
 40
40
-
 41
41
-
 42
42
-
 43
43
-
 44
44
-
 45
45
-
 46
46
-
 47
47
-
 48
48


Indesit NIS 41 V (EU) Guida utente
- Categoria
- Asciugatrici elettriche
- Tipo
- Guida utente
in altre lingue
- français: Indesit NIS 41 V (EU) Mode d'emploi
- español: Indesit NIS 41 V (EU) Guía del usuario
- português: Indesit NIS 41 V (EU) Guia de usuario
