
MÖJLIG
GB
FR
IT
FR IT


FR
IT
ENGLISH 4
FRANÇAIS 1
ITALIANO 3
Language, Langue, Lingua
Country, Pays, Paese

Contents
Safety information 4
Safety instructions 5
Product description 7
Daily use 7
Helpful hints and tips 8
Care and cleaning 8
What to do if… 9
Technical data 9
noitallatsnI10
Energy efficiency 13
Environment concerns 14
IKEA GUARANTEE 14
Subject to change without notice.
Safety information
Before the installation and use of the appliance, carefully read
the supplied instructions. The manufacturer is not responsible if
an incorrect installation and use causes injuries and damages.
Always keep the instructions with the appliance for future refer-
ence.
Children and vulnerable people safety
Warning! Risk of suffocation, injury or permanent disability.
This appliance can be used by children aged from 8 years
and above and persons with reduced physical, sensory or
mental capabilities or lack of experience and knowledge if
they are supervised by an adult or a person who is responsi-
ble for their safety.
Do not let children play with the appliance.
Keep all packaging away from children.
Keep children and pets away from the appliance when it op-
erates or when it cools down. Accessible parts are hot.
Cleaning and user maintenance shall not be made by chil-
dren without supervision.
General Safety
The appliance and its accessible parts become hot during
use. Do not touch the heating elements.
Do not operate the appliance by means of an external timer
or separate remote-control system.
HSILGNE4

• Unattended cooking on a hob with fat or oil can be danger-
ous and may result in fire.
• Never try to extinguish a fire with water, but switch off the
appliance and then cover flame e.g. with a lid or a fire blan-
ket.
• Do not store items on the cooking surfaces.
• Do not use a steam cleaner to clean the appliance.
• Metallic objects such as knives, forks, spoons and lids should
not be placed on the hob surface since they can get hot.
• If the glass ceramic surface is cracked, switch off the appli-
ance to avoid the possibility of electric shock.
Safety instructions
Installation
Warning! Only a qualified person must
install this appliance.
• Remove all the packaging.
• Do not install or use a damaged appli-
ance.
• Obey the installation instruction supplied
with the appliance.
• Always be careful when you move the
appliance because it is heavy. Always
wear safety gloves.
• Seal the cut surfaces with a sealant to
prevent moisture to cause swelling.
• Protect the bottom of the appliance from
steam and moisture.
• Do not install the appliance adjacent to a
door or under a window. This prevents
hot cookware to fall from the appliance
when the door or the window is opened.
• Keep the minimum distance from the oth-
er appliances and units. Refer to the as-
sembly instructions.
• If the appliance is installed above draw-
ers make sure that the space, between
the bottom of the appliance and the up-
per drawer, is sufficient for air circulation.
Refer to the assembly instructions.
• The bottom of the appliance can get hot.
We recommend to install a non-combus-
tile separation panel under the appliance
to prevent access to the bottom.
Electrical connection
Warning! Risk of fire and electrical
shock.
• All electrical connections must be made
by a qualified electrician.
• The appliance must be earthed.
• Before carrying out any operation make
sure that the appliance is disconnected
from the power supply.
• Use the correct electricity mains cable.
• Do not let the electricity mains cable tan-
gle.
• Make sure the mains cable or plug (if ap-
plicable) does not touch the hot appli-
ance or hot cookware, when you connect
the appliance to the near sockets
• Make sure the appliance is installed cor-
rectly. Loose and incorrect electricity
mains cable or plug (if applicable) can
make the terminal become too hot.
• Make sure that a shock protection is in-
stalled.
• Use the strain relief clamp on cable.
ENGLISH 5

• Make sure not to cause damage to the
mains plug (if applicable) or to the mains
cable. Contact the Service or an electri-
cian to change a damaged mains cable.
• The electrical installation must have an
isolation device which lets you disconnect
the appliance from the mains at all poles.
The isolation device must have a contact
opening width of minimum 3 mm.
• Use only correct isolation devices: line
protecting cut-outs, fuses (screw type
fuses removed from the holder), earth
leakage trips and contactors.
Gas connection
• All gas connections should be made by a
qualified person.
• Make sure that there is air circulation
around the appliance.
• The information about the gas supply is
on the rating plate.
• This appliance is not connected to a de-
vice, which evacuates the products of
combustion. Make sure to connect the
appliance according to current installa-
tion regulations. Pay attention to require-
ments regarding adequate ventilation.
Use
Warning! Risk of injury, burns or
electric shock.
• Use this appliance in a household envi-
ronment.
• Do not change the specification of this
appliance.
• Do not let the appliance stay unattended
during operation.
• Do not operate the appliance with wet
hands or when it has contact with water.
• Do not put cutlery or saucepan lids on the
cooking zones. They become hot.
• Set the cooking zone to “off” after use.
• Do not use the appliance as a work sur-
face or as a storage surface.
• If the surface of the appliance is cracked,
disconnect immediately the appliance
from the power supply. This to prevent an
electrical shock.
Warning! Risk of fire or explosion.
• Fats and oil when heated can release
flammable vapours. Keep flames or heat-
ed objects away from fats and oils when
you cook with them.
• The vapours that very hot oil releases can
cause spontaneous combustion.
• Used oil, that can contain food remnants,
can cause fire at a lower temperature
than oil used for the first time.
• Do not put flammable products or items
that are wet with flammable products in,
near or on the appliance.
Warning! Risk of damage to the
appliance.
• Do not keep hot cookware on the control
panel.
• Do not let cookware to boil dry.
• Be careful not to let objects or cookware
fall on the appliance. The surface can be
damaged.
• Do not activate the cooking zones with
empty cookware or without cookware.
• Do not put aluminium foil on the appli-
ance.
• Cookware made of cast iron, aluminium
or with a damaged bottom can cause
scratches on the glass ceramic. Always lift
these objects up when you have to move
them on the cooking surface.
• Provide good ventilation in the room
where the appliance is installed.
• Make sure that the ventilation openings
are not blocked.
• Use only stable cookware with the correct
shape and diameter larger than the di-
mensions of the burners. There is a risk of
overheating and rupture of the glass
plate (if applicable).
• Make sure the flame does not go out
when you quickly turn the knob from the
maximum to the minimum position.
• Make sure pots are centrally positioned
on the rings and do not stick out over
edges of the cooking surface.
• Use only the accessories supplied with
the appliance.
• Do not install a flame diffuser on the
burner.
ENGLISH 6

Care and Cleaning
Warning! Risk of damage to the
appliance.
• Clean regularly the appliance to prevent
the deterioration of the surface material.
• Do not use water spray and steam to
clean the appliance.
• Do not clean the burners in the dishwash-
er.
• Clean the appliance with a moist soft
cloth. Only use neutral detergents. Do not
use abrasive products, abrasive cleaning
pads, solvents or metal objects.
Disposal
Warning! Risk of injury or suffocation.
• Contact your municipal authority for in-
formation on how to discard the appli-
ance correctly.
• Disconnect the appliance from the mains
supply.
• Cut off the mains cable and discard it.
• Flat the external gas pipes.
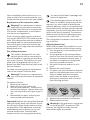
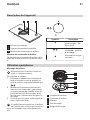
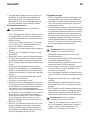
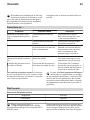
Product description
1 2 3
1
Ultra-Rapid burner
2
Removable pan support
3
Burner control knob
Burner control knob
The hob burner control knob is situated on
the front of the hob .
Symbol Description
there is no gas sup-
ply / off position
there is maximum
gas supply / igni-
tion setting
there is minimum
gas supply
Daily use
Ignition of the burner
Always ignite the burner before posi-
tioning pots or pans.
To ignite the burner:
1. Push the control knob completely in and
turn it counter-clockwise to the maxi-
mum position marked
.
2. Keep the knob pushed for about 5 sec;
this will allow thermocouple to heat up,
and the safety device to switch off, oth-
erwise the gas supply would be inter-
rupted.
3. After the flame is regular, adjust it as
preferred.
ENGLISH 7

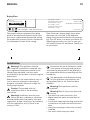
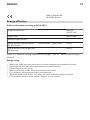
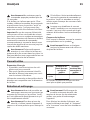
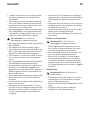
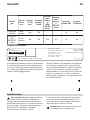
If after a few attempts the burner does
not ignite, check that the crown and its
cap are in correct positions.
1
2
3
4
5
1
Burner cap
2
Burner crown
3
Injector
4
Thermocouple
5
Ignition candle
Warning! Do not keep control knob
pressed for more than 15 seconds.
If the burner does not light after 15 seconds,
release the control knob, turn it into off posi-
tion and wait for at least 1 minute before
trying to light the burner again.
Important! In the absence of electricity You
can ignite the burner without electrical
device; in this case approach the burner
with a flame, push the relevant knob down
and turn it counter-clockwise to maximum
gas release position.
Warning! Maintain extreme caution
while operating with open fire in
kitchen environment. Manufacturer declines
any responsibility in case of misuse of flame.
If the burner accidentally goes out, turn
the control knob to the off position and
wait for at least 1 minute before trying to
light it again.
When switching on the mains, after in-
stallation or a power cut, it is quite nor-
mal for the spark generator to be activated
automatically.
Turning the burners off
To put the flame out, turn the relevant con-
trol knob to the symbol
.
Warning! Always turn the flame down
or switch it off before removing the
pans of the burner.
Helpful hints and tips
Energy savings
• If possible, always place lids on the pans.
• As soon as liquid starts boiling, turn down
the flame to barley keep the liquid sim-
mering.
Use pots and pans with bottom fitting the
size of burner used.
Burner minimum di-
ameter of
pots and pans
maximum di-
ameter of
pots and pans
Ultra-
rapid
160 mm 260 mm
The bottom of the cookware should be as
thick and flat as possible.
Care and cleaning
Warning! Switch the appliance off and
let it cool down before you clean it.
Warning! For safety reasons, do not
clean the appliance with steam
blasters or high-pressure cleaners.
Warning! Do not use abrasive
cleaners, steel wool pads or acids, they
will damage the appliance.
ENGLISH 8

To remove any food remains wash the
enamelled elements, "caps" and "crowns",
with warm soapy water.
Stainless steel elements wash with water,
and then dry with a soft cloth.
This model is equipped with electrical igni-
tion, it is obtained through ceramic "candle"
with electrode.
Keep them well clean to avoid difficult light-
ning.
Periodically ask your local Service Cen-
tre to check the conditions of the gas
supply pipe and the pressure adjuster, if it is
fitted (this service is not free of charge).
After cleaning, be sure to wipe dry with a
soft cloth.
What to do if…
Problem Possible cause Remedy
There is no spark when
lighting the gas
There is no electrical supply Check that the unit is plug-
ged in and the electrical
supply is switched on.
There is no electrical supply Check the house electric in-
stallation fuse.
Burner cap and Crown are
placed uneven
Check the burner cap and
crown have been replaced
correctly, e.g. after cleaning.
The flame is blowing out im-
mediately after lightning
Thermocouple is not heated
enough
After lightning the flame,
keep the knob pushed for
about 5 sec.
The gas ring burns unevenly Burner crown is blocked with
food residues
Check the main injector is
not blocked and the burner
crown is clear of food parti-
cles.
If there is a fault, first try to find a solution to
the problem yourself. If you cannot find a
solution to the problem yourself, contact
your dealer or the After Sales Service.
If you operated the appliance wrongly,
or the installation was not carried out
by a registered engineer, the visit from the
customer service technician or dealer may
not take place free of charge, even during
the warranty period.
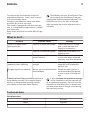
Technical data
Hob dimensions
width 290 mm
depth 520 mm
built in height 45 mm
ENGLISH 9

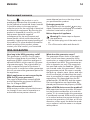
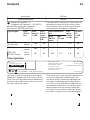
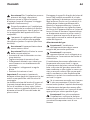
Rating Plate
502-371-42
Made In Italy
© Inter IKEA Systems B.V. 1999
21552
PQM
PNC. 949738211 TYPE H3VF1TC0-G/VI
G20 20 mbar = 3.8 kW
G20/G25 20/25 mbar = 3.8 kW
G30 28-30 mbar = 276 g/h
G31 37 mbar = 271 g/h
G30/G31 30/30 mbar 276 g/h
G130 8 mbar = 3.7 kW
II2H3+ (IT-ES-PT)
III1c2E+3+ (FR)
II2H3B/P (BG-CZ-HR-RO-SK-TR)
230 V
~
50 Hz
ZO 0694
The graphic above represents the rating
plate of the appliance (without serial num-
ber which is generated dynamically during
the production process), which is located at
its underneath surface of the casing.
Dear Customer, please apply here aside
the sticker you can find in the dedicate
plastic bag inserted inside the hob packag-
ing. This will allow us to assist you better, by
identifying precisely your hob, in case you
will need in future our assistance. Thank you
for your help!
Installation
Warning! This appliance must be
installed, connected or repaired only
by a registered competent person to the
relevant gas standard. Use only parts
provided with the product. Use only original
spare parts.
Manufacturer is not responsible for any in-
jury to persons and pets or damage to
property caused by failure to comply fol-
lowing requirements.
Caution! To proceed with the
installation refer to the assembly
instructions.
Warning! Installation process must
follow the laws, ordinances, directives
and standards (electrical safety rules and
regulations, proper recycling in accordance
with the regulations, etc.) in force in the
country of use!
Ensure that the local distribution condi-
tions (nature of the gas and gas pres-
sure) and the adjustment of the appliance
are compatible before proceeding with the
installation.
The parameters of adjustment setting
for this appliance are stated on the
rating plate (refer to the Technical data
chapter).
Warning! The appliance must be
earthed!
Warning! Risk of injury from electrical
current.
• The electrical mains terminal is live.
• Make electrical mains terminal free of
voltage.
• Loose and inappropriate plug and socket
connections can make the terminal over-
heat.
• Have the clamping connections correctly
installed.
• Use strain relief clamp on cable.
ENGLISH 10

Important! You must observe the minimum
distances to other appliances and furniture
cabinets or other units according to
Assembly Instruction.
If there is no oven beneath the hob insert a
dividing panel at a minimum distance of 20
mm from the bottom of the hob.
Protect the cut surfaces of the worktop
against moisture using a suitable sealant in-
cluded in the product in fitting bag. The
sealant seals the appliance to the work top
with no gap. Do not use silicon sealant be-
tween the appliance and the worktop.
Avoid installing the appliance next to doors
and under windows as hot cookware may
be knocked off the pan support when doors
and windows are opened.
Gas Connection
Warning! Only a qualified person must
install this appliance.
Warning! This appliance is not
connected to a combustion products
evacuation device.
Installation must comply with current local
regulation.
The connection of the cooktop to the gas
pipe network or gas cylinder must be made
by means of a rigid copper or steel pipe
with fittings complying with local regula-
tions, or by means of a continuous surface
stainless steel hose complying with local
regulations.
If you see any abnormalities do not re-
pair the pipe, contact local After Sales
Service (refer to the Service chapter).
The connection must be installed correctly,
fixed into hob connection pipe. Otherwise it
will cause leakage of gas
Warning! Once the installation is
complete, check the perfect seal of
every pipe fixing. Use soapy water, never
flame.
Electrical connection
The electrical work necessary to install the
appliance must be done by a qualified
electrician or competent person, according
to the current regulations.
Before connecting, check that the nominal
voltage of the appliance stated on the rat-
ing plate, corresponds to the available sup-
ply voltage. Also, check the power rating of
the appliance and ensure that the wire is
suitably sized to suit the appliance power
rating (refer to the Technical data chapter).
The rating plate is located on the lower cas-
ing of the hob.
The appliance is supplied with a connection
cable. This has to be provided with a prop-
er plug, able to support the load marked on
the identification plate (refer to the Techni-
cal data chapter).
The plug has to be fitted in a proper socket.
If connecting the appliance directly to the
electric system, it is necessary that you in-
stall a double pole switch between the ap-
pliance and the electricity supply, with a
minimum gap of 3 mm between the switch
contacts. The double pole has to be of a
type suitable for the required load in com-
pliance with the current rules.
The connection cable has to be placed in
order that, in each part, it cannot reach a
90 °C temperature. The blue neutral cable
must be connected to the terminal block
marked with "N". The brown (or black)
phase cable (fitted in the terminal block
contact marked with "L") must always be
connected to the live phase.
Electrical Requirements
The manufacturer declines any liability if
these safety measures are not observed.
This hob is designed to be connected to a
230 V 50 Hz AC electrical supply.
Before switching on, make sure the electrici-
ty supply voltage is the same as that indica-
ted on the hob rating plate. The rating plate
is located on the bottom of the hob.
The hob is supplied with a 3 core flexible
supply cord.
ENGLISH 11

Upon completion there must be no cut, or
stray strands of wire present and the cord
clamp must be secure over the outer sheath.
Replacement of the connection cable.
Warning! The replacement of electric
cable must be carried out exclusively
by the After Sales Service or by personnel
with similar competencies, in accordance
with the current regulations.
If the connection cable must be replaced,
only a type H05V2V2-F T90 cable must be
used. The cable section must be suitable to
the voltage and the working temperature.
The yellow/green earth wire must be ap-
proximately 2 cm longer than the brown (or
black) phase wire.
Gas setting conversion
This model is designed for use with
natural gas but can be converted for
use with butane or propane gas providing
the correct injectors. The injectors not sup-
plied with the appliance have to be or-
dered from After Sales Service (refer to the
Service chapter).
For data concerning injector replacement,
refer to the chapter Technical data
Warning! Conversion or replacement
can only be performed by a registered
installer.
To replace injectors:
1. Remove pan support.
2. Remove burner cap and crown.
3. With a socket spanner 7 unscrew and
remove the injectors, replace them with
the ones required for the type of gas in
use.
4. Reassemble the parts, following the
same procedure backwards.
Important! Replace the rating label (placed
near gas supply pipe) with relevant one for
the new type of gas supply before sealing
the appliance. If the appliance is already
sealed please stick it directly on the user
manual booklet after Technical data
chapter close to the rating plate drawing.
You can find this label in package sup-
plied with appliance
If the feeding gas pressure will be dif-
ferent or variable, comparing with the
required, you must install an appropriate
pressure adjuster, which is not supplied with
the product and if needed must be ordered
separately from the local After Sales Service
(refer to the Service chapter). The pressure
adjuster must be fitted on gas supply pipe,
in compliance with the rules of the force.
The rating plate is located on the lower cas-
ing of the hob.
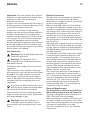
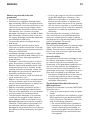
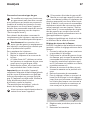
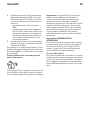
Adjusting flame level
When hob has been fully installed, it is nec-
essary to check the minimum flame setting:
1. Turn the gas tap to the maximum posi-
tion and ignite.
2. Set the gas tap to the minimum flame
position then turn the control knob from
minimum to maximum several times. If
the flame is unstable or extinguished,
follow the procedure further.
3. Re-ignite the burner and set to mini-
mum.
4. Remove the control knob.
5. To adjust, use a thin bladed screwdriver
and turn the adjustment screw until the
flame is steady and does not extin-
guish, when the knob is turned from
minimum to maximum, and vice versa
(see following picture).
6. Repeat this procedure for all burners.
7. Reassemble the knobs.
Warning! If the appliance is connected
to liquid gas (G31 propane or G30
butane), the regulation screw must be
fastened as tightly as possible.
ENGLISH 12

IKEA of Sweden AB
SE-34381 Älmhult
ENGLISH 13
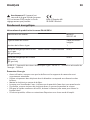
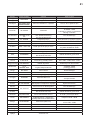
Energy efficiency
Product information according to EU 66/2014
Model identification MÖJLIG
502.371.42
Type of hob Built-in hob
Number of gas burners 1
Energy efficiency per gas burner
(EE gas burner)
Centre middle - Triple Crown 55.9%
Energy efficiency for the gas hob
(EE gas hob)
55.9%
EN 30-2-1: Domestic cooking appliances burning gas - Part 2-1 : Rational use of energy -
General
Energy saving
Before use, make sure that the burners and pan supports are assembled correctly.
Use cookware with diameters applicable to the size of burners.
Center the pot on the burner.
When you heat up water, use only the amount you need.
If it is possible, always put the lids on the cookware.
When the liquid starts to boil, turn down the flame to barely simmer the liquid.
If it is possible, use a pressure cooker. Refer to its user manual.

Environment concerns
The symbol on the product or on its
packaging indicates that this product may
not be treated as household waste. Instead
it should be taken to the appropriate
collection point for the recycling of electrical
and electronic equipment. By ensuring this
product is disposed of correctly, you will
help prevent potential negative
consequences for the environment and
human health, which could otherwise be
caused by inappropriate waste handling of
this product. For more detailed information
about recycling of this product, please
contact your local council, your household
waste disposal service or the shop where
you purchased the product.
Packaging materials
The materials with the symbol
are recy-
clable. Dispose the packaging in a suitable
collection containers to recycle it.
Before disposal of appliance
Warning! Do these steps to dispose
the appliance:
Pull the mains plug out of the mains sock-
et.
Cut off the mains cable and discard it.
IKEA GUARANTEE
How long is the IKEA guarantee valid?
This guarantee is valid for five (5) years
from the original date of purchase of Your
appliance at IKEA, unless the appliance is
named LAGAN in which case two (2) years
of guarantee apply. The original sales re-
ceipt is required as proof of purchase. If
service work is carried out under guarantee,
this will not extend the guarantee period for
the appliance,
Which appliances are not covered by the
IKEA five (5) years guarantee?
The range of appliances named LAGAN
and all appliances purchased in IKEA be-
fore 1st of August 2007
Who will execute the service?
IKEA service provider will provide the serv-
ice through its own service operations or
authorized servi
ce partner network
.
What does this guarantee cover?
The guarantee covers faults of the appli-
ance, which have been caused by faulty
construction or material faults from the date
of purchase from IKEA. This guarantee ap-
plies to domestic use only. The exceptions
are specified under the headline “What is
not covered under this guarantee?” Within
the guarantee period, the costs to remedy
the fault e.g. repairs, parts, labour and trav-
el will be covered, provided that the appli-
ance is accessible for repair without special
expenditure. On these conditions the EU
guidelines (Nr. 99/44/EG) and the respec-
tive local regulations are applicable. Re-
placed parts become the property of IKEA.
What will IKEA do to correct the problem?
IKEA appointed service pr
ovider will exam-
ine the product and decide, at its sole dis-
cretion, if it is covered under this guarantee.
If considered covered, IKEA service provider
or its authorized service partner through its
own service operations, will then, at its sole
discretion, either repair the defective prod-
uct or replace it with the same or a compa-
rable product.
ENGLISH 14

What is not covered under this
guarantee?
Normal wear and tear.
Deliberate or negligent damage, dam-
age caused by failure to observe operat-
ing instructions, incorrect installation or by
connection to the wrong voltage, dam-
age caused by chemical or electro-chem-
ical reaction, rust, corrosion or water
damage including but not limited to dam-
age caused by excessive lime in the wa-
ter supply, damage caused by abnormal
environmental conditions.
Consumable parts including batteries
and lamps.
Non-functional and decorative parts
which do not affect normal use of the ap-
pliance, including any scratches and pos-
sible color differences.
Accidental damage caused by foreign
objects or substances and cleaning or un-
blocking of filters, drainage systems or
soap drawers.
Damage to
the following parts: ceramic
glass,
accessories, crockery and cutlery
baskets, feed and drainage pipes, seals,
lamps and lamp covers, screens, knobs,
casings and parts of casings. Unless such
damages can be proved to have been
caused by production faults.
Cases where no fault could be found dur-
ing a technician’s visit.
Repairs not carried out by our appointed
service providers and/or an authorized
service contractual partner or where non-
original parts have been used.
Repairs caused by installation which is
faulty or not according to specification.
The use of the appliance in a non-domes-
tic environment i.e. professional use.
Transportation damages. If a customer
transports the product to their home or
other address, IKEA is not liable for any
damage that may occur during transport.
However, if IKEA delivers the produ
ct to
the customer's
delivery address, then
damage to the product that occurs during
this delivery will be covered by this guar-
antee.
Cost for carrying out the initial installation
of the IKEA appliance. However, if an
IKEA service provider or its authorized
service partner repairs or replaces the
appliance under the terms of this guaran-
tee, the service provider or its authorized
service partner will re-install the repaired
appliance or install the replacement, if
necessary.
This restriction do not apply to fault-free
work carried out by a qualified specialist
using our original parts in order to adapt
the appliance to the technical safety specifi-
cations of another EU country.
How country law applies
The IKEA guarantee
gives You specific legal
rights, which
covers or exceed local de-
mands. However these conditions do not
limit in any way consumer rights described
in the local legislation
Area of validity
For appliances which are purchased in one
EU country and taken to another EU coun-
try, the services will be provided in the
framework of the guarantee conditions nor-
mal in the new country. An obligation to
carry out services in the framework of the
guarantee exists only if the appliance com-
plies and is installed in accordance with:
the technical specifications of the country
in which the guarantee claim is made;
the Assembly Instructions and User Man-
ual Safety Information;
The dedicated After Sales Service for
IKEA appliances:
Please do not hesitate to contact IKEA After
Sales Service to:
1. make a service request under this guar-
antee;
2. ask for clarification on insta
llation of the
IKEA a
ppliance in the dedicated IKEA
kitchen furniture. The service won’t pro-
vide clarifications related to:
– the overall IKEA kitchen installation;
– connections to electricity (if machine
comes without plug and cable), to
water and to gas since they have to
be executed by an authorized serv-
ice engineer.
ENGLISH 15

3. ask for clarification on user manual con-
tents and specifications of the IKEA ap-
pliance.
To ensure that we provide you with the best
assistance, please read carefully the As-
sembly Instructions and/or the User Manual
section of this booklet before contacting us.
How to reach us if You need our service
Please refer to the last page of this manual
for the full list of IKEA appointed contacts
and relative national phone numbers.
Important! In order to provide You with a
quicker service, we recommend that You
use the specific phone numbers listed at the
end of this manual. Always refer to the
numbers listed in the booklet of the specific
appliance You need an assistance for.
Before calling us, assure that You have to
hand the IKEA article number (8 digit code)
for the appliance of which you need our
assistance.
Important! SAVE THE SALES RECEIPT! It is
Your proof of purchase and required for the
guarantee to apply. Note that the receipt
reports also the IKEA article name and
number (8 digit code) for each of the
appliances you have purchased.
Do You need extra help?
For any additional questions not
related to
After Sales of your appliances, please con-
tact our nearest IKEA store call centre. We
recommend you read the appliance docu-
mentation carefully before contacting us.
ENGLISH 16

Sommaire
Consignes de sécurité 17
Instructions de sécurité 18
Description de l'appareil 21
Utilisation quotidienne 22
Conseils utiles 22
Entretien et nettoyage 22
En cas d'anomalie de fonctionnement 23
Rendement énergétique
Caractéristiques techniques 23
noitallatsnI25
28
En matière de protection de
tnemennorivne'l29
GARANTIE IKEA - FRANCE 29
Sous réserve de modifications.
Consignes de sécurité
Avant d'installer et d'utiliser cet appareil, lisez soigneusement
les instructions fournies. Le fabricant ne peut être tenu pour res-
ponsable des dommages et blessures liés à une mauvaise in-
stallation ou utilisation. Conservez toujours cette notice avec
votre appareil pour vous y référer ultérieurement.
Sécurité des enfants et des personnes vulnérables
Avertissement Risque d'asphyxie, de blessure ou
d'invalidité permanente.
Cet appareil peut être utilisé par des enfants de plus de
8 ans, ainsi que des personnes dont les capacités physiques,
sensorielles et mentales sont réduites ou dont les connaissan-
ces et l'expérience sont insuffisantes, à condition d'être sur-
veillés par une personne responsable de leur sécurité.
Ne laissez pas les enfants jouer avec l'appareil.
Ne laissez pas les emballages à la portée des enfants.
Tenez les enfants et les animaux éloignés de l'appareil lors-
qu'il est en fonctionnement ou lorsqu'il refroidit. Les parties
accessibles sont chaudes.
Les enfants ne doivent pas nettoyer ni entreprendre une
opération de maintenance sur l'appareil sans surveillance.
Sécurité générale
L'appareil et ses parties accessibles deviennent chauds pen-
dant son fonctionnement. Ne touchez pas les résistances.
SIAÇNARF1
7

• Ne faites pas fonctionner l'appareil avec un minuteur externe
ou un système de commande à distance.
• Il peut être dangereux de laisser chauffer de la graisse ou de
l'huile sans surveillance sur une table de cuisson car cela
pourrait provoquer un incendie.
• N'essayez jamais d'éteindre un feu avec de l'eau. Éteignez
l'appareil puis couvrez les flammes, par exemple avec un
couvercle ou une couverture ignifuge.
• N'entreposez rien sur les surfaces de cuisson.
• N'utilisez pas de nettoyeur vapeur pour nettoyer l'appareil.
• Ne posez pas d'objets métalliques tels que couteaux, four-
chettes, cuillères ou couvercles sur la table de cuisson car ils
pourraient chauffer.
• Si la surface vitrocéramique est fissurée, éteignez l'appareil
pour éviter tout risque d'électrocution.
Instructions de sécurité
Installation
Avertissement L'appareil doit être
installé uniquement par un
professionnel qualifié.
• Retirez l'intégralité de l'emballage.
• N'installez pas et ne branchez pas un ap-
pareil endommagé.
• Suivez scrupuleusement les instructions
d'installation fournies avec l'appareil.
• Soyez toujours vigilants lorsque vous dé-
placez l'appareil car il est lourd. Portez
toujours des gants de sécurité.
• Isolez les surfaces découpées à l'aide
d'un matériau d'étanchéité pour éviter
que la moisissure ne provoque de gonfle-
ments.
• Protégez la partie inférieure de l'appareil
de la vapeur et de l'humidité.
• N'installez pas l'appareil près d'une por-
te ou sous une fenêtre. Les récipients
chauds risqueraient de tomber de l'ap-
pareil lors de l'ouverture de celles-ci.
• Respectez l'espacement minimal requis
par rapport aux autres appareils et élé-
ments. Reportez-vous aux instructions de
montage.
• Si l'appareil est installé au-dessus de ti-
roirs, assurez-vous qu'il y a suffisamment
d'espace entre le fond de l'appareil et le
tiroir supérieur pour que l'air puisse circu-
ler. Reportez-vous aux instructions de
montage.
• Le dessous de l'appareil peut devenir
très chaud. Nous vous recommandons
d'installer un panneau de séparation
ignifuge sous l'appareil pour en bloquer
l'accès.
Branchement électrique
Avertissement Risque d'incendie ou
d'électrocution.
• L'ensemble des branchements électriques
doit être effectué par un technicien quali-
fié.
• L'appareil doit être relié à la terre.
FRANÇAIS 1

• Avant toute intervention, assurez-vous
que l'appareil est débranché.
• Utilisez le câble d'alimentation électrique
approprié.
• Ne laissez pas le câble d'alimentation
s'emmêler.
• Assurez-vous que le câble d'alimentation
ou la fiche (si présente) n'entrent pas en
contact avec les surfaces brûlantes de
l'appareil ou les récipients brûlants lors-
que vous branchez l'appareil à des prises
électriques situées à proximité.
• Assurez-vous que l'appareil est bien in-
stallé. Un câble d'alimentation lâche et
inapproprié ou une fiche (si présente) non
serrée peuvent être à l'origine d'une sur-
chauffe des bornes.
• Assurez-vous qu'une protection anti-élec-
trocution est installée.
• Utilisez un collier anti-traction sur le câ-
ble.
• Veillez à ne pas endommager la fiche
secteur (si présente) ni le câble d'alimen-
tation. Contactez le service après-vente
ou un électricien pour remplacer le câble
d'alimentation s'il est endommagé.
• L'installation électrique doit être équipée
d'un dispositif d'isolement à coupure om-
nipolaire. Le dispositif d'isolement doit
présenter une distance d'ouverture des
contacts d'au moins 3 mm.
• N'utilisez que des systèmes d'isolation
appropriés : des coupe-circuits, des fusi-
bles (les fusibles à visser doivent être reti-
rés du support), un disjoncteur différentiel
et des contacteurs.
Raccordement au gaz
• Tous les raccordements au gaz doivent
être effectués par une personne qualifiée.
• Assurez-vous que l'air circule autour de
l'appareil.
• Les informations concernant l'alimenta-
tion en gaz se trouvent sur la plaque si-
gnalétique.
• Cet appareil n'est pas raccordé à un dis-
positif d'évacuation des produits de com-
bustion. Assurez-vous de brancher l'ap-
pareil selon les réglementations d'instal-
lation en vigueur. Veillez à respecter les
exigences en matière d'aération.
Utilisation
Avertissement Risque de blessures, de
brûlures ou d'électrocution.
• Utilisez cet appareil dans un environne-
ment domestique.
• Ne modifiez pas les caractéristiques de
cet appareil.
• Ne laissez jamais l'appareil sans surveil-
lance pendant son fonctionnement.
• N'utilisez jamais cet appareil avec les
mains mouillées ou lorsqu'il est en contact
avec de l'eau.
• Ne posez pas de couverts ou de couver-
cles sur les zones de cuisson. Elles sont
chaudes.
• Éteignez les zones de cuisson après cha-
que utilisation.
• N'utilisez jamais l'appareil comme plan
de travail ou comme plan de stockage.
• Si la surface de l'appareil présente des
fêlures, débranchez immédiatement l'ap-
pareil pour éviter tout risque d'électrocu-
tion.
Avertissement Risque d'explosion ou
d'incendie.
• Les graisses et l'huile chaudes peuvent
dégager des vapeurs inflammables. Te-
nez les flammes ou les objets chauds éloi-
gnés des graisses et de l'huile lorsque
vous vous en servez pour cuisiner.
• Les vapeurs dégagées par l'huile très
chaude peuvent provoquer une combus-
tion spontanée.
• L'huile qui a servi contient des restes
d'aliments pouvant provoquer un incen-
die à température plus faible que l'huile
n'ayant jamais servi.
• Ne placez pas de produits inflammables
ou d'éléments imbibés de produits in-
flammables à l'intérieur ou à proximité
de l'appareil, ni sur celui-ci.
FRANÇAIS 1

Avertissement Risque
d'endommagement de l'appareil.
• Ne laissez pas de récipients chauds sur le
bandeau de commande.
• Ne laissez pas le contenu des récipients
de cuisson s'évaporer complètement.
• Prenez soin de ne pas laisser tomber
d'objets ou de récipients sur l'appareil.
Sa surface risque d'être endommagée.
• Ne faites jamais fonctionner les zones de
cuisson avec des récipients de cuisson vi-
des ou sans aucun récipient de cuisson.
• Ne placez jamais de papier aluminium
sur l'appareil.
• N'utilisez pas de récipients en fonte ou en
aluminium, ni de récipients dont le fond
est endommagé et rugueux. Ils risque-
raient de rayer la surface vitrocéramique.
Soulevez toujours ces objets lorsque vous
devez les déplacer sur la surface de cuis-
son.
• Veillez à ce que la pièce où est installé
l'appareil soit bien aérée.
• Assurez-vous que les orifices de ventila-
tion ne sont pas bouchés.
• Utilisez uniquement des récipients stables
ayant une forme adaptée et un diamètre
supérieur à celui des brûleurs. Risque de
surchauffe et de rupture de la plaque en
verre (si votre appareil en est équipé) !
• Assurez-vous que la flamme ne s'éteint
pas lorsque vous tournez rapidement la
manette de la position maximale à la po-
sition minimale.
• Veillez à ce que les récipients se trouvent
bien au centre des zones de cuisson et
qu'ils ne dépassent pas des rebords de la
table de cuisson.
• N'utilisez que les accessoires fournis avec
l'appareil.
• N'installez pas de diffuseur de flamme sur
le brûleur.
Entretien et nettoyage
Avertissement Risque
d'endommagement de l'appareil.
• Nettoyez régulièrement l'appareil afin de
maintenir le revêtement en bon état.
• Ne pulvérisez pas d'eau ni de vapeur
pour nettoyer l'appareil.
• Ne lavez pas les brûleurs au lave-vaissel-
le.
• Nettoyez l'appareil avec un chiffon doux
humide. Utilisez uniquement des produits
de lavage neutres. N'utilisez pas de pro-
duits abrasifs, de tampons à récurer, de
solvants ni d'objets métalliques.
Mise au rebut
Avertissement Risque de blessure ou
d'asphyxie.
• Contactez votre service municipal pour
obtenir des informations sur la marche à
suivre pour mettre l'appareil au rebut.
• Débranchez l'appareil de l'alimentation
électrique.
• Coupez le câble d'alimentation et met-
tez-le au rebut.
• Aplatissez les tuyaux de gaz externes.
FRANÇAIS 20
La pagina si sta caricando...
La pagina si sta caricando...
La pagina si sta caricando...
La pagina si sta caricando...
La pagina si sta caricando...
La pagina si sta caricando...
La pagina si sta caricando...
La pagina si sta caricando...
La pagina si sta caricando...
La pagina si sta caricando...
La pagina si sta caricando...
La pagina si sta caricando...
La pagina si sta caricando...
La pagina si sta caricando...
La pagina si sta caricando...
La pagina si sta caricando...
La pagina si sta caricando...
La pagina si sta caricando...
La pagina si sta caricando...
La pagina si sta caricando...
La pagina si sta caricando...
La pagina si sta caricando...
La pagina si sta caricando...
La pagina si sta caricando...
La pagina si sta caricando...
La pagina si sta caricando...
La pagina si sta caricando...
La pagina si sta caricando...
La pagina si sta caricando...
La pagina si sta caricando...
La pagina si sta caricando...
La pagina si sta caricando...
-
 1
1
-
 2
2
-
 3
3
-
 4
4
-
 5
5
-
 6
6
-
 7
7
-
 8
8
-
 9
9
-
 10
10
-
 11
11
-
 12
12
-
 13
13
-
 14
14
-
 15
15
-
 16
16
-
 17
17
-
 18
18
-
 19
19
-
 20
20
-
 21
21
-
 22
22
-
 23
23
-
 24
24
-
 25
25
-
 26
26
-
 27
27
-
 28
28
-
 29
29
-
 30
30
-
 31
31
-
 32
32
-
 33
33
-
 34
34
-
 35
35
-
 36
36
-
 37
37
-
 38
38
-
 39
39
-
 40
40
-
 41
41
-
 42
42
-
 43
43
-
 44
44
-
 45
45
-
 46
46
-
 47
47
-
 48
48
-
 49
49
-
 50
50
-
 51
51
-
 52
52


in altre lingue
- English: IKEA MHGA1K User manual
- français: IKEA MHGA1K Manuel utilisateur
Documenti correlati
-
IKEA LHGA4K 50156008 Manuale utente
-
-
IKEA LHGA4K Manuale utente
-
-
-
-
-
-
IKEA AA-2360334-1-1 Manuale utente