
1
3
click!
2
4

click!
5 6
7
8

10
12
1
2
11
9

1
3
2

6
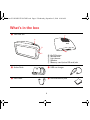
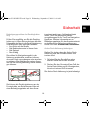
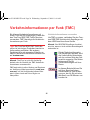
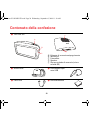
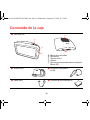
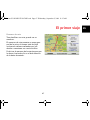
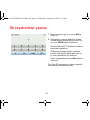
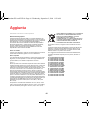
What’s in the box
What’s i n
the box
a TomTom GO
A On/Off button
B Microphone
C Light sensor
D Speaker
E Memory card (micro SD card) slot
b Active Dock c USB car charger
d USB cable e Documentation pack
A
B
C
D
E
Treviso-UG-NONLIVE-NoTMC.book Page 6 Wednesday, September 2, 2009 10:48 AM

Getting started
7
EN
Getting
started
Switching on and off
Install your TomTom GO navigation device
in your car following the instructions in the
installation section at the start of this book.
To switch on your navigation device, press
and hold the On/Off button until you see the
start-up screen. The first time you switch on
your device, it may take a short time to start.
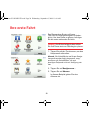
Setting up
When you first switch on your device, you
have to answer a few questions to set up the
device. Answer the questions by tapping
the screen.
You are asked whether you make regular
trips to the same locations. If you tap YES,
you can enter these destinations as your
favourite destinations. Every time you
switch on your device, you can immediately
select one of these locations as your desti-
nation.
To change these destinations or select a
new destination, tap Start-up preferences in
the Preferences menu, then select Ask for a
destination.
Device not starting
In rare cases, your TomTom GO navigation
device may not start correctly or may stop
responding to your taps.
First, check that the battery is properly
charged. To charge the battery, connect
your device to the car charger. It can take up
to 2 hours to fully charge the battery.
If this does not solve the problem, you can
reset the device. To do this, press and hold
the On/Off button for 15 seconds and
release the button when your device begins
to restart.
Treviso-UG-NONLIVE-NoTMC.book Page 7 Wednesday, September 2, 2009 10:48 AM

Getting started
8
Battery notes
The battery in your TomTom GO navigation
device charges when you connect it to the
car charger or to your computer.
When you connect your device to a compu-
ter, you are asked if you want to connect to
the computer. If you select No and then do
not tap the screen within three minutes, the
device will automatically switch off. This
happens so that the battery can charge
faster.
Note: You should plug the USB connector di-
rectly into a USB port on your computer and
not into a USB hub or USB port on a keyboard
or monitor.
GPS reception
When you first start your TomTom GO nav-
igation device, the device may need a few
minutes to determine your GPS position
and show your current position on the map.
In future, your position will be found much
faster, usually within a few seconds.
To ensure good GPS reception, you should
use your device outdoors. Large objects
such as tall buildings can sometimes inter-
fere with reception.
The TomTom GO 950 includes Enhanced
Positioning Technology or EPT. EPT auto-
matically estimates your position when the
GPS signal is lost while you are driving,
such as when you are in a tunnel. When EPT
is in use, the EPT symbol is shown in the
Driving View.
Treviso-UG-NONLIVE-NoTMC.book Page 8 Wednesday, September 2, 2009 10:48 AM

Safety
9
EN
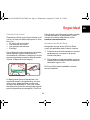
Safety
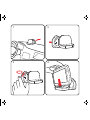
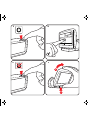
Positioning the dock
Consider carefully where to attach the dock
in your car. The dock should not block or
interfere with any of the following:
• Your view of the road
• Any of the controls in your car
• Any of your mirrors
• The airbag
When your navigation device is in the dock,
you should be able to reach the device eas-
ily without leaning or stretching. The dia-
grams show where you can safely attach the
dock.
You can attach the dock to the windscreen,
side window or use a Dashboard Mount
Disk to attach the dock to your dashboard.
TomTom also offers alternative mounting
solutions for your TomTom navigation
device. For more information about Dash-
board Mount Disks and alternative mount-
ing solutions, go to tomtom.com/
accessories.
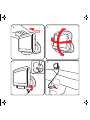
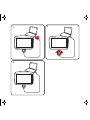
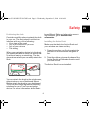
Installing the Active Dock
Make sure that both the Active Dock and
your window are clean and dry.
1. Press the suction cup firmly against the
window on an area where the glass is
flat.
2. Twist the rubber grip near the base of the
Active Dock in a clockwise direction until
you hear a click.
The Active Dock is now installed.
Treviso-UG-NONLIVE-NoTMC.book Page 9 Wednesday, September 2, 2009 10:48 AM

10
Making your first journey
Making
your first
journey
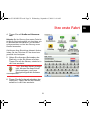
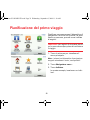
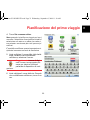
Planning a route with your TomTom GO
navigation device is easy. To plan a route,
follow the steps below.
Important: For safety reasons, you should
always plan a route before you start your
journey.
1. Tap the screen to bring up the Main
Menu.
Note: The buttons on your navigation device
are shown in full colour unless a button is cur-
rently unavailable.
2. Tap Navigate to...
3. Tap Address.
In this example, we will enter an address.
Treviso-UG-NONLIVE-NoTMC.book Page 10 Wednesday, September 2, 2009 10:48 AM

11
Making your first journey
EN
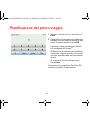
4. Tap Street and house number.
Note: When planning a trip for the first time
your navigation device asks you to choose a
state or country. Your choice is saved and used
for all routes you plan.
You can change this setting at any time by tap-
ping the flag.
5. Start to type the name of the town where
you want to go. Tap the name when it is
shown in the list.
Tip: Instead of typing the name,
tap this button to say the ad-
dress by speaking to your navi-
gation device.
6. Start to type the street name. Tap the
name when it is shown in the list.
Treviso-UG-NONLIVE-NoTMC.book Page 11 Wednesday, September 2, 2009 10:48 AM

12
Making your first journey
7. Enter the house number and then tap
Done.
8. Your navigation device asks if you need
to arrive at a particular time. For this ex-
ercise, tap NO.
The route is calculated by your device
using IQ Routes
TM
.
IQ Routes is used to plan the best possi-
ble route using information about the
average speeds measured on the roads.
When the route has been calculated, tap
Done.
Your TomTom GO navigation device begins
to guide you to your destination.
Treviso-UG-NONLIVE-NoTMC.book Page 12 Wednesday, September 2, 2009 10:48 AM

13
Making your first journey
EN
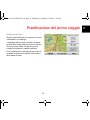
Route summary
After planning a route, you see a summary
of your route.
The route summary shows an overview
map of your route and the total journey time
including delays caused by both incidents
and busy roads.
You can see the route summary at any time
by tapping the right side of the status bar.
Treviso-UG-NONLIVE-NoTMC.book Page 13 Wednesday, September 2, 2009 10:48 AM

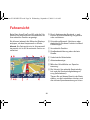
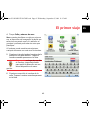
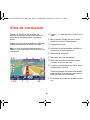
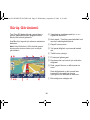
Driving View
14
Driving
View
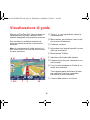
When your TomTom GO starts, you are
shown the Driving View along with detailed
information about your current position.
Tap the centre of the screen at any time to
open the Main Menu.
Note: The Driving View is shown in black and
white until your GO locates your current posi-
tion.
A Tap + and - to zoom in and out.
B Quick menu - you can enable the quick
menu in the Preferences menu.
C Your current position.
D Road sign information or the next street
name.
E Traffic sidebar.
F Battery level indicator.
G Microphone button for voice command
and control.
H The time, your current speed and the
speed limit, if known.
Tap this part of the status bar to change
the volume and hear the next spoken
instruction.
I The name of the street you are on.
Treviso-UG-NONLIVE-NoTMC.book Page 14 Wednesday, September 2, 2009 10:48 AM

Driving View
15
EN
J Navigation instruction for the road
ahead.
Tap this part of the status bar to change
between 2D and 3D views of the Driving
View.
K The remaining journey time, the remain-
ing distance and your estimated arrival
time.
Tap this part of the status bar to open the
route summary screen.
To change the information shown in the sta-
tus bar, tap Status bar preferences in the
Preferences menu.
Driving view symbols
Several symbols are shown in the bottom
left hand corner of the Driving View. Here
are a few examples:
Battery - this symbol shows the bat-
tery level. When the battery is low
and requires charging, the battery
symbol is empty. You should charge
your navigation device as soon as possible.
EPT - this symbol is shown when
your device is using EPT to esti-
mate your current location. EPT is
only used when you have no GPS
reception.
Note: EPT is not supported on all devices.
Sound off - this symbol is shown
when the sound is switched off.
To switch on the sound, open the
preferences menu and tap Turn on sound.
For more information, see the Reference
Guide.
Treviso-UG-NONLIVE-NoTMC.book Page 15 Wednesday, September 2, 2009 10:48 AM

16
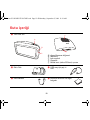
Packungsinhalt
Pack-
ungsin-
halt
a TomTom GO
A Ein/Aus-Taste
B Mikrofon
C Lichtsensor
D Lautsprecher
E Steckplatz für Speicherkarte (Micro SD-
Karte)
b Active Dock c USB-Autoladegerät
d USB-Kabel e Dokumentation
A
B
C
D
E
Treviso-UG-NONLIVE.book Page 16 Wednesday, September 2, 2009 11:04 AM

Erste Schritte
17
DE
Erste
Schritte
Ein- und ausschalten
Installieren Sie Ihr TomTom GO-Navigation-
sgerät in Ihrem Auto gemäß den Anweisun-
gen der Installationsanleitung am Anfang
dieses Handbuchs.
Halten Sie zum Einschalten Ihres Naviga-
tionsgeräts die Ein/Aus-Taste gedrückt, bis
das Startbild erscheint. Wenn Sie Ihr Gerät
zum ersten Mal einschalten, kann der Start
etwas länger dauern.
Einrichten
Beim ersten Einschalten müssen Sie zur Ein-
richtung Ihres Geräts einige Fragen beant-
worten. Zur Beantwortung der Fragen
können Sie einfach das Display antippen.
Sie werden gefragt, ob es Orte gibt, die Sie
regelmäßig aufsuchen. Wenn Sie auf JA tip-
pen, können Sie diese Ziele zu Ihren
Favoriten hinzufügen. Jedes Mal, wenn Sie
Ihr Gerät einschalten, können Sie sofort
einen dieser Orte als Ihr Ziel festlegen.
Um diese Ziele zu ändern oder ein neues
Ziel auszuwählen, tippen Sie im Menü Ein-
stellungen auf Starteinstellungen, und wäh-
len Sie dann Nach einem Ziel fragen aus.
Wenn das Gerät nicht startet
In seltenen Fällen kann es vorkommen, dass
Ihr TomTom GO-Navigationsgerät nicht
richtig startet oder nicht mehr reagiert,
wenn Sie den Touchscreen antippen.
Prüfen Sie zunächst, ob der Akku ausre-
ichend geladen ist. Um den Akku aufzu-
laden, verbinden Sie Ihr Gerät bitte mit dem
Autoladegerät. Das vollständige Aufladen
des Akkus kann bis zu zwei Stunden dauern.
Wird das Problem dadurch nicht behoben,
können Sie das Gerät zurücksetzen. Halten
Sie dafür die Ein/Aus-Taste 15 Sekunden
lang gedrückt und lassen Sie die Taste los,
sobald Ihr Gerät neu startet.
Treviso-UG-NONLIVE.book Page 17 Wednesday, September 2, 2009 11:04 AM

Erste Schritte
18
Informationen zum Akku
Der Akku in Ihrem TomTom GO-Navigation-
sgerät wird aufgeladen, wenn Sie Ihr Gerät
an das Autoladegerät oder an Ihren Compu-
ter anschließen.
Wenn Sie Ihr Gerät mit einem USB-Kabel an
einen Computer anschließen, werden Sie
gefragt, ob Sie eine Verbindung mit dem
Computer herstellen möchten. Wenn Sie
Nein auswählen und das Display in den
nächsten drei Minuten nicht berühren,
schaltet sich das Gerät automatisch aus.
Dies ermöglicht ein schnelleres Aufladen
des Akkus.
Wichtig: Verbinden Sie Ihr Gerät über das
USB-Kabel direkt mit einem USB-Anschluss
Ihres Computers, nicht mit einem USB-Hub
oder einem USB-Anschluss einer Tastatur oder
eines Monitors.
GPS-Empfang
Beim ersten Einschalten Ihres TomTom GO-
Navigationsgeräts kann es einige Minuten
dauern, bis das Gerät Ihre GPS-Position
ermittelt hat und Ihren aktuellen Standort
auf der Karte anzeigt. Danach erfolgt die
Ermittlung Ihres Standorts viel schneller, in
der Regel innerhalb weniger Sekunden.
Zur Sicherstellung eines guten GPS-Emp-
fangs sollten Sie Ihr Gerät nur im Freien ver-
wenden. Große Objekte wie Hochhäuser
können den Empfang stören.
Der TomTom GO 950 verfügt über EPT
(Enhanced Positioning Technology, verbes-
serte Positionsbestimmung). EPT wird
während der Fahrt automatisch zur Ermit-
tlung Ihrer Position aktiviert, wenn z. B. in
einem Tunnel kein GPS-Signal mehr emp-
fangen wird. Wenn EPT aktiviert ist, wird in
der Fahransicht ein entsprechendes Symbol
angezeigt.
Treviso-UG-NONLIVE.book Page 18 Wednesday, September 2, 2009 11:04 AM

Sicherheit
19
DE
Sicher-
heit
Befestigungsposition der Dockinghalter-
ung
Prüfen Sie sorgfältig, wo Sie die Docking-
halterung in Ihrem Auto anbringen können.
Folgendes darf durch die Dockinghalterung
nicht blockiert oder behindert werden:
• Ihre Sicht auf die Straße
• Alle Bedienelemente in Ihrem Auto
• Alle Spiegel
•Der Airbag
Sie sollten Ihr Navigationsgerät in der
Halterung problemlos erreichen können,
ohne sich nach vorne beugen oder strecken
zu müssen. Die Abbildungen zeigen Ihnen,
wo Sie die Dockinghalterung sicher befesti-
gen können.
Sie können die Dockinghalterung an der
Frontscheibe, am Seitenfenster oder mit
einer Befestigungsplatte auf dem Arma-
turenbrett anbringen. Außerdem bietet
Ihnen TomTom alternative Befesti-
gungslösungen für Ihr TomTom-Navigation-
sgerät an. Weitere Informationen zu
Befestigungsplatten für das Armaturenbrett
und alternativen Befestigungslösungen
finden Sie unter tomtom.com/accessories.
Active Dock-Halterung befestigen
Stellen Sie sicher, dass die Active Dock-
Halterung und die Scheibe sauber und
trocken sind.
1. Drücken Sie den Saugfuß an einer
ebenen Stelle fest an die Scheibe.
2. Drehen Sie den Gummigriff am Fuß der
Active Dock-Halterung im Uhrzeigersinn,
bis sie mit einem Klick einrastet.
Die Active Dock-Halterung ist jetzt befestigt.
Treviso-UG-NONLIVE.book Page 19 Wednesday, September 2, 2009 11:04 AM

20
Ihre erste Fahrt
Ihre er-
ste Fahrt
Das Planen einer Route mit Ihrem
TomTom GO-Navigationsgerät ist kinder-
leicht. Um eine Route zu planen, befolgen
Sie die unten stehenden Schritte.
Wichtig: Aus Sicherheitsgründen sollten
Sie Ihre Route stets vor Fahrtbeginn planen.
1. Tippen Sie auf den Touchscreen, um das
Hauptmenü aufzurufen.
Hinweis: Die Schaltflächen auf Ihrem Naviga-
tionsgerät werden farbig dargestellt, ausg-
enommen die Schaltflächen, die zum
jeweiligen Zeitpunkt nicht zur Verfügung ste-
hen.
2. Tippen Sie auf Navigieren zu...
3. Tippen Sie auf Adresse.
In diesem Beispiel geben Sie eine
Adresse ein.
Treviso-UG-NONLIVE.book Page 20 Wednesday, September 2, 2009 11:04 AM

21
Ihre erste Fahrt
DE
4. Tippen Sie auf Straße und Hausnum-
mer.
Hinweis: Bei der Planung Ihrer ersten Fahrt bit-
tet Sie Ihr Navigationsgerät, ein Land bzw. ein-
en Bundesstaat auszuwählen. Ihre Auswahl
wird gespeichert und bei der Planung neuer
Routen verwendet.
Sie können diese Einstellung jederzeit ändern,
indem Sie das Fähnchen für das derzeit aus-
gewählte Land antippen.
5. Geben Sie die ersten Buchstaben der
Stadt ein, zu der Sie fahren möchten.
Tippen Sie auf den Namen, sobald er in
der Liste erscheint.
Tipp: Statt den Namen einzuge-
ben, können Sie diese Schalt-
fläche antippen, um Ihrem
Navigationsgerät die Adresse
vorzusprechen.
6. Tippen Sie die Anfangsbuchstaben der
Straße ein. Tippen Sie auf den Namen,
sobald er in der Liste erscheint.
Treviso-UG-NONLIVE.book Page 21 Wednesday, September 2, 2009 11:04 AM
La pagina si sta caricando...
La pagina si sta caricando...
La pagina si sta caricando...
La pagina si sta caricando...
La pagina si sta caricando...
La pagina si sta caricando...
La pagina si sta caricando...
La pagina si sta caricando...
La pagina si sta caricando...
La pagina si sta caricando...
La pagina si sta caricando...
La pagina si sta caricando...
La pagina si sta caricando...
La pagina si sta caricando...
La pagina si sta caricando...
La pagina si sta caricando...
La pagina si sta caricando...
La pagina si sta caricando...
La pagina si sta caricando...
La pagina si sta caricando...
La pagina si sta caricando...
La pagina si sta caricando...
La pagina si sta caricando...
La pagina si sta caricando...
La pagina si sta caricando...
La pagina si sta caricando...
La pagina si sta caricando...
La pagina si sta caricando...
La pagina si sta caricando...
La pagina si sta caricando...
La pagina si sta caricando...
La pagina si sta caricando...
La pagina si sta caricando...
La pagina si sta caricando...
La pagina si sta caricando...
La pagina si sta caricando...
La pagina si sta caricando...
La pagina si sta caricando...
La pagina si sta caricando...
La pagina si sta caricando...
La pagina si sta caricando...
La pagina si sta caricando...
La pagina si sta caricando...
La pagina si sta caricando...
La pagina si sta caricando...
La pagina si sta caricando...
La pagina si sta caricando...
La pagina si sta caricando...
La pagina si sta caricando...
La pagina si sta caricando...
-
 1
1
-
 2
2
-
 3
3
-
 4
4
-
 5
5
-
 6
6
-
 7
7
-
 8
8
-
 9
9
-
 10
10
-
 11
11
-
 12
12
-
 13
13
-
 14
14
-
 15
15
-
 16
16
-
 17
17
-
 18
18
-
 19
19
-
 20
20
-
 21
21
-
 22
22
-
 23
23
-
 24
24
-
 25
25
-
 26
26
-
 27
27
-
 28
28
-
 29
29
-
 30
30
-
 31
31
-
 32
32
-
 33
33
-
 34
34
-
 35
35
-
 36
36
-
 37
37
-
 38
38
-
 39
39
-
 40
40
-
 41
41
-
 42
42
-
 43
43
-
 44
44
-
 45
45
-
 46
46
-
 47
47
-
 48
48
-
 49
49
-
 50
50
-
 51
51
-
 52
52
-
 53
53
-
 54
54
-
 55
55
-
 56
56
-
 57
57
-
 58
58
-
 59
59
-
 60
60
-
 61
61
-
 62
62
-
 63
63
-
 64
64
-
 65
65
-
 66
66
-
 67
67
-
 68
68
-
 69
69
-
 70
70


in altre lingue
- English: TomTom GO 950 User manual
- español: TomTom GO 950 Manual de usuario
- Deutsch: TomTom GO 950 Benutzerhandbuch
- Türkçe: TomTom GO 950 Kullanım kılavuzu