
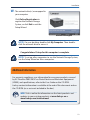
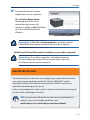
Network Storage
System with 2 Bays
Model No: NAS200 (EU)
QUICK INSTALLATION
English
Deutsch
Español
Français
Italiano
Nederlands
Português

3
Table of Contents
Online Resources
Most web browsers allow you to enter the web address without adding the
http:// in front of the address. This User Guide will refer to websites without
including http:// in front of the address. Some older web browsers may require
you to add it.
Resource Website
Linksys www.linksys.com
Linksys Europe www.linksys.eu
Linksys International www.linksys.com/international
Glossary www.linksys.com/glossary
Network Security www.linksys.com/security
Copyright and Trademarks
Specifications are subject to change without notice. Linksys is a registered
trademark or trademark of Cisco Systems, Inc. and/or its affiliates in the U.S. and
certain other countries. Copyright © 2007 Cisco Systems, Inc. All rights reserved.
Other brands and product names are trademarks or registered trademarks of
their respective holders.
Table of Contents . . . . . . . . . . . . . . . . . . . . . . . . . . . . . . . . . . . . . . . . . . . . . . . . . . . . . . . .3
Installation (English) . . . . . . . . . . . . . . . . . . . . . . . . . . . . . . . . . . . . . . . . . . . . . . .4
Installation (Deutsch) . . . . . . . . . . . . . . . . . . . . . . . . . . . . . . . . . . . . . . . . . . . . .14
Instalación (Español) . . . . . . . . . . . . . . . . . . . . . . . . . . . . . . . . . . . . . . . . . . . . . .24
Installation (Français) . . . . . . . . . . . . . . . . . . . . . . . . . . . . . . . . . . . . . . . . . . . . .34
Installazione (Italiano) . . . . . . . . . . . . . . . . . . . . . . . . . . . . . . . . . . . . . . . . . . . .44
Installatie (Nederlands) . . . . . . . . . . . . . . . . . . . . . . . . . . . . . . . . . . . . . . . . . . .54
Instalação (Português) . . . . . . . . . . . . . . . . . . . . . . . . . . . . . . . . . . . . . . . . . . . .64
Contact Information . . . . . . . . . . . . . . . . . . . . . . . . . . . . . . . . . . . . . . . . . . . . . . . . . . . .74

4
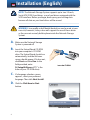
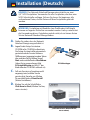
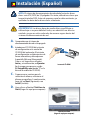
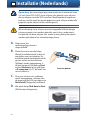
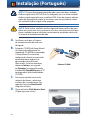
Installation (English)
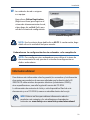
NOTE: The Network Storage System supports up to two 3.5-inch,
Serial-ATA (SATA) hard drives, so use hard drives equipped with the
SATA interface. Before you begin, back up any pre-existing data
because all data on your hard drives will be erased.
WARNING: Low-prole or half-height hard drives can be used at your
own risk; however, Linksys does not support the use of these drives
as they are not securely held in place inside the Network Storage
System.
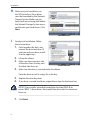
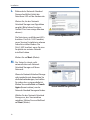
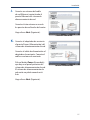
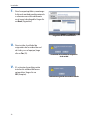
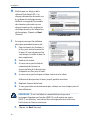
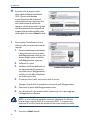
Make sure the Network Storage
System is powered off.
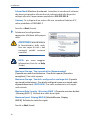
Insert the Setup Wizard CD-ROM
into your computer’s CD-ROM
drive. The Setup Wizard should run
automatically, and the Welcome
screen should appear. If it does not,
click Start and then Run. In the
field provided, enter
D:\SetupUtility.exe (if “D” is the
letter of your CD-ROM drive).
If a language selection screen
appears, select your preferred
language. Then click Next/Install.
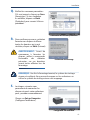
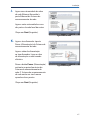
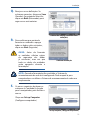
Click the Click Here to Start
button.
A.
B.
C.
D.
Insert the CD-ROMInsert the CD-ROM
Click Here to StartClick Here to Start

5
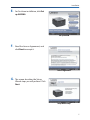
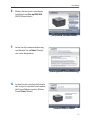
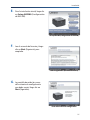
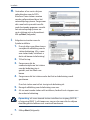
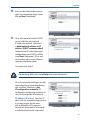
Installation
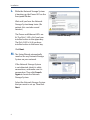
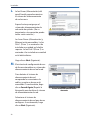
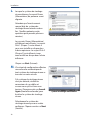
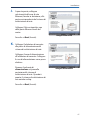
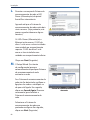
For first-time installation, click Set
up NAS200.
Read the License Agreement, and
click Next to accept it.
The screen describes the Setup
Wizard steps you will perform. Click
Next.
E.
F.
G.
Set up NAS200Set up NAS200
License AgreementLicense Agreement
Setup Wizard StepsSetup Wizard Steps

6
Installation
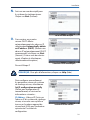
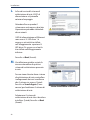
Make sure your hard drives use
the SATA interface. These drives
must be formatted by the Network
Storage System. Make sure you
back up all pre-existing data before
the Network Storage System erases
and formats your hard drives. Click
Next.
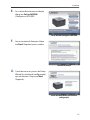
For physical installation, follow
these instructions:
Push together the clips, and
remove the drive bay door. (If
you have only one drive, install
it in the upper bay.)
Lift up the ribbon.
Make sure the connector side
of the drive faces the bay, and
the label side faces up.
Make sure the drive is inserted under the ribbon.
Push the drive in until it snugly fits in the bay.
Replace the drive bay door.
If you have a second hard drive, repeat these steps for the lower bay.
NOTE: If you install a second drive and plan to stripe (RAID 0) or
mirror (RAID 1) these drives, then match the drive sizes for maximum
drive use.
Click Next.
H.
I.
1.
2.
3.
4.
5.
6.
7.
SATA Hard DrivesSATA Hard Drives
Install Hard DriveInstall Hard Drive

7
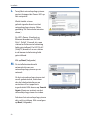
Installation
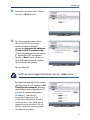
Connect one end of the included
Ethernet network cable to the
Ethernet port of the Network
Storage System.
Connect the other end to one of
the router’s local network ports.
Click Next.
Connect the power adapter to the
Power port of the Network Storage
System.
Connect the power cord to the
power adapter. Plug the power cord
into an electrical outlet.
Press the Power button on the
back panel of the Network Storage
System. The Network Storage
System beeps once when it is ready.
Click Next.
J.
K.
Connect Network CableConnect Network Cable
Connect PowerConnect Power

8
Installation
While the Network Storage System
is booting up, the Power LED on the
front panel flashes.
Wait until you hear the Network
Storage System beep twice. (Be
patient; this can take several
minutes.)
The Power and Ethernet LEDs are
lit. The Disk 1 LED is lit if you have
installed a drive in the upper bay.
The Disk 2 LED is lit if you have
installed a drive in the lower bay.
Click Next.
The Setup Wizard automatically
searches for any Network Storage
System on your network.
If the Network Storage System
is not detected, check its cable
connections, and make sure it is
powered on. Then click Search
Again to locate the Network
Storage System.
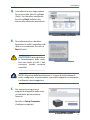
Select the Network Storage System
that you want to set up. Then click
Next.
L.
M.
Wait for Two BeepsWait for Two Beeps
Network Storage System DetectedNetwork Storage System Detected

9
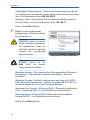
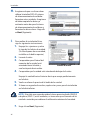
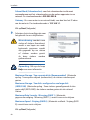
Installation
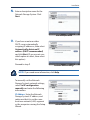
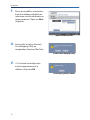
Enter a descriptive name for the
Network Storage System. Click
Next.
If you have a router or other
DHCP server automatically
assigning IP addresses, then select
Automatically obtain an IP
address (DHCP recommended)
and click Next. (If you are not sure
which option to select, then select
this option.)
Proceed to step P.
NOTE: If you need more information, click Help.
To manually set the Network
Storage System’s network settings,
select Set IP conguration
manually and enter the following
information:
IP Address Enter the Network
Storage System’s IP address, and
make sure that it is on the same
local area network (LAN) segment
as the computer running the Setup
Wizard.
N.
O.
Enter Descriptive NameEnter Descriptive Name
Automatic Network SettingsAutomatic Network Settings
Manual Network SettingsManual Network Settings

10
Installation
Subnet Mask Enter the Subnet Mask, which must match the subnet mask
of the other devices on your network. The default is 255.255.255.0.
Gateway If you have a router on your network, enter its IP address. The
default is 192.168.1.1.
Click Next.
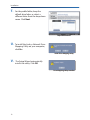
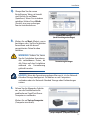
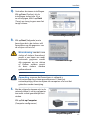
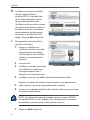
Select the appropriate
configuration for your drive usage:
WARNING: Before you format
drive(s), back up pre-existing
data because all data on your
drive(s) will be erased when
they are formatted.
NOTE: If you need more
information, click Help.
Maximum Storage - Two separate disks (Recommended) Drives seen
separately.
Maximum Storage - Two disks configured as one large disk
(JBOD/LVM) Drives seen as a single virtual drive.
Maximum Data Security - Mirroring (RAID 1) Requires two hard drives.
Maximum Speed - Striping (RAID 0) Requires two hard drives.
Click Next.
P.
Select Drive ConfigurationSelect Drive Configuration

11
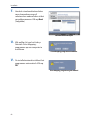
Installation
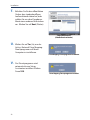
Review the new settings. If they
are correct, click Save. If you would
like to change them, click Back to
return to the previous screen.
To confirm that you want to format
your drives and erase all data on
them, click Next.
WARNING: Before you format
drive(s), back up pre-existing
data because all data on your
drive(s) will be erased when
they are formatted.
NOTE: When formatting is complete, the Network Storage System is
congured. You can map it to computers or use the Network Storage
System without mapping.
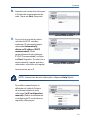
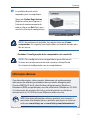
The following steps map the
network drive(s) to your computer
for convenient access.
Click Set up Computer.
Q.
R.
S.
Confirm New SettingsConfirm New Settings
Confirm FormattingConfirm Formatting
Set up ComputerSet up Computer

12
Installation
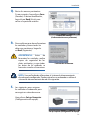
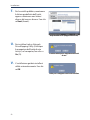
For the public folder, keep the
default drive letter, or select a
different letter from the drop-down
menu. Click Next.
To install the Linksys Network Drive
Mapping Utility on your computer,
click Yes.
The Setup Wizard automatically
installs the utility. Click OK.
T.
U.
V.
Map Network DriveMap Network Drive
Install Drive Mapping UtilityInstall Drive Mapping Utility
Drive Mapping Utility InstalledDrive Mapping Utility Installed

13
Installation
The network drive(s) are mapped to
your computer.
Click Online Registration to
register the Network Storage
System, or click Exit to exit the
Setup Wizard.
NOTE: On your desktop, double-click My Computer. Then double-
click the network drive to access it.
Congratulations! Setup for this computer is complete.
NOTE: To set up other computers to use the Network Storage System,
run the Setup Wizard on those computers.
For warranty, regulatory, user information for consumer products covered
by EU Directive 2002/96/EC on Waste Electric and Electronic Equipment
(WEEE), and specifications, refer to the User Guide on the CD-ROM.
Linksys contact information is available at the end of this document and on
the CD-ROM (or as an insert included in the box).
WEB: Visit us online for information on the latest products and
updates to your existing products at www.linksys.eu or
www.linksys.com/international
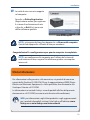
Additional Information
W.
Network Drive MappedNetwork Drive Mapped

14
HINWEIS: Das Network Attached Storage unterstützt bis zu zwei
3,5”-SATA-Festplatten. Verwenden Sie also Festplatten, die über eine
SATA-Schnittstelle verfügen. Sichern Sie, bevor Sie beginnen, alle
vorhandenen Daten, da alle Daten auf Ihren Festplatten gelöscht
werden.
WARNUNG: Festplatten mit Bauhöhe Low Prole oder Half Height
können auf eigenes Risiko hin verwendet werden. Linksys unterstützt
die Verwendung dieser Festplatten jedoch nicht, da sie keinen festen
Sitz im Network Attached Storage haben.
Stellen Sie sicher, dass das Network
Attached Storage ausgeschaltet ist.
Legen Sie die Setup-Assistenten-
CD-ROM in Ihr CD-ROM-Laufwerk ein.
Der Setup-Assistent sollte automatisch
gestartet und das Fenster Welcome
(Willkommen) angezeigt werden. Wenn
dies nicht der Fall ist, klicken Sie auf
Start und anschließend auf Ausführen.
Geben Sie im vorgesehenen Feld
D:\SetupUtility.exe ein (falls „D“ der
Buchstabe des CD-ROM-Laufwerks ist).
Falls ein Fenster zur Sprachauswahl
angezeigt wird, wählen Sie die
gewünschte Sprache aus. Klicken
Sie anschließend auf Next/Install
(Weiter/Installieren).
Klicken Sie auf die Schaltfläche
Click Here to Start (Klicken Sie hier,
um zu starten).
A.
B.
C.
D.
CD-ROM einlegenCD-ROM einlegen
„Click Here to Start“ (Klicken Sie hier,
um zu starten)
„Click Here to Start“ (Klicken Sie hier,
um zu starten)
Installation (Deutsch)

15
Installation
Klicken Sie bei einer erstmaligen
Installation auf Set up NAS200
(NAS200 einrichten).
Lesen Sie die Lizenzvereinbarung,
und klicken Sie auf Next (Weiter),
um sie zu akzeptieren.
In dem Fenster werden die Schritte
des Setup-Assistenten beschrieben,
die Sie ausführen werden. Klicken
Sie auf Next (Weiter).
E.
F.
G.
„Set up NAS200“ (NAS200 einrichten)„Set up NAS200“ (NAS200 einrichten)
„License Agreement“ (Lizenzvereinbarung)„License Agreement“ (Lizenzvereinbarung)
Schritte des Setup-AssistentenSchritte des Setup-Assistenten

16
Installation
Stellen Sie sicher, dass die
Festplatten die SATA-Schnittstelle
verwenden. Diese Festplatten
müssen vom Network Attached
Storage formatiert werden. Stellen
Sie sicher, dass alle vorhandenen
Daten gesichert werden, bevor das
Network Attached Storage Ihre
Festplatten löscht und formatiert.
Klicken Sie auf Next (Weiter).
Befolgen Sie die nachfolgenden
Anweisungen für die physische
Installation:
Drücken Sie die Klammern
zusammen, und entfernen
Sie die Klappe des
Festplattenschachts. (Wenn
Sie nur über eine Festplatte
verfügen, installieren Sie sie
im oberen Schacht.)
Heben Sie das Band an.
Stellen Sie sicher, dass
die Verbindungsseite der
Festplatte zur Klappe und die
beschriftete Seite nach oben
ausgerichtet ist.
Stellen Sie sicher, dass die Festplatte unter dem Band eingesetzt wird.
Schieben Sie die Festplatte hinein, bis sie korrekt im Schacht
eingesetzt ist.
Schließen Sie die Klappe des Festplattenschachts.
Wenn Sie über eine zweite Festplatte verfügen, wiederholen Sie die
Schritte für den unteren Schacht.
HINWEIS: Wenn Sie eine zweite Festplatte installieren und diese
Festplatten stripen (RAID 0) oder spiegeln (RAID 1) möchten, gleichen
Sie die Größen der Festplatten miteinander ab, um sie optimal nutzen
zu können.
Klicken Sie auf Next (Weiter).
H.
I.
1.
2.
3.
4.
5.
6.
7.
SATA-FestplattenSATA-Festplatten
Festplatte installierenFestplatte installieren

17
Installation
Schließen Sie ein Ende des
im Lieferumfang enthaltenen
Ethernet-Netzwerkkabels an
den Ethernet-Port des Network
Attached Storage an.
Schließen Sie das andere Ende
des Kabels an einen der lokalen
Netzwerk-Ports des Routers an.
Klicken Sie auf Next (Weiter).
Schließen Sie das Netzteil an den
Stromanschluss des Network
Attached Storage an.
Schließen Sie das Netzkabel an
das Netzteil an. Stecken Sie das
Netzkabel in eine Steckdose.
Drücken Sie die Einschalttaste
auf der Rückseite des Network
Attached Storage. Das Network
Attached Storage gibt einen
Signalton ab, wenn es
einsatzbereit ist.
Klicken Sie auf Next (Weiter).
J.
K.
Netzwerkkabel anschließenNetzwerkkabel anschließen
Netzkabel anschließenNetzkabel anschließen

18
Installation
Während das Network Attached
Storage hochfährt, blinkt die
Netzstrom-LED auf der Vorderseite.
Warten Sie, bis das Network
Attached Storage zwei Signaltöne
ausgibt. (Bitte haben Sie etwas
Geduld. Dies kann einige Minuten
dauern.)
Die Netzstrom- und Ethernet-LEDs
leuchten. Die Disk 1-LED leuchtet,
wenn Sie eine Festplatte im oberen
Schacht installiert haben. Die
Disk 2-LED leuchtet, wenn Sie eine
Festplatte im unteren Schacht
installiert haben.
Klicken Sie auf Next (Weiter).
Der Setup-Assistent sucht
automatische nach Network
Attached Storages auf Ihrem
Netzwerk.
Wenn das Network Attached Storage
nicht entdeckt wird, überprüfen Sie
die Kabelverbindungen, und stellen
Sie sicher, dass es eingeschaltet ist.
Klicken Sie anschließend auf Search
Again (Erneut suchen), um das
Network Attached Storage zu finden.
Wählen Sie das Network Attached
Storage aus, das Sie einrichten
möchten. Klicken Sie anschließend
auf Next (Weiter).
L.
M.
Auf zwei Signaltöne wartenAuf zwei Signaltöne warten
Network Attached Storage entdecktNetwork Attached Storage entdeckt

19
Installation
Geben Sie einen aussagekräftigen
Namen für das Network Attached
Storage ein. Klicken Sie auf Next
(Weiter).
Wenn Ihr Router oder ein anderer
DHCP-Server automatisch IP-
Adressen zuweist, dann wählen
Sie Automatically obtain an IP
address (DHCP recommended)
(IP-Adresse automatisch beziehen
(DHCP empfohlen)) aus, und klicken
Sie auf Next (Weiter). (Wenn Sie
sich nicht sicher sind, welche
Option Sie wählen sollen, wählen
Sie diese Option.)
Fahren Sie mit Schritt P fort.
HINWEIS: Klicken Sie auf Help (Hilfe), um weitere Informationen zu
erhalten.
Um die Netzwerkeinstellungen
des Network Attached Storage
manuell einzurichten, wählen Sie
Set IP conguration manually
(IP-Konguration manuell
einrichten), und geben Sie
folgende Informationen ein:
IP Address (IP-Adresse): Geben
Sie die IP-Adresse des Network
Attached Storage ein, und stellen
Sie sicher, dass sie sich in demselben
Segment des Local Area Network
(LAN) befindet wie der PC, auf dem
der Setup-Assistent ausgeführt wird.
N.
O.
Aussagekräftigen Namen eingebenAussagekräftigen Namen eingeben
Automatische NetzwerkeinstellungenAutomatische Netzwerkeinstellungen
Manuelle NetzwerkeinstellungenManuelle Netzwerkeinstellungen

20
Installation
Subnet Mask (Subnetzmaske): Geben Sie die Subnetzmaske ein, die mit
der Subnetzmaske der anderen Geräte in Ihrem Netzwerk übereinstimmen
muss. Der Standardwert lautet 255.255.255.0.
Gateway: Wenn sich ein Router in Ihrem Netzwerk befindet, geben Sie
dessen IP-Adresse ein. Der Standardwert lautet 192.168.1.1.
Klicken Sie auf Next (Weiter).
Wählen Sie die entsprechende
Konfiguration für die Verwendung
Ihrer Festplatte aus:
WARNUNG: Sichern Sie, bevor
Sie die Festplatten formatieren,
alle vorhandenen Daten, da
alle Daten auf den Festplatten
während der Formatierung
gelöscht werden.
HINWEIS: Klicken Sie auf
Help (Hilfe), um weitere
Informationen zu erhalten.
Maximum Storage - Two separate disks (Recommended) (Maximaler
Speicherplatz – zwei separate Festplatten (empfohlen)): Separate
Festplatten.
Maximum Storage - Two disks configured as one large disk (JBOD/
LVM) (Maximaler Speicherplatz – mehrere Festplatten (JBOD/LVM)): Die
Laufwerke werden als eine virtuelle Festplatte gesehen.
Maximum Data Security - Mirroring (RAID 1) (Maximale Sicherheit der
Daten – Spiegelung (RAID 1)): Zwei Festplatten sind erforderlich.
Maximum Speed - Striping (RAID 0) (Maximale Geschwindigkeit –
Striping (RAID 0)): Zwei Festplatten sind erforderlich.
Klicken Sie auf Next (Weiter).
P.
Konfiguration der Festplatte auswählenKonfiguration der Festplatte auswählen

21
Installation
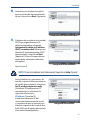
Überprüfen Sie die neuen
Einstellungen. Wenn sie korrekt
sind, klicken Sie auf Save
(Speichern). Wenn Sie sie ändern
möchten, klicken Sie auf Back
(Zurück), um zum vorherigen
Fenster zurückzukehren.
Klicken Sie auf Next (Weiter), um zu
bestätigen, dass Sie Ihre Festplatten
formatieren und alle darauf
gespeicherten Daten löschen
möchten.
WARNUNG: Sichern Sie, bevor
Sie die Festplatten formatieren,
alle vorhandenen Daten, da
alle Daten auf den Festplatten
während der Formatierung
gelöscht werden.
HINWEIS: Wenn die Formatierung abgeschlossen ist, ist das Network
Attached Storage konguriert. Sie können es mit Computern
verbinden oder das Network Attached Storage ohne Verbindungen
nutzen.
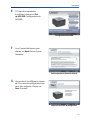
Führen Sie die folgenden Schritte
aus, um die Netzlaufwerke für
problemlosen Zugriff mit Ihrem
Computer zu verbinden.
Klicken Sie auf Set up Computer
(Computer einrichten).
Q.
R.
S.
„Confirm New Settings“
(Neue Einstellungen bestätigen)
„Confirm New Settings“
(Neue Einstellungen bestätigen)
Formatierung bestätigenFormatierung bestätigen
„Set up Computer“ (Computer einrichten)„Set up Computer“ (Computer einrichten)
La pagina si sta caricando...
La pagina si sta caricando...
La pagina si sta caricando...
La pagina si sta caricando...
La pagina si sta caricando...
La pagina si sta caricando...
La pagina si sta caricando...
La pagina si sta caricando...
La pagina si sta caricando...
La pagina si sta caricando...
La pagina si sta caricando...
La pagina si sta caricando...
La pagina si sta caricando...
La pagina si sta caricando...
La pagina si sta caricando...
La pagina si sta caricando...
La pagina si sta caricando...
La pagina si sta caricando...
La pagina si sta caricando...
La pagina si sta caricando...
La pagina si sta caricando...
La pagina si sta caricando...
La pagina si sta caricando...
La pagina si sta caricando...
La pagina si sta caricando...
La pagina si sta caricando...
La pagina si sta caricando...
La pagina si sta caricando...
La pagina si sta caricando...
La pagina si sta caricando...
La pagina si sta caricando...
La pagina si sta caricando...
La pagina si sta caricando...
La pagina si sta caricando...
La pagina si sta caricando...
La pagina si sta caricando...
La pagina si sta caricando...
La pagina si sta caricando...
La pagina si sta caricando...
La pagina si sta caricando...
La pagina si sta caricando...
La pagina si sta caricando...
La pagina si sta caricando...
La pagina si sta caricando...
La pagina si sta caricando...
La pagina si sta caricando...
La pagina si sta caricando...
La pagina si sta caricando...
La pagina si sta caricando...
La pagina si sta caricando...
La pagina si sta caricando...
La pagina si sta caricando...
La pagina si sta caricando...
La pagina si sta caricando...
La pagina si sta caricando...
-
 1
1
-
 2
2
-
 3
3
-
 4
4
-
 5
5
-
 6
6
-
 7
7
-
 8
8
-
 9
9
-
 10
10
-
 11
11
-
 12
12
-
 13
13
-
 14
14
-
 15
15
-
 16
16
-
 17
17
-
 18
18
-
 19
19
-
 20
20
-
 21
21
-
 22
22
-
 23
23
-
 24
24
-
 25
25
-
 26
26
-
 27
27
-
 28
28
-
 29
29
-
 30
30
-
 31
31
-
 32
32
-
 33
33
-
 34
34
-
 35
35
-
 36
36
-
 37
37
-
 38
38
-
 39
39
-
 40
40
-
 41
41
-
 42
42
-
 43
43
-
 44
44
-
 45
45
-
 46
46
-
 47
47
-
 48
48
-
 49
49
-
 50
50
-
 51
51
-
 52
52
-
 53
53
-
 54
54
-
 55
55
-
 56
56
-
 57
57
-
 58
58
-
 59
59
-
 60
60
-
 61
61
-
 62
62
-
 63
63
-
 64
64
-
 65
65
-
 66
66
-
 67
67
-
 68
68
-
 69
69
-
 70
70
-
 71
71
-
 72
72
-
 73
73
-
 74
74
-
 75
75


in altre lingue
- français: Cisco Linksys NAS200
- español: Cisco Linksys NAS200
- Deutsch: Cisco Linksys NAS200
- Nederlands: Cisco Linksys NAS200
- português: Cisco Linksys NAS200
Altri documenti
-
Linksys WRT54G2 Manuale del proprietario
-
ZyXEL NSA-220 Manuale utente
-
 ZyXEL Communications NSA-220 Plus Guida Rapida
-
 ZyXEL Communications nsa320 Guida Rapida
-
EUROCOM P150SM Racer 3W Manuale utente
-
-
-
-
-

