
DE
ES
FR
EN
Owner’s Manual
Mode d’emploi
Manual de instrucciones
Benutzerhandbuch
EnglishFrançaisEspañolDeutsch
HARMONY DIRECTOR™

HD-300 Owner’s Manual
2
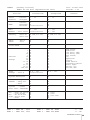
The model number, serial number, power requirements, etc., may be
found on or near the name plate, which is at the bottom of the unit.
You should note this serial number in the space provided below and
retain this manual as a permanent record of your purchase to aid iden-
tification in the event of theft.
Model No.
Serial No.
(bottom_en_01)
1. IMPORTANT NOTICE: DO NOT MODIFY THIS UNIT!
This product, when installed as indicated in the instructions
contained in this manual, meets FCC requirements. Modifica-
tions not expressly approved by Yamaha may void your
authority, granted by the FCC, to use the product.
2. IMPORTANT: When connecting this product to accessories
and/or another product use only high quality shielded cables.
Cable/s supplied with this product MUST be used. Follow all
installation instructions. Failure to follow instructions could
void your FCC authorization to use this product in the USA.
3. NOTE: This product has been tested and found to comply
with the requirements listed in FCC Regulations, Part 15 for
Class “B” digital devices. Compliance with these require-
ments provides a reasonable level of assurance that your
use of this product in a residential environment will not result
in harmful interference with other electronic devices. This
equipment generates/uses radio frequencies and, if not
installed and used according to the instructions found in the
users manual, may cause interference harmful to the opera-
tion of other electronic devices. Compliance with FCC regula-
tions does not guarantee that interference will not occur in all
installations. If this product is found to be the source of inter-
ference, which can be determined by turning the unit “OFF”
and “ON”, please try to eliminate the problem by using one of
the following measures:
Relocate either this product or the device that is being
affected by the interference.
Utilize power outlets that are on different branch (circuit
breaker or fuse) circuits or install AC line filter/s.
In the case of radio or TV interference, relocate/reorient the
antenna. If the antenna lead-in is 300 ohm ribbon lead,
change the lead-in to co-axial type cable.
If these corrective measures do not produce satisfactory
results, please contact the local retailer authorized to distrib-
ute this type of product. If you can not locate the appropriate
retailer, please contact Yamaha Corporation of America,
6600 Orangethorpe Ave, Buena Park, CA90620, USA
The above statements apply ONLY to those products distrib-
uted by Yamaha Corporation of America or its subsidiaries.
* This applies only to products distributed by Yamaha Corporation of America. (class B)
FCC INFORMATION (U.S.A.)
* This applies only to products distributed by Yamaha Corporation of America.
COMPLIANCE INFORMATION STATEMENT (Supplierʼs declaration of conformity procedure)
Responsible Party: Yamaha Corporation of America
Address: 6600 Orangethorpe Ave., Buena Park, Calif. 90620
Telephone: 714-522-9011
Type of Equipment: HARMONY DIRECTOR
Model Name: HD-300
This device complies with Part 15 of the FCC Rules.
Operation is subject to the following two conditions:
1) this device may not cause harmful interference, and
2) this device must accept any interference received including interference that may cause undesired operation.
(FCC SDoC)

HD-300 Owner’s Manual
3
(weee_battery_eu_en_02)
Information for users on collection and disposal of old equipment and used batteries
These symbols on the products, packaging, and/or accompanying documents mean that used electrical and electronic
products and batteries should not be mixed with general household waste.
For proper treatment, recovery and recycling of old products and used batteries, please take them to applicable collection
points, in accordance with your national legislation.
By disposing of these products and batteries correctly, you will help to save valuable resources and prevent any potential
negative effects on human health and the environment which could otherwise arise from inappropriate waste handling.
For more information about collection and recycling of old products and batteries, please contact your local municipality, your
waste disposal service or the point of sale where you purchased the items.
For business users in the European Union:
If you wish to discard electrical and electronic equipment, please contact your dealer or supplier for further information.
Information on Disposal in other Countries outside the European Union:
These symbols are only valid in the European Union. If you wish to discard these items, please contact your local authorities
or dealer and ask for the correct method of disposal.
Note for the battery symbol (bottom two symbol examples):
This symbol might be used in combination with a chemical symbol. In this case it complies with the requirement set by the EU
Battery Directive for the chemical involved.
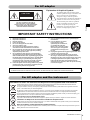
Explanation of Graphical Symbols
The lightning flash with arrowhead symbol
within an equilateral triangle is intended to alert
the user to the presence of uninsulated
“dangerous voltage” within the product’s
enclosure that may be of sufficient magnitude to
constitute a risk of electric shock to persons.
The exclamation point within an equilateral
triangle is intended to alert the user to the
presence of important operating and
maintenance (servicing) instructions in the
literature accompanying the product.
IMPORTANT SAFETY INSTRUCTIONS
1 Read these instructions.
2 Keep these instructions.
3 Heed all warnings.
4 Follow all instructions.
5 Do not use this apparatus near water.
6 Clean only with dry cloth.
7 Do not block any ventilation openings. Install in
accordance with the manufacturer’s instructions.
8 Do not install near any heat sources such as radiators,
heat registers, stoves, or other apparatus (including
amplifiers) that produce heat.
9 Do not defeat the safety purpose of the polarized or
grounding-type plug. A polarized plug has two blades
with one wider than the other. A grounding type plug has
two blades and a third grounding prong. The wide blade
or the third prong are provided for your safety. If the
provided plug does not fit into your outlet, consult an
electrician for replacement of the obsolete outlet.
10 Protect the power cord from being walked on or pinched
particularly at plugs, convenience receptacles, and the
point where they exit from the apparatus.
11 Only use attachments/accessories specified by the
manufacturer.
12 Use only with the cart, stand,
tripod, bracket, or table
specified by the manufacturer,
or sold with the apparatus.
When a cart is used, use caution
when moving the cart/apparatus
combination to avoid injury from
tip-over.
13 Unplug this apparatus during lightning storms or when
unused for long periods of time.
14 Refer all servicing to qualified service personnel.
Servicing is required when the apparatus has been
damaged in any way, such as power-supply cord or plug
is damaged, liquid has been spilled or objects have
fallen into the apparatus, the apparatus has been
exposed to rain or moisture, does not operate normally,
or has been dropped.
(UL60065_03)
CAUTION: TO REDUCE THE RISK OF
ELECTRIC SHOCK, DO NOT REMOVE
COVER (OR BACK). NO USER-SERVICEABLE
PARTS INSIDE. REFER SERVICING TO
QUALIFIED SERVICE PERSONNEL.
CAUTION
RISK OF ELECTRIC SHOCK
DO NOT OPEN
WARNING
TO REDUCE THE RISK OF FIRE OR ELECTRIC SHOCK, DO NOT EXPOSE THIS APPARATUS TO RAIN OR MOISTURE.
English
For AC adaptor
For AC adaptor and the instrument

HD-300 Owner’s Manual
4
PRECAUTIONS
PLEASE READ CAREFULLY BEFORE PROCEEDING
Please keep this manual in a safe and handy place for future reference.
WARNING
• This AC adaptor is designed for use with only Yamaha
electronic instruments. Do not use for any other purpose.
• Indoor use only. Do not use in any wet environments.
CAUTION
• When setting up, make sure that the AC outlet is easily
accessible. If some trouble or malfunction occurs, immediately
turn off the power switch of the instrument and disconnect the
AC adaptor from the outlet. When the AC adaptor is connected
to the AC outlet, keep in mind that electricity is flowing at the
minimum level, even if the power switch is turned off. When you
are not using the instrument for a long time, make sure to
unplug the power cord from the wall AC outlet.
WARNING
Always follow the basic precautions listed below to avoid the possibility of serious injury or even death from
electrical shock, short-circuiting, damages, fire or other hazards. These precautions include, but are not limited
to, the following:
• Do not place the power cord near heat sources such as heaters
or radiators. Also, do not excessively bend or otherwise damage
the cord, or place heavy objects on it.
• Only use the voltage specified as correct for the instrument. The
required voltage is printed on the name plate of the instrument.
• Use the specified adaptor (page 40) only. Using the wrong
adaptor can result in damage to the instrument or overheating.
• Check the electric plug periodically and remove any dirt or dust
which may have accumulated on it.
• This instrument contains no user-serviceable parts. Do not
open the instrument or attempt to disassemble or modify the
internal components in any way. If it should appear to be
malfunctioning, discontinue use immediately and have it
inspected by qualified Yamaha service personnel.
• Do not expose the instrument to rain, use it near water or in
damp or wet conditions, or place on it any containers (such as
vases, bottles or glasses) containing liquids which might spill
into any openings. If any liquid such as water seeps into the
instrument, turn off the power immediately and unplug the
power cord from the AC outlet. Then have the instrument
inspected by qualified Yamaha service personnel.
• Never insert or remove an electric plug with wet hands.
• Do not put burning items, such as candles, on the unit.
A burning item may fall over and cause a fire.
• Radio waves may affect electro-medical devices.
- Do not use this product near medical devices or inside areas
in which the use of radio waves is restricted.
- Do not use this product within 15cm (6 in.) of persons with a
heart pacemaker or defibrillator implant.
For AC adaptor
For the instrument
Power supply/AC adaptor
Do not open
Water warning
Fire warning
Influences on electro-medical devices
DMI-7 1/2

HD-300 Owner’s Manual
5
• Follow the precautions below. Failure to do so might result in
explosion, fire, overheating or battery fluid leakage.
- Do not tamper with or disassemble batteries.
- Do not dispose of batteries in fire.
- Do not attempt to recharge batteries that are not designed to
be charged.
- Keep the batteries separate from metallic objects such as
necklaces, hairpins, coins, and keys.
- Use the specified battery type (page 40) only.
- Use new batteries, all of which are the same type, same model,
and made by the same manufacturer.
- Always make sure all batteries are inserted in conformity with
the +/- polarity markings.
- When the batteries run out, or if the instrument is not to be
used for a long time, remove the batteries from the instrument.
- When using Ni-MH batteries, follow the instructions that came
with the batteries. Use only the specified charger device when
charging.
• Keep batteries away from small children who might accidentally
swallow them.
• If the batteries do leak, avoid contact with the leaked fluid. If the
battery fluid should come in contact with your eyes, mouth, or
skin, wash immediately with water and consult a doctor. Battery
fluid is corrosive and may possibly cause loss of sight or
chemical burns.
• When one of the following problems occur, immediately turn off
the power switch and disconnect the electric plug from the
outlet. (If you are using batteries, remove all batteries from the
instrument.) Then have the device inspected by Yamaha service
personnel.
- The power cord or plug becomes frayed or damaged.
- It emits unusual smells or smoke.
- Some object has been dropped into the instrument.
- There is a sudden loss of sound during use of the instrument.
- If any cracks or breakages exist on the instrument.
CAUTION
Always follow the basic precautions listed below to avoid the possibility of physical injury to you or others, or
damage to the instrument or other property. These precautions include, but are not limited to, the following:
• Do not connect the instrument to an electrical outlet using a
multiple-connector. Doing so can result in lower sound quality,
or possibly cause overheating in the outlet.
• When removing the electric plug from the instrument or an
outlet, always hold the plug itself and not the cord. Pulling by
the cord can damage it.
• Remove the electric plug from the outlet when the instrument is
not to be used for extended periods of time, or during electrical
storms.
• Do not place the instrument in an unstable position where it
might accidentally fall over.
• Before moving the instrument, remove all connected cables, to
prevent damage to the cables or injury to anyone who might trip
over them.
• When setting up the product, make sure that the AC outlet you
are using is easily accessible. If some trouble or malfunction
occurs, immediately turn off the power switch and disconnect
the plug from the outlet. Even when the power switch is turned
off, electricity is still flowing to the product at the minimum
level. When you are not using the product for a long time, make
sure to unplug the power cord from the wall AC outlet.
• Before connecting the instrument to other electronic
components, turn off the power for all components. Before
turning the power on or off for all components, set all volume
levels to minimum.
• Be sure to set the volumes of all components at their minimum
levels and gradually raise the volume controls while playing the
instrument to set the desired listening level.
• Do not insert a finger or hand in any gaps on the instrument.
• Never insert or drop paper, metallic, or other objects into the
gaps on the panel or keyboard. This could cause physical injury
to you or others, damage to the instrument or other property, or
operational failure.
• Do not rest your weight on, or place heavy objects on the
instrument, and do not use excessive force on the buttons,
switches or connectors.
• Do not use the instrument/device or headphones for a long
period of time at a high or uncomfortable volume level, since
this can cause permanent hearing loss. If you experience any
hearing loss or ringing in the ears, consult a physician.
Yamaha cannot be held responsible for damage caused by
improper use or modifications to the instrument, or data that
is lost or destroyed.
Always turn the power off when the instrument is not in use.
Even when the [] (Standby/On) switch is in standby status
(display is off), electricity is still flowing to the instrument at the
minimum level.
When you are not using the instrument for a long time, make sure
you unplug the power cord from the wall AC outlet.
Make sure to discard used batteries according to local regulations.
Battery
If you notice any abnormality
Power supply/AC adaptor
Location
Connections
Handling
DMI-7 2/2

HD-300 Owner’s Manual
6
NOTICE
To avoid the possibility of malfunction/ damage to the
product, damage to data, or damage to other property,
follow the notices below.
Handling
• Do not use the instrument in the vicinity of a TV, radio,
stereo equipment, mobile phone, or other electric
devices. Otherwise, the instrument, TV, or radio may
generate noise. When you use the instrument along
with an application on your smart device such as a
smartphone or tablet, we recommend that you set
Bluetooth to on after enabling “Airplane Mode” on that
device in order to avoid noise caused by
communication.
• Do not expose the instrument to excessive dust or
vibrations, or extreme cold or heat (such as in direct
sunlight, near a heater, or in a car during the day) to
prevent the possibility of panel disfiguration, damage
to the internal components or unstable operation.
• Do not place vinyl, plastic or rubber objects on the
instrument, since this might discolor the panel or
keyboard.
Maintenance
• When cleaning the instrument, use a soft cloth. Do not
use paint thinners, solvents, alcohol, or chemical-
impregnated wiping cloths.
Saving data
• Some of settings of this instrument are retained when
the power is turned off. However, the saved settings
may be lost due to some failure, an operation mistake,
etc.
Information
About copyrights
• Copying of the commercially available musical data
including but not limited to MIDI data and/or audio
data is strictly prohibited except for your personal use.
• This product incorporates and bundles contents in
which Yamaha owns copyrights or with respect to
which Yamaha has license to use others’ copyrights.
Due to copyright laws and other relevant laws, you are
NOT allowed to distribute media in which these
contents are saved or recorded and remain virtually the
same or very similar to those in the product.
* The contents described above include a computer
program, MIDI data, WAVE data, voice recording
data, a score, score data, etc.
* You are allowed to distribute medium in which your
performance or music production using these
contents is recorded, and the permission of Yamaha
Corporation is not required in such cases.
About functions/data bundled with the
instrument
• This device is capable of using various types/formats of
music data by optimizing them to the proper format
music data for use with the device in advance. As a
result, this device may not play them back precisely as
their producers or composers originally intended.
About this manual
• The illustrations and LCD screens as shown in this
manual are for instructional purposes only, and may
appear somewhat different from those on your
instrument.
• Windows is a registered trademark of Microsoft®
Corporation in the United States and other countries.
• Mac, iPhone, and iPad are trademarks of Apple Inc.,
registered in the U.S. and other countries.
• The Bluetooth® word mark and logos are registered
trademarks owned by Bluetooth SIG, Inc. and any use
of such marks by Yamaha Corporation is under license.
• Sound Back is trademark of Korg Inc.
• The company names and product names in this
manual are the trademarks or registered trademarks of
their respective companies.

HD-300 Owner’s Manual
7
Precautions when using the USB
[TO DEVICE] terminal
This instrument features a built-in USB [TO
DEVICE] terminal. When connecting a USB device
to the USB [TO DEVICE] terminal, be sure to handle
the USB device with care. Follow the important
precautions below.
NOTE
For more information about the handling of USB devices,
refer to the owner’s manual of the USB device.
Compatible USB devices
• USB flash drive
Other USB devices such as a USB hub, computer
keyboard or mouse cannot be used.
The instrument does not necessarily support all
commercially available USB devices. Yamaha cannot
guarantee operation of USB devices that you purchase.
Before purchasing a USB device for use with this
instrument, please visit the following web page:
https://download.yamaha.com/
Although USB devices 1.1 to 3.0 can be used on this
instrument, the amount of time for saving to or loading
from the USB device may differ depending on the type
of data or the status of the instrument.
NOTICE
The rating of the USB [TO DEVICE] terminal is a
maximum of 5V/500mA. Do not connect USB devices
having a rating above this, since this can cause damage
to the instrument itself.
Connecting a USB device
When connecting a USB device to the USB [TO
DEVICE] terminal, make sure that the connector on the
device is appropriate and that it is connected in the
proper direction.
NOTICE
• Avoid connecting or disconnecting the USB device
during playback/recording and file management
operations (such as Delete), or when accessing the
USB device. Failure to observe this may result in
“freezing” of the operation of the instrument or
corruption of the USB device and the data.
• When connecting then disconnecting the USB device
(and vice versa), make sure to wait a few seconds
between the two operations.
• Do not use an extension cable when connecting a
USB device.
Using USB flash drives
By connecting the instrument to a USB flash drive, you
can save data you’ve created to the connected device, as
well as read data from the connected device.
• Number of USB flash drives that can be used
Only one USB flash drive can be connected to the
[USB TO DEVICE] terminal.
Formatting a USB flash drive
A USB flash drive cannot be formatted with this
instrument. If necessary, please format it on your
computer to FAT32 format.
NOTICE
The format operation overwrites any previously existing
data. Make sure that the drive you are formatting does
not contain important data.
To protect your data (write-protect)
To prevent important data from being inadvertently
erased, apply the write-protect provided with each USB
flash drive. If you are saving data to the USB flash drive,
make sure to disable write-protect.
Turning off the instrument
When turning off the instrument, make sure that the
instrument is NOT accessing the USB flash drive by file
management (such as during the Delete operation).
Failure to do so may corrupt the USB flash drive and the
data.
Precautions when using the USB
[TO HOST] terminal
When connecting the computer to the USB [TO
HOST] terminal, make sure to observe the following
points to avoid freezing the computer and corrupting
or losing the data.
NOTICE
• Use an AB type USB cable of less than 3 meters.
USB 3.0 cables cannot be used.
• Execute the following before turning the power to the
instrument on/off or plugging/unplugging the USB
cable to/from the USB [TO HOST] terminal.
- Quit any open application software on the computer.
- Make sure that data is not being transmitted from the
instrument. (Data is transmitted only by playing
notes on the keyboard.)
• While the computer is connected to the instrument,
you should wait for six seconds or more between
these operations: (1) when turning the power of the
instrument off then on again, or (2) when alternately
connecting/disconnecting the USB cable.
If the computer or the instrument freezes, restart the
application software or the computer OS, or turn the
power to the instrument off and then on again.

HD-300 Owner’s Manual
8
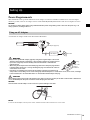
Introduction
Thank you for purchasing the Yamaha Harmony Director.
The Harmony Director is a general training instrument that facilitates harmony and rhythm training by reproducing an
accurate reference tone at a user-specified temperament and playing complex rhythms at any tempo. It also features the
ability to record performances and play time-shifted recordings to help improve your playing. The Harmony Director is a
powerful tool for anyone—from performers wanting to play in perfect tune with an ensemble of wind instruments or a
group of singers, to instructors looking to train students within a limited time span.
Please read through the contents of this manual thoroughly to fully understand and make use of the features included on
this instrument. After reading, carefully store this manual in a location where you can easily and quickly refer to it.
Included Accessories
• Owner’s Manual (this manual) × 1
• Utilization Guide/Feature Introduction × 1
•AC adaptor × 1
• Warranty information × 1
• Online Member Product Registration × 1
About this Manual
This instrument comes with the following manuals.
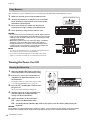
Owner’s Manual (This Manual)
This manual describes how to use the HD-300.
Use Guide/Feature Basics
Use Guide: This introduces features that aid a deeper level of self-directed learning.
Feature Basics: This introduces the HD-300 features suited for a range of learning situations.
These are also available from the “Manual Library” page on the following website.
Yamaha downloads
https://download.yamaha.com/
Harmony Director™ is a trademark or registered trademark of the Yamaha Corporation.

HD-300 Owner’s Manual
9
Contents
PRECAUTIONS..................................................................4
NOTICE ...............................................................................6
Information..........................................................................6
Introduction.........................................................................8
Included Accessories...........................................................8
About this Manual ..............................................................8
Component Names 10
Front Panel ....................................................................... 10
Rear Panel.......................................................................... 12
Setting Up 13
Power Requirements........................................................ 13
Turning the Power On/Off ............................................. 14
Adjusting the Volume and Screen Contrast................. 16
Screen Configuration and Basic Operation17
Home Screen..................................................................... 17
Producing Reference Tones for Playing
Harmony (Voice, Temperament, Hold,
Octave, Transpose) 18
Basic Operation ................................................................ 18
Temperaments.................................................................. 20
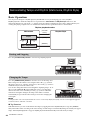
Demonstrating Tempo and Rhythm
(Metronome, Rhythm Style) 22
Basic Operation ................................................................ 22
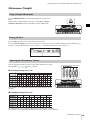
Metronome (Simple) ....................................................... 23
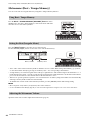
Metronome (Beat • Tempo Memory) ........................... 24
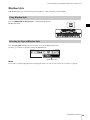
Rhythm Style..................................................................... 25
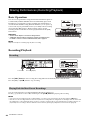
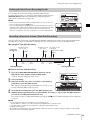
Sharing Performances
(Recording/Playback) 26
Basic Operation ................................................................ 26
Recording/Playback ......................................................... 26
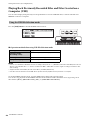
Playing Back Previously Recorded Files and Files Created
on a Computer (USB)...................................................... 28
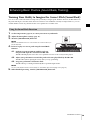
Enhancing Basic Practice
(Sound Back, Training) 29
Training Your Ability to Imagine the Correct Pitch
(Sound Back)..................................................................... 29
Playing Training Examples and Accompaniments
(Training) .......................................................................... 30
Restoring Factory Settings 30
Advanced Settings (Settings) 31
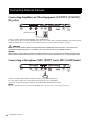
Connecting External Devices 32
Connecting Amplifiers or Other Equipment
(OUTPUT [L/MONO], [R] jacks) ................................. 32
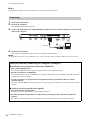
Connecting a Microphone
(MIC [INPUT] jack, MIC [GAIN] knob)..................... 32
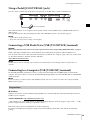
Using a Pedal ([FOOT PEDAL] jack) ........................... 33
Connecting a USB Flash Drive
(USB [TO DEVICE] terminal) ....................................... 33
Connecting to a Computer
(USB [TO HOST] terminal) ........................................... 33
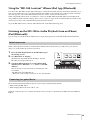
Using the “HD-300 Assistant” iPhone/iPad App
(Bluetooth) ........................................................................ 35
Listening on the HD-300 to Audio Playback from an
iPhone/iPad (Bluetooth) ................................................. 35
Appendix 36
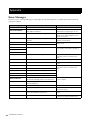
Error Messages.................................................................. 36
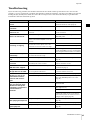
Troubleshooting ............................................................... 37
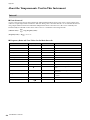
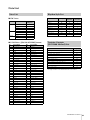
About the Temperaments Used in This Instrument... 38
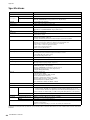
Specifications .................................................................... 40
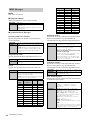
Data List............................................................................. 41

HD-300 Owner’s Manual
10
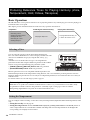
Front Panel
[] (Standby/On) switch..............pa ge14
Switches the instrument between standby/on modes.
[MAIN VOL] slider......................... page16
Adjusts the main volume of the instrument.
[BALANCE] slider......................... page16
Adjusts the volume balance between the sounds
played with the keyboard and the rhythm style/
metronome playback.
LCD display...................................page17
Shows the instrument status, settings, and other
information.
Internal microphone.....................page16
Used for recording and the Sound Back functions.
Microphone volume LED ............. page16
Lights when the microphone input level is too high.
This is used when adjusting the sensitivity of the
microphone.
Bluetooth status LED...................page35
Indicates the Bluetooth connection status. This is
used when connecting to an iPhone or iPad.
VOICE buttons ............................. page18
Selects the Voice for use when playing the keyboard,
or when playing back the contents for training.
TEMPERAMENT buttons..... pages 18, 21
These set the temperament (equal/pure/individual)
and lock/unlock the root key auto detection.
TRANSPOSE buttons .................. page19
These configure the keyboard transpose settings and
are used when playing a music score for a transposing
instrument as notated.
[OCTAVE] slider........................... page19
Adjusts the keyboard octave.
[HOLD] button .............................. page19
Used to keep the played notes sounding even after the
keys are released.
[SOUND BACK] button................ page29
Switches the Sound Back function on and off.
RECORDING buttons................... page26
Used for recording and playback.
Component Names

Component Names
HD-300 Owner’s Manual
11
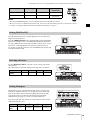
[RHYTHM STYLE] button.....pages 22, 25
Sets the rhythm playback to the Rhythm Style mode.
[BEAT] button.................pages 22, 23, 24
Sets the rhythm playback to the Metronome mode.
Dial, [-]/[+] buttons .......................page17
Used to change settings and select files.
[START/STOP] button.... pages 22, 28, 30
Starts/stops the rhythm style, metronome, training
content playback, or playback of a file on a USB flash
drive.
[TEMPO/TAP] button....................page22
Adjusts the playback tempo.
BEAT • TEMPO MEMORY buttons
...............................................pages 22, 24
Used to enter, store, and load special metronome
beats.
NOTE
The CURSOR [ ][ ] buttons are also used to move the
cursor for other functions.
[METRONOME VOL] slider
... pages 16, 23
Adjusts the volume for each metronome note type.
[TRAINING] button....................... page30
This sets the instrument to the training content (JBS
content) playback mode.
[USB] button................................. page28
Sets the instrument to the USB file playback mode.
[EXIT] button .................. pages 28, 30, 31
Moves up one hierarchy level on the screens, such as
training, USB file playback, and advanced settings, or
exits from it.
[SETTING] button......................... page31
Enters the advanced settings screen.

Component Names
HD-300 Owner’s Manual
12
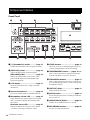
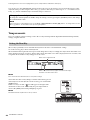
Rear Panel
[FOOT PEDAL] jack..............pages 31, 33
For connecting the Foot Controller FC7 (sold
separately). You can control the function with your
foot, by assigning either the main volume, hold, start/
stop or record/stop function to the FC7.
OUTPUT [L/MONO]/[R] jack.........page32
This is a standard phone jack that outputs audio
signals. Connect these to an external amplifier or
speaker for outputting the audio at loud levels.
To use with and mono amplifier, only connect to the
[L/MONO] jack.
MIC [INPUT] jack, MIC [GAIN] knob
...............................................pages 16, 32
For connecting a commercially available microphone
(with a stereo mini-phone jack and plug-in power
compatibility). When an external microphone is
connected, the internal microphone will be disabled.
Turn the [GAIN] knob to adjust the sensitivity of the
internal microphone and the external microphone.
USB [TO HOST] terminal....... pages 7, 33
For connecting to a computer using a commercially
available USB cable. When connected, you can send
and receive MIDI and audio data.
USB [TO DEVICE] terminal ... pages 7, 33
For connecting a USB flash drive required to use the
recording and file playback functions.
DC IN jack ..................................... page13
For connecting the power adaptor that comes with
this instrument, or one sold separately.
Cord hook..................................... page13
Used to prevent damage to the cord of the AC
adaptor.
FC7
Keyboard amplifier or
monitor speaker
Keyboard amplifier or
monitor speaker
Microphone USB flash drive
Power outlet
AC adaptor

HD-300 Owner’s Manual
13
Power Requirements
This instrument can be operated either from an AC adaptor or batteries. Yamaha recommends use of an AC adaptor
whenever possible, since an AC adaptor is more environmentally friendly than batteries and does not deplete resources.
NOTICE
You should use an AC adaptor when using a USB flash memory drive. Using battery power could cause the power to go out
during operation, resulting in data loss.
Connect the AC adaptor in the order shown in the illustration.
WARNING
• Only use the specified AC adaptor (page 40). Using the wrong AC adaptor can result in
damage to the instrument, overheating, or fire accidents. Note that an accident caused
by incorrect usage may void the warranty even if the instrument is still within the
warranty period.
• When using an AC adaptor with a removable plug, make sure to keep the plug attached
to the AC adaptor during use or storage. Inserting the plug alone into the AC outlet can
cause electric shock or fire.
•If the plug is accidentally removed from the AC adaptor, insert the plug all the way in
until you hear a click, taking care to avoid touching any internal metal parts. To avoid electric shock, short circuit, or damage
to the instrument, also be careful that there is no dust between the AC adaptor and plug.
CAUTION
When setting up the product, make sure that the power outlet you are using is easily accessible. If some trouble or malfunction
occurs, immediately turn the power off and disconnect the plug from the outlet.
NOTICE
Hook the cable of the AC adaptor on the cord hook to prevent damage to the cable.
NOTE
To remove the AC adaptor, turn the power off first, and then follow the above instructions in reverse order.
Setting Up
Using an AC Adaptor
AC adaptor
DC IN jack (page 12)
AC outlet
Plug
Slide in the
plug as
indicated

Setting Up
HD-300 Owner’s Manual
14
This instrument accepts AA alkaline batteries and rechargeable Ni-MH (Nickel-Metal Hydride) batteries.
1. Make sure that the power of the instrument is off.
2. Turn the instrument over and place it on a soft cloth.
Open the battery compartment cover located on the
instrument’s bottom panel.
3. Insert six new batteries. Make sure that they are
orientated correctly according to the illustration.
4. Close the battery compartment with the cover.
NOTICE
• Do not connect or disconnect the DC plug of the AC adaptor while the
power is on, even if the batteries are installed. Doing so, the power will
suddenly turned off and this result in the loss of data being recorded
or transferred at the time.
• When battery power becomes low, a message saying “Low Battery”
will appear on the screen. When this happens, either replace or
recharge all batteries. If you continue to use the instrument in this
condition, it may not work properly, or the power will suddenly and
automatically turn off because of insufficient power.
NOTE
• Use only the specified charger device for charging rechargeable batteries.
This instrument cannot be used to recharge batteries.
• Power will be automatically drawn from the AC adaptor when an AC
adaptor is connected even if batteries are installed in the instrument.
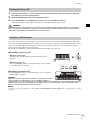
Turning the Power On/Off
1. Move the [MAIN VOL] slider to the left to
reduce the volume to the minimum setting.
2. If necessary, connect any external devices
(amplifiers for digital instrument, etc.) to
the instrument.
For details on how to connect these devices, refer
to “Connecting External Devices” (page 32).
3. Press the [] (Standby/On) switch to turn
the power on.
The screen on the instrument will appear.
4. Turn the power on to any external devices,
and then adjust the volume and other
settings on the external device.
5. Adjust the volume on the instrument.
5-1. Center the [BALANCE] slider.
5-2. Gradually shift the [MAIN VOL] slider to the right to raise the volume while playing the
keyboard.
NOTICE
Do not attempt to use the instrument (press any keys or buttons, or step on pedals, etc.) after turning on the power until the
instrument has completely started up (the Home screen appears). Doing so may cause the instrument to malfunction.
Using Batteries
Turning the Power On
Bottom of the instrument
Battery compartment cover

Setting Up
HD-300 Owner’s Manual
15
1. When an external device is connected, first turn the volume down on the external device and then
turn off the power of the external device.
2. Move the [MAIN VOL] slider to the minimum setting.
3. Press and hold the [] (Standby/On) switch for one second, and then release it.
A message will appear on the display, and the power will be turned off after a few seconds.
CAUTION
Even when the power is off, a small amount of electricity is still flowing through the instrument. Make sure to unplug the AC
adaptor from the power outlet when you intend not to use the instrument for an extended period of time or during electrical
storms. When using batteries, remove the batteries from the instrument.
To prevent unnecessary power consumption, this instrument features an Auto Power Off function that automatically
turns the power off if the instrument is not operated for a specific period of time. The amount of time that elapses before
the power is automatically turned off depends on the type of power being used. This is set to 30 minutes for battery
power, and two hours when using an AC adaptor.
The Auto Power Off function can be enabled/disabled on the Settings screen (page 31).
Disabling Auto Power Off
• When the power is off
Turn the power on while holding down the lowest key on the
keyboard.
•When the power is on
Press the [SETTING] button to call up the Settings screen, and then
set “AutoPowerOff ” to “Disable.”
Enabling Auto Power Off
Press the [SETTING] button to call up the Settings screen, and then set
“AutoPowerOff” to “Enable.”
NOTICE
When you intend not to operate this instrument for a specific period of time
while connecting to an external device such as an amplifier, speaker, or
computer, make sure to follow the instructions in the Owner’s Manual to turn off the power to the instrument and the connected
external devices in order to protect the devices from damage. If you do not want the power to turn off automatically when a
device is connected, disable the Auto Power Off function.
NOTE
To move the cursor on the Settings screen, use the BEAT • TEMPO MEMORY CURSOR [ ][ ] buttons. To change values, use the [-]/
[+] buttons.
Turning the Power Off
Auto Power Off Function

Setting Up
HD-300 Owner’s Manual
16
Adjusting the Volume and Screen Contrast
To adjust the volume of the entire sound of this instrument, use the
[MAIN VOL] slider while playing the keyboard.
In addition, the following volume sliders are also available.
•
[BALANCE] slider: Adjusts the volume balance between the
keyboard and rhythm playback.
Turn this left to increase the volume of the keyboard.
Turn this right to increase the volume of the rhythm playback
(metronome, Rhythm Style, etc.).
•
[METRONOME VOL] slider: Adjusts the volume of each
metronome note type individually.
CAUTION
Do not use the instrument at a high volume level for a long period of time.
Doing so can cause hearing loss.
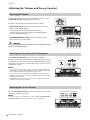
Use the MIC [GAIN] knob on the rear panel to adjust the
microphone sensitivity while speaking or singing into the microphone.
Configure this so the microphone volume (CLIP) LED at the top left of
the panel does not light up even when the sound you want to record is
at maximum volume.
NOTE
• You can also check the volume of input sounds on the input level meter on
the bottom left of the LCD display. When using this to adjust settings, adjust
the sensitivity until “Clip!” no longer appears on the screen.
• If the microphone volume indicator (CLIP) LED lights even when the MIC
[GAIN] knob is turned down, adjust by increasing the distance between this
unit and the sound source.
• Sound input from the microphone is used only for recording. It will not be
output from the line output or speaker.
Press the [SETTING] button to call up the Settings screen, and then
change the “LCD Contrast” value.
NOTE
To move the cursor on the Settings screen, use the BEAT • TEMPO MEMORY
CURSOR [ ][ ] buttons. To change values, use the [-]/[+] buttons.
Adjusting the Volume
Adjusting the Sensitivity of the Microphone
Adjusting the Screen Contrast

HD-300 Owner’s Manual
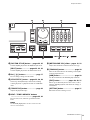
17
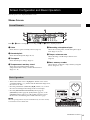
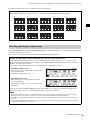
Turn the power on to display the Home screen.
Home Screen
Items – relate to tuning, to recording, and and relate to rhythm playback.
Voice
Shows the voice option currently selected. (Page 18)
Standard pitch
Shows the standard pitch. (Pages 20, 31)
Transpose
Shows the transpose settings. (Page 19)
Temperament, root key, chord
Shows the current temperament settings
(temperament and root key), and the chord detected.
(Pages 18 – 21)
Recording, microphone input
Shows the recording status, and the microphone input
level. (Pages 16, 26, 29)
Tempo, reference note
Shows the tempo, and the tempo reference note.
(Page 22)
Beat, memory number
Shows the beat, or the beat • tempo memory (irregular
meter). (Pages 22 – 25)
• The location of the cursor is highlighted, and the cursor can be
controlled with the [-]/[+] buttons and the dial. In the image above,
the cursor is on “M1.”
•Press the panel buttons (CURSOR [ ][ ] buttons, etc.) to move
the cursor and change items/settings in the screen display.
• Press the [INDIVIDUAL VOL/PITCH] button (page 21),
[TRAINING] button (page 30), [USB] button (page 28), or the
[SETTING] button (page 31) to call up their respective screens.
Each screen is described in greater detail in the above pages.
NOTE
When the [-] and [+] buttons are pressed simultaneously, the value currently
focused will reset to the default value.
Screen Configuration and Basic Operation
Screen Elements
Basic Operation

HD-300 Owner’s Manual
18
Basic Operation
The HD-300 can be used to produce reference tones to play along with as a way of developing your sense for playing your
instrument in the correct pitch.
This chapter provides detailed instructions for the necessary operations shown below:
You can select the sounds produced when playing the keyboard.
Press one of the VOICE buttons to select a category, and then select the
desired Voice within the category by using the dial, or the [-]/[+]
buttons.
Available Voices are divided into two types: one using FM tone
generation and the other using the PCM tone generation. The VOICE
buttons correspond to the following tone generation systems.
•
[WOOD]/[BRASS]/[ORGAN] buttons: FM tone generation
•
[PIANO/OTHERS] button: PCM tone generation
FM tone generation Voices are compatible with the Equal, Pure, and
Individual temperaments in the temperament setting function, and so are suitable for producing reference tones for
harmony. PCM tone generation Voices can only be used Equal temperament, but are useful since there are a variety of
available sounds.
For details on the Voices of each category, refer to page 41.
You can configure advanced settings, such as the root key and temperament (Equal/Pure/Individual temperament) of the
song.
•
Setting the root key: See the page 20.
•
Setting the temperament: Use the TEMPERAMENT [EQUAL]/[PURE]/[INDIVIDUAL VOL/PITCH] buttons to
select a temperament mode out of the three available. The lamp of the selected temperament mode will light. The
corresponding screen displays are listed below.
Producing Reference Tones for Playing Harmony (Voice,
Temperament, Hold, Octave, Transpose)
Selecting a Voice
Voice settings for tuning
While there is no specific rule-of-thumb on which reference sound to use, you should select a Voice that is easily
recognizable for both the conductor and performers. (Generally, organ or string-type sounds are ideal for
distinguishing slight differences in pitch, due to their rich harmonic tone.)
Setting the Temperament
Preparation Producing the reference tone(s) Playing the instrument(s)
• Selecting a Voice
• Setting the temperament
• Setting hold on/off
• Selecting an octave
• Setting transpose
Playing the keyboard
Playing wind instrument(s) etc.
to match the reference tone

Producing Reference Tones for Playing Harmony (Voice, Temperament, Hold, Octave, Transpose)
HD-300 Owner’s Manual
19
NOTE
• When the [PIANO/OTHERS] button is pressed, Equal temperament is automatically selected.
• When you select Pure or Individual temperament mode, the Voice type using the FM tone generator is automatically selected.
• For details on setting the Individual temperament (individual volume/pitch), see page 21.
Turn the hold function on to continue playing a note even after your
finger leaves the keyboard.
Press the
[HOLD] button to have the lamp light up and turn the hold
function on. When a note is continually played with the hold function,
pressing a different note on the keyboard will stop the previous sound
and start to continually play the sound for the newly pressed note.
To stop the sound being produced, press the [HOLD] button again and
turn the hold function off.
Use the
[OCTAVE] slider to select the octave of notes played with
the keyboard.
The relationship between the slider position and octave is as follows.
This function is used to match the keyboard sound to a transposing
instrument. With this function, you can play the sounds at the same
pitch as the transposing instrument by playing the keyboard, while
using the musical score written for the transposing instrument,
without having to transpose it to the score for the keyboard.
Press the [C]/[B
b
]/[E
b
]/[F] buttons to set the transpose value directly
without moving the cursor.
Button [EQUAL] [PURE] [INDIVIDUAL
VOL/PITCH]
Display on screen
Equal Pure User
Temperament mode
Equal temperament Pure temperament Individual (custom)
temperament
Setting Hold On/Off
Selecting an Octave
Slider position LOW1 LOW2 MID HI
Octave
C-1 – C4 C0 – C5 C1 – C6 C2 – C7
Setting Transpose
Button [C] [B
b
] [E
b
] [F]
Transpose
value
0 -2 semitones +3 semitones +5 semitones

Producing Reference Tones for Playing Harmony (Voice, Temperament, Hold, Octave, Transpose)
HD-300 Owner’s Manual
20
You can also press the [TRANSPOSE] button and move the cursor to the transpose area to adjust the transpose value.
Adjust the transpose value using the dial or the [-]/[+] buttons. The transpose value range is -2 – +12 semitones. Press
both [-]/[+] buttons simultaneously to return the transpose value to 0.
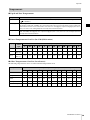
Temperaments
Users can configure advanced settings, such as the root key and temperament (Equal/Pure/Individual temperament)
settings, using this function.
The root key is primarily used to determine the keynote for the “Pure” and “Individual” settings.
To set the root key, play a chord on the keyboard.
The instrument will recognize the chord pressed and change the root key accordingly. For major chords this will be set to
major (displayed in upper case letter), and for minor chords this will be set to minor (displayed in lower case letter). The
recognized chord and the root key will appear on the screen.
NOTE
If the chord cannot be determined, the root key will not change.
Chord detection and root key changes continue with each key pressed
on the keyboard. To lock (fix) the current root key, press and hold the
[PURE] button.
When a root key is locked, a icon will appear to the right of the
chord name on the screen. Additionally, if a pure temperament is
selected, the [PURE] button lamp will light up in green.
NOTE
Chord detection will stop when the root key is locked.
Changing the standard pitch
To change the standard pitch from 442Hz, call up the Settings screen by pressing the [SETTING] button, and change
the “Standard Pitch” value.
NOTE
To move the cursor on the Settings screen, use the BEAT • TEMPO MEMORY CURSOR [ ][ ] buttons. To change values, use the
dial or [-][+] buttons. To exit from the menu, press the [EXIT] button.
Setting the Root Key
Name of the recognized chord
Name of the current root key. Upper case letter means major,
and lower case letter means minor.
La pagina si sta caricando...
La pagina si sta caricando...
La pagina si sta caricando...
La pagina si sta caricando...
La pagina si sta caricando...
La pagina si sta caricando...
La pagina si sta caricando...
La pagina si sta caricando...
La pagina si sta caricando...
La pagina si sta caricando...
La pagina si sta caricando...
La pagina si sta caricando...
La pagina si sta caricando...
La pagina si sta caricando...
La pagina si sta caricando...
La pagina si sta caricando...
La pagina si sta caricando...
La pagina si sta caricando...
La pagina si sta caricando...
La pagina si sta caricando...
La pagina si sta caricando...
La pagina si sta caricando...
La pagina si sta caricando...
La pagina si sta caricando...
La pagina si sta caricando...
La pagina si sta caricando...
La pagina si sta caricando...
La pagina si sta caricando...
-
 1
1
-
 2
2
-
 3
3
-
 4
4
-
 5
5
-
 6
6
-
 7
7
-
 8
8
-
 9
9
-
 10
10
-
 11
11
-
 12
12
-
 13
13
-
 14
14
-
 15
15
-
 16
16
-
 17
17
-
 18
18
-
 19
19
-
 20
20
-
 21
21
-
 22
22
-
 23
23
-
 24
24
-
 25
25
-
 26
26
-
 27
27
-
 28
28
-
 29
29
-
 30
30
-
 31
31
-
 32
32
-
 33
33
-
 34
34
-
 35
35
-
 36
36
-
 37
37
-
 38
38
-
 39
39
-
 40
40
-
 41
41
-
 42
42
-
 43
43
-
 44
44
-
 45
45
-
 46
46
-
 47
47
-
 48
48


in altre lingue
- English: Yamaha HD-300 Owner's manual
Documenti correlati
-
Yamaha HD-300 Manuale del proprietario
-
Yamaha DGX-660 Manuale utente
-
Yamaha EZ-300 Manuale del proprietario
-
Yamaha P-515 Manuale del proprietario
-
Yamaha PSREW400 Manuale utente
-
Yamaha PSR-E463 Manuale del proprietario
-
-
Yamaha PSR-I500 Manuale del proprietario
-
-
Yamaha PSR-S770 Manuale utente
