
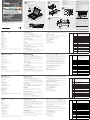
Hardwareübersicht A
Vorderseitige Ansicht
1. Griff
2. Ausziehentriegelung
3. LCD-Display
4. LCD-Bedienelemente
5. Port-LEDs
6. Tastatur
7. Touchpad
8. Stations-/Portumschalter
9. Externer Mausanschluss
10. LED-Betriebsanzeige
11. Schienen für die Rackmontage
12. Verriegelungs-LEDs
13. Schalter zum Zurücksetzen
14. Abschnitt zur Firmwareaktualisierung
15. USB-Port
16. LED-Beleuchtung
Rückseitige Ansicht
1. Netzeingangsbuchse
2. Netzschalter
3. Port für Reihenschaltung
4. KVM-Portabschnitt
5. Erdungsanschluss
6. Externer Konsolabschnitt
* Die vorder- und rückseitigen Ansichten des CL5708 sind ähnlich, der Unterschied liegt
darin, dass der CL5708 nur eine Reihe LED-Anzeigen (Vorderseite) und eine Reihe
CPU-Ports (Rückseite) besitzt.
CL5708 / CL5716 LCD KVM Switch Quick Start Guide www.aten.com
Commutateur KVM LCD CL5708 / CL5716 – Guide de mise en route rapide
CL5708 / CL5716 Ausziehbarer LCD-KVM-Switch Kurzanleitung
Concentrador KVM con pantalla LCD retráctil CL5708 / CL5716 Guía rápida
Hardware Review A
Front View
1. Handle
2. Slide Release
3. LCD Display
4. LCD Controls
5. Port LEDs
6. Keyboard
7. Touchpad
8. Station/Port Switches
9. External Mouse Port
10. Power LED
11. Rack Mounting Brackets
12. Lock LEDs
13. Reset Switch
14. Firmware Upgrade Section
15. USB Port
16. LED Illumination Light
Rear View
1. Power Socket
2. Power Switch
3. Daisy-chain Port
4. KVM Port Section
5. Grounding Terminal
6. External Console Section
* The front and rear panel views are similar for the CL5708, the difference being that
the CL5708 has only one row of LED lights (front) and one row of CPU ports (rear)
Description du matériel A
Vue avant
1. Poignée
2. Bouton coulissant d'ouverture
3. Écran LCD
4. Commandes LCD
5. Voyants des ports
6. Clavier
7. Pavé tactile
8. Commutateur de ports/stations
9. Port souris externe
10. Voyant d'alimentation
11. Supports de fi xation pour montage sur bâti
12. Voyants de verrouillage
13. Bouton de réinitialisation
14. Section de mise à niveau du microprogramme
15. Port USB
16. Eclairage LED
Vue arrière
1. Prise d'alimentation
2. Bouton marche/arrêt
3. Port de connexion en chaîne
4. Section des ports KVM
5. Borne de terre
6. Section de console externe
* Les panneaux avant et arrière du CL5708 sont similaires, à la différence près que le
CL5708 ne possède qu'une rangée de voyants (à l'avant) et une rangée de ports UC (à
l'arrière).
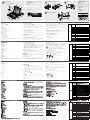
Hardware Installation
Standard Rack Mounting B
To rack mount the switch, do the following:
1. While one person positions the switch in the rack and holds it in place, the second
person loosely screws the front brackets to the rack.
2. While the fi rst person still holds the switch in place, the second person slides the L
brackets into the switch's side mounting brackets, from the rear until the bracket
fl anges contact the rack, then screws the L brackets to the rack.
3. After the L brackets have been secured, tighten the front bracket screws.
Single Stage Installation C
1. Use a KVM cable set to connect any available KVM Port to the computer's keyboard,
video and mouse ports.
2. Plug the power cord into the CL5708 / CL5716's power socket and into a AC power
source.
Operation
The CL5708 / CL5716 provides three port selection methods to access the computers
on the installation: Manual, an OSD (on-screen display) menu system, and Hotkeys.
Manual Port Switching:
Use the UP and DOWN Port ID / Station ID selection buttons located on the keyboard
module to switch KVM focus to any port on the installation. Continually pressing any
button cycles through the list of available ports/stations.
OSD Port Switching: D
The OSD incorporates a two level (administrator / user) password system.
Before the OSD main screen displays, a login screen appears requiring a password. If
this is the fi rst time that the OSD is used, or if the password function has not been set,
simply press [Enter]. The OSD main screen displays in administrator mode.
Installation du matériel
Montage sur bâti standard B
Pour monter le commutateur sur bâti, procédez comme suit :
1. Pendant qu'une première personne positionne le commutateur dans le bâti et le
maintient en place, une deuxième visse les supports avant sur le bâti.
2. Pendant que la première personne maintient toujours en place le commutateur, la
deuxième fait glisser les supports en L dans les supports de montage latéraux du
commutateur (à l'arrière) jusqu'à ce que les brides des supports entrent en contact
avec le bâti, puis visse les supports en L sur le bâti.
3. Une fois les supports en L bien en place, serrez les vis des supports avant.
Installation simple C
1. Utilisez un jeu de câbles KVM pour relier un port KVM disponible aux ports clavier,
vidéo et souris de l'ordinateur.
2. Branchez le cordon d'alimentation sur la prise d'alimentation du CL5708 / CL5716 et
sur une prise secteur.
Fonctionnement
Le CL5708 / CL5716 fournit trois méthodes de sélection des ports pour accéder aux
ordinateurs de l’installation : la commutation manuelle, un système de menu OSD
(Affi chage à l’écran) et des raccourcis clavier.
Commutation manuelle des ports:
Utilisez les boutons de sélection d’identifi cateur de port / station Haut et Bas situés sur
le module clavier pour transférer le contrôle KVM à n’importe quel port de l’installation.
Ces boutons permettent de parcourir en boucle l’ensemble des ports / stations
disponibles.
Note: You can optionally change the OSD hotkey to the [Ctrl]key, in which case you
would press [Ctrl] twice. With this method, you must press the same [Ctrl] key.
To bring the KVM focus to a port, Double Click it, or move the Highlight Bar to it then
press [Enter].
Keyboard Port Switching:
All hotkey operations begin by invoking Hotkey mode. There are two possible keystroke
sequences used to invoke Hotkey mode, though only one can be operational at any
given time:
Number Lock and Minus Keys (Default Hotkey)
1. Hold down the Num Lock key
2. Press and release the minus key
3. Release the Num Lock key: [Num Lock] + [-]
Control and F12 Keys
1. Hold down the Ctrl key
2. Press and release the F12 key
3. Release the Ctrl key: [Ctrl] + [F12]
Commutation des ports par OSD: D
L'OSD incorpore un système de mot de passe à deux niveaux (administrateur /
utilisateur).
Avant d'accéder à l'écran principal de l'OSD, une page de connexion requérant un mot
de passe s'affi che. Si vous utilisez l'OSD pour la première fois ou si la fonction de mot
de passe n'a pas encore été confi gurée, appuyez simplement sur la touche [Entrée].
L'écran principal de l'OSD s'affi che en mode administrateur.
Remarque : vous pouvez remplacer le raccourci clavier de l'OSD par la touche [Ctrl].
Dans ce cas, vous devez appuyer deux fois sur [Ctrl]. Si vous optez pour
cette méthode, vous devez appuyer sur la même touche [Ctrl] du clavier.
Pour passer le contrôle KVM à un port particulier, double-cliquez dessus ou
positionnez-y la barre en surbrillance et appuyez sur [Entrée].
Contrôle et sélection des ports à l'aide des raccourcis clavier:
Toutes les opérations de raccourcis clavier doivent s'effectuer en mode de raccourcis
clavier. Il existe deux séquences de frappes de touches possibles permettant d'activer le
mode de raccourcis clavier. Vous pouvez cependant n'en utiliser qu'une à la fois.
Touches [Verr num] et [Moins] (Raccourci clavier par défaut)
1. Appuyez sur la touche Verr num et maintenez-la enfoncée.
2. Appuyez sur la touche Moins [-], puis relâchez-la.
3. Relâchez la touche Verr num : [Verr num] + [-]
Touches [Ctrl] et [F12]
1. Appuyez sur la touche Ctrl et maintenez-la enfoncée.
2. Appuyez sur la touche F12, puis relâchez-la.
3. Relâchez la touche Ctrl : [Ctrl] + [F12]
Hotkey Summary Table
[Num Lock] + [-]
or [Ctrl] + [F12]
[A] [Enter] or [Q]
[Enter]
Invokes Auto Scanmode. When Auto Scan
mode is in effect, [P] or left-click pauses auto-
scanning.
When auto-scanning is paused, pressing any key
or another left-click resumes auto-scanning.
[B] Toggles the beeper on or off.
[Esc] or [Spacebar] Exits hotkey mode.
[F1] Set Operating System to Windows.
[F2] Set Operating System to Mac.
[F3] Set Operating System to Sun.
[F5] Performs a keyboard / mouse reset on the
target computer.
[H] Toggles the Quick Hotkey invocation keys
between [Ctrl] + [F12] and [Num Lock] + [-].
[R] [Enter] This administrator only hotkey restores the
switch’s default values.
[SN][PN] [Enter] Switches access to the computer that
corresponds to that port ID.
[T] Toggles the OSD Hotkey between [Ctrl] [Ctrl]
and [Scroll Lock] [Scroll Lock].
[←] Invokes Skip mode and skips from the current
port to the fi rst accessible port previous to it.
[→] Invokes Skip mode and skips from the current
port to the next accessible port.
[↑]
Invokes Skip mode and skips from the current
port to the last accessible port of the previous
station.
[↓]
Invokes Skip mode and skips from the current
port to the fi rst accessible port of the next
station.
Résumé des raccourcis clavier
[Verr num] +
[-] ou [Ctrl] +
[F12]
[A] [Entrée] ou [Q]
[Entrée]
Active le mode de commutation automatique. Lorsque
la commutation automatique est activée, appuyez sur
[P] ou cliquez avec le bouton gauche de la souris pour
suspendre la commutation.
Lorsque la commutation automatique est suspendue,
appuyez sur une touche quelconque ou cliquez avec
le bouton gauche de la souris pour reprendre la
commutation.
[B] Active ou désactive le bip sonore.
[Échap] ou [Espace] Quitte le mode de raccourcis clavier.
[F1] Choisit le système d’exploitation Windows.
[F2] Choisit le système d’exploitation Mac.
[F3] Choisit le système d’exploitation Sun.
[F5] Effectue une réinitialisation clavier / souris sur
l’ordinateur cible.
[H] Bascule les touches de raccourci clavier entre [Ctrl] +
[F12] et [Verr num] + [-].
[R] [Entrée]
Cette combinaison de touches (uniquement accessible
à l'administrateur) rétablit les valeurs par défaut du
commutateur.
[SN][PN] [Entrée] Donne l'accès à l'ordinateur possédant cet ID de port.
[T] Bascule le raccourci clavier de l’OSD entre [Ctrl] [Ctrl] et
[Arrêt défi l] [Arrêt défi l].
[←] Active le mode de changement de ports et passe du
port actuel au premier port précédent accessible.
[→] Active le mode de changement de ports et passe du
port actuel au premier port suivant accessible.
[↑]
Active le mode de changement de ports et passe du
port actuel au dernier port accessible de la station
précédente.
[↓] Active le mode de changement de ports et passe du port
actuel au premier port accessible de la station suivante.
Hardware installieren
Standard-Rack-Montage B
Um den Switch im Rack einzubauen, gehen Sie folgendermaßen vor:
1. Während die eine Person den Switch in den Rack schiebt und festhält, setzt die
zweite Person die Schrauben lose auf die Montageschienen.
2. Während die erste Person den Switch nach wie vor festhält, schiebt die zweite die
L-Schienen von hinten auf die seitlichen Montagerahmen des Switches, bis der
Flansch den Rack berührt. Schrauben Sie die L-Schienen anschließend am Rack fest.
3. Nachdem Sie die L-Schienen befestigt haben, ziehen Sie auch die Schrauben an der
Vorderseite fest.
Einzelinstallation C
1. Verbinden Sie die Tastatur-, Maus- und Monitoranschlüsse des Computers mit einem
freien KVM-Anschluss am Gerät. Verwenden Sie dazu ein KVM-Kabelset.
2. Verbinden Sie das Netzkabel mit der Stromeingangsbuchse, dem CL5708 / CL5716
und dem Steckdose.
Bedienung
Der CL5708 / CL5716 ermöglicht drei Auswahloptionen des Ports, um die
angeschlossenen
Computer zu steuern: Manuell, OSD-Menü (On Screen Display) und Hotkeys.
Port manuell umschalten:
Drücken Sie den Port- bzw. Stationsauswahlschalter AUF- oder ABWÄRTS, die sich am
Tastaturmodul befi nden , um die KVM-Steuerung auf den gewünschten Port zu legen.
Drücken Sie diese Tasten mehrmals, um der Reihe nach durch die Liste verfügbarer
Ports bzw. Stationen zu schalten.
Portauswahl per OSD-Menü: D
Das OSD beinhaltet ein Passwortsystem auf zwei Ebenen (Administrator / Benutzer).
Bevor der Hauptbildschirm des OSD-Menüs angezeigt wird, müssen Sie sich mit einem
Hotkey-Übersichtstabelle
[Num] + [-]
oder [STRG]
+ [F12]
[A] [Enter]
oder [Q]
[Enter]
Aktiviert die automatische Portumschaltung. Während der
automatischen Portumschaltung drücken Sie die Taste [P] oder
klicken mit der linken Maustaste, um diese vorübergehend
anzuhalten.
Ist die automatische Portumschaltung angehalten, können Sie
sie durch Drücken einer beliebigen Taste bzw. Klicken mit der
linken Maustaste fortsetzen.
[B] Schaltet die Tonsignale ein bzw. aus.
[Esc] oder
[Leertaste] Beendet den Hotkey-Modus.
[F1] Legt Windows als Betriebssystem fest.
[F2] Legt Mac als Betriebssystem fest.
[F3] Legt Sun als Betriebssystem fest.
[F5] Setzt alle Tastatur- und Mauszuordnungen am Zielcomputer
zurück.
[H] Schaltet zwischen den Aktivierungstasten für den Hotkey-
Modus [Strg] + [F12] und [Num] + [–] und um.
[R] [Enter] Diese Hotkey-Kombination steht nur dem Administrator zur
Verfügung. Sie dient zur Wiederherstellung der werksseitigen
Standardwerte des Switch.
[SN][PN]
[Enter] Schaltet auf den Computer um, der an diesen Port
angeschlossen ist.
[T] Schaltet den OSD-Hotkey von [Strg] [Strg] auf [Rollen] [Rollen]
um, und umgekehrt.
[←] Aktiviert die Überspringen-Funktion vom aktuellen Port zum
erstmöglichen vorigen Port, der verfügbar ist.
[→] Aktiviert die Überspringen-Funktion vom aktuellen Port zum
nächstmöglichen Port, der verfügbar ist.
[↑] Aktiviert die Überspringen-Funktion vom aktuellen Port zum
letzten verfügbaren Port der vorigen Station.
[↓] Aktiviert die Überspringen-Funktion vom aktuellen Port zum
ersten verfügbaren Port der folgenden Station.
Kennwort anmelden. Wenn Sie das OSD das erste Mal aufrufen oder das Kennwort
noch nicht festgelegt wurde, drücken Sie [Enter]. Das OSD-Hauptmenü erscheint im
Administrator-Modus.
Hinweis : Sie können die OSD-Hotkey auch der Taste [Strg] zuordenen. In diesem Fall
müssen Sie die Taste [Strg] zweimal drücken. Dabei müssen Sie jeweils die
leiche [Strg]-Taste drücken.
Um die KVM-Funktionen auf einen Port umzuschalten, doppelklicken Sie auf ihn, oder
bewegen Sie den Markierungsbalken hierauf und betätigen die Taste [Enter].
Port über die Tastatur umschalten:
Für die Bedienung über Hotkey-Tasten müssen Sie zunächst den Hotkey-Modus
aktivieren.
Es gibt zwei mögliche Tastenkombinationen, um den Hotkey-Modus zu aktivieren. Sie
können aber immer nur eine gleichzeitig verwenden.
Tasten Num und Minus (Standard-Hotkey-Tasten)
1. Halten Sie die Taste Num gedrückt.
2. Drücken Sie die Taste Minus, und lassen Sie sie los.
3. Lassen Sie die Taste Num los. [Num] + [-]
Tasten Strg und F12
1. Halten Sie die Taste Strg gedrückt.
2. Drücken Sie die Taste F12, und lassen Sie sie los.
3. Lassen Sie die Taste Strg los. [STRG] + [F12]
Instalación del hardware B
Montaje en rack estándar
Para montar el concentrador en el rack, haga lo siguiente:
1. Mientras una persona coloca el conmutador en el rack y lo aguanta en su sitio, una
segunda atornilla (sin apretar) la parte frontal de los raíles en el rack.
2. Mientras la primera persona sigue aguantando el conmutador, la segunda desliza
los raíles en L sobre el conmutador desde la parte trasera hasta que la pestaña del
soporte haga contacto con el rack y luego atornilla los raíles en L al rack.
3. Cuando tenga los raíles en L atornillados, apriete los tornillos frontales de los raíles.
Instalación individual C
1. Use un juego de cables KVM para conectar cualquier puerto KVM disponible a los
puertos para teclado, monitor y ratón del ordenador.
2. Enchufe el cable de alimentación a la entrada de alimentación del CL5708 / CL5716
y a una toma eléctrica.
Funcionamiento
El CL5708 / CL5716 ofrece tres métodos de selección para acceder a los ordenadores
conectados: Manual, a través del menú OSD y a través de teclas de acceso directo.
Conmutación manual de puertos:
Pulse los botones de selección de puertos/estaciones ARRIBA y ABAJO ubicados en el
módulo
de teclado para pasar el control KVM al puerto deseado. Pulse estos botones varias
veces para pasar cíclicamente por la lista de puertos/estaciones.
Sumario de las teclas de acceso directo
[Bloq Num] +
[-] o [Ctrl] +
[F12]
[A] [Intro] o [Q]
[Intro]
Activa el modo de conmutación automática. Pulse
la tecla [P] o haga clic con el botón izquierdo del
ratón para detener la conmutación automática
temporalmente.
Pulse cualquier tecla o haga clic con el botón izquierdo
del ratón para reanudar la conmutación automática.
[B] Activa o desactiva las señales acústicas.
[Esc] o [Espacio] Sale del modo de teclas de acceso directo.
[F1] Establece el sistema operativo Windows.
[F2] Establece el sistema operativo Mac.
[F3] Establece el sistema operativo Sun.
[F5] Resetea los ajustes para teclado y ratón en el
ordenador remoto.
[H] Alterna las teclas de acceso directo [Ctrl] + [F12] y
[Bloq Num] + [-].
[R] [Intro] Esta combinación de teclas de acceso directo (sólo
accesible al administrador) restablece los valores
predeterminados del concentrador.
[SN][PN] [Intro] Da acceso al ordenador al que le corresponde el ID de
puerto seleccionado.
[T] Alterna la tecla de acceso directo del OSD entre [Ctrl]
[Ctrl] y [Bloq Despl] [Bloq Despl].
[←] Activa el modo de cambio de puertos y salta del
puerto actual al primer puerto anterior accesible.
[→] Cambia al modo de cambio de puertos y salta del
puerto actual al primer puerto posterior accesible.
[↑] Cambia al modo de cambio de puertos y salta del
puerto actual al último puerto accesible de la estación
anterior.
[↓] Cambia al modo de cambio de puertos y salta del
puerto actual al primer puerto accesible de la estación
siguiente.
Presentación del hardware A
Vista frontal
1. Asa
2. Desbloqueo retráctil
3. Pantalla LCD
4. Controles LCD
5. Indicadores LED de los puertos
6. Teclado
7. Panel táctil
8. Conmutadores de puertos/estaciones
9. Puerto para ratón externo
10. Indicador LED de alimentación
11. Raíles para montaje en rack
12. Indicadores LED de bloqueo
13. Interruptor de reseteo
14. Sección para actualizaciones del fi rmware
15. Puerto USB
16. Iluminacion LED
Vista posterior
1. Entrada de alimentación
2. Interruptor de alimentación
3. Puerto para conexión en margarita
4. Sección de puertos KVM
5. Terminal de tierra
6. Sección de consola externa
* Los paneles anterior y posterior del CL5708 son similares, la única diferencia es que
el CL5708 sólo posee una fi la de indicadores LED (delante) y una fi la de puertos para
CPU (detrás).
Conmutación del puerto a través del OSD: D
El OSD incluye un sistema de acceso por contraseña de dos niveles (administrador/
usuario).
Antes de que aparezca el menú OSD principal, deberá conectarse especifi cando una
contraseña. Si ésta es la primera vez que abre el OSD o si no se ha establecido ninguna
contraseña, sólo tiene que pulsar [Intro]. La pantalla principal del OSD aparece en modo
Administrador.
Nota: si lo desea, puede cambiar la tecla de acceso directo al OSD por la tecla [Ctrl].
En este aso, debe pulsar dos veces la tecla [Ctrl]. Con este método, debe pulsar
la misma tecla [Ctrl].
Para llevar el control KVM a un puerto, haga doble clic en él o desplace la barra
resaltada sobre él y pulse [Intro].
Conmutación de puertos a través del teclado:
Todas las operaciones relacionadas con teclas de acceso directo requieren que primero
cambie al modo de teclas de acceso directo. Existen dos secuencias de pulsaciones de
teclas posibles para activar el modo de teclas de acceso directo, aunque sólo puede
utilizar una a la vez:
Teclas [Bloq Num] y [Menos] (Tecla de acceso directo predeterminada)
1. Mantenga pulsada la tecla Bloq Num.
2. Pulse la tecla Menos [-] y suéltela.
3. Suelte la tecla Bloq Num: [Bloq Num] + [-]
Teclas [Ctrl] y [F12]
1. Mantenga pulsada la tecla Ctrl.
2. Pulse la tecla F12 y suéltela.
3. Suelte la tecla Ctrl: [Ctrl] + [F12]
© Copyright 2015 ATEN® International Co., Ltd.
ATEN and the ATEN logo are trademarks of ATEN International Co., Ltd. All rights reserved. All
other trademarks are the property of their respective owners.
This product is RoHS compliant.
Part No. PAPE-1223-751G Printing Date: 01/2015
LCD KVM Switch
Quick Start Guide
CL5708 / CL5716
Important Notice
Considering environmental protection, ATEN does not provide
a fully printed user manual for this product. If the information
contained in the Quick Start Guide is not enough for you to
confi gure and operate your product, please visit our website
www.aten.com, and download the full user manual.
Online Registration
http://eservice.aten.com
Technical Phone Support
International:
886-2-86926959
North America:
1-888-999-ATEN Ext: 4988
United Kingdom:
44-8-4481-58923
All information, documentation, fi rmware, software utilities, and
specifications contained in this package are subject to change
without prior notification by the manufacturer. Please visit our
website http://www.aten.com/download/?cid=dds for the most up-
to-date versions.
EMC Information
FEDERAL COMMUNICATIONS COMMISSION INTERFERENCE STATEMENT:
This equipment has been tested and found to comply with the limits for a
Class A digital device, pursuant to Part 15 of the FCC Rules. These limits
are designed to provide reasonable protection against harmful interference
when the equipment is operated in a commercial environment. This
equipment generates, uses, and can radiate radio frequency energy and,
if not installed and used in accordance with the instruction manual, may
cause harmful interference to radio communications. Operation of this
equipment in a residential area is likely to cause harmful interference in
which case the user will be required to correct the interference at his own
expense.
FCC Caution: Any changes or modifi cations not expressly approved by the
party responsible for compliance could void the user's authority to operate
this equipment.
CE Warning: This is a class A product. In a domestic environment this
product may cause radio interference in which case the user may be
required to take adequate measures.
The following contains information that relates to China:
APackage Contents
1 CL5708/CL5716 LCD KVM Switch with standard
Rack Mount Kit
2 Custom KVM Cable Sets
1 5-in-1 USB / PS/2 Console Cable
1 Firmware Upgrade Cable
1 Power Cord
1 User Instructions
B
D
Standard Rack Mounting
OSD
CSingle Stage Installation
Rear View
Front View
2
1
1
2
1
16
2
1
2
4
3
5
6
14
15
13
12
11
10
9
8
7
EXIT I LIGHT
Press the Exit/Light pushbutton for
two seconds to turn the LED light
ON or Off. (Default: On)
Hardware Review
1 2 3
65 4

www.aten.com
www.aten.com
하드웨어 구성
전면 부 A
1. 손잡이
2. 슬라이드 잠금 해제 장치
3. LCD 디스플레이
4. LCD 제어 버튼
5. 포트 LED
6. 키보드
7. 터치 패드
8. 스테이션/포트 스위치
9. 외부 마우스 포트
10. 전원 LED
11. 랙 마운팅 브라켓
12. Lock LED
13. 초기화 스위치
14. 펌웨어 업그레이드 섹션
15. USB 포트
16. LED 불빛
후면 부
1. 전원 소켓
2. 전원 스위치
3. 데이지 체인 포트
4. KVM 포트 섹션
5. 접지 단자
6. 외부 콘솔 섹션
The following contains information that relates to China:
CL5708/CL5716 LCD KVM Switchクイックスタートガイド
CL5708 / CL5716 LCD KVM 스위치 빠른 시작 가이드
AB
C
D
Online Registration
International:
http://support.aten.com
North America:
http://www.aten-usa.com/product_
registration
Technical Phone Support
International:
886-2-86926959
North America:
1-888-999-ATEN Ext: 4988
United Kingdom:
44-8-4481-58923
CL5708 / CL5716 LCD KVM Switch – Guida rapida
Instalación del hardware
Montaggio in rack standard B
Per montare in rack lo switch, procedere come segue:
1. Mentre una persona posiziona lo switch nel rack e lo tiene in posizione, la seconda
persona avvita leggermente le staffe anteriori al rack.
2. Mentre la prima persona continua a tenere in posizione lo switch, la seconda fa
scivolare le staffe a L nei supporti laterali di montaggio dello switch, partendo dal
retro, fi no a quando non sono a stretto contatto con il rack e poi avvita le staffe a L al
rack.
3. Una volta fi ssati i supporti a L, stringere le viti dei supporti anteriori.
Installazione singola C
1. Usare un set di cavi KVM per connettere qualsiasi porta KVM disponibile alle porte
della tastiera, video e mouse del computer.
2. Inserire la spina del cavo di alimentazione nella presa di alimentazione del CL5708 /
CL5716 e in una fonte di alimentazione CA.
Funcionamiento
Il CL5708 / CL5716 offre tre metodi di selezione della porta per accedere ai computer
dell’installazione: Manuale, sistema di menu OSD (On-Screen Display) e tasti di ricerca
rapida.
Cambiamento manuale della porta:
Utilizzare i pulsanti Su e Giù di selezione ID porta/ID stazione situati sulla tastiera per
spostare il KVM su qualsiasi porta dell’installazione. Tenere premuto un pulsante
consente di spostarsi ciclicamente all’interno dell’elenco delle porte/stazioni disponibili.
Hardware
Visione anteriore A
1. Maniglia
2. Sganciamento della slitta retraibile
3. Display a cristalli liquidi
4. Comandi LCD
5. LED della porta
6. Tastiera
7. Touchpad
8. Interruttore della stazione/della porta
9. Porta esterna del mouse
10. LED d’alimentazione
11. Staffe per il montaggio in rack
12. LED di blocco
13. Interruttore di ripristino
14. Sezione per l’aggiornamento del fi rmware
15. Porta USB
16. Illuminazione LED
Visione posteriore
1. Presa per l’alimentazione
2. Interruttore di alimentazione
3. Porte in cascata
4. Sezione della porta KVM
5. Terminale di messa a terra
6. Sezione della console esterna
* I pannelli anteriore e posteriore sono simili nel CL5708: differiscono solo per il fatto
che il CL5708 è dotato di una sola fi la di LED (anteriore) ed una sola fi la di porte per
la CPU (posteriore).
Cambiamento della porta tramite OSD: D
L’OSD incorpora un sistema di password a due livelli (Amministratore/Utente).
Prima che appaia la schermata principale dell’OSD, comparirà una schermata di login
dove viene richiesta la password. Se è la prima volta che si esegue l’OSD, o se non è
stata impostata la funzione password, premere solamente [Invio]. Apparirà la schermata
principale dell’OSD in modalità Amministratore.
Nota: Se lo si desidera, è possibile cambiare il tasto di scelta rapida dell’OSD con il tasto
[Ctrl], nel qual caso si premerà [Ctrl] due volte. In questo modo è necessario
premere lo stesso tasto [Ctrl].
Per selezionare una porta per il KVM, fare doppio clic su essa o evidenziarla e premere
[Invio].
Cambiamento della porta tramite tastiera:
Tutte le operazioni con i tasti di scelta rapida iniziano con la selezione della modalità
Tasti di scelta rapida. Per richiamare questa modalità esistono due possibili sequenze di
tasti, ma uno solo è sempre operativo:
Tasti Bloc Num e Meno (Tasto di scelta rapida predefi nito)
1. tenere premuto il tasto Bloc Num
2. premere e rilasciare il tasto Meno
3. rilasciare il tasto Bloc Num : [Bloc Num] + [ - ]
Tasti Control F12
1. tenere premuto il tasto Ctrl
2. premere e rilasciare il tasto F12
3. Rilasciare il tasto Ctrl : [Ctrl] + [F12]
* CL5708 장비의 경우 전면 부와 후면 부 패널이 위와 유사합니다. 다만 다른 점은
CL5708 장비의 전면 패널에는 하나의 LED 디스플레이 배열이 있으며 후면 패널
에 하나의 CPU 포트 배열이 있습니다.
하드웨어 설치
표준 랙 마운팅 B
스위치를 랙 마운팅 하기 위해서 다음의 과정을 따릅니다:
1. 한 사람이 스위치의 나사 구멍과 랙의 나사구멍이 일치하도록 장비를 들고 있으
면, 다른 한 사람은 랙 전면 브라켓을 스크류 나사를 사용해서 느슨하게 고정시
킵니다.
2. 한 사람은 계속해서 장비를 들고 있고, 다른 한 사람은 장비 뒷 쪽에서 L 모양의
브라켓을 랙에 닿을 때까지 스위치의 양옆 마운팅 브라켓 사이로 밀어 넣습니다.
그리고 나서 L 모양의 브라켓을 랙에 고정시킵니다.
3. L 모양의 브라켓을 설치한 뒤 전면 브라켓의 스크류 나사를 꽉 조여서 랙에 확실
히 고정시킵 니다.
단일 스테이지 설치 방법 C
1. KVM 케이블 세트를 사용하여 컴퓨터와 연결한다.
2. 파워 코드를CL5708 / CL5716의 전원 소켓에 연결한 뒤, AC전원에 연결한다.
사용방법
CL5708 / CL5716은 설치되어있는 컴퓨터에 액세스하기 위하여 모두 3가지의 포
트선택방법을 제공하고 있다: 수동, OSD (on-screen display) 메뉴 시스템 및 핫
키
수동 포트 스위칭:
정면 패널에 있는 푸시 버튼을 사용하여 포트를 스위칭한다.
OSD 포트 스위칭: D
OSD는 두 레벨(관리자/사용자) 비밀번호 시스템을 지원합니다.
OSD 메인 스크린이 나타나기 전에, 비밀번호를 입력하는 로그인 화면이 나타납니
다.
만약 처음으로 OSD를 사용하는 것이거나 비밀번호를 설정하지 않으셨으면 비밀번
호는 입력할 필요 없이 엔터 키를 누르면 관리자로 로그인 되면서 OSD 메인 스크
린이 나타납니다.
주의: 사용자가 원할 경우 OSD 핫 키를 [Ctrl]키로 변경할 수 있으며, 변경 뒤에는
[Ctrl]키를 두 번 누를 경우 메인 화면이 나타납니다. 이때, 사용자는 반드시
키보드의 동일한 [Ctrl]키를 두 번 눌러야합니다.
KVM 포트 화면을 불러오기 위해서는 해당 항목을 더블 클릭하거나, 커서를 해당
항목으로 이동 시킨 뒤 [Enter]키를 누릅니다.
키보드 포트 스위칭(핫키사용):
모든 핫 키 운용은 핫 키 모드를 실행해야 사용할 수 있습니다. 핫 키 모드를 실행
하기 위한 두 가지 단축키가 있습니다. 하지만 오직 한가지 방법만 설정할 수 있습
니다:
Number Lock 키 + Minus 키
1. Num Lock 키를 누르고 있는 상태에서;
2. minus 키를 눌렀다가 뗍니다;
3. 누르고 있는 Num Lock 키를 뗍니다: [Num Lock] + [-]
Control 키 + F12 키 (초기설정 핫키)
1. Ctrl 키를 누르고 있는 상태에서;
2. F12 키를 눌렀다가 뗍니다;
3. 누르고 있던 Ctrl 키를 뗍니다: [Ctrl] + [F12]
핫 키 요약 표:
[Num Lock]
+[-] 또는
[Ctrl]+[F12]
[A] [Enter]
또는
[Q] [Enter]
자동 스캔(Auto Scan)모드를 실행합니다. 자동 스캔(Auto
Scan)모드가 실행되면 [P] 또는 마우스 왼쪽 버튼을 클릭
하 면 자동 스캔을 일시 중지 합니다. 자동 스캔이 일시 중
지 되 었을 경우, 아무런 키를 누르거나 다시 마 우스왼쪽
버튼을 클 릭하면 자동 스캔을 계속합니다.
[B] 경보 기능을 on / off 할 수 있습니다.
[Esc] 또는
[Spacebar] 핫 키 모드를 해제합니다.
[F1] 포트를 윈도우 시스템으로 설정.
[F2] 포트를 맥 시스템으로 설정.
[F3] 포트를 선 시스템으로 설정.
[F5] 해당컴퓨터의 키보드/마우스 리셋 시킴.
[H]
핫 키 실행 단축키를 변경합니다.
[Ctrl] + [F12] 또는 [Num Lock] + [-] 둘 중 하나의 단
축키를 선택합니다.
[R] [Enter] 스위치를 초기 상태로 복구합니다.
[SN][PN]
[Enter] 해당 포트 ID에 연결되어 있는 컴퓨터에 접속합니다.
[T] 이 핫 키를 누르면, OSD 핫 키를 [Ctrl] [Ctrl] 또는 [Scroll
Lock] [Scroll Lock], 둘 중 하나로 설정합니다.
[←] Skip 모드를 실행합니다. 현재 포트에서 접속 가능한 바로
전 단계의 포트로 건너 뜁니다.
[→] Skip 모드를 실행합니다. 현재 포트에서 접속 가능한 바로
다 음 단계의 포트로 건너 뜁니다.
[↑] Skip 모드를 실행합니다. 현재 포트에서 이전 스테이션의
접 속 가능한 마지막 포트로 건너 뜁니다.
[↓] Skip 모드를 실행합니다. 현재 포트에서 다음 스테이션의
접 속 가능한 첫 번째 포트로 건너 뜁니다.
Tabella di riepilogo dei tasti di scelta rapida
[Bloc Num]
+ [-] o [Ctrl]
+ [F12]
[A] [Invio] o
[Q] [Invio]
Richiamare la modalità Scansione automatica Quando la modalità
Scansione automatica è attiva, premendo [P] o facendo clic con il
tasto sinistro del mouse si mette in pausa tale modalità.
Quando la modalità Scansione automatica è in pausa, premendo
un tasto qualsiasi o facendo clic nuovamente con il tasto sinistro
del mouse si riattiva tale modalità.
[B] Attiva e disattiva il segnale acustico.
[Esc] o [Barra
spaziatrice] Uscita dalla modalità Tasti di scelta rapida.
[F1] Imposta il sistema operativo su Windows.
[F2] Imposta il sistema operativo su Mac.
[F3] Imposta il sistema operativo su Sun.
[F5] Esegue un ripristino della tastiera/del mouse sul computer di
destinazione.
[H] Seleziona come tasti di attivazione della modalità Tasti di scelta
rapida [Ctrl] + [F12] o [Bloc Lock] + [-].
[R] [Invio] Questo tasto di scelta rapida utilizzabile solo dall’amministratore
ripristina I valori predefi niti dello switch.
[SN][PN][Invio] Cambia l’accesso sul computer corrispondente a quell’ID della porta.
[T] Seleziona come Tasti di scelta rapida dell’OSD [Ctrl] [Ctrl] o [Scroll
Lock] [Scroll Lock].
[←] Richiama la modalità Passa a e passa dalla porta corrente alla
prima porta accessibile precedente.
[→] Richiama la modalità Passa a e passa dalla porta corrente alla
prima porta accessibile successiva.
[↑] Richiama la modalità Passa a e passa dalla porta corrente all’ultima
porta accessibile della stazione precedente.
[↓] Richiama la modalità Passa a e passa dalla porta corrente alla prima
porta accessibile della stazione successiva.
AB D
Standard Rack Mounting OSD
C
Rear View
1 2 3
65 4
1 2
2
1
1
サポートお問合せ窓口:+81-3-5615-5811
www.aten.com
16
2
1
2
4
3
5
6
14
15
13
12
11
10
9
8
7
EXIT I LIGHT
Press the Exit/Light pushbutton for
two seconds to turn the LED light
ON or Off. (Default: On)
Single Stage Installation
Package Contents
1 CL5708/CL5716 LCD KVM Switch with standard Rack Mount Kit
2 Custom KVM Cable Sets
1 5-in-1 USB / PS/2 Console Cable
1 Firmware Upgrade Cable
1 Power Cord
1 User Instructions
Front View
Hardware Review
-
 1
1
-
 2
2


in altre lingue
- français: ATEN CL5708M Guide de démarrage rapide
- español: ATEN CL5708M Guía de inicio rápido
- Deutsch: ATEN CL5708M Schnellstartanleitung
- 日本語: ATEN CL5708M クイックスタートガイド